DECKED DS1 User manual

Watchshortinstallationvideos atwww.decked.com/video|Registeryoursystematwww.decked.com/warranty
Installation Instructions:
DS1/DS2
TOOLS REQUIRED
FORD SUPER DUTY
6’9” BED LENGTH
19992016
VERSION8
DECKED.COM | 208.806.0251
@DECKEDUSA | #DECKEDUSA
FOLLOW US:
• 3/8” socket
• 7/16” socket
• Wire cutters
• 1/8” hex wrench
• 7/32” hex wrench
• 1/2” drill bit
• 10 mm socket or
open end wrench
RC417
REGISTERYOURSYSTEM INSTRUCTIONVIDEOS

DS1/DS2 | v.8 | Page 2DECKED.COM |#DECKEDUSA |@DECKEDUSA
▼ ASSEMBLY OVERVIEW ▼
RULER
CCHANNEL
TAILGATE
AMMO CAN
CABSIDE AMMO
CAN
AMMO
CAN LID
CENTER VERT DRAWER
TORSION BRACE
BOTTLE OPENER
RIGHT/PASSENGER
DECK HALF
LEFT/DRIVER
DECK HALF
AMMO CAN
WINDOW
COVER
CONTENTS
DECKED carton
LEFT/DRIVER DECK HALF 1
RIGHT/PASSENGER DECK HALF 1
CENTER VERT 1
DRAWER 2
CABSIDE AMMO CAN 2
TAILGATE SIDE AMMO CAN 2
AMMO CAN LID 4
AMMO CAN WINDOW 2
CCHANNEL 2
RULER 1
HARDWARE BOX 1
TORSION BRACE 1
BOTTLE OPENER 1
Hardware box - unbagged components
(inside DECKED carton):
WEATHER STRIPS 2
HANDLE 1
HARDWARE box - bagged components
PREP SD/TUN - 1
PREP TBO - 1
CCHANNEL 1
BOLT 1 FS (B1) - 1
CS AMMO CANS - 1
(DS1 ONLY) J7 - 2
(DS2 ONLY) J8 - 2
J10 - 2
DRAWER 1 1
DRAWER 3 1
HANDLE 1
WHEELS 1
PREPEXTRA 1
WASHERS 1

DECKED.COM |#DECKEDUSA |@DECKEDUSA DS1/DS2 | v.8 | Page 3
▼ HEY! TORQUE BOY: READ BEFORE YOU INSTALL DECKED ▼
1. DON’T gorogueon us,please readtheinstructions.
2. DON'T overtightenbolts,getem' hand-tight.
3. DON'Tuse powertools.
4. Ifyoudon'tfollowdirectionsand
do
usepowertools:
1). Setclutchataverylowsetting. 2). Ifyoublowit,seeNOTE.*
NOTE*Twoextrathreadedinsertsareincluded inBAG PREP-EXTRA.That’sallyouget,unlessyoucall us and ask for
more.The insertswillreplaceanystrippedinsertsinthetailgateammocansorfrontfaceof the centervertat
thebottleopener,butNOTTHETOPOF THE CENTER VERT,sohandtightenuntil snug only!Youcan alsoscrewthe
insertsback in if dislocated.Thereis astraightscrewdriverslotontheundersideofthe threadedinsert.
5. Startallboltswithfingerstoavoidcross-threading.
6. DON'T overtightenJ-hooksduringinstallation.
Justget 'emgood andsnug; enoughtokeepthe
systemfrommovingin the bed.
7. Nice jobif you’restillreading.
TAILGATEammo canshavewidebottoms;CABSIDE ammocans havenarrowbottoms.
NOTE:Youwillneed abuddy tohelpwith exactlytwosteps.
Prevent embarrassing, expletive-filled language,
watch our detailed installation video or give us a call. We’re happy to help!
208.806.0251 | DECKED.COM/INSTALLVIDEO
AMMO CAN DRAIN HOLES
(TODRILL ORNOTTODRILL.)
• Do you use a tonneau or shell over your DECKED system?
There is no need to drill holes, unless you leave your tonneau open in a deluge.
• Does your DECKED system live outside?
The ammo cans will get water in them. You’ll need to drill holes in the ammo cans.
There are two dimples in the bottom of each ammo can. Drill a 1/2” hole at each dimple. A smaller hole
will get clogged.

DS1/DS2 | v.8 | Page 4DECKED.COM |#DECKEDUSA |@DECKEDUSA
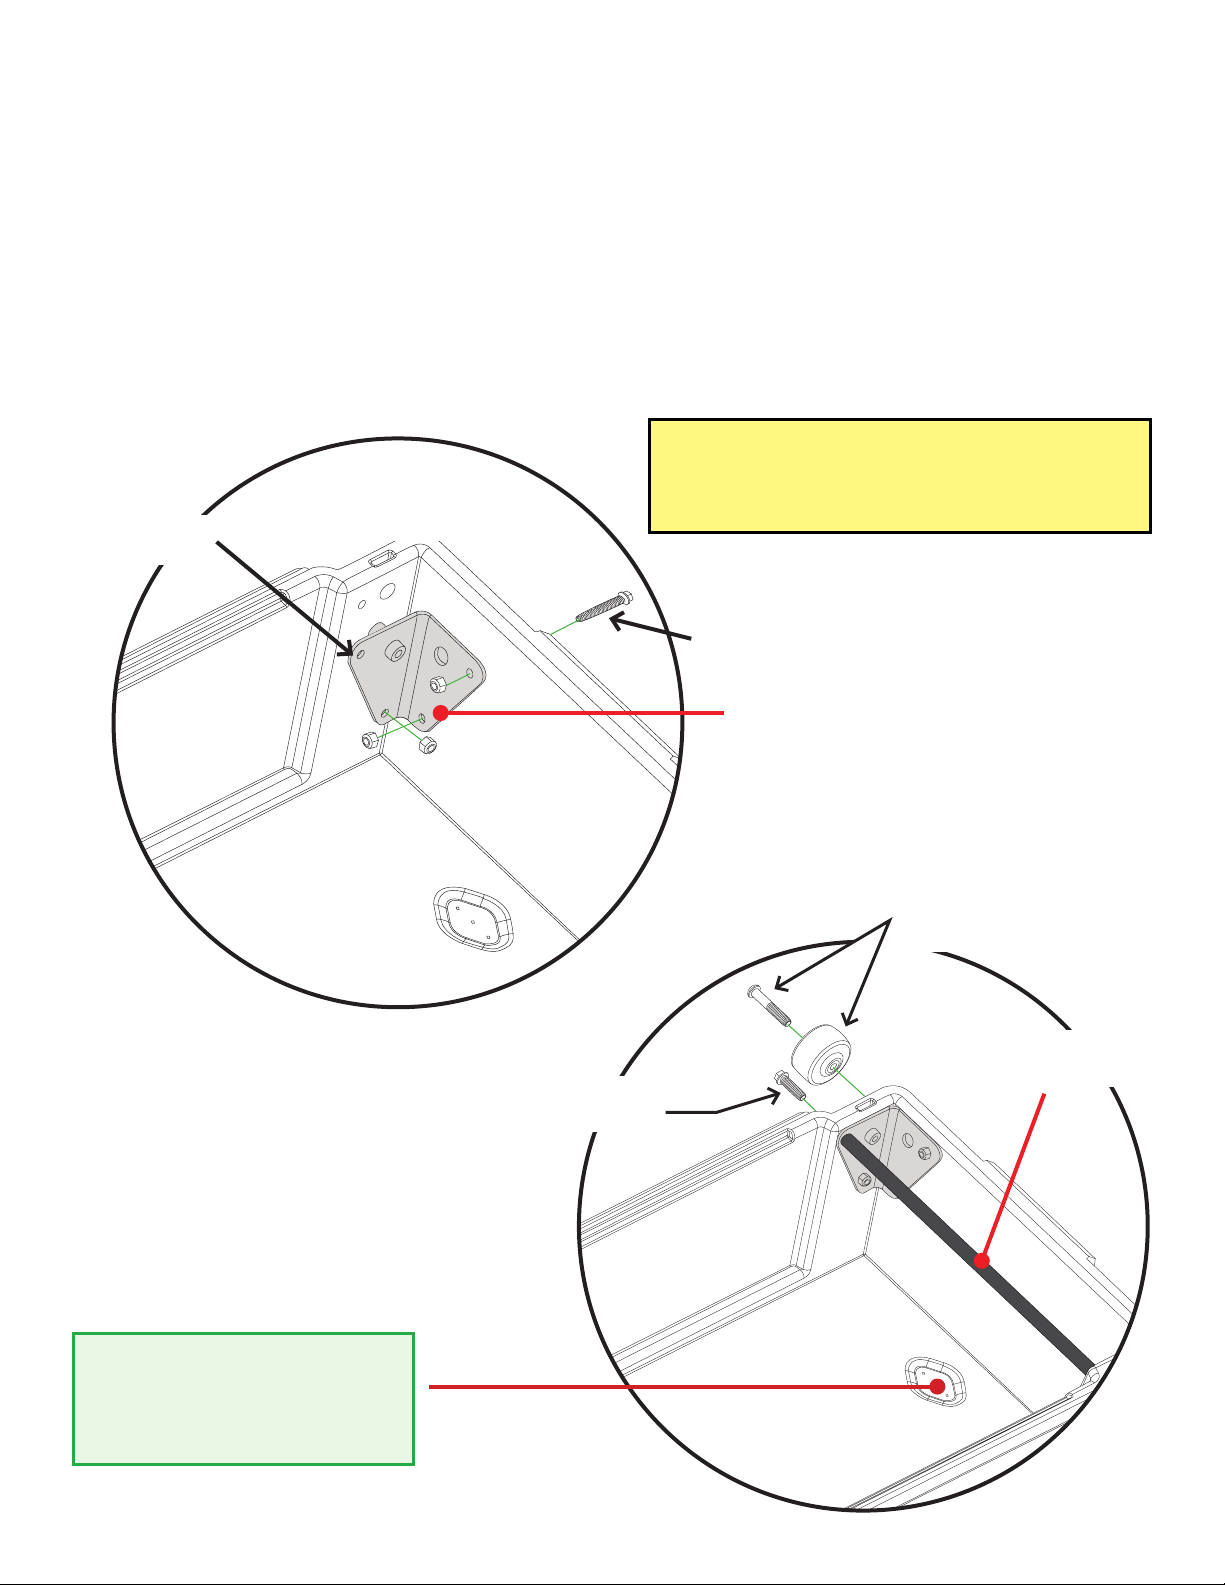
PREP BED
(JUSTLIKE YOURMOMMA TAUGHTYOU.)
• Removecabside factorytie-downson bothsidesoftruck bed(10 mmwrenchrequired).
MakesuretoSAVE THE FACTORY SUPER DUTY BOLTS,asyouwillneed themforthe DECKEDbrackets.
• InstallDECKEDtie-downbracketsonboth sidesoftruck usingboltsfromstepabove;BAG PREP SD/TUN.
SAVE THESE BOLTS REUSE BOLTS
PREP SD/TUN

DECKED.COM |#DECKEDUSA |@DECKEDUSA DS1/DS2 | v.8 | Page 5
ASSEMBLY: DRIVER’SSIDEDECK
(LET’SDOTHIS!)
• Therearethreepre-installedgaskets–one onthe centervert,oneoneach undersideofthedeckswheretheyrest
onthe centervert.Do yourslook weird?(Theyshould be flat.)See themhere:DECKED.COM/GASKETS
• PlaceC-channel onthe insideledgesof acabsideammo canand atailgateammocan.
• Theend oftheC-channel withthe endplatemustreston thecabsideammo can.
• Verifythatthetailgateammocan’saxleisclosesttothetailgate;ifnot,grabtheothertailgateammocan.
• InstallnylonwashersontoallboltsinBAG C-CHANNEL,WASHERS.
• LooselyboltC-channeltothe twoammocans. Makesurethe bolthead is inthe C-channel,notinside theammo
can;BAG CCHANNEL. Don’ttightenyet.Houston,comein Houston,doyoucopy?Don’ttightenyet.
•Line upthe driver’s sidedeck (stickerormark onend ofdeckpanel indicatesLEFT/DRIVER)on topofthe
C-channel/ammo canassembly andthe center vertbosses.HeySparky:Tailgateend ofthecenterverthasanaxle
installed;thecentervertaxleandammocanaxlesmustbeonthetailgateend(notcabsideend)oftheassembly.
• UseWASHERSbagtoinstallnylon&rubberwashersonallCSAMMOCANbolts.Installthesamewasherson12B1bolts.
• Usetheaboveboltstoboltthedecktotheammocans;BAG B1 forthetailgateammocan,BAG CSAMMOCANforthe
cabsideammocan.
• Now tighten the loose bolts connecting the ammo cans to the C-channel.
• Boltthedecktothecentervert;BAG B1(nowashers).If you must use power tools, use with caution!
Set drill clutch to LIGHT.
TAILGATE AMMO CAN AXLE
CCHANNEL BAG
WASHERS BAG
CABSIDE AMMO CAN VERT AXLE CCHANNEL ENDPLATE
CS AMMO CANS
B1
NOWASHERS
B1
CCHANNEL
DRIVER SIDE DECK HALF
➡
CAB
NYLON
WASHER
RUBBER
WASHER
NYLON
WASHER
RECOMMENDED TORQUE: Bolts in labeled bags
C-CHANNEL, CS AMMO CAN and B1 - 27 in-lb.

DS1/DS2 | v.8 | Page 6DECKED.COM |#DECKEDUSA |@DECKEDUSA
ASSEMBLY: PASSENGER’SSIDEDECK
• Usingthe assemblyjustbuilt asa support,assemblethe passengerside.
• PlaceC-channel onthe insideledgesof acabsideammo canand atailgateammocan.
• TheC-channel endplatemust reston thecabside ammo can.
• Youshouldhavethecorrecttailgateammo can forthisstep.The axlewill be onthe tailgateside ofthesystem.
Ifnot,swapthetailgateammocans now.
• LooselyboltC-channeltothe twoammocans. Makesurethe bolthead is inthe C-channel,notinside theammo
can;BAG CCHANNEL (with nylonwashers).Dejavu,don’t tightenyet.
• Lineup thepassenger’ssidedeck(stickerormark onend ofdeckpanel indicatesRIGHT/PASSENGER)ontopofthe
C-channel/ammo canassembly.
• Boltthe decktothe ammocans;BAG B1(with nylonandrubber washers)forthe tailgateammocan,
BAG CS AMMO CAN (withnylonandrubber washers)forthe cabsideammo can.
• DO NOT bolt passenger deck to center vert. Do not pass GO! Do not collect $200...
• Now tighten the loose bolts connecting the ammo cans to the C-channel.
• Grabyourbuddy tohelpyoulift thedriverside assemblyintothedriverside ofthe truck bed.Lift thepassenger
sideassembly intothepassengerside ofthe truck bedand seatthepassenger sidedeck onthe upstanding,
cylindricalvertbosses.
• Boltthe passengerside deck halftothe centervert;BAG B1(no washers).Makesureallboltsconnectingthe deck
tothecentervertaresnug.Remember our warning about power tools?
TAILGATE AMMO CAN AXLE
CABSIDE AMMO CANCCHANNEL ENDPLATE
CS AMMO CANS
B1
CCHANNEL
PASSENGER SIDE DECK HALF
CAB
➡
RECOMMENDED TORQUE: Bolts in labeled bags
C-CHANNELS NW, CS AMMO CAN and B1 - 27 in-lb.
DECKED.COM |#DECKEDUSA |@DECKEDUSA DS1/DS2 | v.8 | Page 7
2" BOLT
CORNER
BRACKET
TUBE BRACE
GOES HERE DRAWER 1
DRAWER 3
DRAWER 1
➡
CAB
WHEELS
DRAWERS: BRACKETS+WHEELS
(EASIERTHAN FALLINGOFFA LOG)
• Eachdrawerhasa leftanda rightbracket.Bolt thebracketsintoplace viabottomtwoholes inbracketwith3/4"
lengthbolts.Use the2" lengthboltforthe uppercabside wallholein bracket;BAG DRAWER 1.
• Installatubebracein eachdrawerwithtwo3/4"length bolts;BAG DRAWER 1, BAG DRAWER 3.
• Attachwheelsontothe drawerbracketswitha 7/32"hexwrench;BAG WHEELS.
HELPFUL TIP: If you purchased drain
plugs, install now (instructions are
included with drain plugs).
RECOMMENDED TORQUE:
Bolts in labeled bags DRAWER 1 and DRAWER 3 - 27 in-lb.
Bolts in labeled bag WHEELS - 90 in-lb.
DS1/DS2 | v.8 | Page 8DECKED.COM |#DECKEDUSA |@DECKEDUSA
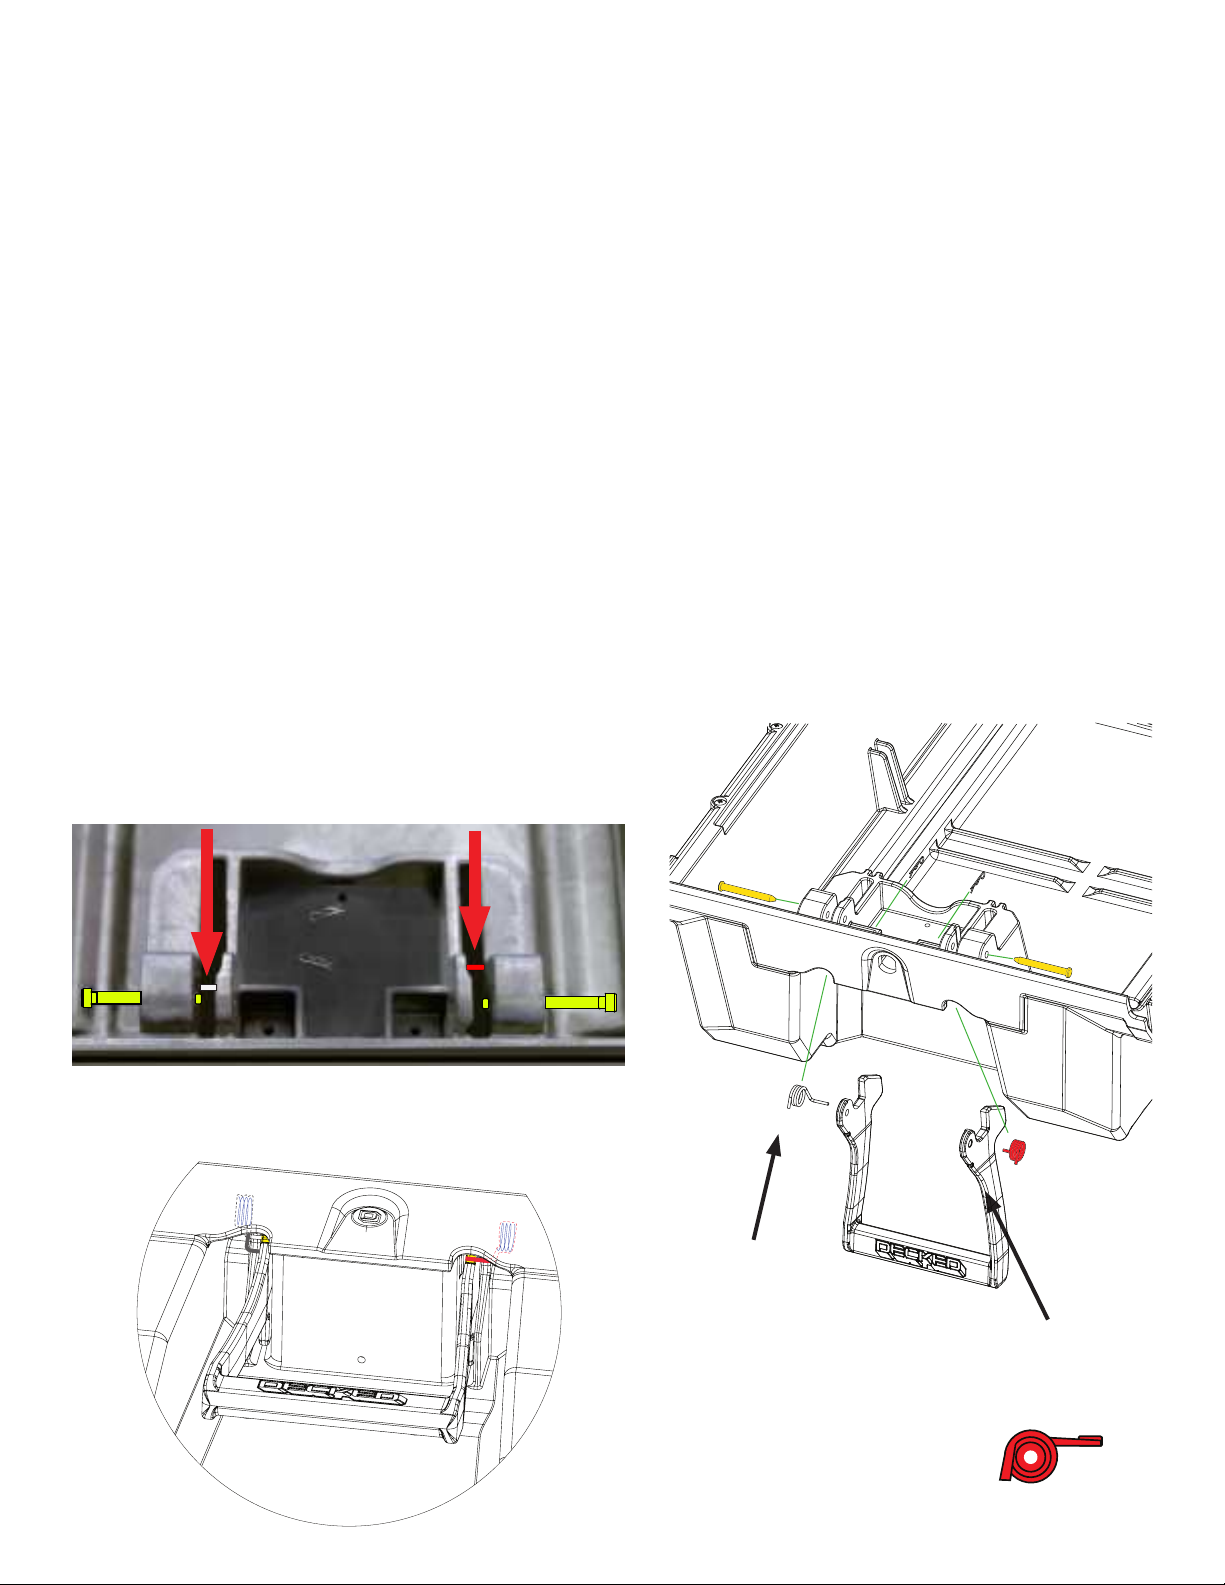
INSTALL: DRAWERHANDLES
• OK,Sparky, onedrawerhandle assembly needstobe installedbyyou.Wedidthe otherone.
• Save yourself the headache, watch this short installation video: DECKED.com/videohandle.
• Fromtheundersideofdrawer, placethe springsintothe cavitieson eitherside ofthehandle slots,
redspring=right spring; BAG HANDLE.NOTE: Each spring arm should point inward, not outward.
• Install a clevis pin through each outside drawer hole and through spring; BAG HANDLE.
• With DECKEDlogofacingoutward,insertthehandleendsbehindthespringarms.Rotatethearmsofthehandletoward
theclevispins,pullingthespringarmdownward.Whenthehandleholeislinedupwiththeclevispin,pushthepin
throughthehandleholeandthroughtheinsidedrawerhole.Repeatontheothersideofthehandle.
• Installahairpin throughtheclevispin; BAG HANDLE.
CORRECT:
SPRING ARM FITS
IN HANDLE NOTCH
WRONG:
SPRINGARMOUT
OFHANDLENOTCH
SPRING ARMS
POINT INWARD
HANDLEOVERVIEW
CLEVIS PIN
CORRECT:
SPRINGARMISHERE
(FULLYHORIZONTAL)
WRONG:
SPRINGARM IS HERE
(NOTFULLYHORIZONTAL)
TOPVIEW
HAIR PIN
HELPFUL TIP: MAKE SURE SPRINGS HAVE
THELONG ARMHORIZONTALAND SHORTLEG
VERTICALBEFOREINSERTINGHANDLE
SPRING
NOTCHES
DECKED.COM |#DECKEDUSA |@DECKEDUSA DS1/DS2 | v.8 | Page 9
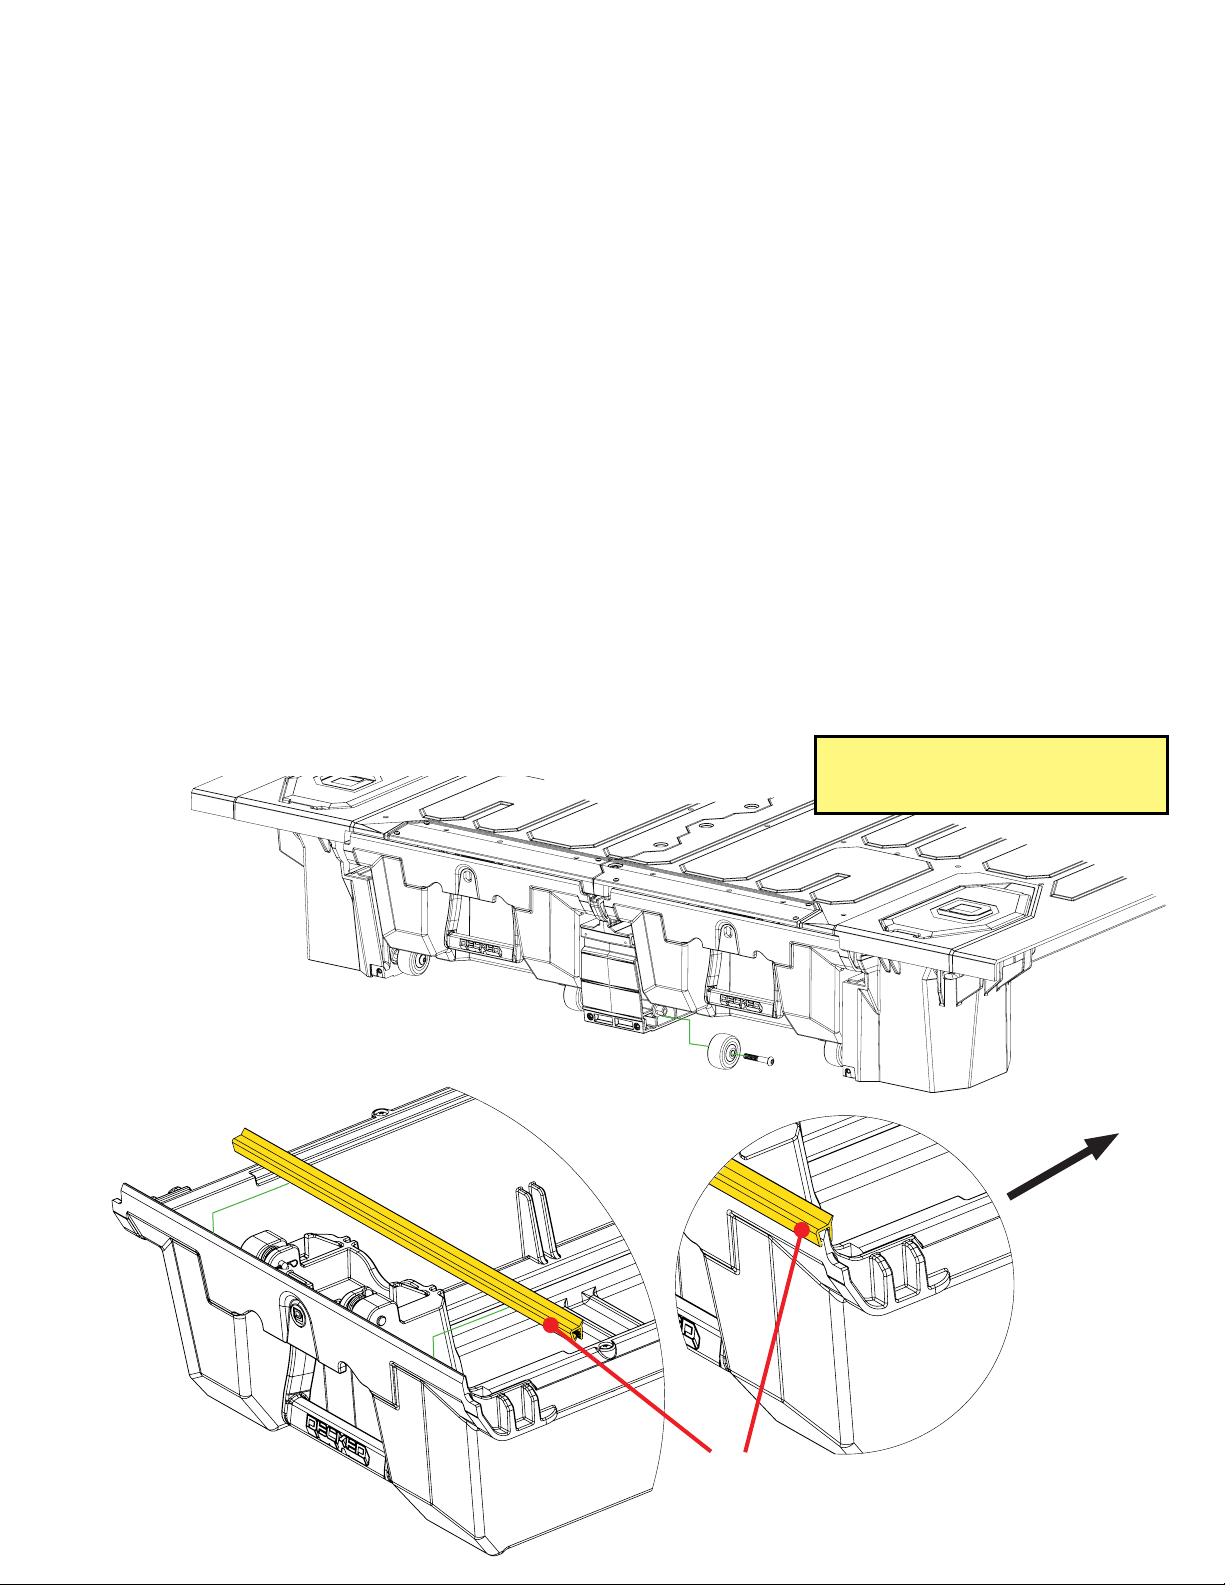
INSTALL: DRAWERS
• Save yourselfthe headache,watchthis shortinstallation video: DECKED.com/videotailgatewheels.
• Installthedrawerbyslidingwheels intotheirtwochannels(C-channel andcentervert),andslide drawerall the
wayforwarduntil closed.
• Installtheremainingtailgateside wheelsontotheir axles;BAG WHEELS.
NOTE: Placing a spacer under the drawer to raise it into position makes this easier
(ammo can lids work well, or a small piece of 2x2 or 2x4).
• Installtheweatherstripsonthe tailgatesidedraweredge: Withtheweatherstripwiperfacingcabside, lineup one
endwith theside ofthedrawerandplace onthe topdraweredge, firmlypressingdownon the weatherstripasyou
movealong thedraweredge.
NOTE: Facing the weather stripping the wrong way will funnel water into drawer: BAD!
• Whenthe weatherstripis fullyseatedalongthe topedge,trim offanymaterialthatextendsbeyondthedrawer
edgewith wirecutters.Watchoutforthe stainlesswirecoil inside;it’ssharp!
WHEELS CABSIDE
WEATHER STRIP
RECOMMENDED TORQUE:
Bolts in labeled bag WHEELS - 90 in-lb.

DS1/DS2 | v.8 | Page 10DECKED.COM |#DECKEDUSA |@DECKEDUSA
INSTALL: THEFUNSTUFF
• UsetheWASHERSbagandPREP TBObagforthe followingsteps.
• Slidetorsionbraceundercentervertandtailgateammocans.Placebottleopenerontheoutsideofthetorsionbrace.
• Looselyinstall(startwithyourfingerstoavoidcross-threading):
• Two1/2” boltsthroughupperholes inthe bottleopener intothecentervert–no washersneeded; leaveloose.
• Two1” boltswithnylonwashersthroughtheend holesin torsionbraceintotailgateammocans; leaveloose.
• Two1” boltswithnylonwashersthroughthebottombottleopenerholesand torsionbraceintocentervert;
leaveloose.
• Alignbottleopener to edges ofcentervertandtightenfourbottleopener bolts.
• Tightenend boltsintotailgateammocans.
1” BOLTS
1” BOLTS
1/2” BOLTS
NYLON
WASHER
NYLON
WASHER
PREP TBO
RECOMMENDED TORQUE:
1” Bolts - 27 in-lb. |1/2” Bolts - 18 in-lb.
HELPFUL TIP: Bottle opener goes
on the outside of the torsion brace.

DECKED.COM |#DECKEDUSA |@DECKEDUSA DS1/DS2 | v.8 | Page 11
CABSIDE AMMO
CAN WINDOW
J10
J7 for DS1
J8 for DS2
✕✕✕✕
➡
➡
CAB CAB
INSTALL: JHOOKS
• InserttheJ-hook throughthetailgateholeon thepassengerside tailgateammo canandloop J-hook
throughtiedownor mountingbracketinbed. Screwon the winged-sphericalnut-washer, roundsidedown,on
theJ-hook andfastenuntil fingertight; BAG J10. Don’ttightenyet.Ifyoudo, youwon’tbeabletocenterthe system
properlyinyourbed.
• InserttheJ-hook throughcabsidehole onthe passengersidecabside ammocan andloop J-hook
throughtiedownor mountingbracketinbed. Screwon the winged-sphericalnut-washer, roundsidedown,on the
J-hookand fastenuntilfinger tightBAG J7 for DS1 / BAG J8 for DS2. Don’t tighten yet.
• RepeatwithJ-hooksandammo canson driversside.
IMPORTANT: Leave all J-hook nuts loose.
PASSENGERSIDE
TAILGATEAMMO CAN PASSENGERSIDE
CABSIDEAMMOCAN

DS1/DS2 | v.8 | Page 12DECKED.COM |#DECKEDUSA |@DECKEDUSA
IMPORTANT: Grab your favorite beverage, crack ‘er open in the bottle opener and make a toast to your truck. You did it. Immediately
post a photo of your significant other, child or canine (in no order of significance - please someone show us your pet alligator)
appreciating your accomplishment. Add hashtag #DECKEDUSA | @DECKEDUSA.
LOCK CORE
PLUGS
1/4” SCREWS
TIGHTEN: JHOOKS
• Finally,tightentheJ-hooks,graduallyandalternatively.DO NOT OVER TIGHTEN.
IMPORTANT: Makesuretocenterthe vertin thecenterofyourbed. Don’tworryaboutside gaps, centertheverton
thecenterrib/troughofthebed.
• InstallthreadboltprotectorsonJ-hook ends;BAG PREP TBO.
• Installrulerbyaligningthe rulerholes withthe insertsin thedecks.Useyourfingerstostartthe1/4” screwsto
avoidcross-threading.Tightenjustuntil snugwitha 1/8”hex wrench.
• Insertlockcoreplugs, orinstalllocksifpurchased.
• Nicejob. Your motherand Iareveryproud of you.
PREP TBO RECOMMENDED TORQUE: J-hooks - 9 in-lb.

DECKED.COM |#DECKEDUSA |@DECKEDUSA DS1/DS2 | v.8 | Page 13
DECKED Products – Limited Lifetime Warranty
(Validon DECKED Productspurchasedon or after8/1/2021)
DECKED LLC, (the “Manufacturer”) warrants the original purchaser only that DECKED Truck and Van Products (The “DECKED” Product) will be free from defects in material and
workmanshipfromthe date of purchaseandcontinuing fortheexpectedlifetimeofthe DECKED Product.The DECKEDProductmustbe registeredbythe original purchaserwith
DECKED, LLC via its website at, www.decked.com/register, and a copy of the original sales receipt must be supplied to the Manufacturer at the time a warranty claim is made.
Thiswarrantyterminatesif the originalpurchasertransfersthe DECKED Producttoanyotherpersonor vehicle.
WHAT IS COVERED
AllDECKED Productsidentified aboveon or afterAugust1,2021
DECKED’s Limited Lifetime Warranty applies to US and Canadian customers only. International shipments are covered by DECKED’s 3 Year Limited Warranty.
WHAT WE WILL DO TO CORRECT PROBLEMS
Subjecttothelimitationsandexclusionsdescribedin this limitedwarranty,theManufacturerwillremedydefectsinworkmanshipor materialsbyprovidingoneofthefollowing
remediesatitsoptionandwithoutchargetotheoriginalpurchaserforparts:(a)repairingthedefectiveportionoftheDECKEDProductor (b)replacingtheentireDECKEDProduct.
In addition, the Manufacturer may elect at its option not to repair or replace the DECKED Product, but rather issue to the original purchaser a refund equal to the purchase price
paidforthe DECKEDProductora credit to be usedtowardsthe purchase ofanewDECKED Product.
WHAT IS NOT COVERED
Thislimitedwarrantyexpresslyexcludes:
• Damageordefectscausedbynormalwearandtear,cosmeticrust,scratches,accidents,unlawfulvehicleoperation,installationinanon-supported
vehicle or installed in a vehicle which does match the DECKED Product’s SKU-intended fitment or use, or modification of the product, or any types
ofrepairofa DECKEDProductotherthanthose authorized orprovidedbytheManufacturer.
• Damage or defects resulting from conditions beyond the Manufacturer’s control and specifications including, but not limited to modification,
misuse, overloading, or failure to assemble, install or use the DECKED Product in accordance with the Manufacturer’s written instructions or
guidelinesincluded with theDECKED Productor separatelymadeavailabletotheoriginal purchaser.
• Damagetothe contentsof the DECKEDProductorvehicle.
• TO THE EXTENTPERMITTED BY LAW, IN NO EVENT SHALL THE MANUFACTURER BE LIABLE FOR ANY INCIDENTAL, SPECIAL, INDIRECT, OR CONSEQUENTIAL
DAMAGES,INCLUDINGECONOMICLOSS,WHETHERRESULTINGFROMNONPERFORMANCE,USE,MISUSE,ORINABILITYTOUSE THE DECKEDPRODUCTOR
THEMANUFACTURER’SNEGLIGENCE.
NO OTHER EXPRESS WARRANTY APPLIES
This Limited Lifetime Warranty is the sole and exclusive warranty for DECKED Products. No employee, agent, dealer, or other person is authorized to alter this warranty or make
anyotherwarrantyonbehalf of DECKED LLC.
NOTIFICATION PROCEDURES
If the DECKED Product does not conform with the terms of this limited warranty, the original purchaser must promptly notify the Manufacturer in writing upon discovery of the
nonconformity. In order to receive remedies under this limited warranty, a warranty claim must have been registered with DECKED LLC by the original purchaser, must describe
the nature of the products nonconformity, include a copy of the original sales receipt, invoice, or other proof of purchase and be accompanied with photos or video. Repairs
or modifications made to the DECKED Product by other than the Manufacturer or its authorized agent will nullify this limited warranty. Coverage under this limited warranty is
conditionedatall timesuponthe owner’scompliancewith theserequiredregistration,notification,andrepairprocedures.
Productregistrationmaybeperformedat: https://decked.com/register
Warrantyclaims must includereciprocalcontactinformationandmaybemade via certifiedmailor emailto:
DECKED Warrantyand Claims
Contactinfo:
DECKED LLC
POBox885
Ketchum,ID83340
208-806-0251
PATENTED
Look Ma! We got patents!
Full size Drawer System: PATENT PROTECTED: US9527454-B2,
USD719905 S, US9168874 B2, CA2969118A1
Midsize Drawer System: PATENT PROTECTED: US10988087B2,
112017005448.6
DECKED Tool Box: PATENT PROTECTED: US20210062581A1
For more information on DECKED's patents visit: DECKED.com/patents
Other manuals for DS1
1
This manual suits for next models
1
Other DECKED Automobile Accessories manuals

DECKED
DECKED TOOL BOX User manual

DECKED
DECKED MT6 User manual

DECKED
DECKED VAN SHELVING User manual

DECKED
DECKED MT5 User manual

DECKED
DECKED LADDER User manual

DECKED
DECKED Slide Reference guide

DECKED
DECKED MG3 User manual

DECKED
DECKED DR6 User manual

DECKED
DECKED DS1 User manual

DECKED
DECKED ToolBox Ladder Bracket User manual


