DECKED MT5 User manual

DECKED.COM |#DECKEDUSA |@DECKEDUSA MT5 / MT7 | v.1.1 | Page 1
Watchshortinstallationvideosatwww.decked.com/video|Register yoursystem at www.decked.com/warranty
Installation Instructions:
MT5 / MT7
TOOLS REQUIRED
TOYOTA TACOMA
5'1” BED LENGTH
MT5 20052018 / MT7 2019CURRENT
VERSION1.1
DECKED.COM | 208.806.0251
@DECKEDUSA | #DECKEDUSA
FOLLOW US:
• Adjustable wrench (that opens to about 1”)
• 1/2” open end wrench
• #2 Phillips screwdriver,
• Short 7/32” hex wrench
• 7/16” deep socket
• 3/8” socket
• Electric drill
• 9/64" drill bit
• 1/4” drill bit
• 5/16" drill bit
• Drill stop
• T40 Torx Driver
DECKED.COM |#DECKEDUSA |@DECKEDUSA MT5 / MT7 | v.1.1 | Page 2
CAB
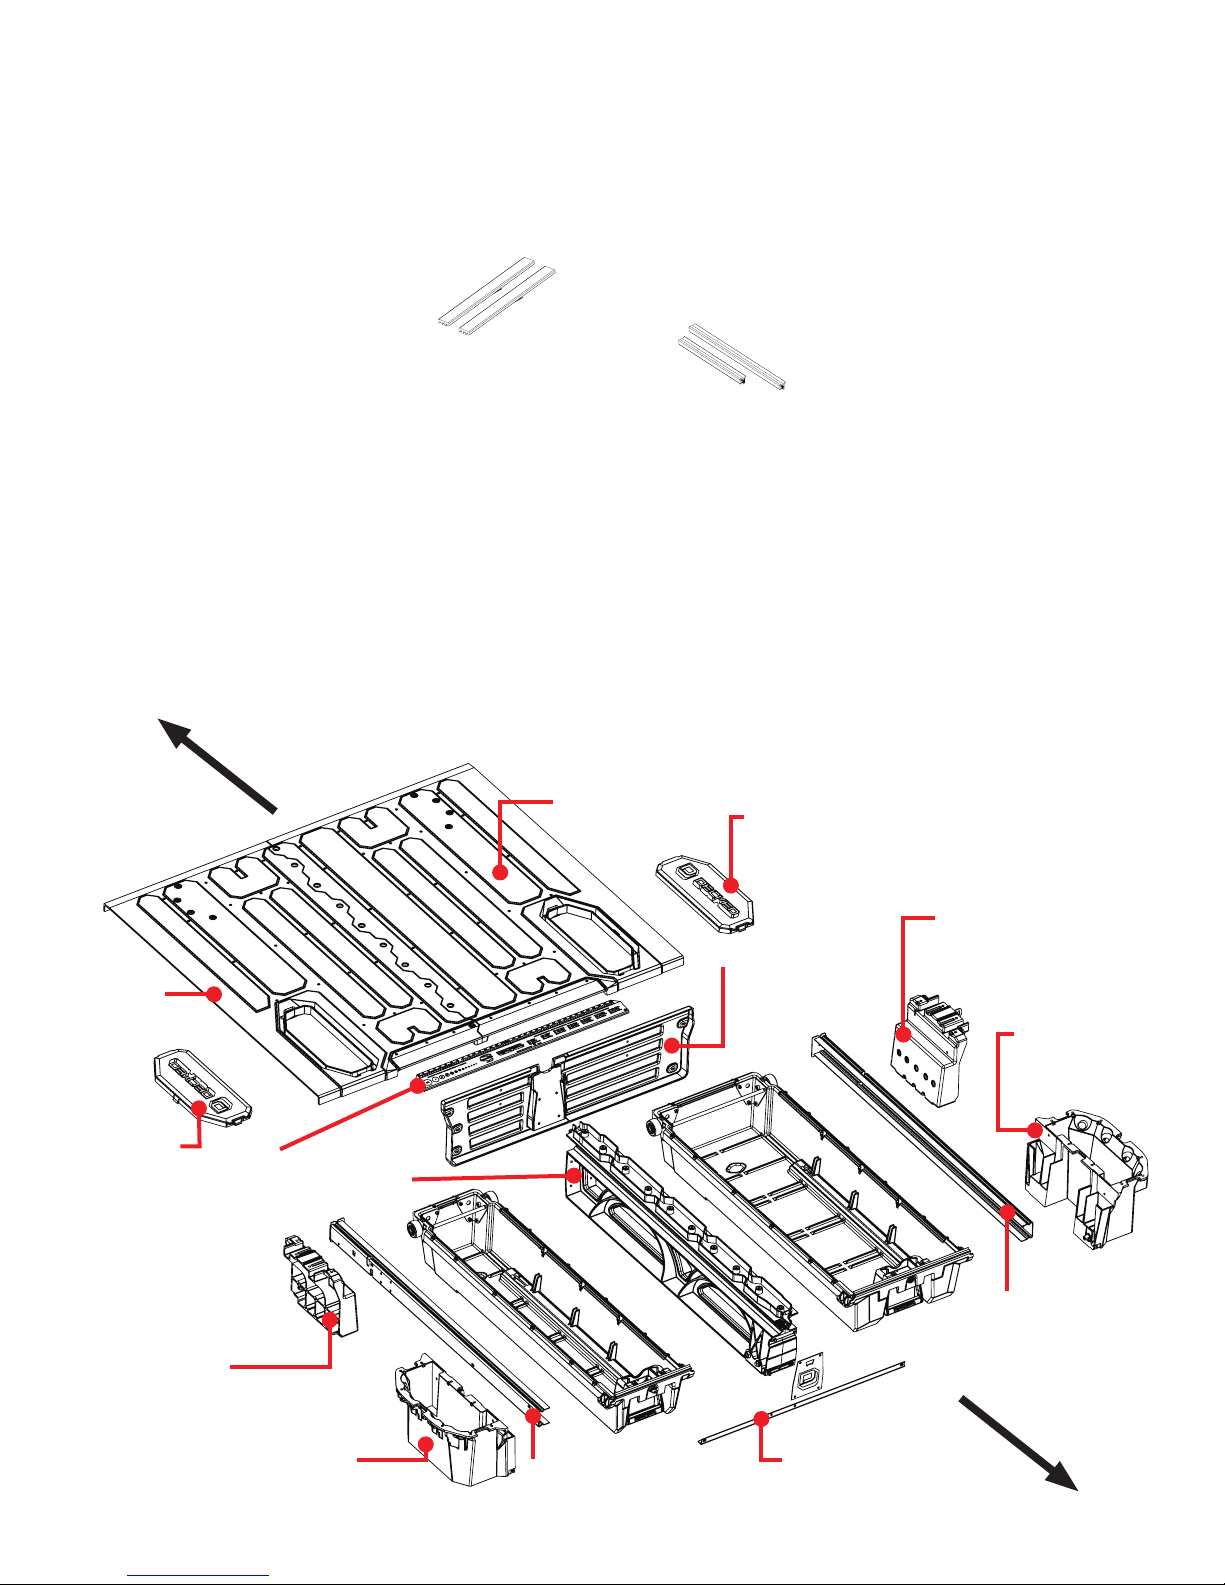
▼ ASSEMBLY OVERVIEW ▼
CENTER VERT
CABSIDE VERT
LEFT DECK
(NARROW)
RIGHT DECK
(WIDE)
LEFT AMMO
CAN
RIGHT AMMO
CAN
LEFT STUD
RIGHT STUD
LEFT AMMO
CAN LID
RIGHT AMMO CAN LID
TORSION
BRACE
RIGHT
CCHANNEL
LEFT
CCHANNEL
TAILGATE
CONTENTS
DECKED carton
LEFT deck half - 1
RIGHT deck half - 1
Center vert - 1
Cabside vert - 1
Drawer - 2
Left ammo can - 1
Right ammo can - 1
Left stud - 1
Right stud - 1
Ammo can lid - 2
C-channel - 2
Ruler - 1
Hardware box - 1
Bottle opener - 1
Torsion brace - 1
Hardware box - unbagged components
(inside DECKED carton):
Shims - 4
Weather strips - 2
HARDWARE box - bagged components
PREP-MT5 or MT7 - 1
S1 1
S2 - 1
N1 - 1
J4 - 2
DRAWER 1 1
DRAWER 2 1
WHEELS 1
FINAL MID 1
PREPEXTRA 1
MS WASHERS 1
(MT7 ONLY) TACOMA TD 1
RULER
DECKED.COM |#DECKEDUSA |@DECKEDUSA MT5 / MT7 | v.1.1 | Page 3
▼ ASSEMBLY OVERVIEW ▼
▼ HEY! TORQUE BOY: READ BEFORE YOU INSTALL DECKED ▼
1. DON’T be anidiotread the instructions.
2. DON'T over tightenbolts,getem' hand-tight.
3. DON'Tuse powertools.
4. Ifyoudon't followdirectionsand
do
usepowertools:
1). Setclutchat a verylowsetting. 2). If you blowit,seeNOTE.*
NOTE*Twoextrathreadedinsertsareincluded inBAG PREP-EXTRA. That’s allyouget. Theinsertswillreplaceany
strippedinsertsin the tailgate ammocans, but NOTTHECENTER VERT, sohand tighten until snugonly! Youcan
alsoscrewthe insertsback in ifdislocated.Thereis astraightscrewdriver slotonthe undersideofthe insert.
5. Startallboltswithfingerstoavoid cross-threading
6. DON'T over tightenJ-hooksduring installation.
Make 'emgood and snug enoughtokeepthe
systemfrommovingin the bed.
7. Nicejob if you’restillreading.
Prevent abusive, expletitive-filled language, watch our detailed installation video
or give us a call. We’re happy to help!
208.806.0251 | DECKED.COM/INSTALLVIDEO
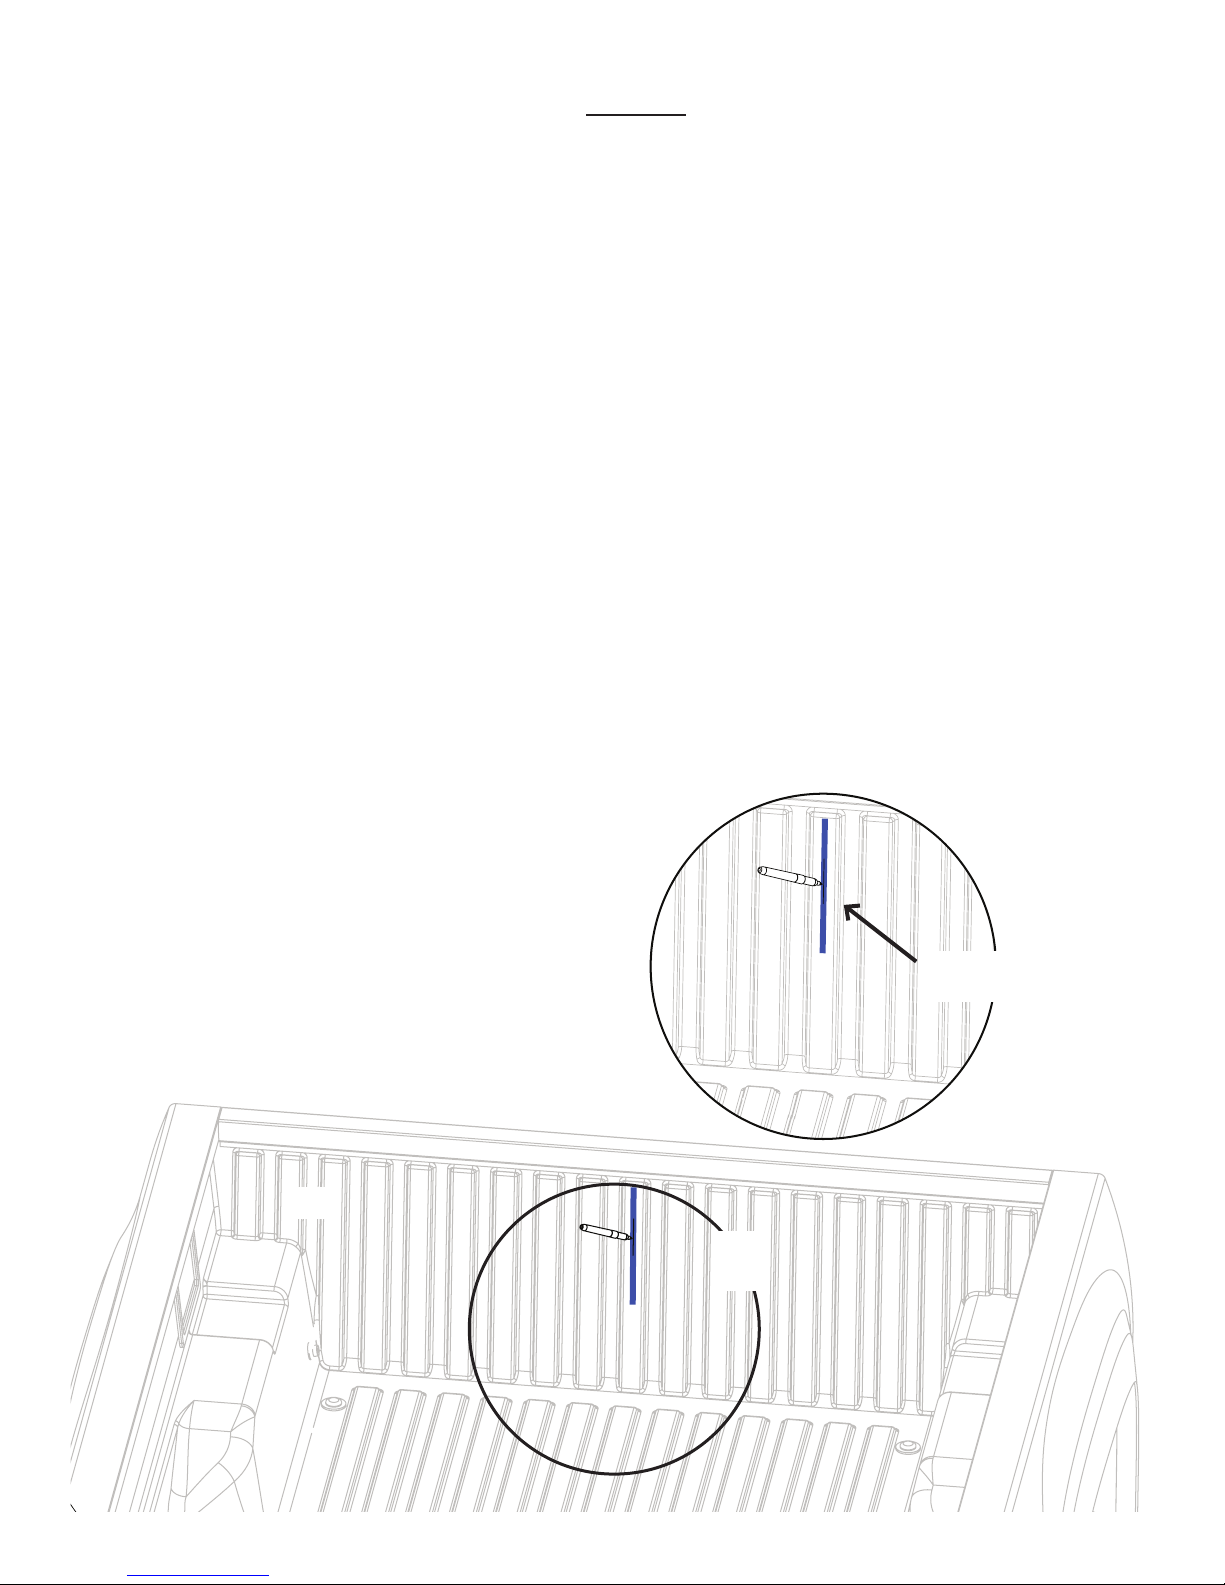
A
CAB
➡
MAKE SURE MARK SITS AT LEAST
14" HIGH (SO YOU CAN SEE IT)
DETAIL A
PREP BED: MARKCENTEROFBED
• Usea marking pen orwaxpenciltomark
thecenterofthe bed (blue)onthe raisedbead.
DECKED.COM |#DECKEDUSA |@DECKEDUSA MT5 / MT7 | v.1.1 | Page 4
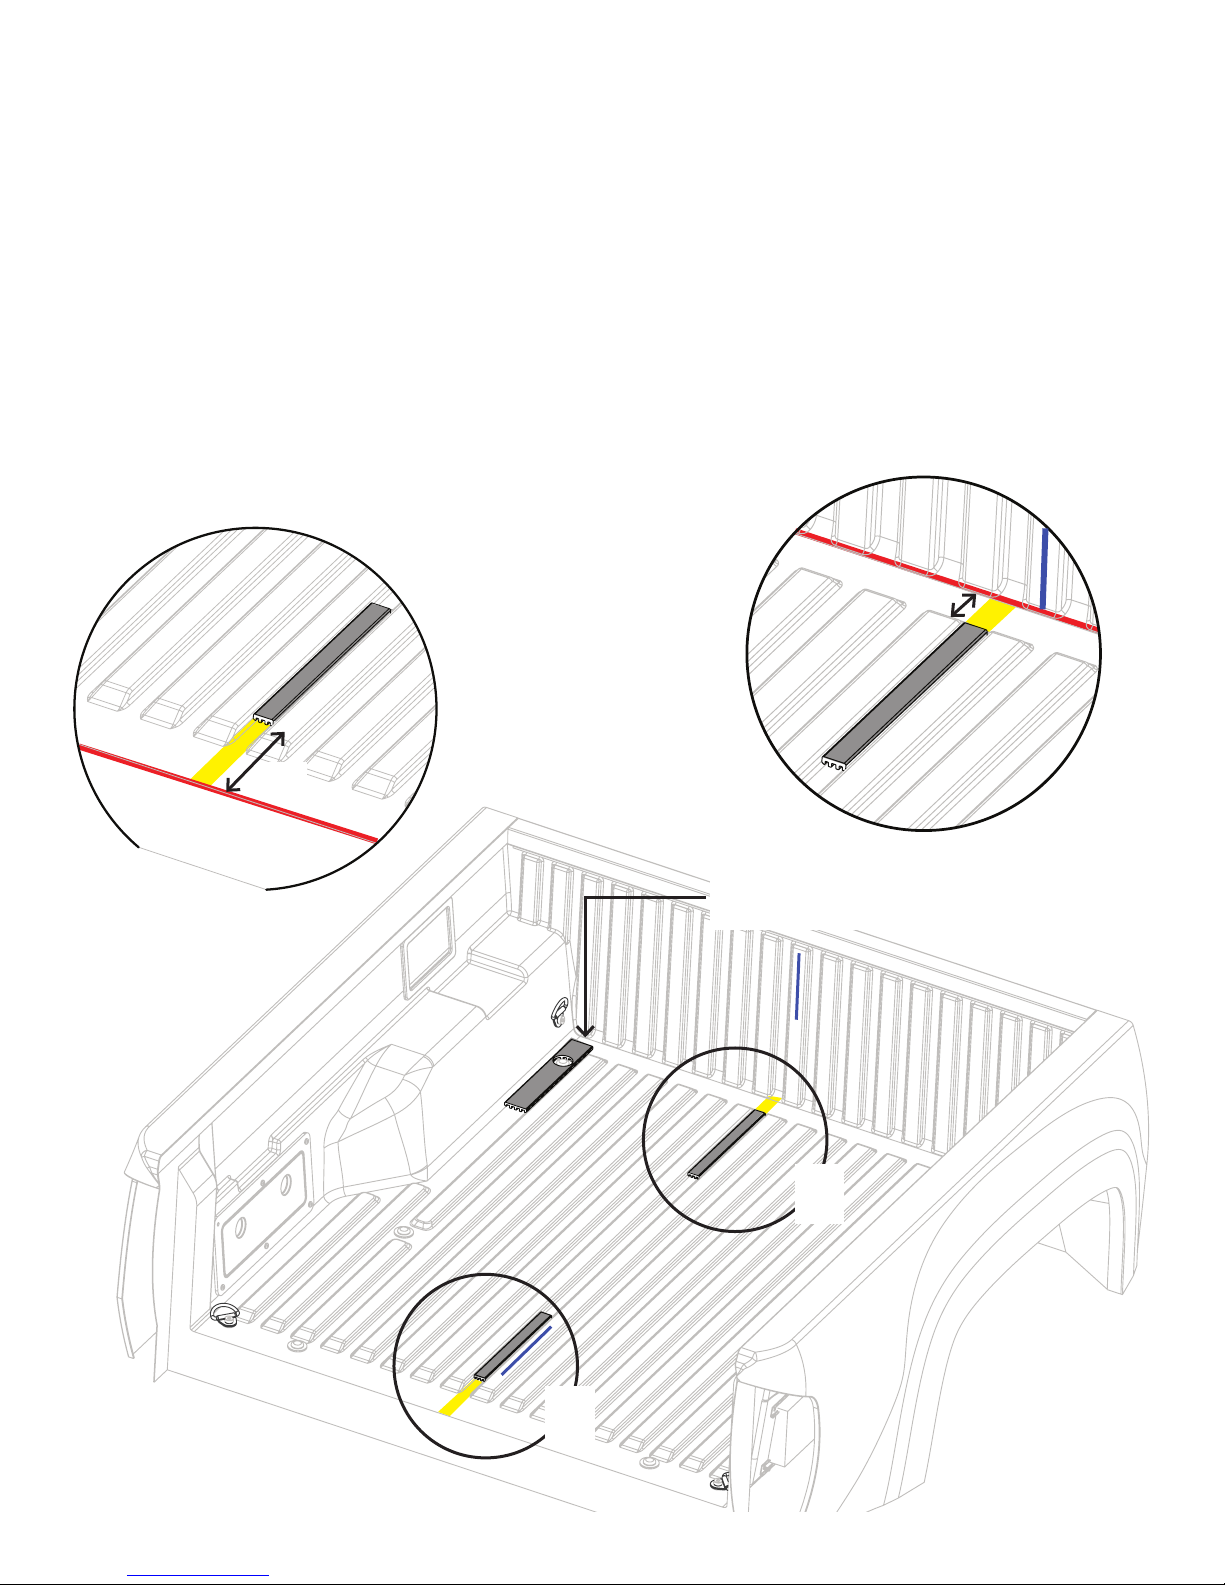
DETAIL A
Alignshimtochannelin floorshown 3”from
cabsidepanelofbed(red).
DETAIL B
Alignshimtochannelin floorshown. Place
shim6 1/2”fromrear ofbed (red).
3”
6 1/2”
A
B
PLACE LARGE SHIM OVER FACTORY BED BOLT
AS SHOWN. REPEAT PASSENGER SIDE.
➡
CAB
PREP BED: SHIMS
• 2 SMALL shimsand2 LARGE shims(with holes)arelooseinyourhardwarekit.
• Usingthe informationbelow:
1) Cleanthe bedsurfacewheretheshims willbelocated.Isopropylalcohol(do notdrink) is recommended.
2) Remove tapefilmand apply shim withthestrengthof 1000mena.k.a push reallyhard.
DECKED.COM |#DECKEDUSA |@DECKEDUSA MT5 / MT7 | v.1.1 | Page 5
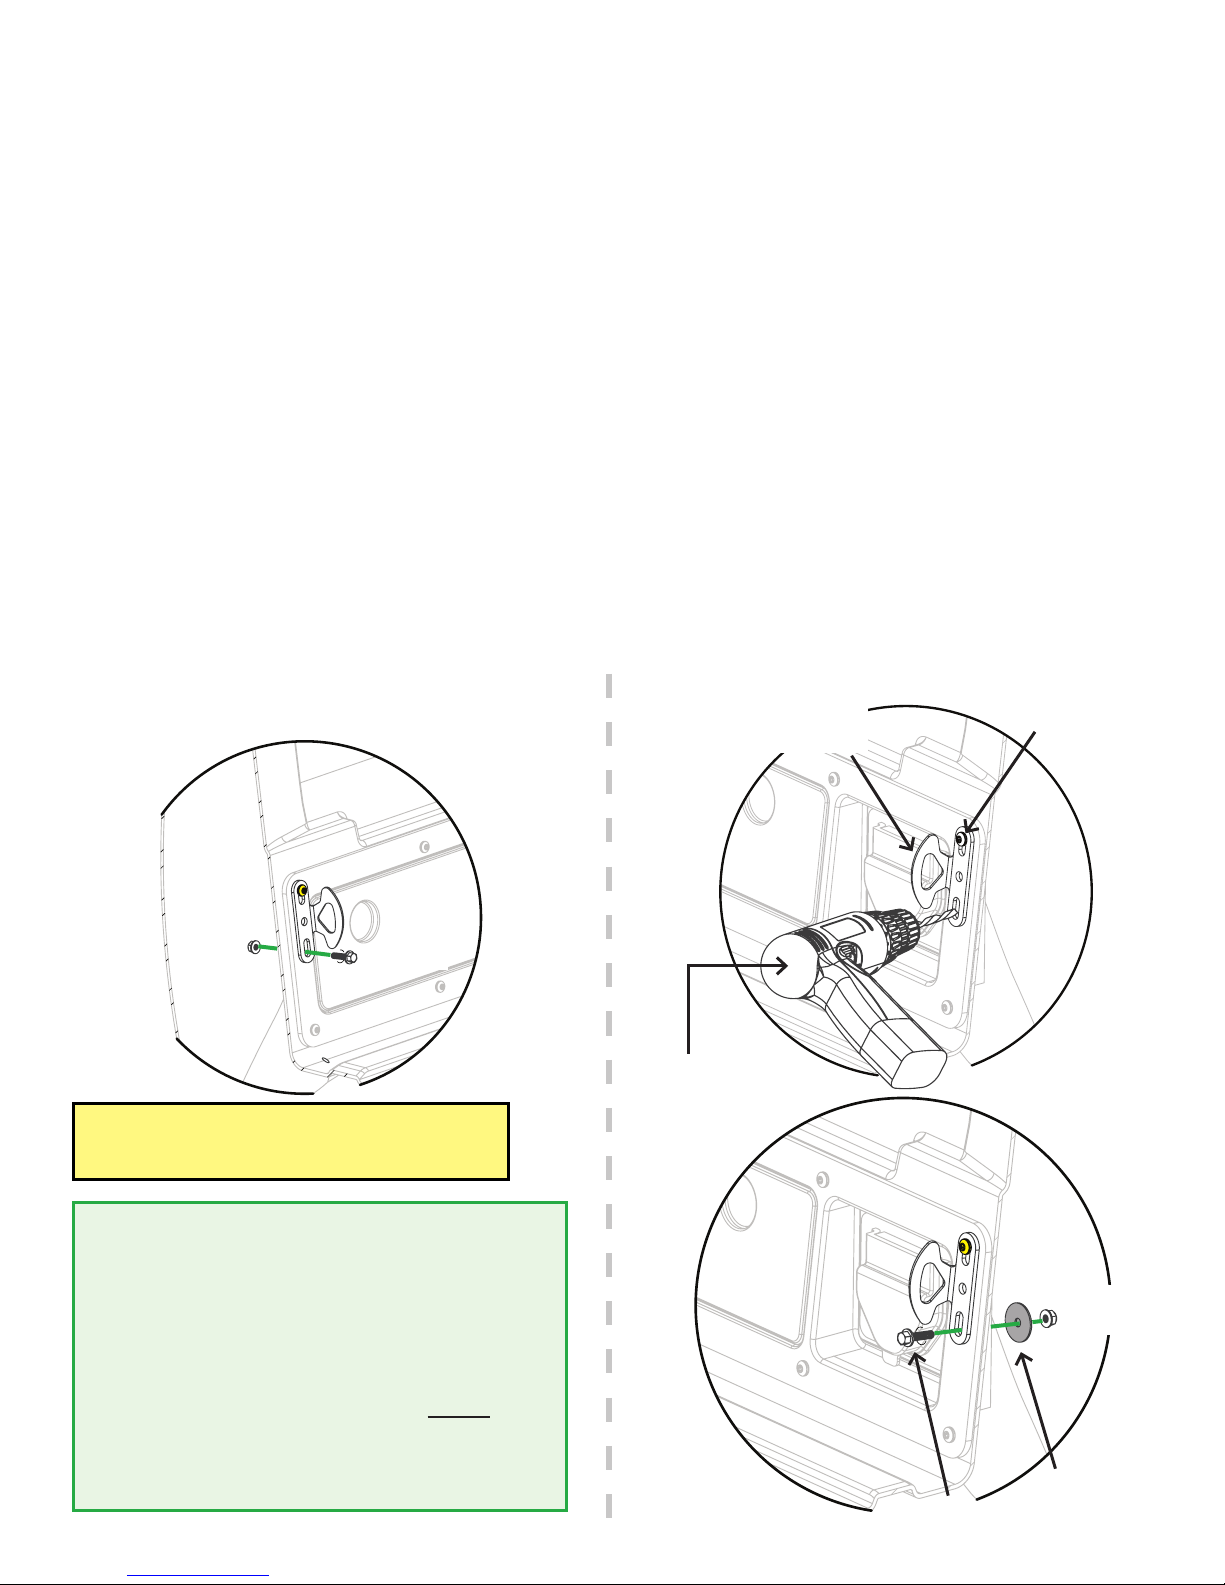
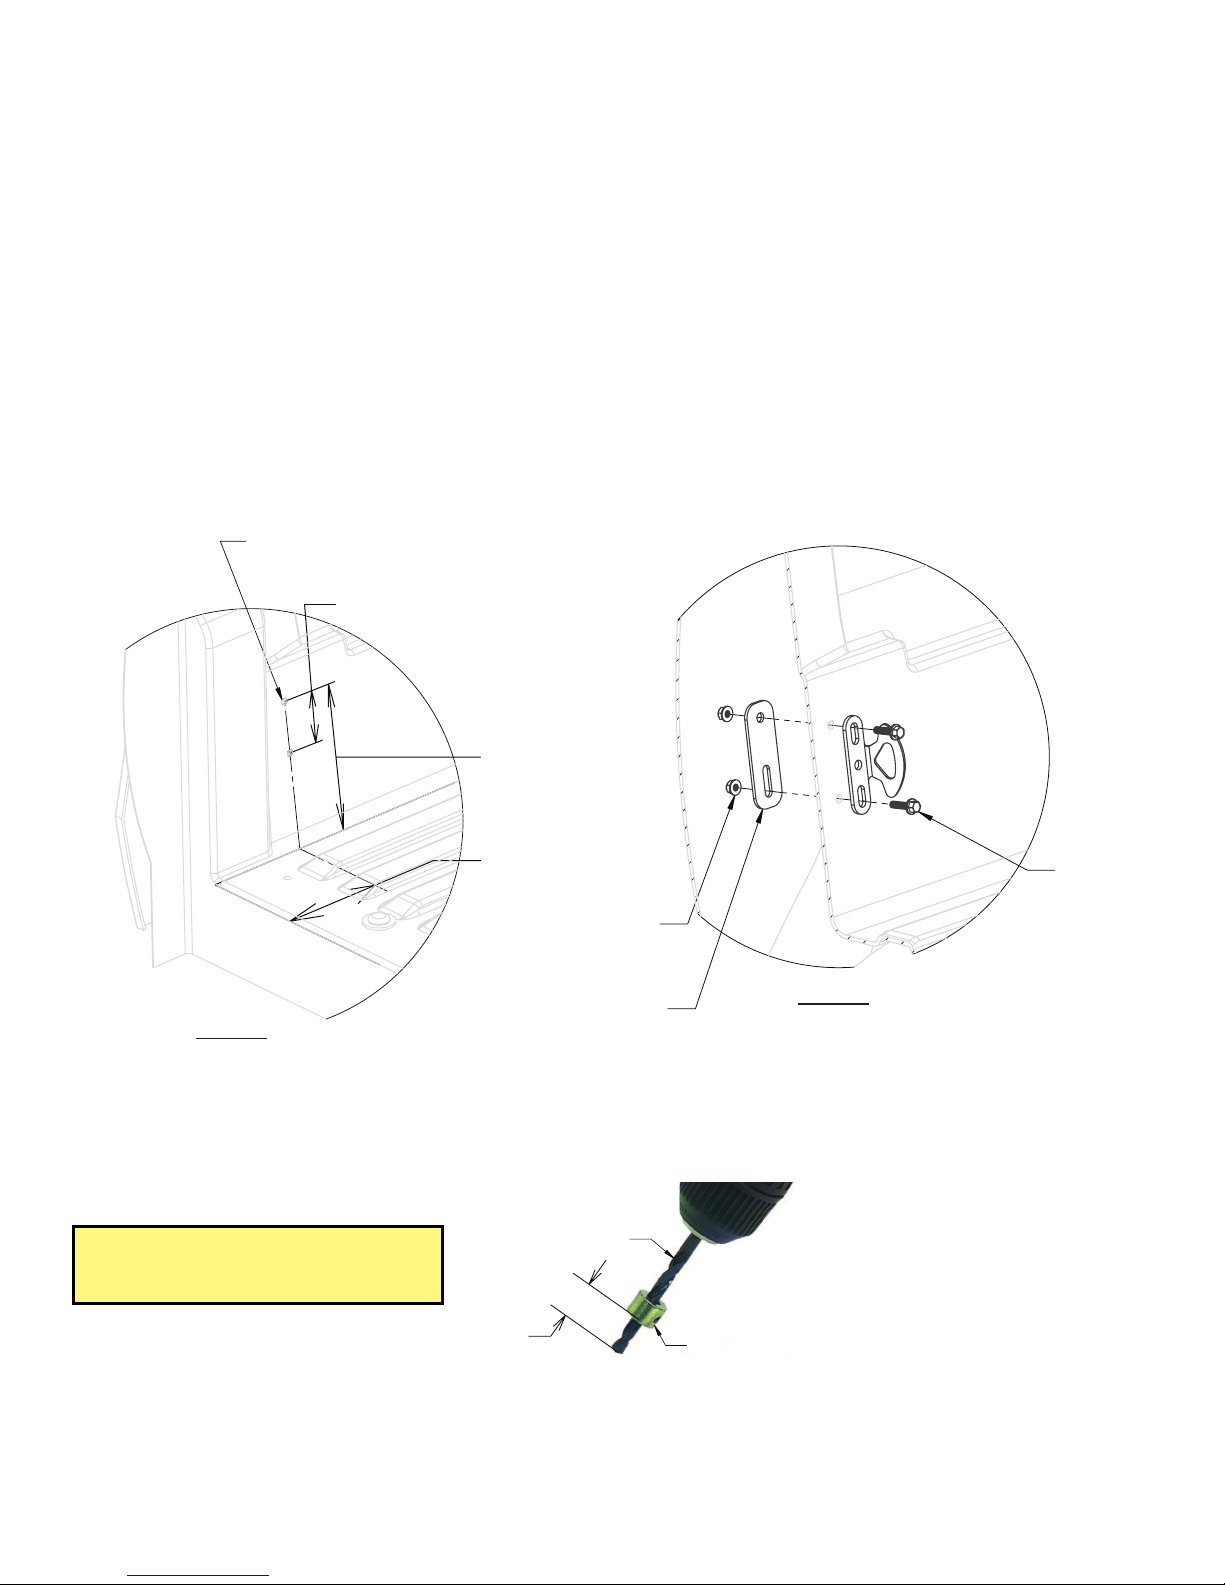
PREP BED: TAILGATEBRACKET
NOTE: You will need to grab a pal for this step (or have incredibly long and flexible arms).
• Remove toprearfactorycompartment boltfromthepassengerside with a T40TorxDriver.Keepbolt.
• Looselyattach passanger sidetailgate bracket with factory bolt in top hole. Make sure the tie down opening is
angled toward the driver, not the tailgate; BAG PREP-MT5 or MT7.
• Alignbracket so it'sparallelwithverticaledge ofcompartment.Tightenfactorybolt atlast!
• Usingthebottomholeinbracketasa guide,drill a5/16"holewitha1/2" drillstopthroughcompartmentandbedwall.
• Installa1" bolt throughthe bracketandbed wall. Install1"washerandflanged nut and tightensecurely;
BAG PREP-MT5 or MT7.
• Repeatdriverside unlessyoudon'thave a driver'sside cubby. If not,follow the instructionsfordriver'ssideon
nextpage.NOTE: On passenger side ONLY, you will need to add a washer; BAG PREP-MT5 or MT7...
We know it's strange, trust us.
DRIVER SIDE
FACTORY BOLT
PASSENGER SIDE
HELPFUL TIP: Feel free to remove doors of cubbies
so you can still somewhat use them. Use will be
compromised, but hey, life ain't always fair, right?!
HELPFUL TIP:The power outlet can stillbe used if you
inserta flat head pigtail extensioncordBEFORE you
installthe decks.Makesureto havethe outletcapped
to keep water out.
ANGLE TIEDOWN
TOWARD DRIVER
➡
CAB
➡
CAB
FLANGED
NUT
WASHER
FLANGED
NUT
REALLY OLD DRILL
WE FOUND ONLINE
1" BOLT
1" BOLT
RECOMMENDED TORQUE:
Bolts in labeled bag PREP-MT5 or MT7 - 53 in-lb.
DECKED.COM |#DECKEDUSA |@DECKEDUSA MT5 / MT7 | v.1.1 | Page 6
PREP BED: TAILGATEBRACKET
(FOR TACOMAS WITH NO DRIVER SIDE TAILGATE CUBBY)
NOTE:DisregardthispageifyouHAVEadriver'ssidetailgatecubby.
• ReferencingdimensionalinfoinDETAILAmarkholelocationsanddrill(2)5/16"holes(withdrillstopsetat.62").
• Referencing DETAIL A install J-hook mounting bracketas shownwith bolts,backing plateand nuts.
Tighten bolts securely. BAGPREP-MT7,BAG TACOMA TD.
DETAIL A
DRIVER'S SIDE ONLY
HOLE DRILLING
DETAIL A
DRIVER'S SIDE ONLY
BOLT INSTALLATION
DRILL 5/16" HOLE 2 PLACES
DRILL STOP
5/16" DRILL BIT
.62"
2.75"
7.5" TO
BOTTOM
OF BED
5.75" FROM
REAR OF BED BOLT
BACKING
PLATE
NUT
DETAIL A
RECOMMENDED TORQUE:
Bolts in labeled bag PREP-MT7 - 53 in-lb.
DECKED.COM |#DECKEDUSA |@DECKEDUSA MT5 / MT7 | v.1.1 | Page 7
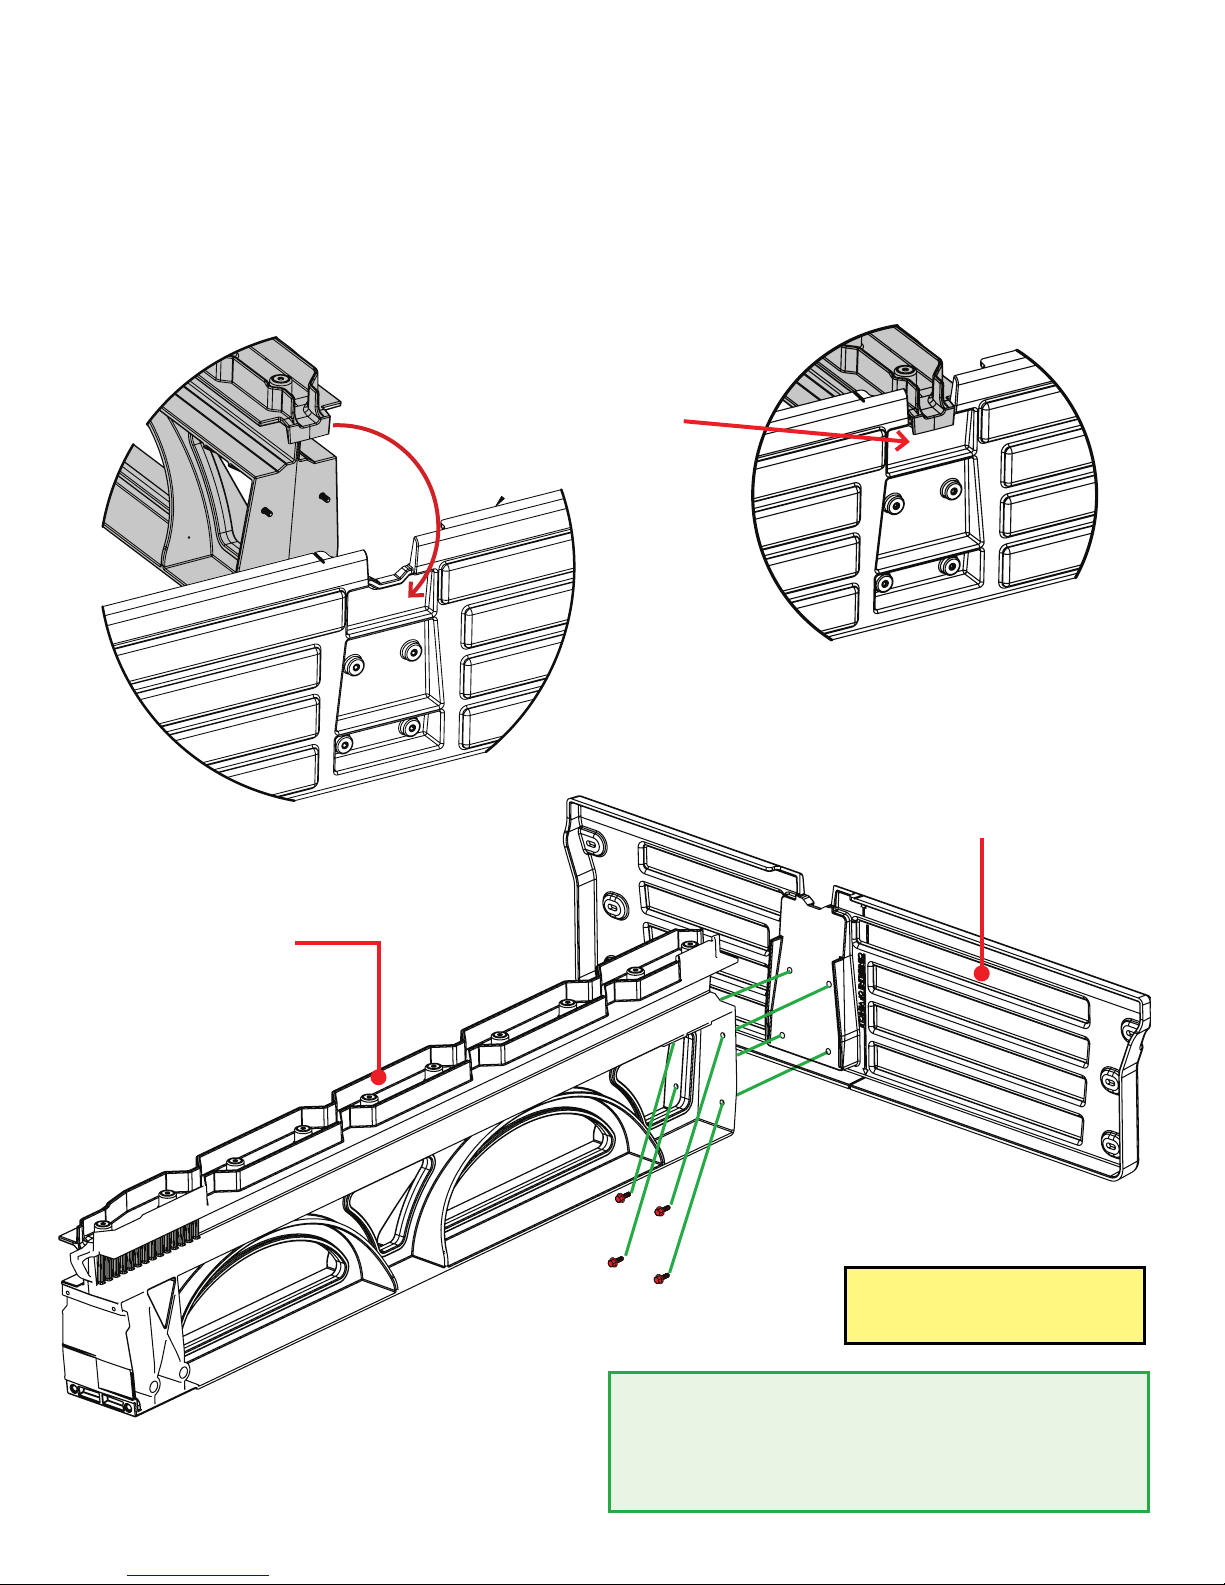
ASSEMBLY: CENTERVERT+CABSIDEVERT
NOTE: Perform the next few steps on a flat surface like a garage floor.
• Attach centerverttocabside vert with fourbolts.Alternate to tighten; BAG S1.
CENTER VERT
CABSIDE VERT
S1
PLACEHOOKONCENTER VERT
OVERNOTCHIN CABSIDEVERT
HELPFUL TIP: BAG S1, a.k.a "Bunker Hill,"is required
for most of the steps, so keep it close! These bolts are
highlighted throughout instructions in RED.
RECOMMENDED TORQUE:
Bolts in labeled bag S1 - 27 in-lb.
DECKED.COM |#DECKEDUSA |@DECKEDUSA MT5 / MT7 | v.1.1 | Page 8
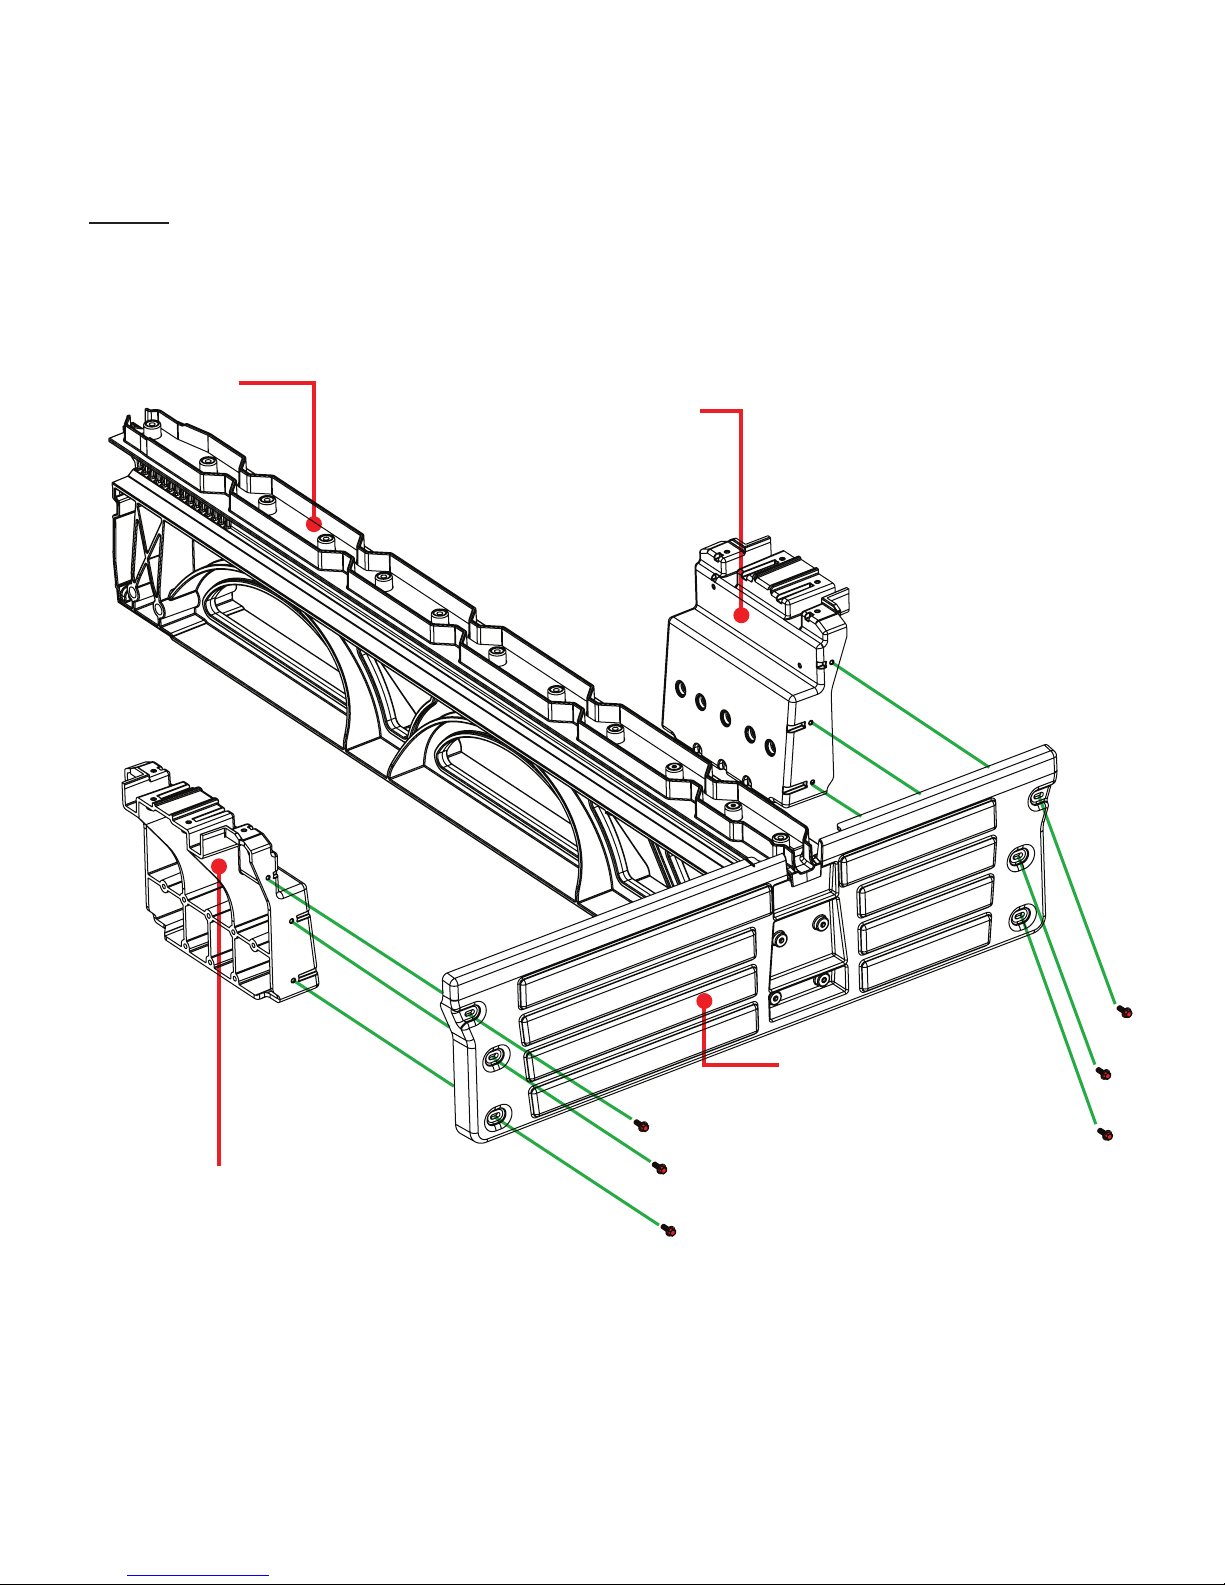
ASSEMBLY: LOOSELYATTACHSTUDS(YUP)
• LOOSELY attachstudstocabside vertwith sixbolts;BAG S1.
CENTER VERT
PASSENGER
SIDE STUD
CABSIDE VERT
DRIVER
SIDE STUD
KEEP LOOSE
(YOGAHELPS)
S1 KEEP LOOSE
S1

DECKED.COM |#DECKEDUSA |@DECKEDUSA MT5 / MT7 | v.1.1 | Page 9
HELPFUL TIP: This step seems like a waste of time,
but Dr. DECKED says it's important...don't skip out.
ASSEMBLY: ALIGN&TIGHTENSTUDS(YUP)
NOTE: This step ensures the studs are properly located before tightening bolts. It's important.
• Placeammocanstosupporttailgateendofdeckpanels.
• Liftdeckpanelsoncentervert+stud+cabsidevertassembly.
• SlidestudsaroundL-Runtildeckpanelsareseated.
• DETAILA:Looselysecurefourboltstoholddecksontostuds; BAGS1.
• Nowyoucansecurelytightentheboltsthatholdthestudstothecabsidevert.
• Unboltdeckfromstuds,removedeckpanels,savebolts,removeammocansandsetasideforlaterassembly.
DETAIL A
S1
A
YOU WILL REMOVE AND SAVE THESE BOLTS
AFTER TIGHTENING CABSIDE VERT + SHIM
BOLTS
TIGHTEN AND SECURE RECOMMENDED TORQUE:
Bolts in labeled bag S1 - 27 in-lb.

DECKED.COM |#DECKEDUSA |@DECKEDUSA MT5 / MT7 | v.1.1 | Page 10
STUD BRACKET
TOP HOLE
CABSIDE BRACKET
(GREY)
STEP 1 STEP 2
NOTE: Make sure centerline arrows on
cabside vert are aligned with your
centerline mark (blue).
STEP 3
KEEP LOOSETIGHTEN
THREE
3 1/2"
BOLTS
3/4" BOLT
CAB
➡
➡
CAB
ASSEMBLY: BRACKETS+MOUNTING
• STEP1:Securely attach studbracket todriverside stud usingthree3 1/2"boltsandthreeflanged nuts;
BAG PREP-MT5 or MT7.
• STEP 2: Loosely attachcabsidebracket tothe tophole in studbracket with 3/4"bolt and flanged nut;
BAG PREP-MT5 or MT7. KEEP LOOSE.
• Repeat STEP 1 and STEP 2 on passenger side.
• STEP 3: While supporting both ends, lift center vert + stud + cabside vert assembly in truck bed.
FLANGED NUT
➡
CAB
FLANGED
NUTS
RECOMMENDED TORQUE:
For all fasteners - 27 in-lb.
DECKED.COM |#DECKEDUSA |@DECKEDUSA MT5 / MT7 | v.1.1 | Page 11
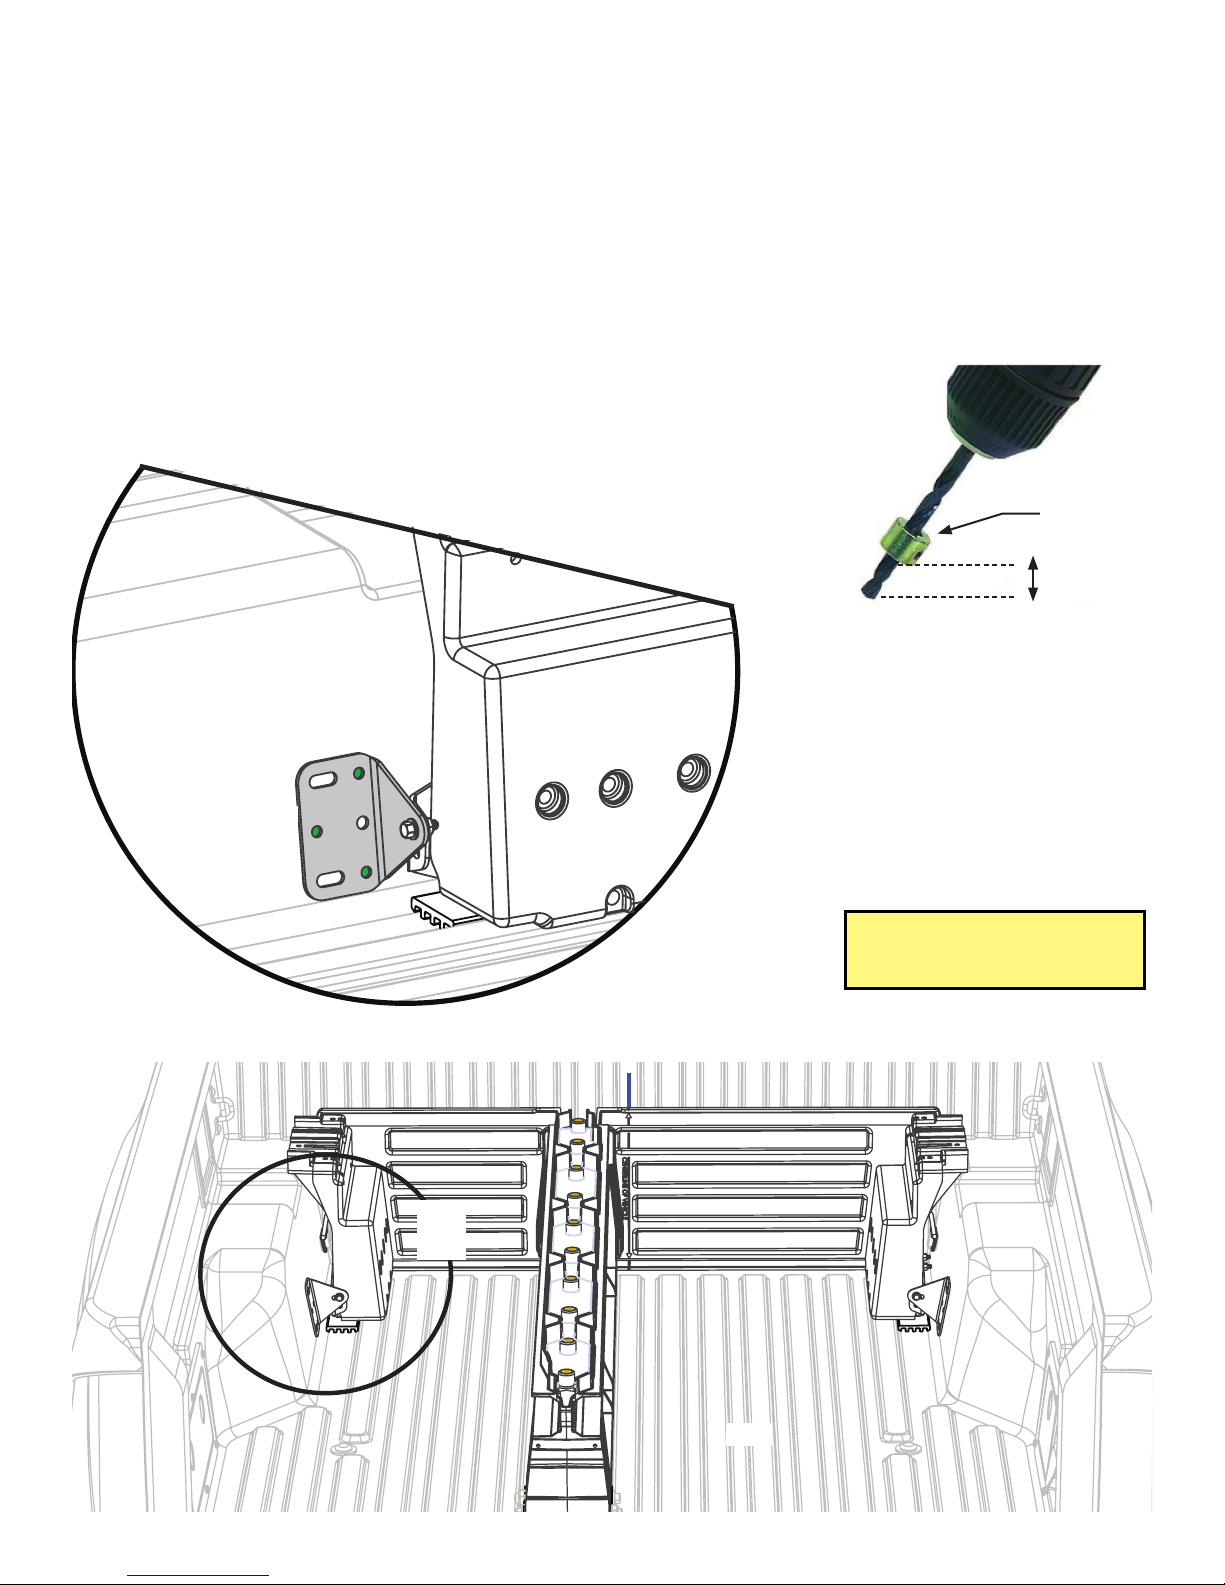
INSTALL: CABSIDEBRACKETDRILL
• Placedriversidecabside bracket flushagainsttruck bedwall,nowtightensecurelytostudbracket.
• Whilekeepingassembly on centerline,drill three1/4"diameterholesintobedusing cabside bracketasa guide
(greenholes).Makesuretouseadrill stopsetto1/2" depth.
• Repeatpassenger side.
A
DETAIL A 1/4” DRILL BIT
DRILL STOP
1/2”
DRILL HOLES
(GREEN)
MAKESURECABSIDEBRACKET
(GREY) IS FLUSH AGAINST BED
➡
CAB
CAB
➡
RECOMMENDED TORQUE:
53 in-lb.

DECKED.COM |#DECKEDUSA |@DECKEDUSA MT5 / MT7 | v.1.1 | Page 12
INSTALL: BACKINGPLATE
NOTE: If your pal left, clank some cans together to get them to come back.
• Installthree1"boltsthroughholes incabsidebracket and pickupbed; BAG PREP-MT5 or MT7.
• PlayRockPaper Scissorswith yourpal. The loser needstoholdthebacking plateinside the wheelwellandattach
threeflangednuts;BAG PREP-MT5 or MT7.Securelytighten.
• Repeatpassenger side.
➡
CAB
1" BOLTS
FLANGED
NUTS
BACKER PLATE GOES OUTSIDE THE
INNER PLASTIC BED ON THE INTERIOR
WHEEL WELL WALL...
TRY SAYING THAT
THREE TIMES FAST.
RECOMMENDED TORQUE:
Bolts in labeled bag PREP-MT5 or MT7 - 27 in-lb.

DECKED.COM |#DECKEDUSA |@DECKEDUSA MT5 / MT7 | v.1.1 | Page 13
INSTALL: CCHANNEL
• Looselyplacedriversideammo can attailgate cornerofbed. The axlesshould be on the tailgate side ofthe truck.
• PlacedriversideC-channel on ledge ofstud andammocan with end platecabside.
• DETAIL A: Insert twobolts through C-channel intoammo can andlooselyfastenwithnut;BAG S2, BAG N1.
• DETAIL B: Tightly attach C-channel tostud; BAG S1.
• Repeatpassenger side.
DETAIL A DETAIL B
CCHANNEL
END PLATE
KEEP LOOSE TIGHTEN
A
B
S2 S1
N1
➡
CAB
➡
CAB
➡
CAB
RECOMMENDED TORQUE:
Bolts in labeled bags S1, S2, N1 - 27 in-lb.

DECKED.COM |#DECKEDUSA |@DECKEDUSA MT5 / MT7 | v.1.1 | Page 14
S1
➡
CAB
INSTALL: DECKHALVES
• Looselyplacedriversidedeck panel on driverside stud,centervertand ammo can.
• Shifttailgateammocanforward,rearward,L-R, as necessarytoalign with fully seateddeckpanel.
• Looselyassemble:
• Five bolts(withoutwashers)throughdeck panel intocentervert;BAG S1.
• Fourboltswith nylonandrubber washersinstalledinordershowninDETAIL A throughdeck panel into
stud;BAG S1, BAG MS WASHERS.
• Eightboltswithnylon and rubberwashers installedin ordershownin DETAIL A throughdeckpanelinto
tailgate ammocan;BAG S1,BAG MS WASHERS.
• Tighten all S1 bolts.
• Securely tighten driver side C-Channel/ammo can nut and bolt.
• Repeatpassenger side(make sure you don't forget to securely tighten passenger side C-Channel/ammo can
nut and bolt).
NYLON WASHER
RUBBER WASHER
DETAIL A
NYLON WASHER
RUBBER WASHER
RECOMMENDED TORQUE:
Bolts in labeled bag S1 - 27 in-lb.
DECKED.COM |#DECKEDUSA |@DECKEDUSA MT5 / MT7 | v.1.1 | Page 15
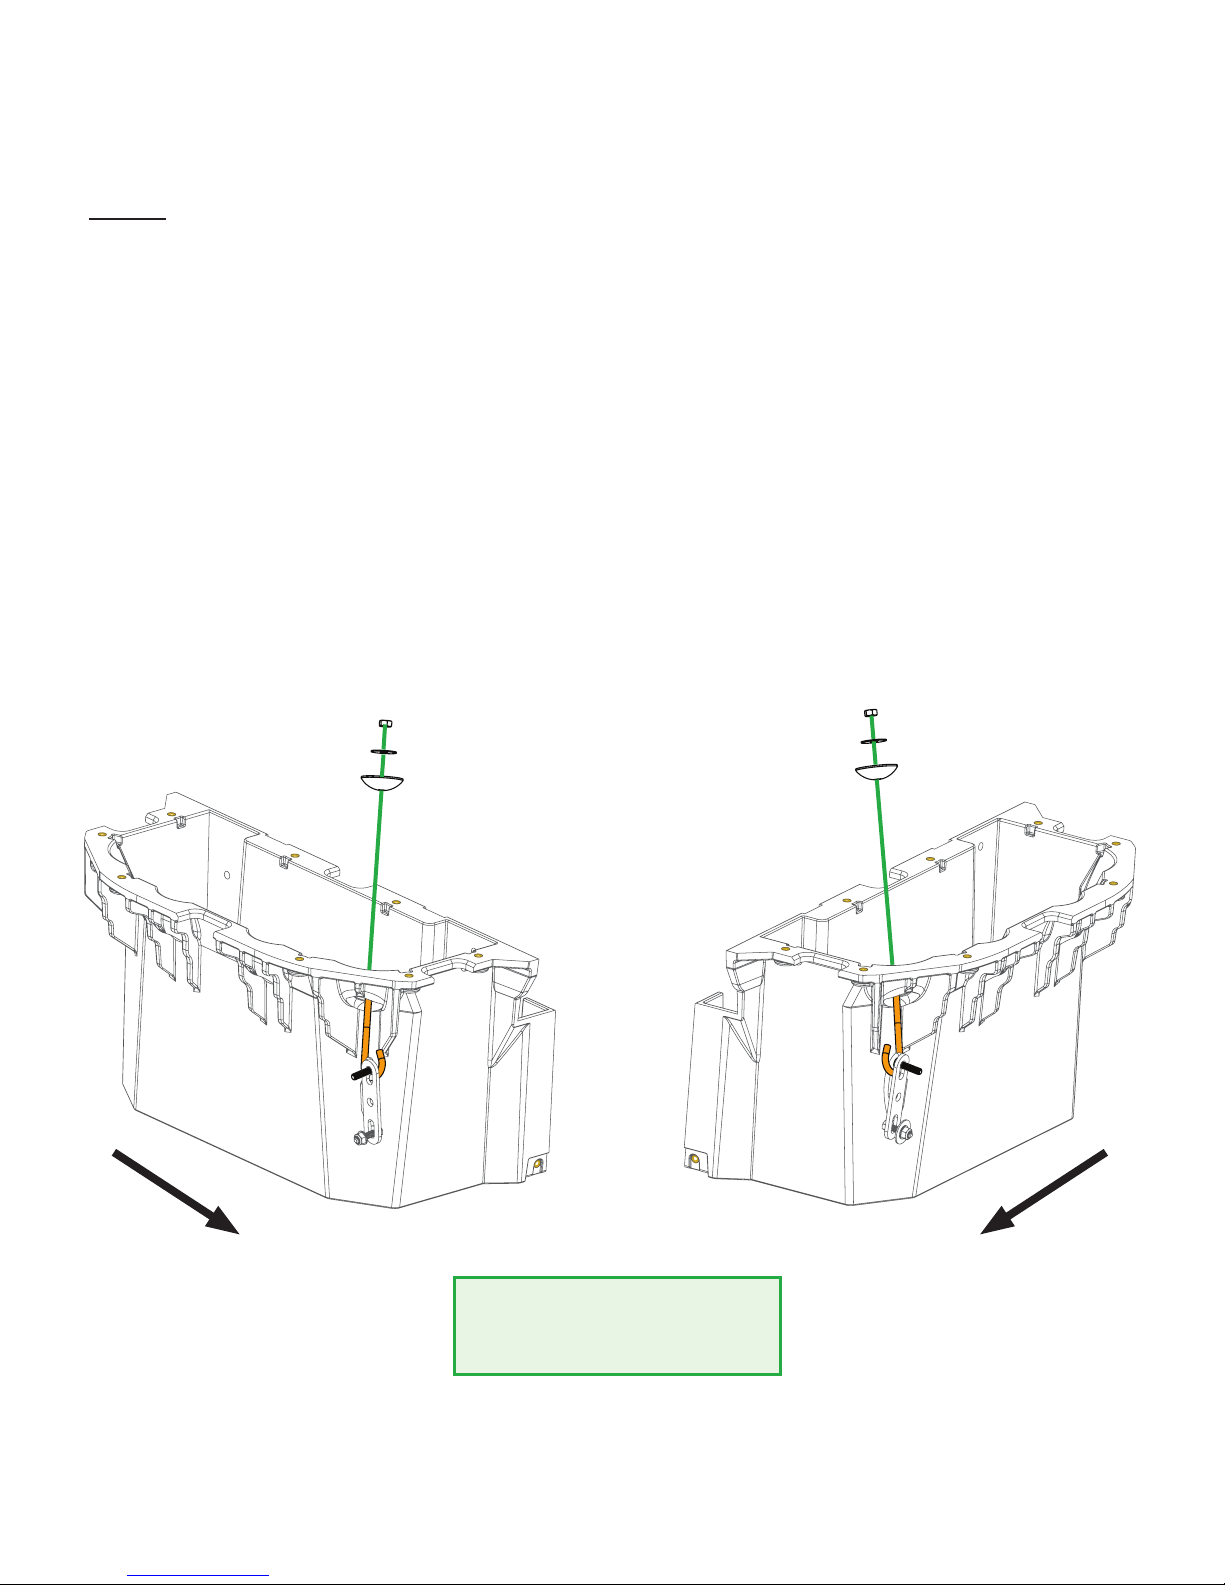
INSTALL: JHOOKS
• Loosely assemble driver side J-hook assembly in order shown through tailgate side hole in ammo can; BAG J4.
• Repeat passenger side.
DRIVER SIDE AMMO CAN PASSENGER SIDE AMMO CAN
TAILGATE
TAILGATE
KEEP LOOSE KEEP LOOSE
J4
J4
✕
✕
✕✕
✕
✕
HELPFUL TIP: Make sure the hooks
open toward tailgate.

DECKED.COM |#DECKEDUSA |@DECKEDUSA MT5 / MT7 | v.1.1 | Page 16
2" BOLT
CORNER
BRACKET
HELPFUL TIP: If you purchased drain
plugs, install now (instructions are
included with drain plugs).
TUBE BRACE
GOES HERE DRAWER1
DRAWER2
DRAWER1
➡
CAB
WHEELS
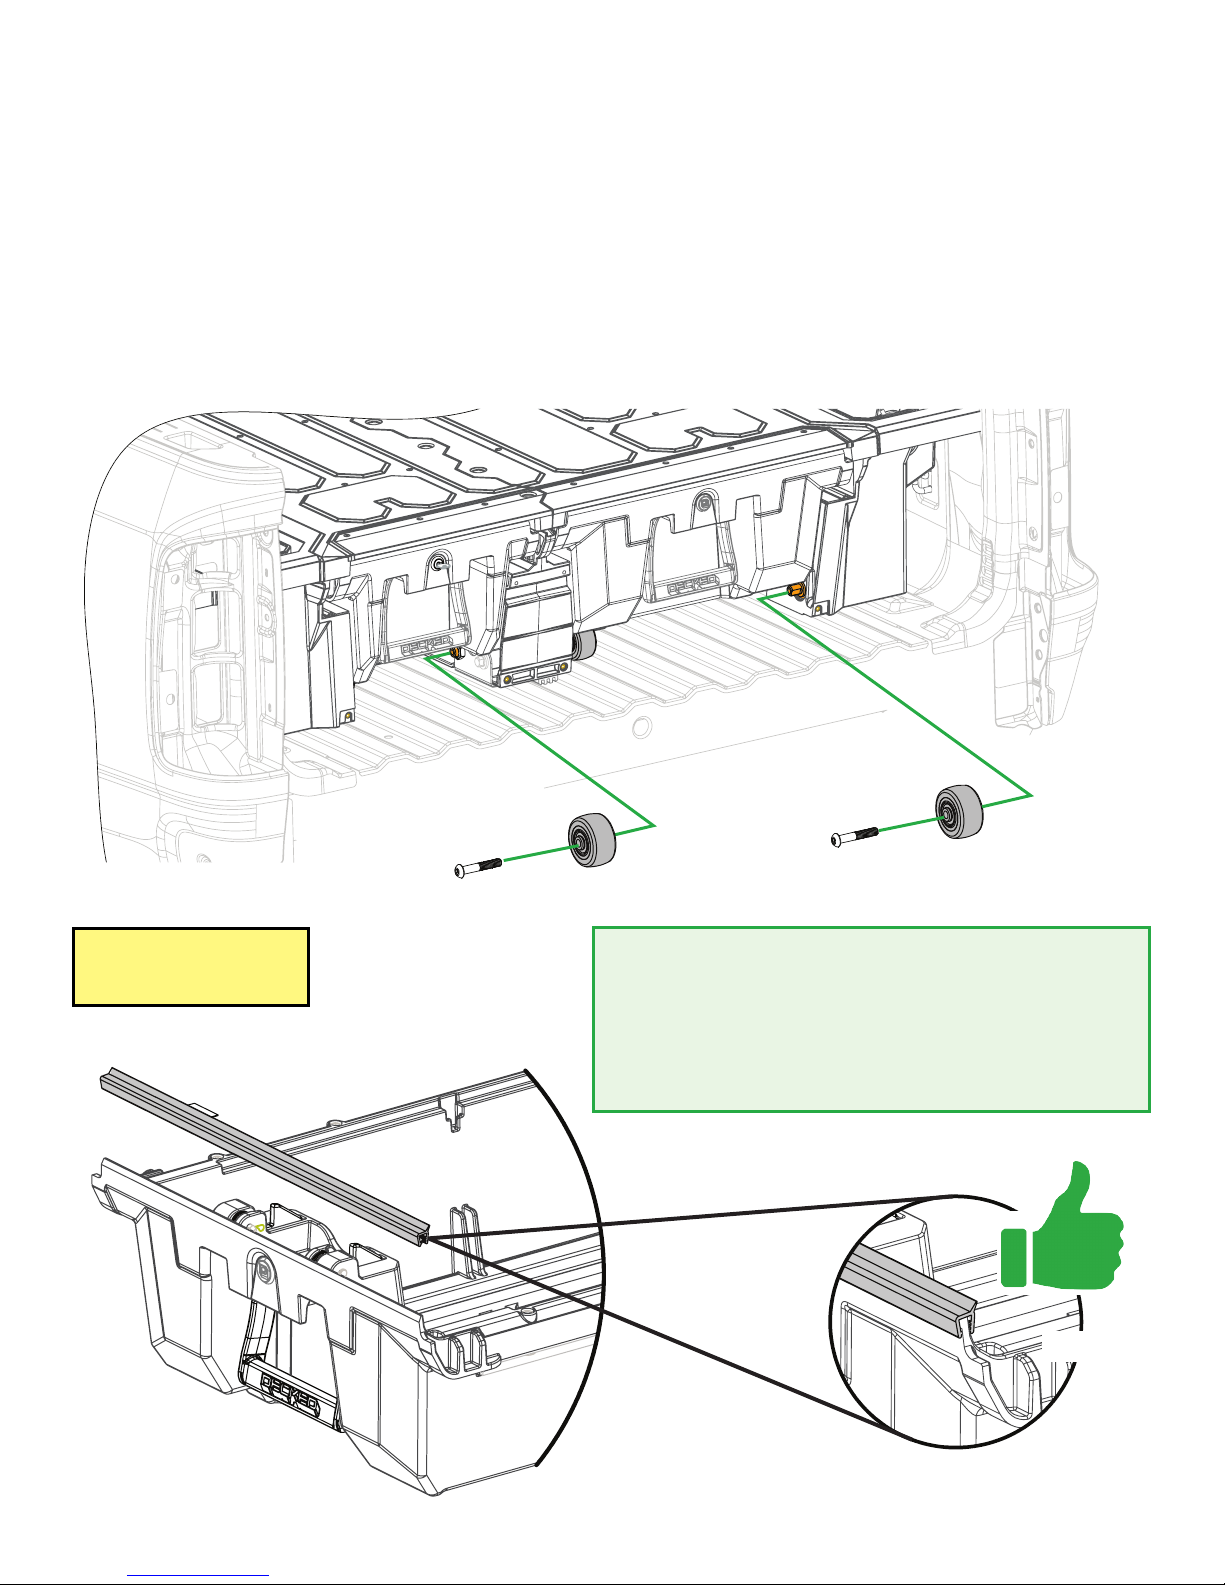
DRAWERS: BRACKETS+WHEELS
•Each drawer hasaleft and arightbracket.Bolt bracketsintoplace via bottom twoholes inbracketwith 3/4"
lengthbolts.Usethe 2" length boltforthe uppercabsidewallholein bracket; BAG DRAWER 1.
•Installa tube bracein eachdrawerwith two3/4"lengthbolts;BAG DRAWER 1, BAG DRAWER 2.
•Attachwheelsonto drawerbracketswith a 7/32" hexwrench;BAG WHEELS.
RECOMMENDED TORQUE:
Bolts in labeled bags DRAWER 1 and DRAWER 2 - 27 in-lb.
Bolts in labeled bag WHEELS - 90 in-lb.
DECKED.COM |#DECKEDUSA |@DECKEDUSA MT5 / MT7 | v.1.1 | Page 17
DETAIL B
DETAIL A
HELPFUL TIP: To make this step easier, jam a 2" piece of
material under drawer, or get your pal to pinch the drawer
up to the deck to give you better leverage.
HELPFUL TIP: Cut weatherstrips if they overhang.
➡
CAB
DRAWERS: AXLEWHEELS+WEATHERSTRIPS
• Slidenarrowdrawerintodriverside drawercavity.NOTE: It is easier to fully install narrow drawer first.
• DETAIL A: Installtwotailgatewheels ontonarrowdraweraxles with a7/32"hexwrench;BAG WHEELS.
• Repeatwith widedrawer.
• DETAIL B: Installweatherstripsontopofdraweredges
WITH WIPER BLADE POINTING TOWARD DRIVER.
IMPORTANT: Facing the weatherstrip the wrong way will funnel water into drawer: DUH!
RECOMMENDED TORQUE:
Wheel bolts - 90 in-lb.

DECKED.COM |#DECKEDUSA |@DECKEDUSA MT5 / MT7 | v.1.1 | Page 18
FINAL STEPS: TORSIONBRACE+BOTTLE
OPENER
•Slide torsionbraceundercentervertandtailgateammo cans.
NOTE: If you jumped the gun and tightened the J-hooks when installing, loosen them.
•Looselyinstall:
• Two bolts with nylonwashersthrough theend holesin torsion braceinto ammocans; BAG S1.
•Two bolts with nylonwashers through the bottombottleopenerholesandtorsionbraceintocentervert;BAG S1.
•Two1/2" lengthboltsthroughupperholesinbottleopenerintocentervert;BAG FINALMID.
•Align bottleopener toedges ofcentervertandtightenfourbottleopener bolts.
•Tightenend boltsintotailgateammocans.
• Finally.....Tighten the J-hooks! DO NOT OVER TIGHTEN, just make snug. Make sure the gap between the
sidewall of the bed and the deck is equal on both sides.
TORSION BRACE
BOTTLE OPENER
1/2" LENGTH
BOLTS BAG
FINAL MID
HELPFUL TIP: Bottle opener goes outside
of torsion brace.
RECOMMENDED TORQUE:
.905” Bolts - 27 in-lb. |J-hooks - 9 in-lb.
1/2” Bolts & 1/4” Ruler screw - 18 in-lb.

DECKED.COM |#DECKEDUSA |@DECKEDUSA MT5 / MT7 | v.1.1 | Page 19
BAM BAM: THERULER
• Centerrulerinembossed areaand screwthree1/2" length Phillipsscrewsthroughthetailgatesideholesdirectly
intodeckpanels; BAG FINAL MID.
NOTE: Theseare small gauge screws. Tightento a light snuggleONLY.
• For the three cabside ruler mounting holes, drill each with a 9/64" bit and a drill stop set to 1/2". There is a lateral
steel tube that runs on the underside of the deck at this location. (SEE UNDERSIDE VIEW OF DECK).
IMPORTANT: Only drill through TOP of steel tube; do not drill through bottom of tube, 'lest you want to pull a
Niagara Falls and funnel water into your drawers.
• Screw three 3/4" length Phillips screws into the cabside ruler holes you just drilled; BAG FINAL MID.
STEEL TUBE RUNS LATERALLY UNDER THESE 3 RULER
HOLES. THEY TAKE THE 3/4" SCREWS.
DO:Drill throughthe top ofsteel
tubeONLY.
DO NOT: Drillthroughbothsides
ofsteeltube =YOU'RE FIRED!
UNDERSIDE VIEW OF DECK
9/64” DRILL
BIT DRILL STOP
1/2”
DECKED.COM |#DECKEDUSA |@DECKEDUSA MT5 / MT7 | v.1.1 | Page 20
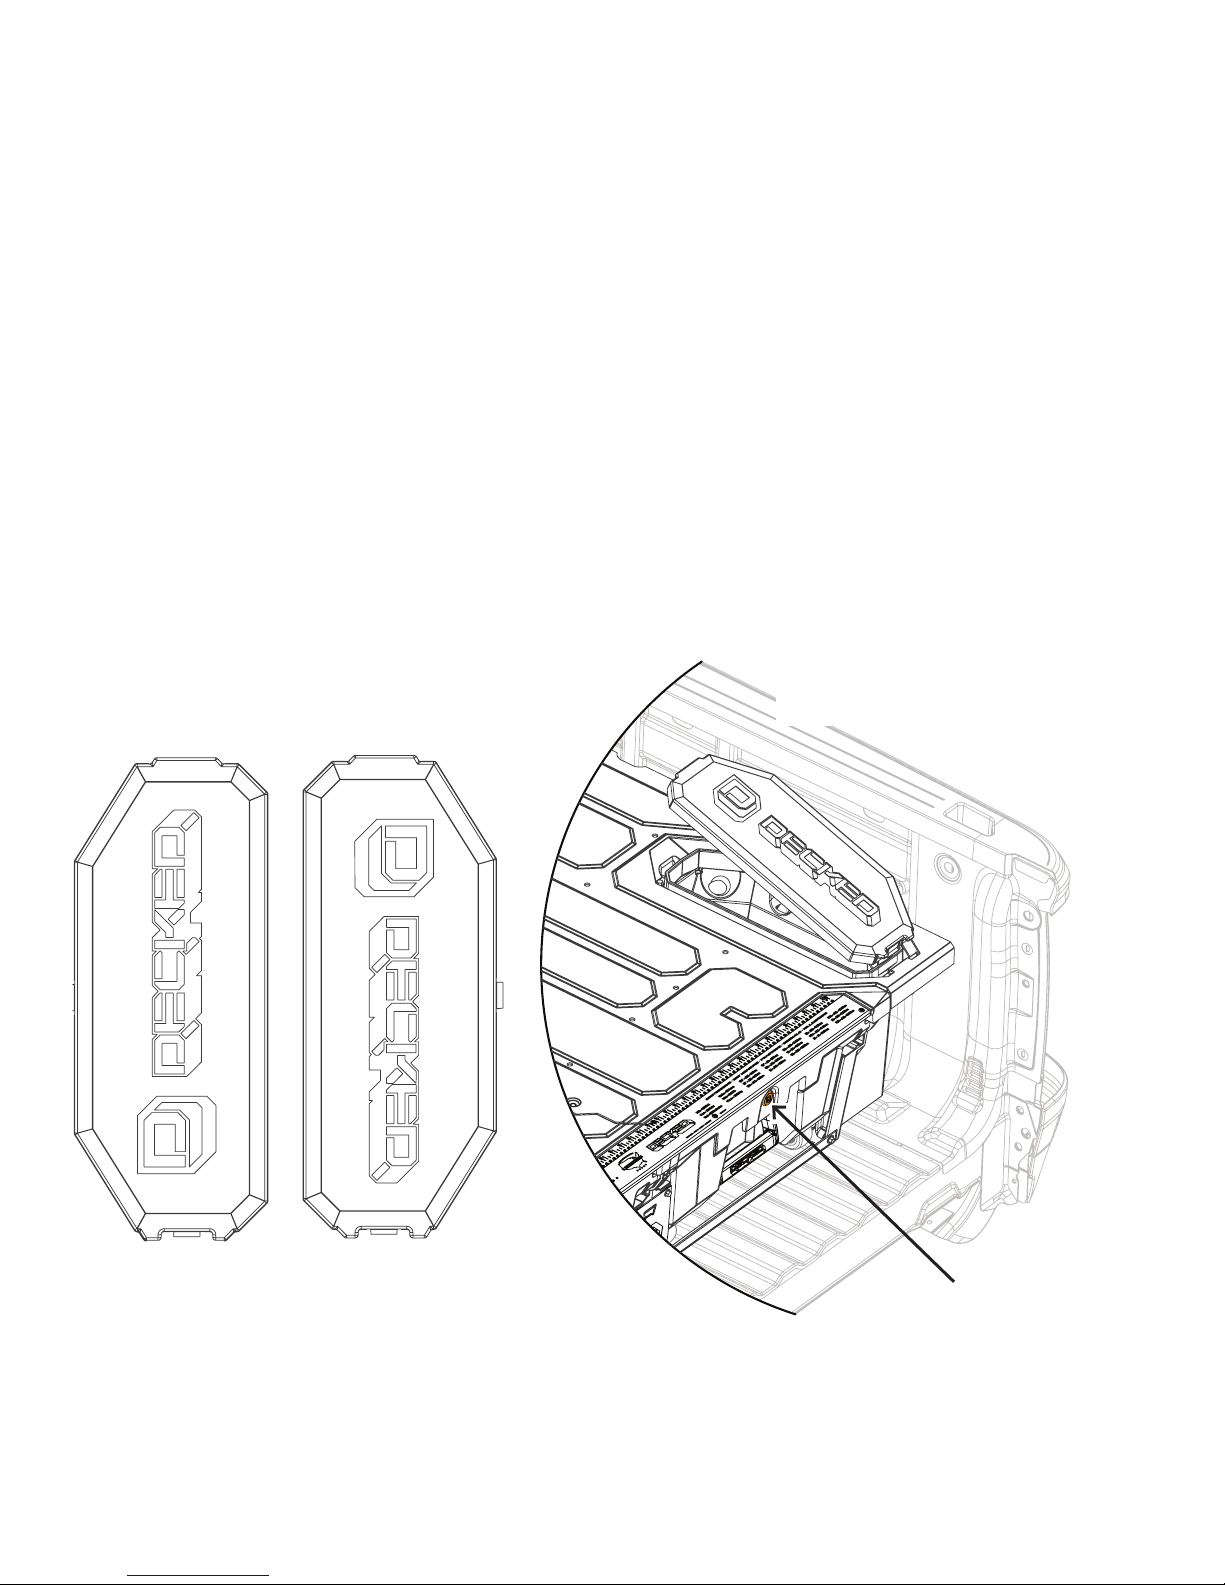
FINAL STEPS: AMMOCANLIDS
• DETAIL A: Ammocan lids aredriver(markedL) and passenger(markedR) side specific.
• DETAIL B: Holdinglidin orientationshown,inserttabontailgateendofammocanlidandpushthecabsideendoflid
downtosecure.Don't be afraidtogive'rthe Fonzitoclose,it's rugged.
• Insert lock hole plugs, unless you ordered drawer locks! Install drawer locks now (instructions with locks);
BAG FINAL MID.
IMPORTANT: Grab your favorite beverage, crack 'er open in the bottle opener and christen this ship!
You did it. Immediately post a photo of your significant other, child or canine (in no order of significance)
appreciating your accomplishment. Add hashtag #DECKEDUSA |@DECKEDUSA.
DETAIL B
FINALMID
#DECKEDUSA | @DECKEDUSA
DETAIL A
DRIVER SIDE
AMMO CAN LID
PASSENGER SIDE
AMMO CAN LID
This manual suits for next models
1
Table of contents
Other DECKED Automobile Accessories manuals

DECKED
DECKED MT6 User manual

DECKED
DECKED Slide Reference guide

DECKED
DECKED DR6 User manual

DECKED
DECKED ToolBox Ladder Bracket User manual

DECKED
DECKED LADDER User manual

DECKED
DECKED DS1 User manual

DECKED
DECKED DS1 User manual

DECKED
DECKED VAN SHELVING User manual

DECKED
DECKED MG3 User manual

DECKED
DECKED TOOL BOX User manual
Popular Automobile Accessories manuals by other brands

Dakota Digital
Dakota Digital VHX-54C-PU Installation

Webasto
Webasto thermo top evo Installation documentation

Thule
Thule 1822 instructions

ensto
ensto One Apartment Series quick guide

ROLEC
ROLEC WallPod Series installation instructions

Whelen Engineering Company
Whelen Engineering Company Inner Edge I01UF Series installation guide


