DECKED DS1 User manual

Watchshortinstallationvideos atwww.decked.com/video|Registeryoursystematwww.decked.com/warranty
Installation Instructions:
DS1
TOOLS REQUIRED
FORD SUPER DUTY
6’9” BED LENGTH
19992008
VERSION4
@DECKEDUSA | #DECKEDUSA
FOLLOW US:
• Adjustable wrench (that opens to about 1”)
• 1/2” open end wrench
• #2 Phillip screwdriver
• 3/8” socket
• 7/16” deep socket
• 7/32” Allen wrench
• 1/2” drill bit
• Wire cutters
• 10 mm socket or open end wrench

Page 2 | v.4 | DS1 DECKED. COM |#DECKEDUSA |@DECKEDUSA
▼ ASSEMBLY OVERVIEW ▼
RULER
CCHANNEL
TAILGATE
AMMO CAN
CABSIDE AMMO
CAN
AMMO
CAN LID
CENTER VERT DRAWER
RIGHT/PASSENGER
DECK HALF
LEFT/DRIVER
DECK HALF
JHOOK
ATTACHMENTS
AMMO CAN
WINDOW
COVER
CONTENTS
DECKED carton
LEFT/DRIVER deck half - 1
RIGHT/PASSENGER deck half - 1
Center vert - 1
Drawer - 2
Cabside ammo can - 2
Tailgate side ammo can - 2
Ammo can lid - 4
Ammo can window - 2
C-channel - 2
Ruler - 1
Hardware box - 1
Hardware box - unbagged components
(inside DECKED carton):
Weather strips - 2
Handle - 1
Bottle opener - 1
HARDWARE box - bagged components
PREP SD/TUN - 1
CCHANNEL HW 1
BOLT 1 FS - 1
CS AMMO CANS - 1
J7 - 2
J10 - 2
DRAWER 1 1
DRAWER 3 1
HANDLE 1
WHEELS 1
FINAL FS 1
PREPEXTRA 1

DECKED. COM |#DECKEDUSA |@DECKEDUSA DS1 | v.4 | Page 3
▼ HEY! TORQUE BOY: READ BEFORE YOU INSTALL DECKED ▼
1. DON’T be an idiotreadthe instructions.
2. DON'T overtightenbolts,getem' hand-tight.
3. DON'Tuse powertools.
4. Ifyoudon'tfollowdirectionsand
do
usepowertools:
1). Setclutchataverylowsetting. 2). Ifyoublowit,seeNOTE.*
NOTE*Twoextrathreadedinsertsareincluded inBAG PREP-EXTRA.That’sallyouget.Theinsertswillreplaceany
strippedinsertsinthetailgateammo cans, but NOTTHECENTERVERT,so hand tightenuntilsnug only! Youcan
alsoscrewtheinsertsback inifdislocated.Thereisastraightscrewdriverslot on the undersideoftheinsert.
5. DON'T overtightenJ-hooksduringinstallation.
Make'emgood andsnug enoughtokeepthe
systemfrommovingin the bed.
6. Nicejob ifyou’restillreading.
TAILGATEammo canshavewidebottoms;CABSIDE ammocans havenarrowbottoms.
NOTE:Youwillneed abuddy tohelpwith exactlytwosteps,notincludingdrainingthe sixpackorsnapping
picsofyouposing.
Prevent abusive, expletitive-filled language, watch our detailed installation video
or give us a call. We’re happy to help!
AMMO CAN DRAIN HOLES
(TODRILL ORNOTTODRILL.)
• Do you use a tonneau or shell over your DECKED system?
There is no need to drill holes.
• Does your DECKED system live outside?
The ammo cans will get water in them. You’ll need to drill holes in the ammo cans.
There are two dimples in the bottom of each ammo can. Drill a 1/2” hole at each dimple. A smaller hole
will get clogged.
Page 4 | v.4 | DS1 DECKED. COM |#DECKEDUSA |@DECKEDUSA
PREP BED
(JUSTLIKE YOURMOMMA TAUGHTYOU.)
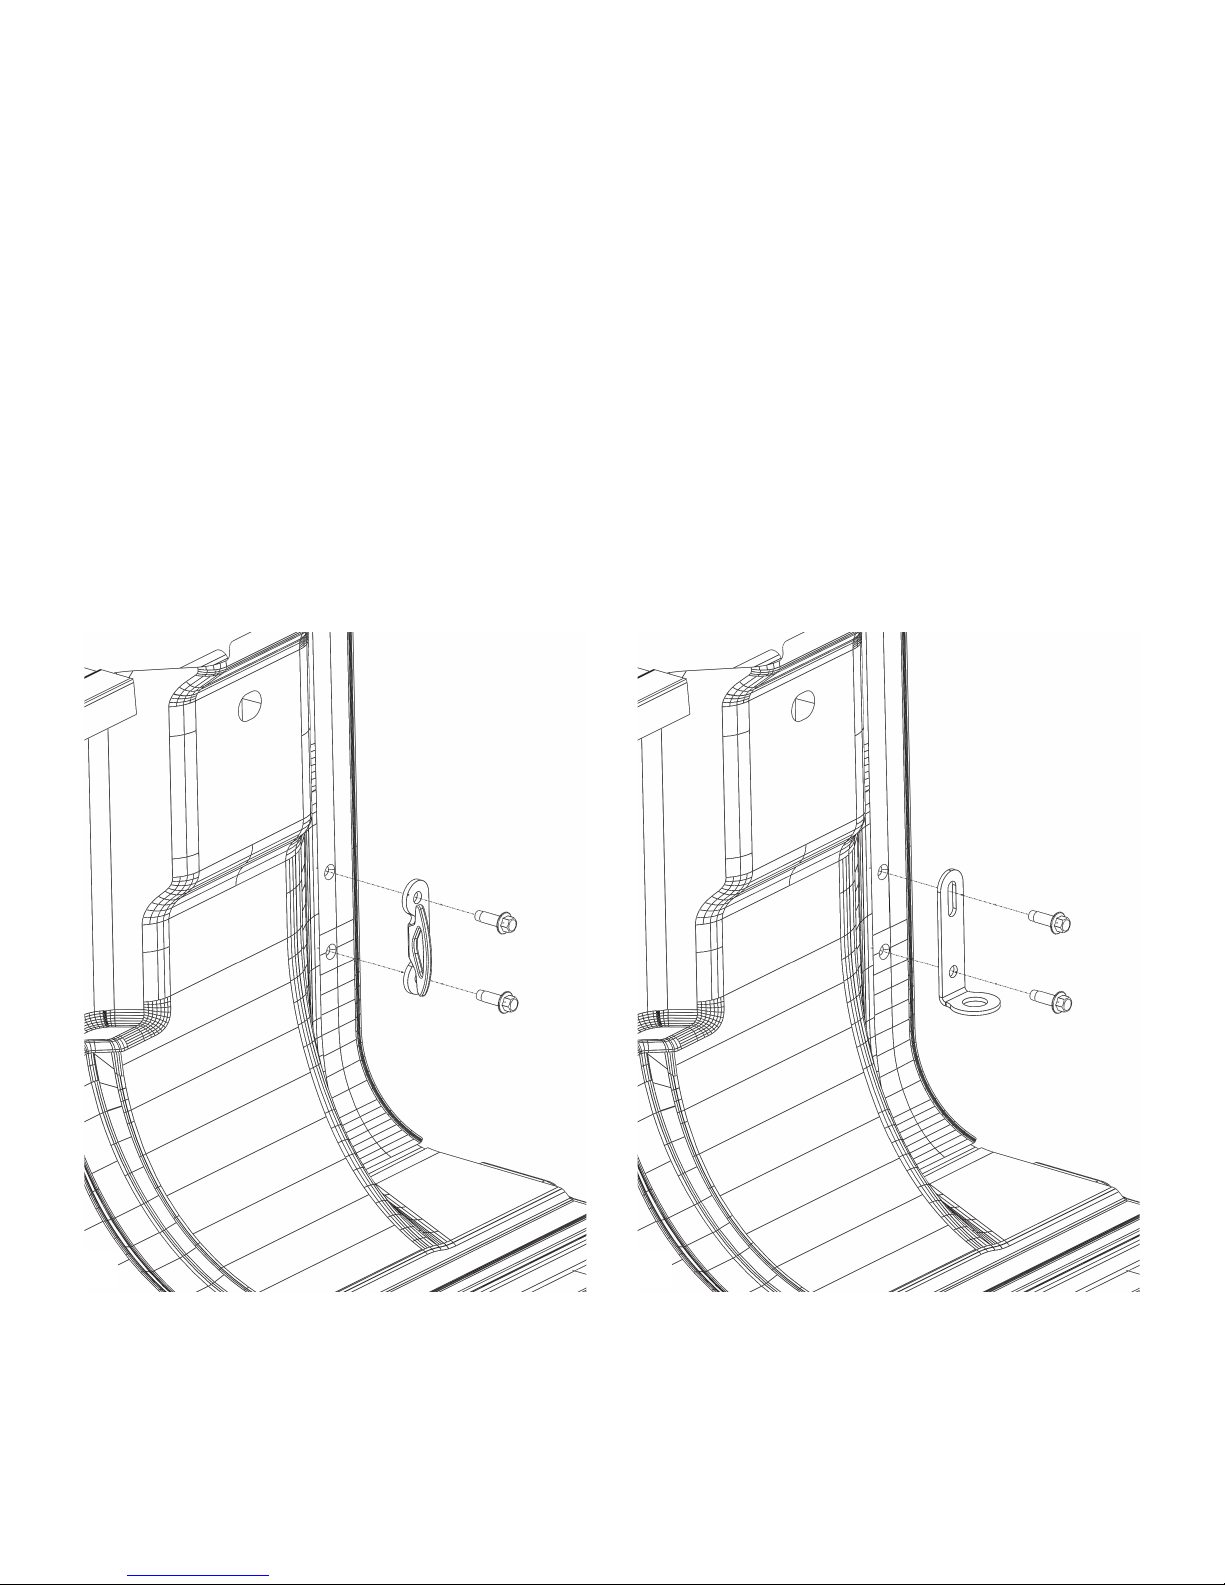
• Removecabside factorytie-downson bothsidesoftruck bed(10 mmwrenchrequired).
MakesuretoSAVE THE FACTORY SUPER DUTY BOLTS,asyouwillneed themforthe DECKEDbrackets.
• InstallDECKEDtie-downbracketsonboth sidesoftruck usingboltsfromstepabove;BAG PREP SD/TUN.
FACTORYTUNDRA
TIEDOWNBRACKETS DECKED
TIEDOWNBRACKETS
SAVE THESE BOLTS REUSE BOLTS
PREP SD/TUN
DECKED. COM |#DECKEDUSA |@DECKEDUSA DS1 | v.4 | Page 5
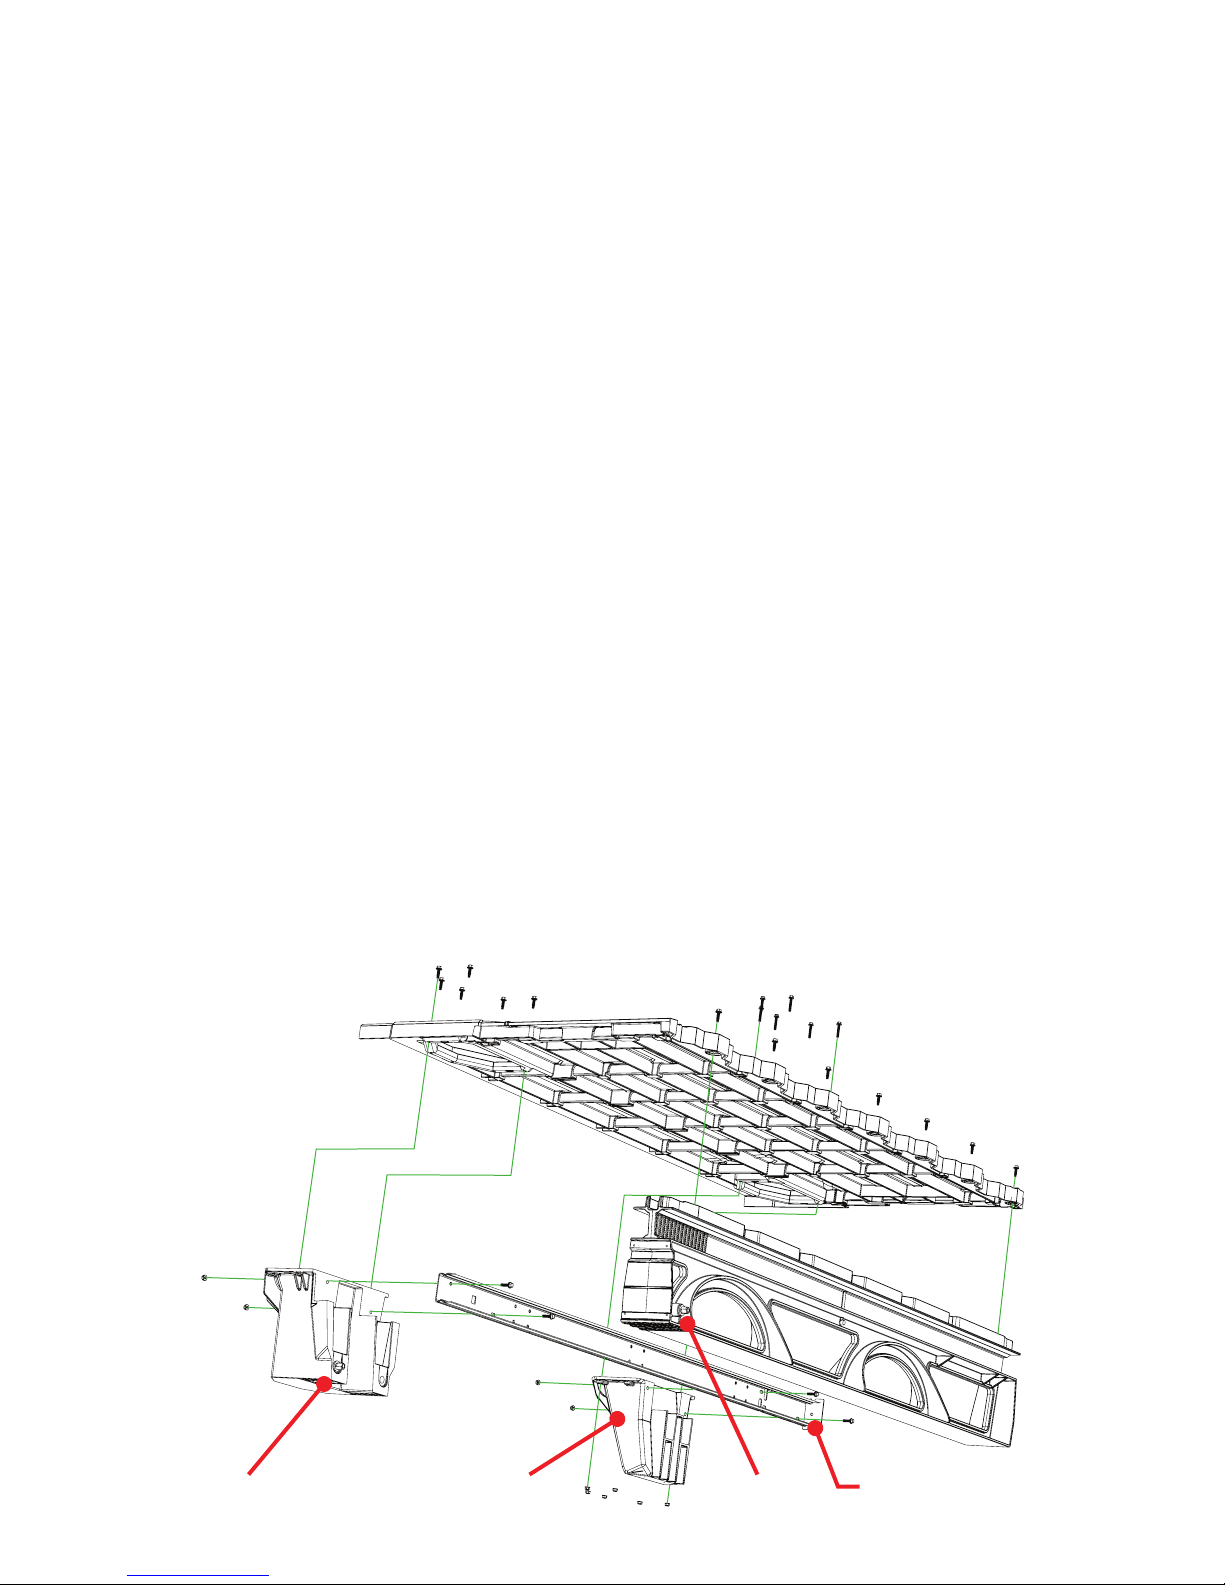
TAILGATE AMMO CAN AXLE CABSIDE AMMO CAN VERT AXLE CCHANNEL ENDPLATE
CS AMMO CANS
B1
B1
CCHANNEL HW
ASSEMBLY: DRIVER’SSIDEDECK
(LET’SDOTHIS!)
• Therearethreepre-installedgaskets–one onthe centervert,oneoneach undersideofthedeckswheretheyrest
onthe centervert.Do yourslook weird?See themhere:DECKED.COM/GASKETS
• PlaceC-channel onthe insideledgesof acabsideammo canand atailgateammocan.
• Theend oftheC-channel withthe endplatemustreston thecabsideammo can.
• Verifythatthetailgateammocan’saxleisclosesttothetailgate;ifnot,grabtheothertailgateammocan.
• LooselyboltC-channel tothe twoammocans. Makesurethe bolthead is onthe C-channelside, notinsidethe
ammocan; BAG CCHANNEL HW.Don’t tightenyet.
•Line upthe driver’s sidedeck (stickeronend ofdeckpanel indicatesLEFT/DRIVER)on topofthe
C-channel/ammo canassembly andthe center vertbosses.NOTE: Tailgate sideof the center verthas anaxle
installed;the centervertandammo canaxlesmustbe onthetailgateend (notcabsideend)ofthe assembly.
• Boltthedecktotheammocans;BAG B1forthetailgateammocan,BAG CSAMMO CANforthecabsideammocan.
• Now go back and tighten the loose bolts connecting the ammo cans to the C-channel.
• Boltthe decktothe centervert;BAG B1:Do not use power tools!
• Grabyourbuddy tohelpyoulift theassembly intothedriverside of thetruck bed.
DRIVER SIDE DECK HALF
➡
CAB

Page 6 | v.4 | DS1 DECKED. COM |#DECKEDUSA |@DECKEDUSA
ASSEMBLY: PASSENGER’SSIDEDECK
(NOWYOU’REACTUALLYGETTINGSOMEWHERE!)
• PlaceC-channel onthe insideledgesof acabsideammo canand atailgateammocan.
• Theend oftheC-channel withthe endplatemustreston thecabsideammo can.
• Youshouldhavethecorrecttailgateammo can forthisstep.The axlewill be onthe tailgateside ofthesystem.
Ifnot,swapthetailgateammocans now.
• LooselyboltC-channel tothe twoammocans. Makesurethe bolthead is onthe C-channelside, notinsidethe
ammocan; BAG CCHANNEL HW.Don’t tightenyet.
• Lineup thepassenger’ssidedeck(stickeronend ofdeckpanel indicatesRIGHT/PASSENGER)ontopofthe
C-channel/ammo canassembly.
• Boltthe decktothe ammocans;BAG B1forthe tailgateammocan, BAG CS AMMO CAN forthecabsideammo can.
• Now go back and tighten the loose bolts connecting the ammo cans to the C-channel.
• Grabyourbuddy tohelpyoulift theassembly intothepassenger side ofthe truckbed.
TAILGATE AMMO CAN AXLECABSIDE AMMO CANCCHANNEL ENDPLATE
CS AMMO CANS
B1
CCHANNEL HW
PASSENGER SIDE DECK HALF
CAB
➡

DECKED. COM |#DECKEDUSA |@DECKEDUSA DS1 | v.4 | Page 7
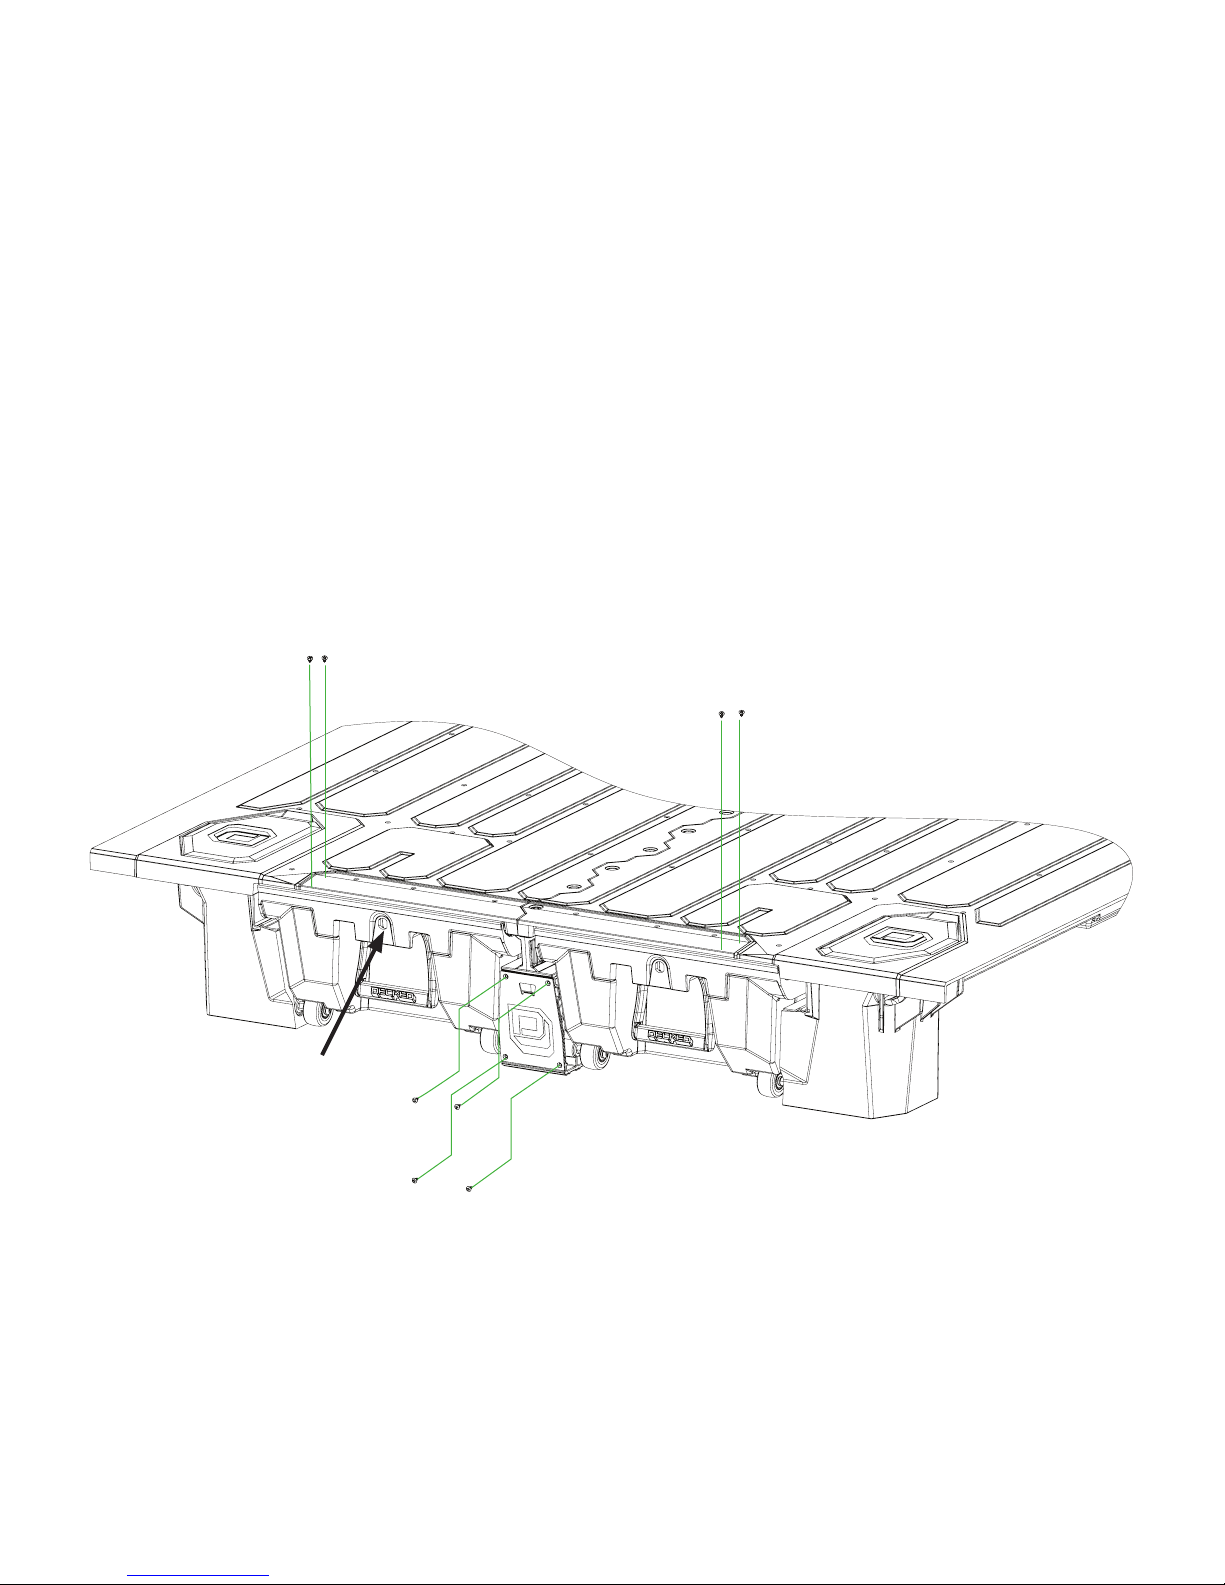
INSTALL: PASSENGER’SSIDEDECKHALF
(OK,FINE,PATYOURSELFONTHEBACK)
• Seatpassengerside deckon theupstandingvertbosses.
• Boltthe passengerside deck halftothe centervert;BAG B1.Makesureallboltsconnecting thedeck to the center
vertaresnug, but no power tools.
• InserttheJ-hook throughthetailgateholeon thepassengerside tailgateammo canandloop J-hookthrough
tiedownor mountingbracketinbed. Assemblewithblack sphericalwasher, flatwasherandnut; BAG J10.Don’t
tightenyet.Ifyoudo,youwon’tbe abletocenterthe systemproperlyin yourbed.
• InserttheJ-hook throughcabsidehole onthe passengersidecabside ammocan andloop J-hookthroughtie
downormounting bracketin bed.Assemblewith blackspherical washer, flatwasherandnut; BAG J7. Don’ttighten
yet. IMPORTANT: Leave all J-hook nuts loose until entire deck is in place.
PASSENGERSIDE
TAILGATE AMMOCAN PASSENGER SIDE
CABSIDEAMMOCAN
B1
CABSIDE AMMO
CAN WINDOW
✕✕✕✕
J10 J7
➡
➡
CAB CAB

Page 8 | v.4 | DS1 DECKED. COM |#DECKEDUSA |@DECKEDUSA
INSTALL: DRIVER’SSIDEDECKHALF
• InserttheJ-hook throughthecabside holeon thedriversidecabside ammocan andloop J-hookthroughtie down
ormounting bracketin bed.Assemblewith blackspherical washer, flatwasherandnut;BAG J7. Don’ttightenyet.
• InserttheJ-hook throughthetailgateholeon thedriversidetailgateammocan andloop J-hook throughtiedown
ormounting bracketin bed.Assemblewith blackspherical washer, flatwasherandnut;BAG J10. Don’ttightenyet.
MAKESURETHE CENTERVERTIS INTHE CENTER OFYOURBED; the gapson eithersidewallmaynotbe equal
becausetheworldisn’tperfectandneither is yourtruckbed.
• Alternatelyandgraduallytightenall J-hookstoensureDECKED iscenteredandsecure.Do not tighten one side of
J-hooks all the way in one step. DO NOT OVERTIGHTEN J-HOOKS!
NOTE: If the DECKED system is noticeably “crowned”, the J-hooks are too tight.
• Installthe window covers inthe cabsideammo cans(frominside theammo can).
DRIVERSIDE
CABSIDEAMMOCAN DRIVERSIDE
TAILGATE AMMOCAN
CABSIDE AMMO
CAN WINDOW
✕✕✕✕
J7 J10
➡
➡
CAB CAB

DECKED. COM |#DECKEDUSA |@DECKEDUSA DS1 | v.4 | Page 9
2" BOLT
CORNER
BRACKET
HELPFUL TIP: If you purchased drain
plugs, install now (instructions are
included with drain plugs).
TUBE BRACE
GOES HERE DRAWER 1
DRAWER 3
DRAWER 1
➡
CAB
WHEELS
DRAWERS: BRACKETS+WHEELS
(SOEASYACHIMPANZEECANDO IT)
• Eachdrawerhasa leftanda rightbracket.Bolt thebracketsintoplace viabottomtwoholes inbracketwith3/4"
lengthbolts.Use the2" lengthboltforthe uppercabside wallholein bracket;BAG DRAWER 1.
• Installatubebracein eachdrawerwithtwo3/4"length bolts;BAG DRAWER 1, BAG DRAWER 3.
• Attachwheelsontothe drawerbracketswitha 7/32" hexwrench;BAG WHEELS.

Page 10 | v.4 | DS1 DECKED. COM |#DECKEDUSA |@DECKEDUSA
INSTALL: DRAWERHANDLES
• Onedrawerhandleassembly needstobe installed.
• Save yourself the headache, watch this short installation video: DECKED.com/videohandle.
• Fromtheundersideofdrawer, placethe springsintothe cavitieson eitherside ofthehandle slots,
redspring=right spring; BAG HANDLE.NOTE: Each spring arm should point inward, not outward.
• Install a clevis pin through each outside drawer hole and through spring; BAG HANDLE.
• With DECKEDlogofacingoutward,insertthehandleendsbehindthespringarms.Rotatethearmsofthehandletoward
theclevispins,pullingthespringarmdownward.Whenthehandleholeislinedupwiththeclevispin,pushthepin
throughthehandleholeandthroughtheinsidedrawerhole.Repeatontheothersideofthehandle.
• Installahairpin throughtheclevispin; BAG HANDLE.
CORRECT:
SPRING ARM FITS
IN HANDLE NOTCH
WRONG:
SPRINGARMOUT
OFHANDLENOTCH
SPRING ARMS
POINT INWARD
HANDLEOVERVIEW
CLEVIS PIN
CORRECT:
SPRINGARMISHERE
(FULLY HORIZONTAL)
WRONG:
SPRINGARMISHERE
(NOTFULLY HORIZONTAL)
TOPVIEW
HAIR PIN
HELPFUL TIP: MAKE SURE SPRINGS HAVE
THELONGARM HORIZONTAL AND SHORTLEG
VERTICALBEFOREINSERTINGHANDLE
SPRING
NOTCHES

DECKED. COM |#DECKEDUSA |@DECKEDUSA DS1 | v.4 | Page 11
INSTALL: DRAWERS
(HOPEFULLYYOU’RESTILLWEARINGYOURS.)
• Save yourselfthe headache,watchthis shortinstallation video: DECKED.com/videotailgatewheels.
• Installthedrawerbyslidingwheels intotheirtwochannels(C-channel andcentervert),andslide drawerall the
wayforwarduntil closed.
• Installtheremainingtailgateside wheelsontotheir axles;BAG WHEELS.
NOTE: Placing a spacer under the drawer to raise it into position makes this easier
(ammo can lids work well, or a small piece of 2x2 or 2x4 is even better).
• Installtheweatherstripsonthe tailgatesidedraweredge: Withtheweatherstripwiperfacingcabside, lineup one
endwith theside ofthedrawerandplace onthe topdraweredge, firmlypressingdownon the weatherstripasyou
movealong thedraweredge.
NOTE: Facing the weather stripping the wrong way will funnel water into drawer: BAD!
• Whenthe weatherstripis fullyseatedalongthe topedge,trim offanythatextendsbeyondthe draweredge with
wirecutters.Watchoutforthe stainlesswirecoil inside;it’ssharp!
WHEELS
CABSIDE
WEATHER STRIP
Page 12 | v.4 | DS1 DECKED. COM |#DECKEDUSA |@DECKEDUSA
FINAL FS
FINAL FS
FINAL FS
INSTALL: THEFUNSTUFF
(PARTYTIME!)
CAUTION: These are small gauge screws – light, hand-tightening is all that is required.
• Centerandscrewonthe ruler/edgeguard;BAG FINAL FS.
• Screwon thebottleopener; BAG FINAL FS.
• Installlockcoreplugs;BAG FINAL FS,orinstalllocksifpurchased.
IMPORTANT: Grab your favorite beverage, crack ‘er open in the bottle opener and make a toast to your truck.
You did it. Immediately post a photo of your significant other, child or canine (in no order of significance -
please someone show us your pet alligator) appreciating your accomplishment.
Add hashtag #DECKEDUSA | @DECKEDUSA.
#DECKEDUSA | @DECKEDUSA

DECKED. COM |#DECKEDUSA |@DECKEDUSA DS1 | v.4 | Page 13
DECKED 3-YEAR LIMITED WARRANTY
(a.k.a.LEGALMUMBOJUMBO)
LIKEYOUR HIGHSCHOOL GUIDANCECOUNSELORUSEDTOSAY, “HELPME,HELP YOU”. REGISTER YOUR PRODUCT!IT’S QUICK, IT’S
SECURE,AND IT’S THEBESTWAYTOHELPUS HELPYOUINTHERARE EVENTTHAT YOURACTSOF AWESOMENESS LEADTO AWARRANTY
ISSUE.PLUS,ASAN ADDEDBONUS,YOUWILLBE THE FIRSTTOKNOWOFPRODUCTIMPROVEMENTSOR ISSUES SPECIFICTOYOUR
MODEL.GO TODECKED.COM/REGISTER
DECKEDLLCwarrantstothe originalpurchaserofthis productthat theproductwillbe freefrommanufacturingdefectsin
workmanshipand materialsfora periodofthree(3) yearsfromthe dateoftheoriginal purchase.If within three(3) yearsfromthe
originaldateofpurchasethis productfailsduetodefectin materialsor workmanship,DECKED LLCwill replaceanydefectivepart
atitsoption.
Theoriginal purchasermustcontactthe DECKEDLLCcustomerserviceteamand providea descriptionof thedefectivepart,
includingdigital picturesifrequested,with theoriginalpurchasedocumentationasvalidationof warrantycoverageor have
previouslyactivatedtheirwarrantyonline.
ThiswarrantyDOESNOTcoverorapplyto:
•Damage totheproductdue tomisuse, mishandling andabuse.
•Productsnotusedin accordancewith the manufacturer’sinstructionsorrecommendations.
•Productnotassembledorinstalledaccordingtomanufacturer’s instructions.
•Normal wearand tear.
•Undeclared damagetothesystemduring shipping, actsofGod. In addition,consequentialdamage and incidental
damages(including losttime)such asdamageto personsorpropertyarenotcoveredunderthiswarranty.
(Thisspace reservedforcrayondrawings,coffeestainsorketchupspills.)
#DECKEDUSA | @DECKEDUSA
Other manuals for DS1
1
Table of contents
Other DECKED Automobile Accessories manuals

DECKED
DECKED LADDER User manual

DECKED
DECKED MG3 User manual

DECKED
DECKED VAN SHELVING User manual

DECKED
DECKED TOOL BOX User manual

DECKED
DECKED DR6 User manual

DECKED
DECKED MT5 User manual

DECKED
DECKED ToolBox Ladder Bracket User manual

DECKED
DECKED Slide Reference guide

DECKED
DECKED DS1 User manual

DECKED
DECKED MT6 User manual


