DECKED DR6 User manual

8-15-2018 K68622704
1
www.mopar.com
Watchshortinstallationvideos atwww.decked.com/video| Registeryoursystematwww.decked.com/warranty
Installation Instructions:
DR6 & DR7
TOOLSREQUIRED
RAM 1500
(2019CURRENT, NEW BODY STYLE ONLY)
VERSION4.2
DECKED.COM | 208.806.0251
@DECKEDUSA | #DECKEDUSA
FOLLOW US:
• Adjustable wrench (that opens to about 1”)
• 1/2” open end wrench
• #2 Phillip screwdriver
• 3/8” socket
• 7/16” deep socket
• 7/32” Allen wrench
• 1/8” Allen wrench
• 1/2” drill bit
DECKED Storage System

8-15-2018 K68622704
2
www.mopar.com
CONTENTS
DECKED carton
LEFT/DRIVER deck half - 1
RIGHT/PASSENGER deck half - 1
Center vert - 1
Drawer - 2
Cabside ammo can - 2
Tailgate side ammo can - 2
Ammo can lid - 4
Ammo can window - 2
C-channel - 2
Ruler - 1
Hardware box - 1
Torsion brace - 1
Bottle opener - 1
Hardware box - unbagged components
(inside DECKED carton):
Weather strips - 2
Handle - 1
Shim - 2
HARDWARE box - bagged components
CCHANNELS C 1
BOLT 1 FS (B1) - 1
CS AMMO CANS - 1
J6C - 4
DRAWER 1 1
DRAWER 3 1
HANDLE C 1
WHEELS 1
PREPEXTRA 1
BED TAPE 1
FOAM SEAL 1
WASHERS 1
PREP TBO 1
▼ ASSEMBLY OVERVIEW ▼
RULER
CCHANNEL
TAILGATE
AMMO CAN
CABSIDE AMMO
CAN
AMMO
CAN LID
CENTER VERT DRAWER
TORSION BRACE
BOTTLE OPENER
RIGHT/PASSENGER
DECK HALF
LEFT/DRIVER
DECK HALF
AMMO CAN
WINDOW
COVER

8-15-2018 K68622704
3
www.mopar.com
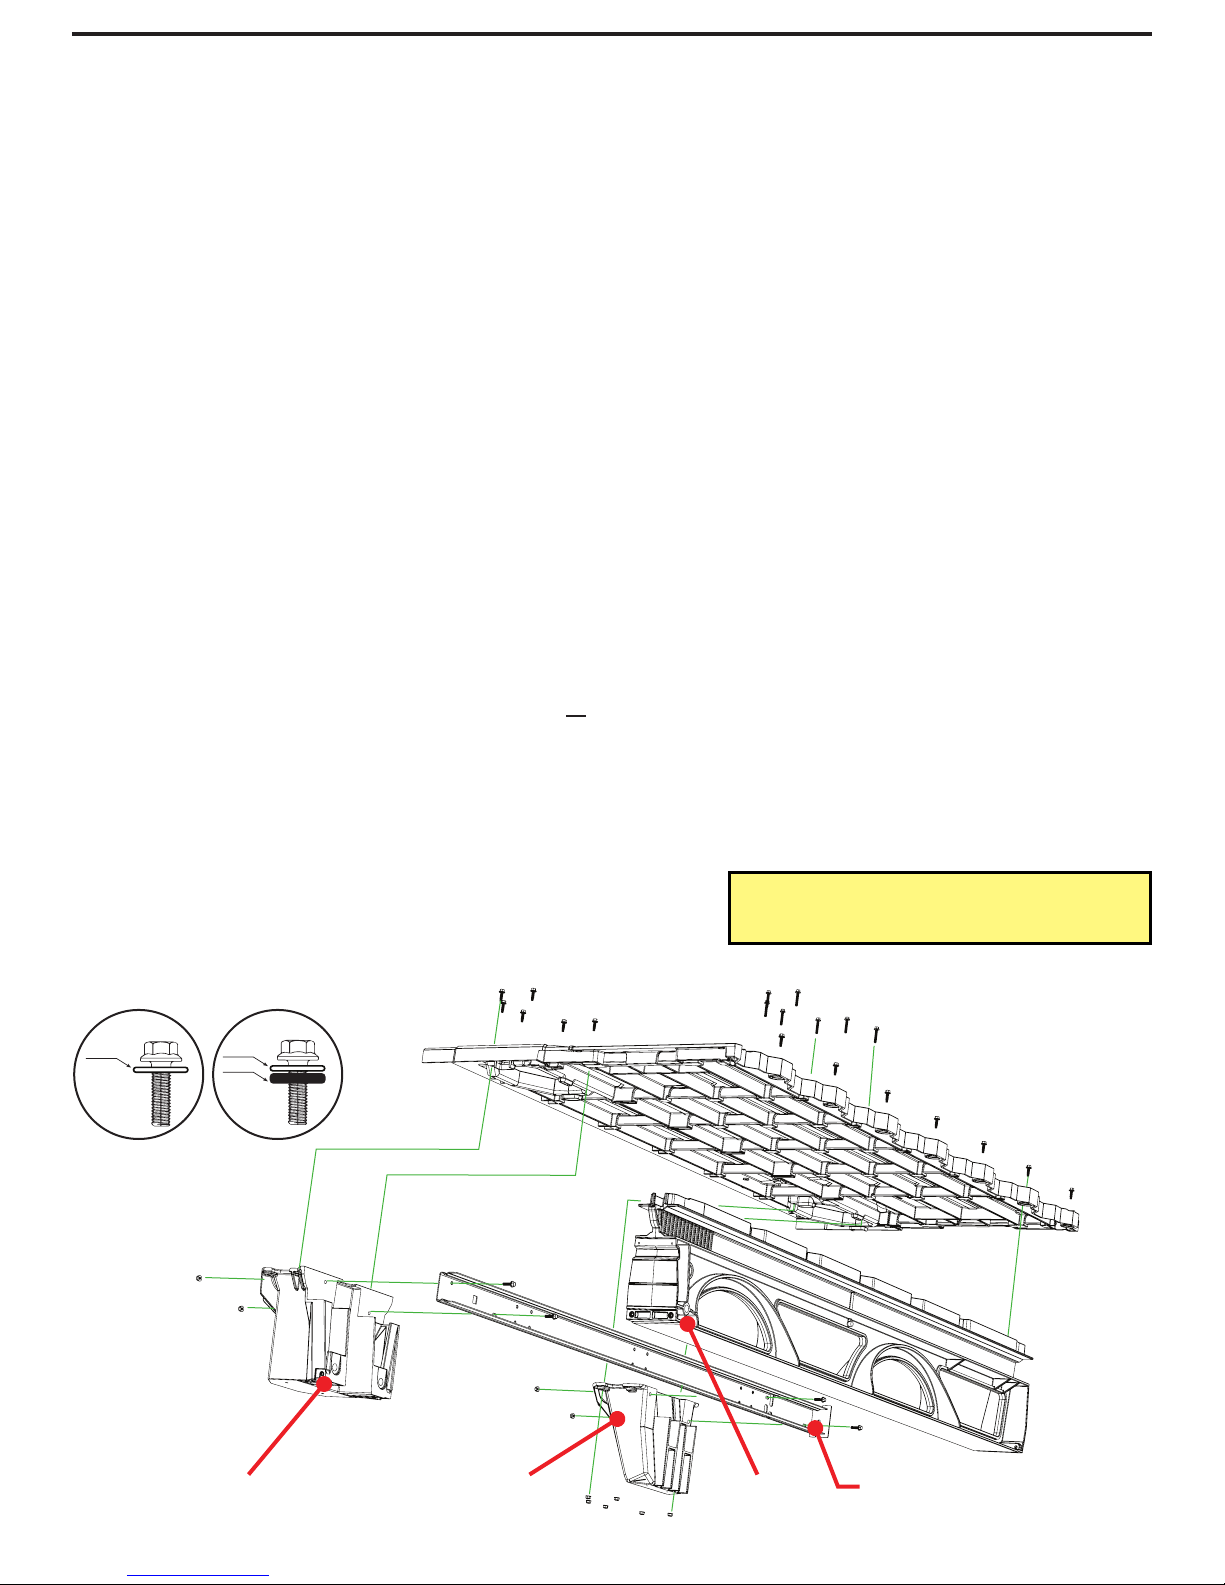
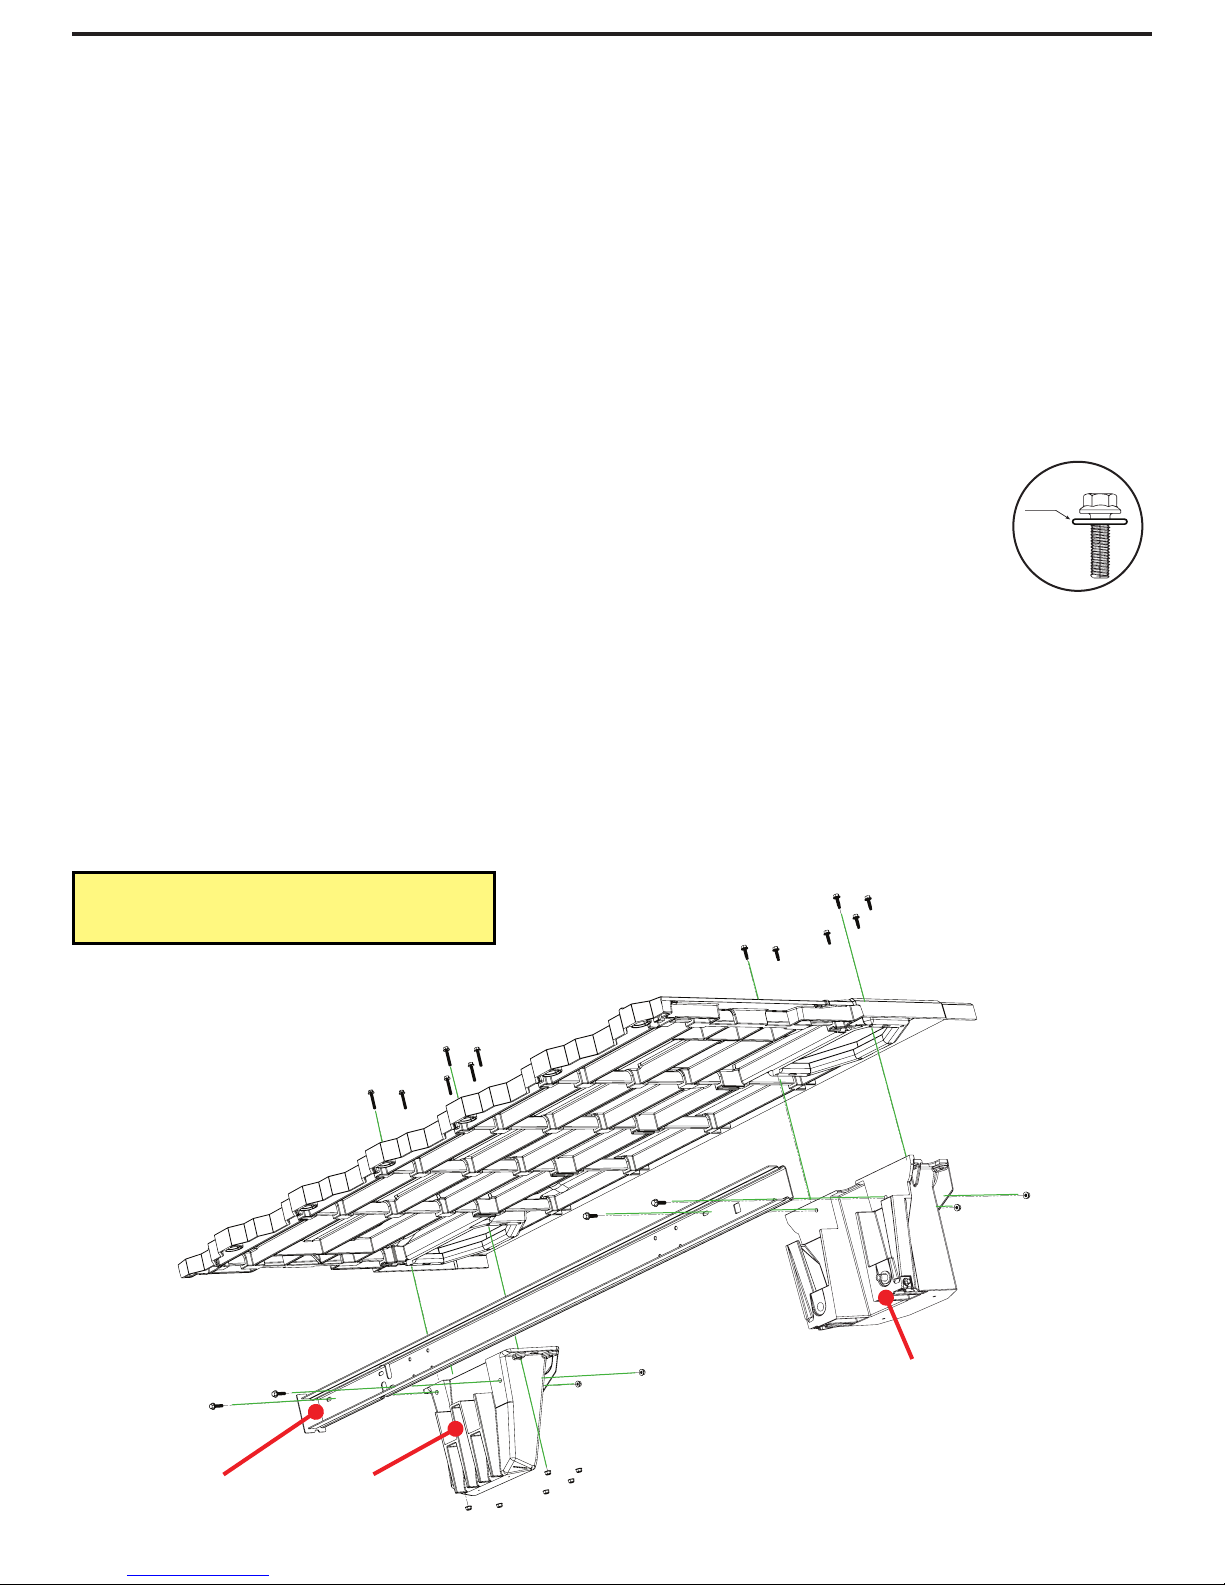
▼ HEY! TORQUE BOY: READ BEFORE YOU INSTALL DECKED ▼
1. DON’T be an idiotreadtheinstructions.
2. DON'T overtightenbolts,getem' hand-tight.
3. DON'Tuse powertools.
4. Ifyoudon'tfollowdirectionsand
do
usepowertools:
1). Setclutchat a verylowsetting. 2). Ifyoublowit,seeNOTE.*
NOTE*Twoextra threadedinsertsareincludedinBAG PREP-EXTRA. That’sall youget.Theinsertswill replaceany
strippedinsertsinthetailgateammocans,butNOTTHE CENTER VERT, so hand tightenuntilsnugonly!You can
alsoscrewtheinsertsback in if dislocated.Thereis a straightscrewdriverslotontheundersideoftheinsert.
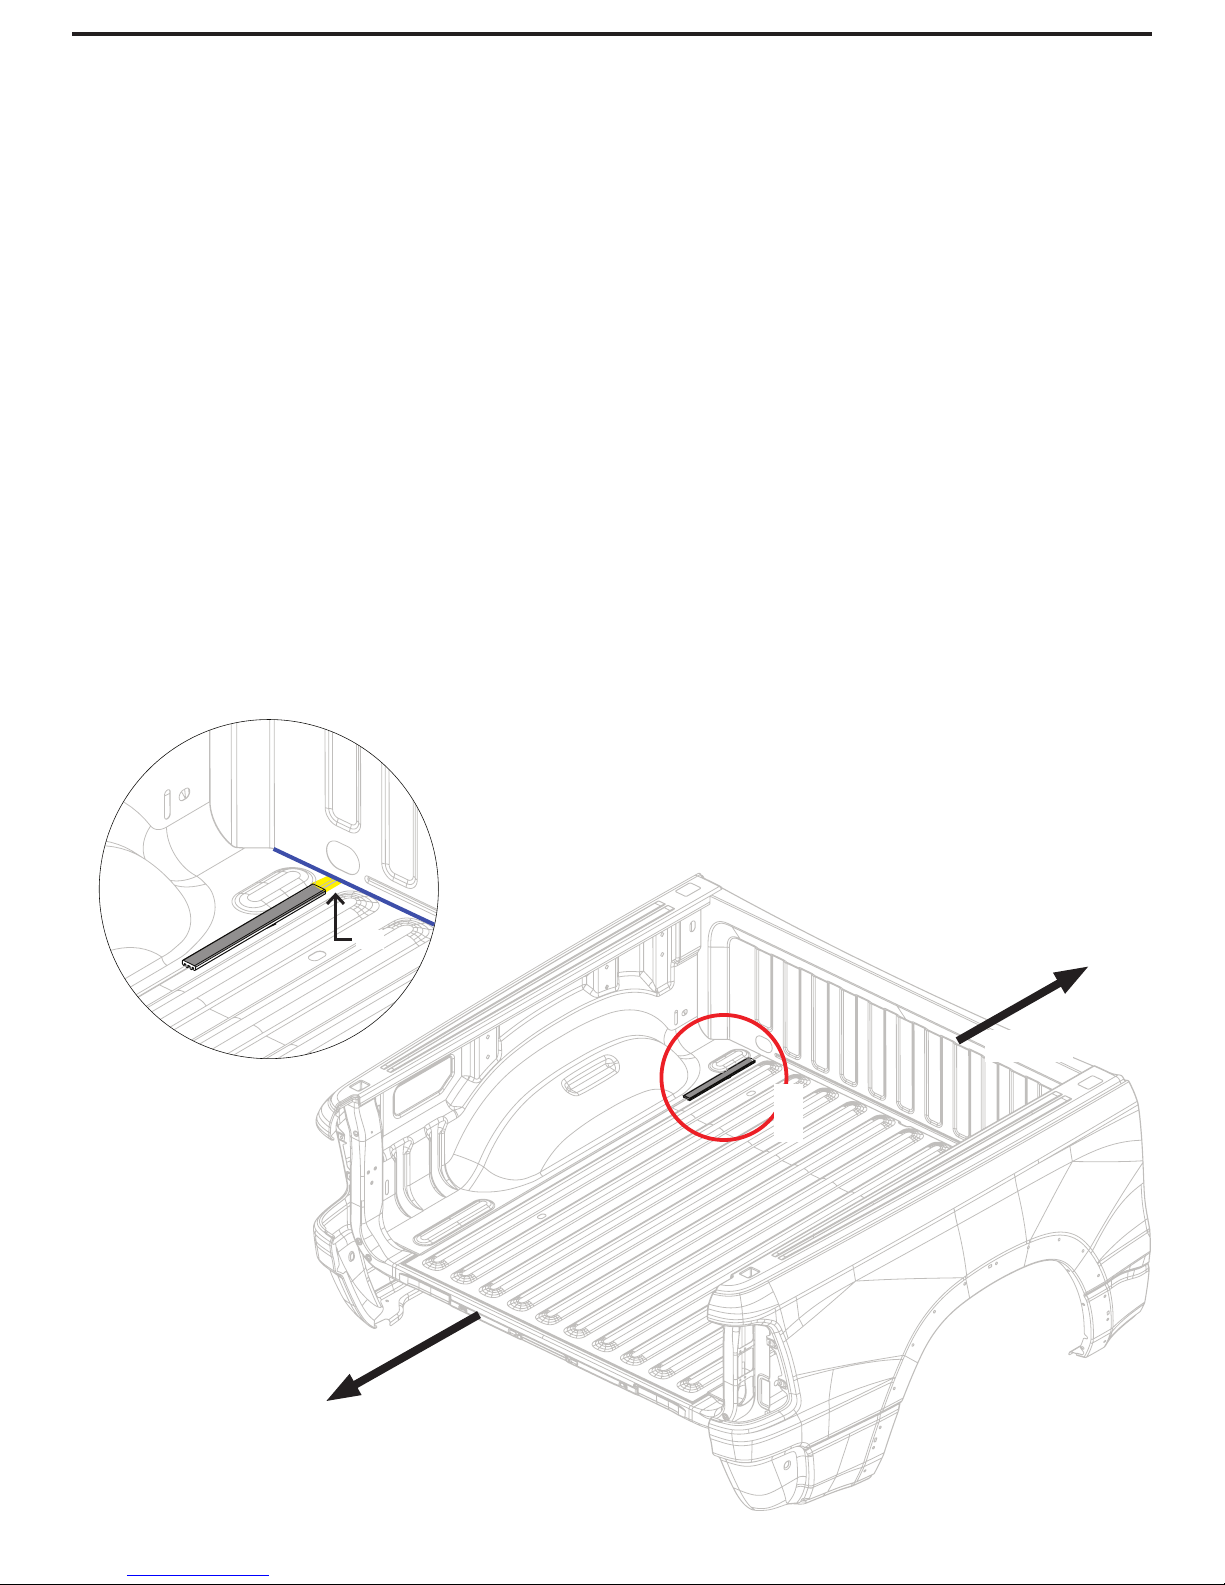
5. DON'T overtightenJ-hooksduringinstallation.
Make'emgood and snugenough tokeepthe
systemfrommovinginthe bed.
6. Nicejob if you’restillreading.
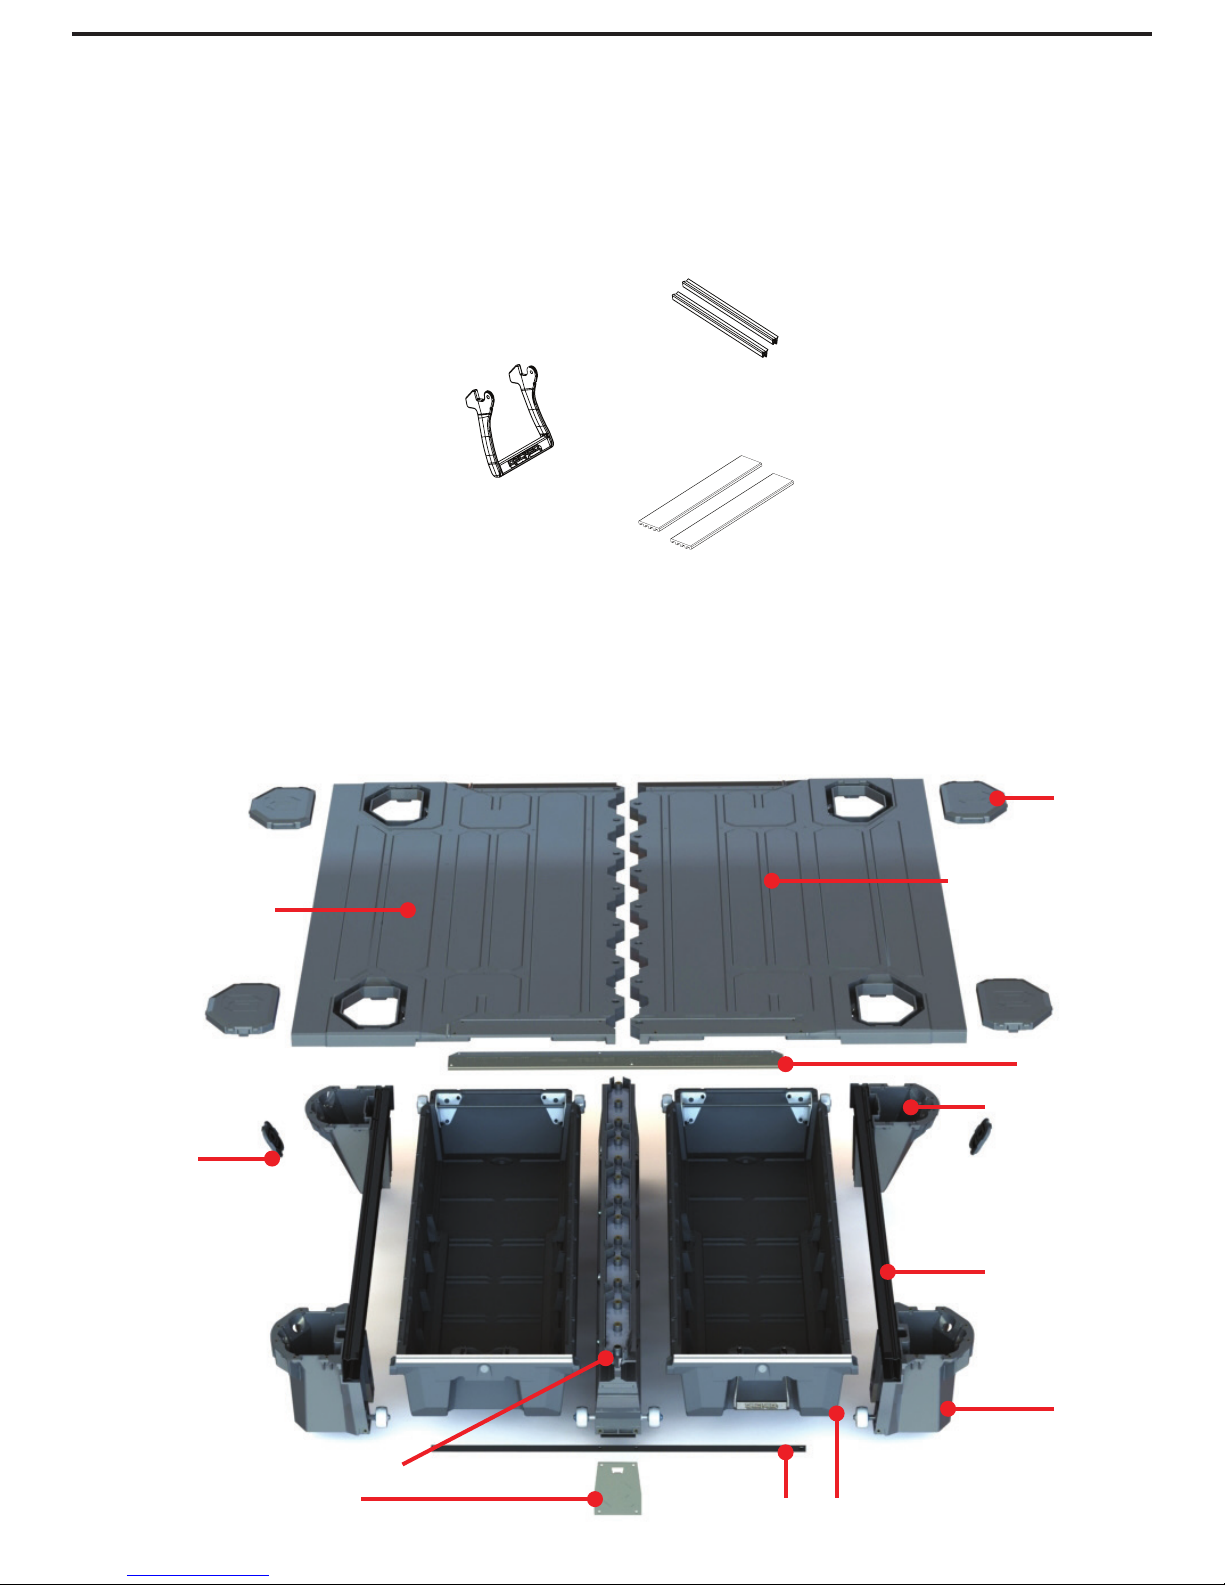
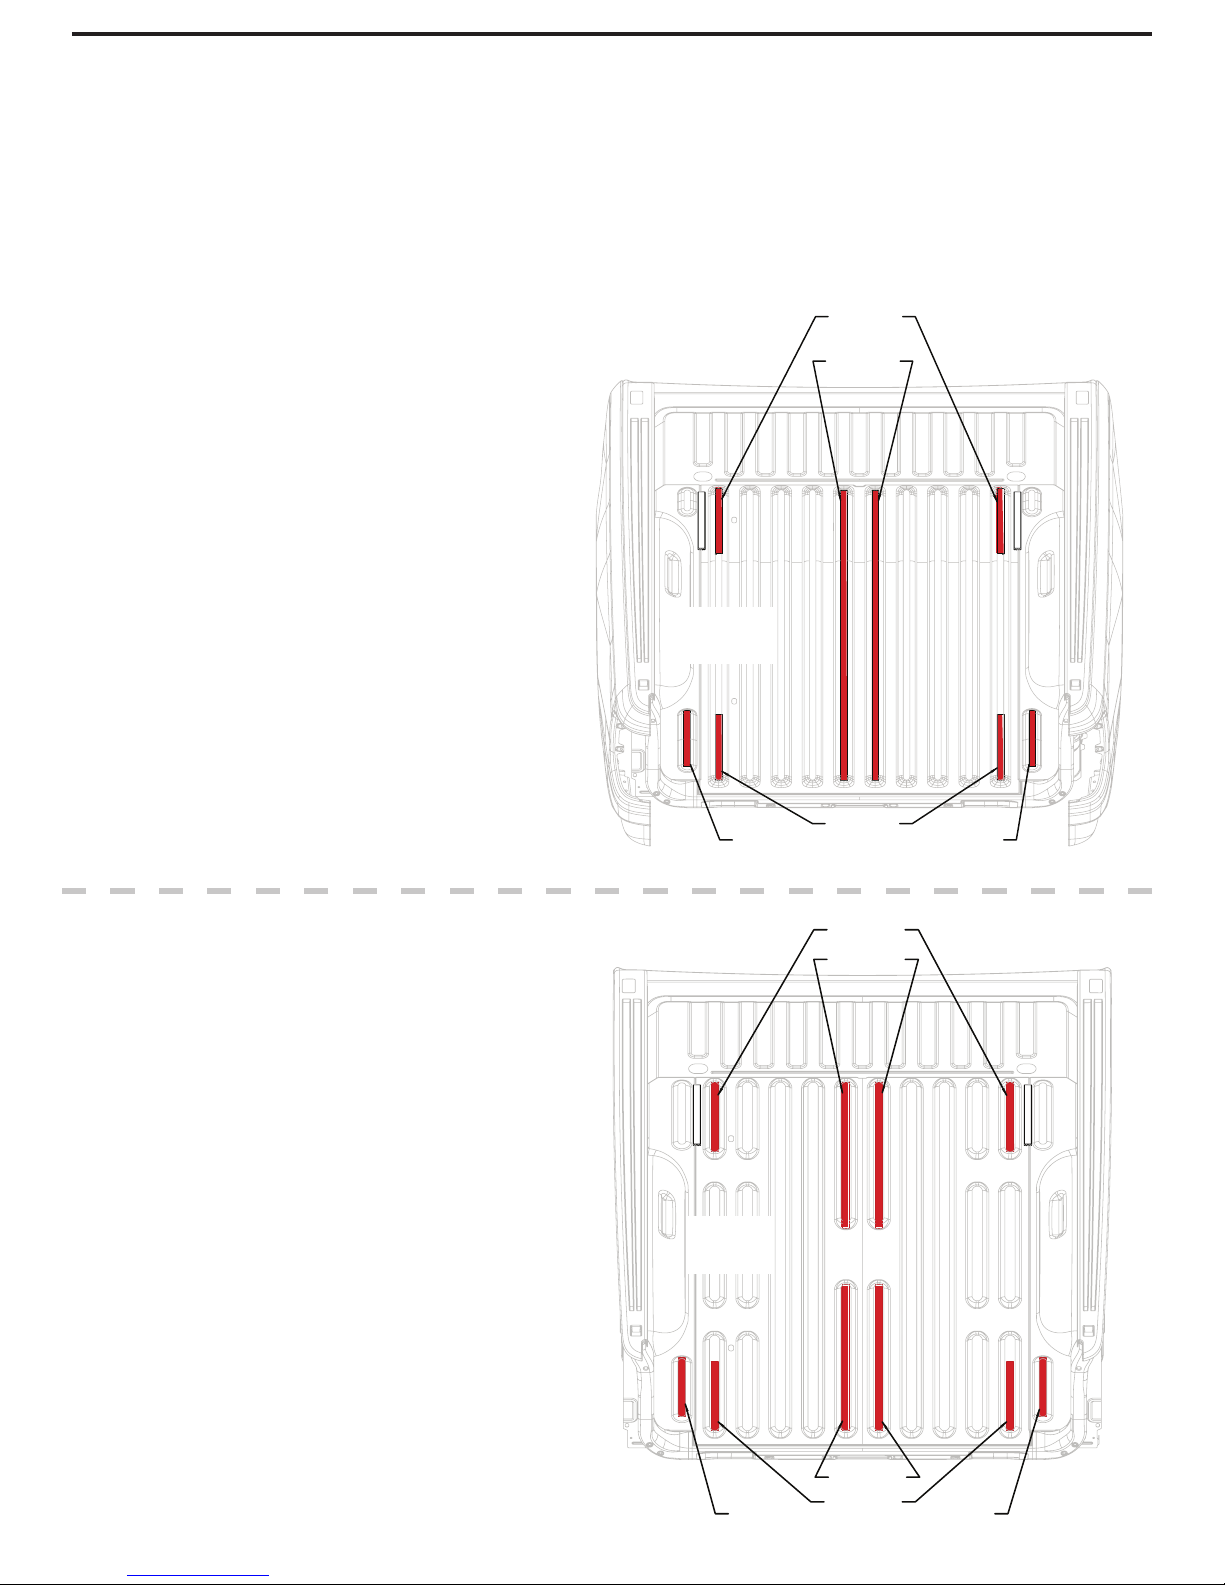
TAILGATE ammo cans havewidebottoms;CABSIDEammocanshavenarrowbottoms.
NOTE:You willneed abuddy tohelp withexactlytwosteps,notincluding drainingthesixpackor snapping
picsofyouposing.
Prevent abusive, expletive-filled language, watch our detailed installation video
or give us a call. We’re happy to help!
208.806.0251 | DECKED.COM/INSTALLVIDEO
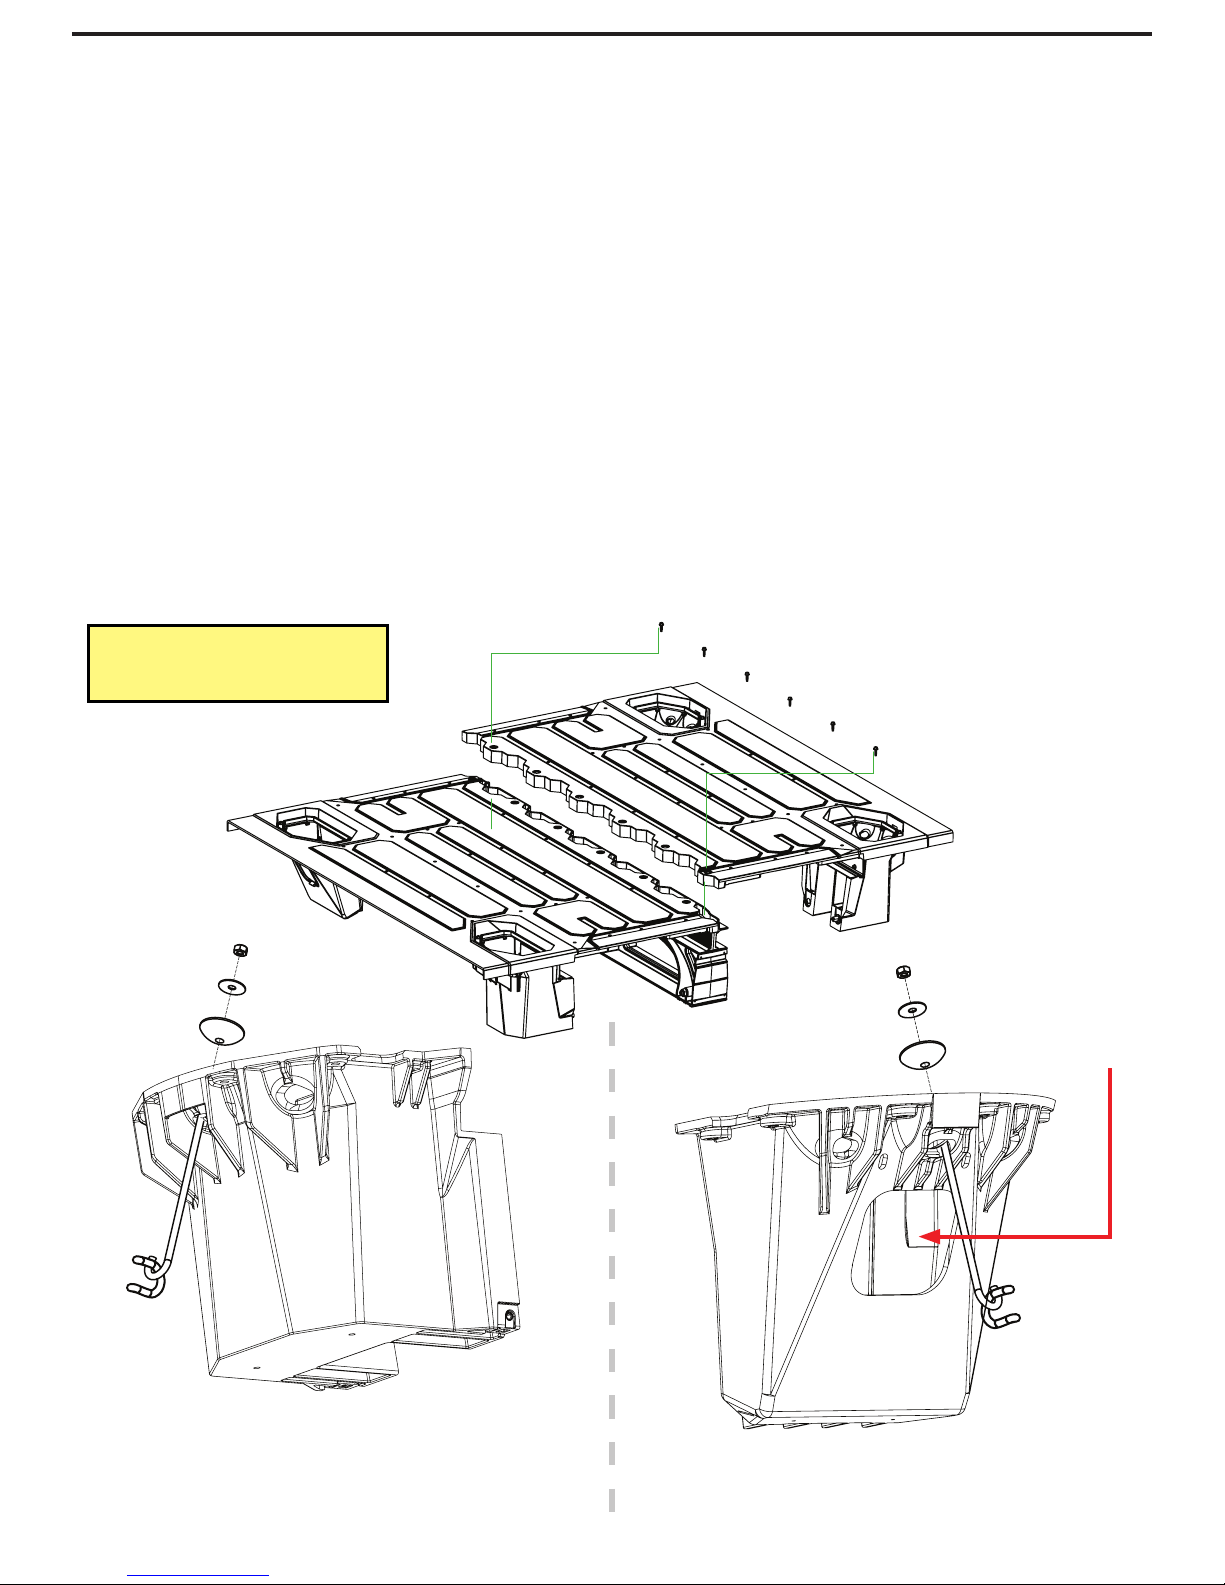
AMMO CAN DRAIN HOLES
(TODRILL ORNOTTODRILL.)
• Do you use a tonneau or shell over your DECKED system?
There is no need to drill holes.
• Does your DECKED system live outside?
The ammo cans will get water in them. You’ll need to drill holes in the ammo cans.
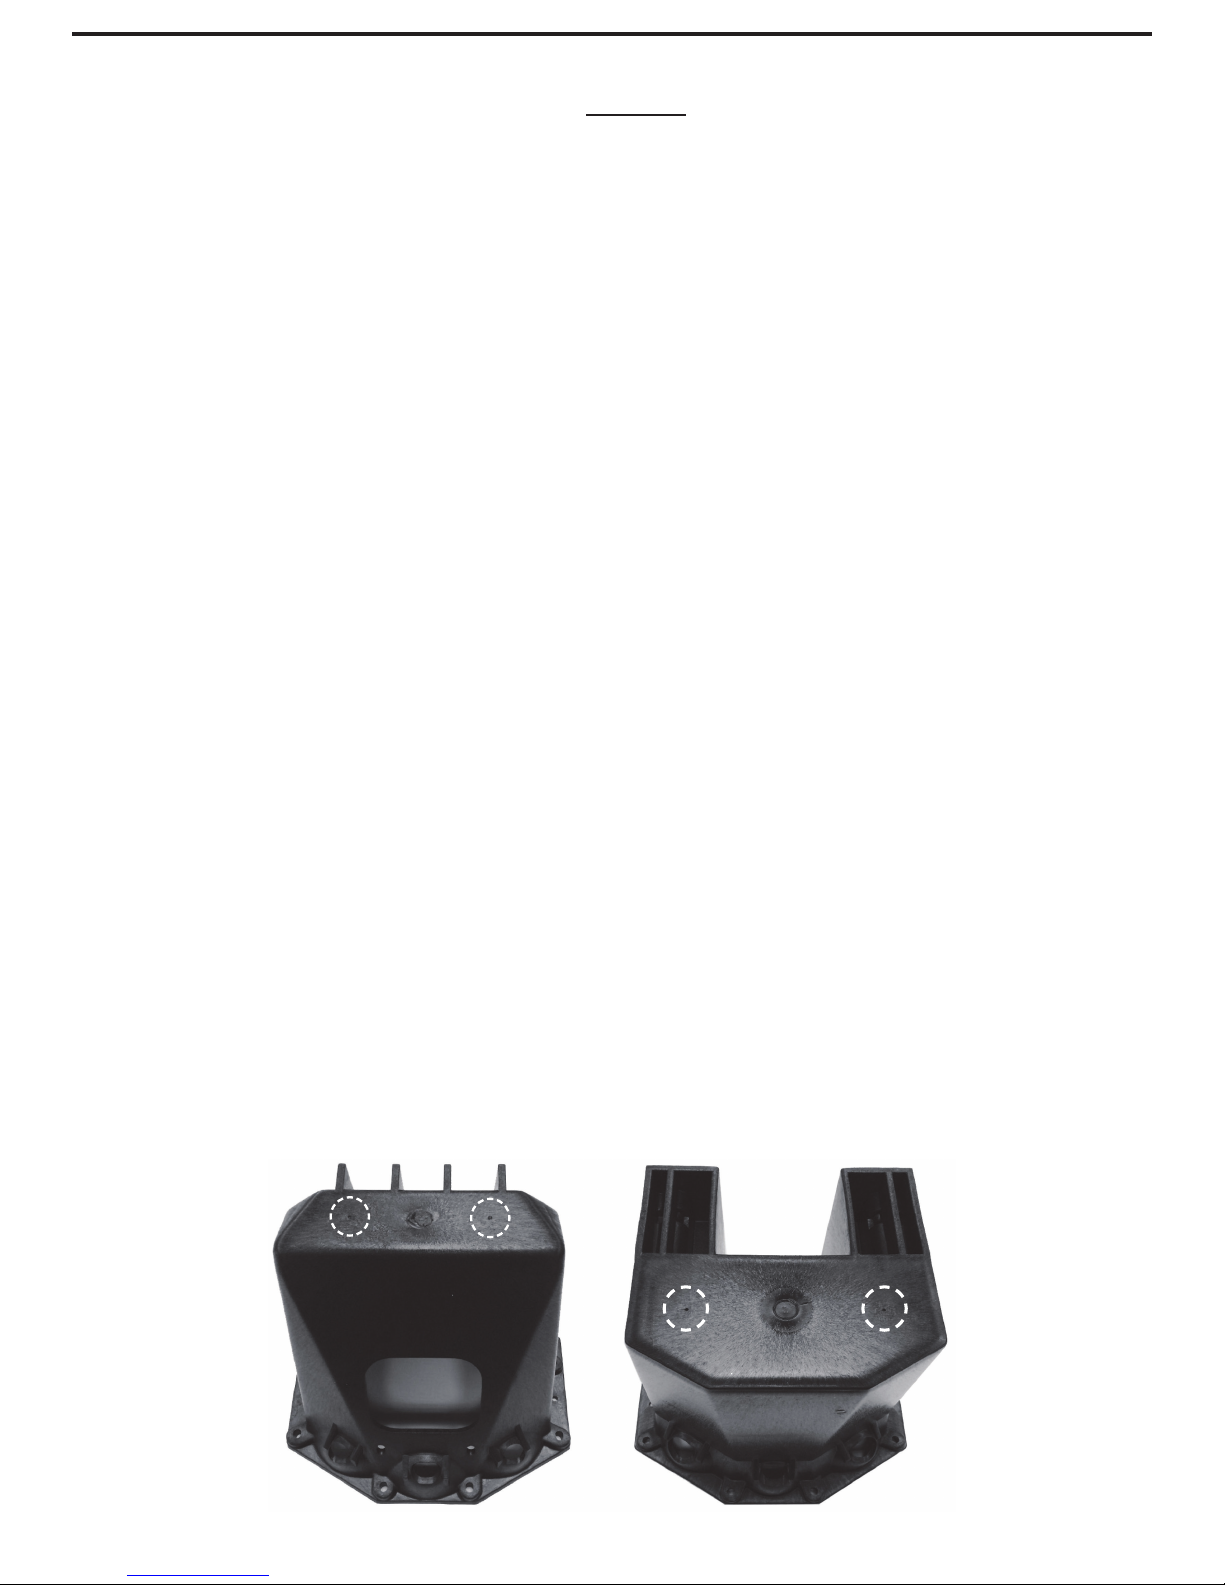
There are two dimples in the bottom of each ammo can. Drill a 1/2” hole at each dimple. A smaller hole
will get clogged.

8-15-2018 K68622704
4
www.mopar.com
DR6 - 5’7” BED:
1) Cut the tape into the following lengths for the 5’7” bed:
- 12” long - 2 strips
- 14” long - 4 strips
- 61” long - 2 strips
2) Referencing the image DR6 shown to the right:
a) Use isopropylalcohol tocleanthetop surfacesof
thefloor beads where the tape will be located.
b) Removefilm fromtapetoexposethe adhesive
surface.
c) Align the tape at theends of the designated floor
beads,centerthe tapeontheflat,topsurfaces
and apply with pressure.
PREPARE BED: INSTALLBEDTAPE
NOTE: Got a spray-in bed liner, Bedrug or mat? You won’t need this bed tape. Otherwise, follow
the directions below depending on your bed length to protect your bed paint.
14” STRIPS
61” STRIPS
14” STRIPS
12” STRIPS 12” STRIPS
30” STRIPS
14” STRIPS
12” STRIPS 12” STRIPS
14” STRIPS
30” STRIPS
DR6
DR7
DR7 - 6’4” BED:
1) Cut the tape into the following lengths for the 6’4” bed:
- 12” long - 2 strips
- 14” long - 4 strips
- 30” long - 4 strips
2) Referencing the image DR7 shown to the right:
a) Use isopropylalcohol tocleanthetop surfacesof
thefloor beads where the tape will be located.
b) Removefilm fromtapetoexposethe adhesive
surface.
c) Align the tape at theends of the designated floor
beads,centerthe tapeontheflat,topsurfaces
and apply with pressure.

8-15-2018 K68622704
5
www.mopar.com
PREPARE BED: INSTALLSHIMS
• Thereare2 SHIMS provided:
• Usingtheinformationintherespectivecirculardetailviews:
a)Cleanthe surfacesthoroughlywheretheshimswill belocated(isopropylalcohol is
recommended).
b)Removethe layerof tapeon the bottomoftheshim toexposethe adhesivesurface.
c)Placethe shimandapply withpressure.
NOTE: Repeat DETAIL A passenger side.
CABSIDE
TAILGATE
DETAIL A
Centershim betweenfloor beadsshown.
Placeshim2” fromcabside panel(blue).
Repeat on passenger side.
2”
A

8-15-2018 K68622704
6
www.mopar.com
CCHANNELS C
ASSEMBLY: DRIVER’SSIDEDECK
(LET’SDOTHIS!)
• Therearethreepre-installedgaskets–one on thecentervert,one on eachundersideofthe deckswhere theyrest
onthe center vert.Do yourslook weird?Seethem here:DECKED.COM/GASKETS
• PlaceC-channel on theinside ledgesofa cabsideammo canand a tailgateammo can.
• Theend of theC-channel with theendplatemustrestonthe cabside ammocan.
• Verifythatthetailgateammocan’saxleisclosesttothetailgate;ifnot,grabtheothertailgateammocan.
• InstallnylonwashersontoallboltsinBAG C-CHANNELSC.
• LooselyboltC-channeltothe twoammo canswith (4)nylon washersonthe (4)bolts.Make sure the bolt head is
on the C-channel side, not inside the ammo can;BAG CCHANNELS C.Don’t tightenyet.
•Line up thedriver’sside deck(stickeronendofdeck panelindicatesLEFT/DRIVER)on topofthe
C-channel/ammo can assemblyand thecentervertbosses.NOTE:Tailgate sideof the center vert hasan axle
installed;the centervertandammo canaxlesmustbeon thetailgateend(notcabside end) oftheassembly.
• UseWASHERSbagtoinstallnylon&rubberwashersonallCSAMMOCANbolts.Installthesamewasherson12B1bolts.
• Boltthedecktotheammocans;BAG B1forthetailgateammocan,BAG CS AMMO CANforthecabsideammocan.
• Now go back and tighten the loose bolts connecting the ammo cans to the C-channel.
• Boltthe deck tothecentervert;BAG B1 (no washers):Do not use power tools!
TAILGATE AMMO CAN AXLE CABSIDE AMMO CAN VERT AXLE CCHANNEL ENDPLATE
B1
DRIVER SIDE DECK HALF
➡
CAB
CCHANNEL BAG
WASHERS BAG
NY
LON WASHER NYLON WASHER
RUBBER WASHER
CS AMMO CANS
B1
NOWASHERS
RECOMMENDED TORQUE: Bolts in labeled bags
C-CHANNELS C, CS AMMO CAN and B1 - 27 in-lb.

8-15-2018 K68622704
7
www.mopar.com
ASSEMBLY: PASSENGER’SSIDEDECK
(NOWYOU’REACTUALLYGETTINGSOMEWHERE!)
• Usingthe assembly justbuilt as asupport,assemblethepassenger side.
• PlaceC-channel on theinside ledgesofa cabsideammo canand a tailgateammo can.
• TheC-channel endplatemustrestonthe cabsideammo can.
• You shouldhavethecorrecttailgateammocan forthisstep.Theaxle will beon thetailgatesideofthesystem.
Ifnot,swapthetailgateammocansnow.
• LooselyboltC-channeltothe twoammo canswith (4)nylon washersonthe (4)bolts.Make sure the bolt head is
on the C-channel side, not inside the ammo can;BAG CCHANNELS C.Don’t tightenyet.
• Lineup the passenger’sside deck(stickeronend of deckpanel
indicatesRIGHT/PASSENGER)on topoftheC-channel/ammocanassembly.
• Boltthe deck totheammo cans;BAG B1 (withnylon andrubber washers)forthetailgateammo can,
BAG CS AMMO CAN (withnylonandrubber washers)forthe cabside ammocan.
• DO NOT bolt passenger deck to center vert.
• Now go back and tighten the loose bolts connecting the ammo cans to the C-channel.
• Grabyourbuddy tohelpyoulift the driversideassembly into the driversideofthe truckbed. Liftthe passenger
sideassembly intothe passengerside ofthetruck beadand seat thepassengerside deckon theupstanding
vertbosses
B1
CCHANNELS C
TAILGATE AMMO CAN AXLE
CABSIDE AMMO CANCCHANNEL ENDPLATE
CS AMMO CANS
B1
PASSENGER SIDE DECK HALF
CAB
➡
NYLON WASHER
RECOMMENDED TORQUE: Bolts in labeled bags
C-CHANNELS C, CS AMMO CAN and B1 - 27 in-lb.

8-15-2018 K68622704
8
www.mopar.com
INSTALL: PASSENGER’SSIDEDECKHALF
(OK,FINE,PATYOURSELFONTHE BACK)
• Boltthe passenger sidedeck halftothe center vert;BAG B1. Makesureallboltsconnectingthedeck tothecenter
vertaresnug, but no power tools.
• InserttheJ-hook throughthecenterholeon thepassenger sidetailgateammo canand loopJ-hook throughtie
downormountingbracketinbed. Assemblewithblack sphericalwasher, flat washerand nut;BAG J6C.Don’t
tightenyet.Ifyoudo,youwon’tbeable tocenterthesystemproperlyin yourbed.
• InserttheJ-hook throughcenterholeonthe passengerside cabsideammo can andloop J-hookthroughtie down
ormounting bracketin bed.Assemblewith black sphericalwasher, flatwasherandnut; BAG J6C. Don’t tighten yet.
IMPORTANT: Leave all J-hook nuts loose.
PASSENGERSIDE
TAILGATE AMMOCAN PASSENGERSIDE
CABSIDEAMMOCAN
B1
CABSIDE AMMO
CAN WINDOW
✕
✕
✕✕
J6C
➡
➡
CAB CAB
RECOMMENDED TORQUE:
Bolts in labeled bag B1 - 27 in-lb.
J6C

8-15-2018 K68622704
9
www.mopar.com
INSTALL: DRIVER’SSIDE DECKHALF
• InserttheJ-hook throughthecenterholeon thedriverside cabside ammo can andloop J-hookthroughtie down
ormounting bracketin bed.Assemblewith black sphericalwasher, flatwasherandnut; BAG J6C.Don’t tighten yet.
• InserttheJ-hook throughthecenterholeon thedriverside tailgateammocan and loop J-hook throughtiedownor
mountingbracketinbed. Assemblewithblack spherical washer,flatwasherand nut;BAG J6C. Don’ttightenyet.
IMPORTANT: Leave all J-hook nuts loose until entire deck is in place.
DRIVERSIDE
CABSIDEAMMOCAN DRIVERSIDE
TAILGATE AMMOCAN
CABSIDE AMMO
CAN WINDOW
✕✕✕✕
➡
CAB
➡
CAB
J6C J6C

8-15-2018 K68622704
10
www.mopar.com
DETAIL A
CABSIDE FOAM SEAL
(showninred)
A
➡
CAB
INSTALL: CABSIDEFOAMSEAL
NOTE: You won’t need this seal if you have a tonneau cover or camper shell.
• LoosenallfourJ-hooksif youjumpedthe gunand tightenedthemalready.
• Standingatthetailgateendofthebed, grabdeckpanelsand pullthe whole systemasfartowardthe tailgateend
aspossible.
• Climbup on deckand placefoamseal inthe gap betweenthe deckand cabsidepanel withthe adhesiveside
facingthedeck, not thetruck, as showninDETAIL A.The top edge offoamsealshould belevelwiththetopedge
of thedeck. NOTE: Depending on how the seal is unrolled, the paper carrier may not end up on the adhesive
side of the seal. Check for stickiness in determining the adhesive side of the seal.
• Slowlystickthefoamsealacrossthe deckpanel and remove thepaper carrieras yougo.
• Oncefoamseal is inplace, standattailgateendofbed andpush theDECKED systemasfartowardsthecabas
possibletocompresstheseal.
Placesealingap.Alignwithtopedge ofdeck panel.
Affixadhesiveside ofsealto deck.

8-15-2018 K68622704
11
www.mopar.com
2" BOLT
CORNER
BRACKET
HELPFUL TIP: If you purchased drain
plugs, install now (instructions are
included with drain plugs).
TUBE BRACE
GOES HERE DRAWER 1
DRAWER 3
DRAWER 1
➡
CAB
WHEELS
DRAWERS: BRACKETS+WHEELS
(SOEASYA CHIMPANZEECANDO IT)
• Eachdrawerhasa leftanda rightbracket.Boltthe bracketsintoplacevia bottomtwoholesin bracketwith 3/4"
lengthbolts.Use the 2"length boltforthe upper cabside wallhole inbracket;BAG DRAWER 1.
• Installatubebraceineach drawerwithtwo3/4"length bolts;BAG DRAWER 1, BAG DRAWER 3.
• Attachwheelsontothe drawerbracketswitha7/32" hex wrench;BAG WHEELS.
RECOMMENDED TORQUE:
Bolts in labeled bags DRAWER 1 and DRAWER 3 - 27 in-lb.
Bolts in labeled bag WHEELS - 90 in-lb.

8-15-2018 K68622704
12
www.mopar.com
INSTALL: DRAWERHANDLES
• Onedrawerhandleassembly needstobeinstalled.
• Save yourself the headache, watch this short installation video: DECKED.com/videohandle.
• Fromtheundersideofdrawer,place thesprings intothecavitiesoneither side ofthe handle slots,
redspring=right spring; BAG HANDLE C.NOTE: Each spring arm should point inward, not outward.
• Install a clevis pin through each outside drawer hole and through spring; BAG HANDLE C.
• With DECKEDlogofacingoutward,insertthehandleendsbehindthespringarms.Rotatethearmsofthehandletoward
theclevispins,pullingthespringarmdownward.Whenthehandleholeislinedupwiththeclevispin,pushthepin
throughthehandleholeandthroughtheinsidedrawerhole.Repeatontheothersideofthehandle.
• Installahairpin throughtheclevispin;BAG HANDLE C.
CORRECT:
SPRING ARM FITS
IN HANDLE NOTCH
WRONG:
SPRINGARM OUT
OFHANDLE NOTCH
SPRING ARMS
POINT INWARD
HANDLEOVERVIEW
CLEVIS PIN
CORRECT:
SPRINGARM ISHERE
(FULLY HORIZONTAL)
WRONG:
SPRINGARM ISHERE
(NOTFULLY HORIZONTAL)
TOPVIEW
HAIR PIN
HELPFUL TIP: MAKE SURE SPRINGS HAVE
THELONGARM HORIZONTALAND SHORTLEG
VERTICALBEFOREINSERTINGHANDLE
SPRING
NOTCHES

8-15-2018 K68622704
13
www.mopar.com
INSTALL: DRAWERS
(HOPEFULLYYOU’RESTILLWEARINGYOURS.)
• Save yourselfthe headache,watch thisshort installation video: DECKED.com/videotailgatewheels.
• Installthedrawerbyslidingwheelsintotheir twochannels (C-channeland centervert),and slide drawerall the
wayforwarduntilclosed.
• Installtheremainingtailgatesidewheels ontotheiraxles; BAG WHEELS.
NOTE: Placing a spacer under the drawer to raise it into position makes this easier
(ammo can lids work well, or a small piece of 2x2 or 2x4 is even better).
• Installtheweatherstripsonthetailgatesidedraweredge:Withtheweatherstripwiper facing cabside, lineup one
endwith the sideof the drawerandplace on thetopdraweredge,firmly pressingdownontheweatherstripas you
movealong the draweredge.
NOTE: Facing the weather stripping the wrong way will funnel water into drawer: BAD!
RECOMMENDED TORQUE: Bolts in labeled bag WHEELS - 90 in-lb.
WHEELS CABSIDE
WEATHER STRIP

8-15-2018 K68622704
14
www.mopar.com
INSTALL: THEFUN STUFF
(PARTYTIME!)
• Usethe bagofhardware;PREPTBO,thatiseitherattachedtothetorsionbraceorinthehardwarebox,forthe followingsteps.
• Slidetorsionbraceunder centervertand tailgateammo cans. Place bottleopenerontheoutsideof the torsionbrace.
• Looselyinstall(startwithyourfingerstoavoidcross-threading):
• Two.905”boltswith nylon washersthroughtheendholesintorsionbraceintoammocans.
• Two.905”boltswith nylon washersthroughthebottombottleopener holes and torsionbraceintocentervert.
• Two1/2”lengthboltsthroughupperholesinbottleopener into centervert.
• Alignbottleopener toedgesofcentervertandtightenfourbottleopener bolts.
• Tightenendboltsintotailgateammo cans.
• Finally, tighten the J-hooks. DO NOT OVER TIGHTEN. Make sure to center the vert in the center of your bed.
• Installruler byaligningtherulerholeswiththeinsertsin the decks.Useyourfingerstostartthe 1/4”screwstoavoid
cross-threading.Tightenjustuntilsnugwitha1/8”Allenwrench.
• Insertlockcoreplugs, or installlocksifpurchased.
• See,wasn’tthatworthit?Congratulateyourselfon a jobwell-done!Nowgetout thereandplayhard!
#DECKEDUSA | @DECKEDUSA
NYLON WASHER
LOCK CORE
PLUGS
.905” BOLTS
.905” BOLTS
1/2” BOLTS
NYLON
WASHER
1/4” SCREWS
IMPORTANT: Grab your favorite beverage, crack ‘er open in the bottle opener and make a toast to your van. You did it. Immediately
post a photo of your significant other, child or canine (in no order of significance - please someone show us your pet alligator)
appreciating your accomplishment. Add hashtag #DECKEDUSA | @DECKEDUSA.
RECOMMENDED TORQUE:
.905” Bolts - 27 in-lb. |J-hooks - 9 in-lb.
1/2” Bolts & 1/4” Ruler screw - 18 in-lb.
HELPFUL TIP: Bottle opener goes
on the outside of the torsion brace.

8-15-2018 K68622704
15
www.mopar.com
#DECKEDUSA | @DECKEDUSA
DECKED 3-YEAR LIMITED WARRANTY
(a.k.a.LEGALMUMBOJUMBO)
DECKEDLLCwarrants tothe originalpurchaser ofthis productthatthe productwill befree frommanufacturingdefectsin
workmanshipand materialsfora periodof three(3) yearsfromthedateofthe originalpurchase.Ifwithin three(3) yearsfromthe
originaldateofpurchasethis productfailsdue todefectin materialsorworkmanship,DECKEDLLCwill replaceany defectivepart at
itsoption.
Theoriginal purchasermust contacttheDECKEDLLCcustomerserviceteamand provideadescription ofthe defectivepart,
includingdigital picturesifrequested,with theoriginal purchasedocumentationasvalidationofwarranty coverage orhave
previouslyactivatedtheirwarranty online.
ThiswarrantyDOESNOTcoveror apply to:
•Damage tothe productdue tomisuse, mishandlingandabuse.
•Productsnotusedin accordancewith themanufacturer’sinstructionsorrecommendations.
•Productnotassembledorinstalledaccordingtomanufacturer’sinstructions.
•Normal wearand tear.
•Undeclared damageto thesystemduring shipping, actsofGod. Inaddition,consequential damageandincidental
damages(including losttime) such asdamage topersonsorpropertyarenotcoveredunder this warranty.
REGISTERYOUR PRODUCT FOR ANYFUTURE WARRANTYNEEDS. DECKED.COM/REGISTER
This manual suits for next models
1
Table of contents
Other DECKED Automobile Accessories manuals

DECKED
DECKED MT5 User manual

DECKED
DECKED MG3 User manual

DECKED
DECKED LADDER User manual

DECKED
DECKED ToolBox Ladder Bracket User manual

DECKED
DECKED Slide Reference guide

DECKED
DECKED DS1 User manual

DECKED
DECKED VAN SHELVING User manual

DECKED
DECKED DS1 User manual

DECKED
DECKED TOOL BOX User manual

DECKED
DECKED MT6 User manual