Deerc D20 User manual

D20
V 4.0
Instructions For Use
Gebrauchsanweisung
+1(855)777-8866

English 01-29
Deutsch 30-56

Contents
1.0 Disclaimer & Warning ...............................................................................
2.0 Safety Guidelines ........................................................................................
3.0 Maintenance ................................................................................................
4.0 Package Contents ......................................................................................
5.0 Drone Details ...............................................................................................
6.0 Transmitter Details .....................................................................................
7.0 Joystick Mode ..............................................................................................
8.0 Charging ......................................................................................................
9.0 Installation
Propeller .........................................................................................................
Propeller Guard ............................................................................................
Drone Battery ................................................................................................
Camera Angle Adjustment ......................................................................
Transmitter Battery ......................................................................................
Phone Holder ................................................................................................
10.0 Operation Guide
Download APP .............................................................................................
Connect to Wi-Fi ...........................................................................................
Pairing ..............................................................................................................
Calibrating the Gyro ...................................................................................
One Key Takeoff/Landing .........................................................................
11.0 Functions Details
Emergency Stop ...........................................................................................
Speed Switch..................................................................................................
Trimmer Function.........................................................................................
Take Photo/Video ........................................................................................
360° Flip ..........................................................................................................
Headless Mode .............................................................................................
12.0 Specifications .............................................................................................
13.0 Trouble Shooting......................................................................................
14.0 Contact Us...................................................................................................
15.0 General Information ...............................................................................
01
01
05
06
07
08
09
10
11
11
12
12
13
13
14
14
15
16
16
17
17
18
19
20
21
22
24
24
25

-01-
1.0 DISCLAIMER & WARNING
2.0 SAFETY GUIDELINES
2.1 Check Before Use
1. Please read this Disclaimer & Warning and Safety Guidelines carefully
before using our product. This product is not recommended for people
under the age of 14. By using this product, you hereby agree to this
disclaimer and signify that you have read it fully. You agree that you are
responsible for your own conduct and any damage caused while using this
product, and any consequence. You agree to only use this product for it's
designed purposes and in accordance with the local laws, regulations and
all applicable policies and guidelines that Deerc may provide.
2. When using this product, please be sure to strictly abide by the specifica-
tion requirements and safety guidelines stated in this document. Any
personal injury, property damage, legal disputes and all other adverse
events caused by the violation of any of the safety instructions or due to any
other factor, WILL NOT be Deerc’s responsibility.
① This product is a high precision drone that integrates various electronic
stability and control mechanisms. Please be sure to configure this drone
carefully and correctly to ensure safe, accident-free operation.
② Ensure that the batteries of the drone and transmitter are clean, undam-
aged, and fully charged before every use.
③ Ensure that all the propellers are undamaged and are installed in the
correct orientation.
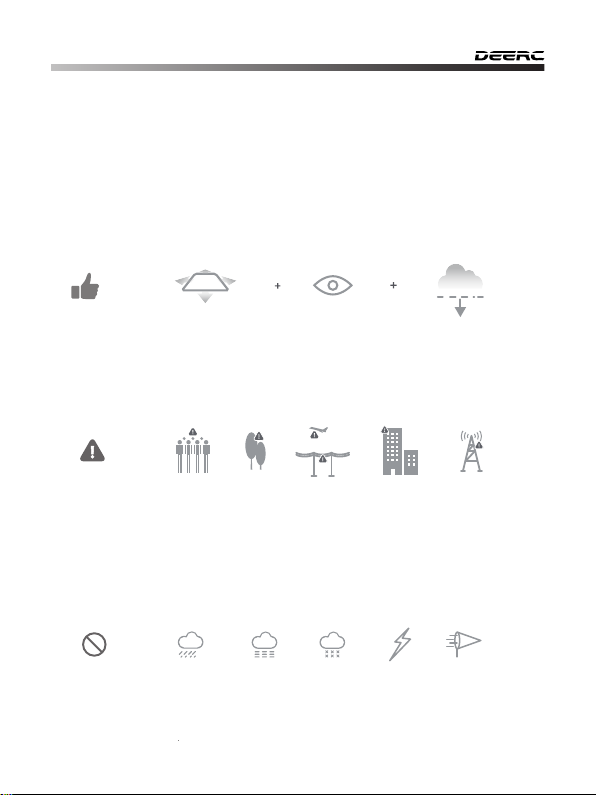
Fly in Open Areas Maintain Line
of Sight
Fly Below
131 feet (40 m)
- - - - - - - - - - - - - - - - - - - - - - - - - - - - - - - - - - - - - - - - - - - - - - - - - - - - - - - - - - -
2.2 Flight Environment
-02-
- - - - - - - - - - - - - - - - - - - - - - - - - - - - - - - - - - - - - - - - - - - - - - - - - - - - - - - - - - -
④Please perform a thorough check of the product before each use.
Inspect the integrity of the parts, any signs of cracks and wear off on the
propellers, battery power and effectiveness of the indicator, etc. If there is
any problem found after checking the drone, please refrain from using it
until the problem is resolved.
Avoid flying over or near obstacles, crowds, high voltage power lines, trees,
airports or bodies of water.
DO NOT fly near strong electromagnetic sources such as power lines and
base stations as it may affect the onboard compass.
DO NOT use this drone in adverse weather conditions such as rain, snow,
fog, and wind.

-03-
2.3 Operations Requirements
2.4 Use of Battery
⑥Stay away from the rotating
propellers and motors.
⑦ DO NOT fly in any spaces
where drones are prohibited.
Please respect people's right to
privacy by not flying your drone
close to others.
①DO NOT use this product to follow any moving vehicles.
②During the flight, turn off the motors only in case of an emergency.
③When the battery runs low, return the drone back to your starting point.
④DO NOT use this product if you feel tired, take medicine or feel unwell
and drink alcohol.
⑤Be aware of the volume of noise that the drone produces. Please ensure
to keep your distance to avoid ear damage.
①Please ensure batteries are fitted in the correct orientation as shown in
the instruction manual.
②Avoid short circuits by fitting the batteries correctly, and do not crush or
squeeze the batteries as this could cause the risk of a fire or explosion.
③DO NOT mix new and old batteries as this can lead to poor performance
of the product.
④Please dispose of used batteries carefully, do not litter, and recycle where
ever possible.
⑤DO NOT expose dead batteries to heat or fire or they may explode.

-04-
Li-Po Battery Disposal & Recycling
Waste Lithium-polymer batteries must not be placed with household trash.
Please contact local environmental or waste agency or the waste agency
or the supplier of your model or your nearest Li-Po battery recycling center.
11
13
14
15
16
⑥If the device is not going to be used for an extended period of time,
please remove batteries to prevent potential damage to the drone from
battery leakage.
⑦Only use the USB charging cable that comes with the drone to charge
the battery.
⑧DO NOT connect the battery directly to wall outlets or car cigarette
-lighter sockets as this will damage your battery since they have different
voltage.
⑨DO NOT attempt to disassemble or modify the battery in any way.
⑩DO NOT use the battery if it gives off an odor, generates heat, becomes
discolored, deformed or appears abnormal in any way. If any of these
situations occur while the battery is in use or being charged, remove it from
the device or charger immediately and discontinue use.
DO NOT pierce the battery casing with a nail or any other sharp object,
break it open with a hammer, or step on it! Dispose or recycle this battery as
it may cause personal injury or damage to your drone.
Always charge the batteries on a fireproof surface and away from
combustible materials. DO NOT charge on surfaces that can catch fire,
which includes wood, cloth, carpet.
DO NOT immerse the battery in water or get it wet.
DO NOT solder battery terminal in any way.
Keep batteries out of reach of children or pets.
DO NOT short-circuit the battery by connecting wires or any other metal
object to the positive(+) and negative(-) terminals.
12

-05-
3.0 MAINTENANCE
①Clean the drone after each use with a clean, soft cloth.
②Avoid prolonged exposure to direct sunlight and avoid buildup of heat
on the drone or batteries.
③This device is not waterproof and must not be submerged or subjected
to water under any circumstance. Failure to keep the device completely dry
will result in the failure and permanent damage to the unit. Be aware that
although it might be dry where you are, droplets of rain or mist from a river
or waterfall could damage your drone where it is flying.
④Frequently check the charging plug and other accessories for signs of
damage. If any part of the device or cables are damaged, avoid use or
charging until the damaged parts is replaced.

-06-
4.0 PACKAGE CONTENTS
D20
V 4.0
[email protected](EU)[email protected](USA)
Instructions For Use
Gebrauchsanweisung
+1(855)777-8866
Drone Transmitter Drone Battery
Spare Propellers
Screwdriver
USB Charging
Cable Propeller Guard
Instructions For Use
-07-
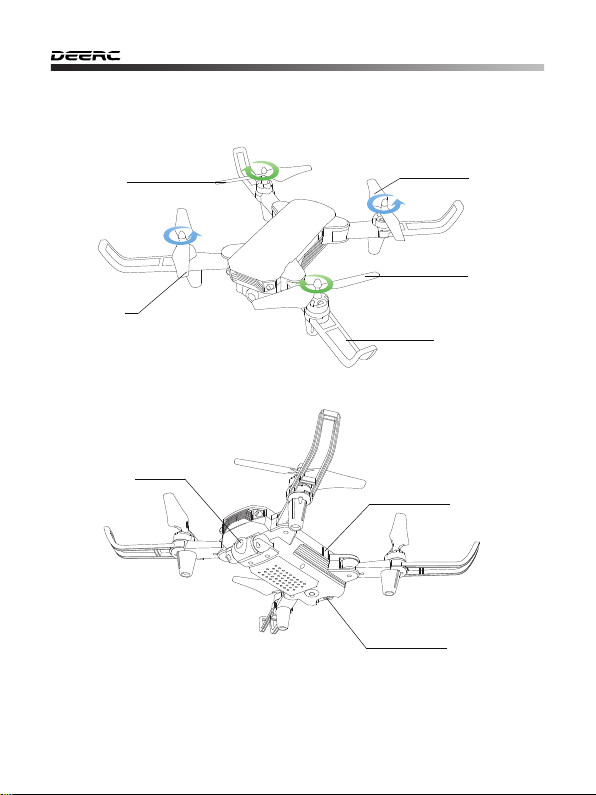
5.0 DRONE DETAILS
Propeller B
Propeller A
Propeller A
Propeller B
HD Camera
Power Switch
(Long press)
Propeller Guard
Drone Battery
Other manuals for D20
1
Table of contents
Other Deerc Drone manuals


 user manual")


