Delft Imaging Delft Light User manual

User Manual
Delft Light

2
Contents
About this manual............................................................................................................... 2
Important notices................................................................................................................ 2
Introduction ......................................................................................................................... 3
Consideration on deployment ....................................................................................... 3
Notice for save operations ............................................................................................. 3
Battery (X-ray/detector).............................................................................................. 3
ATXtreme (X-ray) .......................................................................................................... 3
Flat panel detector...................................................................................................... 3
Installation ........................................................................................................................... 4
Assembly of the X-ray and detector (wall) stand ..................................................... 4
Detector installation..................................................................................................... 4
X-ray tube/generator installation (ATXtreme) ........................................................... 5
Operator laptop........................................................................................................... 6
Workflow step by step......................................................................................................... 6
Making an image......................................................................................................... 7
Shutting down system.................................................................................................. 8
ANNEX A TECHNICAL SPECIFICATIONS DELFT LIGHT...................................................... 9
ANNEX B Suggested exposure time table for an average person weighing 70 kg. .10
ANNEX C MOBISUN SOLARPANEL..................................................................................11
KEY features: ...................................................................................................................11
Operation........................................................................................................................11
About this manual
The Delft Light is especially designed for TB screening projects in remote locations. All
components like the X-ray tube and detector operate on rechargeable batteries
and the system comes as a complete package with a tube and detector stand.
This user manual complements the reference manuals provided with this system and
cannot replace these manuals. When the user manual and the reference manual
differ, the reference manuals are considered as leading.
Important notices
Delft Imaging does not assume responsibility for the misuse of the Delft Light soft- and
hardware. Since Delft Imaging cannot control the use of the Delft Light, it shall not be
held responsible for any direct or consequential personal injury or damage.

3
Introduction
Consideration on deployment
The Delft Light is a portable X-ray system which can be deployed in almost any
venue, room or even a tent. Local radiation safety rules need to be followed to
obtain high quality images with the least amount of radiation (ALARA principle).
Because of its nature there is no ‘standard’ setup for the Delft Light while this always
depend on the venue used, amount of space, patient flow etc. Some considerations
for a correct use are:
•Patient flow, where do patients enter/exit the room?
•X-ray beam direction. Where does the primary beam point to? This maybe a
trade off with the patient flow.
•Radiographer area. What is a safe distance for the radiographer, additional
lead shielding available?
•What is the maximum distance between the X-ray and detector stand?
Minimum distance should be at least 120 cm.
Notice for save operations
The Delft Light is a fully battery-operated X-ray system. Annex A provides detailed
information on the correct use and storage. Some important considerations:
Battery (X-ray/detector)
•Always store the batteries is a save location (the backpack) when not in use.
•Always check the batteries on mechanical damage and or leakage before
use.
•Never use a battery with apparent mechanical damage and/or leakage
•Always use the delivered battery chargers and power cords.
•When the Delft Light is not in use for a longer period recharge the batteries at
least every 5 months.
ATXtreme (X-ray)
•Although the Delft Light is a portable system the X-ray generator and tube
weigh 8 kg. Take special care when mounting the X-ray part to the provided
stand.
•Always use the fall save mechanism attached to the stand to prevent the X-
ray tube from dropping when adjusting the system to the required height.
Flat panel detector
•Always use the fall save mechanism attached to the stand to prevent the
detector from dropping when adjusting the system to the required height.
•Always use the provided detector holder to prevent damage to the image
sensor.

4
Installation
Assembly of the X-ray and detector (wall) stand
Attach the upper part of the detector and X-ray stand to the lower using the
provided guidance strip and bolts. Determine the best way to setup the stands in the
available venue, see above considerations on correct placement.
Take all components out of the backpack. Before starting, make sure both the
detector and X-ray batteries are fully charged.
Detector installation
1. If not done put the detector in
the holder. Make sure the image
area faces the front of the
holder. The battery part should
be visible on the back. Make sure
the battery is full before installing
it. See image for reference.
2. Carefully hang the detector
holder on the Versarix holder.
Power on the detector using the
power button on the side.
5
X-ray tube/generator installation (ATXtreme)
1. Unpack X-ray stand from flight
case and assemble. (Refer to
Delft Light instruction movie
how-to).
2. Using the grip on the ATXtreme
attach the grip to the spring-
arm of the X-ray stand and
securely fasten the provided
screw, level the ATXtreme using
the provided level. Measure
SID with provided ruler.
3. Install the Li-Ion battery.
4. How to open/close battery
compartment:
5. Attach the exposure switch to
RJ45 connector on the back of
the ATXtreme.
6. Power on X-ray by pressing the
power button. After
initialisation the display will
show kV and mAs settings of
the last exposure taken.

6
Operator laptop
1. Unpack X-ray laptop from
backpack and put it on a stable
surface (the top of the backpack
can be used for this).
2. Connect the CXDI LAN cable
between the laptop and
detector using the provided USB-
c-2-UTP converter. See image for
reference.
3. Power on the laptop and logon
to the CANON NE software.
Workflow step by step
After installation of all components the system can be used to start screening. The
Delft Light supports several methods of Patient identification:
•Using an existing (radiology) Information System using Dicom Modality Worklist
protocols
•Typing in the patient demographics
•Using a bar- or QR scanner which will automatically fill in the required
demographics like, Name, Sex, Date of Birth and a unique identifier by
scanning the bar- or QR-code.
The following procedure should be done before the patient or participant is called
into the room.

7
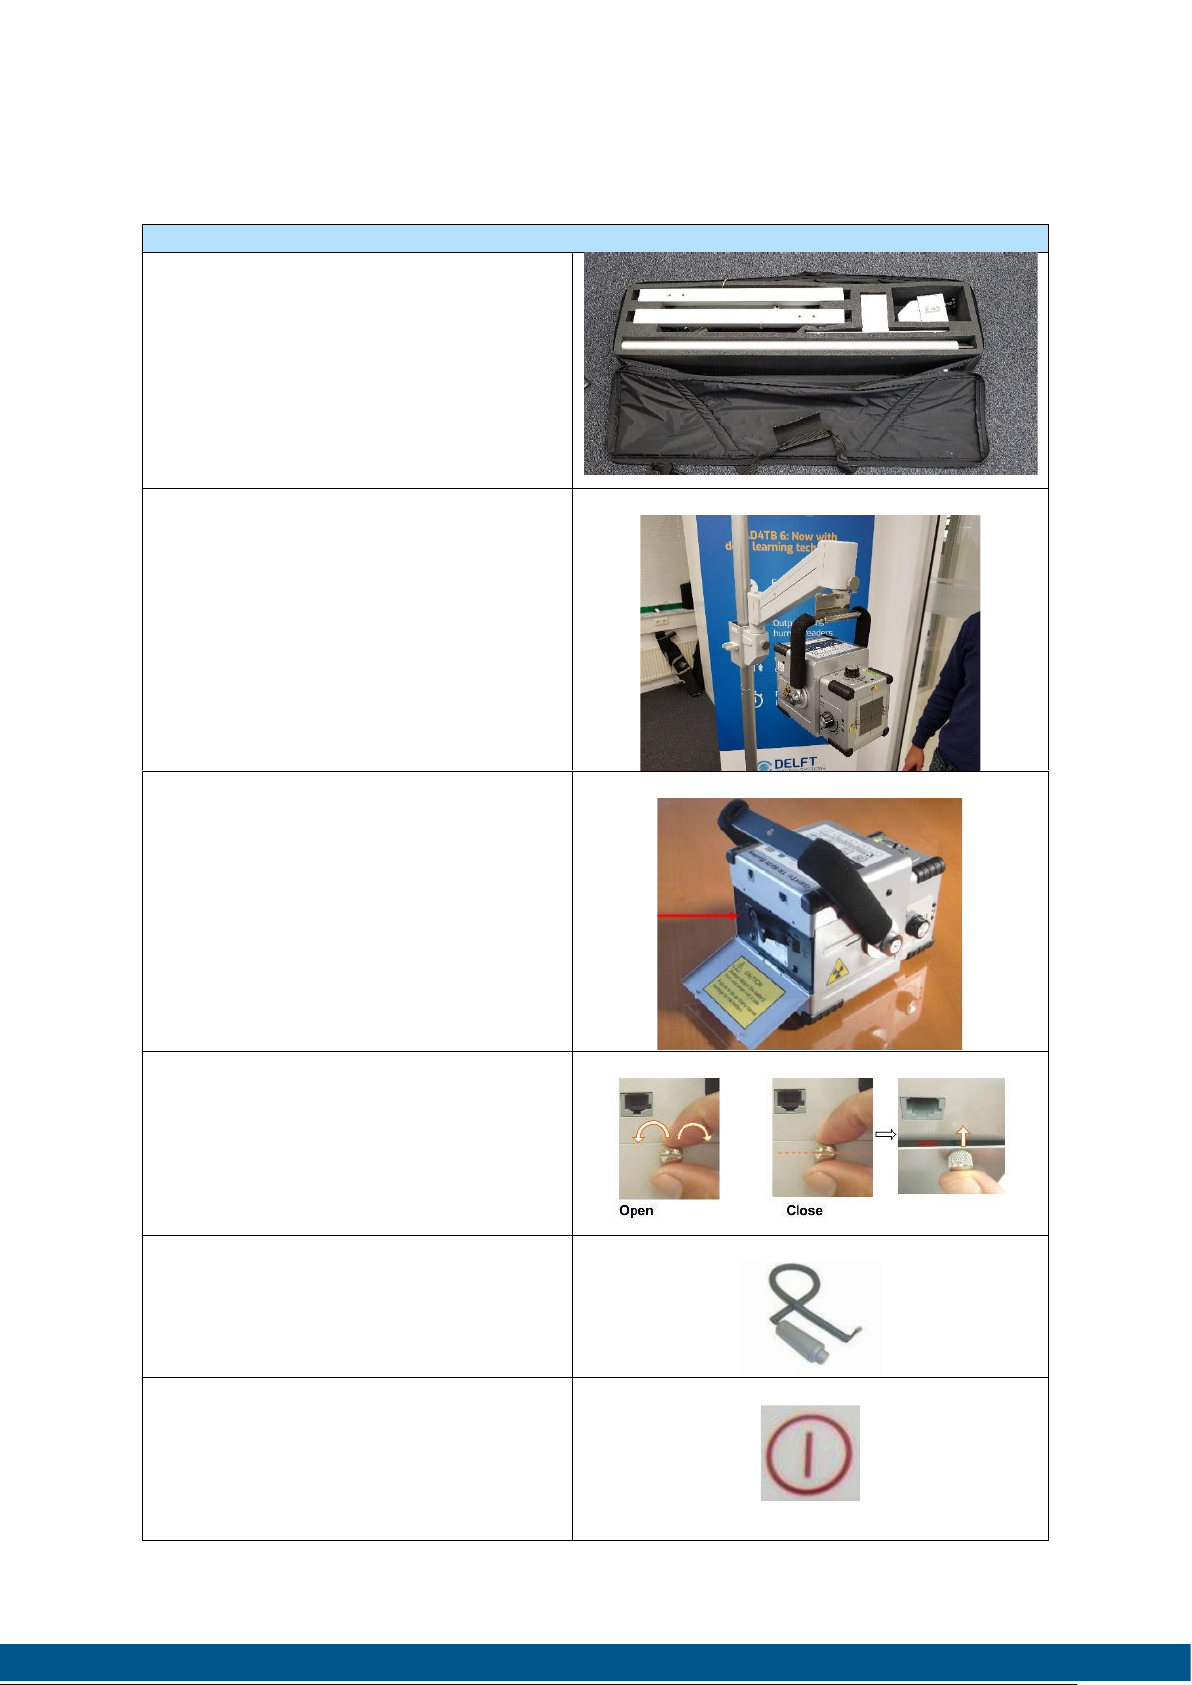
Making an image
1. Press EXAM TAB. Depending on
the method of entry either
scan the bar- or QR-code or
manual enter the required
patient demographics.
Press Start Exam.
2. Select the required protocol
(CHEST PA)
Press Start.
1. After initialisation a green bar
showing Ready will appear on
the right upper corner. Call in
the participant/patient and
position him/her in the correct
way.
2. Press the collimation light
button and adjust detector
and X-ray height using the
provided laser cross.
3. Select the required kV/mAs
setting on the ATXtreme by
using the preselect buttons.
8
4. Ask the participant/patient to
breath in and hold and
immediate press the expose
button. After a few seconds
the image will appear.
Check image and collimation
adjust ROI if necessary, press
END EXAM.
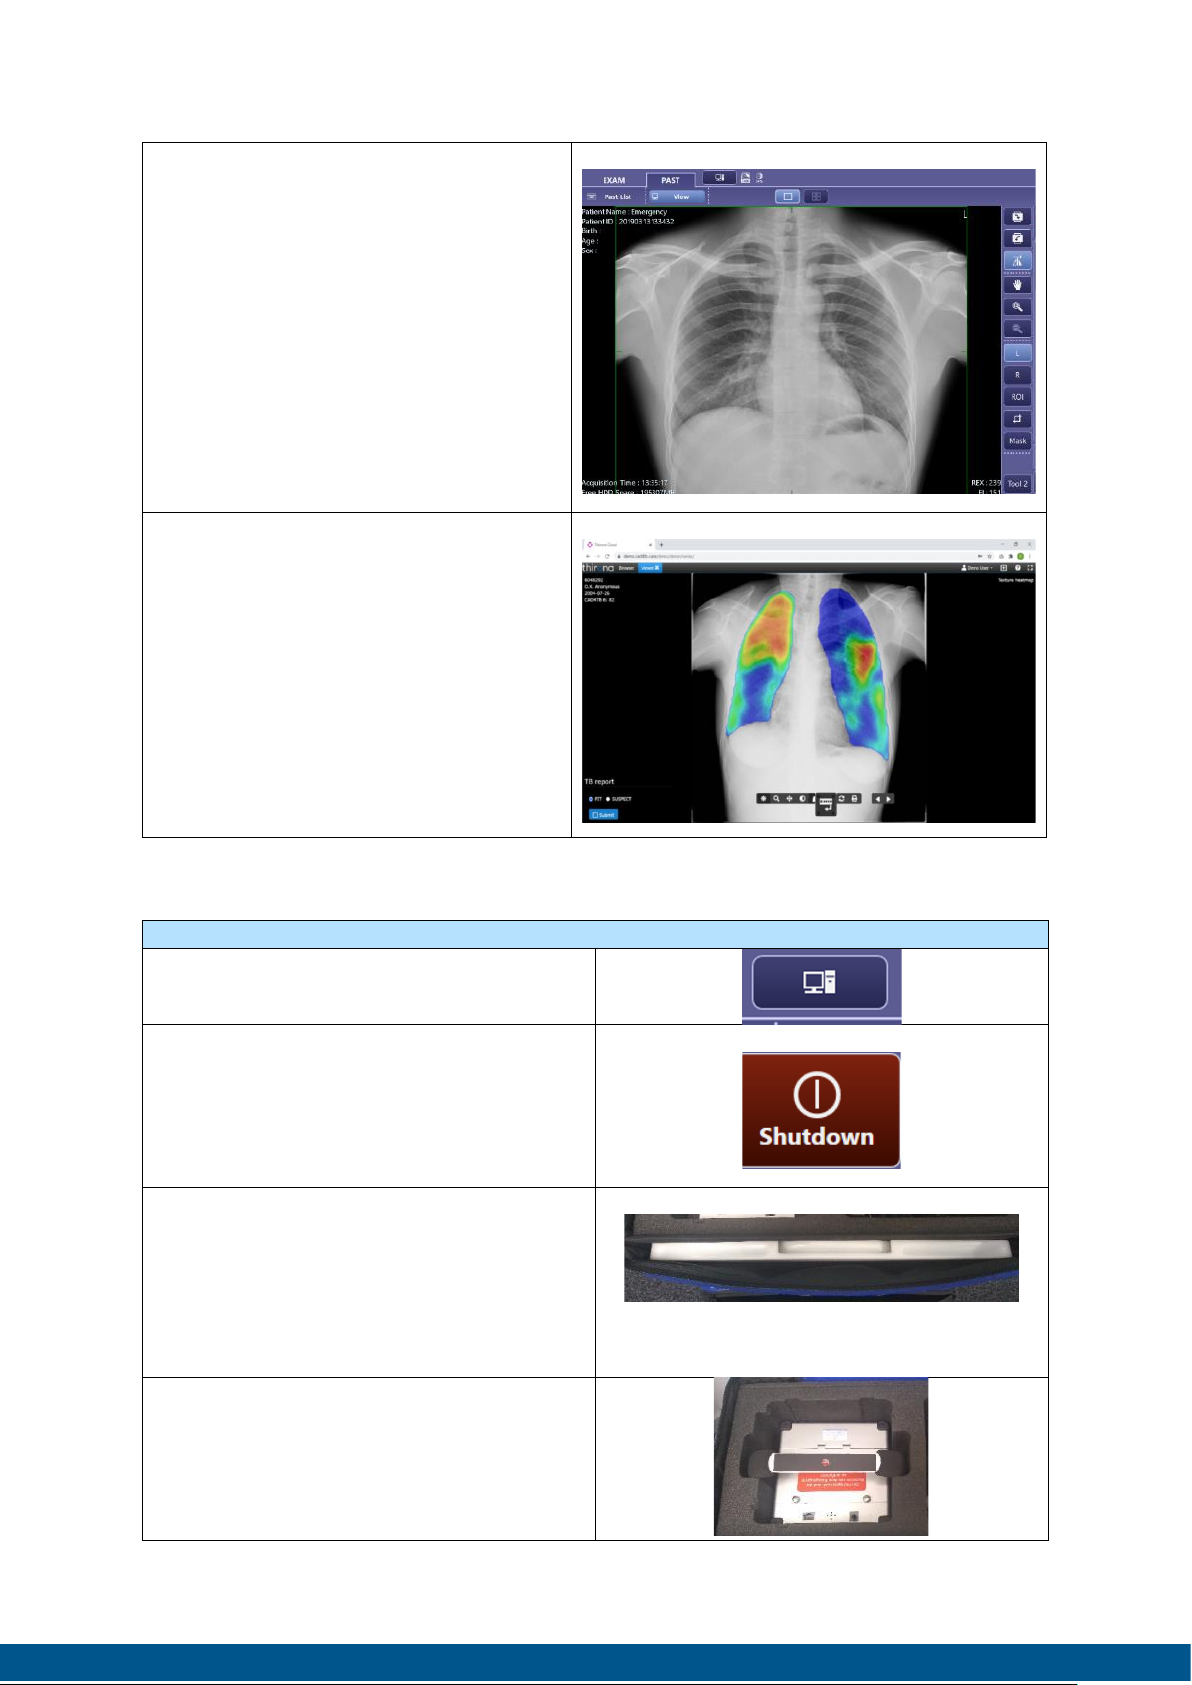
5. Press CAD4TB button to display
CAD4TB score and heatmap.
Shutting down system
1. Shutdown the laptop by pressing
the System Button.
2. Press shutdown Button. The
laptop will shut down. Disconnect
USBs-2-UTP converter and put the
laptop in the front of the
backpack.
3. Power off the CXDI 702c detector
by pressing the power button on
the side for > 3 seconds. Remove
the detector cable and take out
the detector of the stand, put
cable and detector in backpack.
4. Power off by pressing the Power
button. Remove the X-ray unit
from the stand and remove the
battery. Store components in the
backpack.

9
ANNEX A TECHNICAL SPECIFICATIONS DELFT LIGHT
Items
Specification
Electrical Power
1,35 kW @ 90 kV, 15 mA
Device power source
22.2 VDC (Battery)
22.2 VDC (Battery)
Battery
DC 59,2 V, Li+ battery
Frequency
120kHz
kV, mA
40-90 kV / 2 kV steps
X-ray exposure time
range [sec]
0.01 ~ 1 sec / 0,01 steps
Accuracy of
output
Accuracy of
radiation output
± 10%
X-ray tube
Model
Toshiba D –0814
Inherent filtration
0.8mm AL
Focal spot
0.8 x 0.8mm
Anode heat storage
10.000 HU
Total filtration
(HVL)
Tube Inherent
Filtration
0.8mm AL
Beam limiting device
Addition
Filtration
0.5mm AL
Size
22(H)x18(W)x25(H) cm
Weight
7 kg
Detector
CXDI 702-c
Effective pixel area
2240 x 2992
A/D conversion
14/16 bits
Preview time
< 3 sec
DQE
85%
Size
35 x 43 cm
Weight
3 kg

10
ANNEX B Suggested exposure time table for an average person
weighing 70 kg.
Region
Diagn. Ref.
value (cGy x
cm²)
Pro-
jection
SID
(cm)
Grid
kV
mAs
Cranium
110
PA
100
x
78
6,3
100
LAT
100
x
68
5,6
Thorax
20
PA
120-180
x
90
1,0
100
LAT
120-180
x
120
2,5
AP
100
x
76
2,1
Abdomen
550
AP
100
x
80
7,0
Cervical spine
AP
100
x
64
4,2
LAT
100
x
70
4,2
Thoracic spine
220
AP
100
x
74
7,0
320
LAT
100
x
84
7,3
Lumbar spine
320
AP
100
x
84
8,1
800
LAT
100
x
90
8,5
Pelvis
500
AP
100
x
84
6,4
LAT
100
x
94
8,5
Hip
AP
100
x
84
4,2
Shoulder + Clavicle
AP
100
x
74
4,2
Upper arm
AP/LAT
100
60
4,0
Elbow
AP
100
52
4,0
LAT
100
50
5,0
Hand + Wrist
AP
100
50
3,0
LAT
100
54
4,0
Femur
AP
100
70
3,5
LAT
100
70
2,8
AP
100
64
4,2
LAT
100
64
3,5
Tibia + Fibula
AP
100
64
3,5
LAT
100
64
3,5
Ankle
AP
100
54
6,4
LAT
100
50
4,0
Ankle joint
LAT
100
56
4,0
Toe
AP
100
46
3,0

11
ANNEX C MOBISUN SOLARPANEL
The Delft Light (backpack X-ray) has an option to use it with the Mobisun solarpanel,
Li-ION battery and inverter. This system is to power all required components with a
portable(6kg) solar/powerpack!
The internal battery capacity is enough to recharge the X-ray and detector batteries
and power the CANON laptop and CAD4TB tablet.
The 25 Watt integrated solar panel takes 16 hours to fully charge the Mobisun internal
battery again. It is also possible to use the GRID to recharge the internal battery,
which takes approx. 2,5 hours.
KEY features:
•Output 230 VAC @ 250 Watt
•Output 2 x USB, 5 Volt, 3,2 Amp
•Peak power 500 Watt,
•Battery capacity 70 Ah, 256 Wh
•Water resistant IPX4
•Possible to add more portable solarpanels to reduce recharging time
•Dimensions 550x300x50 mm
•Weight 6 kg
Operation
Install the Mobisun in a location where it can capture most of the (sun) light. Attach
the delivered power cable to the 230 VAC power outlet on the side. Select 230 VAC
AC operation by flipping the switch to 230 VAC. Now the internal battery is able to
power the two battery chargers (one for the detector, one for the X-ray) and the
laptop
Table of contents
Other Delft Imaging Medical Equipment manuals

Popular Medical Equipment manuals by other brands


Otto Bock
Otto Bock 17KO1 Series Instructions for use

Diamedica
Diamedica Glostavent Helix Instructions for use manual

Otto Bock
Otto Bock DynamicArm 12K100N Instructions for use

Hausmann
Hausmann 1427 Installation & operation instructions

medi
medi Stabimed manual

TALARMADE
TALARMADE HeadUp HUCS instruction manual


