Dell PowerEdge User manual

Dell PowerEdge 12 Gbps SAS HBA
User’s Guide
Regulatory Model: UCSE 900

Notes, Cautions, and Warnings
NOTE: A NOTE indicates important information that helps you make better use of your computer.
CAUTION: A CAUTION indicates either potential damage to hardware or loss of data and tells you
how to avoid the problem.
WARNING: A WARNING indicates a potential for property damage, personal injury, or death.
Copyright ©2014 Dell Inc. All rights reserved. This product is protected by U.S. and international copyright and
intellectual property laws. Dell™and the Dell logo are trademarks of Dell Inc. in the United States and/or other
jurisdictions. All other marks and names mentioned herein may be trademarks of their respective companies.
2014 - 09
Rev. A00

Contents
1 Overview.................................................................................................................5
LED Port activity feature for 12 Gbps SAS HBA controller only...........................................................6
Supported operating systems...............................................................................................................6
Related documentation.........................................................................................................................7
2 Deploying 12 Gbps SAS HBA controller............................................................8
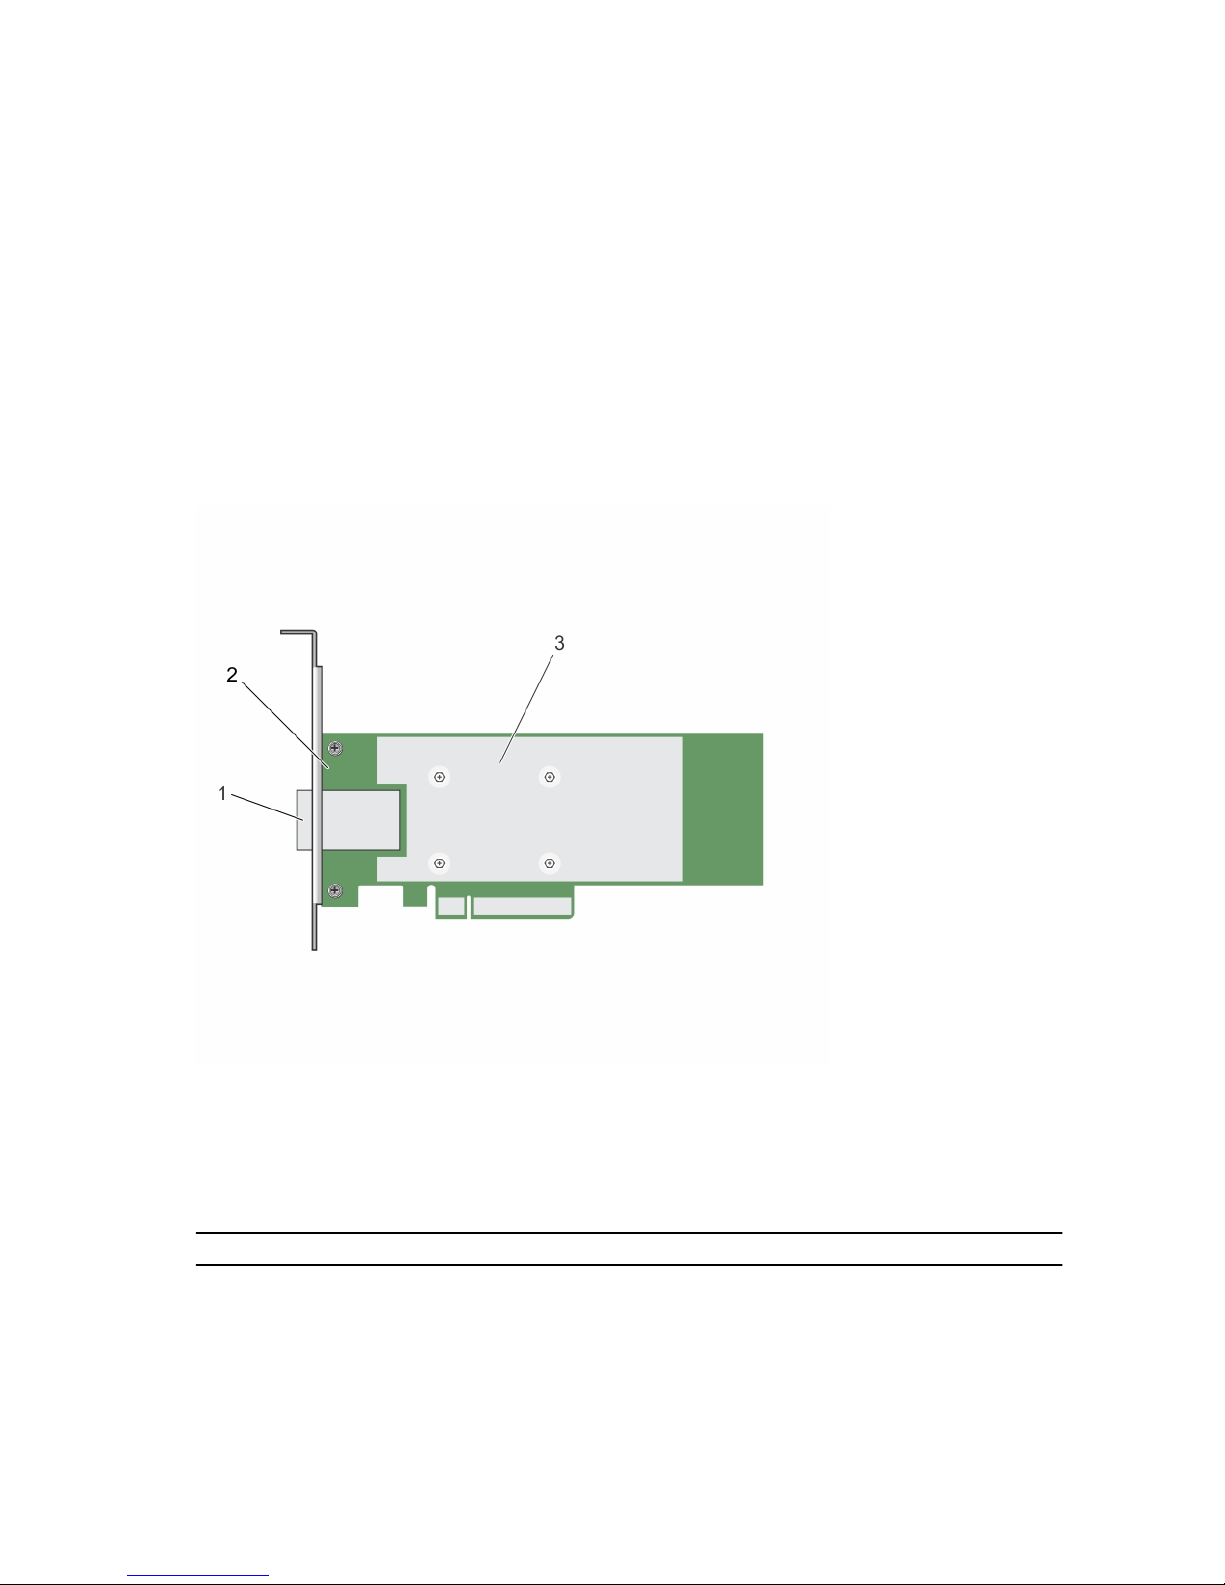
Installing 12 Gbps SAS HBA controller..................................................................................................8
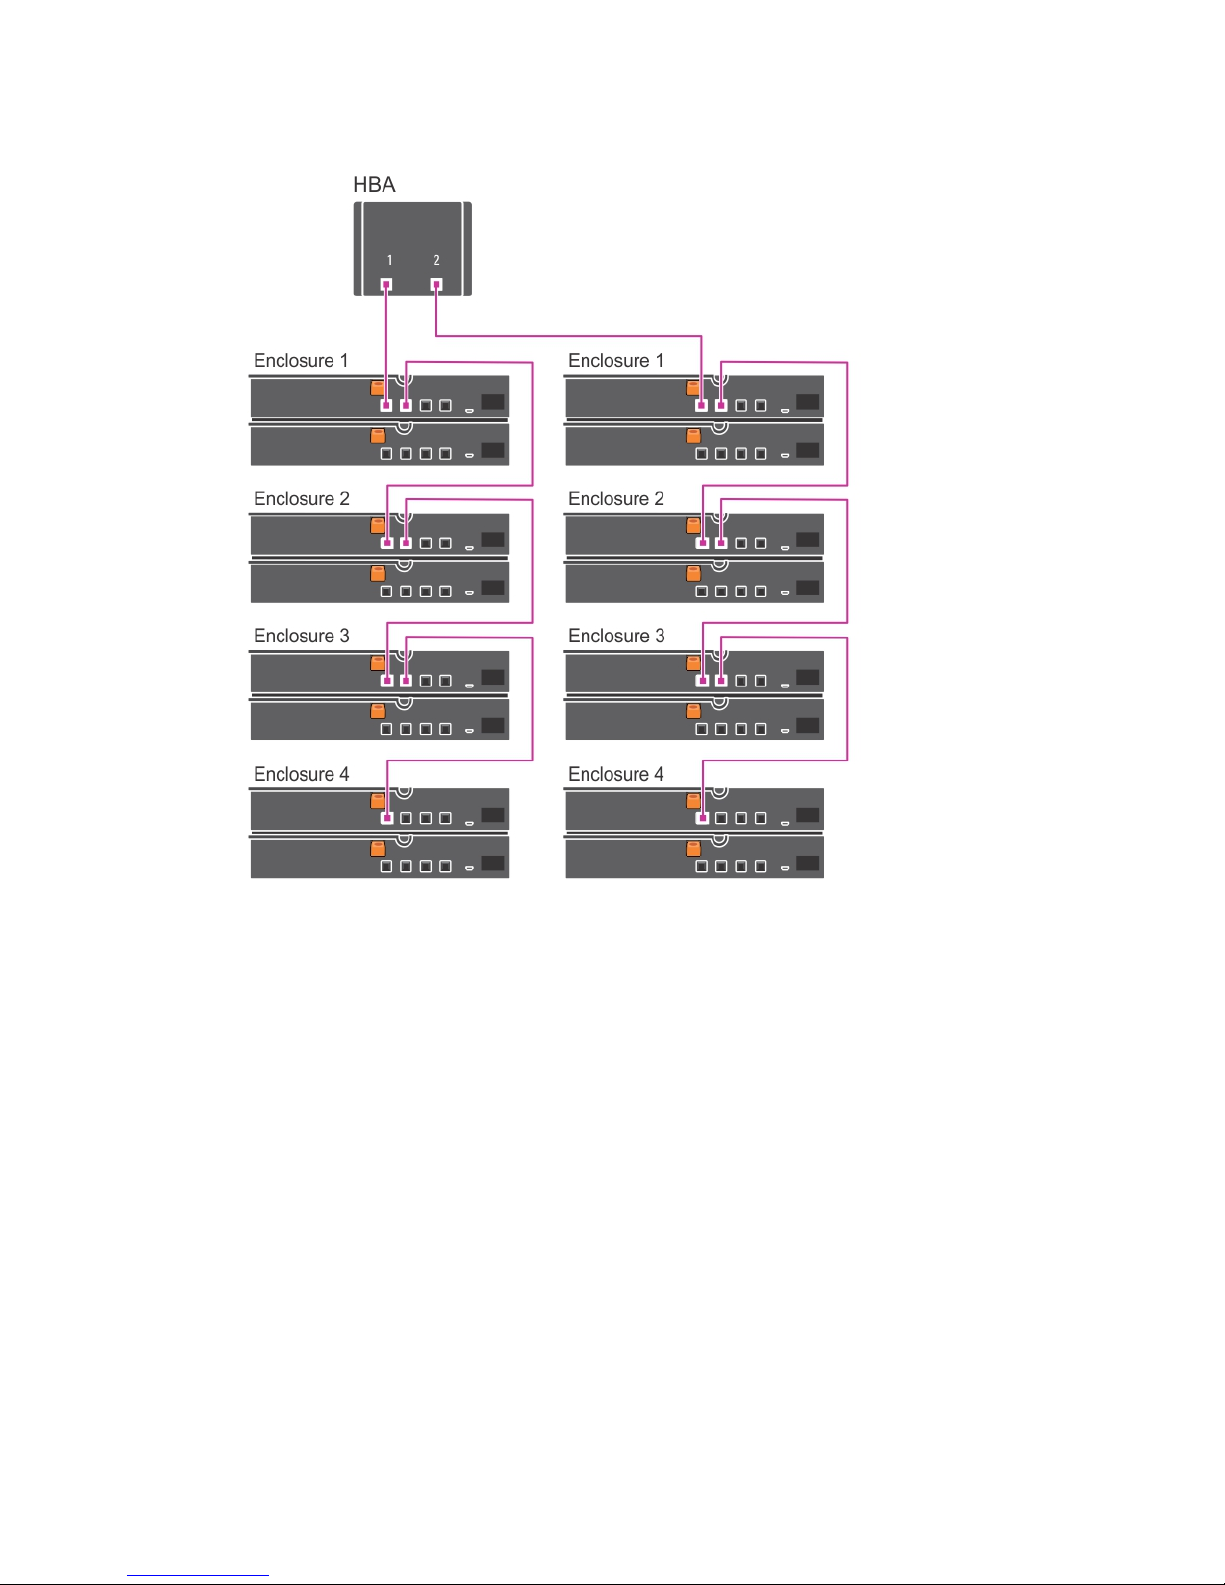
Cabling 12 Gbps SAS HBA controller installed on host server to the storage enclosure...................9
3 Driver installation................................................................................................11
Creating the device driver media........................................................................................................ 11
Downloading drivers from the Dell support website....................................................................11
Downloading drivers from the Dell Systems Service and Diagnostic Tools Media ................... 12
Windows driver installation................................................................................................................. 12
Installing the driver during a Windows Server 2008 R2 and newer installation..........................12
Installing the driver after Windows Server 2008 R2 and newer installation ...............................12
Updating 12 Gbps SAS HBA controller driver for existing Windows Server 2008 R2 and
newer..............................................................................................................................................13
Linux driver installation........................................................................................................................14
Installing or updating the RPM driver package with DKMS support............................................14
Installing or updating the RPM driver package with KMOD support...........................................14
Installing or updating the RPM driver package with KMP support.............................................. 14
4 Human Interface Infrastructure configuration utility................................. 16
Entering the HII configuration utility.................................................................................................. 16
Exiting the HII configuration utility..................................................................................................... 16
Navigating to Dell 12 Gbps SAS HBA configuration utility.................................................................16
Controller management .....................................................................................................................17
Viewing the controller properties................................................................................................. 17
Changing the controller properties.............................................................................................. 17
Managing physical disk drives............................................................................................................. 17
Viewing physical disk drive properties..........................................................................................18
Selecting physical disk drive operations.......................................................................................18
5 Updating the firmware.......................................................................................19
6 Getting help.........................................................................................................20
Contacting Dell................................................................................................................................... 20

Documentation feedback...................................................................................................................20
Locating your system service tag.......................................................................................................20

1
Overview
The Dell 12 Gbps SAS HBA controller is a Host Bus Adapter (HBA), which provides physical disk drive
interface with no-RAID capability and is available in low-profile and full-height form factor for external
storage.
The 12 Gbps SAS HBA controller is part of the Dell Serial-Attached SCSI (SAS) controller solutions.
Figure 1. displays the feature of the 12 Gbps SAS HBA controller.
Figure 1. Features of 12 Gbps SAS HBA controller
1. Split connector 2. 12 Gbps SAS HBA controller
3. Controller carrier
Table 1. Specifications for 12 Gbps SAS HBA controller
Specification 12 Gbps SAS HBA controller
SAS technology Yes
Support for x4 or x8 PCI-e host interface Yes
5

Specification 12 Gbps SAS HBA controller
Form factor Half-height, Half-length PCI adapter
I/O Controller (IOC) LSI SAS 3008
Operating voltage requirements +12 V, +3.3 V, +3.3 Vaux
Communication to the system PCIe lanes
Communication to end devices SAS links
SAS connectors 2x4 external
Lead free Yes
Dell-compliant SAS and SATA compatibility Yes
Dell-supported direct connected end devices Dell-supported external tape devices, Dell supported
external RBODs, and JBODs.
Hardware-based RAID support No
12 Gbps throughput Yes
PCI-e x8 link width Yes
PCI-e 3.0 Yes
LED Port activity feature for 12 Gbps SAS HBA controller
only
The 12 Gbps SAS HBA controller is equipped with port activity or status LEDs. The LEDs enable you to
quickly determine the status of an external SAS port. Each x4 connector has its own set of LEDs.
The following table describes the color of the LEDs and corresponding SAS port state.
Table 2. x4 Connector LEDs Description
LED Color SAS Port State
Off Indicates one of the following:
• Power is off.
• Port has been reset.
• Either all links in the port are disconnected or the
cable is disconnected.
Green All links in the port are connected and functional.
Amber One or more links in the port is not connected. This is
applicable only in a wide port configuration.
Supported operating systems
The 12 GBPS SAS HBA controller supports the following operating systems:
• Microsoft Windows Server 2012
• Microsoft Windows Server 2012 R2
6

• Microsoft Windows Server 2008 R2
• Microsoft Windows Server 2008 R2 SP1
• VMware ESXi 5.1 Update 2
NOTE: The 12 GBPS SAS HBA driver for VMware ESXi is bundled with the VMware ISO image
available from Dell. For more information, see dell.com/virtualizationsolutions.
• VMware ESXi 5.5 Update 2
• Red Hat Enterprise Linux version 6.5 (64-bit)
• Red Hat Enterprise Linux 6.5 for HPC Compute Node
• Red Hat Enterprise Virtualization 4.0 (64-bit)
• SUSE Linux Enterprise Server version 11 SP3 (64-bit)
• Red Hat Enterprise Linux version 7
NOTE: For the latest list of supported operating systems and driver installation instructions, see the
system documentation at dell.com/support/manuals. For specific operating system service pack
requirements, see the Drivers and Downloads section at dell.com/support/manuals.
Related documentation
• For all storage controllers and PCIe SSD documents, go to dell.com/storagecontrollermanuals.
• For all Dell OpenManage documents, go to dell.com/openmanagemanuals.
• For all operating system documents, go to dell.com/operatingsystemmanuals.
• For all PowerEdge documentation, go to dell.com/poweredgemanuals.
• For all PowerVault documentation, go to dell.com/powervaultmanuals.
• Your product documentation includes, Dell PowerEdge 12 Gbps SAS HBA User’s Guide . The User’s
Guide describes features, installation, management, and troubleshooting of 12 Gbps SAS HBA
controller.
7

2
Deploying 12 Gbps SAS HBA controller
CAUTION: Many repairs may only be done by a certified service technician. You should only
perform troubleshooting and simple repairs as authorized in your product documentation, or as
directed by the online or telephone service and support team. Damage due to servicing that is
not authorized by Dell is not covered by your warranty. Read and follow the safety instructions
that came with the system.
NOTE: For information about removing and reinstalling system parts, see the system-specfic
Owner's Manual at dell.com/poweredgemanuals.
This section provides a set of high level installation and removal instructions for the 12 Gbps SAS HBA
controller.
Installing 12 Gbps SAS HBA controller
CAUTION: Many repairs may only be done by a certified service technician. You should only
perform troubleshooting and simple repairs as authorized in your product documentation, or as
directed by the online or telephone service and support team. Damage due to servicing that is
not authorized by Dell is not covered by your warranty. Read and follow the safety instructions
that came with the product.
CAUTION: To ensure protection for the electronic components inside, follow the ElectroStatic
Discharge (ESD) guidelines.
1. Unpack your 12 Gbps SAS HBA controller.
2. Turn off the system, including any attached peripherals, and disconnect the system from the
electrical outlet.
NOTE: For more information about Power Supply Units (PSUs), see your system’s Hardware
Owner’s Manual at dell.com/poweredgemanuals.
3. Disconnect the system from the network and remove the cover of the system.
4. If applicable, remove the blank.
5. Select an appropriate PCIe slot.
NOTE: To avoid damage to the controller, hold the controller by its edges only.
6. Align the connector on the 12 Gbps SAS HBA controller with the PCIe slot on the system.
7. Press down the controller till the connectors are firmly engaged.
8. Tighten the screws on the bracket, if any, or use the system’s retention clips to secure the controller
on the system.
9. Use SAS cable(s) to connect the external tape device or enclosure to the adapter.
10. Install the system cover.
11. Reconnect the power cable(s) and network cables, and then turn on the system.
8

Figure 2. Installing the 12 Gbps SAS HBA controller
1. SAS cables (2) 2. SAS cable connectors (2)
3. 12 Gbps SAS HBA PCIe connector 4. PCIe connector on the system board
5. 12 Gbps SAS HBA controller
Cabling 12 Gbps SAS HBA controller installed on host
server to the storage enclosure
Perform the following steps to connect the 12 Gbps SAS HBA controller to the physical disk drives in
storage enclosures:
1. Set up the 12 Gbps SAS HBA controller. See Installing the 12 Gbps SAS HBA controller.
2. Connect the SAS cables such that the first four enclosures are daisy-chained with one of the
enclosures connected to a single port on the controller. The second four enclosures are daisy-
chained with one of the enclosures connected to the second port on the controller. See Figure 3.
NOTE: The controller supports up to eight enclosures only.
NOTE: For more information about the single-port and multi-chain configurations, see the
PowerVault system-specific manuals at dell.com/powervaultmanuals.
9

Figure 3. Cabling the 12 Gbps SAS HBA controller to the storage enclosure
10

3
Driver installation
The 12 Gbps SAS HBA controller requires software drivers to operate with the supported operating
systems.
This chapter contains the procedures for installing the drivers for the 12 Gbps SAS HBA controller.
NOTE: The drivers for 12 Gbps SAS HBA controller for VMware ESXi is packaged within the VMware
ESXi ISO image downloaded from Dell support site. For more information, see the VMware
documentation at dell.com/virtualizationsolutions.
Two methods for installing a driver discussed in this chapter are:
•Installing a driver during operating system installation: Use the method if you are performing a new
installation of the operating system and want to include the drivers.
•Updating existing drivers: Use the method if the operating system and the 12 Gbps SAS HBA
controller is already installed and you want to update to the latest drivers.
NOTE: It is recommended that you update existing operating system drivers after installation. Native
driver support is available for Windows 2012 R2, Windows 2008 R2, and so on.
Creating the device driver media
Use one of the following two methods to create the device driver media:
1. Downloading drivers from the Dell Systems Service and Diagnostic Tools Media .
2. Downloading drivers from the Dell support website.
Downloading drivers from the Dell support website
To download drivers from the Dell Support website:
1. Go to dell.com/support.
2. Enter the service tag of your system in the Choose by Service Tag to get started field or select
Choose from a list of all Dell products.
3. Select System Type, Operating System, and Category from the drop-down list.
The drivers that are applicable to your selection are displayed.
4. Download the drivers that you require to a USB drive, CD, or DVD.
5. During the operating system installation, use the media that you created with the Load Driver option
to load mass storage drivers. For more information about reinstalling the operating system, see the
relevant section for your operating system later in this guide.
11

Downloading drivers from the Dell Systems Service and Diagnostic Tools
Media
To download drivers from the Dell Systems Service and Diagnostic Tools media:
1. Insert the Dell Systems Service and Diagnostics Tools media in your system.
The Welcome to Dell Service and Diagnostic Utilities screen is displayed.
2. Select your system model and operating system.
3. Click Continue.
4. From the list of drivers displayed, select the driver you require.
5. Select the self-extracting zip file and click Run.
6. Copy the driver to a drive, CD, DVD, or USB drive.
7. Repeat the steps 1–6 for all the drivers you require.
Windows driver installation
Before you install the Windows driver for 12 Gbps SAS HBA controller, you must first create a device
driver media.
• Read the Microsoft Getting Started document that shipped with your operating system.
• Ensure that your system has the latest BIOS, firmware, and driver updates. If required, download the
latest BIOS, firmware, and driver updates from dell.com/support.
• Create a device driver media using one of the methods listed here:
– USB drive
– CD
– DVD
Installing the driver during a Windows Server 2008 R2 and newer installation
To install the driver:
1. Start the system using the Windows Server 2008 R2, or newer media.
2. Follow the on-screen instructions until you reach Where do you want to install Windows Server
2008 R2 or newer window, and then select Load driver.
3. The system asks you to insert the media. Insert the installation media and browse to the appropriate
location.
4. Select a 12 Gbps SAS HBA controller from the list.
5. Click Next and continue installation.
Installing the driver after Windows Server 2008 R2 and newer installation
Perform the following steps to configure the driver for the 12 Gbps SAS HBA controller on a system that
already has Windows installed:
1. Turn off the system.
2. Install the new 12 Gbps SAS HBA controller in the system.
For detailed instructions about installing and cabling the 12 Gbps SAS HBA controller in the system,
see Deploying the 12 Gbps SAS HBA controller.
12

3. Turn on the system.
The Found New Hardware Wizard screen displays the detected hardware device.
4. Click Next.
5. On the Locate device driver screen, select the Search for a suitable driver for my device option and
click Next.
6. Browse and select the drivers from the Locate Driver Files screen.
7. Click Next.
The wizard detects and installs the appropriate device drivers.
8. Click Finish to complete the installation.
9. Restart the system when prompted.
Updating 12 Gbps SAS HBA controller driver for existing Windows Server
2008 R2 and newer
NOTE: Close all applications on your system before you update the driver.
1. Insert the media (CD, DVD, or USB drive) containing the driver.
2. Click Start → Settings → Control Panel → System.
The System Properties screen is displayed.
NOTE: The path to System might vary on the basis of operating system family.
3. Click on the Hardware tab.
4. Click Device Manager.
The Device Manager screen is displayed.
NOTE: The path to Device Manager might vary on the basis of operating system family.
5. Expand SCSI and RAID Controllers by double-clicking the entry or by clicking the plus (+) symbol
next to SCSI and RAID Controller.
NOTE: In Windows Server 2008, Windows Server 2008 R2, and Windows Server 2012, the 12
Gbps SAS HBA controller is listed under Storage Controllers.
6. Double-click the RAID controller for which you want to update the driver.
7. Click the Driver tab and click Update Driver.
The screen to update the device driver wizard is displayed.
8. Select Install from a list or specific location.
9. Click Next.
10. Follow the steps in the wizard and browse to the location of the driver files.
11. Select the INF file from the driver media (CD, DVD, or other media).
12. Click Next and continue the installation steps in the wizard.
13. Click Finish to exit the wizard and reboot the system for the changes to take place.
NOTE: Dell provides the Dell Update Package (DUP) to update drivers on systems running
Windows Server 2008 R2 and newer operating system. DUP is an executable application that
updates drivers for specific devices. DUP supports command line interface and silent execution.
For more information, see dell.com/support.
13

Linux driver installation
NOTE: The driver update disk (DUD) images are created only for those operating system releases in
which the native (in-box) driver is insufficient for installation. In the event that an operating system is
being installed with a corresponding DUD image, follow the instructions below. If not, proceed with
using the native device driver and then skip to the topic Installing or Updating the RPM Driver
Package With DKMS Support.
Installing or updating the RPM driver package with DKMS support
NOTE: This procedure is applicable for Red Hat Enterprise Linux 5 SP7 and SUSE Enterprise Linux 10
SP4.
NOTE: For SUSE Enterprise Linux 10 SP4 operating system installation, download the latest driver
from dell.com/support, and update the driver using the procedures detailed in this section.
Perform the following steps to install the RPM package with DKMS support:
1. Expand the gzipped tarball driver release package.
2. Install the DKMS package using the command: rpm –ihv megaraid_sas- <version> .noarch.rpm.
3. Install the driver package using the command: rpm –ihv megaraid_sas- <version> .noarch.rpm.
NOTE: Use rpm -Uvh <package name> when updating an existing package.
4. If the previous device driver is in use, you must restart the system for the updated driver to take
effect.
5. Verify that the driver is loaded with the following system commands: modinfo megaraid_sas and
dkms status.
Installing or updating the RPM driver package with KMOD support
NOTE: This procedure is applicable for Red Hat Enterprise Linux 6.5 SP2.
Perform the following steps to install the RPM package with KMOD support:
1. Expand the gzipped tarball driver release package.
2. Install the driver package using the command: rpm –ihv kmodmegaraid_ sas-<version>.rpm.
NOTE: Use rpm -Uvh <package name> when upgrading an existing package.
3. If the previous device driver is in use, you must restart the system for the updated driver to take
effect.
4. Verify that the driver is loaded with the following system commands: modinfo megaraid_sas.
Installing or updating the RPM driver package with KMP support
NOTE: This procedure is applicable for SUSE Enterprise Linux 11 SP2.
Perform the following steps to install the RPM package with KMP support:
1. Expand the gzipped tarball driver release package.
2. Install the driver package using the command: rpm –ihv kmpmegaraid_ sas- <version>.rpm.
NOTE: Use rpm -Uvh <package name> when updating an existing package.
14

3. If the previous device driver is in use, you must reboot the system for the updated driver to take
effect.
4. Verify that the driver is loaded with the following system commands: modinfo megaraid_sas.
Upgrading the Kernel
When upgrading to a new kernel, you must reinstall the DKMS-enabled driver packages. Perform the
following steps to update or install the driver for a new kernel:
1. At a terminal window, type the following: dkms build -m <module_name> – v <module version> – k
<kernel version> dkms install -m <module_name> – v <module version> – k <kernel version>.
2. To check if the driver is successfully installed in the new kernel, type: dkms status.
A message similar to the following is displayed: <driver name>, <driver version>, <new
kernel version>: installed.
3. If the previous device driver is in use, you must restart the system for the updated driver to take
effect.
15

4
Human Interface Infrastructure
configuration utility
The HII configuration utility is a standardized way of viewing and setting a device configuration. The HII
configuration utility provides pre-operating system functionality and management for the following:
• Viewing physical device properties.
• Running physical device operations.
• Retrieving debug information.
Entering the HII configuration utility
Follow the steps to enter the HII configuration utility:
1. Turn on the system.
2. Press <F2> during system startup to enter the System Setup.
Displays the list of menu on the System Setup Main Menu screen.
3. Click Device Settings.
To access the management menu for the controller, use the arrow keys or the mouse.
NOTE: For more information about all the options, click Help that is available on the upper-
right corner of the browser screen.
Exiting the HII configuration utility
To exit the HII configuration utility, click the Exit button on the upper-right corner in System Setup menu
of the HII Configuration utility.
NOTE: Clicking Exit in any HII configuration utility page takes you back to the main System Setup
menu.
NOTE: Press <Esc> from any HII configuration utility page to return to the previous page.
Navigating to Dell 12 Gbps SAS HBA configuration utility
1. Enter the HII configuration utility. See Entering the HII configuration utility.
The Device Settings screen displays a list of NIC ports and the 12 Gbps SAS HBA configuration utility.
2. To enter 12 Gbps SAS HBA configuration utility, click Dell 12 Gbps SAS HBA configuration utility.
Displays the list of Configuration Options:
• Controller management
• Physical disk management
16

Controller management
Controller management allows you to configure, manage, and view the controller properties.
Viewing the controller properties
View Controller Properties screen allows you to view the controller properties.
In the System Setup Main Menu, click Device Settings → Dell 12 Gbps SAS HBA Configuration Utility →
Controller Management → View Controller Properties.
The table describes the fields on the View Controller Properties screen:
Menu Item Description
Controller Name Indicates the controller name.
Controller
Revision
Indicates the controller revision.
PCI ID Indicates the PCI ID.
PCI Slot Number Indicates the controller slot numbering.
Host Interface Indicates the controller type.
Physical Disk
Count
Indicates the count of physical drive.
Firmware Type Indicates the type of firmware.
Firmware Version Indicates the version of firmware.
Default NVData
Version
Indicates the version of default NVData.
Persistent NVData
Version
Indicates the version of persistent NVData.
Changing the controller properties
1. Enter the Dell 12 Gbps SAS HBA Configuration Utility. See Navigating to Dell 12 Gbps SAS HBA
configuration utility.
2. Click Controller Management → Change Controller Properties.
You can Enable or Disable the Legacy BIOS.
Managing physical disk drives
Physical disk drive management allows you to manage, view, and perform the physical disk drive
properties.
17

Viewing physical disk drive properties
View physical disk properties screen allows you to view the physical disk drive properties.
In System Setup Main Menu, click Device Settings → Dell 12 Gbps SAS HBA Configuration Utility →
Physical Disk Management → View Physical Disk Properties.
The table describes the fields on the View Physical Disk Properties screen:
Menu Item Description
Select the Physical
Disk
Allows you to select the physical disk.
Physical Disk ID Indicates the physical disk ID.
State Indicates the current state of the physical disk.
Revision Indicates the revision.
Device Type Indicates the device type.
SAS Address Indicates the SAS address.
Disk Cache
Setting
Indicates the disk cache setting.
Size Indicates the total physical storage size of the disk.
Disk Protocol Indicates the disk protocol.
Serial Number of
Disk
Indicates the serial number of the physical disk.
Hardware Vendor Indicates the name of hardware vendor.
Selecting physical disk drive operations
1. Start the Dell 12 Gbps SAS HBA Configuration Utility. See Navigating to Dell 12 Gbps SAS HBA
configuration utility.
2. Click Physical Disk Management → Select Physical Disk Operations.
The table describes the Select Physical Disk Operations screen details:
Menu Item Description
Select Physical
Disk
Allows you to select the physical disk.
Start Locate/Blink Allows you to activate the driver’s LED.
Stop Locate/
Unblink
Allows you to deactivate the driver’s LED.
Write Cache
Setting
By default, the Write Cache Setting option is set to Disabled.
Enabled Allows you to enable write-cache.
18

5
Updating the firmware
Perform the below procedures to download and run DUP to update the firmware:
1. Navigate to dell.com/support.
2. Enter your system Service Tag and click Submit.
The Product Support page is displayed.
3. Click Driver and Downloads.
4. Select the operating system, category, and the update importance.
The list of applicable updates are displayed.
5. Click Download.
6. When the download is complete, run DUP by double-clicking the filename.
NOTE: You can also download a different file format from the File Title column by selecting a
file format for the DUP and clicking it. In case you want to download more than one file type,
you must do it one at a time.
NOTE: You can also download a DUP or group of DUPs using Dell Repository Manager. See the
Dell Repository Manager User's Guide for more information.
7. Read the update information displayed in the DUP window.
8. Check the DUP inventory report for package version and installed versions of component.
9. Click Install to install the DUP.
NOTE: For more information about updating the firmware on systems supporting different
operating systems see dell.com/openmanagemanuals.
19

6
Getting help
You can get help with your Dell product by contacting Dell, or send feedback on product documentation.
Contacting Dell
NOTE: If you do not have an active Internet connection, you can find contact information on your
purchase invoice, packing slip, bill, or Dell product catalog.
Dell provides several online and telephone-based support and service options. Availability varies by
country and product, and some services may not be available in your area. To contact Dell for sales,
technical support, or customer service issues:
Go to dell.com/contactdell.
Documentation feedback
can click on the Feedback link in any of the Dell documentation pages, fill out the form, and click Submit
to send your feedback.
Locating your system service tag
Your system is identified by a unique Express Service Code and Service Tag number. The Express Service
Code and Service Tag are found on the front of the system by pulling out the information tag.
Alternatively, the information may be on a sticker on the chassis of the system. This information is used
by Dell to route support calls to the appropriate personnel.
20
Other manuals for PowerEdge
6
Table of contents
Other Dell PCI Card manuals
Popular PCI Card manuals by other brands

HighPoint
HighPoint RocketU 1344A Quick installation guide

Linksys
Linksys WMP11 ver. 2.7 user guide

Digitus
Digitus DS-30105 Quick installation guide

Sonnet
Sonnet Tempo SSD Pro 6Gb/s SATA PCIe Drive Card quick start guide

Intellinet
Intellinet 524575 Quick install guide

Avermedia
Avermedia DVD EZMaker 7 Quick installation guide