Delta Regis DRTQ Series User manual

DRTQ Series Manual 2
Safety............................................................................................................3
Specifications...............................................................................................4
Component Identification............................................................................5
Glossary of Terms.........................................................................................6
Display Features and Settings..................................................................7-9
Display Screen..........................................................................................7
Main Menu.................................................................................................7
Settings…..................................................................................................7
Adjusting Your Settings..........................................................................8-9
Measuring Torque...................................................................................10-11
Using Quick Run.......................................................................................10
Using Measure Mode................................................................................10
Peak Mode................................................................................................11
Track Mode...............................................................................................11
Exporting Data………………………………………………..............................12
USB Driver Installation………………………………………………...........13-17
Trouble Shooting…………………………………………………………………18
Warranty / Limitation Of Liability………………………………………………19
Table Of Contents

DRTQ Series Manual 3
WARNING
Do not operate unit until you read and understand ALL safety information. Failure
to do so may result in damage to the product and/or bodily injury.
Safety Information
•Do not wear any loose articles of clothing or jewelry when operating unit.
•Always wear appropriate attire when using these products (i.e. protective eye
wear, pants, closed toed shoes).
•Always check for loose wires and cables on and around unit before beginning
operation.
•Keep unit and charger away from water, always store in a dry place and safe
environment.
•Do not operate unit in a flammable or explosive environment.
•Never apply torque to this unit that exceeds the maximum torque value. Doing
so may result in damage to the unit and injury to the operator.
•Unauthorized personnel should never be permitted to operate this unit.
•Never use additional accessories with this unit that were not included and are not
from this manufacturer, doing so could result in damage to the unit.
•Always operate unit in a clean and organized work place.
•This unit should always be kept clean, dry, and free from oil and grease.
•Do not perform repairs on this unit, unless you are an authorized service
technician.
•Always unplug unit before inspecting, cleaning, or performing maintenance on
the unit.
•Never perform maintenance on unit that is not in accordance with the
maintenance procedures listed in the service and maintenance portion of this
manual. Failure to comply with these instructions may result in damage to the
unit.
Safety

DRTQ Series Manual 4
DRTQ Series Features
The DRTQ series touch screen torque tester provides an intuitive menu selection through the use of an
easy to operate touch screen interface. The DRTQ series provides unsurpassed accuracy for testing
torque wrenches, manual screwdrivers, electric screwdriver, pneumatic screwdriver, and other torque
controlled power tools.
The DRTQ series is unrivaled with the number of features and benefits it has to offer. Its integrated level
sensor automatically rotates the LCD screen depending on the torque testers’ orientation. In addition the
unit provides the ability to do a quick audit or metrology level calibration making it an incredibly versatile
and priceless instrument for any QA department.
±0.5% of reading from 10% to 100% of full scale
Full color LCD touch screen
On-screen torque calculator
Made in North America
1 Year Warranty
Processes statistical calculations: CP, CPK, Sigma
On-Screen graphing capability for tool performance analysis
Export data directly to computer through USB or save to SD Card
Automatic screen rotation (level sensor flips screen vertically or horizontally)
“Quick Run” mode provides the ability to quickly audit and verify a tool
Metrology level “Measure mode” allows users to to establish acceptable tolerances
Eight available engineering units: In Ozs, In Lbs, Ft Lbs, Nm, cNm, KgCm, gfCm, Kgm
Li-Ion technology provides extended battery life (up to 4 hours of continuous use or 12 hours idle)
Advanced user programmable options
Models Available:
Model #
Torque Range
DRTQ-160-Z
16.00 –160.00 In Oz
DRTQ-10-I
1.00 –10.00 In Lb
DRTQ-25-I
2.50 –25.00 In Lb
DRTQ-100-I
10.00 –100.00 In Lb
DRTQ-100-F
10.00 -100.00 Ft Lb
Precision/ Accuracy
+/- 0.5%
Data Output Port
SD & USB (Mini)
Battery
3.7 V, 4400 mAh Lithium Ion
Charge Time
2 hours
Battery Life
4 hours
Charger
Output 5V 2A Max
Weight
4.25 Lbs
Calibration of Unit: In order to maintain a high standard of accuracy periodic calibrations are required. In
most applications a 6-12 month periodic calibration is acceptable. Please contact your local distributor or
the manufacturer when your unit is up for its calibration interval.
Specifications

DRTQ Series Manual 5
Component Identification
LCD Touch Screen
Rundown Fixture
(Not available on all units)
Docking Plate
(Optional Accessory)
Power On Button
AC Power Adapter
SD Card Slot
USB Port

DRTQ Series Manual 6
Filter: The expected time needed to capture a peak (Milliseconds)
Peak: Peak Mode is used to measure and display the maximum torque that a tool
experiences when being used in a CW or CCW direction. The Peak Mode is most
commonly used for calibrating pulse tools, electric/pneumatic clutch tools, clicker style
torque wrenches and hand torque drivers.
Track: The Track Mode measures the amount of force that is applied to the transducer in
live time. This is used to verify the calibration of dial indicating & beam style torque
wrenches. Track Mode may also be used for bottle cap fastening.
Torque High Limit: The Torque High Limit is used to notify an operator when the
reading falls above the maximum torque value. Maximum acceptable reading.
Torque Low Limit: The Torque Low Limit is used to notify an operator when the reading
falls below the minimum torque value. Minimum acceptable reading.
Cpk Value: The Cpk value, also known as the process capability for a centered
process, is a statistical value that is used to indicate how closely a series of test samples
are grouped around the target value.
Torque Threshold: The Torque Threshold is the minimum reading the unit will read.
This feature is designed to help avoid picking up a reading due to operation setup.
Note: Setting this value too high may not allow the unit to pick up readings.
CW: Captures peaks in the clockwise direction only.
CCW: Captures peaks in the counterclockwise direction only.
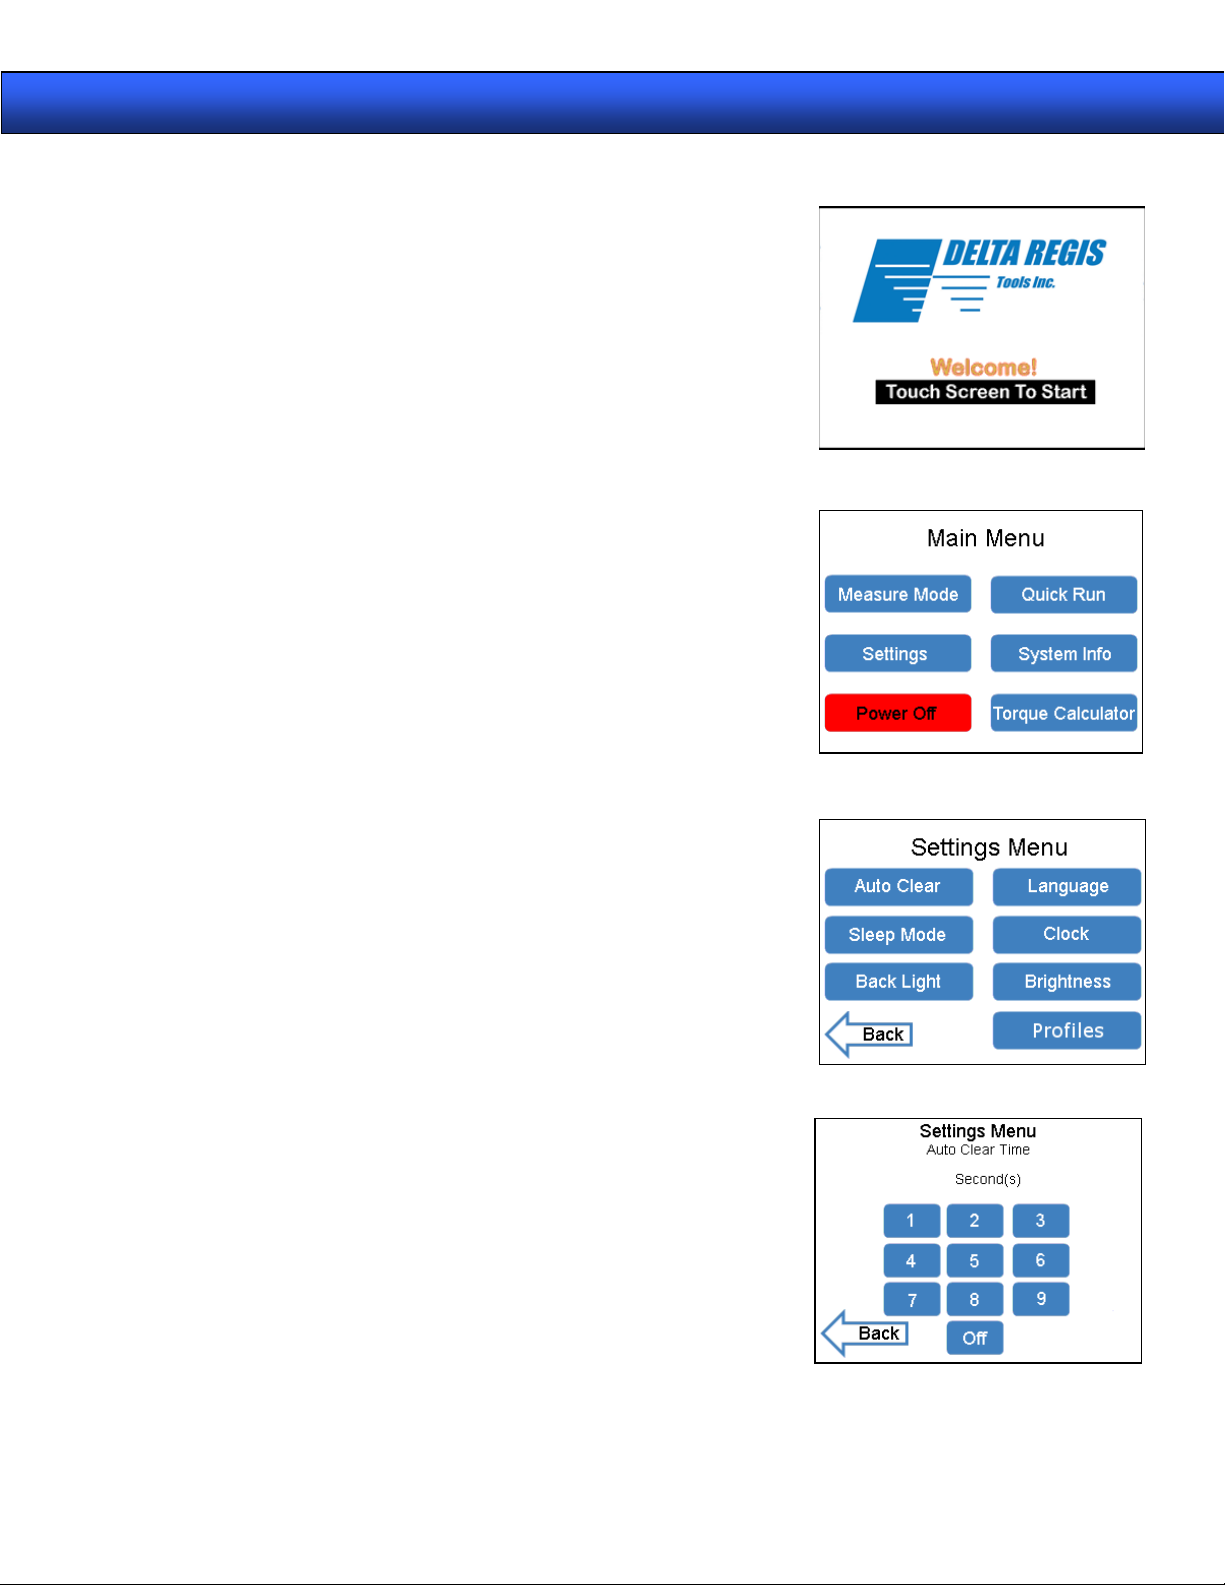
Measure Mode: Use this mode if you would like to save or export data related to your
tools performance.
Quick Run: Use this mode if you would like quick access to the torque tester’s
measuring capability.
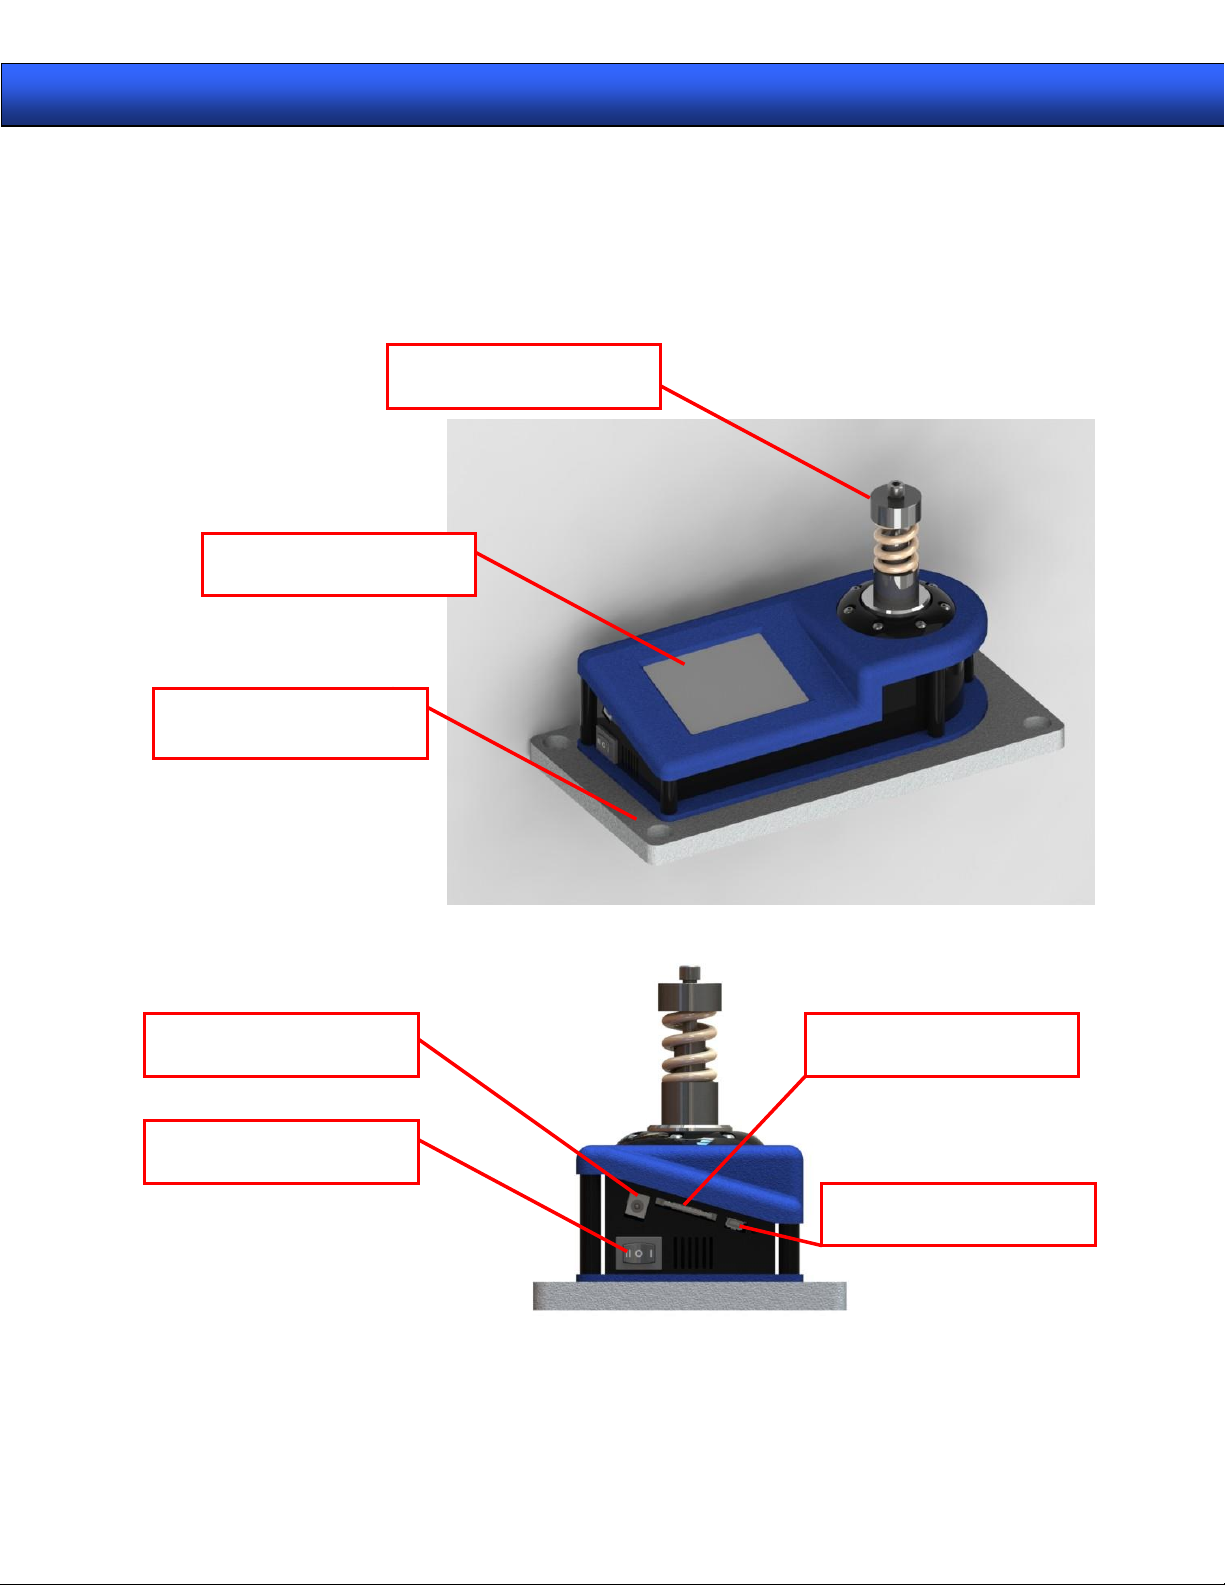
Rundown Fixture: A rundown fixture helps simulate an actual joint during the fastening
process. Common types of joints are hard, medium, and soft. A rundown fixture is
required for testing power tools such as cordless screwdrivers, electric screwdrivers, air
screwdrivers, & nutrunners.
Profile: The torque tester allows for up to 8 different profiles to be preset. The profile
allows the user to quickly select a predetermined testing strategy.
Glossary of Terms

DRTQ Series Manual 7
Power-up & Display Screen
When the operator switches on the unit (press the white square
button on the left hand side of the unit to power on the torque
tester) this screen will appear. Touch any area of this torque
display screen to continue to the main menu.
Main Menu
This screen will allow users to navigate through different
functions that the DRTQ Series torque tester features. Users
may return to this screen when they are finished with one
function and would like to move on to another. Please note
that users must return to the main menu to power down the
unit.
Settings
The DRTQ series torque tester offers a settings menu that
allow users to adjust the features on the unit to their own
specifications. The following step by step instructions will help
you navigate through the settings menu and adjust the
following features. To get started you must select [Settings]
from the main menu.
Adjusting Your Settings
Auto Clear The Auto Clear function allows users to set a
desired amount of time (in seconds) for a torque
reading to be displayed before it is cleared from
the screen. To adjust the time, select a number 1
thru 9 and select the [Back] arrow. To turn off
this feature select [Off] and select the [Back]
arrow. For visual reference of this screen you
may refer to the picture on the right.
Display Features & Settings
Fig. 7.1
Fig. 7.2
Fig. 7.3
Fig. 7.4

DRTQ Series Manual 8
Adjusting Your Settings Continued
Language The Language feature allows for the future addition of
multiple languages. The tester features the following
languages: English. To change the language, simply
select the language of your choice and select the
[Back] arrow. For visual reference of this screen you
may refer to the picture on the right.
Clock The DRTQ torque tester allows users to set the time
and date on the torque tester. To adjust the date
press the numbers on the keypad, once you have
finished adjusting the date you can adjust the clock
also by pressing the same numbers on the key pad.
Sleep Mode The Sleep Mode feature automatically shuts down the
torque tester when it is not in use, in order to
conserve battery life. Users are allowed to adjust the
set amount of time the torque tester is on before the
Sleep Mode is enabled. Users also have the option to
disable this feature. To adjust the time, touch a
number a on the keypad from 1to 40. This will set
the time in minutes. Once you have adjusted the time
select the [Back] arrow.
Back Light The Back Light keeps the screen lit on the torque
tester for a specified amount of time, while the torque
tester is not in use. Users have the option of keeping
the back light on from 30 seconds to 8 minutes.
Users are allowed to turn off this feature as well. To
adjust the time, select a number on the keypad from
.5 to 8. Select the [Back] arrow when you are
finished.
Display Features & Settings
Fig. 8.1
Fig. 8.2
Fig. 8.3
Fig. 8.4

DRTQ Series Manual 9
Adjusting Your Settings Continued
Brightness The Brightness feature allows users to adjust the
touch screen’s level of brightness. To increase the
level of brightness select the [+] button; to decrease
the level of bright select the [-] button. You many
continue to press either button until you reach your
desired level of brightness. Select the [Back] arrow
when finished.
Peak Time The Peak Time Setting allows users to adjust the
filter. Once a peak is detected, the value of peak
time will set the maximum time allotted to detect a
new peak. If a new peak is not achieved within that
time, the last peak value will be locked in and
displayed. To adjust the time select a number from
the key pad and select the [Back] arrow. Peak Time
is measured in milliseconds.
Torque
Calculator The torque calculator is provided for the
convenience being able to convert different units of
torque.
Profile The profile menus allows for up to 8 different testing
strategies to be preset and stored in the memory. All
functions of the profile can be customized to each
testing strategy.
Display Features & Settings
Fig. 9.1
Fig. 9.2
Fig. 9.3
Fig. 9.4

DRTQ Series Manual 10
Using Quick Run
1. Select [Quick Run] from the main menu.
2. Select the correct units of measurement, you can adjust the
setting by selecting the black arrows.
3. Select the mode of measuring (Peak or Track), you can
adjust the mode by the selecting the back arrows. Refer to
Figure 10.1 to view an example of the Quick Run screen.
4. The Quick Run mode has feature that allows the user to
graph the Peak Time.
5. To Adjust the length of time on the graph, please refer to
Adjusting Your Settings, Peak Time.
Using Measure Mode
1. Select [Measure Mode] from the main menu.
2. [Peak] or [Track], if you are unsure which testing mode
you should select, refer to the glossary of terms at the
beginning of this manual for clarification. Press the
[Next] arrow
3. Select a user profile. Please note that a user profile
is customized to each specific testing. Changes to
the profile settings can be performed from
the [Settings] > [Profile] start up screen menus.
Measuring Torque
Fig. 10.1
Fig. 10.2
Fig. 10.3
Fig. 10.4

DRTQ Series Manual 11
Using Peak Mode
4. You may begin testing your tool. For screwdrivers
and power tools, insert the rundown fixture into the
transducer before you begin.
a. You can press the statistics button in the lower
right hand corner to access additional
information.
b. You can export the captured readings by
pressing the save button in the lower right
hand corner.
5. Once the export button is pressed the [Export
Name] (Job Name) screen will appear. It is
recommended to save the export name as the
serial number of the tool(s) for easy reference.
Press [Next] to proceed to the next screen.
6. Once you have captured your peak you
may save and export your data to a
computer via a USB Cable or an SD card,
or you may clear the reading by selecting
[clear]
Using Track Mode
1. Select [Track] and select the [Next] arrow.
2. Select the units you are measuring from the menu and
select the [Next] arrow.
3. The screen for the Track mode will now appear, please
see Figure 11.4 for an example. The High and Low
Torque limits will be displayed from their settings in Peak
mode.
4. When you have finished measuring in Track mode you
may return to the main menu by selecting the [Main
Menu] arrow.
Measuring Torque
Fig. 11.1
Fig. 11.2
Fig. 11.4
Fig. 11.3
(1) 5.24
(2) 5.25
(3) 5.42
(4) 5.25
(5) 5.28
(6) 5.25
(7) 5.34
(8) 5.30

DRTQ Series Manual 12
Date:10/01/2009 Time:20:29:13 Unit S/N:
123456 Transducer: 25 In Lb
Job:TOOL123 #1
Measurement direction: CW
Maximum Torque Limit: 10.75 In Lb
Minimum Torque Limit: 10.25 In Lb
Threshold Torque Limit: 5.00 In Lb
Peak Time: 0.500 Seconds
Maximum recorded: 10.69 In Lb
Minimum recorded: 10.50 In Lb
Sigma: 0.068
Cp: 1.234
Cpk: 0.908
Readings above maximum: 0
Readings below minimum: 0
Percentage not OK: 0.000%
Reading # Peak
1 10.64
2 10.50
3 10.53
4 10.54
5 10.55
6 10.52
7 10.51
8 10.53
9 10.65
10 10.69
Exporting Data from Peak Mode (USB)
Note: Before exporting any data you must install
the USB Device Driver. Refer to the USB
installation instructions of this manual.
1. To export your data select the [Export]
button.
2. You will be given the option of creating a
name for your data. You may select letters
and numbers to create the name. To switch
between the numeric and alpha screens
press the [123] button when it is on the alpha
screen or press the [ABC] button when it is
on the numeric screen. To move on select
the [Next] arrow.
3. You will now have the option of exporting it to
an SD card or a USB Cable. Refer to Figure
12.1 to view the export screen.
4. From the measurement export screen select
the data you would like to export, and press
the [USB] or [SD Card] buttons.
Exporting Data from Peak Mode Continued
1. The Data that is exported from your computer
will display the following information in the
HyperTerminal program. Please refer to Figure
12.2 to view what the data export will look like.
2. Users may copy and paste the data read out in
HyperTerminal into a Microsoft Office application
Exporting Data
Fig. 12.1
Fig. 12.2
(1) 5.24
(2) 5.25
(3) 5.42
(4) 5.25
(5) 5.28
(6) 5.25
(7) 5.34
(8) 5.30

DRTQ Series Manual 13
USB Device Driver Installation Instructions
1. Connect the USB cable from your DRTQ torque tester to
the USB port on your computer.
2. Once it is connected, a “Found New Hardware” bubble
will appear over your task bar on the computer’s desktop
screen.
3. Next the Hardware wizard dialog box will
appear.
4. Check “No not this time” and click [Next>].
USB Driver Installation

DRTQ Series Manual 14
5. The dialog box will ask how the software should
be installed, check “Install from a list or specific
location (Advanced)” option and click [Next>].
6. Browse to where the “fascdc.inf” file is located
and click [Next>].
7. The wizard will begin the installation of the
driver. A box will pop up with a warning that
this software has not passed Windows Logo
testing (this is WINDOWS software).
Click [Continue Anyway]
USB Driver Installation

DRTQ Series Manual 15
8. A box will appear stating that the New Hardware
Wizard has finished installing the software.
Click [Finish].
9. The virtual serial port has been installed. The
determine the port name click on [Start] then
[Control Panel], then double click on [System].
The following box should appear.
USB Driver Installation

DRTQ Series Manual 16
10. Select the [Hardware] tab and click on [Device
Manager]
11. The Device Manager Program will appear.
Expand the “Ports” group:
In this case the port is COM23
USB Driver Installation

DRTQ Series Manual 17
12. The FSTT1 uses the native CDC classic device driver supported by Windows XP.
The following text is a copy of the required inf file:
;
; fascdc.inf
;
[Version]
Signature="$Chicago$"
Class=Ports
ClassGuid={4D36E978-E325-11CE-BFC1-08002BE10318}
Provider=%FAS%
DriverVer=09/12/2006,1.1.1.5
[DestinationDirs]
DefaultDestDir=12
[Manufacturer]
%FAS%=FAS_Mfg
[FAS_Mfg]
%USBtoSerialConverter%=USBtoSer.Install,USB\VID_03EB&PID_6119
[USBtoSer.Install]
include=mdmcpq.inf
CopyFiles=FakeModemCopyFileSection
AddReg=USBtoSer.AddReg
[USBtoSer.AddReg]
HKR,,DevLoader,,*ntkern
HKR,,NTMPDriver,,usbser.sys
HKR,,EnumPropPages32,,"MsPorts.dll,SerialPortPropPageProvider"
[USBtoSer.Install.Services]
AddService=usbser,0x00000002,USBtoSer.AddService
[USBtoSer.AddService]
DisplayName=%USBSer%
ServiceType=1
StartType=3
ErrorControl=1
ServiceBinary=%12%\usbser.sys
[Strings]
FAS="Flexible Assembly Systems"
USBtoSerialConverter="FAS USB to Serial Converter"
USBSer="USB Serial Driver"
USB Driver Installation

DRTQ Series Manual 18
Problem
Possible Cause
Solution
Inconsistent Torque Readings
Wrong Filter Set
Rundown Fixture Not Being Used
Always use a rundown fixture
when testing power tools
Tool being tested is unable to hold
consistent torque value
Send tool in for evaluation
Torque Tester needs calibration
Send torque tester in for
calibration
Unit turns off by itself
Low Battery
Recharge the unit
Sleep mode time set too short
Adjust sleep mode time
Unit will not turn on
Low Battery
Recharge the unit
Flash memory corrupt
Perform hard reset
Calibration of Unit: In order to maintain a high standard of accuracy periodic calibrations are required. In
most applications a 6-12 month periodic calibration is acceptable. Please contact your local distributor or
the manufacturer when your unit is up for its calibration interval.
Trouble Shooting Guide

DRTQ Series Manual 19
Warranty
Delta Regis Canada Inc. (Manufacturer) warrants to Purchaser that all goods supplied hereunder, which are manufactured by Delta Regis Canada
Inc or individual manufacturer’s, will be free from defect in material or workmanship for a period of one (1) year from the delivery date unless a
different period is set forth in the body of the proposal in which these terms are incorporated. Should any defect appear during the warranty
period, Delta Regis Canada Inc shall, if given prompt notice by Purchaser, correct such nonconformity by, in Delta Regis Canada Inc' sole
discretion, either repair or replacement of the nonconforming goods F.O.B. Delta Regis Canada Inc' designated repair facility. The foregoing
warranties are subject to revocation in Delta Regis Canada Inc’sole discretion in the event that Purchaser (1) modifies the goods in any way
without the express written consent of Delta Regis Canada Inc; (2) employs such goods in a manner that is not in accordance with Delta Regis
Canada Inc' supplied instructions; or (3) damages the goods in any manner through any means.
The foregoing warranties also are subject to revocation or modification in Delta Regis Canada Inc’ sole discretion in the event that Purchaser uses
or transfers the goods outside of the country from which they were sold without notice to and written consent from Delta Regis Canada Inc. In
such event, Delta Regis Canada Inc may charge Purchaser, at prevailing prices.
Repair parts are warranted by Delta Regis Canada Inc for a period of one (1) year from the date of delivery, provided, however, that repairs or
replacements to original goods shall not renew or extend the warranty period of such goods. Replaced goods or parts become the property of
Delta Regis Canada Inc. Goods supplied hereunder, which have been purchased by Delta Regis Canada Inc from other manufacturers, shall have
only the warranty offered by the manufacturer thereof, and Delta Regis Canada Inc disclaims any responsibility with respect to the performance
of such goods. Service labor provided by Delta Regis Canada Inc is warranted by Delta Regis Canada Inc for a period of ninety (90) days from
the date that the Field Service Report is executed.
THE FOREGOING WARRANTIES ARE EXCLUSIVE AND IN LIEU OF ALL OTHER WARRANTIES OF QUALITY OR
PERFORMANCE, EXPRESS, IMPLIED, STATUTORY OR OTHERWISE, INCLUDING WITHOUT LIMITATION ANY WARRANTIES
OF MERCHANTABILITY OR OF FITNESS FOR A PARTICULAR PURPOSE.
Limit of Liability
DELTA REGIS CANADA INC SOLE AND EXCLUSIVE LIABILITY HEREUNDER SHALL BE TO REPAIR OR REPLACE GOODS OR
PARTS THEREOF FOUND TO BE DEFECTIVE WITHIN THE WARRANTY PERIOD. IN NO EVENT SHALL DELTA REGIS TOOLS
INC BE LIABLE TO PURCHASER FOR INCIDENTAL OR CONSEQUENTIAL DAMAGES WHETHER IN CONTRACT, TORT, OR
OTHERWISE, INCLUDING BUT NOT LIMITED TO DAMAGES RELATED TO LOSS OF PROFITS OR REVENUE, LOSS OF USE OF
THE GOODS OR ANY ASSOCIATED EQUIPMENT, COST OF SUBSTITUTE GOODS, DOWNTIME COSTS, OR OTHER DAMAGES TO
PURCHASER OR ITS CUSTOMERS.
Warranty / Limitation Of Liability
This manual suits for next models
5
Table of contents