Delta-T SLM9 User manual

User Manual for the
Self Levelling Mount
type SLM9
Delta-T Devices Ltd
SLM9-UM-1.2

Notices
Copyright
All rights reserved. Under the copyright laws, this manual may not be
copied, in whole or in part, without the written consent of Delta-T Devices
Ltd. Under the law, copying includes translation into another language.
Copyright © 2012 Delta-T Devices Limited.
Design Changes
Delta-T Devices reserves the right to change the designs and
specifications of its products at any time without prior notice.
Author:
Nick Webb.
User Manual Version: 1.2 Sep 2012
Delta-T Devices Ltd
130 Low Road, Burwell
Cambridge CB25 0EJ
UK
Tel: +44 1638 742922
Fax: +44 1638 743155
email: sales@delta-t.co.uk
tech.support@delta-t.co.uk
web: www.delta-t.co.uk

SLM9 User Manual v1.2 Contents
3
Contents
Introduction 4
Features 4
Overview 5
Instructions 6
Assembly Instructions 6
Complete Systems supplied by Delta-T 6
Quick Summary of Operation 6
Assembly of HemiView System Parts 7
Using the Canon EOS 60D Camera 11
Taking Hemiphotos 11
Image Size and Compression 11
Camera Settings 12
Exposure 12
Taking the Picture 16
Use of Canon Remote Controls 18
Downloading Images to a PC 18
Trouble Shooting 18
Image Alignment in HemiView 19
Setting the Lens Equation in HemiView 20
Warranty and Service 21
Terms and Conditions of Sale 21
Service, Repairs and Spares 22
Technical Support 22
Contact Details: 22
4
Features SLM9 User Manual v1.2
Introduction
Features
The self-levelling mount SLM9 is intended for use with either a tripod or a
monopod. It helps keep a camera and fisheye lens aligned to the horizon
and North. This is necessary when taking hemispherical photos for use with
Delta-T’s HemiView canopy analysis software.
The SLM9 is designed for use with the Canon 60D digital SLR camera with
a Sigma EX DC 4.5mm F2.8 circular fisheye lens.
For ease of use, the mount is equipped with the following features:
•Bubble level and adjustable levelling weights
•Compass for North/South alignment, viewable from above or below
•Markers used to align hemispherical photos in HemiView, illuminated
by the camera flashgun
•Optional rugged carrying case
•Optional monopod or tripod
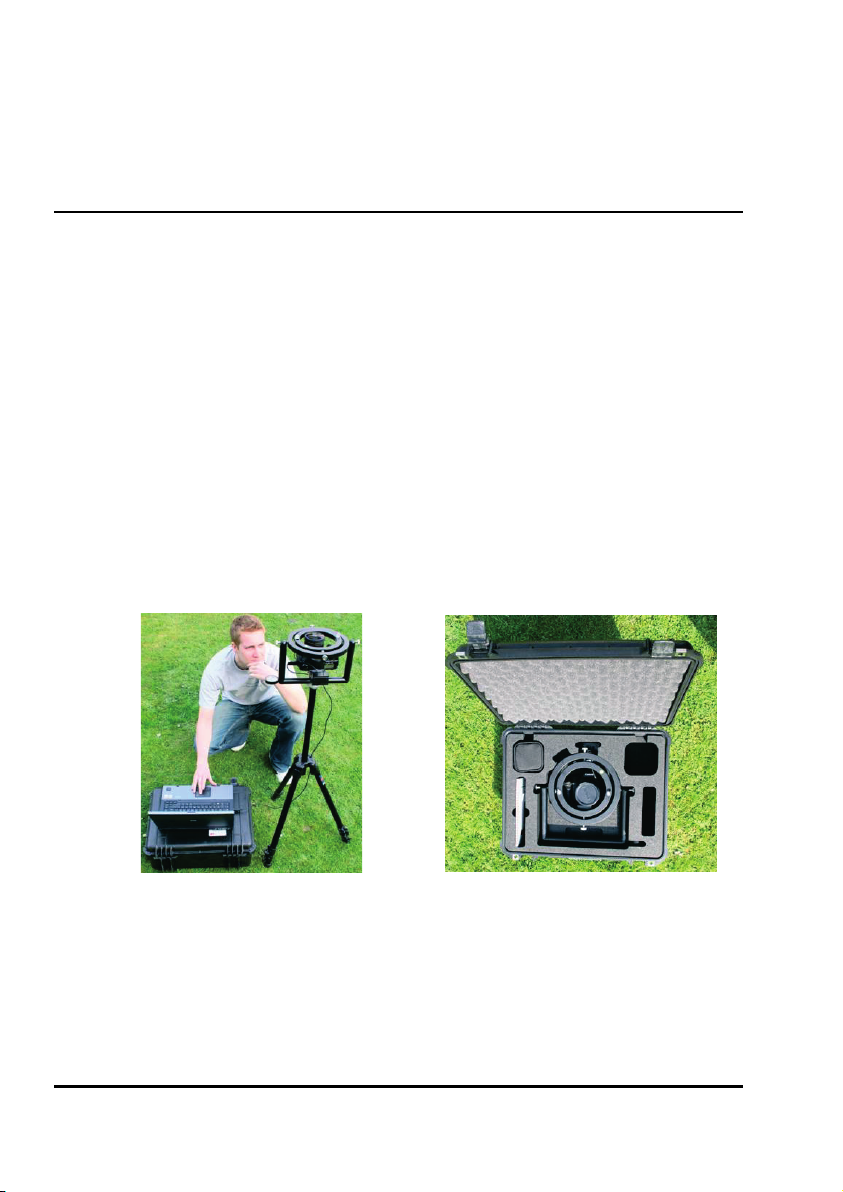
Image capture,
processing and
analysis in the field is
possible via a
ruggedised notebook or
tablet PC (not included)
Optional rugged, waterproof
carrying case

SLM9 User Manual v1.2 Contents
5
Overview
Gimbals Bubble
level
South
marker
Compass
Sigma
EXDC lens
Canon
EOS 60D
Flash
adapter
Fibre optics
light pipe Tripod
North
marker
Mounting the camera
1) Locate pin 2) Tighten bolt
Levelling adjustments
Balance weights

6
Assembly Instructions SLM9 User Manual v1.2
Instructions
Assembly Instructions
Complete Systems supplied by Delta-T
Complete HemiView systems supplied by Delta-T come with camera,
memory card, lens, flash assembly and self-levelling mount pre-assembled.
Charge up and insert the camera battery.
Mount the self-levelling mount to a camera tripod or monopod.
The system is now assembled.
See also Assembly of HemiView System Parts on page 7
Quick Summary of Operation
1. Mount system on a tripod or monopod.
2. Orient it to North using the compass.
3. Level it using the bubble level and balance weights.
4. Select appropriate camera settings.
5. Avoid camera wobble using the self-timer, or a remote control (not
supplied), or a laptop PC running the Canon EOS Utility image capture
software.
6. Use the live preview and review options in the camera, or on a PC, to
check the image is OK.
7. Replace the camera lens cover after use.
8. Open, review, annotate, classify and sort images on your PC in Canon
ZoomBrowser software, as required.
9. Process and analyse selected images in the HemiView software on
your PC.
For step 9 refer also to the HemiView User Manual and online help.
SLM9 User Manual v1.2 Contents
7
Assembly of HemiView System
Parts
1. If you have a tripod, attach the SLM9 Self Levelling Mount to the tripod
for stability, using the tripod socket in its base.
2. Attach the Sigma EX DC fisheye lens to a Canon EOS 60D camera as
described in the camera and lens manuals.
3. Charge and install the camera battery as described in the camera
manual.
4. Fit a memory card as described in the camera manual.
5. Set the lens to Manual and focus ring to Infinity as described in the
camera and lens manuals.
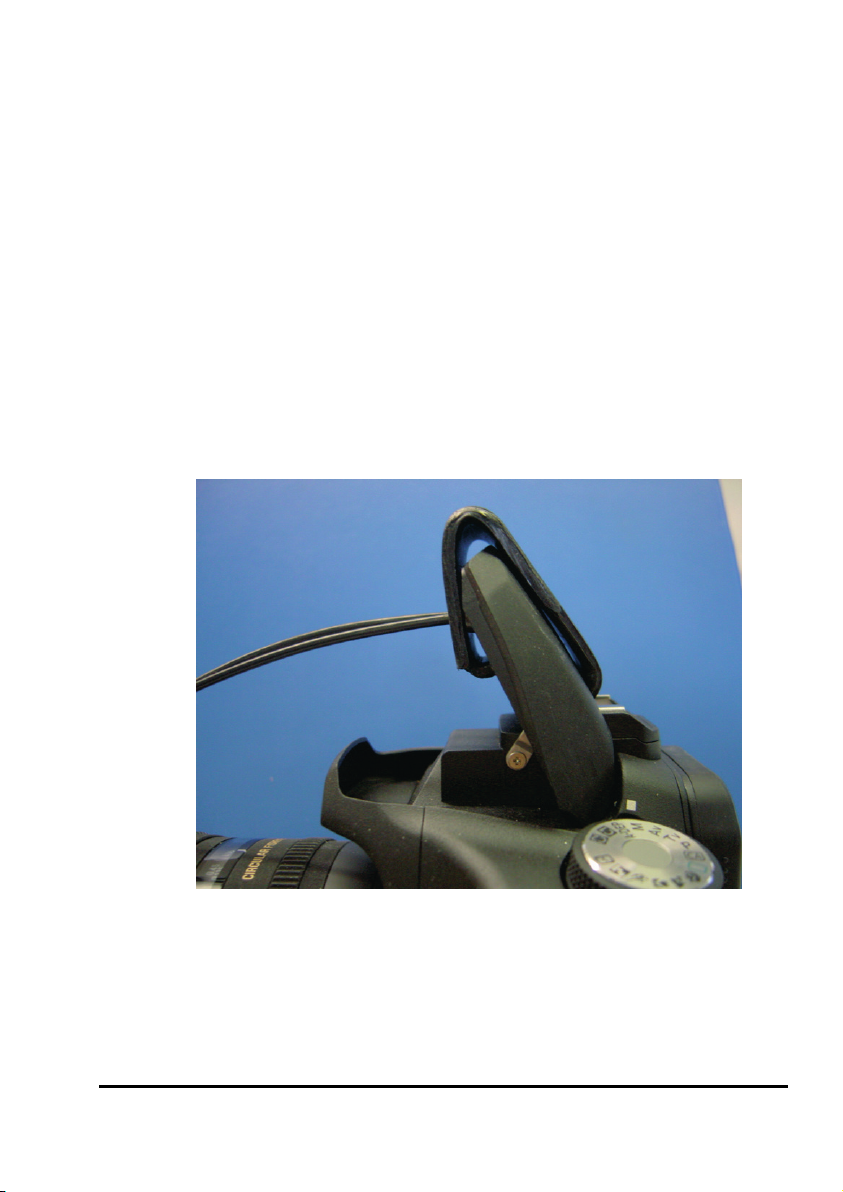
6. Release the built-in flash (p. 129 of the EOS60D Manual) and slide the
SLM9 flash adapter clip over it.

8
Quick Summary of Operation SLM9 User Manual v1.2
7. Attach the camera base to the self levelling mount
8. Remove all (i.e.both parts) of the lens cap
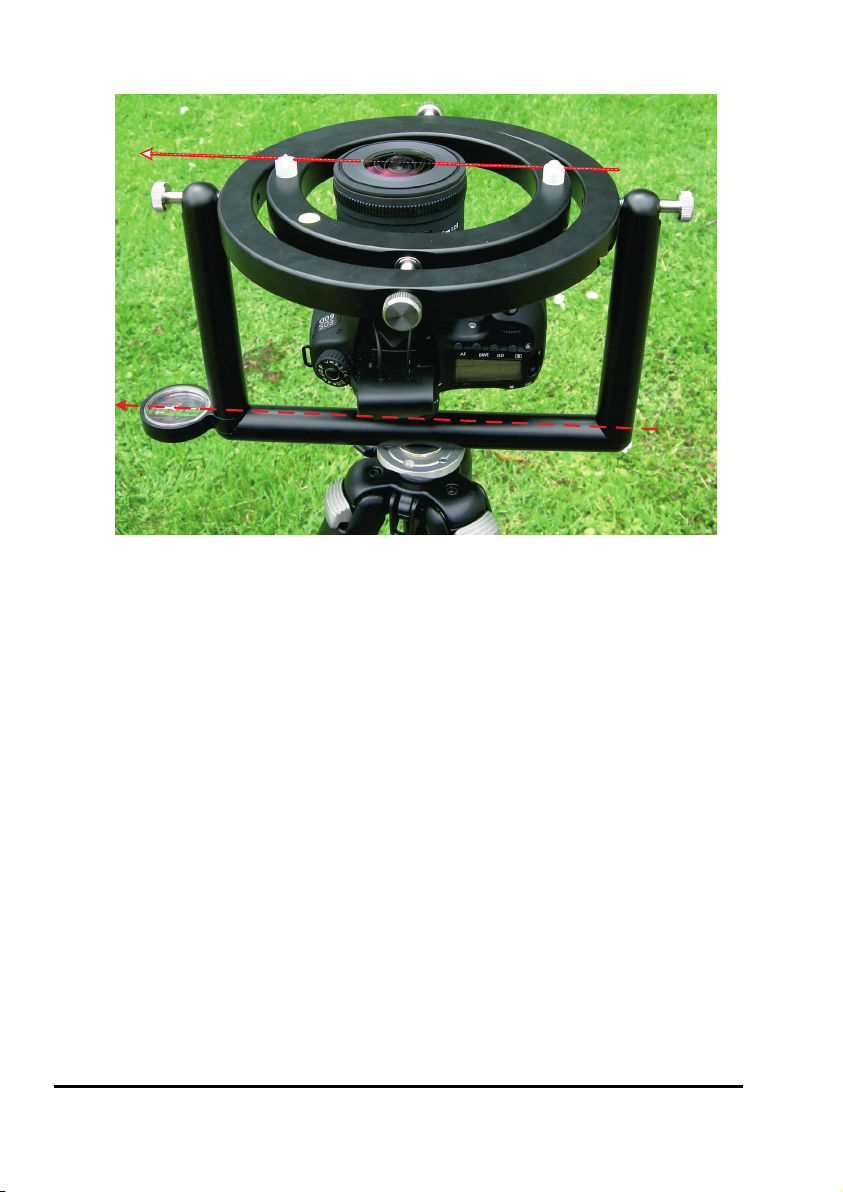
9. When attaching the camera, ensure that the gold line on the lens is parallel to the
surface of the inner gimbal ring.
10. Push the two alignment marker fibre optic cables into the holes in the flash
adapter.

SLM9 User Manual v1.2 Contents
9
Levelling adjustments
Unlock & slide weights (1) and/or (2)
12
3
1
2
3
3
Adjust both gimbal screws (3) together
to move the inner ring
11. Adjust the balance weights so
that the bubble indicator is within
the central circle of the
bubble level.
Tighten the thumbscrews
to lock the weights (1)
and/or (2) in position.
Further adjustment in the East-
West direction can be made by
adjusting both of the inner
gimbal screws (3) together.
10
Quick Summary of Operation SLM9 User Manual v1.2
12. Rotate the mount to point North.
13. Re-check the mount is level whenever you change the balance of the camera,
e.g. change the battery or flashcard, or reposition the monitor.
Also check the lens alignment (see 9 above) if the camera receives a knock.
NORTH
SLM9 User Manual v1.2 Contents
11
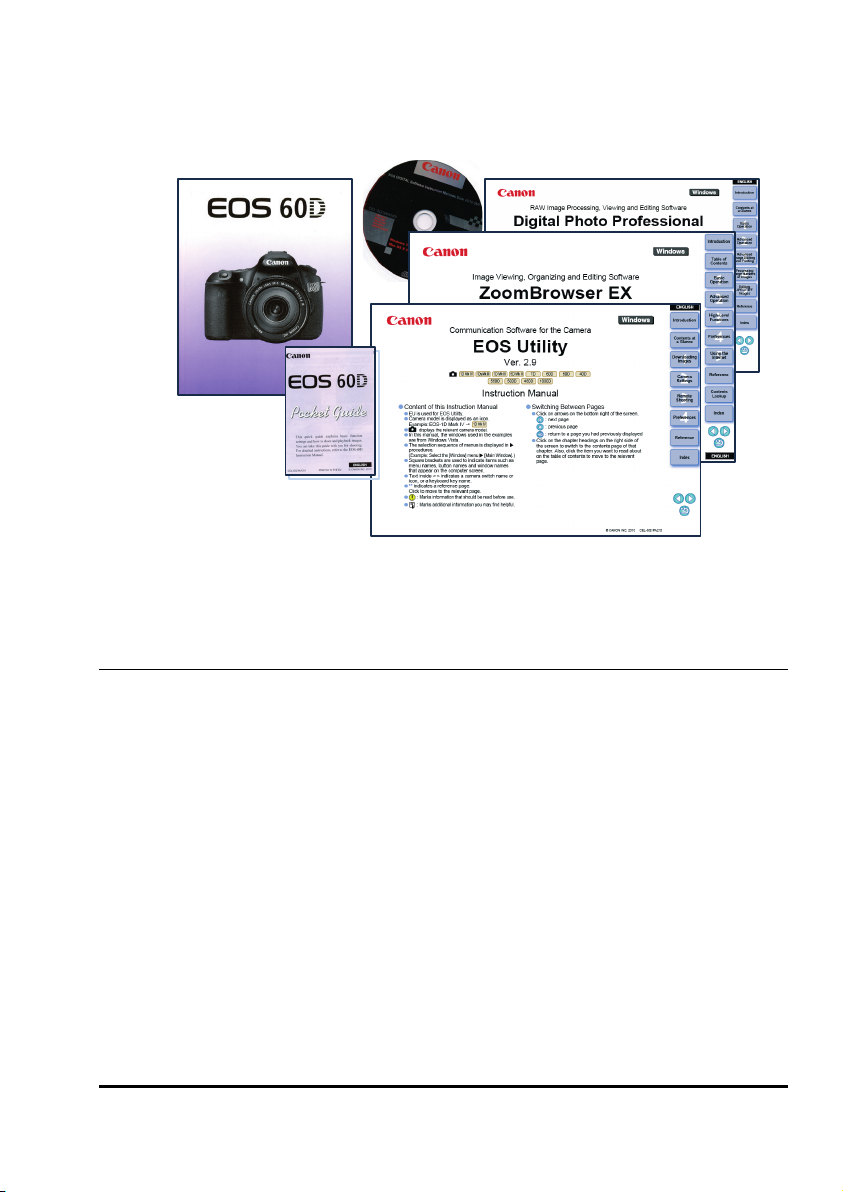
Using the Canon EOS 60D Camera
This is a great camera with great software. So spend some time
familiarising yourself with it.
The software manuals are available as PDF files on the Canon CD.
These may be also downloaded from the Canon website.
Taking Hemiphotos
The Canon EOS 60D is a very capable camera, giving you a lot of control
over the settings. This does mean that getting the right settings can be
complicated. It is well worth taking some time to learn how the camera
works before using it in the field. The following notes will point you towards
the appropriate sections of the camera manual.
Page numbers refer to current English version of the Canon manual.
Image Size and Compression
There is a trade-off between image quality and the number of images you
can store on a memory card, but HemiView work usually demands the best
available resolution. Using the largest image size at 5184 x 3456 pixels a
typical hemi-photo may occupy 25 MB if saved to file in the native Canon
RAW format, which would allow you about 100 shots on a 4GB card. Lower
image quality and/or image compression will increase the number of
images you can store. Saving as a JPEG will give you about 490 shots. Do
a trial comparison on your site to see if the image quality makes any

12
Taking Hemiphotos SLM9 User Manual v1.2
significant difference.
Note that HemiView does not directly accept the native Canon RAW image
file format, but you can convert it to a bitmap on your PC using the Canon
software provided..
See also the EOS 60D manual, page 85.
Camera Settings
The optimum setting depends on the nature of the picture.
We recommend the following as a starting point for new users (see Canon
60D Manual, Image Settings p. 59 onwards).
Setting Canon 60D
User Manual
Sigma Lens
Manual * Note 1
Camera mode
Manual
p. 118
Image Quality
p. 84
AEB
0
p. 121
White Balance
Daylight *Note 2
p.96
Metering mode
Evaluative
p. 119
Picture Style
F Faithful
p. 90 – 91
Flash Mode
M Manual
p. 135 -136
Exposure and shutter
speed
Tv, 1/80s - see this
SLM9 manual
*Note 1: Manually focus the lens to infinity, unless under a very low canopy.
*Note 2: Varying this to find the best contrast between sky and canopy.
Saving Settings
You may fine tune your settings and save the configuration on the camera,
using the camera controls.
You can also configure it from your PC using the Canon software.
See also the Canon 60D User Manual and EOS software manuals
Exposure
Getting the exposure right can have a significant effect on how easy it is to
classify an image in HemiView, and on the accuracy results.
Aim to have areas of sky at the top end of the brightness range, and areas
of canopy at the lower end. Check this on your image by looking at the
brightness histograms.
On the Camera, select to play back the image onto the LCD monitor
and toggle the INFO button to display image information, including a
histogram. (It may be easier to inspect histograms on your PC using the
Canon EOS software)

SLM9 User Manual v1.2 Contents
13
If the image is over-exposed, the sky areas will have a tendency to spread
in the final image. Under-exposure is less of a problem, but will reduce the
amount of visual detail of the canopy. The camera’s automatic exposure will
tend to adjust the exposure too much for very open and very closed
canopies. We suggest two approaches to dealing with this.
1 Manual Exposure
•Select the Tv: Shutter Priority AE exposure mode (Camera Manual
p. 114). Set the shutter speed to, say,1/80 second to minimise camera
shake. Note the exposure values under a section of canopy with about
50% sky visible. Use the smallest aperture hole size possible (i.e.
largest f/number) to give the greatest depth of field in focus.
•Set the camera to manual exposure, and set the shutter speed and
aperture to these values.
•Having decided on an exposure setting, (as in 1 above) press the <>
button to lock the exposure. All the hemi-photos you now take will be
at the same exposure setting.
•Use this exposure setting for all your hemiphotos, as long as lighting
conditions remain the same. The exposure meter will indicate over-
exposure for open canopy, and under-exposure in closed canopies.
2 Auto Exposure
•Set the camera to Program AE (Auto Exposure) mode P.
•For more open canopies, over-expose using the exposure
compensation setting, up to the full +2.0EV for very open canopies.1
•For more closed canopies, under-expose, up to the full -2.0EV for
mostly closed canopies.
•If you have sufficient memory, try exposure bracketing to take photos
with higher and lower exposures. Choose the image that gives the
clearest canopy edges.
Note: In the Canon 60D you have to disable the flash for AEB auto
exposure bracketing to work, so the N-S markers will not light up. This
is not such a problem because the North indicator is always at 9 o’clock
in the image.
You can auto-exposure bracket (AEB) and white balance bracket
simultaneously, taking 9 shots.
See pages 100 &122 of the Canon 60D User Manual.
1This seems wrong at first. Why would you do you want to make a light picture lighter and a
dark picture darker? The reason is that in auto-exposure mode the camera will compensate,
darken a picture of all bright sky, and brighten a picture of an all dark canopy. That is why it
is better to work in fixed, manual exposure mode if you can – but that option depends on the
light being stable – which, of course, is not always so!

14
Taking Hemiphotos SLM9 User Manual v1.2
Example of 3 hemiphotos taken using auto-exposure bracketing and
displayed in Canon’s versatile ZoomBrowser software.
Underneath each picture the corresponding brightness histogram (for the
whole image) and shooting information are given.
Note the time stamp and the auto-exposure setting changes.
Incidentally, the dark evergreen tree (lower left) dominates the dark end of
these histograms. Depending on your objectives, you might want to edit it
out (in Photoshop, say) before using HemiView.

SLM9 User Manual v1.2 Contents
15
Illustration showing 9 hemi-photos taken automatically
(Canon 60D camera and 4.5mm Sigma EXDC fisheye lens, using auto
exposure bracketing together with white balance bracketing and with
Drive Mode (p.81) set to low-speed continuous shooting.)
Shooting information for the central photo is shown at right.
These images are as displayed by the Canon DigitalPhoto Professional
software provided with the 60D camera.

16
Taking Hemiphotos SLM9 User Manual v1.2
Taking the Picture
To ensure the camera is level it is often easiest to use the timer or a remote
control to take a picture.
The Canon user manual describes a range of suitable remote control
accessories which you may wish to acquire. Here we describe two methods
you can use if you don’t have a remote control.
Using Timer
See Self-Timer Operation in the Canon 50D
user manual
1 Press the AF DRIVE button.
2 Look at the LCD panel, rotate the dial
Select the two or ten second timer
3 Press the shutter release and move the
camera and SLM into place, checking it
is as level as possible, and pointing to
North. Hold it still until the timer
completes.
The beeper will sound, the self-timer
lamp will blink, and the shot will be
taken.
Using PC Image Capture Software
The Canon EOS 60D camera comes with a
USB serial cable for connecting to a PC and Canon software on CD for
acquiring and managing image files from the camera.
As an alternative to using the timer you may control the Canon 60D
remotely via the USB serial cable connected to a notebook PC
This has the advantage of allowing you to immediately inspect the image at
high resolution, take another if necessary, and if you wish, analyse the
canopy on the spot using HemiView.
But to do this we recommend use of a ruggedized notebook or tablet PC.
See the Canon EOS Software Instruction Manual for:
•Canon software installation instructions
•Instructions on using the USB cable
•Instructions of acquiring images from the camera under PC control
•Trouble Shooting Canon software
SLM9 User Manual v1.2 Contents
17
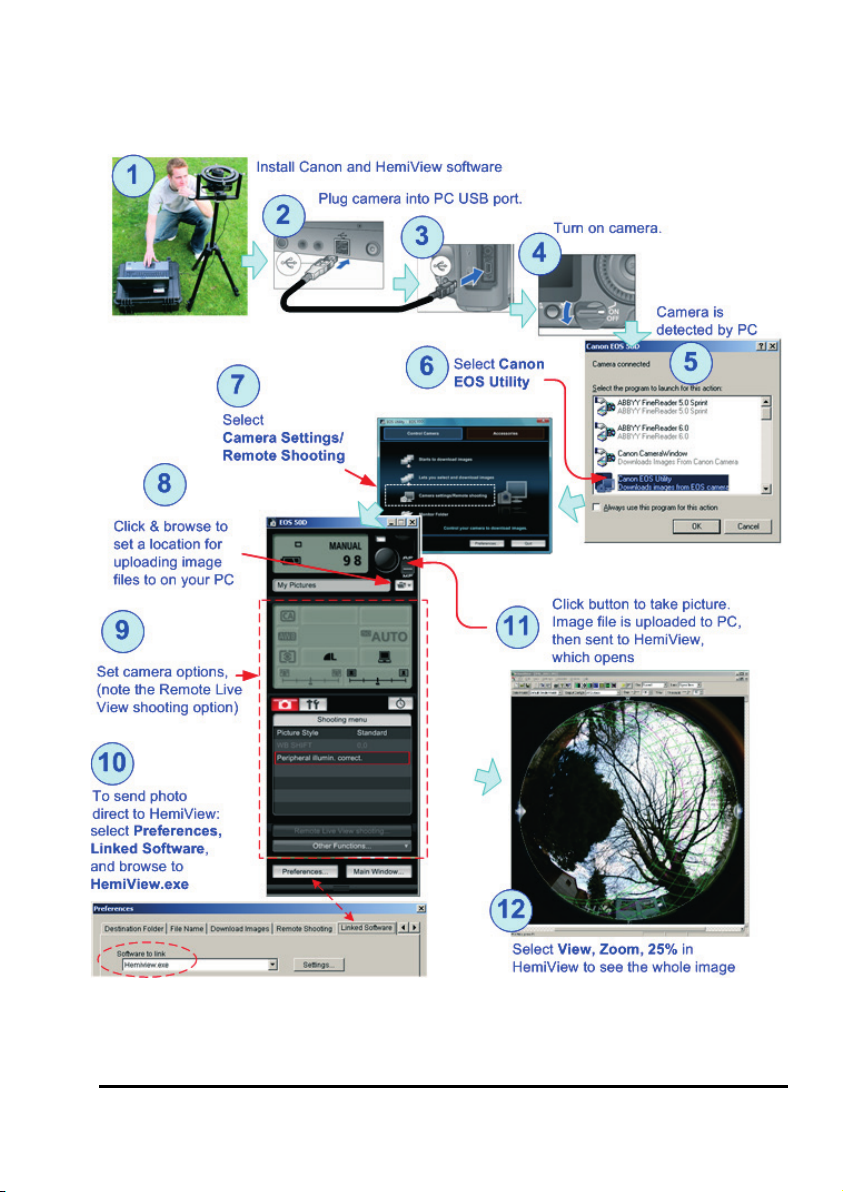
This diagram shows an example of the whole image acquisition and
analysis process being controlled from a PC in the field,
using the Canon EOS Software and then HemiView.
Using a rugged notebook or tablet PC with the Canon 60D, a canopy can
be viewed live, camera settings adjusted, image captured and automatically
imported into HemiView.

18
Downloading Images to a PC SLM9 User Manual v1.2
Use of Canon Remote Controls
Provided the camera is within range, a remote control may help eliminate
camera shake. The following may be obtained from reputable camera
suppliers: Canon Remote Switch types RC-6, RC-1 and RC-5.
See Canon 60D User Manual page 126.
Downloading Images to a PC
You are strongly recommended to read the Canon EOS 60D User Manual
and the Canon EOS Software (Windows) Instruction Manual for full details.
There are many ways to transfer images out of the camera.
Images may be transferred via a USB cable using the Canon software.
The flash card may be removed and read by a flash card reader connected
to your PC USB port
Note: Images can be opened directly from a memory card in HemiView, but
this is not recommended - because HemiView does not store the images
themselves, only information about them, so the images will be lost when
the memory card is removed.
Trouble Shooting
Refer to the Trouble Shooting section of the Canon EOS Software
Instructions Manual.

SLM9 User Manual v1.2 Contents
19
Image Alignment in HemiView
In HemiView use File, Open to load an image
Align the horizon circle to the shoulders of the two alignment markers, with
the pointed marker at the magnetic North point, as shown below.
Note: with the SLM9 the camera orientation is fixed
All images are aligned with North-South horizontal and North on the left.
(Note: earlier versions of the self-levelling mount held directly onto the lens
itself and not the camera - and for that reason the camera orientation, and
therefore the location of North, was previously undefined in Hemiphotos.)
HemiView software needs to be told where North is, by dragging the north
indicator to the North marker cone on the left.
To define the horizon correctly, drag the white horizon line to intercept the
flat top of the rim of each of the North and South markers, as shown.
For full instructions refer to the HemiView manual and its online help.
1
2
3
1 - Select
the North
Indicator
2 - Drag the
North
indicator
around to
align it with
the white
North
marker cone
3 - Drag and
position the
horizon
circle to
intersect the
top rim of
North and
South
markers
20
Trouble Shooting SLM9 User Manual v1.2
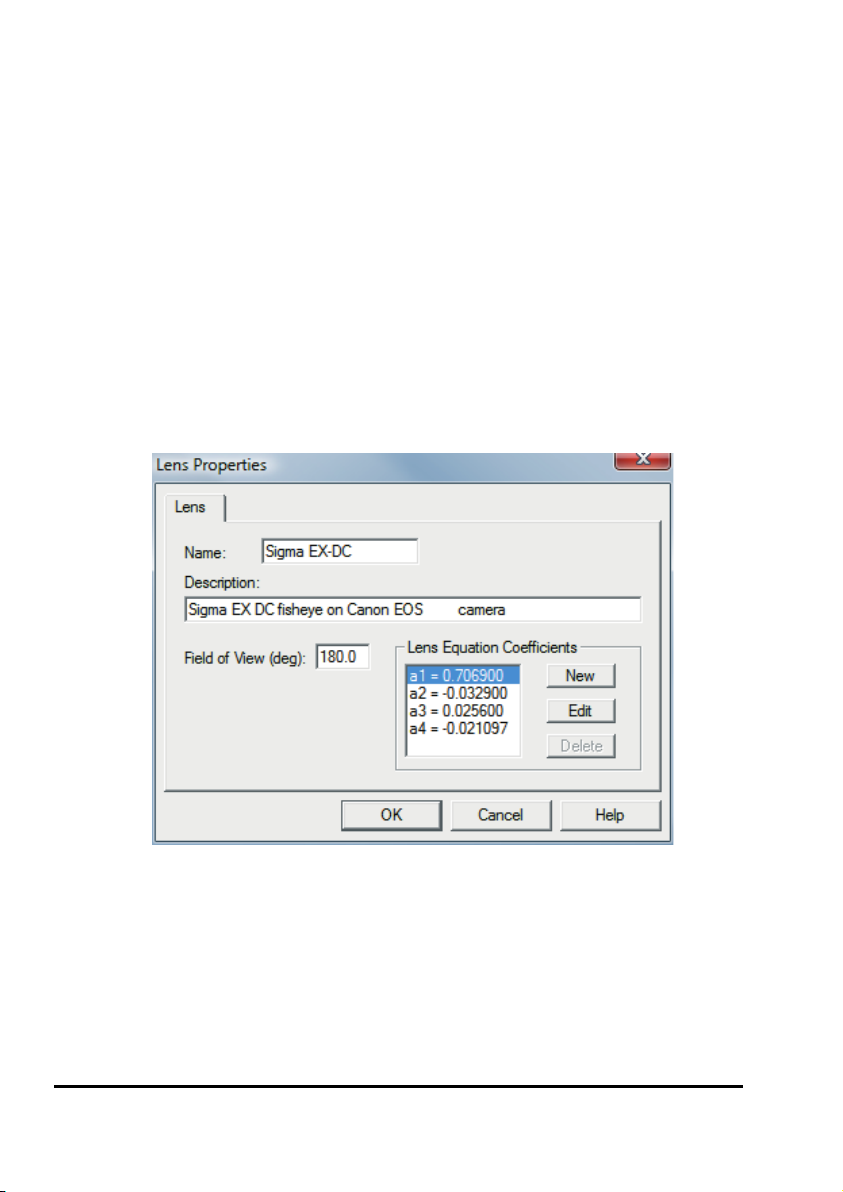
Setting the Lens Equation in
HemiView
If the Sigma EX DC 4.5mm fisheye lens does not appear in the standard list
of lenses installed with HemiView, you will have to enter the correct
coefficients in HemiView.
Create a new lens with the following settings: (Settings, Lens, New)
Enter the coefficients in the Lens Properties dialog as shown below.
Field of View (deg): 180.0
a1: 0.706900
a2: -0.032900
a3: 0.025600
a4: -0.021097
When you exit HemiView, this lens will be saved in the HemiView
lenses.csv file.
When using HemiView, specify these lens properties for all hemi-photos
taken with Canon EOS 50D or 60D cameras with a Sigma 4.5mm EX DC
lens.
60D
Table of contents
Other Delta-T Camera Accessories manuals


Popular Camera Accessories manuals by other brands


Moog
Moog FusionDome FDW75C8N Installation and operation instructions

Gates Underwater Products
Gates Underwater Products PMW-200 Setup, use and care guide

Zacuto
Zacuto Cine EVF manual

Digital Watchdog
Digital Watchdog DWC-BLJUNC-W quick start guide

Clas Ohlson
Clas Ohlson XY81W140BL-WW operating instructions

Campbell
Campbell CM110 instruction manual