C
B
Please scan the QR code to MyDeltaSolar cloud.
Data Collector -> Installer Manual -> Download the Installer Manual.
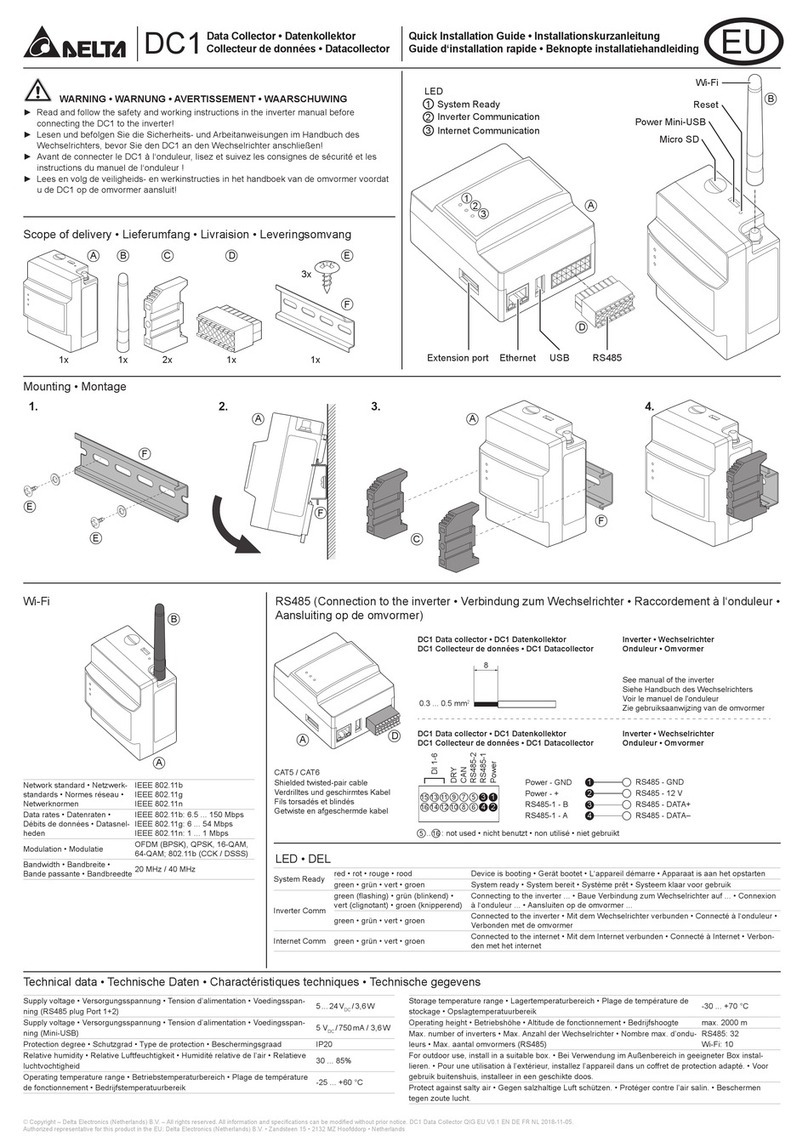
● Setting cables
Prepare 0.3 to 0.5mm2 x single wire, 4 cores (twin wires) shielded cables (rated temperature: 80ºC to 85ºC).
* Process the cables before use.
● Assemble 16-pin connector
Hold down the pin ①of 16-pin connector , insert cable and connect connector to Data Collector.
● Assemble communication connector
Hold down pin ①of connector in inverter, insert cable and connect connector to inverter.
Setting Connectors and Cables
8mm
Cable
40mm
Φ0.6~0.8 Φ5~6
①
①
LED Explanation
LEDExplanation
Green
Green (blinking)
Green
Green
Red
Name
Stytem Ready
Internet Comm
Inverter Comm
Modulation techniques
Bandwidth
Explanation
IEEE 802.11 b/g/n
802.11n 6.5Mbps to 150Mbps (MCS 0-7)
802.11g 6Mbps to 54Mbps
802.11b 1Mbps to 11Mbps
OFDM with BPSK, QPSK, 16-QAM, 64-QAM
802.11b with CCK and DSSS
20MHz/ 40MHz
Name
Network standard support
Data rates
Wi-Fi Module
Booting.
Sub-1G mode can’t connect to N1 Module.
System ready.
Searching inverters.
Inverter connected.
Internet connected.
Quick Installation Guide
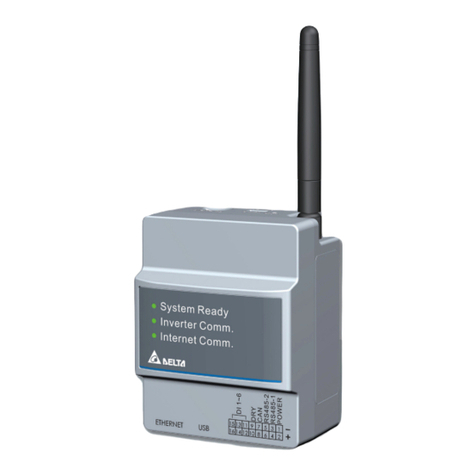
Model name: Data Collector
Part Number: PPM DC1_100
Do not allow any fire producing objects to be near the product, or apply any spray, including
combustible gases, to the product. The product may ignite or explode in the unlikely event
such an occurrence takes place.
Warning
Do not touch the product with wet hands. The product may cause injury due to electric shock
or equipment malfunction may occur in the unlikely event such an occurrence takes place.
Do not disassemble or modify the product. The product may cause injury or fire due to electric
shock in the unlikely event such an occurrence takes place.
Caution
Do not install the product in the following types of locations:
There is danger of burnout in some rare cases.
・Locations that are exposed to rain water, such as outdoors or under eaves and the like.
・Locations that are exposed to steam or where the moisture level is 30 to 85% RH, such as
lavatories, changing rooms, work sites, kitchens and the like.
Do not use organic solvents (paint thinners, benzene and the like), strong alkaline substances
or strong acidic substances to clean the case of the product. There is danger of discoloring
the case or the equipment malfunctioning in some rare cases.
When installing the Data Collector on a wall made of materials that are not wood, be sure to
acquire plastic anchors available on the market to secure Data Collector on the wall surface.
There is danger of injury from the product falling in some rare cases.
Do not install the product in a place that is subject to significant effects of vibration and impact.
There is danger of injury from the product falling in some rare cases.
NO. Product name Qty RemarksShape
Data Collector
Scope of Delivery
DIN Rail
DIN Rail Screw (PH2)
16-pin Connector
DIN Rail Stopper
This is a rail used to install
the product on a wall.
These are wood screws for
the Wall Surface.
Connect to the main unit.
1
3
4
5
6
1 unitMain unit
1 piece
Wi-Fi Antenna Install antenna to Enhance
Wireless Signals.
21 piece
3 pieces
2 pieces
1 piece
Quick Installation Guide
71 copy This document.
Quick User Guide
81 copy User guide
Stoppers to secure the
installation of Data Collector
on a DIN Rail.
Essential Points for Safety
・ Request a specialist to dispose of the product.
・ Pull 16-pin terminal and Power supply terminal off when any abnormality is detected like smoke, heat.
・ Install the product with the “DELTA” logo facing front when installing the Data Collector on a wall.
・ Take care to ensure no water or other liquid gets on the Data Collector.
・ The product may malfunction or may be damaged by static electricity. Be sure to remove any static
electricity on the body, through such means as touching a metal object nearby, prior to coming into
contact with the product.
・ Do not connect a telephone line to the LAN terminal on the Data Collector, make sure Ethernet cable
is used.
・ Store the product in a location with the temperature ranging between -30 and +70°C, with the
humidity ranging from 30 to 85% RH.
・ Max. 32 inverters can be monitored through RS-485 at one time.
Max. 10 inverters can be monitored through Wi-Fi at one time.
Do not install the product in the following places:
・ Do not expose to extreme fluctuation temperature.
・ Do not expose to salt air.
・ Do not expose to corrosive substances, explosive / flammable GAS, chemicals.
・ Do not install in direct sunlight.
・ Do not install in a place exceeding the operating temperature range (-25 to +60°C).
・ Do not install above 2000m MSL or higher.
・ Do not expose to water vapor, oil vapor, smoke, cotton dust, metal powder, sawdust.
※If installed outdoor, please put it in box which is suitable for outdoor use.
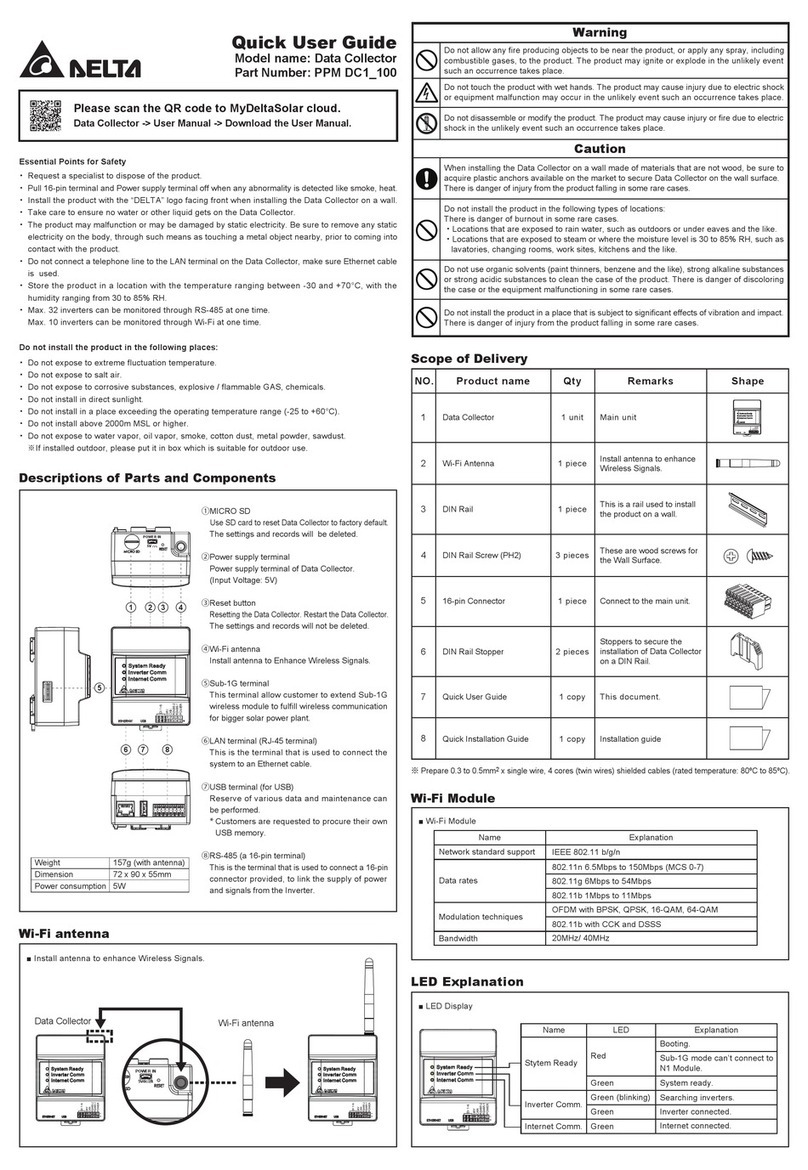
POWER IN
5V
1 42 3
6 87
5
①MICRO SD
Use SD card to reset Data Collector to factory default.
The settings and records will be deleted.
②Power supply terminal
Power supply terminal of Data Collector.
(Input Voltage: 5V)
③Reset button
Resetting the Data Collector. Restart the Data Collector.
The settings and records will not be deleted.
④Wi-Fi antenna
Install antenna to Enhance Wireless Signals.
⑤Sub-1G terminal
This terminal allow customer to extend Sub-1G
wireless module to fulfill wireless communication
for bigger solar power plant.
⑥LAN terminal (RJ-45 terminal)
This is the terminal that is used to connect the
system to an ethernet cable.
⑦USB terminal (for USB)
Reserve of various data and maintenancecan
be performed.
*Customers are requested to procure their own
USB memory.
⑧RS-485 (a 16-pin terminal)
This is the terminal that is used to connect a 16-pin
connector provided, to link the supply of power
and signals from the Inverter.
Weight
Dimension
Power consumption
157g (with antenna)
72 x 90 x 55mm
5W
Installation Method
■ Installation on wall
1. Use the supplied DIN Rail and mount in distribution cabinet (A).
2. Fix the Data Collector on top of the DIN Rail.(B)
3. Buckle the Data Collector on the DIN Rail.(C)
4. Install two stoppers on the DIN Rail on both side of the Data Collector, then lock in the screws
on stoppers to fix these stoppers on the DIN Rail.(D)
AD
■ Installation in box (outdoor) E
F
1. Please prepare a protective case to protect Data Collector (E).
* If the external box is made of plastic material, Wi-Fi antenna
can be installed in the box.
* If the external box is made of metal, Wi-Fi antenna needs to
be installed outside the box (F). User needs to use extension
cable to connect the Wi-Fi antenna.
2. An external box is available for customer from Delta.
Contact retailer for more details.
Descriptions of Parts and Components
