Deltec CADD-Prizm VIP CONTIN 6100 User manual

31
Model 6100 and 6101
Ambulatory
Infusion
Pumps
PATIENT INFORMATION
CONTIN Continuous Delivery Mode

Table of Contents
Introduction ................................................................. 1
Warnings ...................................................................... 2
Cautions......................................................................... 4
CADD-Prizm®Pump (Diagram) ................................... 6
Description of the Keys ............................................... 7
Installing a New Battery .............................................. 8
The Main Screen ........................................................... 10
The HELP Key Å....................................................... 11
Starting the Pump ........................................................ 12
Stopping the Pump ...................................................... 13
Removing a Cassette .................................................... 14
Attaching a Cassette .................................................... 15
Resetting the Reservoir Volume................................... 18
Priming the Tubing and Starting the Pump ............... 19
Inserting the Tubing into the Air Detector ................. 21
What if I drop or hit the pump? .................................. 22
Alarms and Messages .................................................. 23

1
Introduction
Your doctor has recommended that you use the CADD-Prizm®
pump as part of your treatment.
The CADD-Prizm®pump can be carried with you and is
designed to deliver medication into your body. Your physi-
cian will prescribe your medication specifically for you. Your
prescription is programmed into your pump by your clinician
according to your physician’s specific orders. This pump can
be reprogrammed as your medication needs change.
The pump is programmed to deliver your medication con-
tinuously, at a steady rate. The pump stores programmed
information and historical information that your clinician
needs for your specific therapy.
Your clinician will instruct you on the proper use of this
pump. This guide is intended to supplement those instruc-
tions. Perform only those procedures for which you have
received training.
The following is a list of warnings and cautions that you
should read before operating the pump. It is important that
you understand and follow these instructions.

2
Failure to properly follow warnings, cautions, and instruc-
tions could result in damage to the pump or death or serious
injury.
Warnings
•If the pump is used to deliver life-sustaining medication, an
additional pump must be available.
•Use of a syringe with the CADD®Administration Set may
result in UNDER-DELIVERY of medication. Syringe function
can be adversely affected by variations in plunger dimen-
sion and lubricity, which can result in greater force re-
quired to move the syringe plunger. A syringe plunger will
lose lubrication as it ages and, as a result, the amount of
under-delivery will increase and could, on occasion, be
significant.
You must regularly compare the volume remaining in the
syringe to the pump’s displayed values such as Reservoir
Volume or Given to determine if under-delivery is occur-
ring and, if necessary, contact your clinician.
•Do not use rechargeable NiCad or nickel metal hydride
(NiMH) batteries. Do not use carbon zinc (“heavy duty”)
batteries. They do not provide sufficient power for the
pump to operate properly.
•Always have new batteries available for replacement. If
power is lost, non-delivery of drug will occur.
•There is no pump alarm to alert you that the battery has
not been properly installed or has become dislodged. An
improperly installed or dislodged battery could result in
loss of power and non-delivery of drug.

3
•If the pump is dropped or hit, the battery door may be-
come broken or damaged. Do not use the pump if the
battery door is damaged because the battery will not be
properly secured; this may result in loss of power or non-
delivery of drug.
•Prior to starting infusion, inspect the fluid path for kinks, a
closed clamp, or other upstream obstructions, and remove
all air to prevent air embolism.
•Close the tubing clamp before removing the cassette from
the pump to prevent unregulated gravity infusion.
•You must use a CADD®Extension Set with Anti-Siphon
Valve or a CADD®Administration Set with either an
integral or add on Anti-Siphon Valve to protect against
delivery inaccuracies and unregulated gravity infusion that
can result from an improperly attached cassette.
•For detailed instructions and warning pertaining to
Medication Cassette™Reservoirs or CADD®Administration
Sets, please refer to the instructions for use supplied with
those products.
•Frozen Medication must be thawed at room temperature
only. Do not heat the Medication Cassette™Reservoir in a
microwave oven as this may damage the medication, the
Medication Cassette™Reservoir, or cause leakage.
•Attach the cassette (the part of the Medication Cassette™
Reservoir or CADD®Administration Set that attaches to
the pump) properly. An improperly attached or detached
cassette could result in unregulated gravity infusion or a
reflux of blood.

4
•Do not prime the fluid path with the tubing connected to
your catheter. This could result in over-delivery of medica-
tion or air embolism.
•Ensure that the entire fluid path is free of all air bubbles
before connecting to your catheter to prevent air embo-
lism.
•If the pump is dropped or hit, inspect the pump for dam-
age. Do not use a pump that is damaged or is not working
properly. Contact your clinician for further instructions.
Cautions
•Do not operate the pump at temperatures below + 2˚C
(36˚F) or above 40˚C (104˚F).
•Donot store the pump at temperatures below -20˚C (-4˚F)
or above 60˚C (140˚F). Do not store the pump with a
Medication Cassette™Reservoir or CADD®Administration
Set attached.
•Do not expose the pump to humidity levels below 10% or
above 90% relative humidity.
•Do not store the pump for prolonged periods with the
battery installed.
•Do not immerse the pump in cleaning fluids or water or
allow solution to soak into the pump, accumulate on the
keypad, or enter the battery compartment, Data In/Out
jack, accessory jack, or Air Detector Port area.
•Do not clean the pump with acetone, other plastic sol-
vents, or abrasive cleaners.

5
•Do not use the pump in the presence of flammable anes-
thetics or explosive gasses.
•Use only Deltec accessories as using other brands may
adversely affect the operation of the pump.
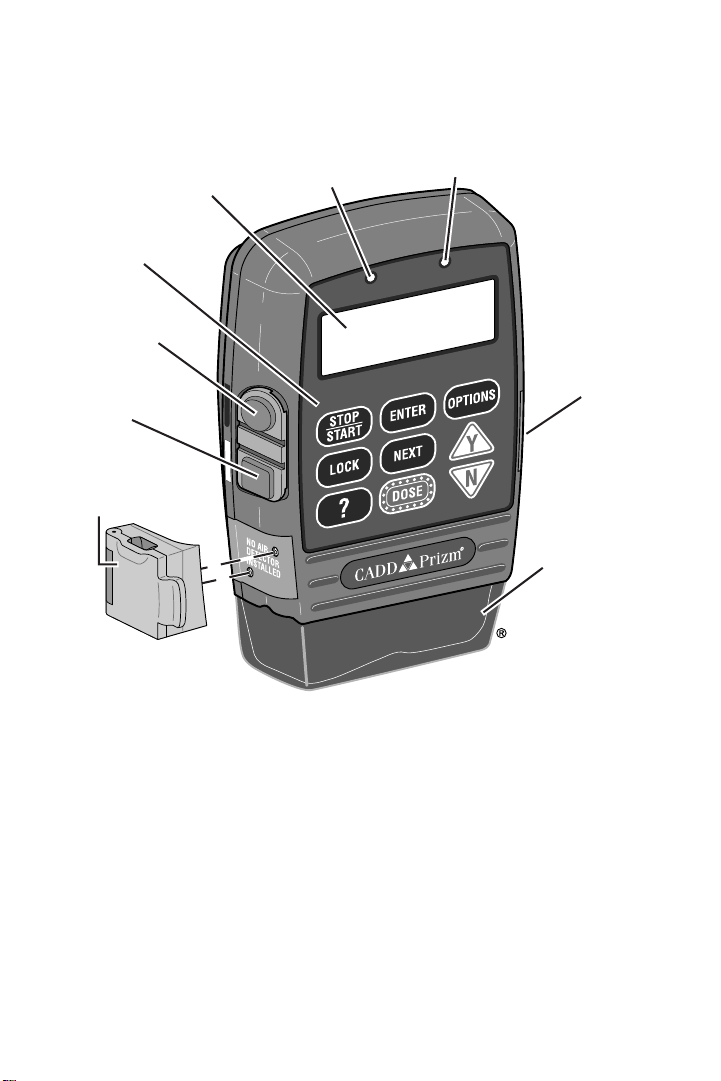
6
Display
Keypad
Power Jack
Data In/Out
Jack
Air Detector
(Optional)
Amber
Light
Green
Light
Cassette
(The part of
the Medication
Cassette™
Reservoir
or the CADD®
Administration
Set that
attaches to the
pump)
Battery
Compartment
CADD-Prizm®Pump (Diagram)
Green Light
Blinks every 3 seconds when the pump is running and deliver-
ing medication.
Amber Light
Flashing: pump is stopped; or an alarm exists. Steady: pump is
inoperable, call clinician.
Display
Shows information and messages. After a short time, the
display turns itself off to save power. Press any key to turn
the display back on.

7
Description of the Keys
⁄Starts and stops the pump and silences
alarms.
ŒUsed by the clinician.
ÅThe “Help” Key — explains what you see on
the display.
¤Used by the clinician.
„Advances you from one screen to the next
and silences some alarms.
ÍThis key is not used in the Continuous
Delivery mode.
‹Used by the clinician.
´Lets you answer yes to a question on the
pump’s display.
ÎLets you answer no to a question on the
pump’s display.

8
Installing a New Battery
If 9-volt Battery Low or 9-volt Battery Depleted appears in
the display, or if Battery Low appears on the main screen,
you should change the battery.
Use a new 9 volt alkaline or lithium battery such as the
DURACELL®Alkaline MN 1604, the EVEREADY®ENERGIZER
Alkaline #522 or the ULTRALIFE®Lithium U9VL battery.
Dispose of used batteries in an environmentally safe manner,
and according to any regulations which may apply.
WARNINGS:
•Do not use rechargeable NiCad or nickel metal hydride
(NiMH) batteries. Do not use carbon zinc (“heavy duty”)
batteries. They do not provide sufficient power for the
pump to operate properly, which could result in death or
serious injury.
•Always have new batteries available for replacement. If
power is lost, non-delivery of drug will occur and, depend-
ing on the drug being administered, could result in death
or serious injury.
•There is no pump alarm to alert you that the battery has
not been properly installed or has become dislodged. An
improperly installed or dislodged battery could result in
loss of power and non-delivery of drug and, depending on
the drug being administered, could result in death or
serious injury.
•If the pump is dropped or hit, the battery door may
become broken or damaged. DO NOT USE the pump if it
has been damaged because the battery will not be prop-
erly secured; this may result in loss of power, nondelivery
of drug, and, depending on the type of drug being admin-
istered, death or serious injury.

9
To install a new battery:
1. Stop the pump by pressing ⁄.
2. When you see Stop the pump?,
press ´.
3. Press the button on the
battery door and slide the
battery door forward. Remove
the used battery.
4. Match the +and –markings on
the new battery with the
markings on the pump. Insert
the battery. The pump will
beep if the battery is inserted
correctly.
5. Replace the battery door. The
pump will power up auto-
matically.
6. Start the pump by pressing
⁄.
7. When you see Start the
pump?, press ´.
NOTE:
•If you put the battery in
backwards, the display will
remain blank. Reinsert the
battery, making sure to match
the +and –markings.
The power up sequence will start, the pump will go through
m
Match
attery»
Stop the Pump?
Press Y or N
pen
o
n»
Press
Battery
Door
Button
Start the Pump?
Press Y or N

10
Battery
Status
Status of
Reservoir
Volume
*** CONTIN 6220X ***
Low Battery RUNNING
Res Vol 47.0 ml
Press NEXT to advance
Reminder that the „key lets
you look at the pump’s program
Pump Status
(RUNNING or
STOPPED)
an electronic self-test, and the pump will beep at the end
of the power up sequence. All of the display indicators, the
software revision level, and each parameter will appear
briefly.
CAUTION: Do not store the pump for prolonged periods of
time with the battery installed. Battery leakage could dam-
age the pump.
Main Screen
The following screen is what you will see on the pump’s
display most of the time. It is called the Main Screen and
shows the following:

11
This is the
calculated amount of
fluid left in the
reservoir. ?≥
The HELP Key Å
If you have a question about a screen, press Åfor more
information. A description of the screen will appear.
For example, if you want information about the Reservoir
Volume screen, you can press Åand the following will
appear:
The symbol (?≥) in the lower
right corner means there are
more help screens. Press Å
again to see the next help
screen.
To page through all the help screens, press Årepeatedly.
This will take you through all the help screens, then back to
the original screen you had questions about.
To return to the original screen you had questions about,
without going through all the help screens, press „.

12
Start the Pump?
Press Y or N
Starting pump...
*** CONTIN 6220X ***
RUNNING
Res Vol 50.0 ml
Press NEXT to advance
Starting the Pump
When you start the pump, it will review the program, and
then begin delivering medication. If the pump will not start,
a message should appear on the display. Refer to the
Messages and Alarms section on page 23.
WARNING: Prior to starting infusion, inspect the fluid path
for kinks, a closed clamp, or other upstream obstructions,
and remove all air bubbles to prevent air embolism. An
undetected upstream occlusion may result in under- or non-
delivery of drug and, depending on the drug being adminis-
tered, could result in death or serious injury. Air embolism
can result in death or serious injury.
1. Press ⁄.
2. When Start the pump? ap-
pears, press ´.
Starting pump… will appear. The
pump will automatically review
and display the preprogrammed
settings.
RUNNING will appear on the
main screen, the green light will
blink, and fluid delivery will
begin as programmed by your
clinician.

13
Stop the Pump?
Press Y or N
*** CONTIN 6220X ***
STOPPED
Press NEXT to advance
Stopping the Pump
Stopping the pump stops delivery of medication. Whenever
the pump is stopped, the amber light will blink.
1. Press ⁄.
2. When Stop the Pump? ap-
pears, press ´.
STOPPED will appear on the
main screen, and the amber
light will blink.

14
2000-03-08 D.
Z
«Prizm Remove
C
Stop the Pump?
Press Y or N
Removing a Cassette
WARNING: Close the tubing clamp before removing the
cassette from the pump to prevent unregulated infusion,
which could result in death or serious injury.
To remove a cassette:
1. Press ⁄to stop the
pump. When Stop the
pump? appears, press ´.
2. Close all tubing clamps and discon-
nect the tubing from your access
device as instructed by your clini-
cian.
3. Use a coin to unlatch the cassette.
Insert the coin into the slot and
turn clockwise until the latching
button pops out.
NOTE: If you cannot turn the
latching button, the cassette
may be locked. Contact your
clinician.
4. Remove the cassette from
the pump.
5. Discard the Medication
Cassette™Reservoir or
CADD®Administration Set
as instructed by your
clinician.
®
®

15
2000-03-08 D.
Z
«Prizm Hinge
C
®
Attaching a Cassette
WARNING:
•You must use a CADD®Extension Set with Anti-Siphon
Valve or a CADD®Administration Set with either an
integral or add on Anti-Siphon Valve to protect against
unregulated gravity infusion that can result from an
improperly attached cassette. Unregulated gravity infu-
sion can result in death or serious injury.
•For detailed instructions and warnings pertaining to the
Medication Cassette™Reservoir or CADD®Administration
Set, please refer to the instructions for use supplied with
those products.
•Frozen medication must be thawed at room temperature
only. Do not heat the Medication Cassette™Reservoir in a
microwave oven as this may damage the medication, the
Medication Cassette™Reservoir, or cause leakage.
Use aseptic technique as
instructed by your clinician.
1. Clamp the tubing on the
new Medication
Cassette™Reservoir or
CADD®Administration
Set.
2. Insert the cassette hooks
into the hinge pins on
the pump.

16
3. Place the pump upright on
a firm, flat surface. Press
down so the cassette fits
tightly against the pump.
4. Insert a coin into the latching
button, push in, and turn
counterclockwise until the
mark on the latch lines up
with the solid dot.
WARNING: Attach the cassette (the part of the Medication
Cassette™Reservoir or CADD®Administration Set that
attaches to the pump) properly. An improperly attached or
detached cassette could result in unregulated gravity infu-
sion of medication from the fluid container or a reflux of
blood, which could result in death or serious injury.
5. Gently twist and pull on the
cassette to make sure it is
firmly attached.
2000-03-08 D. Zurn
Pi Att hC Tbl
®
®
2000 03 08 D Zurn
®

17
6. A message will appear on the
display showing the type of
cassette you have latched.
Press „.
7. Reset Reservoir Volume to — ?
may appear. Press ´to reset
the Reservoir Volume to the
originally programmed value.
Admin set latched
Next to continue
Reset Reservoir
Volume to 100.0 ml?
Press Y or N

18
Resetting the Reservoir
Volume
Normally, when you lock a new cassette on the pump, you
will be prompted to reset the Reservoir Volume. You can,
however, reset the Reservoir Volume without changing the
cassette.
1. Begin at the Main Screen. Make sure STOPPED appears in
the Main Screen.
2. Press „to go to the Reservoir Volume screen.
3. Press ¤to reset the Reservoir Volume to the originally
programmed value.
This manual suits for next models
1
Table of contents
Other Deltec Medical Equipment manuals


Popular Medical Equipment manuals by other brands


mychway
mychway MS-11R5 user manual

Clinical innovations
Clinical innovations Koala Quick reference guide

medi
medi Ankle sport brace Instructions for use

Little Doctor
Little Doctor LD Prof-Plus instruction manual

MD Orthopaedics
MD Orthopaedics MITCHELL PONSETI AFO Instructions for use

Handicare
Handicare 1000 Smart XL user manual