Deltec CADD-TPN 5700 User manual

INSTRUCTIONSKEYSPUMP OPERATIONS 1. Press and hold STOP/START key until (---) appears on display. (The word STOP will flash in the lower right corner of the
display.)
1. Press and release LOCK key to determine the current lock level.
2. Use scroll keys to select the desired lock level.
3. Press LOCK key again after you have selected the lock level. 000 will appear on the display.
4. Use scroll keys to enter the security code.
5. Press the LOCK key again to complete the locking sequence.
1. Make sure the pump is in the Stop mode. Push the battery door release button and slide the door off. Remove and discard
the used battery.
2. Install new battery in the compartment, bottom-end first. Place battery door halfway over battery compartment and press
battery into compartment. Slide the battery door closed. IMPORTANT: If a gap is present anywhere between the battery
door and pump housing, the door is not properly latched.
3. Start the pump.
CAUTION: Always close fluid path tubing with the clamp before removing administration set from the pump.
1. Insert coin into locking button and turn one-quarter turn clockwise until button pops out.
2. Remove used administration set from the pump and discard.
1. Attach a new administration set to the pump, hinge side first. Place pump in an upright position on a firm, flat surface. Press
downward on the top of the pump to ensure it fits tightly.
2. Insert coin into locking button, push in and turn one-quarter turn counter-clockwise until definite stop is felt.
WARNING: It is essential that you attach the cassette properly. The coin slot of the locking button must align
with the arrow or seam on the pump case. If you do not attach the cassette properly, unregulated gravity
infusion of medication from the reservoir or a reflux of blood may result, which could result in death or
serious injury to the patient.
To begin each infusion in LL0 or LL1, follow the programming steps below to reset the pump.
It is important that both the RES VOL and INFUSION ML screens be reset in order to start the infusion at the beginning of the
infusion period.
1. Press SELECT MODE until the “RES VOL” screen appears on the display.
2. Press SET/CLEAR to reset value to previously programmed amount.
3. Press SELECT MODE until the “INFUSION ML” screen appears on the display.
4. Press SET/CLEAR key.
IMPORTANT:
Even though the value on the INFUSION ML display does not change, you must press SET/CLEAR to reset this
screen. This tells the pump to start at the beginning of the infusion. Make sure you hear a beep when you press SET/CLEAR.
Note: The pump must be in LL0 to perform this function.
1. Press SELECT MODE until the “ML GIVEN” screen appears on the display.
2. Press SET/CLEAR key to clear the ML GIVEN value to 0000.
1. Press and hold PRIME key until (PPP) appears on display.
2. Release key, then press and hold key again until the fluid path is primed.
1. Press and hold STOP/START key until (---) disappears from display. (The pump will review the programmed values, then
ML will flash in the upper right corner of the display.)
IMPORTANT:
If you are beginning a new infusion and a taper up is programmed, verify that you are starting the infusion at the
beginning of the cycle by looking for “TAPER ” flashing on the screen after the pump is started. (Be sure to distinguish TAPER
↑” from “TAPER ↓”. If you do not have a taper up programmed, you will not see this up arrow.
Note: To taper down immediately, the pump must be in the process of delivering solution at the continuous rate, and a taper-
down period must have been programmed initially.
1. Stop the pump.
2. Press SELECT MODE until “ML/HR” appears on the display.
3. Press the down SCROLL key. The “TAPER ↓” indicator will appear on the display.
4. Press the SET/CLEAR key to set the programmed taper-down period.
5. Start the pump. The taper-down period will begin immediately, and the “TAPER ” and “ML” indicators will blink on the display.
FOR THE FOLLOWING OPERATIONS, THE PUMP MUST BE PLACED IN THE STOP MODE.
Stopping the Pump
(Programming and priming can
only be done in the Stop mode)
Changing the Lock Level
Changing the Battery
Removing the Administration
Set
Attaching a new
Administration Set
STEPS TO BEGIN EACH
INFUSION IN LL0 AND LL1
Resetting the RESERVOIR
VOLUME (RES VOL)
Resetting the INFUSION ML
Clearing the ML GIVEN
Priming (LL0 or LL1)
Starting the Pump
Tapering Down Immediately
PROGRAMMING SEQUENCE
STANDARD DELIVERY
A. Setting RESERVOIR VOLUME (RES VOL) (Volume of solution in
the fluid container)
1. Press SELECT MODE until “RES VOL” appears on the display.
2. Use SCROLL keys to change the value to match the actual volume in
the fluid container.
3. Press SET/CLEAR to set new value.
B. Setting INFUSION (ML) (Amount of solution to be delivered)
1. Press SELECT MODE until “INFUSION ML” appears on the display.
2. Use SCROLL keys to change the value for the infusion volume.
3. Press SET/CLEAR to set new value.
C. Setting INFUSION PERIOD (HR:MIN) (Total amount of time
needed to deliver the solution, including the continuous and tapered
infusion periods.)
1. Press SELECT MODE until “INFUSION PERIOD (HR:MIN)” appears on
the display.
2. Use the SCROLL keys to change the value for the infusion period.
3. Press SET/CLEAR to set new value.
D. Setting the TAPER-UP PERIOD (HR:MIN) (Amount of time at the
beginning of the infusion period during which the rate is tapered up to
the continuous rate)
1. Press SELECT MODE until “TAPER ( (HR:MIN)” appears on the
display.
2. Use the SCROLL keys to change the value for the taper-up period.
3. Press SET/CLEAR to set new value.
E. Setting the TAPER-DOWN PERIOD (HR:MIN) (Amount of time at
the end of the infusion period during which the rate is tapered down
from the continuous rate)
1. Press SELECT MODE until “TAPER ↑(HR:MIN)”appears on the display.
2. Use the SCROLL keys to change the value for the taper-down period.
3. Press SET/CLEAR to set new value.
F. Reviewing the ML/HR (Number of milliliters delivered per hour)
1. Press SELECT MODE until “ML/HR” appears on the display.
(Thisnonprogrammable value is automatically calculated by the pump
after you complete the programming.)
G. Clearing the ML GIVEN (Total number of milliliters delivered since
the display was last cleared)
1. Press SELECT MODE until “ML GIVEN” appears on the display.
2. Press SET/CLEAR to clear value.
(This nonprogrammable value is automatically calculated by the pump in
10 ml increments as solution is delivered.)
KEYS
ADDITIONAL POWER SOURCE OPTIONS
In addition to powering the pump with a 9-volt battery, you have these power source
options:
1. Power pack (rechargeable) with a battery adapter
2. Power pack (rechargeable) with a battery adapter and AC adapter
Refer to the External Power Source (EPS) System
Instructions for Use
for detailed
information.
⁄
Œ
´
Î
„
¤
„
¤
‹
⁄
⁄
„
´
Î
„
¤
„
¤
„
„
¤
´
Î
„
¤
´
Î
„
¤
´
Î
„
¤
´
Î
„
¤
ALARMS AND TROUBLESHOOTING
Prepare to discontinue therapy, or use another fluid container
if the infusion has not been completed.
Press STOP/START or SET/CLEAR to stop alarm and reset
reservoir volume (RES VOL). Remove the used fluid container
and install a new, filled one if necessary.
Start the pump, or remove the power source, if appropriate.
Change the battery soon, or prepare to use the EPS System.
Change the battery immediately, or prepare to use the EPS
System.
Remove the obstruction or press STOP/START to turn off the
alarm and put the pump into the Stop mode. Restart the pump
if necessary.
Close the tubing with the clamp and remove the pump from
service.
Remove and reinsert the battery, or insert a new battery.
Remove pump from service if alarm persists.
Corrective action is not necessary.
Press the SCROLL keys to select a new value for the longer
infusion period. Press the SET/CLEAR key to set the value for
the new infusion period, and the alarm will stop.
Press the SCROLL keys to select a new value for the shorter
infusion period. Press the SET/CLEAR key to set the value for
the new infusion period, and the alarm will stop.
Attach the AC adapter to the power pack and plug the AC
adapter into a wall outlet. This stops the beeping and begins
recharging the power pack, or stop the pump. Disconnect the
battery adapter from the power pack, then remove the battery
adapter from the pump. To continue your infusion, you may
insert a fresh 9-volt alkaline or lithium battery into the pump.
ALARM/CONDITION CAUSE CORRECTIVE ACTION
The ML remaining value (RES VOL) is at or below 50 ml.
The fluid container is empty. The ML value (RES VOL) is at
0000.
The pump is in the Stop mode.
Battery is low, but pump is still operable.
Battery is too low to operate pump; pump operation stops.
High pressure is being caused by an obstruction in the fluid
path.
A controller, microprocessor or motor fault has occurred.
Pump operation stops.
A power-up fault has occurred or battery is too low to operate
pump.
The end of the infusion period has been reached. The pump
switches to the KVO rate of 5 ml/hr.
A new, larger infusion volume has been programmed, or a
new, shorter taper-up or taper-down period has been
programmed.
A new, smaller infusion volume has been programmed, or a
new, shorter taper-up or taper-down period has been
programmed.
The battery in the power pack has reached a low charge.
(Note: When the beeping starts, the pump will continue to
run for approximately 30 minutes. Then, the pump will sound
a low battery alarm.)
RES VOL and ML blink on the display; 1 beep sounds at
50ml, 40ml, 30ml, 20ml and 10ml.
STOP blinks on the display; 2 beeps sound each second.
STOP blinks on the display; 3 beeps sound each second.
LO BAT blinks on the display; 3 beeps sound every 5 minutes.
LO BAT remains on the display; a continuous, variable-tone
alarm sounds.
HI P appears on the display; a continuous, variable-tone
alarm sounds; pump delivery stops.
The letter E and two numbers appear on the display; a
continuous, variable-tone alarm sounds.
All indicators appear on the display; a continuous, variable-
tone alarm sounds.
A series of 9 beeps sound in succession.
If the calculated continuous infusion rate is greater than
400ml/hr, the “Rate Too High” alarm (a two-tone alarm) will
sound.
If the calculated continuous infusion rate is lower than
10ml/hr, the “Rate Too Low” alarm (a two-tone alarm) will
sound.
The power pack is beeping (single beep every few seconds)
and the amber LED is flashing.
This card is for functions that can performed in Lock Level 0. Please
make sure this card is only accessible to users at your facility who have
knowledge of programming the pump in Lock Level 0. Contact our Customer
Service department at the number listed below if you have
any additional questions regarding pump operations.
Deltec®and CADD-TPN®are registered trademarks in the U.S.A. by SIMS Deltec Inc. and
are registered in certain other countries by SIMS companies.
©1998 SIMS Deltec, Inc. All rights reserved. Printed in U.S.A. 8/98 19208 SIMSDeltec,Inc.
St.Paul,MN,55112
Taper-Up
Period Taper-Down
Period
Infusion Period
012345678910
TIME (HOURS)
INFUSION VOLUME
KVO RATE
5 ML/HR
DELIVERY RATE (ML/HR)
400
250
200
150
100
50
0
Continuous Rate (ML/HR)
Infusion Profile
CADD-TPN®
Infusion Pump
Model 5700
Quick Reference Card for Clinicians
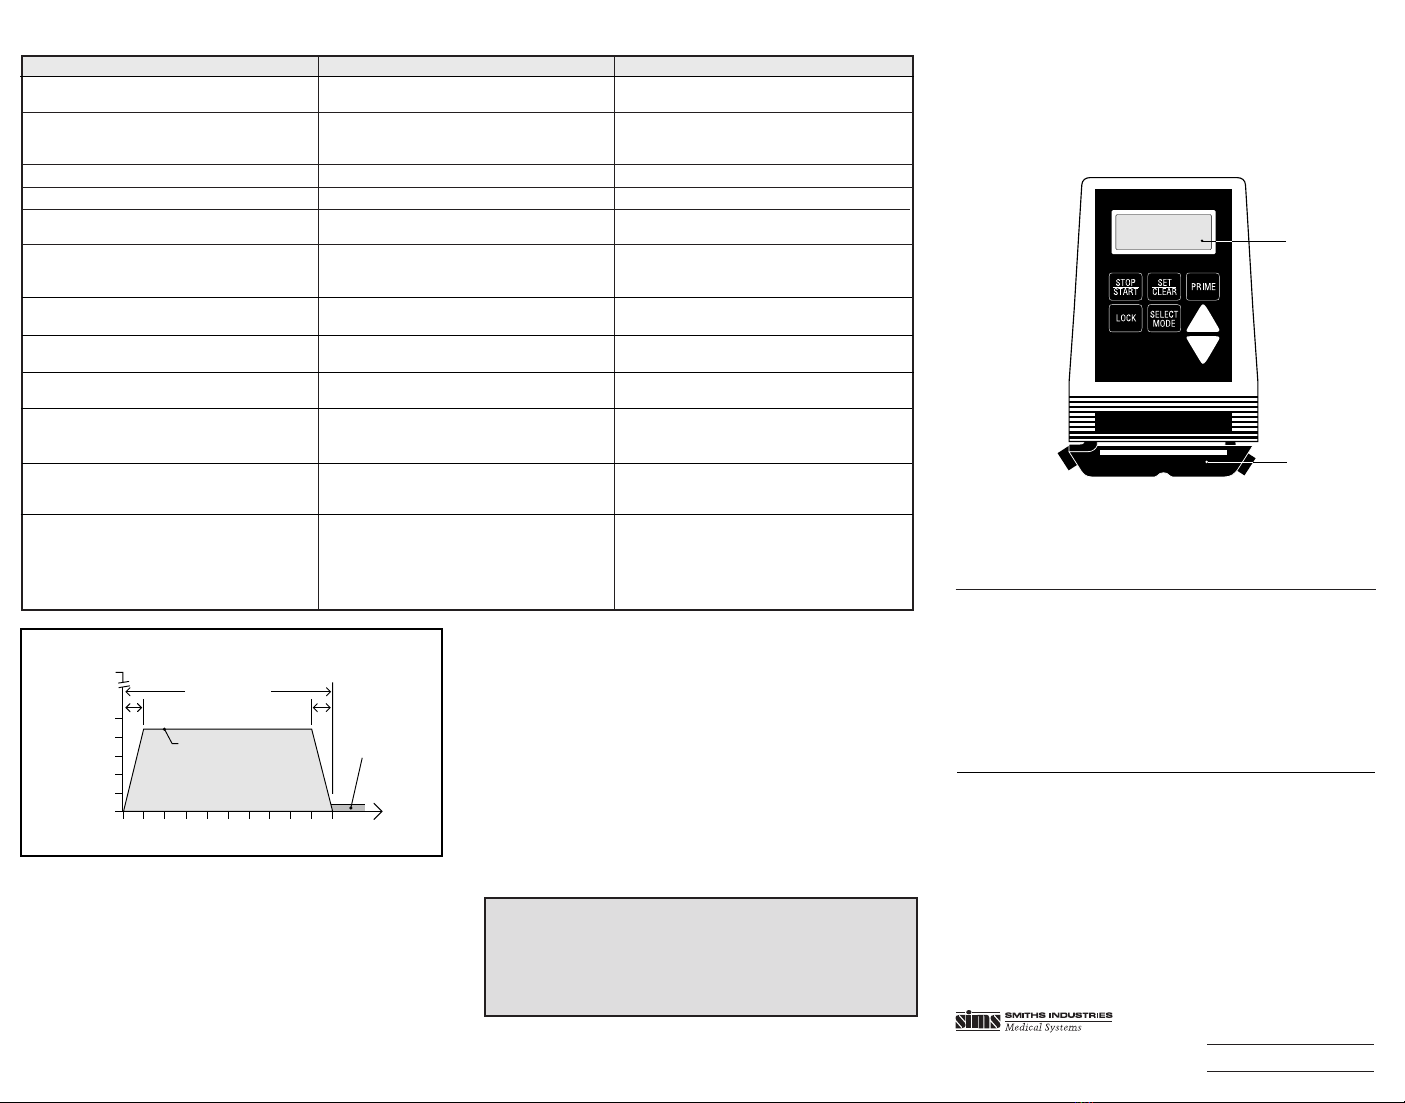
ADisplay
BCassette (part of the reservoir or administration set that attaches to
pump)
Keypad
STOP/START Stops and starts the pump
SET/CLEAR Sets new value; clears record-keeping screens
LOCK Displays or changes lock levels (security levels)
PRIME Fills tubing with fluid
SELECT MODE Advances to next programming screen
Change numerical values on programming
screens
´
Î
CADD-TPN
®
B
D
A
ISO 9001 Registered
This publication is intended as an operating reference only. For detailed
instructions,specifications,warnings,warrantyandadditionalinforma-
tion on operating the Model 5700 CADD-TPN pump, please refer to the
Operator’sManualsuppliedwiththeproduct. Assistancewithprogram-
ming and operation of the CADD-TPN pump is available to clinicians
24-hours-a-day by calling 800-426-2448 in the U.S.A. and Canada.
Deltec
Other manuals for CADD-TPN 5700
1
Other Deltec Medical Equipment manuals


Popular Medical Equipment manuals by other brands

Masimo
Masimo sedline Quick reference guide

Belmont Medical Technologies
Belmont Medical Technologies CritiCool user manual

Fresenius Medical Care
Fresenius Medical Care bibag V2.0 Technician manual

Stryker
Stryker Gynnie Maintenance manual

Invacare
Invacare RPS350-1E user manual

Practivet
Practivet INFUSION PUMP quick start guide


