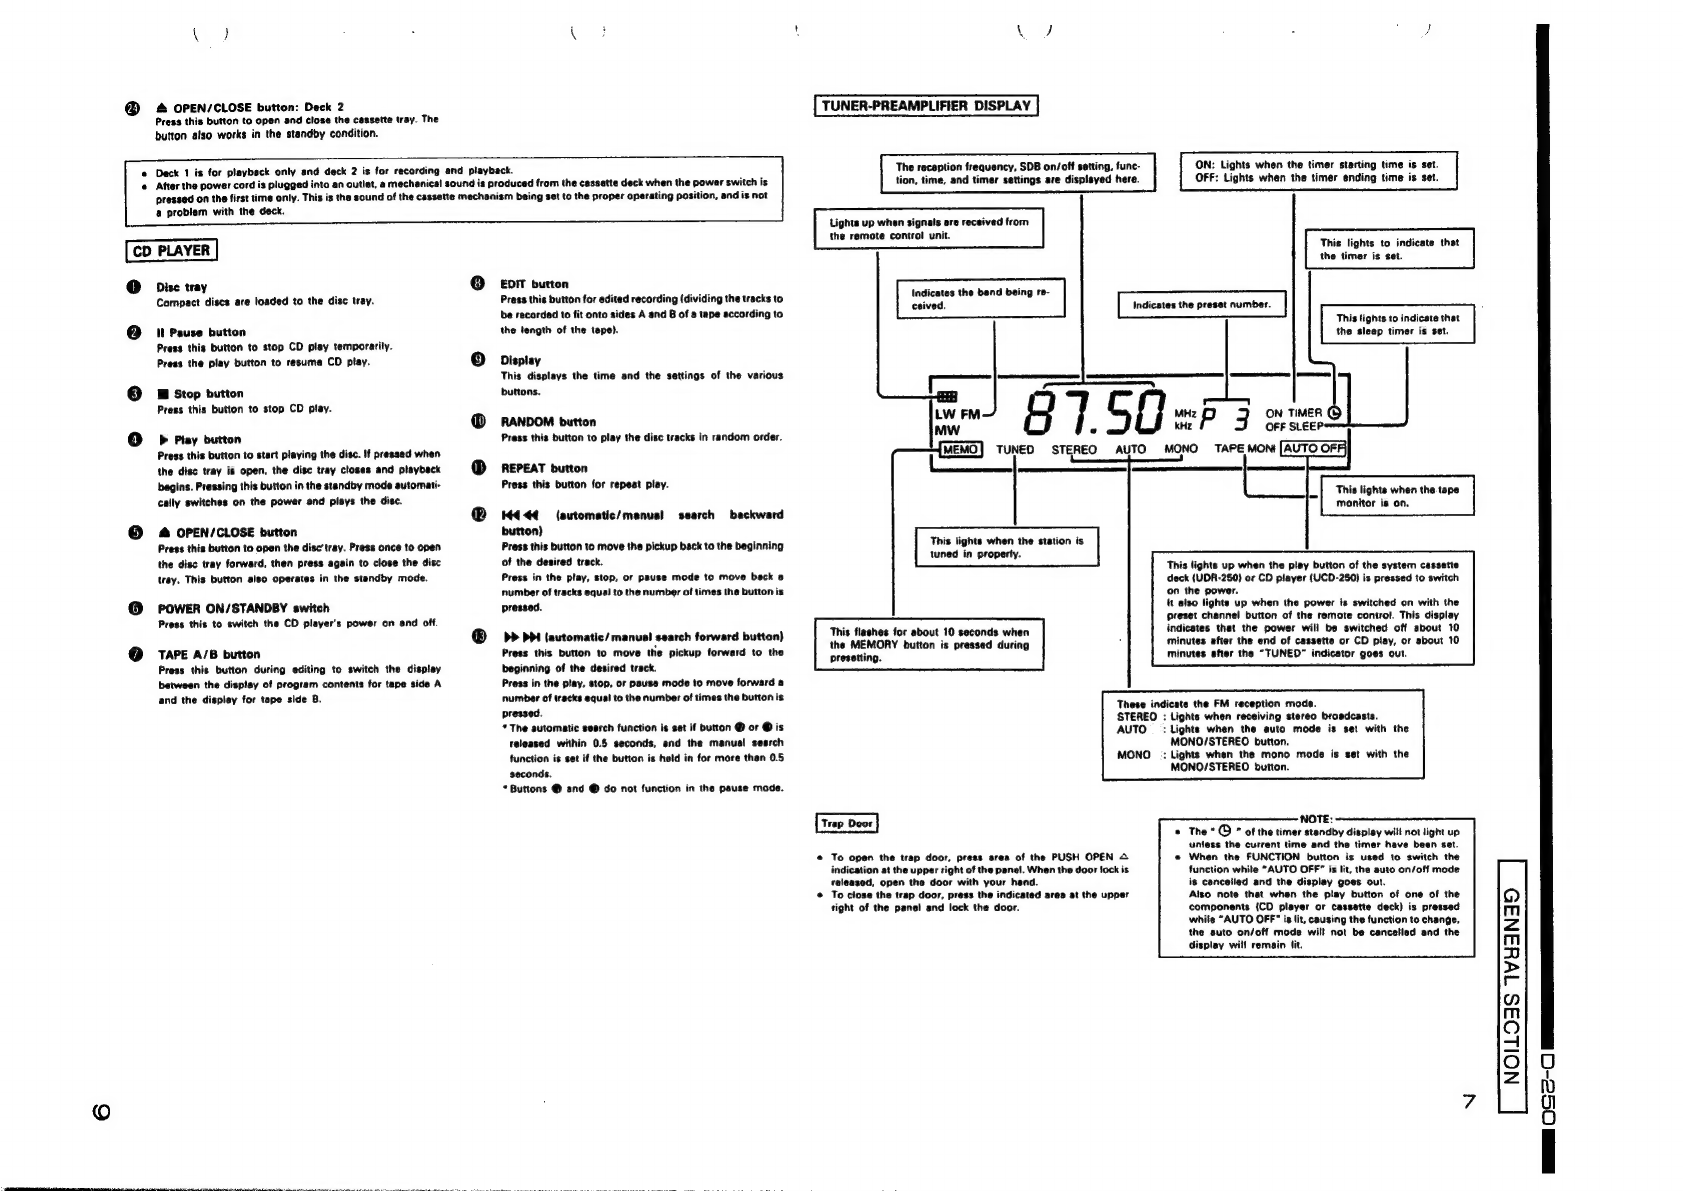
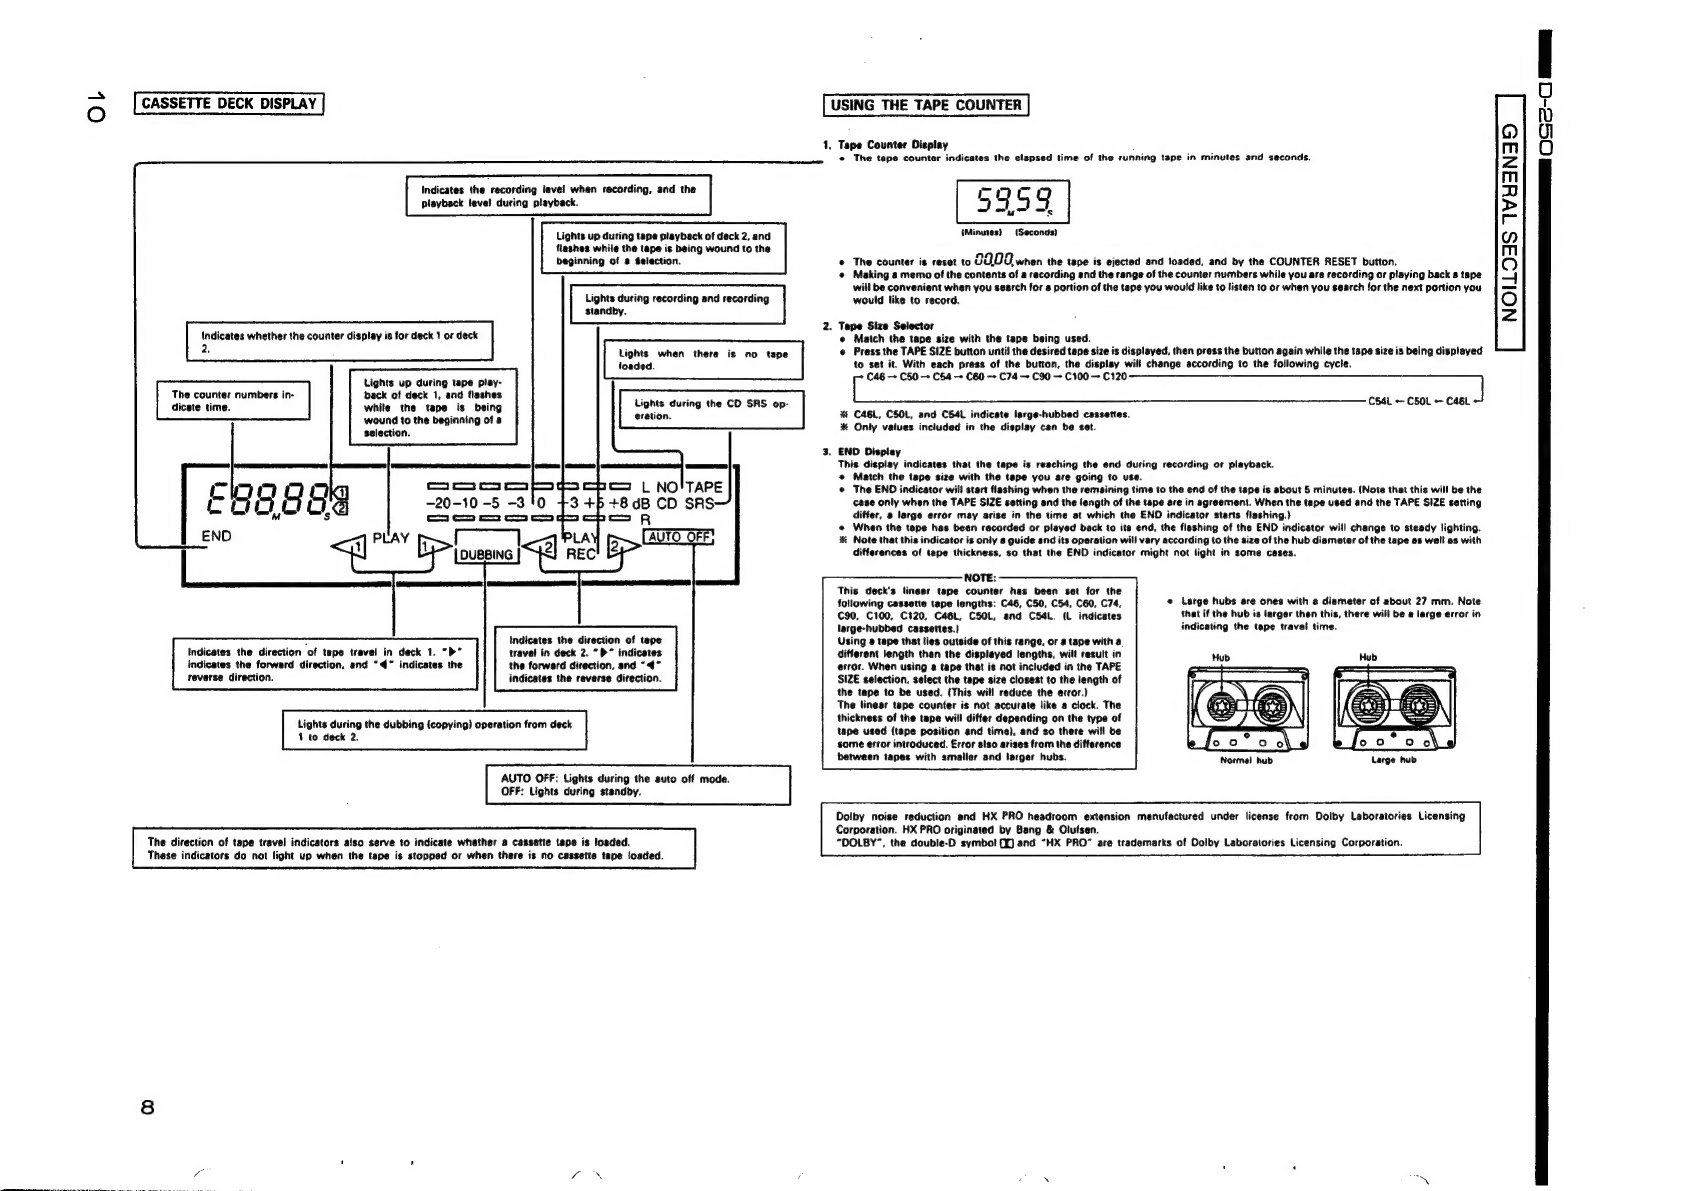
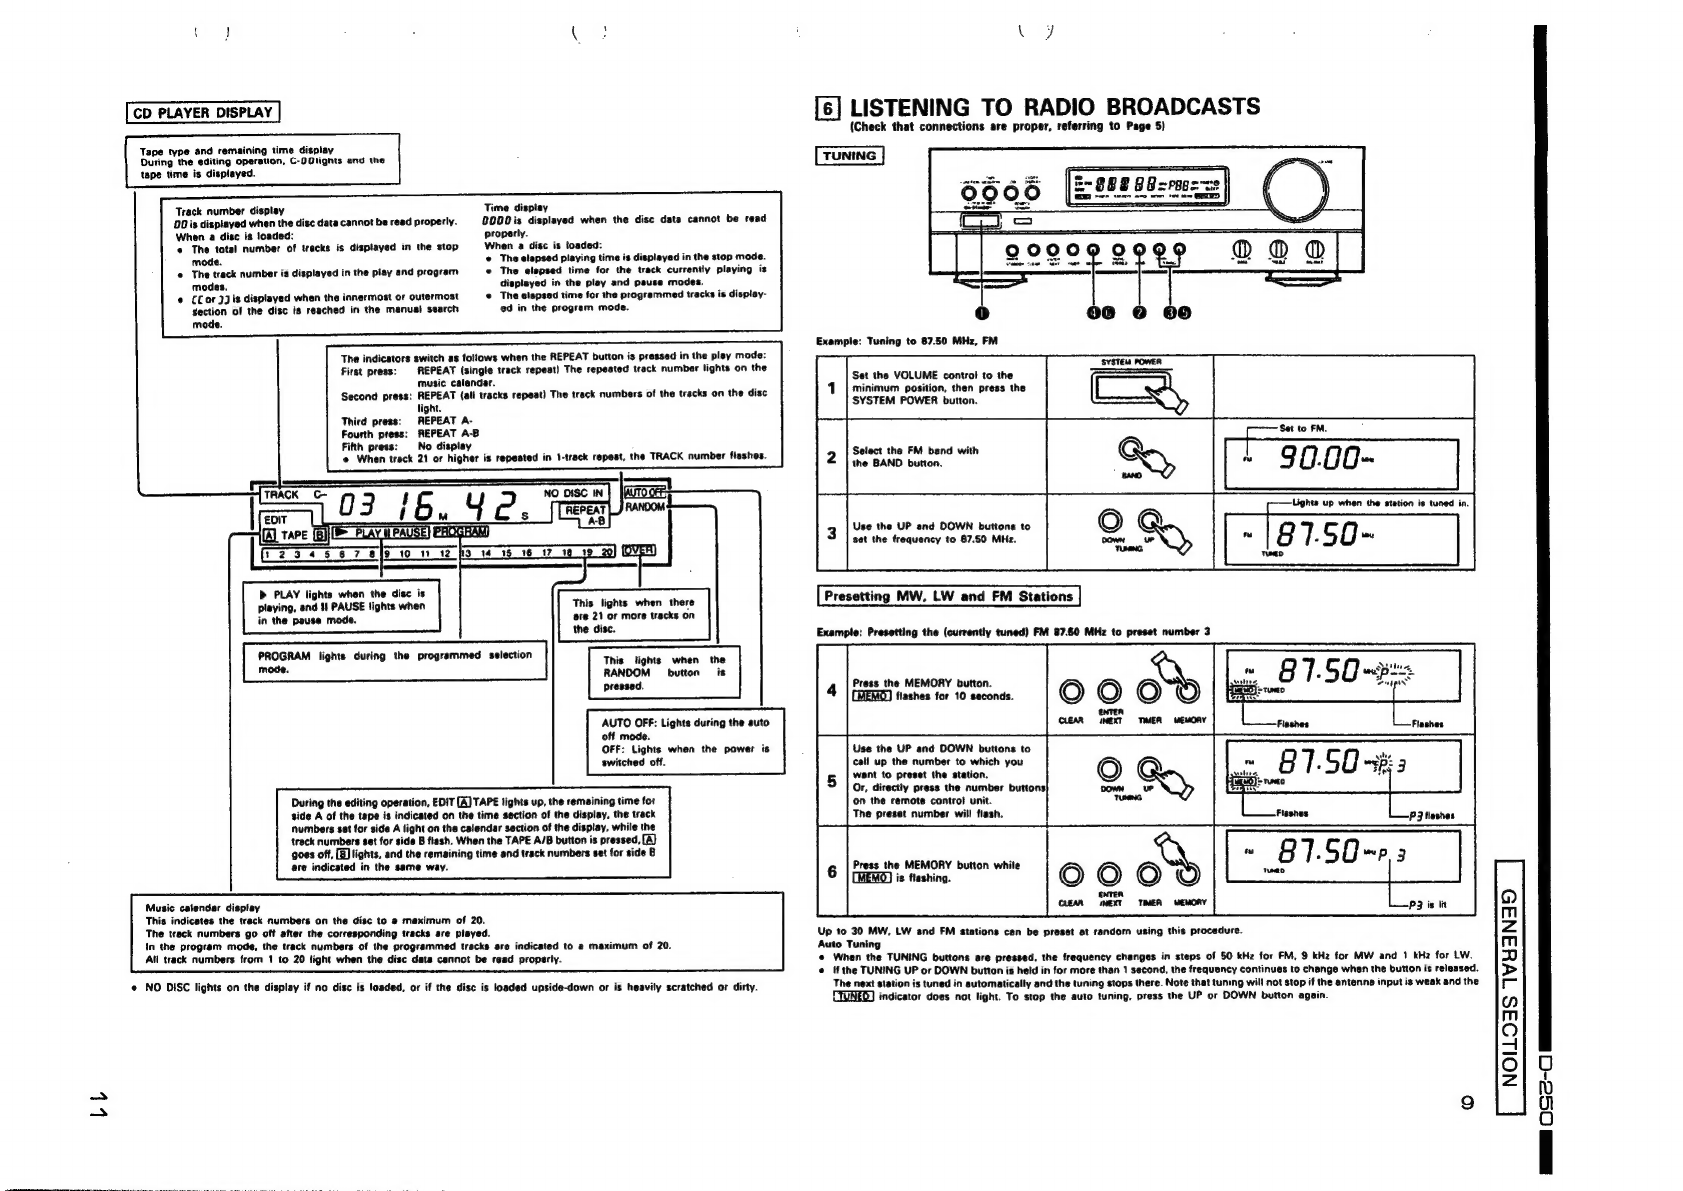
Denon UPO-250 User manual

PERSONAL
COMPONENT
SYSTEM
UNIT
No.
UPO-250
(Power
Amplifier)
UNIT
No.
UTP-250
(MW,
LW,
FM
Tuner/Pre
Amplifier)
UNIT
No.
UDRW-250
(Cassette
Tape
Deck)
UNIT
No.
UCD-250
(Compact
Disc
Player)
OPERATING
INSTRUCTIONS
BEDIENUNGSANLEITUNG
MODE
D’EMPLOI
ISTRUZIONI
PER
L’USO
FOR
ENGLISH
READERS
"
FUR
DEUTSCHE
LESER
~
POUR
LES
LECTEURS
FRANCAIS
OOO
RPA
ALTAR
ee
PAGE
4~
PAGE
23
SEITE
23
~
SENE
43
PAGE
44
—~
PAGE
63
KA
RUEBA
24
2
PARE
OF

NOTE
ON
USE/HINWEISE
ZUM
SULL'USO
Avoid
high
temperetures
Allow
for
sufficient
haat
dispersion
when
installed
on
rack,
Vermeiden
Sie
hohe
Temperaturen
Beachten
Sie,
daG
eine
zureichende
Luftzirkuletion
gewahrieistet
wird,
wenn
des
Gerdt
auf
ein
Regal
gestellt
wird.
Eviter
des
températures
élevées
Tenir
compte
d'une
dispersion
de
chaleur
suffisante
tors
de
I'instaltation
sur
une
étegére.
Evitete
di
esporre
f'unitd
a
temperature
alte.
Assicuratevi
che
ci
sia
un‘adeguate
dispersions
de!
calore
quando
instaliate
I'unité
in
un
mobile
per
com-
ponenti
audio.
Handle
the
power
cord
carefully.
Hold
the
plug
when
unplugging
the
cord.
Gehen
Sie
vorsichtig
mit
dem
Netzkabel
um.
Halten
Sie
das
Kabe!
am
Stecker,
wenn
Sie
den
Stecker
herauazichen.
Manipuiler
le
cordon
d‘slimentstion
avec
préceution.
Tonic
ia
prise
tors
du
débranchement
du
cordon.
Manneggiste
i
filo
di
stimentazione
con
curs.
Agite
per
le
spine
quendo
scotlegste
il
cavo
dalla
presa.
Irregutarities
GEBRAUCH/OBSERVATIONS
RELATIVES
A
L’UTILISATION/NOTE
Hatten
Sie
das
Gerét
von
Feuchtigkelt,
Wasser
und
Staub
fern.
Protéger
I'eppereil
contre
I'humidité,
l'eau
et
is
pous-
siére.
Tenete
('unité
lontens
dall’umidits,
dall’scqua
e
dalis
polvere.
Unplug
the
power
cord
when
not
using
the
set
for
long
periods
of
time.
Wenn
das
Gerdt
eine
lingere
Zeit
nicht
verwendet
werden
soll,
trennen
Sie
das
Netzkabel
vom
Netzstecker.
Débrancher
le
cordon
d’slimentation
toreque
I'appareil
est
pes
utilisé
pendant
de
tongues
périodes.
Disinnestete
it
filo
di
alimentazione
quando
svete
linten-
zione
di
non
usare
il
filo
di
etimentazione
per
un
lungo
“(For
sets
with
ventilation
holes)
Do
not
obstruct
the
ventilation
holes.
Die
Beldftungsdtinungen
darfen
nicht
verdeckt
werden.
No
pes
obsirver
les
trous
d’aération.
Non
coprite
i
fori
di
ventilazione.
Do
not
let
foreign
objects
in
the
set.
Keine
fremden
Gegensténde
in
das
Gerit
kommen
lassen.
Ne
pas
isisser
des
objets
étrangers
dans
l'appareil.
E’
importante
che
nessun
oggetto
6
inserito
all’intemo
dell‘unitd.
Do
not
let
insecticides,
benzene,
and
thinner
come
in
contact
with
the
set.
Lassen
Sie
das
Gerat
nicht
mit
Insektiziden,
Benzin
oder
VerdOnnungemittein
in
Berdhrung
kommen.
Ne
pas
mettre
en
contact
des
insecticides,
du
benzéne
et
un
diluant
avec
l'appareil.
Assicuratevvi
che
I'unté
non
vengs
in
contstto
con
ineetticidi,
benzolo
o
sotventi.
ia
Never
disassemble
or
modify
the
sei
in
any
way.
Versuchen
Sie
niemsls
des
Gerit
suseinander
zu
neh-
men
oder
suf
jegliche
Art
zu
verindern.
Ne
jamsis
démonter
ou
modifier
l'appareil
d'une
man-
fére
ou
d'une
sutre.
Non
smontate
mai,
ne
modificete
I'unitd
in
nessun
modo.
©
If
the
system
should
smoke
or
produce
strange
smells,
immediately
set
the
power
switch
to
the
STANDBY
position,
unplug
the
power
cord,
and
contact
your
store
of
purchase.
UnregelméGigkeiten
©
Sollte
das
Gerat
Rauch
produzieren
oder
eigenartig
riechen,
stellen
Sie
den
Netzschalter
sofort
auf
die
Position
STANDBY
(Bereitschatt),
ziehen
Sie
den
Netzstecker
heraus
und
kontaktieren
Sie
ihren
Handler.
Anomalies
e
Si
de
ta
fumée
sort
de
ta
chaine
ou
des
odeurs
bizarres,
placer
l'interrupteur
d’alimentation
immédiatement
sur
la
position
de
veille
(STANDBY),
débrancher
le
cordon
d'alimentation
et
contacter
le
distributeur.
Irregolarita
©
Quatora
il
sistema
dovesse
produrre
de|
fumo
o
degli
odori
strani,
collocate
immediatamente
I'interruttore
di
accensione
nella
posizione
STANDBY,
disinnestate
il
filo
di
alimentazione
e
rivoigetevi
al
negozio
dell’acquisto.
“SERIAL
NO.
PLEASE
RECORD
UNIT
SERIAL
NUMBER
ATTACHED
TO
THE
REAR
OF
THE
CABINET
FOR
FUTURE
REFERENCE”
SAFETY
IMPORTANT
WARNING:
TO
PREVENT
FIRE
OR
SHOCK
HAZARD,
DO
NOT
EXPOSE
THIS
APPLIANCE
TO
RAIN
OR
MOISTURE.
(UTP-260
only)
IMPORTANT
(BRITISH
MODEL
ONLY)
The
wires
in
this
mains
lead
are
coloured
in
accordance
with
the
fotlowing
code:
Blue:
Neutral
Brown:
live
The
colours
of
the
wires
in
the
mains
lead
of
this
apparatus
may
not
correspond
with
the
coloured
markings
identifying
the
terminals
in
your
plug
proceed
as
fotlows.
The
wire
which
is
cofoured
biue
must
be
connected
to
the
terminal
which
is
merked
with
the
letter
N
or
coloured
black.
The
wire
which
is
coloured
brown
must
be
connected
to
the
terminal
which
is
marked
with
the
letter
L
or
coloured
red.
CLASS
1
LASER
PRODUCT
LUOKAN
1
LASERLAITE
KLASSE
1
LASERAPFARAT
ADVARSEL:
USYNUG
LASERSTRALING
VED
AGNING,
NAR
SMKERHEDSAFBAYDERE
ER
UDE
AF
FUNICTION.
UDSAETTELBE
FOR
STRAUNG.
LAITTEEN
KAYTTAMINEN
MUULLA
KUIN
TASSA
KAVTTOOHJEESSA
MAINITULLA
TAVALLA
SAATTAA
ALTISTAA
KAYTTAJAN
TURVALLISUUSLUOKAN
1
VUTTAVALLE
NAKYMATTOMALLE
LASERSATEILYLLE.
OM
APPARATEN
ANVANDS
PA
ANNAT
SATY
AN
1
DENNA
SAUKSANVISNING
SPECWICERATS,
KAN
ANVANDAREN
UTSATTAS
FOR
OSYNUG
LASERSTRALNING
80M
OVERSKAIDER
GRANSEN
FOR
LASERKLASS
1.
VARONTUS!
_VARNING-
“CLASS
1
LASER
PRODUCT”
Q
m
Zz
m
Bs)
>
T—
on
m
©)
a
fe)
Zz
ee
a
a
en
ee
ee
ey
(OC
-C
ay

FRONT
PANEL/FRONTPLATTE/PANNEAU
AVANT/PANNELLO
ANTERIORE
POWER
AMPLIFIER
TUNER-PREAMPLIFIER
LEISTUNGSVERSTARKER
TUNER-VORVERSTARKER
AMPLIFICATEUR
DE
PUISSANCE
TUNER-PREAMPLIFICATEUR
AMPLIFICATORE
DI
POTENZA
SINTONIZZATORE-PREAMPLIFICATORE
m~
Pe
8G
=ragens
NED
STEREO
AUTO
MOND
TAPE More
PUTO
OFF)
CASSETTE
DECK
CD
PLAYER
CASSETTENDECK
CD-SPIELER
PLATINE
CASSETTE
LECTEUR
CD
PIASTRA
A
CASSETTE
DISPLAY
DELLA
PIASTRA
A
CASSETTE:
me
1888
G.
Ga."
ares
ee
Dt
w
oray
wrausE
Ve
DES
OT AS
WHIZ
TD
1S
16
37
18
1020
OFT
e
As
an
aid
to
better
understanding
the
operation
method,
the
illustrations
used
in
this
manual
may
differ
from
the
actual
system.
@
Als
Hilfestellung
zum
besseren
Verstandnis
der
Betriebsmethode,
erlauben
wir
uns
den
Hinweis,
daB
sich
die
Abbildungen
in
dieser
Bedienungsanieitung
leicht
von
dem
aktuellen
System
unterscheiden.
©
Pour
faciliter
1a
compréhension
de
la
méthode
de
fonctionnement,
les
illustrations
utilisées
dans
ce
manuel
peuvent
étre
différentes
de
celles
de
la
chaine
réstle.
¢
Per
rendere
la
spiegazione
del
metodo
operativo
piv
facile,
je
illustrazioni
usate
in
questo
libretto
delle
istruzioni
possono
differire
dal
sistema
stesso.
G)
m
Zz
m
BS)
>
-
”
m
.@)
=
oO
z

SSeS
ee
ca}
CONTENTS
Main
Features
.
Before
Using
...
Antenna
Connections
Connections
Pert
Names
and
Functions
Power
Amplifier
..
Tuner-Preamplifier
.
Cassette
Deck
CD
Player
...
Displey
...
Se
ite
Listening
to
Radio
Broadcasts
Using
the
Timer
.
Cassette
Deck
ov
©
Bafore
Recording
and
Playback
.......cccsssssecsssrereee
19
Playing
Cassette
Tapes
eevee
Check
that
the
following
parts
are
inctuded
In
the
package
@
Operating
instructions
@EFM
Antenna...
@AM
Loop
Antenna
@
Remote
Controller
®
REP/AA
Batteries
...
©
System
Connectors
1
&
@FM
Antenna
Adaptor
.
@
Pin
Plug
Cords
........
[1]
MAIN
FEATURES
AM/FM
30-station
random
preset
tuner
Random
presetting
permits
easy
operation
snd
will
be
conve-
nient
for
the
increased
number
of
FM
stations
in
the
future.
Independent
power
amplifier
designed
for
quality
sound
High
quality
50
W
per
channel
power
amplifier
with
large
speaker
terminals.
New
SDB
control
The
Super
Dynamic
Bass
control
circuit
delivers
clear
bass
sound.
Super
finear
converter
and
high
pertormance
digital
filter
Denon’s
unique
systems
for
preventing
loss
of
CD
sound
quality
permit
excetlent
sound
field
reproduction.
[2]
BEFORE
USING
Note
the
following
points
before
using
the
D-250.
Moving
the
system
To
prevent
short-circuiting
or
damage
of
the
connection
cords,
be
sure
to
unplug
the
power
cord
and
disconnect
all
connec-
tion
cords
before
moving
the
system.
In
addition,
atways
remove
CDs
before
moving
the
system.
Failing
to
do
so
may
result
in
scratched
CDs.
Before
switching
on
the
power
Check
again
that
all
connections
are
proper
and
that
the
connection
cords
are
not
damaged.
Be
sure
to
disconnect
the
power
plug
before
disconnecting
or
connecting
the
connec-
tion
cords.
[3]
ANTENNA
CONNECTIONS
FM
Indoor
Antenna
(Single
Side
Playback,
Two-Side
Playback
and
Continuous
Playbeck}
Recording
Cassette
Tapes
Playing
CDs
Compact
Discs
Bea
AM
Loop
Antenne
Assembie
the
included
AM
loop
antennas
as
shown
in
the
disgram,
separate
it
as
far
from
@
Regular
Playback
the
system
as
possibie,
and
place
it
in
a
@
Other
Playback
Features
Position
that
provides
the
best
reception.
In
FM
antenna
e
Edited
Recording
onto
Sides
A
and
some
cases,
reception
is
better
if
the
poiar-
Bota
Tape
pobed
of
the
serene
are
ioalanea
ane
g
oadcasts
will
no!
received
wi
the
3
Ramote
Control
Unit
2
loop
antenna
is
not
connected
or
if
it
is
Loop
antenne
[13
Auto
On/Ott
Function
.
connected
but
is
located
near
a
metal
part.
fi4
Important
Information
Attach
the
loop
antenna
even
when
using
an
[18
Specifications
....
outdoor
AM
antenna.
fig
Troubleshooting
..
ide
from
the
main
unit:
Benne
enr
awe
Connecting
an
Outdoor
Antenna
©
Editing
circuit
Center
conductor
side
Automatic
selection
of
CD
tracks
for
minimum
biank
space
on
the
tape
when
recording.
®
Dolby
8,
C
and
HX
PRO
circuits
For
high
quality
sound
in
playback
and
recording.
©
CD
SRS
circuit
CDs
can
be
recorded
at
the
touch
of
a
button.
©
Easy-to-use
remote
controt
unit
e
Auto
on/off
function
This
function
switches
on
the
power
with
just
a
press
of
the
CD
of
cassette
deck
play
button.
The
power
is
switched
off
about
10
minutes
after
playback
has
finished.
Use
an
outdoor
antenna
if
reception
cannot
be
heard
clearly
with
the
included
antenna.
Change
the
location,
height,
and
direction
of
the
antenna
to
find
the
position
of
best
reception,
then
fix
the
antenna
in
that
position.
Assembling
the
Loop
Antenna
75ohm
coaxial
cable
{3C-2V
or
other)
e
Hum
may
be
produced
if
a
TV
set
or
another
audio
component
is
set
near
this
system
or
their
connection
cords
are
nearby.
If
this
happens,
try
changing
the
position
of
the
equipment
and
connection
cords.
e
Connect
the
outdoor
antenna
using
75-ohm
coaxial
cable.
This
will
help
shieid
the
antenna
from
externsi
noise.
@
Places
for
Installing
Outdoor
Antennas
©
Donot
move
the
system
abruptly
from
a
cold
place
to
a
warm
place,
since
t
his
may
cause
water
Gropiets
(condensation)
to
form
in
the
equipment,
preventing
proper
operation.
If
this
happens,
wait
one
hour
before
using
the
system.
@
Remove
the
tie
fastening
the
toop
antenna’s
iead
and
connect
the
lead
to
the
antenna
terminals.
e
Separate
the
FM
and
AM
antenna
wires
from
the
system
connector
wires.
©
Install
the
outdoor
antenna
facing
a
brosdcast
station's
transmission
antenna.
When
surrounded
by
buildings
or
hills,
place
the
antenna
in
the
location
which
provides
best
reception
and
try
changing
the
direction
of
the
antenna
to
obtain
optimum
reception.
e
Do
not
install
the
antenna
under
power
lines.
\t
is
extremely
dangerous
for
the
sntenna
to
come
into
contact
with
a
power
tine.
©
Install
awey
from
roads
and
train
tracks
to
prevent
noise
from
cars
and
trains.
©
Do
not
install
the
antenna
too
high,
as
it
may
be
hit
by
lightning.
9)
m
z
m
wD
>
—
2)
m
?)
zs
oO
z
a
We
ie
OSc-C
i!

[4]
CONNECTIONS
These
jacks
are
for
connecting
the
exclusive
surround
processor.
For
instructions
on
connections,
refer
to
the
surround
processor's
manual.
FM
antenna
Refer
to
Page
4.
las
233
vif
AM
foop
antenna
Keep
the
FM
and
AM
antenna
wires
away
from
the
system
connector
wires
to
prevent
noise
from
entering
the
antennas.
COAXIAL,
DIGITAL
tN
a
San
EH
UUUOUUU
UU
AVA
eam
of
Owe
Gécrema
(MM
cartridge)
NOTE:
This
system
includes
digital
circuitry
which
may
interfere
with
the
colors
on
a
TV.
Should
this
occur,
switch
off
the
power
of
the
unused
component(s).
USC-250
(Left
channe}}
(Right
channel)
Speaker
system
connections
Connect
the
speaker
system
for
the
left
channel
(the
feft
side
as
seen
from
the
front)
to
the
L
terminals,
and
the
speaker
system
for
the
right
channel
to
the
R
terminals.
Pradecnern
Pare
AC
OUTLET
AC
240
V
50
ue.
(for
U.K.
mode!)
Always
connect
the
amplifier’s
(UPO-250)
power
card
to
this
AC
(Plug
into
a
power
outlet.)
outiet.
e@
SWITCHED
(total
capacity
of
370
W)
The
power
of
this
outlet
is
switched
on
and
off
with
the
tuner’s
power
switch.
Plug
the
power
amplifier’s
power
cord
into
this
outlet.
e
UNSWITCHED
{total
capacity
—
110W)
The
power
is
supplied
to
these
outlets
regardiess
of
whether
or
not
the
tuner’s
power
switch
is
turned
on
or
off.
Plug
the
power
cords
of
the
CD
player
and
cassette
deck
into
these
outlets.
Power
cord
{for
U.K.
model)
MONO
OUT
jack
Jack
for
connecting
a
subwoofer
(super
woofer)
with
built-in
amplifier.
Do
not
plug
the
power
cord
into
the
outlet
until
all
connections
have been
completed.
Connect
properly
as
illustrated
in
the
diagram.
©
Check
the
left
and
right
channels,
then
properly
connect
the
left
speaker's
terminals
to
the
amplifier’s
L
terminals
and
the
right
speaker's
terminals
to
the
amplifier's
R
terminals.
e
Insert
the
plugs
securely.
Incomplete
connections
can
cause
noise.
@
When
the
power
cord
has
been
disconnected
from
the
power
outlet,
wait
about
5
seconds
before
plugging
it
back
in.
@
Use
the
AC
OUTLET
to
plug
in
the
amplifier
CD
and
Cassette
deck.
Never
use
it
for
other
appliances,
such
as
halr
driers,
etc.
e
Note
that
grouping
connection
cords
(pin-plug
cords)
together
with
power
cords
or
setting
them
near
power
transformers
can
cause
hum
or
other
noise.
e
Note
that
if
the
input
jacks
selected
with
the
FUNCTION
button
are
open
(if
a
component
is
not
connected),
there
might
be
leakage
of
the
reproduced
sound
of
a
component
connected
to
another
set
of
input
jacks.
NOTE:
System
operation
is
not
possible
and
the
power
cannot
be
turned
on
and
off
unless
ail
system
connector
cords
and
pin-plug
cords
are
connected.
G)
m
z
m
0
>
-
n
m
i?)
ra
Oo
Zz

00
[5]
PART
NAMES
AND
FUNCTIONS
POWER
AMPLIFIER
C2)
PHONES
jack
When
using
headphones,
plug
them
in
here.
The
sound
from
the
speakers
is
cut
when
headphones
are
plugged
in.
POWER
switch
When
pressed
once,
the
power
is
switched
on
and
the
power
indicator
LED
lights
up.
This
switch
is
usually
left
on.
TUNER-PREAMPLIFIER
FUNCTION
button
Use
this
to
select
the
program
source.
The
setection
changes
in
the
order
of
TUNER,
TAPE,
CO,
PHONO,
and
DAT.
TAPE
MONITOR
button
Use
this
to
listen
to
the
sound
of
the
tape.
When
used
with
3
3-head
tepe
deck,
the
sound
can
be
monitored
while
recording.
SOB
(Super
Dynamic
Bess)
button
Press
this
button
for
more
powerful
bass
sound.
CLOCK/DISPLAY
button
This
button
switches
the
dispisy
to
the
reception
frequency
or
the
function
display
and
time
display.
Remote
contro!
sensor
The
remote
control
unit
is
pointed
toward
this
sensor
and
operated.
VOLUME
control
This
control
sdjusts
the
overall
volume.
Turn
clockwise
(
J
to
increase
the
volume,
counterctockwise
(
1)
to
decrease
it.
SYSTEM
POWER
button
(This
switch
can
switch
on
the
power
for
the
entire
system.)
Press
to
switch
the
power
on,
press
again
to
put
the
system
into
standby.
TIMER
STANDBY
button
Press
this
button
to
cause
the
timer
to
operate
at
the
set
time.
When
the
timer
has
been
set,
pressing
this
button
will
light
up
the
dispiay’s
timer
standby
indicator
(o
},
and
pressing
it
again
will
switch
off
the
stendby
indicator.
The
timer
will
not
function
when
the
standby
indicator
is
off.
CLEAR
button
This
button
is
usad
to
change
the
current
time
setting
or
the
contents
of
the
set
timer.
®
e
8
&€
8
Power
indicator
LED
This
LED
will
flash
for
about
5
seconds
until
the
speaker
relay
goes
on,
then
it
will
light
steadily.
The
LED
will
also
flash
when
the
protection
circuit
is
activated.
Should
this
occur,
switch
the
power
off,
check
the
speaker
connections,
then
switch
the
power
on
again.
ENTER/NEXT
button
This
is
used
when
setting
the
timer,
setting
the
current
time,
and
when
advancing
to
the
next
operation.
TIMER
button
This
is
used
to
set
the
timer.
MEMORY
button
This
button
is
used
when
presetting
FM,
MW
and
LW
stations.
MONO/STEREO
(FM
stereo
mute/mono)
button
This
button
will
not
function
when
receiving
MW/LW
broadcasts.
{For
FM
reception}
STEREO
Use
this
mode
to
receive
FM
broadcasts
in
(mute):
stereo.
{*AUTO*
appears
on
the
display.)
The
muting
Circuit
is
activated
to
cut
the
hiss
noise
between
stations.
In
this
mode,
FM
broadcasts
are
received
in
monaural,
regardiess
of
whether
they
are
broedcsst
in
monaural
or
stereo.
Set
to
the
mono
mode
it
there
is
much
noise
in
the
stereo
mute
mode
(with
“AUTO“
displayed)
or
if
the
signals
are
weak.
MONO:
BAND
(FM/MW/LW
selection)
button
With each
press,
the
band
is
switched
in
the
order
of
FM,
MW,
LW.
FM,
and
so
on.
TUNING
UP
and
DOWN
buttons
Use
these
to
tune
in
FM,
MW
or
LW
stations
and
when
setting
the
clock
and
timer.
BASS
control
Use
this
controt
to
adjust
the
bass.
TREBLE
control
Use
this
control
to
adjust
the
treble.
BALANCE
control
Use
this
control
to
adjust
the
balance
of
the
volume
between
the
left
and
right
channels.
The
volume
is
the
same
for
the
left
and
right
channels
when
the
control
is
at
the
center.
eo
8 8
8
8
Cassette
tray:
Deck
1
The
cassette
tray
opans
outward
when
the
OPEN/CLOSE
button
is
pressed.
Insert
the
cassette
tape
with
the
side
on
which
the
tape
is
exposed
facing
away
from
you.
To
close
the
cassette
tray,
press
the
OPEN/CLOSE
button
again.
DOLBY
NR
selection
switch.
Use
this
switch
to
select
the
Dolby
NR
mode:
off,
B
type
or
C
type.
During
playback,
set
this
switch
to
the
same
mode
in
which
the
tape
was
recorded.
REV
MODE
switch
Use
this
switch
to
set
the
reverse
mode
to
one
of
the
following
modes:
<—
(single
side
mode),
—
(two-side
mode},
or
Ca)
(continuous
mode).
Refer
to
Page
13
for
details.
COUNTER
RESET
button
Press
this
button
to
reset
the
tape
counter
to
0000.
COUNTER
1/2
selection
button
Use
this
button
to
change
the
counter
display
between
deck
1
and
deck
2.
TAPE
SIZE
setting
button
Set
the
time
of
the
tape
to
the
length
of
the
tape
being
used.
Refer
to
Page
8
for
details.
DUBBING
button
Simply
pressing
this
button
permits
dubbing
{copying}
a
tape
from
deck
1
to
deck
2.
Cassette
tray:
Deck
2
The
cassette
tray
opens
outward
when
the
OPEN/CLOSE
button
is
pressed.
insert
the
cassette
tape with
the
side
on
which
the
tape
is
exposed
facing
away
from
you.
To
close
the
cassette
tray,
press
the
OPEN/CLOSE
button
again.
POWER
ON/STANDBY
switch
This
switch
turn
the
power
of
the
cassette
deck
on
and
off.
4
(rewind)
button:
Deck
1
Press
this
button
to
rewind
the
tape
in
deck
1.
Also,
if
pressed
during
playback
in
the
>
(forward)
direction,
the
tape
is
rewound
to
the
beginning
of
the
currently
playing
selection.
if
pressed
during
playback
in
the
q
(reverse)
direction,
the
tape
is
forwarded
to
the
beginning
of
the
next
selection
(on
the
back
side
of
the
tape).
D>
(fast-forward)
button:
Deck
1
Press
this
button
to
fast
forward
the
tape
in
deck
1.
Also,
if
pressed
during
playback
in
the
>
iforward)
direction,
the
tape
is
fast
forwarded
to.the
beginning
of
the
following
selection.
If
pressed
during
playback
in
the
4
(reverse)
direction,
the
tape
is
rewound
to
the
beginning
of
the
currently
playing
selection
(on
the
back
side
of
the
tape).
&
OPEN/CLOSE
button:
Deck
1
Press
this
button
to
open
and
close
the
cassette
tray.
The
button
also
works
in
the
standby
condition.
i)
4
(reverse
play)
button:
Deck
1
Press
this
button
to
begin
playback
in
the
reverse
direction
on
deck
1.
When
this
button
is
pressed
in
the
standby
condition,
the
power
is
automatically
switched
on
and
the
deck
plays.
@
(stop)
button:
Deck
1
Press
this
button
to
stop
the
moving
tape
in
deck
1.
>
(forward
play)
button:
Deck
1
Press
this
button
to
begin
playbeck
in
the
forward
direction
on
deck
1.
When
this
button
is
pressed
in
the
standby
condition,
the
power
is
automatically
switched
on
and
the
deck
plays.
CD
SRS
(CD
synchronized
recording
button)
Use
this
button
for
simple
CO
synchronized
recording.
Refer
to
Page
15.
REC/REC
MUTE
(recording/recording
mute}
button
To
record,
press
the
REC/REC
MUTE
button
and
the
P
play
button
only.
If
only
the
REC/REC
MUTE
button
is
pressed,
the
deck
is
set
to
the
recording
pause
mode.
If
this
button
is
pressed
again,
or
pressed
during
recording,
the
recording
mute
mode
is
set
for
approximately
5
seconds,
after
which
the
deck
is
set
to
the
recording
pause
mode.
Recording
pause
mode
When
the
play
button
of
the
CD
player
is
pressed
in
the
recording
pause
mode,
the
CD
begins
to
be
recorded.
44
(rewind)
button:
Deck
2
Press
this
button
to
rewind
the
tape
in
deck
2.
Also,
if
pressed
during
playback
in
the
DB
(forward)
direction,
the
tape
is
rewound
to
the
beginning
of
the
currently
playing
selection.
if
pressed
during
playback
in
the
4
(reverse)
direction,
the
tape
is
forwarded
to
the
beginning
of
the
next
selection
(on
the
back
side
of
the
tape).
>>
(fast-forward)
button:
Deck
2
Press
this
button
to
fast
forward
the
tape
in
deck
2.
Also,
if
pressed
during
playback
in
the
P
(forward)
direction,
the
tape
is
fest
forwarded
to
the
beginning
of
the
following
selection.
If
pressed
during
playback
in
the
4
(reverse)
direction,
the
tape
is
rewound
to
the
beginning
of
the
currently
playing
selection
{on
the
back
side
of
the
tape}.
REC
LEVEL
(recording
level)
controt
Use
this
control
to
set
the
recording
level.
4
(reverse
play)
button:
Deck
2
Press
this
button
to
begin
playback
in
the
reverse
direction
on
deck
2.
When
this
button
is
pressed
in
the
standby
condition,
the
power
is
automatically
switched
on
and
the
deck
plays.
@
(stop)
button:
Deck
2
Press
this
button
to
stop
the
moving
tape
in
deck
2.
>
(forward
play)
button:
Deck
2
Press
this
button
to
begin
playback
in
the
forward
direction
on
deck
2.
When
this
button
is
pressed
in
the
standby
condition,
the
power
is
automatically
switched
on
and
the
deck
plays.
G)
m
z
m
D
>
-
no
m
@)
a
oO
2

®
&
OPEN/CLOSE
button:
Deck
2
Press
this
button
to
open
and
close
the
cassette
tray.
The
button
also
works
in
the
standby
condition.
e@
Deck
1
is
for
playback
only
and
deck
2
is
for
recording
and
playback.
e
After
the
power
cord
is
plugged
into
an
outlat,
a
mechanical
sound
is
produced
from
the
cassette
deck
when
the
power
switch
is
C2)
pressed
on
the
first
time
only.
This
is
the
sound
of
the
cassette
mechanism
being
set
to
the
proper
operating
position,
and
is
not
a
problem
with
the
deck.
0
Disc
tray
Compact
discs
are
loaded
to
the
disc
tray.
U
Pause
button
Press
this
button
to
stop
CD
play
temporarily.
Press
the
play
button
to
resume
CD
play.
BB
Stop
button
Press
this
button
to
stop
CD
play.
>
Ptay
button
Press
this
button
to
start
playing
the
disc.
if
pressed
when
the
disc
tray
is
open,
the
disc
tray
closes
and
playback
begins.
Pressing
this
button
in
the
standby
mode
automati-
cally
switches
on
the
power
and
pisys
the
disc.
&
OPEN/CLOSE
button
Press
this
button
to
open
the
disc
tray.
Press
once
to
open
the
disc
tray
forward,
then
press
again
to
close
the
disc
way.
This
button
siso
operates
in
the
standby
mode.
POWER
ON/STANDBY
switch
Press
this
to
switch
the
CD
player's
power
on
and
off.
TAPE
A/B
button
Press
this
button
during
editing
to
switch
the
display
between
the
display
of
program
contents
for
tape
side
A
and
the
display
for
tape
side
B.
EDIT
button
Press
this
button
for
edited
recording
(dividing
the
tracks
to
be
recorded
to
fit
onto
sides
A
and
B
of
a
tape
according
to
the
length
of
the
tape).
Display
This
displays
the
time
and
the
settings
of
the
various
buttons.
RANDOM
button
Press
this
button
to
play
the
disc
tracks
in
random
order.
REPEAT
button
Press
this
button
for
repeat
play.
14d
4
button)
Press
this
button
to
move
the
pickup
back
to
the
beginning
of
the
desired
track.
Press
in
the
play,
stop,
or
pause
mode
to
move
back
a
number
of
tracks
equa!
to
the
number
of
times
the
button
is
pressed.
(automatic/manus!
search
backward
DD
PPI
(automatic/
manual
search
forward
buttan)
Press
this
button
to
move
the
pickup
forward
to
the
beginning
of
the
desired
track.
Press
in
the
play,
stop,
or
pause
mode
to
move
forward
a
number
of
tracks
equal
to
the
number
of
times
the
button
is
Pressed.
*
The
automatic
sesrch
function
is
set
if
button
@
or
@
is
released
within
0.5
seconds,
and
the
manual
sesrch
function
is
set
if
the
button
is
held
in
for
more
than
0.5
seconds.
*
Buttons
@
and
@
do
not
function
in
the
pause
mode.
~~
TUNER-PREAMPLIFIER
DISPLAY
The
reception
frequency,
SDB
on/off
setting,
func-
tion,
time,
and
timer
settings
are
displayed
here.
Lights
up
when
signals
are
received
from
the
remote
contro!
unit.
SS
LW
FM
IMEMO|
TUNED
STEREO
This
flashes
for
about
10
seconds
when
the
MEMORY
button
is
pressed
during
Presetting.
@
To
open
the
trap
door,
press
area
of
the
PUSH
OPEN
&
indication
at
the
uppar
right
of
the
panel.
When
the
door
Sock
is
released,
open
the
door
with
your
hand.
@
To
close
the
trap
door,
press
the
indicated
ares
at
the
upper
sight
of
the
panel
and
lock
the
door.
w-
81.50
AUTO
MONO
TAPE
MON
This
lights
when
the
tape
monitor
is
on.
These
indicate
the
FM
reception
mode.
STEREO
:
AUTO
—
:
Lights
when
the
auto
mode
is
set
with
the
MONO
:
Lights
when
the
mono
mode
is
set
with
the
ON:
Lights
when
the
timer
starting
time
is
set.
OFF:
Lights
when
the
timer
ending
time
is
set.
ights
to
indicate
that
the
timer
is
set.
Indicates
the
bend
being
re-
This
tights
to
indicate
that
the
sleep
timer
is
se’
MHz
P
3
ON
TIMER
©
kHz
OFF
SLEEP
ae
This
lights
up
when
the
play
button
of
the
system
cassette
deck
(UDR-250}
or
CD
player
(UCD-250)
is
pressed
to
switch
on
the
power.
tt
also
lights
up
when
the
power
is
switched
on
with
the
Preset
channel
button
of
the
remote
control.
This
display
indicates
that
the
power
will
be
switched
off
about
10
minutes
after
the
end
of
cassette
or
CD
play,
or
about
10
minutes
after
the
“TUNED”
indicator
goes
out.
Lights
when
receiving
stereo
broadcasts.
MONO/STEREO
button.
MONO/STEREO
button.
NOTE:
e
The*
(e)
*
of
the
timer
standby
display
will
not
light
up
unless
the
current
time
and
the
timer
have been
set.
«
When
the
FUNCTION
button
is
used
to
switch
the
function
while
“AUTO
OFF”
is
lit,
the
auto
on/off
mode
is
cancelled
and
the
display
goes
out.
Also
note
that
when
the
play
button
of
one
of
the
components
{CD
player
or
cassette
deck)
is
pressed
while
“AUTO
OFF"
is
lit,
causing
the
function
to
change,
the
auto
on/off
mode
will
not
be
cancelled
and
the
display
will
remain
lit.
G)
m
z
m
Be)
>
-
no
m
QO
a
O
z
SS
OS
—
ee
a
a

USING
THE
TAPE
COUNTER
1,
Tape
Counter
Display
e
The
tape
counter
indicates
the
elapsed
time
of
the
running
tape
in
minutes
and
seconds.
OL
and
the
recording
level
when
recording,
during
playba
{Minutes}
(Seconds)
0
iY)
G|
J
mi
O
z
m
Be)
>
a
07)
m
O
a
Oo
z
cwo
A
cea
ge
P
END
PLAY
8
Lights
up
during
tape
piayback
of
deck
2,
and
flashes
while
the
tape
is
being
wound
to
the
Ps
beginning
of
a
te
3
e
The
counter
is
reset
to
ea0a
when
the
tape
is
ejected
and
loaded,
and
by
the
COUNTER
RESET
button.
e
Making
a
memo
of
the
contents
of
a
recording
and
the
range
of
the
counter
numbers
while
you
are
recording
or
playing
back
a
tape
will
be
convenient
when
you
search
for
a
portion
of
the
tape
you
would
like
to
listen
to
or
when
you
search
for
the
next
portion
you
Lights
during
recording
and recording
would
like
to
record.
by.
:
;
7
2.
Tape
Size
Selector
Indicates
whether
the
counter
display
is
for
deck
1
or
deck
¢
Match
the
tape
size
with
the
tape
being
used.
2.
Lights
when
there
is
no
tape
@
Press
the
TAPE
SIZE
button
until
the
desired
tape
size
is
displayed,
then
press
the
button
again
while
the
tape
size
is
being
displayed
loaded.
to
set
it.
With each
press
of
the
button,
the
display
will
change
according
to
the
following
cycle.
C46
—
C50
—
C54
~
C80
--
C74
~
C90
—
C100
—
C120
The
counter
numbers
|
ae
ee
:
#
C46L,
CSOL,
and
C54L
indica!
ge-hubbed
cassettes.
%*
Only
values
included
in
the
display
can
be
set.
Lights
up
during
tape
play-
back
of
deck
1,
and
flashes
while
the
tape
is
being
wound
to
the
beginning
of
a
selection.
Lights
during
the
CD
SRS
op-
3.
END
Display
This
display
indicates
that
the
tape
is
reaching
the
end
during
recording
or
playback.
@
Match
the
tape
size
with
the
tape
you
are
going
to
use.
ono
T
©
The
END
indicator
will
start
flashing
when
the
remaining
time
to
the
end
of
the
tape
is
about
5
minutes.
(Note
that
this
will
be
the
-20-10
-5 -3
'0
3
+5
+8
dB
CD
SRS
case
only
when
the
TAPE
SIZE
setting
and
the
length
of
the
tape
are
in
agreement.
When
the
tape
used
and
the
TAPE
SIZE
setting
escapee
cac
oR
ditter,
2
large
error
may
arise
in
the
time
at
which
the
END
indicator
starts
flashing.)
, :
oe
«@
When
the
tape
has
been
recorded
or
played
back
to
its
end,
the
flashing
of
the
END
indicator
will
change
to
steady
lighting.
LA
%&
Note
that
this
indicator
is
only
8
guide
and
its
operation
will
vary
according
to
the
size
of
the
hub
diameter
of
the
tape
as
well
as
with
differences
of
tape
thickness,
so
that
the
END
indicator
might
not
light
in
some
cases.
NOTE:
This
deck's
linear
tape
counter
has
been
set
for
the
following
cassette
tape
lengths:
C46,
C50, C54,
C60, C74,
*
Large
hubs
are
ones
with
@
diameter
of
about
27
mm.
Note
90,
C100,
C20,
C46L,
C5OL,
and
CS54L.
{L
indicates
that
if
the
hub
is
larger
than
this,
there
will
be
a
large
error
in
large-hubbed
cassettes.)
indicating
the
tape
travel
time.
Using
a
tape
that
lies
outside
of
this
range,
or
a
tape
with
a
different
length
than
the
displayed
lengths,
will
result
in
error.
When
using
a
tape
that
is
not
included
in
the
TAPE
Indicates
the
direction
of
tape
travel
in
deck
2.
“D*
indicates
the
forward
direction,
and
“4°
indicates
the
reverse
direction.
Indicates
the
direction
of
tape
travel
in
deck
1.
"Db"
indicates
the
forward
direction.
and
“4”
indicates
the
reverse
direction.
SIZE
selection.
select
the
tape
size
closest
to
the
length
of
the
tape
to
be
used.
(This
will
reduce
the
error.)
The
linear
tape
counter
is
not
accurate
like
a
clock.
The
thickness
of
the
tape
will
differ
depending
on
the
type
of
tepe
used
(tape
position
and
time),
and
so
there
will
be
some
error
introduced.
Error
also
arises
from
the
difference
between
tapes
with
smaller
and
larger
hubs.
Normal
hub
Large
hub
Dolby
noise
reduction
and
HX
PRO
headroom
extension
menufactured
under
license
from
Dolby
Laboratories
Licensing
Corporation.
HX
PRO
originated
by
Bang
&
Olutsen.
“DOLBY”,
the
double-D
symbol!
(J
and
“HX
PRO”
are
trademarks
of
Dolby
Laboratories
Licensing
Corporation.

—_
—
Tape
type
and
remaining
time
display
During
the
editing
operation,
C-O0lignhts
and
the
tape
time
is
displayed.
Track
number
display
Time
display
D0
is
displayed
when
the
disc
data
cannot
be
read
properly.
OOO
is
displayed
when
the
disc
data
cannot
be
read
When
a
disc
is
loaded:
properly.
e
The
total
number
of
tracks
is
displayed
in
the
stop
When
a
disc
is
loaded:
mode.
@
The
elapsed
playing
time
is
displayed
in
the
stop
mode.
e@
The
track
number
is
displayed
in
the
play
and
program
«©
The
elapsed
time
for
the
track
currently
playing
is
modes,
ed
in
the
play
and
pause
modes.
@
(Cor
JJ
is
displayed
when
the
innermost
or
outermost
e@
The
elapsed
time
for
the
programmed
tracks
is
display-
section
of
the
disc
is
reached
in
the
manual
search
ed
in
the
program
mode.
mode.
The
indicators
switch
as
follows
when
the
REPEAT
button
is
pressed
in
the
play
mode:
First
press:
REPEAT
(single
track
repeat)
The
repeated
track
number
lights
on
the
music
calendar.
Second
press:
REPEAT
(all
tracks
repeat)
The
track
numbers
of
the
tracks
on
the
disc
light.
Third
press:
REPEAT
A-
Fourth
press:
REPEAT
A-8
Fifth
press:
No
display
@
When
track
21
or
higher
is
repeated
in
1-track
repest,
the
TRACK
number
flashes.
D>
PLAY
lights
when
the
disc
is
playing,
and
1
PAUSE
lights
when
in
the
pause
mode.
PROGRAM
lights
during
the
programmed
selection
mode.
This
lights
when
there
ere
21
of
more
tracks
on
the
disc.
This
lights
when
the
RANDOM
button
is
pressed.
AUTO
OFF:
Lights
during
the
auto
off
mode.
OFF:
Lights
when
the
power
is
switched
off.
During
the
editing
operation,
EDIT
(A)
TAPE
lights
up,
the
remaining
time
for
side
A
of
the
tape
is
indicated
on
the
time
section
of
the
display,
the
track
numbers
set
for
side
A
light
on
the
calendar
section
of
the
display,
while
the
track
numbers
set
for
side
B
flash.
When
the
TAPE
A/B
button
is
pressed,
[A]
goes
off,
[5]
lights,
and
the
remaining
time
and
track
numbers
set
for
side
B
are
indicated
in
the
same
way.
Music
calendar
display
This
indicates
the
track
numbers
on
the
disc
to
a
maximum
of
20.
The
track
numbers
go
off
after
the
corresponding
tracks
are
played.
in
the
program
mode,
the
track
numbers
of
the
programmed
tracks
are
indicated
to
a
maximum
of
20.
All
track
numbers
from
1
to
20
light
when
the
disc
data
cannot
be
read
properly.
@
NO
DISC
lights
on
the
display
if
no
disc
is
loaded,
or
if
the
disc
is
loaded
upside-down
or
is
heavily
scratched
or
dirty.
[6]
LISTENING
TO
RADIO
BROADCASTS
(Check
that
connections
are
proper,
referring
to
Page
5)
a
|
a
8888-0
eae
[
Ptarts
Example:
Tuning
to
87.50
MHz,
FM
SYSTEM
POWER
Set
the
VOLUME
control
to
the
minimum
position,
then
press
the
SYSTEM
POWER
button.
Select
the
FM
band
with
the
BAND
button.
Use
the
UP
and
DOWN
buttons
to
set
the
frequency
to
87.50
MHz.
Example:
Presetting
the
(currently
tuned)
FM
87.80
MHz
to
preset
number
3
090%
text
THEA
=6MEMORY
Press
the
MEMORY
button.
flashes
for
10
seconds.
Use
the
UP
and
DOWN
buttons
to
call
up
the
number
to
which
you
want
to
preset
the
station.
Or,
directly
press
the
number
buttons!
on
the
remote
contro!
unit.
The
preset
number
will
flash.
Press
the
MEMORY
button
while
is
flashing.
Up
to
30
MW.
LW
and
FM
stations
can
be
preset
at
random
using
this
procedure.
Auto
Tuning
@
When
the
TUNING
buttons
are
pressed,
the
frequency
changes
in
steps
of
50
kHz
for
FM,
9
kHz
for
MW
and
1
kHz
for
LW.
e
(fthe
TUNING
UP
or
DOWN
button
is
held
in
for
more
than
1
second,
the
frequency
continues
to
change
when
the
button
is
released.
The
next
station
is
tuned
in
automatically
and
the
tuning
stops
there.
Note
that
tuning
will
not
stop
if
the
antenna
input
is
weak
and
the
indicator
does
not
light.
To
stop
the
auto
tuning,
press
the
UP
or
DOWN
button
again.
G)
m
z
m
w
>
Za
”
m
i?)
a
ie)
z
SOC
a
a
aa
a
a
Sr
ee
Se

a)
USING
THE
TIMER
Example:
Listening
to
the
FM
station
preset
at
number
3
e
Be
sure
to
set
the
current
time.
©
Regular
timer:
The
power
can
be
switched
on
and
off
once
every
day
at
the
same
time.
(Wake-up
music}
®
Sleep
timer:
The
power
can
be
set
to
turn
off
in
up
to
60
minutes
in
steps
of
10
minutes
using
the
remote
control
unit.
(Bedtime
Press
the
TUNER
button
on
the
remote
control
unit.
music)
Be
sure
to
preset
stations
before
setting
the
timer.
Refer
to
“Presetting
MW,
LW
and
FM
Stations”
on
Page
9.
e
Turn
the
standby
switch
off
when
not
using
the
timer.
Press
button
“3”
on
the
remote
=
!
control
unit,
Should
a
power
failure
occur
or
if
the
power
cord
becomes
unplugged
from
the
power
outlet,
00:00
or
the
time
at
which
the
power
failed
will
flash
on
the
time
display.
if
this
happens,
reset
the
current
time.
{Reset
the
current
time
and
timer
settings.
If
00:00
was
displayed,
also
reset
the
stations
preset
on
the
tuner.)
The
standby
mark
starts
flashing
if
there
is
a
power
failure
or
the
power
cord
is
unplugged
while
the
standby
mark
is
lit.
If
this
happens,
reset
the
time
and
the
timer.
{If
the
display
reads
90:00
,
aiso
reset
the
tuner's
preset
channels.)
FM
Stereo
Reception
To
make
the
standby
mark
stop
flashing,
press
the
TIMER
button,
then
press
the
TIMER
or
CLEAR
button
while
“FUNC”
is
disptayed.
@
When
the
MONO/STEREO
button
is
pressed
(which
lights
the
AUTO
and
MONO
indicators)
and
an
FM
stereo
broadcast
is
received,
the
STEREO
indicetor
lights
and
the
station
is
received
in
stereo.
If
the
MONO
indicator
is
lit
by
pressing
the
MONO/STEREO
button,
the
Setting
the
Current
Time
(A
24-hour
clock
display
is
used.)
STEREO
indicator
goes
off
and
the
station
is
received
in
monaural.
Notes
on
Presetting
@
When
an
FM
station
is
preset,
the
auto
ar
monaural
mode
is
also
set,
so
check
the
display
before
Ppresetting
the
station.
©
Ifa
station
is
preset
to
a
number
at
which
another
station
has
previously
been
preset,
the
previous
station
is
cleared
and
the
new
station
7
e
is
preset.
7
&~
888
8S=ragc~2
FEI
wate
twee
ay
ere
se
som
IED
©
If
the
power
cord
is
unplugged,
the
preset
memory
is
not
cleared
immediately,
but
will
be
cleared
if
the
cord
is
laft
unplugged
over
a
pete
—
el
long
period.
Should
this
happen,
preset
the
stations
again.
Hold
in
the
CLOCK/DISPLAY
button
for
3
seconds
or
tonger.
Set
the
hours
with
the
UP
and
DOWN
buttons.
wehbe
Press
the
ENTER/NEXT
button.
]
gz
The
minutes’
places
flash.
7
Set
the
minutes
with
the
UP
7
The
set
places
flash.
and
DOWN
buttons.
D
Press
the
ENTER/NEXT
button
at
the
sound
of
a
time
signal.
The
display
lights
steadily
The
time
display
lights
steadily
:
and
the
clock
starts
to
and
the
clock
starts
keeping
count
from
0
seconds.
the
time.
10
\
~*~
10
|
7
if
|
:
7
Sets
©
q
gam
4
NOILOSS
IWHANSD
eae
a
a
0
ee
ee
OCO-O
aa

Eb
Setting
the
Timer
{Preset
the
MW,
LW
and
FM
stations
in
advance)
Example:
Setting
the
timer
to
turn
on
at
12:35
and
off
at
12:56.
-
B88
90
=r0x72
90.00
MHz
FM
is
being
received
on
preset
number
“1°.
87.50
MHz
FM
is
set
to
preset
number
“3°.
Press
the
SYSTEM
POWER
button.
Press
the
TIMER
button.
Press
the
UP
and
DOWN
buttons
to
display
“TUNER®.
Press
the
ENTER/NEXT
button.
Press
the
UP
and
OOWN
buttons
to
set
the
preset
number.
Press
the
ENTER/NEXT
button.
Use
the
UP
and
DOWN
buttons
to
set
the
hour
at
which
the
timer
is
to
switch
on.
Press
the
ENTER/NEXT
bution.
Use
the
UP
and
OOWN
buttons
to
set
the
minutes
at
which
the
timer
is
to
switch
on.
Press
the
ENTER/NEXT
button.
.
Pa
>
Cs
5
’
o
re
pace
Had
NOILOAS
IWHYSNAD
ES
OS
Cana
Pa
|
Use
the
UP
and
DOWN
buttons
to
set
the
hour
at
which
the
timer
is
to
switch
off.
Press
the
ENTEA/NEXT
button.
Use
the
UP
and
DOWN
buttons
to
set
the
minutes
at
which
the
timer
is
to
switch
off.
Press
the
ENTER/NEXT
button.
Press
the
TIMER
STANDBY
button.
~
90.007
+
erp,
‘The
stumingnon
goes
oft
and
the
aurrent
ame
11S.
eee
Press
the
SYSTEM
POWER
button.
@
When
the
TIMER
STANDBY
button
is
pressed
and
the
“(Q
”
mark
is
lit,
the
timer
will
function
at
the
same
times
each
day.
e
To
switch
off
the
timer,
press
the
TIMER
STANDBY
button
and
turn
off
the
“
(c)
"
mark.
NOTE:
The
timer
standby
mark
*
(Q
*
will
not
light
untess
the
current
timer
has
been
set.
Should
this
be
the
case,
set
the
current
time,
then
press
the
TIMER
STANDBY
button.
81.50
-%3
~
11

—
Ways
to
Use
the
Timer
SS
Example
1:
Waking
up
to
the
music
of
a
compact
disc.
G3
-
By
-
S
Press
the
tuner-preamplifier's
~-+
Press
the
CD
player's
SYSTEM
POWER
button
to
OPEN/CLOSE
bunon
switch
on
the
power.
tO
Open
the
tray.
Press
the
tuner-preamplifier's
TIMER
button.
Press
the
UP
and
DOWN
buttons
of
the
tuner-preamplifier
to
display
“cb”.
[es
Press
the
tuner-preamplifier’s
->
Press
the
cassette
deck’s
SYSTEM
POWER
button
to
OPEN/CLOSE
button
switch
on
the
power.
to
open
the
tray.
——$—$
Press
the
tuner-preamplitier’s
TIMER
button.
Press
the
UP
snd
DOWN
buttons
of
the
tuner-preampiifier
to
display
"TAPE".
@
The
tape
will
be
played
back
in
the
direction
indicated
by
the
tape
direction
indicator
in
the
tape
deck
on
the
side
of
the
tape
counter
display.
12
—~
Set
the
compact
disc
~>
Press
the
OPEN/CLOSE
in
the
trey.
button
again
to
close
the
tray.
rs
eee
ee
>
OVE
0
Casey
—
Load
the
cassette
tape.
—-
Press
the
OPEN/CLOSE
button
again
to
close
the
tray.
Example
3:
Unattended
recording
of
radio
broadcests
(“air
checks“)
—
Load
the
cassette
tape
to
->
Press
the
OPEN/CLOSE
which
you
will
record.
button
again
to
close
the
tray.
~
FUNC
-
Press
the
tuner-presmplilier's
—
Press
the
deck
2
SYSTEM
POWER
button
to
OPEN/CLOSE
button
switch
on
the
power.
to
open
the
tray.
Press
the
tuner-preamplifier’s
TIMER
button.
Press
the
UP
and
DOWN
buttons
of
the
tuner-preamplifier
to
displey
AIR.CH.
4
|
Follow
steps
4
to
16
under
“Setting
the
Timer”
on
Page
11.
e@
Timer
recording
starts
in
the
direction
indicated
by
the
tape
direction indicator
of
deck
2.
@
Check
that
the
tape
direction
and
REV
MODE
switch
settings
are
as
desired.
@
The
section
of
leader
tape
at
the
beginning
of
the
tape
cannot
be
recorded.
To
avoid
missing
the
beginning
of
the
recording,
set
the
starting
time
to
about
1
minute
before
the
program
is
scheduled
to
start.
Checking
the
Timer
Settings
To
check
the
timer
settings,
switch
on
the
power
of
the
tuner-preamplifier,
press
the
TIMER
button,
then
press
the
ENTER/NEXT
button.
The
timer
start
mode,
reception
band,
preset
number,
on
time,
and
off
time
are
displayed
in
order
each
time
the
ENTER/NEXT
button
is
pressed.
One
more
press
returns
the
display
to
the
reception
frequency.
When
the
on
time
and
off
time
have
not
been
set,
0000
fiashes
and
there
is
no
transition
to
the
next
display.
Changing
the
Timer
Settings
When
the
timer
setting
operation
is
repeated,
the
previous
settings
are
deleted
and
the
new
settings
are
set.
Deleting
the
Timer
Settings
The
timer
settings
can
be
cleared
by
pressing
the
TIMER
button
and
then
while
FUNC
is
being
displayed,
pressing
the
TIMER
button
again
or
pressing
the
CLEAR
button.
Note
about
the
Set
Timer
If
the
set
time
of
the
timer
is
reached
while
the
power
is
on,
the
timer
settings
will
take
over
and
there
will
be
a
switch
to
the
function
that
has
been
set
on
the
timer.
Cancelling
the
Tim
Press
the
TIMER
STANDBY
button
and
the
~
(Q~
mark
will
go
off.
G)
m
2
m
wv
>
i
no
m
Q
=
Oo
z
LEER
NS
eR
(_)
——(_]
ee

CASSETTE
DECK
(Use
the
remote
control
unit
for
these
operations.)
Example:
Setting
the
power
to
switch
off
in
50
minutes.
[Auto
Reverse
|
ie]
Vv
This
deck
is
equipped
with
an
auto
reverse
mechanism,
so
cassette
tapes
can
be
played
and
recorded
on
both
sides
or
played
continuously
without
having
to
turn
them
over.
OCirection
of
tape
travel
5
This
deck
has
two
play
buttons,
one
for
the
forward
direction
Playback
on
back
side
:
Playback
on
front
side
(front
side}
and
another
for
the
reverse
direction
{back
side).
The
—
side
being
played
can
be
changed
during
plsyback
by
pressing
ae
weno
en
tobe
the
opposite
play
button.
mceonans-
ver
l@
Reverse
mode
Set
the
reverse
mode
switch
{REV
MODE)
as
follows:
Press
the
remote
control
unit's
GOs
is
isplayed:
SLEEP"
appears
and
SLEEP
button.
flashes
for
5
seconds.
@
Single-side
recording/playback
mode
{
——
}
Start
from
”
In
this
position,
only
the
front
side
or
the
back
side
of
the
front
side
cassette
tape
is
played
or
recorded.
(The tape
stops
automati-
Press
the
SLEEP
button
again
while
|
“50°
is
displayed,
and
the
frequency
display
(87.50)
|
The
power
is
switched
cally
when
the
end
of
that
side
is
reached.)
Auto
stop
+
—_
—-Po
in
from
“SLEEP*
is
flashing.
reappears
after
5
seconds.
off
after
50
minutes.
back
side
©
Two-side
recording/playback
mode
{
>
)
In
this
position,
when
the
and
of
the
front
side
is
reached,
recording
or
playback
automatically
switches
to
the
back
side
Start
from
and
continues
from
there.
(The
tape
stops
automatically
when
front
side
©
if
the
steep
timer
and
reguiar
timer
settings
overlap,
the
sleep
timer
is
given
priority.
the
end
of
the
back
side
is
reached.)
Do
not
press
the
TIMER
STANDBY
button
after
the
power
has
been
switched
on
with
the
timer.
ff
this
is
done,
the
timer
will
not
function
properly.
:
when
ta
pie
gical
feet
f
the
decks,
playback
©
Ifthe
same
time
is
set
for
the
on
time
and
oft
time,
the
power
will
not
be
switched
on
even
when
the
“STANDBY”
indicator
is
lit.
coutnuee
Git
the
STOP
pada
ocrasd.
ee
Paes
et
syou:stert
playing
or
recording
from
the
back
side,
she-tape
e
It
the
timer
is
set
for
an
AM
or
FM
station
and
the
on
time
of
the
timer
is
reached
while
listening
to
another
station,
the
tuner
will
stop
automatically
at
the
end
of
the
back
side.
switches
to
the
station
which
was
set
with
the
timer.
@
Relay
playback
mode
{
C>
}
PO)
If
the
display
is
not
normal,
unplug
the
power
cord,
then
holding
in
the
MEMORY
button
and
the
BAND
button,
plug
the
power
When
tapes
are
loaded
in
both
decks,
playback
continues
from
r-
TN
--->
-N\
plug
into
the
power
outiet.
This
will
reset
the
tuner
to
the
initial
settings
and
provide
8
proper
display.
{f
this
is
done,
reset
the
eueee
ah
than
back
agein,
es:shown:in'
the
Preset
stations,
current
time,
and
timer
settings.
Auto
stop
Reverse
*
The
reverse
recording/playback
mode
{
——
}is
set
automati-
cally
during
recording.
8
Handling
Precautions
Deck
1
:
acts
3
ato
eae
ag
©
C-120
cassette
tapes
Stan
from
5
ny.
©
To
cancel
the
timer
while
it
is
operating
in
the
sleep
mode,
press
the
SLEEP
button,
and
while
“SLEEP"
is
flashing,
press
the
CLEAR
Avoid
using
120-minute
cassette
tapes,
since
they
have
a
—_>
tront
side
[(po—
—
p>
——*
button
on
the
tuner-preampiifier.
E
extremely
thin
tape
which
tends
to
become
wound
onto
the
|
Reverse
©
Press
the
SLEEP
button
and
continue
to
press
it
until
the
power
is
switched
off.
When
the
power
is
switched
off
the
sleep
timer
will
be
capstans
or
pinch
rollers.
+-—-—
PO}
+
J
cancelled.
©
Tape
slack
a=
If
the
tape
is
slack,
it
may
become
wound
onto
mechanism
Relay
Deck
2
1
I
parts
or
otherwise
damaged.
Take
up
the
slack
with
a
pencil
|
X
——>
pa—
—_
—_>
t
before
loading
the
cassette.
@
Storage
Precautions
*@
Avoid
storing
in
the
following
places:
«
Hot,
humid
places
e
Dusty
pieces
«
Places
exposed
to
direct
sunlight
e
Near
magnetic
fields
(TVs,
speakers,
etc.)
©
Store
the
cassette
tape
in
@
case
equipped
with
stoppers
to
keep
the
tape
from
coming
slack.
@
Protecting
Cassette
Tapes
From
Being
Erased
Accidentally
©
Cassette
tapes
are
equipped
with
accidental
erasure
preven-
tion
tabs.
To
protect
recorded
tapes
from
being
erased
Prevention
tab
for
side
A
accidentally,
use
a
screwdriver,
etc.,
and
break
these
tabs
off.
To
record
on
a
cassette
tape
whose
accidental
erasure
prevention
tabs
have
been
broken
off,
place
a
pieced
of
ceilophane
tape
over
the
hole.
t
Accidentet
eresure
Ppravention
teb
for
side
B
13
SL
:
7
7
ra
t
t
{
.
J
1
i
io
7
r
ake
t
4
A
\
X
NOILOSS
WHANAD
SR
So
—
(egg
SEN
OS
TO

OL
Before
Operating
@
Loading
@
Press
the
OPEN/CLOSE
button
(@)
to
open
the
cassette
@
Set
the
tape
in
the
cassette
tray
with
the
open
side
{on
@
Press
the
OPEN/CLOSE
button
again
to
close
the
tray.
e
Unloading
@
Press
the
STOP
button
{
@
).
@
Press
the
OPEN/CLOSE
button
(@@)
to
open
the
cassette
tay.
@
Remove
the
cassette
tape.
tray.
which
the
tape
is
exposed}
facing
away
from
you.
Check
the
following
before
recording
or
playing
cassette
tapes:
1
2.
ig
the
head
dirty?...
The
sound
quality
will
be
poor
if
the
head
is
dirty.
Refer
to
Page
21.
Are
the
accidental
erasure
prevention
tabs
broken
off?...
Recording
is
not
possible
if
these
tabs
sre
broken
off.
Refer
to
Page
13.
NOTE:
Load
the
cassette
tape
on
an
angle
with
the
open
side
facing
away
trom
you.
Loading
it
in
the
opposite
direction
can
cause
damage.
Do
not
press
the
OPEN/CLOSE
button
during
playback
or
recording.
Always
press
the
STOP
button
before
pressing
the
OPEN/CLOSE
button.
Using
the
Tape
Counter
(Linear
Tape
Counter)
This
counter
disptays
the
elapsed
running
time
of
the
tape
in
minutes
and
seconds.
The
counter
can
be
reset
to)
0
(by
pressing
the
COUNTER
RESET
button.
Or,
the
counter
will
also
be
reset
when
the
tape
is
loaded
or
unloaded.
:
Making
8
memo
of
the
contents
of
a
recording
and
the
range
of
the
counter
numbers
while
you
sre
recording
or
playing
back
a
tape
will
be
convenient
when
you
search
for
8
portion
of
the
tape
to
which
you
would
like
to
listen.
NOTE:
This
deck’s
linear
tepe
counter
has
been
set
for
the
following
cassette
tape
lengths:
C46,
C50,
C54, C60, C74, C90,
C100,
C120,
C46L,
CSOL,
and
C5AL.
IL
indicates
lerge-hubbed
cassettes.)
Using
a
tape
that
lies
outside
of
this
range,
or
8
tape with
a
different
fength
than
the
displayed
lengths,
will
result
in
error.
When
using
a
tape
that
is
not
included
in
the
TAPE
SIZE
selection,
select
the
tepe
size
closest
to
the
length
of
the
tape
to
be
used.
(This
will
reduce
the
error.)
The
linear
tape
counter
is
not
accurate
like
a
clock.
The
thickness
of
the
tepe
will
differ
depending
on
the
type
of
tape
used
(tape
position
and
time),
and
so
there
will
be
some
error
introduced.
Error
also
arises
from
the
difference
between
tapes
with
smaller
and
larger
hubs,
and
shows
up
in
the
remaining
tepe
display
(END
mark).
Auto
Tape
Selector
Mechanism
This
deck
is
equipped
with
an
auto
tape
selector
mechan-
ism
which
uses
the
detection
holes
in
the
cassette
halves
to
Accidental
erasure
prevention
tabs
automatically
set
the
recording
bias
and
equalization
best
suited
for
that
type
of
tape.
14
Do
not
use
ferrichrome
tepes.
Use
meta!
tapes
equipped
with
detection
holes.
(Use
of
the
old
type
of
metal
tepe
without
detection
holes
will
result
in
the
sound
having
an
emphasized
treble
region.)
Metal
tape
Chrome
tape
[9]
PLAYING
CASSETTE
TAPES
(Single
Side
Playback,
Two-Side
Playback,
and
Continuous
Playback)
DEES
e
Functions
common
for
deck
1
and
deck
2.
@
When
operating
from
the
remote
contro!
unit,
the
operation
switches
between
deck
1
and
deck
2
each
time
the
1/2
button
is
pressed.
The
counter
indicator
({i)
or
[Z])
lights
for
the
selected
deck.
Loading
the
tape
—_
The
tape
can
be
loaded
easily
by
in-
Serting
it
at
an
angle.
Press
the
OPEN/CLOSE
button,
and
load
a
recorded
tape
into
the
tray.
Refer
to
Page
14.
Removing
the
tape
ie
The
tape
can
be
re-
moved
easily
by
ift-
ing
it
out
toward
your-
self
at
an
angle.
Set
the
REV
MODE
switch.
Refer
to
Page
13.
Two-side
Playback
Single
side
bDlayback
Set
to
B
or
C
(es
indicated
on
the
tape)
for
tapes
recorded
with
Dolby
NR.
Set
the
DOLBY
NR
switch.
Refer
to
Page
6
@.
Playback
starts
in
the
direction
of
the
button
pressed.
Press
the
play
button
(>
or
4).
Q
m
Zz
m
wv
>
r-
”
m
O
=.
O
Zz

Lb
PLAYING
CASSETTE
TAPES
Using
the
MS
(Music
Search)
Function
and
the
Music
Search
Display
Using
the
MS
(Music
Search)
Function
Wi
Use
this
function
to
move
to
the
beginning
of
the
following
section
or
return
to
the
beginning
of
the
current
selection.
@
Press
>
or
4.
:
@Press
PP
or
44.
@
In
the
rewind
direction,
playback
© ®
starts
from
the
beginning
of
the
selection
which
is
currently
play-
-
ing,
and
in
the
fast-forward
direc-
tion,
playback
starts
from
the
be-
<
pe
2
d
7
belgcti
ginning
of
the
following
selection.
©
@
PLAY
pp
pp pp
=
Cue
PAY
e
For
the
normal
fast-forward
or
rewind
operations,
press
the
stop
button
Ml
before
pressing
the
bP
or
€€
button.
Display
During
the
Music
Search
Operation
During
the
music
search
operation,
the
number
of
selections
being
skipped
is
indicated
on
the
tape
counter,
and
this
number
decreases
each
time
a
blank
section
is
detected
(for
example,
3
-
2
-~
1).
@
When
skipping
back
to
a
previous
selection
P
-
0
3
—Number
of
tracks
to
be
skipped
tems
lights
when
skipping
backward
The
tape
skips
by
a
number
of
selections
equal
to
the
number
of
times
the
DP
or
44
button
is
pressed.
For
example:
@
When
skipping
ahead
to
a
following
selection
P
0g
5
*—Number
of
tracks
to
be
skipped
Adjustment
of
the
Recording
Input
Level
Control
Too
high
@
recording
level
will
resutt
in
@
recording
which
has
8
high
degree
of
distortion,
whereas
too
low
a
fecording
tevel
will
result
in
a
high
degree
of
noise.
Adjustment
of
the
recording
input
level
is
of
the
utmost
importance
in
making
8
well-balanced
recording.
Guide
to
Recording
Input
Levels
NOTE:
Maples
ies
dance
et
gn
wat
ars
ype
|
inormall
tepes
‘
on
the
source
and
the
type
of
tape.
and
so
a
trial
recording
Type
1§
(CrO,)
tapes
i
+3
dB
Type
1V
(meta!)
tapes
i
+3
dB
should
be
made.
Press
the
OPEN/CLOSE
button
&
for
deck
2
and
load
the
tape
to
which
you
will
record.
Refer
to
Page
14.
Single-side
recording
Two-side
(reverse)
recording.
|
Set
the
REV
MODE
switch
to
<=
or
=>.
|
Fav
Or
|
Refer
to
Page
13.
Set
to
B
or
C
to
record
with
Dolby
Noise
“COBY
WA
dD)
Reduction.
Recording
from
the
radio
Recording
from
a
VDP
or
DAT
Press
the
BAND
selector
|
Press
the
tuner-preamplifier’s
FUNCTION
button.
button
and
select
PHONO
or
DAT.
4
|
Setect
the
station
Start
playback
on
the
VDP
or
DAT.
you
wish
to
record.
{Refer
to
Page
9.)
Set
the
DOLBY
NR
switch.
Refer
to
Page
6
©.
Recording
from
2
CD
piayer
Adjust
the
recording
tevel.
Recording
leve!
control
oUt
REC
LEVEL
Adjust
the
lighting
condition
of
the
level
meter
with
the
record-
ing
level
control,
Refer
to
the
section
on
Page
15.
Set
the
disc
in
the
CD
player.
(Refer
to
Page
16.)
When
the
CO
SRS
button
is
pressed,
a
7-second
blank
portion
is
automati-
cally
created
before
re-
cording
starts.
wre
inste
The
REC
Press
the
REC/REC
MUTE
button.
@
en
dtag
yy
lights.
Press
the
CO
SRS
button.
The
CD
SRS
indicator
lights
and
recording
starts.
Press
the
®
or
€
button.
(Recording
starts)
To
stop
recording,
press
the
stop
button.
15
NOILOAS
IWYANSD

SL
RECORDING
CASSETTE
TAPES
@
Making
a
Synchro Dubbing
(Copy)
Synchro
dubbing
(tape
copying)
can
be
made
at
regular
speed
from
deck
1
to
deck
2.
1
or
as
Prass
the
SYSTEM
POWER
button
of
the
tuner-preamplifier.
@
Press
the
SYSTEM
POWER
button
of
the
tuner-preamplifier
or
press
the
POWER
ON/STANDBY
button
of
the
deck.
@
Press
the
OPEN/CLOSE
(@&)
button
and
toad
the
tape
to
be
plsyed
back
in
deck
1.
@
Press
the
OPEN/CLOSE
(@)
button
and
toad
the
tape
to
be
recorded
back
in
deck
2.
@
Set
the
reverse
mode
with
the
REV
MODE
switch.
{REV
MODE
<=
Da:cqQ)
®
Press
the
DUBBING
(synchro
dubbing)
button.
Note
that
if
the
POWER
ON/STANDBY
button
of
the
deck
is
pressed
to
switch
on
the
power,
the
power
of
the
tuner-preamplifier
will
automatically
be
switched
on
when
the
DUBBING
button
is
pressed.
You
will
be
able
to
hear
the
audio
normally.
@To
stop
the
dubbing,
press
the
stop
button
(
MB)
or
press
the
DUBBING
button.
The
tape
will
automatically
stop
when
it
reaches
the
end
and
the
synchro
dubbing
mode
will
be
cancelled.
©
Recording
level
during
synchro
dubbing
During
synchro
dubbing,
the
recording
is
made
at
the
same
level
as
the
playback
tape
of
deck
1,
regardless
of
the
position
of
the
recording
level
control.
Note
that
when
the
recording
tape
and
the
playback
tape
are
of
different
types,
the
recording
level
might
be
different
and
so
synchro
dubbing
should
be
done
with
the
same
type
of
tape
if
possible.
©
Dolby
NR
mode
during
synchro
dubbing
Tha
Dolby
NR
system
is
automatically
disengaged
from
the
panel
switch
during
synchro
dubbing
(even
though
the
displey
does
not
change)
and
the
tape
is
recorded
with
the
Dolby
NR
mode
of
the
playback
tape.
¢
You
cen
listen
to
the
sound
of
another
source
while
synchro
dubbing.
Changing
the
source
with
the
FUNCTION
button
or
the
CD
play
button
will
not
interrupt
the
synchro
dubbing.
@
When
synchro
dubbing,
both
decks
begin
running
in
the
forward
direction
(from
the
A
side).
©
The
synchro
DUBBING
button
is
effective
in
starting
the
operation
only
when
both
tapes
are
in
the
stopped
condition.
©
The
following
buttons
do
not
function
during
the
synchro
dubbing
operation:
forward
play
P,
reverse
play
€,
fast
forward
PP.
rewind
4,
and
REC/REC
MUTE.
e
To
ensure
complete
reproduction,
use
the
same
length
of
recording
tape
as
the
playback
tape,
and
rewind
both
tapes
to
the
beginning
of
side
A
before
starting
the
dubbing
operation.
©
By
setting
the
REV
MODE
switch
tothe
=
or
C2
position,
when
the
playback
tape
of
deck
1
reverses
at
the
end
of
the
tape
on
side
A,
the
deck
2
tape
will
reverse
at
the
same
time
and
dubbing
can
continue
on
side
B.
16
[11]
PLAYING
CDs
©
Press
the
OPEN/CLOSE
button
(@)
once
to
open
the
disc
try,
once
again
to
close
it.
©
The
disc
tray
can
also
be
closed
by
pressing
the
play
(>)
button.
When
this
is
done,
playback
automatically
starts
from
the
first
track
on
the
disc
(or
if
the
tracks
are
programmed,
the
first
programmed
track).
@
Load
the
disc
with
the
label
side
facing
up,
being
careful
not
to
touch
the
disc
surface.
©
Load
the
disc
with
the
disc
tray
open
all
the
way.
©
Set the
disc
securely
in
the
tray
guide
at
the
center
of
the
disc
tray.
To
play
an
8
cm
diac,
place
the
disc
in
the
sunken
part
at
the
center
of
the
disc
tray.
@
When
the
disc
tray
is
closed,
the
disc
turns
automatically
for
several
seconds,
and
the
number
of
tracks
and
total
playing
time
appear
on
the
display.
@
When
removing
the
disc
trom
its
case:
As
shown
in
the
diagram,
grasp
the
disc
along
the
edges,
gently
press
down
on
the
hole
in
the
middle
with
a
finger,
and
Jift
the
disc.
{t
should
come
out
easily.
PACT
(
Only
discs
with
this
mark
can
be
played.
OIGITAL
AUDIO
©
For
CDVs.
only
the
audio
part
is
played
(the
video
part
is
not
played).
@
When
setting
the
disc
in
the
disc
tray:
Always
set
the
disc
with
the
label
side
facing
up.
(Compact
discs
can
onty
be
played
on
one
side).
For
8
cm
CDs,
set
the
disc
in
the
sunken
part
in
the
middle
of
the
tray.
Handling
the
Disc
Tray
Do
not
switch
off
the
power
or
push
or
pull
the
disc
tray
when
it
is
moving,
since
this
may
damage
it.
if
the
cord
of
a
set
of
headphones,
etc.,
gets
caught
in
the
disc
tray
when
it
is
closed,
press
the
OPEN/CLOSE
button
(@&)
again.
©
Never
set
objects
other
than
CDs
in
the
disc
tray,
a8
this
can
cause
damage.
NOTE:
|
“NO
DISC”
is
displayed
on the
display
window
when
no
disc
is
toaded,
when
the
disc
is
loaded
upside-down,
or
when
the
disc
is
not
properly
loaded.
Also,”
OO,
00,
~
may
appear
during
playback
of
a
CD
if
the
disc
1s
scratched
or
dirty.
If
this
happens,
the
set
will
not
operate
when
3
normal
operating
button
(other
than
the
OPEN/CLOSE
button)
is
pressed,
$o
press
the
OPEN/CLOSE
(
&)
button,
remove
the
disc,
clean
it
as
necessary,
then
press
the
PLAY
(>)
button
again.
wae
A
an
Mm
oscew
ca
UUn
ed,
922666
7
bo
80
55
17 19
86
os
88
87
OB 08
G)
m
z
m
a
>
a
n
mr
i?)
a4
O
Zz

=
©
“188
8B.
BG,
ei
Ma
veee
eee
Set
the
CO
in
the
disc
tray.
Refer
to
Page
16.
The
display
appears
several
seconds
after
the
disc
tray
closes.
ro
ben
Oa
429696760
90 11
02
12
1095
Press
the
OPEN/CLOSE
button.
The
disc
tray
closes.
|e
18
ci
D
play
starts.
1294667000011
12
19
96
08
Press
the
play
button,
To
stop
play
temporarily:
“PD
PLAY”
goes
off
and
“ft
PAUSE”
appears.
CO
play
is
paused
at
the
point
the
button
is
pressed.
Press
the
pause
button.
To
resume
CD
play:
it
PAUSE”
goes
off
and
“>
PLAY”
appears.
CD
play
resumes
from
the
point
the
pause
button
was
pressed.
Press
the
play
button.
To
stop
CD
play:
iS
62.
83,
™"
023680700
00
01
9919
0855
Press
the
stop
button.
NOTE:
e
OU
is
displayed
on
the
track
number
section
of
the
display
for
several
seconds
after
the
disc
(insert
the
disc
before
performing
the
following
operations.)
|
@
Playing
Certain
Tracks
DIRECT
SELECTION
€xampile:
Playing
the
&th
track
Perform
this
operation
from
the
remote
control
unit.
@
Press
the
DIRECT
button.
@
Press
track
button
“8".
“TRACK
8”
appears
on
the
display,
and
the
8th
track
begins
playing.
@
When
the
end
of
the
track
is
reached,
play
continues
on
to
the
next
track.
©
For
track
numbers
of
11
and
higher,
for
example
15,
press
and
(5).
For
track
numbers
of
20
and
higher,
for
example
23,
press
(230). (£70).
and
GJ.
For
track
number
20,
press
and
gaystedtns
sessssnerseseaerecsstesnseed
t
TRACK
REPEAT
@
When
the
specified
track
finishes
playing,
the
pickup
returns
to
the
beginning
of
that
track
and
play
is
repeated.
@
Ifthe
REPEAT
button
is
pressed
once
during
play,
the
track
will
be
played
repeatedly.
¢
If
the
REPEAT
button
is
pressed
once
during
programmed
play,
the
track
will
be
played
repeatedly.
*
{ifthe
REPEAT
button
is
pressed
once
while
the
disc
is
stopped,
the
TRACK
numbers
indicator
flashes
and
the
1
track
repeat
play
mode
is
set.
sesscsrsmnersnnseoseeeeneee]
ALL
TRACKS
REPEAT
@
When
the
last
track
finishes
playing,
the
pickup
returns
to
the
first
track
of
the
disc
and
play
is
repeated.
©
Ifthe
REPEAT
button
is
pressed
twice
during
play,
the
disc
will
be
played
repeatedly.
@
If
the
REPEAT
button
is
pressed
twice
during
programmed
play,
the
program
will
be
pisyed
repeatedly.
*
If
the
REPEAT
button
is
pressed
twice
while
the
disc
is
stopped,
the
TRACK
numbers
indicator
lights
and
the
all
tracks
repeat
play
mode
is
set.
@
Press
the
REPEAT
button
once.
@
Press
the
144.44
or
DP
DDI
button,
and
select
the
desired
track.
@
Press
the
play
button
(>)
to
start
play.
@
Press
the
REPEAT
button
twice.
@
Press
the
play
button
(P)
to
start
play.
@
Playing
a
Specific
Section
Repeatedly
..........-rrccevesere
sci
csbayutate
tuiesubsiwavenctsbdicdbebbvasasniaie
ssbauibadacerninreiiisidsrerbnincesiess|
BECTON
REPEAT
Example:
The
CD
has
a
totel
of
15
tracks
Only
that
track
is
played
repeatediy,
and
that
track
number
lights
on
the
music
calendar.
*
With
a
1-track
repeat
of
track
21
or
higher,
“TRACK
No.”
flashes.
The
total
number
of
tracks
flashes,
and
then
(
the
first
track
is
repeated
by
pressing
the
play
button
@
when
play
is
started
by
direct
selection
from
the
ramote
contro!
or
with
the
DPI
or
K4@
button,
only
those
selected
tracks
are
played
repeatedly.
{2)
Press
the
REPEAT
button
before
CD
play.
ss
due
sce
yyles
tpseseresmunaun
Press
the
REPEAT
button
before
CD
play
or
during
CD
play.
Cot
wns
Press
the
REPEAT
button
during
CO
play.
wet
C&a
Press
the
REPEAT
button
during
CD
play.
rut
Cau
Pressing
the
REPEAT
button
once
The
track
numbers
contained
on
the
disc
light
up
on
the
music
calendar,
and
all
tracks
are
played
repeatedly.
Dessresmonnud
“REPEAT
A-”
lights
up.
if
nothing
else
is
done,
ail
tracks
are
played
repeatedly.
“REPEAT
A-B*
lights
up.
ony
The
A:B
section
is
played
repeatedly.
returns
the
player
to
regulsr
CD
play.
17
G)
m
z
m
a)
>
-
”
m
i?)
a
12)
Zz

N
0
oO
PROGRAMMED
SELECTION
Example:
Programming
track
3
to
play
first,
track
18
to
play
second,
on
e
CO
with
18
tracks
and
a
total
playing
time
of
62
minutes,
3
seconds
Playing
Certain
Tracks
in
any
Desired
Order
.................
(Perform
this
operation
from
the
remote
contro!
unit.)
Setting
and
Playing
the
Program
(Set
the
Slide
Switch
to
the
“MAIN®
Side.)
Press
the
PROGRAM
button.
'@
2.03."
Set
track
3
to
play
first.
After
2
seconds
The
display
when
track
3
is
set
to
play
first
Time
of
first
track:
8
minutes,
00
seconds
Set
track
18
to
play
second.
After
2
seconds
The
display
when
track
18
is
set
to
play
second
Total
time
of
tracks
1
end
2:
16
minutes,
05
seconds
Press
the
play
button.
beet
—
stert
playing
in
the
programmed
The
numbers
of
the
programmed
tracks
go
off
once
the
tracks
are
played.
The
time
display
will
read
“—-—M
——S"
if
®
track
number
of
31
or
higher
is
set
in
the
program.
When
a
program
is
set
during
CD
play
after
a
direct
selection,
the
track
currently
playing
is
set
es
the
first
track
in
the
program.
Up
to
20
tracks
of
your
choice
from
among
track
numbers
1
through
99
can
be
programmed
with
this
CD
player.
If
you
attempt
to
set
a
track
number
that
is
greater
than
the
number
of
tracks
on
the
disc,
that
track
number
will
not
be
displayed
when
the
buttons
are
pressed.
Programming
is
also
possible
when
the
disc
tray
is
open.
In
this
case,
track
numbers
greater
than
the
number
of
tracks
on
the
disc
can
be
programmed,
but
these
are
ignored
when
the
disc
is
played.
There
is
a
silent
interval
of
4
seconds
between
tracks.
This
is
has
been
designed
to
create
a
blank
section
of
4
seconds
between
selections
when
recording
programmed
tracks
onto
tape.
@
The
entire
program
is
cleared
when
the
disc
tray
is
opened
or
closed
(by
pressing
the
&
button).
If
you
make
8
misteke
when
programming
tracks,
press
the
CANCEL
button
and
program
again.
(Each
press
of
the
CANCEL
button
cancels
the
last
track.)
An
A-B
section
repeat
is
not
possible
during
programmed
play.
Other
operetions
possible
during
programmed
play:
The
quick
search,
pause,
skip
monitor,
and
other
operations
can
be
used
during
programmed
play.
To
move
to
the
beginning
of
the
previous
track
with
the
quick
search
operation,
press
144
44
once,
then
once
again
while
the
time
display
reads
‘O0u
0OQs.To
move
to
the
beginning
of
the
following
track.
press
DP
PPI
once,
regardless
of
the
time
display.
Perform
programming
and
canceling
in
the
stop
mode.
18
seseesereneenssss
|
QUICK
SEARCH
|
@
Press
the
auto
search
forward
button
(D>
PPI).
©
Each
press
of
the
auto
search
forward
button
(D>
PP)
moves
the
pickup
to
the
beginning
of
following
tracks.
@
Press
the
auto
search
backward
button
(#44
44).
©
Each
press
of
the
auto
search
backward
button
(Hd
4¢)
during
the
search
operation
moves
the
pickup
to
the
beginning
of
previous
tracks.
©
Searching
for
Tracks
While
Listening
to
the
Sound
e
Use
this
to
skip
through
a
disc
listening
to
the
sound
at
high
speed.
This
function
is
convenient
when
searching
for
a
certain
section
within
a
long
track.
«
Use
the
skip
monitor
function
to
find
the
desired
position,
then
release
the
search
button
to
start
regular
playback
from
there.
(2)
Forward
skip
monitor
©
The
track
number
and
elapsed
playing
time
of
the
track
being
skipped
through
are
indicated
on
the
display.
©
Ifthe
end
of
the
tast
track
on
the
disc
is
reached
while
pressing
the
search
button,
(33)
appears
on
the
display
and
the
skip
monitor
operation
stops.
To
resume
CD
play,
press
the
search
backward
button
(#€¢
44)
until
(32)
switches
to
the
track
number,
then
perform
a
different
operation.
@
During
CD
play,
press
and
hold
in
the
forward
search
button
{>>
DDI
to
skip
forward
while
listening
to
the
sound.
[2]
Backward
skip
monitor
©
The
track
number
and
elapsed
playing
time
of
the
track
being
skipped
through
are
indicated
on
the
display.
©
if
the
beginning
of
the
first
track
on
the
disc
is
reached
while
Pressing
the
search
button,
(C0)
appears
on
the
display
and
the
skip
monitor
operation
stops.
To
resume
CD
play,
press
the
Search
forward
button
(
>>
PPI)
until
(CC)
switches
to
the
track
number,
then
perform
2
different
operstion.
@
During
CD
play,
press
and
hold
in
the
backward
search
button
{844
44)
to
skip
backward
while
listening
to
the
sound.
if
the
forward
or
backwerd
skip
button
is
pressed
di
programmed
CD
play
and
ed
at
a
track
which
has
not
been
programmed,
the
next
pro:
il
ed
once
that
track
has
been
pI
id
to
the
end.
G)
m
Zz
m
wv
>
i=
7)
m
O)
=
e)
z

N
=
©
Playing
Tracks
in
Random
Orde!
e
The
function
plays
each
track
on
the
disc
once
in
random
order.
eaesneenseners
sessstsseeesennnopecotsseneneerssssesnetennesssneess
|
RANDOM
SEARCH
©
Prassing
the
RANDOM
button
when
a
program
has
been
set
will
play
the
programmed
tracks
in
random
order.
tot
=
Press
the
EDIT
button
to
set
the
tape
length.
©
Press
the
EDIT
button
four
times
when
using
a
60-minute
{C
60)
tape.
{The
tape
length
is
to
total
time
of
sides
A
and
B.)
The
display
changes
as
follows
each
time
the
EDIT
button
is
pressed.
Setting
the
desired
recording
time
(Method
2)
Select
a
tape
iength
close
to
the
desired
time,
then
make
a
fine
adjustment
using
the
1€4
<q
or
DD
Pdi
button.
For
example,
to
set
51
minutes,
select
C-50,
then
©
Pressing
the
RANDOM
button
when
repeat
piay
has
been
set
will
play
the
tracks
through
randomly
one
time,
and
each
time
following
this
there
will
be
a
random
search
with
a
different
pattern.
©
An
A-B
section
repeat
is
not
possible
during
random
play.
©
During
the
search
operation,
the
track
numbers
of
the
disc
from
track
1
to
the
last
track
will
be
repeatedly
displayed
at
high
speed
in
the
TRACK
NO.
section,
and
the
following
tracks
to
be
played
will
not
be
known
from
the
end
of
the
search
to
the
time
CD
play
begins.
«
Apress
of
the
RANDOM
button
lights
the
[RANDOM
J
indicator
©
Pressing
the
RANDOM
button
when
t-track
repeat
has
been
to
show
that
the
random
mode
has
been
set,
Random
search
set
will
automatically
change
the
setting
to
all
tracks
repeat
will
begin
when
the
play
button
is
pressed
and
the
disc
will
and
these
tracks
will
be
played
randomly.
start
playing
automatically.
NOTE:
@
Simply
pressing
the
RANDOM
button
during
CD
play
will
start
Random
play
is
not
possible
during
the
edit
operation.
the
random
search
and
start
random
play.
Edited
Recording
onto
Sides
A
and
B
of
a
Tape
(EDIT)
Editing
is
possible
with
CDs
containing
up
to
20
tracks.
Before
starting
the
edited
recording
operation.
load
the
cassette
tape
to
which
you
will
record
into
deck
2
with
side
A
tacing
up.
The
teader
tape
is
automatically
taken
up
before
recording
starts.
(Set
the
REV
MODE
switch
to
the
<>
_
position.)
©
Automatic
Edited
Recording
..
..
|
RECORDING
IN
THE
SAME
ORDER
AS
ON
THE
DISC
Example:
Recording
«
disc
with
18
tracks
and
a
total
playing
time
of
56
minutes
onto
#
C-60
cassette
tape
18
56.
00.
12363
67
©
4
00
99
12:19
tt
6
oe
Press
the
OPEN/CLOSE
button.
—
Set
the
disc.
Press
the
OPEN/CLOSE
button.
--
Press
the
play
button
and
set
the
function
to
CD.
~
Press
the
stop
button.
NOTE:
©
With
edited
recording,
side
6
of
the
tape
will
be
recorded
automatically
even
when
the
REV
MODE
switch
of
the
deck
is
set
to
the
==
position.
©
During
edited
recording,
only
the
following
buttons
will
function:
the
stop
button
of
the
CD
or
the
OPEN/CLOSE
button,
and
the
stop
button
of
the
deck.
©
When
using
a
recorded
tape
for
edited
recording,
the
tape
should
be
erased
before
use,
since
when
the
tape
is
longer
than
the
set
time,
an
unrecorded
section
of
side
B
will
remain
atter
the
tape
stops.
When
a
tape
which
has
been
recorded
with
this
system
is
p!
back,
there
will
be
4-second
blank
portions
between
tracks
(for
making
it
easy
to
reach
the
beginning
of
a
track).
This
will
differ
from
the
actuat
silent
portions
between
the
tracks
on
the
disc,
and
so
there
will
be
some
error
in
the
actual
remaining
time
of
the
tape
and
the
displayed
time.
{When
the
tape
time
has
already
been
set,
the
display
will
change
in
press
the
DP
PPI
button
once
to
set
C-51.
order
starting
at
that
time
each
time
the
EDIT
button
is
pressed.)
tape
C-
>
+--+
C120-—_
C10
-——-.C-90'——C-74
SEE
c
$
i
58.
oo,
120-minute
100-minute
90-minute
74-minute
Que
tape
tape
tape
tape
12965
67
08
10
55
97
19
08
8
8
The
desired
recording
time
can
be
set
ee
EDIT”
Hashes
for
2
seconds
when
this
is
displayed.
{Method
1)
2
minutes
40
seconds
i
extra
on
side
A
a
Example:
For
8
36-minute
tape,
use
the
F444
or
DD
DDT
tor
c-5)
02
y
0.
button
to
set
36.
@un
To
set
the
tape
length
using
the
remote
contro!
unit,
use
the
ee
WOW
vlog
Wd
Me
number
buttons.
For
example,
in
the
case
of
a
30-minute
tape,
}
press
[10]
twice
and
press
[10).
Tracks
for
side
A
light
up.
Tracks
for
side
B
flash.
(Tracks
1
through
9
are
recorded
on
side
A}
(Tracks
10
through
18
are
recorded
on
side
B.)
mistake,
press
the
EOIT
play
C-O0,
then
start
w
C51
01,00,
°
7a
“yy
”
ica
ves
7
Tracks
for
side
A
flesh.
1
minute
20
seconds
Tracks
for
side
B
light
up.
extra
on
side
B.
A/B
button
is
pressed.
(Use
this
to
check
the
extra
time
on
side
B.)
Track
number
Elapsed
time
o
G8Ole
Bin
53
1236369
0 9
16
WY
HS
I,
pacer
@
Note
that
in
some
cases,
even
if
the
tape
is
longer
than
the
total
playing
time
on
the
disc,
it
may
not
be
possible
to
record
all
the
tracks
onto
the
tape,
since
they
are
divided
onto
sides
A
end
8B.
In
such
cases,
the
OVER
indicator
flashes.
@
Follow
the
instructions
under
“PROGRAMMED
SELECTION”
on
Page
18
to
program
the
tracks.
@
Pertorm
steps
2
through
4
under
the
aforementioned
“Automatic
Edited
Recording”.
-
Programmed
CD
Play
Using
the
Search
Buttons
(144
4¢
>>
PDI}
Pressing
the
PROGRAM
button
of
the
remote
control
unit
will
light
up
the
“PROGRAM”
indicator,
When
the
disc
is
stopped,
programming
can
be
done
with
the
search
buttons
(Hq
€¢
D>
PPI
on
the
CD
player
or
with
the
search
buttons
(hd
44
DP
DPI)
on
the
remote
control
unit.
¢
Select
the
tracks
with
the
search
buttons,
then
press
the
PROGRAM
button
to
program
them.
«
The
search
buttons
(44 PP)
can
be
used
to
change
the
track
numbers
continuously.
After
the
track
numbers
have
been
selected
with
the
search
buttons,
if
the
play
button
is
pressed
to
start
CD
play
before
the
PROGRAM
button
is
pressed,
the
last
track
of
the
program
set
up
to
this
point
will
be
played.
In
this
case,
the
tracks
selected
with
the
search
buttons
will
not
be
programmed.
19
NOILOAS
WHANAD
OSL
Se
ea
aaa
an
a

'\)
fi]
REMOTE
CONTROL
UNIT
a;
The
0-250
is
supplied
with
a
remote
contro!
unit
(RC-184)
for
system
control.
Replace
the
batteries
with
new
ones
when
the
transmission
distence
possible
with
the
remote
control
unit
shortens.
For
tonger
battery
life,
remove
the
batteries
when
not
using
the
remote
control
unit
for
long
periods.
When
replacing
batteries,
use
two
new
batteries.
Never
use
an
old
battery
with
a
new
one.
Do
not
use
two
different
types
of
batteries.
Do
not
heat
batt
or
take
them.
apart.
Be
careful
that
the
remote
contro!
sensor
is
not
exposed
to
direct
sunlight
or
strong
light
from
lighting
fixtures.
The
remote
contro!
sensor
is
focated
on
the
tuner
preampli-
fier.
Point
the
remote
control
unit
at
the
sensor,
then
press
the
buttons
for
the
desired
operation.
Operate
the
remote
controt
unit
within
the
range
ifjustrated
in
the
diagram.
Remote
contro!
sensor
30°
Remote
contros
unit's
transmission
window
@
Open
the
battery
case
lid
on
the
back
of
the
remote
contro}
unit.
@insert
the
two
batteries
(REP,
AA)
in
the
proper
direction.
cc
«appears
at
the
upper
left
corner
of
the
tuner-preamplifier’s
display
when
a
signal
is
received.
©
The
remote
control
unit
can
be
used
at
a
distance
of
about
7
meters
from
the
remote
control
sensor,
but
this
distance
will
be
shorter
if
there
are
obstacles
in
the
way
or
if
the
remote
control
is
operated
from
an
angle.
10.
Do
not
press
buttons
on
tha
remote
contro!
unit
and
on
the
main
unit
at
the
same
time.
Doing
so
will
lead
to
a
malfunction.
11.
\t
EERE
appears
on
the
tuner-preamplifier's
display
due
to
incident
light
even
though
the
remote
contro!
unit
has
not
been
operated,
it
is
best
to
move
the
set
or
place
it
in
a
different
direction.
Even
if
this
happens,
it
will
not
cause
a
malfunction
with
remote
control
unit.
When
adjusting
the
volume
continuously
with
the
remote
controt
unit,
the
volume
adjustment
will
stop
if
the
remote
control
unit
is
moved
away
from
the
remote
control
sensor.
Should
this
happen,
press
the
button
again
to
continue
changing
the
volume.
SLEEP
Press
this
to
set
the
sleep
timer.
Press
this
to
switch
on
the
power
for
the
entire
system
or
set
the
system
to
standby.
TUNER
Press
this
to
listen
to
the
preset
stations.
CD
Play
DIRECT
button
Press
for
direct
track
selection
of
CD
pleyer,
PROGRAM
button
Press
for
programmed
selection
of
CD
player.
CANCEL
button
Press
once
during
programming
to
can-
cel
the
tast
track
programmed.
CENTER
and
REAR
jevel
Use
to
adjust
the
volume
of
an
optional
AV
amplifier.
Press
Ww
to
lower
the
volume,
4
to
raise
the
volume.
Operating
the
CD
Player
Pause
button
(tl)
Press
to
temporarily
stop
CD
play.
Press
the
play
button
Db
to
resume
play.
Stop
button
(
@
}
Press
to
stop
CD
play.
Play
button
(>}
Press
to
start
CD
play.’
Manual
search
backward
button
(44)
Manual!
search
forward
button
(PP)
Press
these
to
quickly
move
backward
or
forward.
Backward
skip
monitor
button
(44)
Press
during
CD
play
to
go
back
to
the
beginning
of
that
track.
Press
the
button
again
within
0.5
seconds
to
go
back
to
the
beginning
of
the
previous
track.
Forward
skip
monitor
button
(>>I)
Press
during
CO
play
to
go
forward
to
the
beginning
of
the
next
track.
Press
the
button
again
to
go
forward
to
the
begin-
ning
of
the
track
two
tracks
ahead.
Button
Names
and
Functions
SDB
{Super
Dynamic
Bass)
Press
this
button
for
more
powerful
bass
sound.
Press
again
to
return
to
the
original
setting.
When
the
MAIN/AV
switch
is
set
to
the
AV
side,
number
buttons
4,
5,
6,
and
+10
can
be
used
for
the
following
operations.
Use
these
buttons
when
a
DENON
AV
amplifier
having
these
functions
is
used
with
this
system.
4
button
-+
VCR-2
5
button
—-
08S
6
button
~
TV
+10
button
--
3CH
LOGIC
MAIN/AV
switch
Switch
to
the
AV
side
when
the
system
is
used
together
with
the
optional
AV
ampli-
tier.
Usually,
this
switch
is
set
to
the
MAIN
side.
When
set
to
AV,
the
number
buttons
switch
over
to
the
functions
indi-
cated
below
them.
FUNCTION
{input
switching)
button
Switches
the
function
between
TUNER,
TAPE,
CO,
PHONO,
and
DAT.
Number
buttons
After
pressing
TUNER,
these
buttons
call
up
the
preset
stations.
When
used
with
CD
piay,
after
pressing
DIRECT
or
PROGRAM,
these
buttons
spe-
cify
the
tracks
to
be
played.
MASTER
VOLUME
Adjusts
the
volume.
Press
V
to
tower
the
volume,
and
A
to
raise
it.
Operating
the
Cassette
Decks
Deek
1/2
button
Press
this
to
setect
the
deck
to
be
oper-
ated.
Stop
button
(
M@
)
Press
this
to
stop
the
tape
deck.
Forward
play
button
(>)
Press
this
to
play
back
or
record
in
the
forward
direction.
Reverse
play
button
(4)
Press
this
to
play
back
or
record
in
the
reverse
direction.
@
REC/REC
MUTEE
button
(recording/recording
mute
button)
To
set
the
recording
mode
when
in
the
stop
mode.
press
this
buttan,
then
press
either
the
“Db”
or
the
“4°
button.
When
pressed
during
the
recording
or
record-
ing
pause
mode,
@
biank
section
of
appro-
ximately
§
seconds
is
created
on
the
tape,
after
which
the
deck
is
set
to
the
record-
ing
pause
mode.
Rewind
button
(44)
Press
this
to
rewind
the
tape.
Fast-forward
button
(b>)
Press
this
to
fast-forward
the
tape.
TAPE
MONITOR
button
Use
this
to
monitor
the
sound
of
the
tape.
When
used
in
combination
with
a
3-head
deck,
the
recorded
sound
can
be
moni-
tored
{from
the
tape).
G)
m
z
m
D
>
-
”
m
2)
=
Oo
z
This manual suits for next models
3
Table of contents
Languages:
Other Denon Stereo System manuals

Denon
Denon dn-500dc User manual

Denon
Denon D-F101S User manual

Denon
Denon S-52 Administrator guide

Denon
Denon D-107 User manual

Denon
Denon S-32 User manual

Denon
Denon D-M38 Dimensions

Denon
Denon AVR-1709 User manual

Denon
Denon S-81 User manual

Denon
Denon D-AJ03 User manual

Denon
Denon S-81 Administrator guide

Denon
Denon S-81 User manual

Denon
Denon D-M51DVS User manual

Denon
Denon CEOL carino User manual

Denon
Denon CDR-M30 User manual

Denon
Denon DM33S - Micro System User manual

Denon
Denon S-52 User manual

Denon
Denon UCD-250 User manual

Denon
Denon D-M37 User manual

Denon
Denon D-90 User manual

Denon
Denon D-F100MC User manual