a
[>]
el[y
=]
CONTENTS
Main
Features
.......ccccccccceceeeccssceseeeseeteeneerseereceeeeneenene
4
(Single
Side
Playback,
Two-Side
Before
Using
.4
Playback
and
Continuous
Playback)
.......--.-eee
V7
Antenna
Connections
.
4
10]
Recording
Cassette
Tapes
........c
cece
erence
18
Connections
5
[11]
Playing
CDS
oo...
cece
eeeeseeseerensarer
ce
teeteateeetens
18~21
Part
Names
and
Functions
®
Compact
Discs
18
@
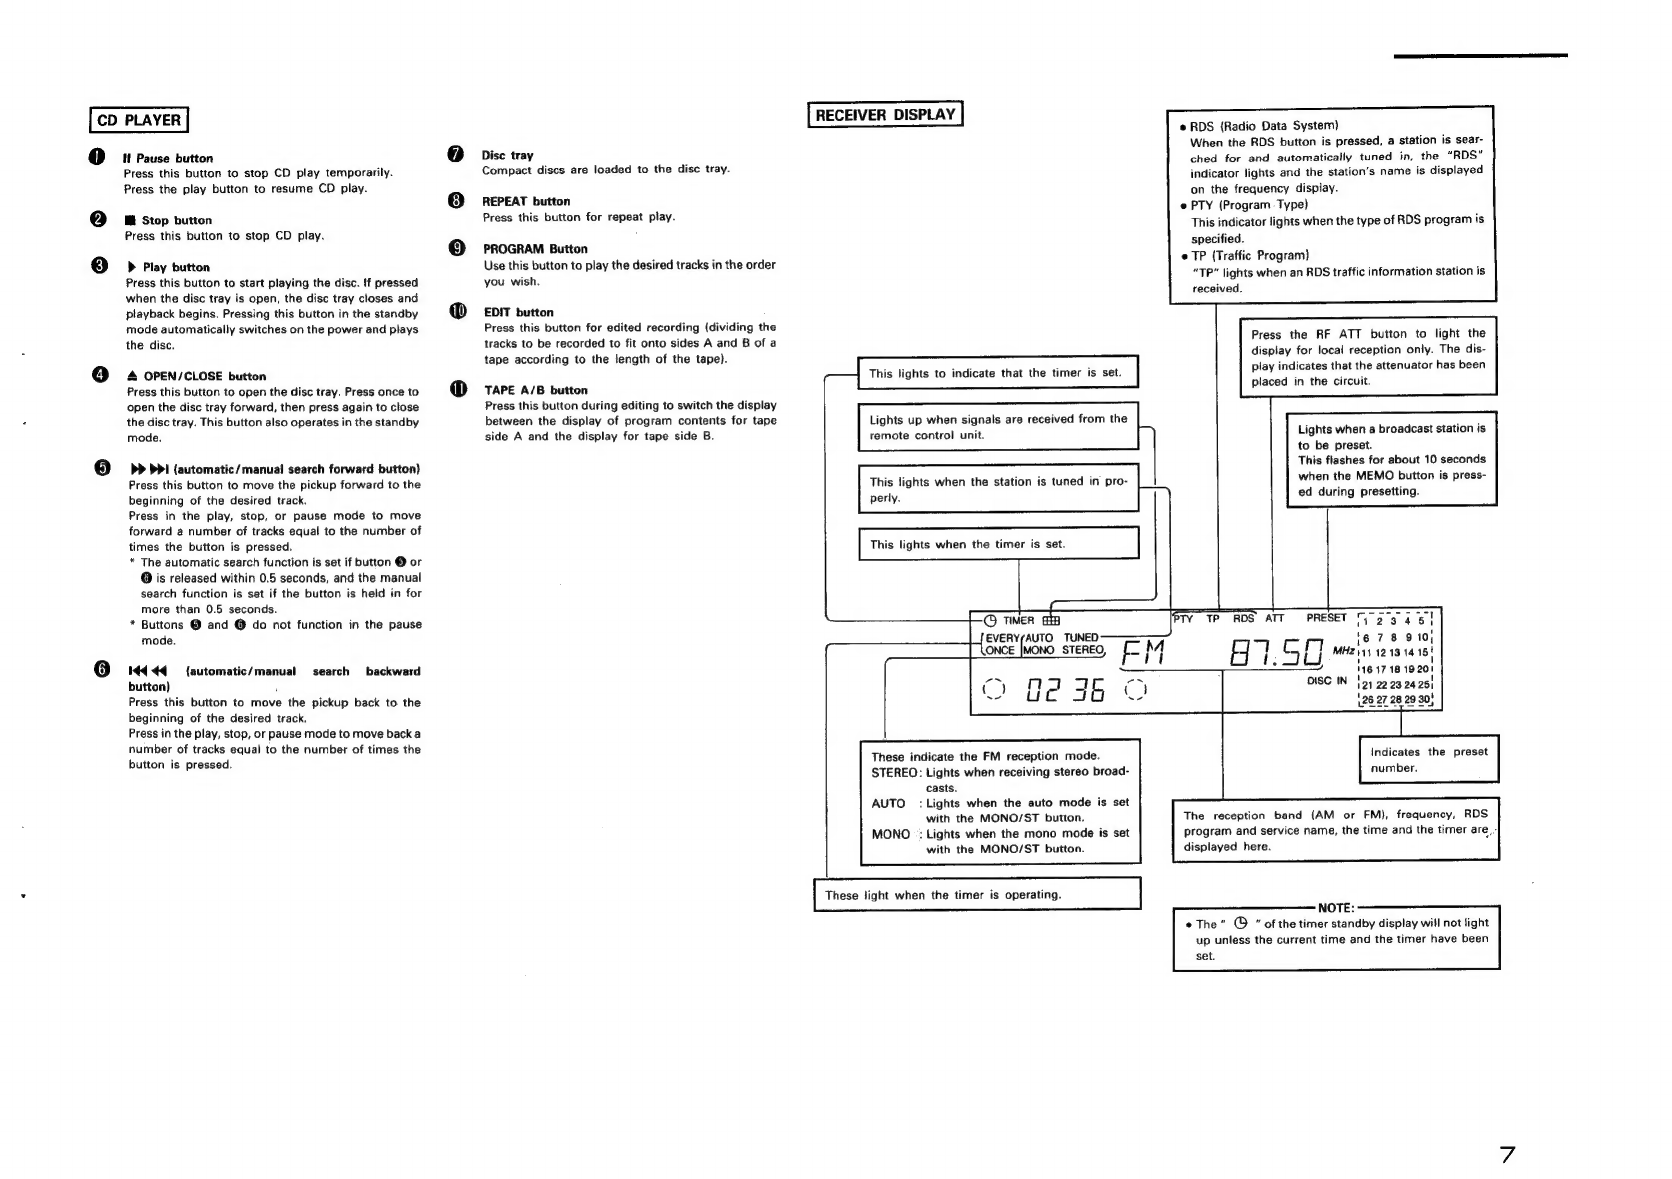
RECEIVER
Sos
ois
dseet
ai
alsa
bad
oni
6
e
Regular
Play
Cassette
Deck
6
@
Various
CD
Play
Functions
e
CD
Player
e
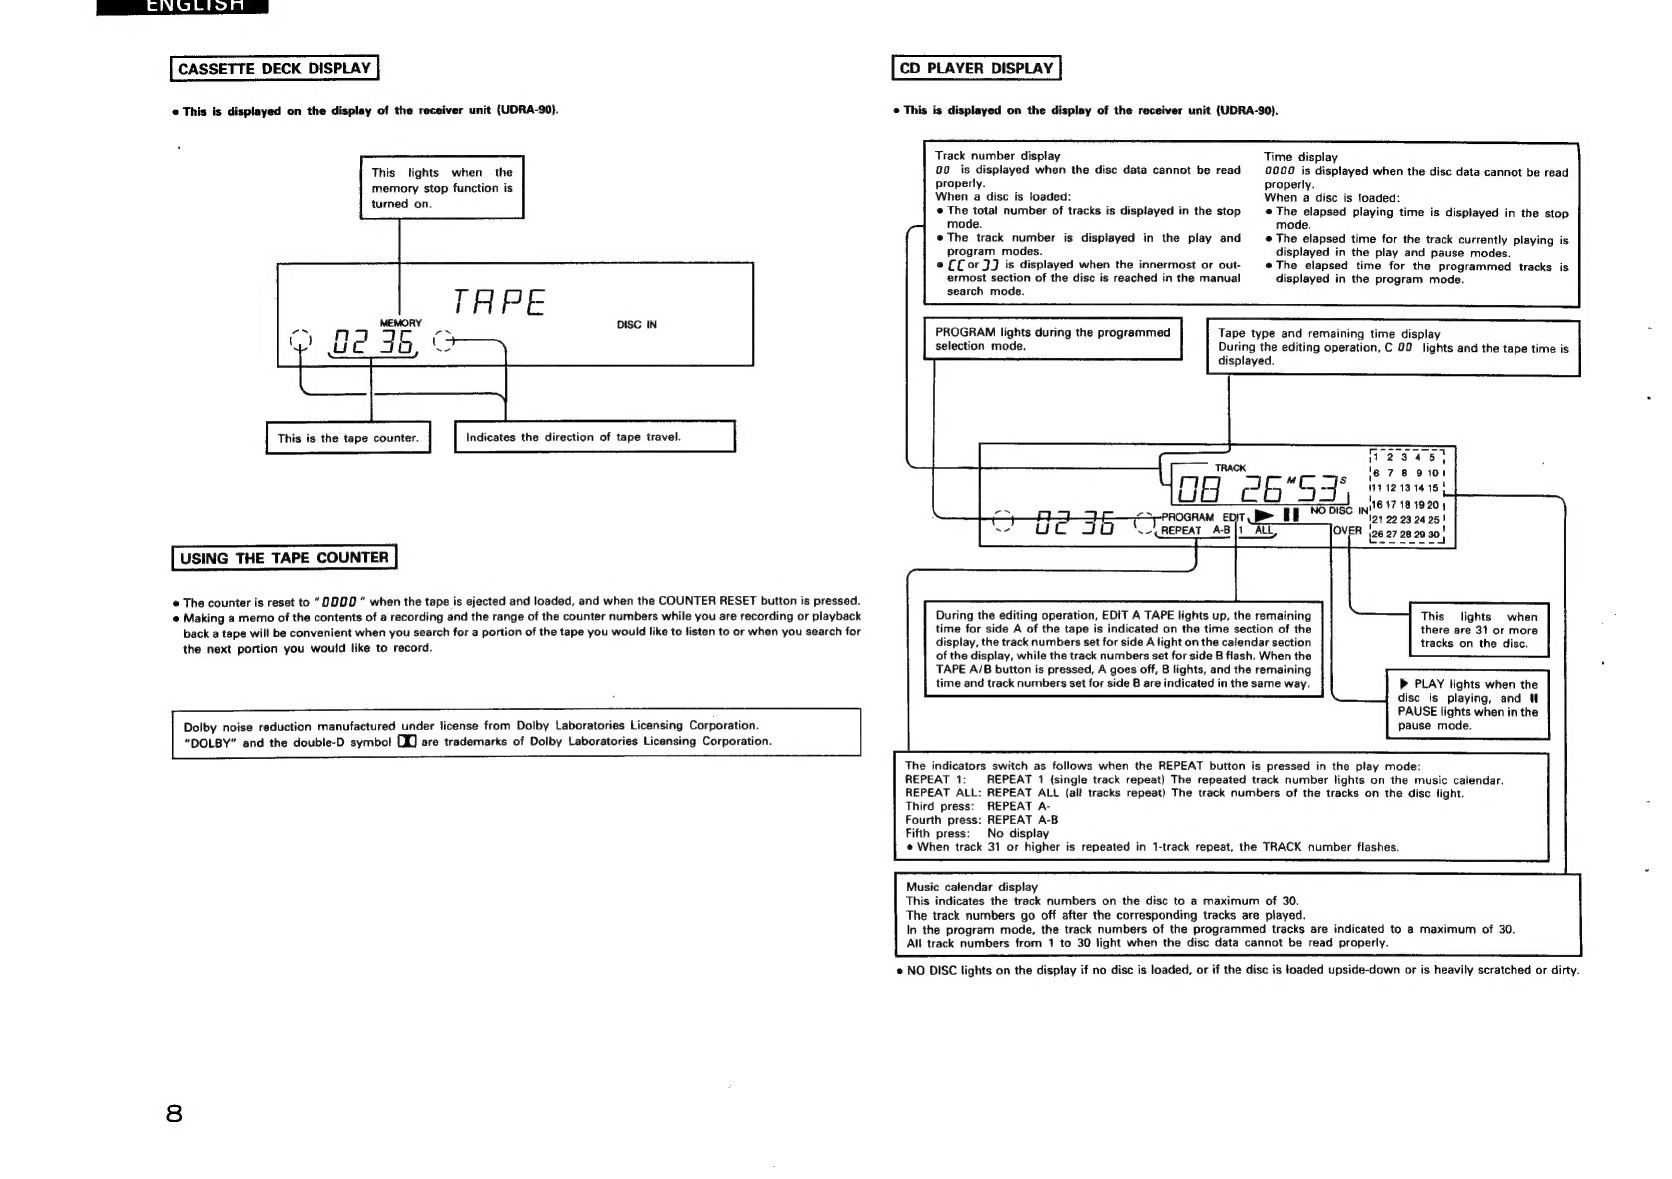
Display
Listening
to
Radio
Broadcasts
elRte]
Using
the
Timer
....cccccecccecceseeeneneeereesesesenerecees
Cassette
Deck
.......ccccceececcrsesseesetsesesesesesessesecesesernaeeeces
16
e
Before
Recording
and
Playback
........:.::csese
renee
16
[eo
Playing
Cassette
Tapes
e
Edited
Recording
onto
Sides
A
and
B
of
a
Tape
ooo...
ec
ccccccete
cee
cnecenecetseneeeteenees
21
12|
Remote
Control
Unit
0...
cece
re
eects
tecteerterereeeteee
22
13}
Important
Information
14]
Specifications
15)
Troubleshooting
DENON
Service
Network
..0......ccccccceiecenseeteeteeeenees
92,93
Check
that
the
following
parts
are
included
in
the
package
aside
from
the
main
unit:
Operating
Instructions
.
FM
Indoor
Antenna
...
AM
Loop
Antenna
..
Remote
Controller
..
©OOOOOGO
[7]
MAIN
FEATURES
@
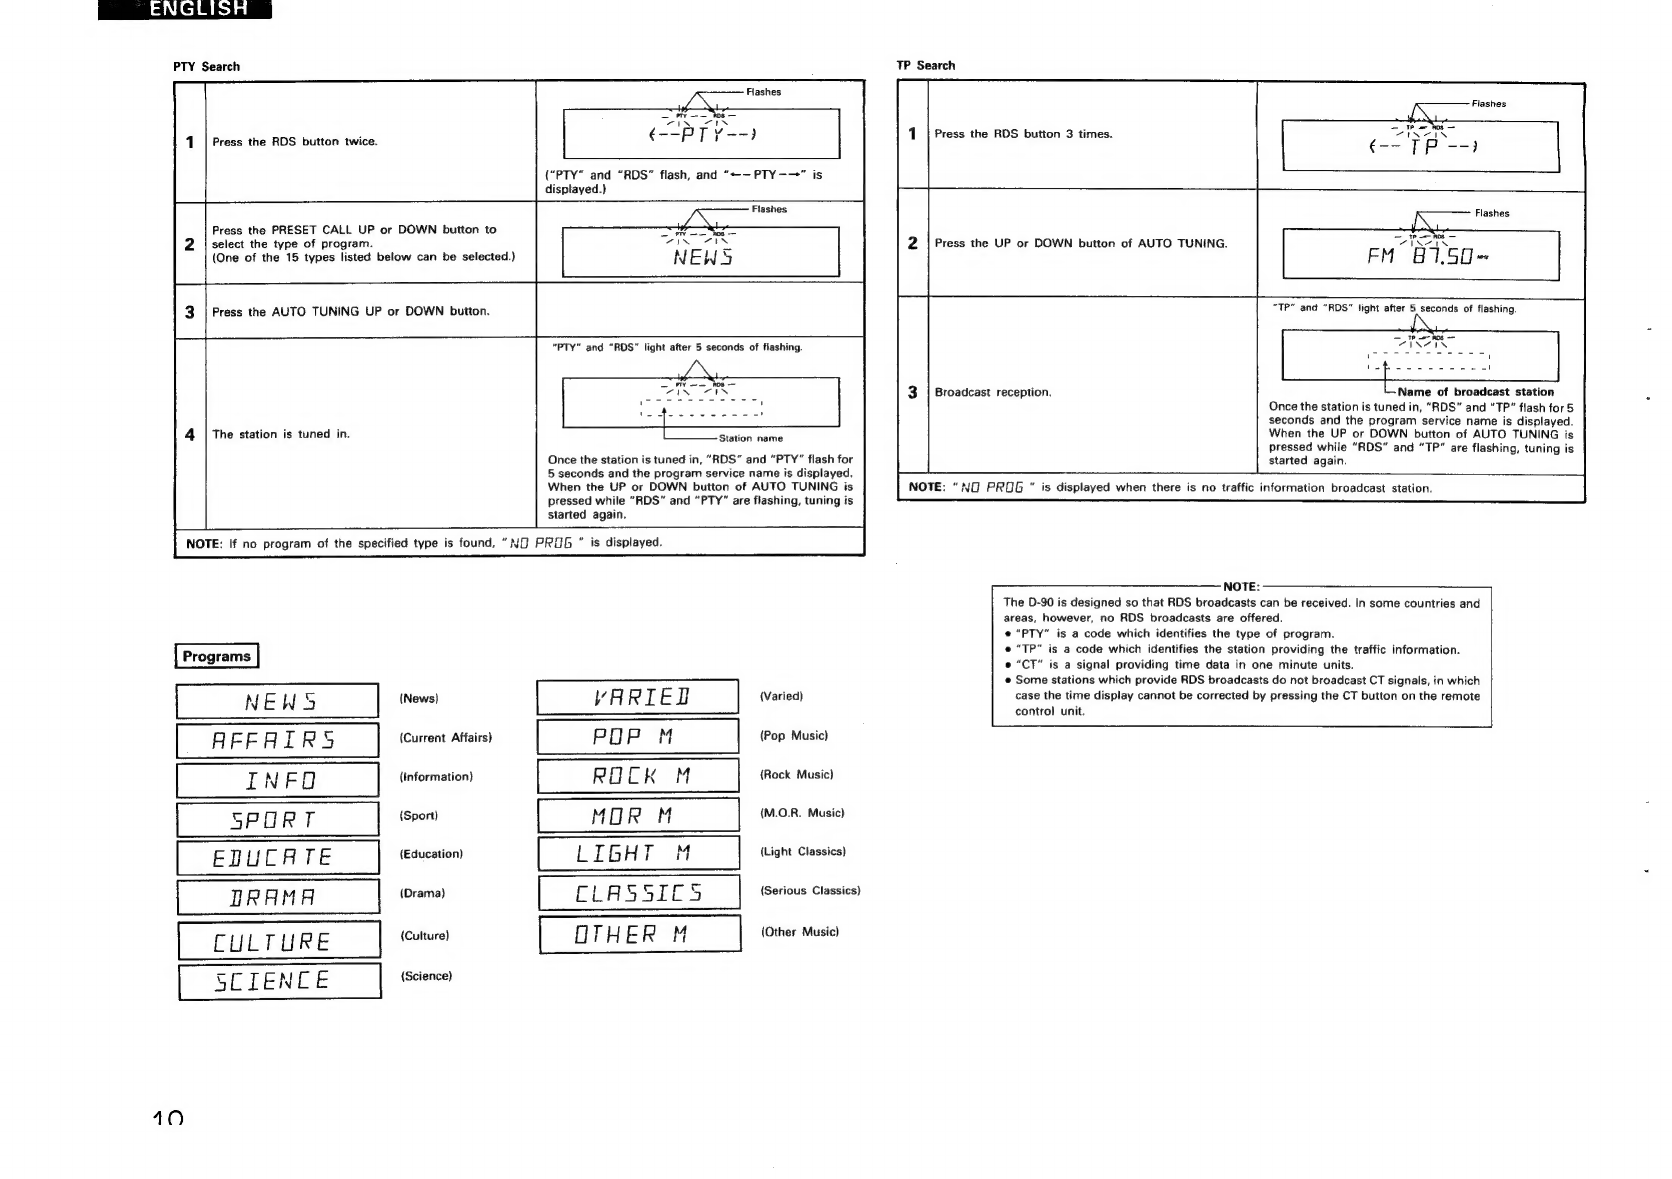
RDS
reception
(FM
only)
RDS
programs
can
be
easily
received
(FM
only).
e
AM/FM
30-station
random
preset
tuner
Random
presetting
permits
easy
operation
and
will
be
convenient
for
the
increased
number
of
FM
stations
in
the
future.
©
Independent
power
amplifier
designed
for
quality
sound
High
quality
30
W
per
channel
power
amplifier
with
large
speaker
terminals.
e
New
SDB
control
The
Super
Dynamic
Bass
control
circuit
delivers
clear
bass
sound.
@
Super
linear
converter
and
high
performance
digital
filter
Denon’‘s
unique
systems
for
preventing
loss
of
CD
sound
quality
permit
excellent
sound
field
reproduction.
[2]
BEFORE
USING
Note
the
following
points
before
using
the
D-90.
e
Moving
the
system
To
prevent
short-circuiting
or
damage
of
the
connection
cords,
be
sure
to
unplug
the
power
cord
and
disconnect
all
connection
cords
before
moving
the
system.
In
addition,
always
remove
CDs
before
moving
the
system.
Failing
to
do
so
may
result
in
scratched
CDs.
e
Before
switching
on
the
power
4
Check
again
that
all
connections
are
proper
and
that
the
connection
cords
are
not
damaged.
Be
sure
to
disconnect
the
power
plug
before
disconnecting
or
connecting
the
connection
cords.
RO3/AAA
Batteries
..........
System
Connectors
1
&
2
e
Editing
circuit
Automatic
selection
of
CD
tracks
for
minimum
blank
space
on
the
tape
when
recording.
®
Dolby
B
and
C
NR
circuits
For
high
quality
sound
in
playback
and
recording.
CD
SRS
circuit
CDs
can
be
recorded
at
the
touch
of
a
button.
«
Easy-to-use
remote
control
unit
e
Auto
on
function
This
function
switches
on
the
power
with
just
a
press
of
the
PRESET
CALL
and
CD
or
cassette
deck
play
button.
The
power
also
turns
on
automatically
when
the
PRESET
button
and
the
number
buttons
in
the
tuner
section
of
the
remote
control
unit
are
pressed.
e
Hum
may
be
produced
if
a
TV
set
or
another
audio
component
is
set
near
this
system
or
their
connection
cords
are
nearby.
If
this
happens,
try
changing
the
position
of
the
equipment
and
connection
cords.
@
Do
not
move
the
system
abruptly
from
a
cold
place
to
a
warm
place,
since
this
may
cause
water
droplets
(conden-
sation)
to
form
in
the
equipment,
preventing
proper
operation.
If
this
happens,
wait
one
hour
before
using
the
system.
.
[3]
ANTENNA
CONNECTIONS
Connecting
the
Included
Antennas
AM
Loop
Antenna
Assemble
the
included
AM
loop
antenna
as
shown
in
the
diagram,
separate
it
as
far
from
the
system
as
possible,
and
place
it
in
a
position
that
provides
the
best
reception.
In
some
cases,
reception
is
better
if
the
polar-
ities
of
the
connections
are
reversed.
)
AM
broadcasts
will
not
be
received
well
if
the
loop
antenna
is
not
con-
nected
or
if
it
is
connected
but
is
located
near
a
metal
part.
Attach
the
loop
antenna
even
when
using
an
outdoor
AM
antenna.
Loop
antenna
Assembling
the
Loop
Antenna
e
Remove
the
tie
fastening
the
loop
antenna’s
lead
and
connect
the
lead
to
the
antenna
terminals.
FM
Indoor
Antenna
FM
antenna
e
Separate
the
FM
and
AM
antenna
wires
from
the
system
connector
wires.
e
Connect
the
included
FM
indoor
antenna
to
the
FM
antenna
terminal,
tune
in
an
FM
station,
then
find
the
position
at
which
distortion
and
noise
is
minimum
and
fasten
the
ends
of
the
antenna
in
that
position
using
tape
or
pins.
Disconnect
this
antenna
when
using
an
outdoor
antenna.
Connecting
an
Outdoor
Antenna
Use
an
outdoor
antenna
if
reception
cannot
be
heard
clearly
with
the
included
antenna.
Change
the
location,
height,
and
direction
of
the
antenna
to
find
the
position
of
best
reception,
then
fix
the
antenna
in
that
position.
75-ohm
coaxial
cable
{3C-2V
or
other)
@
Connect
the
outdoor
antenna
using
75-ohm
coaxial
cable.
This
will
help
shield
the
antenna
from
external
noise.
Places
for
Installing
Outdoor
Antennas
¢
install
the
outdoor
antenna
facing
a
broadcast
station's
transmission
antenna.
When
surrounded
by
buildings
or
hills,
place
the
antenna
in
the
location
which
provides
best
reception
and
try
changing
the
direction
of
the
antenna
to
obtain
optimum
reception.
e@
Do
not
install
the
antenna
under
power
lines.
It
is
extremely
dangerous
for
the
antenna
to
come
into
contact
with
a
power
line.
e
Install
away
from
roads
and
train
tracks
to
prevent
noise
from
cars
and
trains.
©
Do
not
install
the
antenna
too
high,
as
it
may
be
hit
by
lightning.