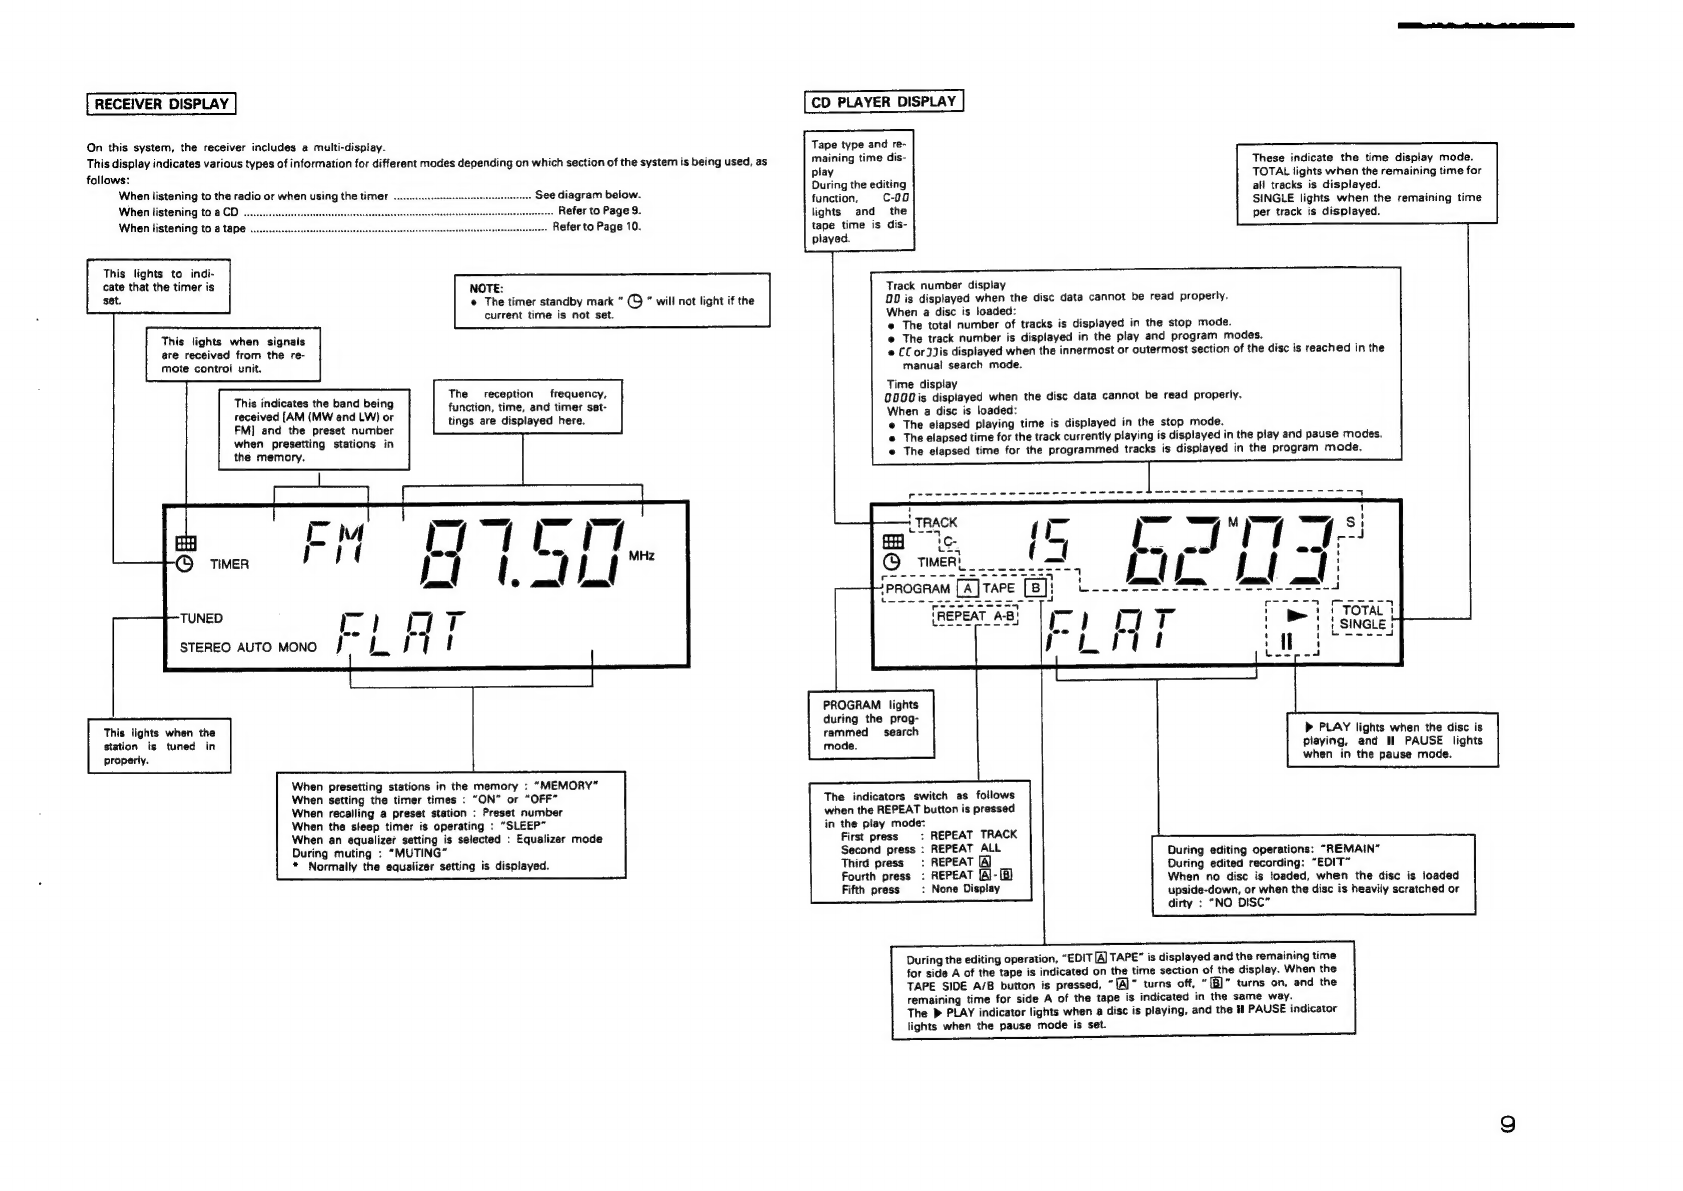
Denon D-60 User manual

STEREO
COMPONENT
SYSTEM
D-60
OPERATING
INSTRUCTIONS
BEDIENUNGSANLEITUNG
iSt
MODE
D’EMPLOI
DIGITAL
AUDIO
|
|
|
|
}
|
|
a.)
Ld
ltl
|
vik
;
|
ssa
aa
oes
m
i]
=
a
re
a
|
=
-™
__|
=
ig
|
met
FOR
ENGLISH
READERS
PAGE
4
~
PAGE
25
FUR
DEUTSCHE
LESER
SEITE
26
~
SEITE
47
a
POUR
LES
LECTEURS
FRANCAIS
PAGF
49
~
Dace
an

Avoid
high
temperatures
Allow
for
sufficient
heat
dispersion
when
instafled
on
a
rack,
Vermeiden
Sie
hohe
Temperaturen
Beachten
Sie,
da&
eine
zureichende
Luftzirkutation
gewahrleistet
wird,
wenn
das
Gerét
auf
ein
Regal
gestellt
wird.
Eviter
des
températures
élevées
Tenir
compte
d'une
dispersion
de
chaleur
suffisante
tors
de
l'installation
sur
une
étagére.
Keep
the
set
free
from
moisture,
water,
and
dust.
Halten
Sie
das
Geraét
von
Feuchtigkeit,
Wasser
und
Staub
fern.
Protéger
I’appareil
contre
I’humidité,
l'eau
et
ta
pous-
siére.
Unplug
the
power
cord
when
not
using
the
set
for
long
periods
of
time.
Wenn
das
Gerét
eine
langere
Zeit
nicht
verwendet
werden
soll,
trennen
Sie
das
Netzkabel
vom
Netzstecker.
Débrancher
le
cordon
d’alimentation
lorsque.
|‘appareil
n'est
pas
utilisé
pendant
de
longues
périodes.
NOTE
ON
USE/HINWEISE
ZUM
GEBRAUCH/OBSERVATIONS
RELATIVES
A
L’UTILISATION
Do
not
let
foreign
objects
in
the
set.
Keine
fremden
Gegensténde
in
das
Gerét
kommen
lassen.
Ne
pas
faisser
des
objets
étrangers
dans
tappareil.
Do
not
let
insecticides,
benzene,
and
thinner
come
in
contact
with
the
set.
Lassen
Sie
das
Gerat
nicht
mit
insektiziden,
Benzin
oder
Verdinnungsmitteln
in
Berdhrung
kommen.
Ne
pas
mettre
en
contact
des
insecticides,
du
benzéne
et
un
diluant
avec
l'appareil.
Handle
the
power
cord
carefully.
Hold
the
plug
when
unplugging
the
cord.
Gehen
Sie
vorsichtig
mit
dem
Netzkabel
um.
‘
ithe.
Halten
Sie
das
Kabel
am
Stecker,
wenn
Sie
den
Stecker
(For
sets
with
ventilation
hotes)
“
.
:
herausziehen.
ar
Never
disassemble
or
modify
the
set
in
any
way.
Manipuler
te
cordon
d’alimentation
avec
précaution.
Do
not
obstruct
the
ventilation
holes.
Versuchen
Sie
niemals
das
Gerat
auseinander
zu
neh-
Tenir
la
prise
lors
du
débranchement
du
cordon.
Die
Beliftungsdffnungen
durfen
nicht
verdeckt
werden.
men
oder
auf
jegiiche
Art
zu
veréndern.
Ne
pas
obstruer
jes
trous
d‘aération.
Ne
jamais
démonter
ou
modifier
l'appareil
d'une
man-
iére
ou
d’une
autre.
Irregularities
e
Ifthe
system
should
smoke
or
produce
strange
smells,
immediately
set
the
power
switch
to
the
STANDBY
position,
unplug
the
power
cord,
and
contact
your
store
of
purchase.
UnregelmaRigkeiten
e
Sollte
das
Gerat
Rauch
produzieren
oder
eigenartig
riechen,
stellen
Sie
den
Netzschalter
sofort
auf
die
Position
STANDBY
(Bereitschaft),
ziehen
Sie
den
Netzstecker
heraus
und
kontaktieren
Sie
Ihren
Handler.
Anomalies
@
Si
de
la
fumée
sort
de
la
chaine
ou
des
odeurs
bizarres,
placer
|'interrupteur
d’alimentation
immédiatement
sur
la
position
de
veille
(STANDBY),
débrancher
le
cordon
d’alimentation
et
contacter
le
distributeur.
“SERIAL
NO.
PLEASE
RECORD
UNIT
SERIAL
NUMBER
ATTACHED
TO
THE
REAR
OF
THE
CABINET
FOR
FUTURE
REFERENCE”

[3]
CONNECTIONS
e@
Do
not
piug
the
power
cord
into
the
power
outiet
until
all
connections
are
completed.
Connect
properly
as
shown
in
the
diagram.
e@
Check
the
right
and
left
channels,
and
be
sure
to
connect
the
speaker's
L
terminals
to
the
amplifier’s
L
terminals,
the
speaker's
R
terminals
to
the
amplifiers
R
terminals.
e
Be
sure
to
insert
the
plugs
securely.
Incomplete
connec-
tions
can
cause
noise.
@
This
systern
inciudes
digital
circuitry,
so
it
may
cause
problems
with
the
colors
on
a
TV.
If
so,
turn
the
systern’s
power
switch
off.
fa]
Assembling
the
Loop
Antenna
Assemble
the
included
AM
loop
antenna
as
shown
in
the
diagram.
AM
loop
antenna
wa
Antanna
stand
@
Undo
the
clasp.
@
Insert
the
AM
loop
antenna
into
the
antenna
stand.
e
Note
that
if
the
input
jacks
selected
with
the
FUNCTION
selectors
are
open
(if
nothing
is
connected),
the
sound
may
leak
to
another
component
connected
to
different
input
jacks.
e
Note
that
grouping
connection
cords
(pin-plug
cords)
together
with
power
cords
or
setting
them
near
power
transformers
can
cause
noise.
«
This
system
consists
of
precision
components
using
microprocessors.
Avaid
using
it
in
places
where
there
is
much
external
noise.
The
system
may
not
operate
properly
if
used
in
is
such
places,
but
this
is
not
a
problem
with
the
systern.
if
it
should
function
improperly,
perform
the
desired
operation
once
again.
(2]
Connecting
the
System
Connector
Cord
When
connecting
the
system
connector
cord,
press
on
the
center
of
the
connector
plug
until
you
hear
a
click.
When
disconnecting
the
system
connector
cord,
press
the
sides
of
the
connector
plug
towards
the
middle
and
pull.
Connector
plug
Connector
cord
NOTE
e
Note
that
disconnecting
by
pulling
on
the
cord
can
damage
it.
e@
Keep
the
power
cord
unplugged
when
connecting
the
system
connector
cord.
e
Note
that
connecting
the
system
connector
cord
when
the
power
cord
is
plugged
into
a
power
outlet
may
result
in
improper
operation.
(3)
Connecting
the
Included
Antenna
Adapter
Connect
the
coaxial
cable
and
antenna
adapter
using
the
procedure
on
the
diagram
below.
ul
3C-2V
+
PULL
ANTENNA
ADAPTER
-
os
a
a
qj
<
4
CLAMP
Sa
ASS
é
al
78
ohm
COAXIAL
CABLE
SYSTEM
CONNECTIONS
Keep
the
FM
and
AM
antenna
wires
away
from
the
system
connector
wire
to
prevent
noise
from
entering
the
antennas.
AM
OUTDOOR
ANTENNA
300
ohm
ANTENNA
FM
INDOOR
ANTENNA
(an
Accessory)
300
ohm
AM
foop
antenna
DOLBY
NOSE
At
MANUFACTURED
UNDER
LICENSE
DOLAY
LABORATORIES
LICENSING:
“DOLBY”
AND
pousteD
SyMBo:
OO
ane
TRADEMARKS
LICENSING
ATION,
Speaker
system
connections
Connect
the
speaker
system
for
the
left
channel
(the
left
side
as
seen
from
the
front)
to
the
L
terminals,
the
speaker
system
for
the
right
channel
to
the
R
terminals.
Connect
the
speaker
systems
before
inserting
the
system
connector.
FM
OUTDOOR
ANTENNA
SYSTEM
CDNNECTOR
2
‘THRE
UNIT
SHALL
BE
USED
WARNING:
SHOCK
HAZAI
AVIS:
RISQUE
DE
CHOC
(Left
channel)
(Right
channel)
75
ohm
ANTENNA
(Plug
into
a
power
outlet.)
=.
Power
cord
;
(for
U.K.
model)
a!
ONLY
FOR
MODEL
NO.
D-40
DO
NOT
OPEN.
RD
—
ELECTRIQUE
=
NE
PAS
OUVAWR.
HOO0O0U0
2000

Installing
the
AM
Loop
Antenna
Tune
in
an
AM
station
(refer
to
Page
12},
listen
to
the
sound,
then
instalt
the
antenna
in
a
position
as
far
fram
the
set
as
possible
in
which
distortion
and
noise
are
minimum.
In
some
cases
it
is
better
to
connect
with
the
polarities
inverted.
Good
reception
of
AM
stations
is
not
possible
if
the
joop
antenna
is
not
connected
or
if
it
is
touching
meta!
objects.
Refer
to
Page
5
for
in-
structions
on
connect-
ing
the
antenna
termin-
al
cords.
ANT,
TERMINAL
ANTENNA
CAUTION
Use
an
outdoor
antenna
if
reception
is
not
good
with
the
included
antenna.
Change
the
location,
height,
and
direction
of
the
antenna
to
find
the
position
where
reception
is
best,
then
fix
the
antenna
in
that
position.
ry
Places
for
installing
Outdoor
Antennas
@
Install
the
outdoor
antenna
facing
a
broadcast
station's
transmission
antenna.
When
surrounded
by
buildings
or
hills,
try
changing
the
direction
to
obtain
optimum
reception.
e
Do
not
install
the
antenna
under
power
lines.
it
is
extremely
dangerous
for
the
antenna
to
come
into
contact
with
a
power
line.
@
Install
away
from
roads
or
train
tracks
to
prevent
noise
from
cars
and
trains.
#
Do
not
install
the
antenna
too
high,
as
it
may
be
hit
by
lightening.
a
roti
ee
ORL
PI
Loop
antenna
Connect
the
antenna
to
the
FM
terminals
(refer
to
page
12),
tune
in
an
FM
broadcast,
then
move
the
antenna
to
find
a
position
in
which
distortion
and
noise
are
minimum.
Secure
the
ends
of
the
antenna
in
that
position
using
tape,
tacks,
etc.
FM
indoor
Antenna
(An
accessory)
FM
antenna
75
ohms
coaxial
cable
(3C-2V
or
5C-2V}
Connect
the
outdoor
antenna
using
a
75
ohms
coaxial
cable.
This
protects
against
externa}
noise.
After
completing
the
system
connections
and
antenna
connections,
install
the
sets
as
shown
on
the
diagrams
below.
{Stacking}
[Partial
Stacking]
CAUTION:
Set
the
receiver
(UDRA-60)
on
the
top.
{L-Speaker}
{Receiver}
(R-Speaker}
Cassette
Deck
(CD
Player}
[installing
Side
by
Side)
(L-Speaker)
(R-Speaker)
{Receiver}
{CD
Player)
Cassette
Deck
CAUTION:
Set
the
receiver
(UDRA-60)
on
the
top.
{L-Speaker)
{R-Speaker)
{Receiver}
(CD
Player)
CAUTION:
Do
not
plug
the
power
cord
into
the
power
outlet
until
all
connections
are
completed.
Connect
properly
as
shown
in
the
diagram.
¢
This
system
includes
digital
circuitry,
so
it
may
cause
problems
with
the
colors
on
a
TV.
If
so,
turn
the
system's
power
switch
off.

[4]
PART
NAMES
AND
FUNCTIONS
@
POWER
ON/STANDBY
switch
®@
SDB
(Super
Dynamic
Bass)
button
C1)
Disc
tray
C5)
»
PLAY
button
When
pressed
once,
the
power
turns
on
and
the
display
lights
up.
The
set
will
begin
to
function
normally
approximately
4
to
5
seconds
after
the
power
is
turned
on.
Press
the
button
again
to
turn
the
power
off.
STANDBY
(timer
standby)
button
Press
this
button
to
turn
the
timer
on.
When
pressed
once,
the
standby
indicator
(
Oo
)
appears
on
the
display,
and
when
pressed
again,
the
standby
indicator
turns
off.
The
timer
will
not
function
when
the
standby
indicator
is
off.
TIMER
button
This
is
used
to
set
the
timer.
ENTER/NEXT
button
Use
this
to
move
on
to
the
next
step
when
setting
the
clock
and
timer.
CLOCK/DISPLAY
button
Press
once
to
display
the
time,
once
again
to
return
to
the
previous
display.
MEMORY
button
Use
this
to
store
reception
frequencies
and
modes
at
the
preset
channels.
Remote
control
sensor
This
is
where
the
signals
from
the
remote
control
unit
are
received.
BAND
selector
button
Use
this
to
switch
between
the
FM,
AM
(MW)
and
AM
(LW)
bands.
The
band
changes
each
time
the
button
is
pressed,
and
the
currently
set
band
is
indicated
on
the
display.
TUNING
UP
and
DOWN
buttons
Use
these
to
tune
in
FM
or
AM
(MW
and
LW}
stations
and
when
setting
the
clock
and
timer.
PRESET
EQ
(equalizer)
button
Use
this
to
switch
the
equalizer
setting.
Press
this
button
for
more
powerful
bass
sound.
Press
again
to
turn
the
SDB
function
off.
FUNCTION
selectors
Use
these
to
select
the
program
source.
VOLUME
controi
Use
this
controi
to
adjust
the
volume.
Turn
clockwise
{
™
)}
to
increase
the
volume,
counterc-
lockwise
(
(
}
to
decrease
it.
MONO/ST.
(FM
stereo
mute/mono}
selector
button
CAUTION:
This
button
will
not
function
when
receiving
AM
broadcasts.
{For
FM
reception)
STEREO:
Use
this
mode
to
receive
FM
broadcasts
in
stereo.
(“AUTO”
appears
on
the
display.)
The
muting
circuit
is
activated
to
cut
noise
between
stations.
MONO:
in
this
mode,
FM
broadcasts
are
received
in
monaural,
regardless
of
whether
they
are
broadcast
in
monaural
or
stereo.
Set
to
the
mono
mode
if
there
is
much
noise
in
the
stereo
mute
mode
(with
“AUTO”
displayed)
or
if
the
signals
are
weak.
BASS
control
Use
this
to
adjust
the
bass.
TREBLE
control
Use
this
to
adjust
the
treble.
PHONES
jack
When
using
headphones,
plug
them
in
here.
The
sound
from
the
speakers
is
cut
when
headphones
are
plugged
in.
Use
headphones
equipped
with
a
stereo
mini-plug
(3.5mm
in
diameter).
Load
discs
here.
14444
(sutomatic/manual
search
reverse
button)
Press
this
button
to
move
the
pickup
back
to
the
beginning
of
the
desired
track.
Press
in
the
play
or
pause
mode
to
move
back
a
number
of
tracks
equal
to
the
number
of
times
the
button
is
pressed.
b>
PPI
(automatic
/
manual
search
forward
button)
Press
this
button
to
move
the
pickup
forward
to
the
baginning
of
the
desired
track.
Press
in
the
play
or
pause
mode
to
move
forward
a
number
of
tracks
equai
to
the
number
of
times
the
button
is
pressed.
*
The
automatic
search
function
is
set
if
the
button
is
released
within
0.5
seconds,
and
the
manual
search
function
is
set
if
the
button
is
held
in
for
more
than
0.5
seconds.
ll
PAUSE
button
Press
this
button
to
stop
playback
temporarily.
Press
the
PLAY
button
to
resume
playback.
Press
this
button
to
start
playing
the
disc.
If
pressed
when
the
disc
holder
is
open,
the
disc
holder
closes
and
playback
begins.
STOP
button
Press
this
button
to
stop
playback.
REPEAT
button
Press
this
button
for
repeat
playback.
EDIT
button
Press
this
button
for
edited
recording
(dividing
the
tracks
to
be
recorded
to
fit
onto
sides
A
and
B
of
a
tape
according
to
the
tape’s
length).
TAPE
A/B
button
Press
this
button
during
editing
to
switch
the
display
between
the
display
for
side
A
and
the
display
for
side
B
of
the
tape.
@
OPEN/CLOSE
button
Press
this
to
open
and
close
the
disc
holder.
The
disc
holder
opens
out
when
the
button
is
pressed
once,
and
closes
when
the
button
is
pressed
again.
If
a
disc
is
loaded,
the
total
number
of
tracks
and
total
time
of
that disc
appears
on
the
display
several
seconds
after
the
disc
holder
is
closed.
Disc
play
indicator
This
lights
when
a
disc
is
playing,
and
flashes
when
in
the
pause
mode.

Cassette
tray:
Deck
1
The
cassette
tray
opens
out
when
the
OPEN/CLOSE
button
@
is
pressed.
Insert
the
cassette
tape
with
the
side
on
which
the
tape
is
exposed
facing
away
from
you.
To
close
the
cassette
tray,
press
the
OPEN/CLOSE
button
@
again.
Tape
direction
indicators:
Deck
1
These
indicate
the
direction
of
playback
of
the
tape
in
Deck
1
as
well
as
whether
or
not
a
tape
is
loaded.
The
indicators
flash
when
the
tape
is
being
fast-forwarded
or
rewound.
The
tape
direction
indicators
for
Deck
2
remain
off
when
the
tape
in
Deck
1
is
moving.
4
(rewind)
button:
Deck
1
Press
this
to
rewind
the
tape
in
Deck
1.
Also,
if
pressed
during
playback
in
the
>
(forward)
direction,
the
tape
is
rewound
to
the
beginning
of
the
currently
playing
selection,
and
if
pressed
during
playback
in
the
4
(reverse)
direction,
the
tape
is
forwarded
to
the
begin-
ning
of
the
next
selection
{on
the
back
side
of
the
tape).
bb
(fast-forward)
button:
Deck
1
Press
this
to
fast-forward
the
tape
in
Deck
1.
Also,
if
pressed
during
playback
in
the
»
(forward)
direction,
the
tape
is
fast-forwarded
to
the
beginning
of
the
following
selection,
and
if
pressed
during
playback
in
the
¢q
(reverse)
direction,
the
tape
is
rewound
to
the
beginning
of
the
currently
playing
selection
(on
the
back
side
of
the
tape).
Cassette
tray:
Deck
2
When
the
OPEN/CLOSE
button
is
pressed,
the
cassette
tray
opens
out.
Place
the
cassette
tape
in
the
tray
with
the
side
on
which
the
tape
is
exposed
facing
the
back.
To
close
the
cassette
tray,
press
the
OPEN/CLOSE
button
again.
Tape
direction
indicators:
Deck
2
These
indicate
the
direction
of
playback
of
the
tape
in
Deck
2
as
well
as
whether
or
not
a
tape
is
loaded.
The
indicators
flash
when
the
tape
is
being
fast-forwarded
or
rewound.
The
tape
direction
indicators
for
Deck
1
remain
off
when
the
tape
in
Deck
2
is
moving.
>>
(fast-forward)
button:
Deck
2
Press
this
to
fast-forward
the
tape
in
Deck
2.
Also,
if
pressed
during
playback
in
the
>
(forward)
direction,
the
tape
is
fast-forwarded
to
the
beginning
of
the
faliowing
selection,
and
if
pressed
during
playback
in
the
4
(reverse)
direction,
the
tape
is
rewound
to
the
beginning
of
the
currently
playing
selection
(on
the
back
side
of
the
tape).
44
(rewind)
button:
Deck
2
Press
this
to
rewind
the
tape
in
Deck
2.
Also,
if
pressed
during
playback
in
the
>
(forward)
direction,
the
tape
is
rewound
to
the
beginning
of
the
currently
playing
selection,
and
if
pressed
during
playback
in
the
q
(reverse)
direction,
the
tape
is
forwarded
to
the
begin-
ning
of
the
next
selection
(on
the
back
side
of
the
tape).
>
(forward
play)
button:
Deck
1
Press
this
button
to
begin
playback
in
the
forward
direction
on
Deck
1.
Deck
1
indicator
This
indicator
lights
when
Deck
1
is
selected.
This
indicates
the
deck
for
which
the
counter
is
functioning.
Normally,
the
indicator
on
the
deck
which
has
been
operated
lights.
4
(reverse
play)
button:
Deck
1
Press
this
button
to
begin
playback
in
the
reverse
direction
on
Deck
1.
Bl
(stop)
button:
Deck
1
Press
this
button
when
the
tape
in
Deck
1
is
moving
to
stop
the
tape.
4
(reverse
play)
button:
Deck
2
Press
this
button
to
begin
playback
in
the
reverse
direction
on
Deck
2.
Deck
2
indicator
This
indicator
lights
when
Deck
2
is
selected.
This
indicates
the
deck
for
which
the
counter
is
functioning.
Normally,
the
indicator
on
the
deck
which
has
been
operated
lights.
>
(forward
play)
button:
Deck
2
Press
this
button
to
begin
playback
in
the
forward
direction
on
Deck
2.
BB
(stop)
button:
Deck
2
Press
this
button
when
the
tape
in
Deck
2
is
moving
to
stop
the
tape.
The
tape
direction
indicators
for
Decks
1
and
2
(@
and
@)
also
indicate
whether
or
not
cassette
tapes
are
toaded.
The
indicators
remain
off
if
no
cassette
tape
is
toaded
when
in
the
stop
mode.
~)
&
OPEN/CLOSE
button:
Deck
1
Press
this
button
to
open
and
close
the
cassette
tray.
@
OPEN/CLOSE
button:
Deck
2
Press
this
button
to
open
and
close
the
cassette
tray.
Dubbing
indicator
This
lights
during
dubbing.
DUBBING
button
Dubbing
(copying)
a
tape
from Deck
1
onto
Deck
2
is
possible
simply
by
pressing
this
button.
COUNTER
RESET
button
Press
this
button
to
reset
the
tape
counter
to
‘0000’.
REV.
MODE
switch
Use
this
to
set
the
reverse
mode
to
one
of
the
following
modes:
=
(Single
side
mode),
[>
(Double
side
(reverse]
mode),
C=>
(continuous
mode).
Refer
to
Page
18.
DOLBY
NR
selector
switch
Use
this
switch
to
select
the
Dolby
NR
mode,
ON,
OFF.
During
playback,
set
this
switch
to
the
same
mode
in
which
the
tape
was
recorded.
CD
SRS
indicator
This
lights
during
recording
with
the
CD
SRS
function.
®
CD
SRS
(CD
synchronized
recording
button)
Use
this
button
for
CD
synchronized
recording.
Refer
to
Page
22.
oS
ee
CD
SRS
button
This
button
is
used
for
recording
COs
(Page
22).
Pay
attention
to
the
following:
@
Recording
begins
on
the
tape
as
soon
as
this
button
is
pressed,
so
be
sure
to
wind
up
the
leader
tape
beforehand.
@
If
this
button
is
pressed
while
a
CD
is
playing,
the
CD
SRS
indicator
(
@
)
lights
but
recording
onto
the
tape
does
not
begin.
Stop
the
CD
first
before
pressing
this
button.
Listes
he
a
@
REC/REC
MUTE
(recording
/
recording
mute)
button
To
record,
press
the
REC/REC
MUTE
button,
then
press
the
»
or
@
button.
If
oniy
the
REC/REC
MUTE
button
is
pressed,
the
deck
is
set
to
the
recording
pause
mode.
If
this
button
is
pressed
during
recording,
the
recording
mute
mode
is
set
for
approximately
5
seconds,
after
which
the
deck
is
set
to
the
recording
pause
mode.
To
resume
recording,
press
the
®
or
q
button.
When
the
button
is
pressed
while
the
cassette
deck
is
in
the
stop
mode,
a
blank
section
of
approximately
5
seconds
is
created
on
the
tape, after
which
the
deck
is
set
to
the
recording
pause
mode.
If
the
REC/REC
MUTE
button
is
held
in,
a
blank
section
is
created
on
the
tape
until
the
point
where
the
button
is
released.
Recording
pause
mode
Recording
of
the
CD
begins
if
the
CD
player's
PLAY
key
is
pressed
during
the
recording
pause
mode.
@
REC/REC
MUTE
indicator
This
lights
when
the
recording
or
recording
standby
mode
is
set
using
the
REC/REC
MUTE
button
@,
and
flashes
during
the
recording
mute
mode.
®
Tape
counter
The
tape
counter
functions
for
the
deck
whose
indicator
(®
or
®)
is
fit.
NOTE
e
After
the
power
cord
is
plugged
into
an
outlet,
a
mechanical
sound
is
produced
from
the
cassette
deck
when
the
power
switch
is
turned
on
the
first
time
only.
This
is
the
sound
of
the
cassette
mechanism
being
set
to
the
proper
operating
position,
and
is
not
a
probiern
with
the
deck.

On
this
system,
the
receiver
includes
a
multi-display.
This
display
indicates
various
types
of
information
for
different
modes
depending
on
which
section
of
the
system
is
being
used,
as
follows:
When
listening
to
the
radio
or
when
using
the
timer
When
listening
to
8
CD
ou...
csssssereesnseeneersseseeenees
When
listening
to
a
tape
........esscssseessneeseeeeteenesnseseesseeee
This
lights
to
indi-
cate
that
the
timer
is
set.
This
lights
when
signais
are
received
from
the
re-
mote
controi
unit.
This
indicates
the
band
being
received
[AM
(MW
and
LW)
or
FM]
and
the
preset
number
when
presetting
stations
in
the
memory.
This
lights
when
the
station
is
tuned
in
properly.
When
presetting
stations
in
the
memory
:
“MEMORY”
When
setting
the
timer
times
:
“ON”
or
“OFF”
When
recalling
a
preset
station
:
Preset
number
When
the
sleep
timer
is
operating
:
“SLEEP”
When
an
equalizer
setting
is
selected
:
Equalizer
mode
During
muting
:
“MUTING”
*
Normaily
the
equalizer
setting
is
displayed.
CD
PLAYER
DISPLAY
Tape
type
and
re-
maining
time
dis-
play
During
the
editing
.
See
diagram
below.
function
c-o0
.
Refer
to
Page
9.
lights
and
the
..
Refer
to
Page
10.
tape
time
is
dis-
played.
NOTE:
Track
number
display
e@
The
timer
standby
mark
“
(C)
*
will
not
light
if
the
current
time
is
not
set.
When
a
disc
is
loaded:
manual
search
mode.
Time
display
The
reception
frequency,
function,
time,
and
timer
set-
tings
are
displayed
here.
When
a
disc
is
loaded:
PROGRAM
lights
during
the
prog-
rammed
search
mode.
The
indicators
switch
as
follows
when
the
REPEAT
button
is
pressed
in
the
play
mode:
First
press
:
REPEAT
TRACK
Second
press
:
REPEAT
ALL
Third
press
:
REPEAT
fourth
press
:
REPEAT
[4)-[B)
Fifth
press
:
None
Display
00
is
displayed
when
the
disc
data
cannot
be
read
properly.
e
The
total
number
of
tracks
is
displayed
in
the
stop
mode.
@
The
track
number
is
displayed
in
the
play
and
program
modes.
@
CCorjJis
displayed
when
the
innermost
or
outermost
section
of
the
disc
is
reached
in
the
Q00Vis
displayed
when
the
disc
data
cannot
be
read
properly.
@
The
elapsed
playing
time
is
displayed
in
the
stop
mode.
e
The
elapsed
time
for
the
track
currently
playing
is
displayed
in
the
play
and
pause
modes.
e
The
elapsed
time
for
the
programmed
tracks
is
displayed
in
the
program
mode.
During
the
editing
operation,
“EDIT
[A
TAPE”
is
displayed
and
the
remaining
time
for
side
A
of
the
tape
is
indicated
on
the
time
section
of
the
display.
When
the
TAPE
SIDE
A/B
button
is
pressed,
”[A]”
turns
off,
“[B]”
turns
on,
and
the
remaining
time
for
side
A
of
the
tape
is
indicated
in
the
same
way.
The
P
PLAY
indicator
lights
when
a
disc
is
playing,
and
the
Il
PAUSE
indicator
lights
when
the
pause
mode
is
set.
These
indicate
the
time
display
mode.
TOTAL
lights
when
the
remaining
time
for
all
tracks
is
displayed.
SINGLE
lights
when
the
remaining
time
per
track
is
displayed.
»
PLAY
lights
when
the
disc
is
playing,
and
Hl
PAUSE
lights
when
in
the
pause
mode.
During
editing
operations:
“REMAIN”
During
edited
recording:
“EDIT”
When
no
disc
is
toaded,
when
the
disc
is
ioaded
upside-down,
or
when
the
disc
is
heavily
scratched
or
dirty
:
“NO
DISC”

RE
ad
CASSETTE
DECK
DISPLAY
RECEIVER
SECTION
Tape
function
indicator
When
an
equalizer
setting
is
selected:
Equalizer
mode
When
the
sleep
timer
is
operating:
“SLEEP”
During
muting:
“MUTING”
*
Normally
the
equalizer
setting
is
displayed.
CASSETTE
DECK
SECTION
*
10
Ci
mt]
This
is
the
counter.
Gao
is
ete
cour
Remaining
Tape
Indicators
These
indicators
notify
that
the
tape
is
reaching
the
end
during
recording
and
playback.
The
indicators
differ
according
to
the
diameter
of
the
tape
hub.
This
starts
flashing
when
the
tape
is
nearing
the
end
during
recording
or
playback,
then
stops
flashing
and
remains
lit
once
the
end
of
the
tape
is
reached.
*
The
approximate
remaining
time
on
the
tape
after
the
different
sections
of
the
tape
counter
start
flashing
one
by
one
is
as
follows;
Playback
in
Playback
in
Tape
length
forward
direction
|
reverse
direction
|
forward
direction
|
reverse
direction
[cae
[Aton
§
mins
[Aron
&
mine
Aron
rine
|
An
+
ms]
[ese
[rvern
einai
anon
ermine)
=
|_|
*
There
are
no
C-90
tapes
with
large
hubs.
Large
hub
Large
hubs
are
hubs
with
a
diameter
of
about
27mm.
Note
that
if
the
hub
is
larger
than
this,
there
may
be
a
NOTE
major
error
in
indicating
the
remaining
time.
The
remaining
tape
times
shown
on
the
table
at
the
right
are
only
rough
estimates.
in
addition,
the
tape
end
indication
may
not
work
when
using
cassettes
with
thick
tapes
or
cassettes
on
which
the
diameter
of
the
wound
tape
is
large.
Normal
hub
Large
hub
Dolby
noise
reduction
manufactured
under
license
from
Doiby
Laboratories
Licensing
Corporation.
“DOLBY”,
the
double-D
symbol
is
trademarks
of
Dolby
Laboratories
Licensing
Corporation.
[5]
REMOTE
CONTROL
UNIT
|
The
5-60
comes
with
a
remote
control
unit
(RC-148)
for
system
control.
|
Inserting
the
Batteries
Use
R6P/AA
batteries
in
the
remote
control
unit.
Replace
the
batteries
with
new
ones
after
approximately
one
year
of
use,
though
this
time
depends
on
the
frequency
with
which
the
remote
contro}
unit
is
operated.
If
the
remote
control
unit
does
not
function
when
operated
from
close
to
the
main
unit,
replace
the
batteries
with
new
ones,
even
if
the
previous
batteries
have
been
used
for
less
than
a
year.
insert
the
new
batteries
in
the
proper
“+"
and
“—”
directions,
following
the
marks
on
the
remote
control
unit’s
battery
compartment.
To
make
the
batteries
last
longer,
remove
them
when
not
using
the
remote
contro!
unit
for
jong
periods
of
time.
To
prevent
damage
or
leakage
of
battery
fluid:
«
Do
not
use
an
old
battery
together
with
a
new
one.
e
Do
not
use
two
batteries
of
different
types
together.
e
Do
not
short-circuit,
take
apart,
heat,
or
dispose
of
batteries
in
flames.
if
the
battery
fluid
should
leak,
carefully
wipe
ail
the
battery
fluid
off
the
inside
of
the
battery
compartment,
then
insert
new
batteries.
@
Open
the
battery
case
lid
on
the
back
of
the
remote
control
unit.
@
Insert
the
two
batteries
(R6P/AA)
in
the
proper
direction.
@Set
the
battery
case
lid
back
in
place.
CAUTIONS:
The
remote
control
unit
may
not
function
properly
if
the
infrared
sensor
(remote
controi
sensor)
is
exposed
to
direct
sunlight
or
other
strong
light,
or
if
there
is
an
obstacle
between
the
remote
control
unit
and
the
remote
control
sensor.
When
adjusting
the
volume
from
the
remote
control
unit,
the
votume
will
stop
changing
if
the
remote
control
transmitter
is
moved
away
from
the
remote
control
sensor.
Press
the
button
again
to
continue
changing
the
volume.
The
“signal
received”
mark
“A”
does
not
light
when
the
EQ
key
on
the
remote
contro!
unit
is
pressed.
If
jezae)
appears
on
the
tuner’s
display
due
to
incidental
light
even
though
the
remote
contro!
unit
has
not
been
operated,
it
is
best
to
move
the
set
or
place
it
in
a
different
direction.
However,
this
will
not
cause
malfunction.
Do
not
press
buttons
on
the
remote
control
unit
and
on
the
main
unit
at
the
same
time.
This
will
lead
to
malfunction.
When
the
[MUTE]
button
on
the
remote
control
unit
is
pressed,
the
sound
is
muted
and
remains
muted
when
the
power
switch
is
turned
off
then
turned
back
on.
In
such
cases,
press
the
button
on
the
remote
contro!
unit
again.
The
remote
contro!
sensor
is
located
on
the
right
side
of
the
display
window
on
the
receiver.
Point
the
remote
control
unit
at
the
sensor
when
using
it,
as
shown
in
the
diagram.
The
remote
control
unit
will
function
from
a
maximum
direct
distance
of
approximately
7
meters.
This
distance
will
de-
crease,
however,
if
there
is
an
obstacie
between
the
remote
control
unit
and
the
sensor,
or
if
used
the
remote
control
unit
is
used
from
an
angle.
The
~
FAR”
mark
lights
in
the
bottom
corner
of
the
receiver's
display
when
signais
are
received
from
the
remote
control
unit.

POWER
button
Press
this
to
turn
the
power
for
the
entire
system
on
and
off.
Operating
the
Cassette
Decks
OPEN/CLOSE
(4)
Press
this
to
open
and
close
the
cas-
sette
trays.
DECK
1/2
Press
this
to
select
the
deck
to
be
operated.
Stap
button
(IB)
Press
this
to
stop
the
tape.
Forward
play
button
(>)
Press
this
to
play
or
record
in
the
forward
direction.
Reverse
piay
button
(4)
Press
this
to
play
or
record
in
the
reverse
direction,
REC/REC
MUTE
{recording
mute
but-
ton)
(@)
To
set
to
the
recording
mode
when
in
the
stop
mode,
press
this
button,
then
press
either
the
“Db”
or
“<q”
button.
When
pressed
during
the
recording
or
recording
pause
mode,
a
blank
section
of
approximately
5
seconds
is
created
on
the
tape,
after
which
the
deck
is
set
to
the
recording
pause
mode.
Rewind
button
(44)
Press
this
to
rewind
the
tape.
Fast-forward
button
(PP)
Press
this
to
fast-forward
the
tape.
All
operations
marked
[R)
from
the
following
page
on
are
possible
using
the
remote
control
unit.
REMOTE
CONTROL
UNIT
NOTE:
If
the
open/close
button
on
the
remote
control
unit
is
pressed
and
the
disc
tray
is
opened
or
closed
when
no
disc
is
loaded,
the
remote
control
operation
is
given
priority,
and
nothing
will
happen
when
the
play
button
or
other
buttons
on
the
main
unit
are
pressed.
If
this
happens,
press
the
open/close
button
on
the
main
unit
before
using
it.
Operating
the
Receiver
SLEEP
Press
this
to
set
the
sieep
timer.
PRESET
Press
these
to
tune
in
preset
stations.
MUTE
When
pressed
once,
the
sound
is
muted,
and
when
pressed
again,
the
volume
returns
to
the
previous
set-
ting.
Ea
Press
this
to
select
an
equalizer
setting
suitable
for
the
type
of
music
you
are
currently
listening
to.
FUNCTION
(function
selector}
Press
this
to
switch
the
function
be-
tween
TUNER,
TAPE,
CD,
PHONO
and
LINE.
VOLUME
Use
these
to
adjust
the
volume.
The
volume
decreases
when
the
V
button
is
pressed,
and
increases
when
the
A
button
is
pressed.
Operating
the
CD
Playe
OPEN/CLOSE
(4)
Press
this
to
open
and
close
the
disc
tray.
TIME
The
time
on
the
display
switches
as
follows
each
time
this
button
is
press-
ad:
Remaining
time
per
track
—
Total
remaining
time
—
Elapsed
time
per
track,
PROGRAM
Use
this
for
programming
tracks.
Stop
button
(MH)
Press
this
to
stop
playback.
Play
button
(>)
Press
this
to
start
playback.
Manuai
search
reverse
button
(44)
Manual
search
forward
button
(b>)
Use
these
to
forward
or
reverse
the
cD.
Auto
search
reverse
button
(144)
Auto
search
forward
button
{
PPi)
Use
these
to
search
for
the
beginning
of
the
desired
track.
[6]
SETTING
THE
CURRENT
TIME
Setting
the
Current
Time
(The
time
is
displayed
DENON
wacom
comonenr
svarem
steno
Aecenen
0-66
Press
the
POWER
ON/
STANDBY
button
to
turn
the
power
on.
Press
the
CLOCK/DISPLAY
button,
and
hold
it
in
for
at
lease
3
seconds.
Use
the
UP
and
DOWN
buttons
to
set
the
hours,
Press
the
ENTER/NEXT
button.
Use
the
UP
and
DOWN
buttons
to
set
the
minutes.
Press
the
ENTER/NEXT
button
at
the
sound
of
a
time
service's
chime.
The
time
display
stops
flashing,
and
the
ciock
starts
counting
the
time.
POWER
ON/STANOBY
TUNING
the
24-hour
mode)
NIZNt7
7:28
ZINZIN
NIZNIZ
7:30
ZINZIN
11

[7]
LISTENING
TO
RADIO
BROADCASTS
DENON
rence
commonent
svstiw STEREO
RECEIEA
0-08
Jae
eis
He
Setar
DENON
vente
component
svtne
steno
necenen
000
s—
Fe
FISD
weweworme
FLAT
Ge
ee
Stacey
TAA
ENTER
CLOCK
EMD
neNT
OAT
Set
the
VOLUME
contro!
(Example:
Tuning
to
FM
102.50
MHz)
to
the
“MIN”
position,
then
POWER
press
the
POWER
ON/
ON/STANOBY
STANDBY
button
to
turn
Set
the
VOLUME
control
the
power
on.
to
the
“MIN”
position,
then
press
the
POWER
ON/
STANDBY
button
to
turn
the
power
on.
Press
the
MEMORY
button.
The
“MEMORY”
indicator
flashes.
Select
the
FM
band
FM
8
7.
S
Que
with
the
BAND
button.
AUTO
MONO
FLA
T
Use
the
UP
and
DOWN
buttons
to
cail
out
the
numbe:
at
which
you
want
to
preset
the
station.
The
preset
number
flashes,
Press
the
MEMORY
button
whil
ie
ie
rent
ee
amy
FM
a
After
1
second,
the
preset
number
switches
to
the
preset
e
Press
the
MONO/ST
button
to
turn
the
“AUTO
MONO”
indicator
on.
When
an
FM
stereo
broadcast
is
received,
the
“STEREO”
tone
dispiay.
indicator
lights
and
the
broadcast
is
received
in
stereo.
@
When
the
MONO/ST
button
is
pressed
and
the
“MONO”
indicator
is
turned
on,
the
“STEREO”
indicator
turns
off
and
the
broadcast
is
received
in
monaural.
Use
the
UP
and
DOWN
FM
10
e.
S
Que
buttons
to
tune
to
102.50
MHz.
aio
oso
FLAT
“MEMORY”
flashes
for
10
seconds.
Notes
on
Presetting
Note:
@
When
an
FM
station
is
preset,
the
auto
or
monaural
mode
is
aiso
set,
so
check
the
display
before
presetting
the
station.
Use
the
same
operation
to
receive
AM
(MW
or
LW)
stations.
©
Ifa
station
is
preset
at
a
button
at
which
another
station
has
previously
been
preset,
the
previous
station
is
cleared
and
the
new
Station
is
preset.
@
The
preset
memory
is
not
cleared
immediately
if
the
power
cord
is
unplugged,
but
will
be
cleared
if
the
cord
is
left
unplugged
over
a
long
period
of
time.
If
this
happens,
preset
the
stations
again.
The
memory
is
backed
up
for
24
hours.
12

Example:
Listening
to
the
FM
station
preset
at
button
3:
(Remote
Controi
only)
Press
the
FUNCTION
IS
TEES
FM
button
on
the
remote
102.5
Que
e@
Load
the
disc
with
the
disc
holder
open.
e
Press
the
OPEN/CLOSE
button
(4)
once
to
open
the
disc
tray,
once
again
to
close
it.
e
Set
the
disc
securely
in
the
tray
guide
at
the
center
of
the
disc
holder.
To
play
8cm
discs,
place
the
disc
in
the
sunken
part
at
the
center
of
the
disc
holder.
e
Load
discs
with
the
labelled
side
facing
up,
being
careful
e
The
disc
tray
can
also
be
closed
by
pressing
the
PLAY
(
P}
button.
In
this
case,
playback
automatically
starts
from
the
first
track
on
the
disc
(or
if
tracks
are
programmed,
the
first
programmed
track).
When
the
disc
holder
is
ciosed,
the
disc
turns
automatical-
ly
for
several
seconds,
and
the
number
of
tracks
and
total
playing
time
appear
on
the
display.
control
unit
to
call
out
“TUNER”.
P
3
Not
to
touch
the
disc
surface.
AUTO
MONO
Handling
the
Disc
Tray
Do
not
turn
off
the
power
or
push
or
pull
the
disc
tray
when
it
is
moving,
as
this
may
damage
it.
if
the
cord
of
a
set
of
headphones,
etc.,
gets
caught
in
the
disc
tray
when
it
is
closed,
press
the
OPEN/CLOSE
button
(4)
again.
e@
Never
set
objects
other
than
CDs
in
the
disc
tray,
as
this
can
cause
damage.
Use
the
PRESET
7
4
buttons
to
call
out
PR
en
FM
102.5
Qu
auto
wono
FLAT
PLAYING
CDs
e
Cleaning
Discs
Dust,
fingerprints,
or
spittle
on
the
disc
can
cause
noise
or
skipping.
If
the
disc
is
dirty
or
if
the
player
does
not
work
properly,
clean
the
disc
as
follows:
e
Hold
the
disc
as
shown
in
the
diagram,
with
the
signal
surface
facing
up
(the
labelled
side
facing
down).
[ome
[toners
|
@
Discs
which
can
be
played
COMPACT
Only
discs
with
this
mark
can
be
,
:
played.
e
Using
a
soft
cloth,
wipe
the
disc
gently
from
the
inside
towards
the
edges
in
straight
lines
(as
shown
by
the
DIGITAL
AUDIO
arrows).
oe
Only
the
audio
part
is
CD
single
(8
cm)
Loading
Discs
e
Do
not
wipe
from
the
edges
towards
the
center
or
e
For
CDVs,
only
the
audio
part
is
played
(the
video
part
is
around
the
disc
as
you
would
wipe
records.
not
played).
e
Do
not
use
hard
cloths
or
rub
the
disc,
since
this
can
scratch
the
signal
surface.
Never
use
the
following
to
clean
discs:
®
Sotvents
such
as
benzene
or
alcohol
e
Cleaners
containing
abrasives
e@
Sprays
or
cleaner
for
records
e@
Anti-static
products
@
When
removing
the
disc
from
its
case:
As
shown
in
the
diagram,
grasp
the
disc
along
the
edges,
gently
press
down
on
the
hole
in
the
middle
with
a
finger,
and
lift
the
disc.
It
should
come
out
easily.
W@
When
setting
the
disc
in
the
disc
tray:
Always
set
the
disc
with
the
labelled
side
facing
up.
{Compact
discs
can
only
be
played
on
one
side.)
For
8
cm
CDs,
set
the
disc
in
the
sunken
part
in
the
middie
of
the
tray.
13

Regular
Playback
DENON
censor
commosent
svareu sreata
mictnan
Example:
Playing
a
CD
with
15
tracks
and
14
a
total
playing
time
of
62
minutes
03
seconds,
starting
from
track
1
OPEN/CLOSE
Press
the
OPEN/CLOSE
button.
The
disc
tray
opens.
Set
the
CD
in
the
disc
tray.
Refer
to
Page
13.
Press
the
OPEN/CLOSE
button.
The
disc
tray
ctoses.
The
display
appears
several
seconds
after
the
disc tray
closes.
Press
the
PLAY
button.
‘Operations
marked
[R]
can
also
be
performed
using
the
remote
control
unit.
TRACK
0
QO
TRACK
!
S
62"07°
DENON
verso
comowent
svatew creneo
micenen
To
stop
playback
temporarily:
Press
the
PAUSE
button.
@
STOP
button
»
PLAY
button
lf
PAUSE
button
“
»
PLAY”
turns
off
and
“
If
PAUSE”
appears,
and
playback
is
paused
at
the
point
the
button
is
pressed.
To
resume
playback:
Press
the
PLAY
button.
“
ILPAUSE”
turns
off
and
“”
>»
PLAY”
appears,
and
playback
is
paused
at
the
point
the
button
is
pressed.
To
stop
playback:
Press
the
STOP
button.
NOTE:
e
“00”
is
displayed
on
the
track
number
section
of
the
dispiay
for
several
seconds
after
the
disc
is
set,
while
the
data
on
the
number
of
tracks,
playing
time,
etc.,
is
being
read
from
the
innermost
section
of
the
disc.
After
this,
the
number
of
tracks
and
total
playing
time
appear.
me
wie
Ba
tea:
FLAT
@
If
no
disc
is
loaded,
if
the
disc
is
upside-down,
or
if
the
data
on
the
innermost
part
of
the
disc
cannot
be
read
properly
due
to
scratches
or
dirt.

Various
Playback
Functions
led
{Automatic/manual
search
reverse
button)
>>
DppI
(Automatic/manuat
search
forward
button}
DENON
‘etscnn
comment
svéten-stunto
atcenven
PM
ALO
TECraCL
OGY
20AC
OBIT
8
Maes
OVER
Sas
P
(Play
button)
Quick
Search
-
Moving
to
the
Next
Track
During
Playback
Press
the
auto
search
forward
button
(
DP#).
Press
the
auto
search
reverse
button
(id).
e
The
disc
moves
forward
to
the
beginning
of
the
next
track
if
the
auto
search
forward
button
(PPI)
is
pressed
once,
to
the
beginning
of
the
second
track
after
the
current
track
if
the
auto
search
forward
button
(PPI)
is
pressed
twice,
and
so
on.
Press
the
Pb
DPI
(automatic/
manual
search
for-
ward)
button
to
perform
this
operation
from
the
main
unit.
During
Playback
e
The
disc
moves
forward
to
the
beginning
of
the
current
track
if
the
auto
search
reverse
button
(I¢q}
is
pressed
once,
to
the
beginning
of
the
previous
track
if
the
auto
search
reverse
button
(144)
is
pressed
twice,
and
so
on.
Press
the
K€
44
(automatic/manual
search
re-
verse)
button
to
perform
this
operation
from
the
main
unit.
Press
the
REPEAT
button
twice.
REPEAT
ALL
|is
displayed.
Skip
Monitor
-
Searching
for
Tracks
While
Listening
to
the
Sound
Use
this
function
to
skip
through
while
listening
to
the
sound.
This
functions
comes
in
handy
for
example
when
searching
for
a
certain
section
in
a
long
track.
©
After
finding
the
desired
position
with
the
skip
monitor
function,
simply
release
the
search
button
to
resume
normal
playback
e
After
the
last
track
is
played,
playback
starts
over
from
the
first
track.
e
The
all-track
repeat
mode
can
also
be
set
by
pressing
the
REPEAT
button
twice
during
playback.
@
The
program
repeat
mode
is
set
if
the
REPEAT
button
Press
the
Play
button
(b>)
is
pressed
during
programmed
playback.
to
start
playback.
REPEAT
TRACK
Jis
displayed.
If
nothing
else
is
done,
that
track
is
played
repeatedly.
Press
the
REPEAT
button
during
playback.
from
that
point.
During
piayback,
press
and
hold
in
the
manual
search
forward
button
(PP)
to
skip
forward
while
listening
to
the
sound.
[el
@
The
track
number
and
elapsed
playing
time
of
that
track
are
indicated
on
the
display.
©
if
the
end
of
the
last
track
on
the
disc
is
reached
while
pressing
the
search
button,
(
27)
appears
on
the
display
and
the
skip
monitor
operation
stops.
To
resume
playback,
press
the
manual
search
reverse
button
(€@)
until
(37)
switches
to
the
track
number,
then
perform
a
different
operation.
e
Press
and
hold
in
the
D>
DPI
(automatic/manual
search
forward)
button
to
perform
this
operation
from
the
main
unit.
Press
the
REPEAT
button
during
playback
or
before
starting
playback.
REPEAT
ALL
jis
displayed.
If
nothing
else
is
done,
all
tracks
are
played
repeatedly.
@
The
track
number
and
elapsed
playing
time
of
that
track
are
indicated
on
the
display.
REPEAT
A-_|is
displayed.
if
nothing
else
is
done,
that
track
is
played
repeatedly.
Press
the
REPEAT
button
during
playback.
This
section
is
played
repeatedly.
Press
the
REPEAT
button
during
playback.
REPEAT
A-B
|is
displayed.
The
A-B
section
is
played
repeatedly.
Normal
playback
resumes
if
the
REPEAT
button
is
pressed
again.
During
playback,
press
and
hoid
in
the
manual
search
reverse
button
{€4)
to
skip
backwards
while
listening
to
the
sound.
[a]
If
the
forward
or
reverse
search
button
is
pressed
during
programmed
playback
and
released
at
a
track
which
has
not
been
set
in
the
e
If
the
beginning
of
the
first
track
on
the
disc
is
reached
while
pressing
the
search
button,
(CC)
appears
on
the
display
and
the
skip
monitor
operation
stops.
To
resume
playback,
press
the
manual
search
forward
button
(PP)
until
(CC)
switches
to
the
track
number,
then
perform
a
different
operation.
e
Press
and
hold
in
the
t¢@
44
(automatic/manual
search
reverse)
button
to
perform
this
operation
from
the
main
unit.
program,
playback
of
the
next
programmed
track
begins
once
that
track
has
been
played
to
the
end.
15

Use
this
function
to
set
certain
tracks
to
play
in
any
order
you
want.
Example:
Programming
track
3
to
play
first,
track
5
to
play
second
16
Programmed
Playback
(remote
contro!
only}
CD
with
25
tracks
and
a
total
playing
time
of
41
minutes,
37
seconds
Press
the
PROGRAM
button
on
the
remote
control
unit.
Press
the
44
or
PPI
button
to
set
track
3,
Press
the
PROGRAM
button
on
the
remote
contro}
unit.
Press
the
I44
or
DPI
button
to
set
track
5.
Press
the
PROGRAM
button
on
the
remote
control
unit.
Press
the
>
(play)
button.
REMOTE
CONTROL
UNIT
e
Set
the
program
when
the
CD
player
is
in
the
stop
mode.
@
Programming
is
not
possible
when
the
CD
is
playing.
©
Tochange
the
track
number
continuously
in
step
4
above,
press
the
€4
or
PP
button.
TRACK
es
y
en
eh
PROGRAM
The
numbers
of
the
programmed
tracks
turn
off
once
the
tracks
are
played.
The
time
display
will
read
“—
—
M
—
—
S“
if
a
track
witha
number
of
31
or
greater
is
set
in
the
program.
With
this
set,
up
to
20
tracks
with
numbers
between
1
to
99
can
be
set
in
the
program.
If
you
attempt
to
set
a
track
number
greater
than
the
number
of
tracks
on
the
disc,
that
track
number
will
not
be
displayed
when
the
button
is
pressed.
Programming
is
also
possible
while
the
disc
tray
is
open.
In
this
case,
track
numbers
greater
than
the
number
of
tracks
on
the
disc
can
be
programmed,
but
these
are
ignored
when
the
disc
is
played.
No
sound
is
produced
for
4
seconds
between
tracks.
This
is
so
that
4-second
blanks
are
created
between
tracks
when
programmed
tracks
are
recorded
on
tapes.
e
The
entire
program
is
cleared
when
the
disc
tray
is
opened
or
closed
(by
pressing
the
@
button).
if
you
make
a
mistake
when
setting
the
program,
either
press
the
OPEN/CLOSE
key
or
the
STOP
key
twice
and
start
over.
Operations
possible
during
programmed
playback
The
quick
search,
pause
and
skip
monitor
functions
can
be
used
during
programmed
playback.
For
the
quick
search
function,
to
move
to
the
beginning
of
the
previous
track,
press
the
I¢@
button
once,
then
once
again
while
the
time
display
reads
"OO
MOOS".
To
move
to
the
beginning
of
the
following
track,
press
the
PPI
button
once,
regardless
of
the
time
display.

[3]
BEFORE
RECORDING
AND
PLAYBACK
i
Cautions
on
Handting
e
C-120
cassette
tapes
Avoid
using
120-minute
cassette
tapes,
as
they
have
extremely
thin
tape
which
tends
to
get
caught
on
the
capstans
or
pinch
rollers.
e
Tape
slack
If
the
tape
is
stack,
it
may
get
tangled
or
be
damaged.
Take
up
slack
with
a
pencil,
etc.,
before
loading
the
cassette.
BB
Protecting
Cassette
Tapes
From
Being
Erased
Accidentally
e
Cassette
tapes
are
equipped
with
accidental
erasure
prevention
tabs.
To
protect
recorded
tapes
from
being
erased
accidentally,
use
a
screwdriver,
etc.,
and
break
these
tabs
off.
e
To
record
on
a
cassette
tape
whose
accidental
erasure
prevention
tabs
have
been
broken
off,
place
a
piece
of
cellophane
tape
over
the
hole.
Accidental
erasure
prevention
tab
for
side
8
Accidental
erasure
prevention
tab
for
side
A
@
Cautions
on
Storing
e
Avaid
storing
in
the
following
places:
«Hot,
humid
places
+
Dusty
places
«Places
exposed
to
direct
sunlight
«Near
magnetic
forces
(TVs,
speakers,
etc.)
e
Store
the
cassette
tape
in
a
case
equipped
with
stoppers
to
keep
the
tape
from
coming
slack.
Using
the
Tape
Counter
e
Reset
the
counter
to
OOO0D
by
pressing
the
COUNTER
RESET
button.
e
The
counter
indicates
the
position
of
the
tape
for
the
deck
indicated
by
the
DECK
1
and
DECK
2
indicators.
@
Ifthe
playback
mode
is
set
directly
after
rewinding
the
tape
in
the
recording
or
playback
mode,
the
indication
on
the
tape
counter
may
differ
slightly
from
the
indication
when
recording
or
playback
was
actuaily
started.
To
avoid
this,
set
the
deck
to
the
stop
mode
first
before
setting
the
playback
mode
after
rewinding
the
tape.
Auto
Tape
Selector
Mechanism
This
deck
is
equipped
with
an
auto
tape
selector
mechanism
which
uses
the
detection
holes
in
the
cassette
halves
to
automatically
set
the
recording
bias
and
equalization
best
suited
for
that
type
of
tape.
@
Do
not
use
ferrichrome
tapes.
e
Use
metal
tapes
equipped
with
detection
holes.
Accidental
erasure
prevention
tabs
Detection
holes
Detection
holes
Metal
tape
Chrome
tape
NOTES
e
Set
the
cassette
tape
with
the
exposed
side
facing
the
inside
of
the
set.
Setting
the
cassette
tape
in
the
other
direction
can
damage
the
set.
®
Do
not
press
the
OPEN/CLOSE
button
during
playback
or
recording.
Always
press
the
stop
button
before
pressing
the
OPEN/CLOSE
button.
Common
for
Deck
Deck
2
e
Loading
@
Press
the
OPEN/CLOSE
button
()
to
open
the
cassette
tray.
@
Set
the
tape
in
the
cassette
tray
with
the
open
side
(on
which
tape
is
exposed)
facing
away
from
you.
@
Press
the
OPEN/CLOSE
button
again
to
close
the
tray.
e
Unioading
@
Press
the
STOP
button
(MM).
(Deck
1
or
Deck
2)
@
Press
the
OPEN/CLOSE
(4)
button
to
open
the
cassette
tray.
@
Remove
the
cassette
tape.
Check
the
following
before
recording
or
playing
cassette
tapes:
The
sound
quality
will
be
poor
if
the
head
is
dirty.
Refer
to
Page
25.
1.
Is
the
head
dirty?
«0...
css.
sete
2.
Are
the
accidental
erasure
prevention
tabs
DrOkON
OFF?
......esseseseeesversensenesnssenensssesssensesseesneesees
Recording
is
not
possible
if
the
accidental
erasure
prevention
tabs
broken
off...
Refer
to
Page
17.
17

TRS
See
This
deck
is
equipped
with
an
auto
reverse
mechanism,
so
cassette
tapes
can
be
played
and
recorded
on
both
sides
or
played
continuously
without
having
to
turn
them
over.
I
Direction
of
tape
travel
This
deck
has
two
play
buttons,
one
for
the
forward
direction
(front
side)
and
another
for
the
reverse
direction
(back
sida).
The
side
being
played
can
be
changed
during
playback
by
Playback
on
back
side
pressing
the
opposite
play
button.
(Side
which
is
visible
when
loaded
in
cassette
tray.)
W@
Reverse
mode
Set
the
reverse
mode
switch
(REV.
MODE)
as
follows:
@
Single-side
recording/playback
mode
{
=—
)
In
this
position,
only
the
front
side
or
the
back
side
of
the
Seat
frown
(O>)
ines
[eS
ihine
aise
cassette
tape
is
played
or
recorded.
(The
tape
stops
automatically
when
the
end
of
that side
is
reached.)
mel
©
Double-side
(reverse)
recording/
playback
mode
(
—>
)
Auto
stop
(23)
2
an
en
[eS
oh
a
In
this
position,
when
the
end
of
the
front
side
is
reached,
recording
or
playback
automatically
switches
to
the
back
i
i
i-
Start
from
side
and
continues
from
there.
(The
tape
stops
automati
Stan
fron
(2>|
a
es
[eS
=
leverse
cally
when
the
end
of
the
back
side
is
reached.)
Auto
stop
(@>)
ess
es
oe
[e9)
ead
*
If
you
start
playing
or
recording
from
the
back
side,
the
tape
will
stop
automatically
at
the
end
of
the
back
side.
@
Continuous
mode
(
C>
}
c™
xy
om
me
(PO)
‘ . .
Reverse
Reverse
Playback
continues
until
the
STOP
button
is
pressed,
but
J
stops
automatically
after
both
sides
have
been
played
five
=m(O>)
=
a
ms
times,
*
The
reverse
recording/playback
mode
{
=>
)
is
set
automatically
during
recording.
e
Relay
playback
mode
Deck
1
When
tapes
are
loaded
in
both
decks
Start
rom(@
9)
Playback
continues
from
deck
1
onto
deck
2,
as
shown
on
r
front
side
the
diagram
at
the
right.
I
-
@
Lf
Deck
2
!
Lm
(05)
mm
(Olay
(@:)
Reverse
Ln
os
Cet
nu“
18
[dl
PLAYIN
G
C.
ASSETTE
T
APES
{Single
Side
Playback,
Double
Side
Playback
and
Continuous
Playback)
DENON
stesone
commonant
srartessteaco
cAsserit
rare
orci
@
For
both
Deck
1
and
Deck
2
@
When
operating
from
the
remote
control
unit,
operation
switches
between
Deck
1
and
Deck
2
each
time
the
DECK
1/2
button
is
pressed.
The
indicator
for
the
selected
deck
(DECK
1
or
DECK
2)
lights.
Press
the
OPEN/CLOSE,
and
toad
a
recorded
tape
into
the
tray.
Refer
to
Page
17.
Singie
side
playback
Double
side
playback
Continuous
playback
Set
the
reverse
mode
selector.
ary
Laos
Refer
to
Page
8.
DOLBY
NR
ON.
OFF
Set
the
Dolby
NR
seiector.
Cito
Set the
selector
to
“ON”
for
Refer
to
Page
8.
tapes
recorded
in
Dolby
NR.
Playback
begins
in
the
direc-
Press
the
play
button
(>
or
4).
tion
of
the
button
which
was
pressed.
Press
the
ll
button
to
stop
playback.
These
operations
can
be
performed
from
the
remote
contro!
unit
once
tapes
are
loaded.
Operations
marked
[R]
can
also
be
performed
using
the
remote
control
unit.

e
Use
this
function
to
move
to
the
beginning
of
the
following
selection
or
return
to
the
beginning
of
the
current
selection.
{For
both
Deck
1
and
Deck
2)
e
There
must
be
blank
spaces
of
at
least
4
seconds
between
the
selections
on
the
tape
for
the
search
function
to
work.
e
In
the
rewind
direction,
playback
starts
from
the
beginning
of
the
selection
which
is
currently
playing,
and
in
the
fast-forward
direction,
playback
starts
from
the
beginning
of
the
following
selection.
For the
normal
fast-forward
or
rewind
operations,
press
the
iJ
stop
button
before
pressing
the
PP
or
44
button.
The
tape
skips
by
a
number
of
selections
equal
to
the
number
of
times
the
PP
or
€@
button
is
pressed.
For
example:
ie
it
PLAY
D>
DD D>
Press
>
or
¢
Press
DP
or
44
Operations
marked
[R]
can
also
be
performed
using
the
remote
control
unit.
Display
During
the
Music
Search
Operation
During
the
music
search
operation,
the
number
of
selections
being
skipped
is
indicated
on
the
tape
counter,
and
this
number
decreases
each time
a
blank
section
is
detected
(for
example,
3
-
2
—
1).
e
When
skipping
back
to
a
previous
selection
@
When
skipping
ahead
to
a
following
selection
P
QS
Number
of
tracks
to
be
skipped
——--—Number
of
tracks
to
be
skipped
This
lights
when
skipping
backwards
fa]
CONVENIENT
FUNCTIONS
This
set
includes
preset
equalizer
settings
which
can
be
selected
according
to
the
type
of
music
or
application.
There
are
six
preset
equalizer
modes
which
can
be
called
out
easily
either
on
the
main
unit
or
from
the
remote
control
unit.
In
addition,
these
moces
are
indicated
on
the
receiver's
display.
SDB:
Use
this
mode
to
create
a
more
powerful
bass
sound.
FLAT:Use
this
mode
for
straight,
pure
sound.
DISCO:
VOCAL:
Use
this
mode
for
strengly
modulated
sound.
Use
this
mode
to
create
glossy
vocals.
ROCK:
Use
this
mode
for
powerful
sound.
BGM:
Use
this
mode
for
easy
tistening.
USING
THE
TIMER
@
Notes
on
Setting
the
Timer
e
Always
set
the
current
time
beforehand.
e
Be
sure
to
preset
radio
stations
before
setting
the
timer.
(Refer
to
“Presetting
AM
and
FM
Stations”
on
Page
12.}
e
Turn
the
standby
switch
off
when
not
using
the
timer.
I
Types
of
Timers:
TIMER:
This
can
be
used
to
turn
the
power
on
and
off
at
the
same
time
each
day.
(“Good
morning
music”)
SLEEP
TIMER:
This
can
be
used
to
set
the
power
to
turn
off
in
intervais
of
10
minutes
between
60
and
10
minutes,
using
the
remote
con-
trol
unit.
(“Good
night
music”)
ff
there
should
be
a
power
failure
or
if
the
power
cord
should
be
unplugged
from
the
power
outlet,
“00:00"
or
the
time
at
which
the
power
failed
flashes
on
the
time
display.
If
this
happens,
reset
the
current
time.
(Reset
the
current
time
and
timer
settings.)
To
check
the
timer
settings,
turn
the
receiver's
power
on
then
press
the
timer
button.
Next,
press
the
ENTER/NEXT
button
repeatedly
to
display
the
following:
Timer
start
mode
—
reception
band,
preset
channel
number
and
timer
on
time
—
timer
off
time.
Press
the
ENTER/NEXT
button
once
again
to
return
to
the
frequency
display.
If
the
timer
on
or
off
times
are
not
set,
“00:00”
flashes
and
the
display
does
not
switch
to
the
next
step.
Changing
the
Timer
Settings
When
timer
setting
operations
are
repeated,
the old
timer
settings
are
cleared
and
the
new
ones
are
set.
Clearing
the
Timer
Settings
Press
the
TIMER
key
once,
then
press
it
again
while
“FU
NC”
is
displayed
to
clear
the
timer
settings.
Cautions
on
Setting
the
Timer
The
timer
settings
are
given
priority,
so
when
the
timer
on
time
is
reached,
the
function
switches
to
that
function
set
for
the
timer.
19

PERSONAL
COMPONENT
SYSTEM
STEREG
RECENTER
0-68
ENTER/NEXT
button
TIMER
button
STANDBY
button
POWER
ON/STANDBY
button
Example:
Setting
the
timer
to
turn
on
at
12:35
and
off
at
12:56
Tuner
(FM
102.50
MHz
set
at
preset
number
73”)
Press
the
POWER
ON/
POWER
STANDBY
button
to
turn
ON/STANDBY
the
power
on.
Press
the
TIMER
button,
TIMER
TUNING
uP
Press
the
UP
and
DOWN
buttons
to
display
“TUNER:”.
Press
the
ENTER/NEXT
buttons.
ENTER/
NEXT
TUNING
Press
the
UP
and
DOWN
buttons
to
set
the
DOWN
ve
preset
number.
Press
the
ENTER/NEXT
OD
U
buttons.
NEXT
20
ay
Use
the
UP
and
DOWN
buttons
to
set
hour
at
which
UP
and
DOWN
buttons
5
z
the
timer
is
to
turn
on.
Press
the
ENTER/NEXT
button.
AUTO
MONO.
TUNING
Use
the
UP
and
DOWN
buttons
to
set
minutes
at
which
the
timer
is
to
turn
on.
mans
(]}
ons)
Press
the
ENTER/NEXT
button.
Use
the
UP
and
DOWN
buttons
to
set
hour
at
which
the
timer
is
to
turn
on.
Press
the
ENTER/NEXT
button.
ENTER
NEXT
Use
the
UP
and
DOWN
buttons
to
set
minutes
at
which
the
timer
is
to
turn
on.
TUNING
uP
Press
the
ENTER/NEXT
wen
Ff
button,
aurowoso
«=
FLAT
Press
the
STANDBY
c=
omen
Fit
10
2.5
Que
button.
STANDBY
AUTO
MONO
F
LA
T
Press
the
POWER
ON/
POWER
STANDBY
button.
ON/STANDBY
xy
102.5
Om
NVA
TANYA
AN
IN
ZIN
ee
ee
ee
ee
Press
the
POWER
ON/STANDBY
button.
When
the
STANDBY
button
is
pressed
and
the
“
©
”
mark
is
lit,
the
timer
will
function
at
the
same
times
each
day,
To
turn
the
timer
off,
press
the
STANDBY
button
to
turn
the
“
(Q
*
mark
off.

Example:
Waking
up
to
the
music
of
a
compact
disc
Press
the
receiver's
POWER
ON/STANDBY
button
ta
turn
the
power
on.
POWER
ON/STANDBY
OPEN/CLOSE
Press
the
CD
player's
OPEN/CLOSE
button
to
open
the
disc
tray.
[8]
Load
the
CD
in
the
disc
tray.
Refer
to
Page
13.
OPEN/CLOSE
Press
the
CD
player's
OPEN/CLOSE
button
again
to
close
the
disc
tray.
Press
the
receiver's
TIMER
buttons.
TUNING
Use
the
receiver's
UP
and
DOWN
uP
DOWN
buttons
to
display
“Cb*.
Foliow
steps
6
to
16
under
“Setting
the
Timer”
on
Page
20.
Operations
marked
[R]
can
also
be
performed
using
the
remote
controi
unit.
Example:
Waking
up
to
the
music
of
a
cassette
tape
Press
the
receiver's
POWER
ON/STANDBY
button
to
POWER
turn
the
power
on.
oy
Press
the
cassette
deck’s
.
OPEN/CLOSE
button
to
fy
open
the
tray.
@&
OPEN/CLOSE
fa]
Load
the
cassette
tape
in
the
tray.
Refer
to
Page
17.
Press
the
cassette
deck’s
OPEN/CLOSE
button
again
=
to
close
the
tray.
&
OPEN/CLOSE
a]
Press
the
receiver's
TIMER
buttons.
Use
the
receiver's
UP
and
DOWN
buttons
to
display
“TAPE”.
Follow
steps
6
to
16
under
“Setting
the
Timer”
on
Page
20.
The
tape
will
be
played
in
the
direction
indicated
by
the
tape
direction
indicators.
Check
that
the
tape
direction
and
reverse
mode
settings
are
as
desired.
(Refer
to
“Using
the
Auto
Reverse
Function”
on
Page
18.)
@
When
using
the
timer,
the
tape
is
played
in
direction
indicated
for
Deck
2.
Operations
marked
[R]can
also
be
performed
using
the
remote
control
unit.
21

Example:
Setting
the
power
to
turn
off
in
30
minutes
(remote
contro!
only}
Currently
receiving
FM
87.50
MHz
Press
the
SLEEP
button.
Press
the
SLEEP
button
3
times
successively.
The
originai
display
reappears
after
5
seconds.
To
cancel
the
sieep
timer:
f3]
RECORDING
CASSETTE
TAPES
DENOON
-tesone:
comonsnr
srermustinto
CASSErre
fant
0€0r
AUTO
MONO
e
Check
that
the
accidental
erasure
prevention
tabs
on
the
tape
onto
which
you
want
to
record
are
intact.
Recording
is
not
possible
if
the
accidental
erasure
prevention
tabs
are
broken
off.
Refer
to
Page
17.
Press
the
OPEN/CLOSE
button
for
Deck
2
and
load
the
tape
onto
which
you
want
to
record.
———
Refer
to
Page
17.
&
OPEN/CLOSE
One-side
recording
Two-side
(reverse)
recording
Set
the
reverse
mode
selector.
Refer
to
Page
8.
REV
IMODE
=—_
5
eeigi
Set
the
DOLBY
NR
selector.
eon,
Set
to
the
“ON”
position
to
Refer
to
Page
8.
record
in
Dolby
NR.
FM
AUTO
MONO
Press
the
SLEEP
button
repeatedly
until
the
display
reads
“0”.
The
power
turns
off.
Now
press
the
POWER
switch
to
turn
the
power
back
on.
NOTES
if
the
sleep
timer
is
set
to
turn
the
power
off
before
the
timer
off
time,
the
sieep
timer
is
given
priority,
and
the
power
turns
O
off
when
the
sleep
timer
time
is
reached.
Do
not
press
the
TIMER
STANDBY
button
after
the
power
has
been
turned
on
with
the
timer.
If
this
is
done,
the
timer
will
not
function
property.
Press
the
receiver's
band
Press
the
receiver's
FUNCTION
button
Set
the
disc
in
the
selector
button.
and
select
PHONO
or
LINE.
CD
player.
Refer
to
Page
13.
BAND
FUNCTION
SY
On
Select
the
station
you
want
to
record.
Start
playback
on
the
VDP
or
VCR.
e
ifthe
same
time
is
set
for
the
on
time
and
off
time,
the
power
will
not
turn
on
even
if
the
standby
indicator
is
on.
IR]
if
the
timer
is
set
for
an
AM
or
FM
station
and
the
timer
on
time
is
reached
while
listening
to
another
station,
the
station
switches
to
the
station
which
was
set
with
the
timer.
22
Press
the
CD
SRS
button.
:
1
1
°
‘
Press
the
REC/REC
MUTE
button.
REC/REC
MUTE
:
2.
[R]
'
CD
SAS
'
,
The
recording
indicator
lights.
;
The
recording
indicator
|
lights
and
recording
starts.
Press
the
play
button
(>
or
4).
(Recording
starts)
The
recording
indicator
lights.
Table of contents
Other Denon Stereo System manuals

Denon
Denon S-52 Administrator guide

Denon
Denon ADV-M71 User manual

Denon
Denon D-M38 Dimensions

Denon
Denon HEOS Amp User manual

Denon
Denon D-AJ03 User manual

Denon
Denon UPO-250 User manual

Denon
Denon S-32 User manual

Denon
Denon D-F100MC User manual

Denon
Denon CEOL carino User manual

Denon
Denon S-52 User manual