Denon AH-C820W User manual

Preparation
Unpacking 4
Features 5
Wireless 5
Sound quality 5
Comfort 5
Features and functions 6
Charging / Battery status 7
Wearing 10
Switching Audio Guidance 11
Turning the vibration function on and off 13
Connections
Bluetooth operation 14
Pairing 14
Connecting 14
1: Connecting to the headphones for the first time 15
2: Reconnecting paired devices 17
Connecting to a computer via USB 18
Operation
Listening to music 19
Listening to music using a Bluetooth device 19
Listening to music on a computer via USB 20
Conducting phone calls 22
Making a call 22
Answering an incoming call 22
Ending a call 22
Using the call waiting function 23
Ignoring an incoming call 23
Switching a call from the headphones to a mobile phone 23
Other operations 24
Turning the power off 24
Information 25
Replacing the ear tips 25
Audio Playback and Phone Calls on a Bluetooth Device 26
Deleting pairing information 26
Contents Preparation Connections Operation
Troubleshooting
Appendix
Contents
2

Troubleshooting
Troubleshooting 27
Power does not turn on 27
The device cannot be charged 27
No sound comes out 28
Sound is distorted, noisy, or cuts in and out 28
Cannot play media using Bluetooth 29
Cannot make a phone call 30
Appendix
Precautions for Use 31
Disposal of these headphones 32
Trademark information 32
Specifications 33
Contents Preparation Connections Operation
Troubleshooting
Appendix
3

Thank you for purchasing this product.
To ensure proper operation, please read this Owner’s Manual carefully before using the product.
Unpacking
Check that all of these are present before using this device.
.
Quick Start Guide Safety Instructions USB cable
(Micro-B connector,
approximately 1.3 m)
Ear tips
(L/M/S/LONG M/LONG S)
Carrying case
Contents Preparation Connections Operation
Troubleshooting
Appendix
Preparation
4

Features
Wireless
0You can enjoy listening to music wirelessly by connecting these
headphones to your Bluetooth device. Playback operations and
volume adjustment can be performed for the paired audio device
using the headphones.
0You can also make hands-free phone calls by pairing these
headphones to a Bluetooth compatible mobile phone. Equipped
with Qualcomm® cVcTM technology that suppresses echoes,
enabling low-noise phone calls.
Sound quality
0Two 11.5 mm dynamic drivers are placed parallel to each other
for each channel. This creates double the diaphragm area,
achieving exceptional volume and powerful sound quality for
even the deepest bass zone.
0These headphones are compatible with a wide range of codecs,
including the high sound quality codecs aptX, AAC and SBC.
These headphones automatically select the optimum compatible
codec for your Bluetooth device (smartphone or tablet) so you
can enjoy high-grade wireless sound. Additionally, aptX is Low
Latency compatible so you can enjoy videos and gaming without
audio lag.
Comfort
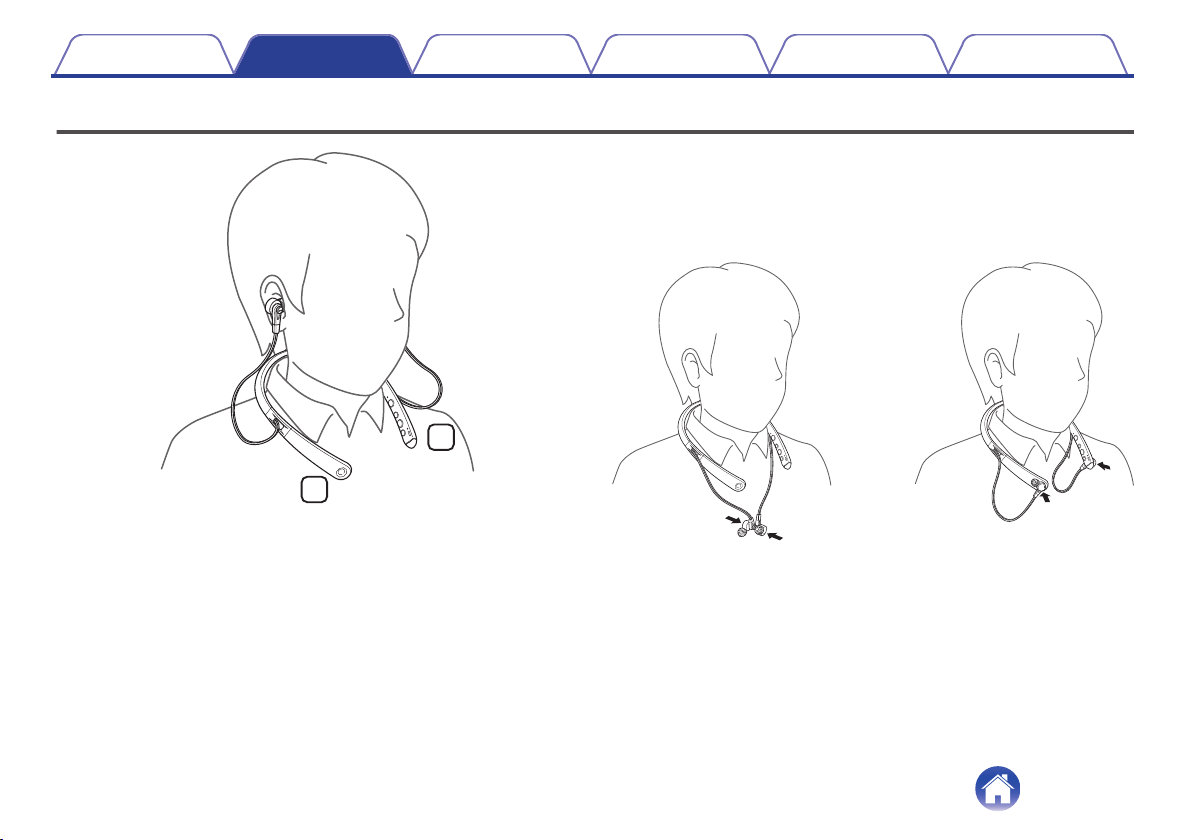
0A neckband format is used, with parts such as the battery and
control buttons located on the ends of the neckband. The
earphones are designed not to come out easily, enabling use for
long periods.
0Choose between silicone ear tips in five different sizes and
ComplyTM foam ear tips made from low repulsion foam to get just
the right fit for your ears.
0Audio and vibration can be used to indicate the status and
controls of the headphones.
Contents Preparation Connections Operation
Troubleshooting
Appendix
5

Features and functions
.
R
L
eq rt y i
Q1oQ0
uw w
ANeckband
BHousing
The housing of the earphones contains magnets. This allows you to join
the earphones together or attach them to the neckband when you are
not using the headphones. (v p. 10)
CEar tips
The ComplyTM foam ear tips are attached at the time of purchase.
Replace them with any of the accessory ear tips to match your
preference. (v p. 25)
DBluetooth LED
EPower button (X)
0Indicates the remaining battery power. (v p. 8)
0Pairs the headphones with Bluetooth devices. (v p. 15)
0Connects to Bluetooth devices. (v p. 17)
0Turns the power off. (v p. 24)
FControl button (1 3)
Performs playback and phone operations.
0“Listening to music” (v p. 19)
0“Conducting phone calls” (v p. 22)
GCall microphones
HCharging LED
IVolume buttons (+/–) (v p. 20)
JUSB port (Micro-B)
KUSB port cover
Contents Preparation Connections Operation
Troubleshooting
Appendix
6

Charging / Battery status
Connect the headphones to a computer or USB AC adapter (sold
separately) using the supplied dedicated USB cable to charge the battery.
.
L
R
PC
or
USB AC
adapter
USB cable (supplied)
The charging status can be checked from the charging LED on
headphones.
Charging status Color of charging LED
Charging
.
Fully charged
.
Contents Preparation Connections Operation
Troubleshooting
Appendix
7

0When using the headphones for the first time after purchase or when the
remaining power of the rechargeable battery is low, charge the battery.
0The headphones can be used for approximately 10 hours of music playback when
fully charged.
0It takes approximately 2 hours to fully charge the rechargeable battery from the
state of no remaining battery power.
0When the USB cable is connected to this device, the headphones disconnect from
Bluetooth and enter charging mode. Reconnect to Bluetooth to start Bluetooth
playback again. (v p. 14)
0The usable time of the headphones differs depending on the temperature of the
environment in which they are used and method of use.
NOTE
0When connecting the USB cable to the USB port, be sure to match the cable
connector with the shape of the socket. Forcing the connector into the socket will
cause damage.
0The rating of the charging output should be DC 5 V, 2.4 A or less.
oChecking the remaining battery power
The remaining power of the rechargeable battery can be checked from
the number of alert sounds or audio guidance. It can also be checked
from the number of times the charging LED flashes. Press and hold the
X button for approximately 2 seconds to turn the power on. If a call is
not in progress, press and release the X button.
.
L
Number of alert
sounds
Number of times the
charging LED flashes
Remaining time of
rechargeable battery
Four times Four times Approx. 10 hours
Three times Three times Approx. 5 hours
Twice Twice Approx. 3 hours
Once Once Less than 1 hours
Contents Preparation Connections Operation
Troubleshooting
Appendix
8

0When the remaining power of the rechargeable battery is running low, the charging
LED flashes at approximately 3-second intervals together with an alert sound.
0
You can also check the remaining power of the rechargeable battery on an iPhone. (*)
zThe remaining power of the rechargeable battery can be displayed as a
percentage (%) on an iPhone, but this number is an approximate value.
Contents Preparation Connections Operation
Troubleshooting
Appendix
9

Wearing
.
R
L
oWhen you are not using the headphones
The housing and neckband of the headphones contain magnets.
When you are not using the headphones, you can join the left and right
earphones together as shown in the figure below, reducing the hassle
caused by dangling cables.
.
R
Contents Preparation Connections Operation
Troubleshooting
Appendix
10

Switching Audio Guidance
You will be notified when an operation has been correctly completed via the audio guidance or an alert sound.
You can switch to audio guidance in your preferred language or use only an alert sound for guidance.
1Connect the headphones and Bluetooth device using
Bluetooth. (v p. 14)
2Press and hold the 1 3 button and volume “+” button
together for approximately 2 seconds.
The options switch between the audio guidance languages or only
alert sounds in the following order while the buttons are pressed.
English / Japanese / German / French / Italian / Spanish /
Chinese / Alert sounds (Default: English)
.
L
2sec.
3Release the buttons when the options have switched to
your desired setting.
This commits the audio guidance setting.
Contents Preparation Connections Operation
Troubleshooting
Appendix
11

oAdjusting the audio guidance volume
The audio guidance volume can be adjusted between 3 levels.
1Press and hold the volume “+” button and volume “-”
button together for approximately 2 seconds.
An alert sound is heard and the audio guidance volume changes in
the following order. Repeat step 1 until the desired volume is
selected.
Medium / High / Low(Default: Medium)
.
L
2sec.
Contents Preparation Connections Operation
Troubleshooting
Appendix
12

Turning the vibration function on and off
The vibration function makes the neckband vibrate as an alert when some operations are performed correctly.
The vibration function can be turned on or off according to your preference.
1Connect the headphones and Bluetooth device using
Bluetooth. (v p. 14)
2Press and hold the 1 3 button and volume “-” button
together for approximately 2 seconds.
An alert sound is heard and the vibration function turns off. Repeat
step 2 to turn this function on.
.
L
2sec.
Headphones operation/status Vibration pattern
Power on Vibrates once
Power off Vibrates once
Entering pairing mode Vibrates twice
Completion of Bluetooth connection Vibrates three times
Turning vibration function on Vibrates twice
Incoming call
Vibrates for approximately 1 second
(repeatedly throughout the incoming
call signal)
Contents Preparation Connections Operation
Troubleshooting
Appendix
13

Bluetooth operation
You can enjoy listening to music wirelessly by connecting the headphones to your Bluetooth device.
Pairing
Pairing (registration) is an operation that is required in order to connect a
Bluetooth device to the headphones. When using Bluetooth for the first
time, you need to pair the headphones and your Bluetooth device so they
can communicate with each other. Once a Bluetooth device has been
paired with your headphones, pairing does not need to be performed
again for future Bluetooth connections with that device.
0Pairing needs to be done again in the following cases.
0When 9 or more devices have been paired with the headphones
These headphones can store pairing information from a maximum of 8 devices.
When 9 or more devices are paired, the new pairing information overwrites the
oldest pairing information in order from the oldest information onwards.
0Multiple Bluetooth devices cannot be played back at the same time.
Connecting
There are two methods for connecting with Bluetooth devices:
1Connecting to the headphones for the first time
(v p. 15)
2Reconnecting paired devices (v p. 17)
Contents Preparation Connections Operation
Troubleshooting
Appendix
Connections
14

1: Connecting to the headphones for
the first time
Check that the headphones are not connected to any Bluetooth device
before pairing.
1Turn on the Bluetooth function of your mobile device.
0For details, see the Owner’s Manual of the Bluetooth device that
you want to connect.
.
2Press and hold the X button for approximately 4
seconds while the headphones are powered off.
The Bluetooth LED lights and then blinks in approximately 1-second
intervals as the headphones enter pairing mode.
0If the vibration function is on, the neckband vibrates twice when
the headphones enter pairing mode. (v p. 13)
.
L
4sec.
0The power of the headphones turns on after pressing and holding the X
button for approximately 2 seconds. Continue pressing the button.
0If the Bluetooth LED does not light even when the X button is pressed, the
rechargeable battery has no power remaining. Charge the battery.
(v p. 7)
Contents Preparation Connections Operation
Troubleshooting
Appendix
15

3Select “DENON AH-C820W” from the list of devices
displayed on the screen of your Bluetooth device.
When pairing is completed and the Bluetooth connection is
established, the Bluetooth LED lights for approximately 2.5 seconds.
0If the vibration function is on, the neckband vibrates three times
when the Bluetooth connection is established. (v p. 13)
.
DENON AH-C820W
4Playing back music on the Bluetooth device.
Music played back on the connected Bluetooth device is output from
the headphones.
0If the power is on, press and hold the X button for approximately 4 seconds to turn
the power off before pairing.
0The headphones pairing mode is canceled if pairing is not completed within 3
minutes. In this case, press and hold the X button for approximately 4 seconds to
turn the power off and then pair the devices again.
0If you are requested to enter a PIN code (pass key), enter “0000” (four zeros).
Contents Preparation Connections Operation
Troubleshooting
Appendix
16

2: Reconnecting paired devices
Check that the headphones are not connected to any Bluetooth device
before connecting.
1Turn on the Bluetooth function of your mobile device.
0For details, see the Owner’s Manual of the Bluetooth device that
you want to connect.
.
2Press and hold the X button for approximately 2
seconds while the headphones are powered off.
The Bluetooth LED flashes for approximately 1.5 seconds and the
headphones power on before automatically connecting to the
Bluetooth device.
0When the Bluetooth connection is established, the Bluetooth LED
lights for approximately 2.5 seconds.
0If the vibration function is on, the neckband vibrates once when
the power turns on and three times when the Bluetooth
connection is established. (v p. 13)
.
L
2sec.
0If the Bluetooth connection is not made automatically, select “DENON AH-
C820W” from the list of devices displayed on the screen of your Bluetooth
device.
Contents Preparation Connections Operation
Troubleshooting
Appendix
17

3Playing back music on the Bluetooth device.
Music played back on the connected Bluetooth device is output from
the headphones.
Connecting to a computer via USB
Audio data on a computer can be played through the headphones by
inserting the USB cable (supplied) in the USB port of the headphones and
connecting them to the computer. (v p. 20)
.
L
R
PC
USB cable (supplied)
0The headphones automatically start charging when they are connected to a
computer.
Contents Preparation Connections Operation
Troubleshooting
Appendix
18

Listening to music
Listening to music using a Bluetooth
device
First check that the headphones and Bluetooth device are connected via
Bluetooth. (v p. 14)
Playback operations can be performed from both the Bluetooth device and
headphones. Here we will explain the operations using the buttons on the
headphones.
Playback/pause
Press the 1 3 button once.
0The Bluetooth LED flashes in 5-second intervals during playback.
.
L
Select track
Next track: Press the 1 3 button twice.
.
L
×2
Previous track: Press the 1 3 button 3 times.
.
L
×3
Contents Preparation Connections Operation
Troubleshooting
Appendix
Operation
19

Volume adjustment
Increase volume: Press the volume “+” button.
Decrease volume: Press the volume “-” button.
0An alert sound is heard when the maximum or minimum volume is
reached.
.
L
Listening to music on a computer via
USB
First check that the headphones and computer are connected via USB.
(v p. 18)
oFor Windows OS
1Click “Start” on the computer screen and then click
“Control Panel”.
This displays the Control Panel settings list.
2Click “Sound”.
This displays the Sound menu screen.
3In the “Playback” tab, make sure that “Default Device”
is checked for “AH-C820W”.
0If it is checked for another device, select “AH-C820W” and click
“Set Default”.
4Play the music in the player software on your
computer.
The music being played is output through the headphones.
Contents Preparation Connections Operation
Troubleshooting
Appendix
20
Other manuals for AH-C820W
1
Table of contents
Other Denon Wireless Headphones manuals

Denon
Denon AH-C830NCW User manual

Denon
Denon GLOBE CRUISER AH-NCW500 User manual

Denon
Denon AH-GC30 User manual

Denon
Denon AH-C160W User manual

Denon
Denon AHGC25WB User manual

Denon
Denon AH-GC20 User manual

Denon
Denon AH-GC25W User manual

Denon
Denon AH-C630W User manual

Denon
Denon AH-GC30 User manual

Denon
Denon AH-C630W User manual