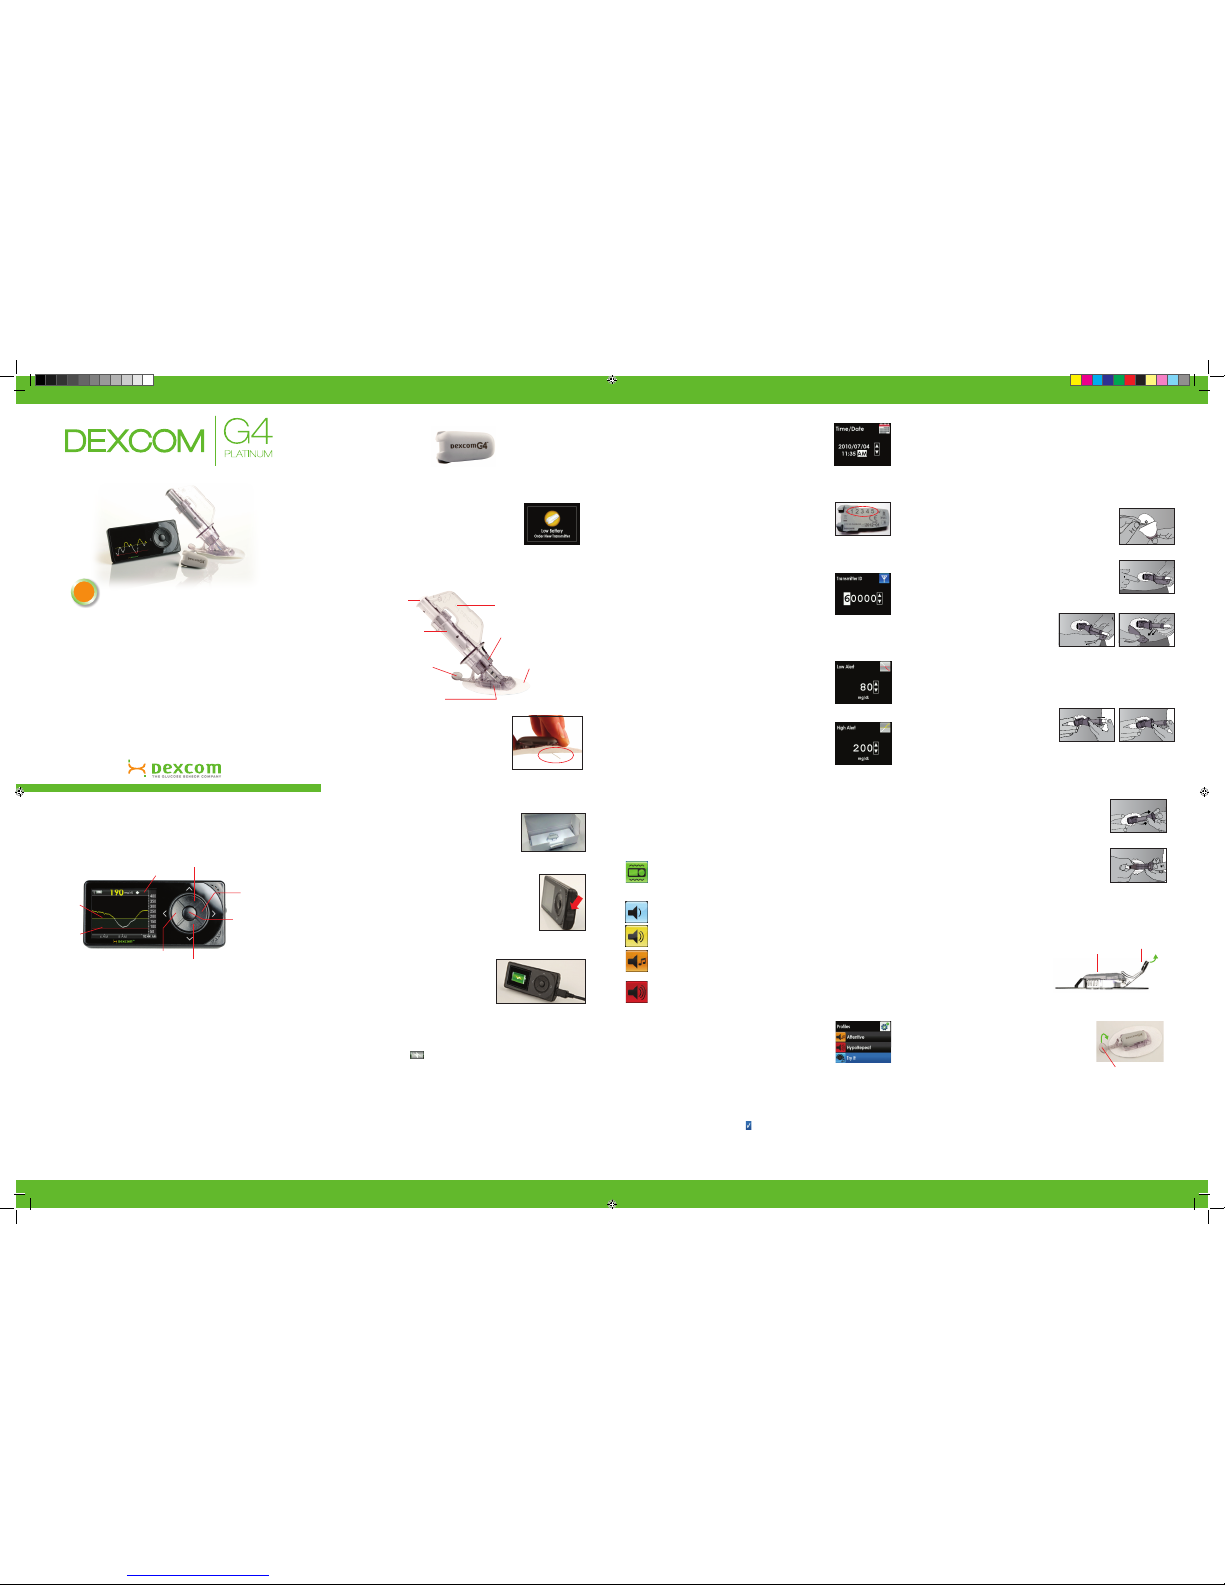
Receiver Display
Youwillseethisscreenwhenyouturnonyourreceiverduringasensorsession
NOTE: Sensor glucose readings above your High Alert setting are yellow. Sensor glucose
readings below your Low Alert setting are red. Sensor glucose readings in target are white.
Step 5
Starting Your Sensor Session
Onceyouhaveinsertedthesensorandattachedthetransmitter,you
need to start the sensor session on your receiver.
a. Fromanytrendgraph,presstheSELECT button
togettotheMainMenu.
b. Press the DOWNbuttontohighlightStartSensor.
Press the SELECTbutton.StartSensorScreen
willletyouknowyoursensor2-hourstartup
periodhasbegun.
c. Checkyourreceiver10minutesafterstarting
your sensor session to make sure your
receiverandtransmitterarecommunicating.
Theantennasymbol( ) should be in the
upperleftcornerofthetrendgraph.IftheOutofRangesymbol
()showsintheupperrightcornerofthetrendgraphinstead,
seetheUser’sGuideformoreinformation.
d. A2-hourcountdownsymbolwillshowonthereceivertrend
screenandwillllinduringthe2-hourstartupperiod.
NOTE: After starting a new sensor session, you will not receive
sensor glucose readings or alerts until your 2-hour startup period
has ended and you have completed your initial calibrations.
[0-24
minutes]
[24-48
minutes]
[72-96
minutes]
Ready for
calibration
[48-72
minutes]
Start
Step 6
Calibrating
YouneedtouseyourbloodglucosemetertocalibrateyourDexcomG4
PLATINUMSystem.Attheendofthe2-hourstartupperiod,youmust
entertwocalibrationsbeforeanysensorglucosereadingswillshow.
Calibrationbloodglucosevaluesneedtobeenteredintothereceiver
within5minutesoftestingwithyourbloodglucosemeter.
Startup Calibration:
a. Afterthe2-hourstartupperiod,adoubleblood
drop prompt will show on the receiver screen.
Press the SELECT button to clear this alert.
b. Wash and dry your hands.
c. Takeangerstickbloodglucose
measurementusingyourbloodglucose
meter.
d. Fromanytrendgraph,presstheSELECT buttontogettotheMain
Menu.
e. Press the DOWNbuttontohighlightEnterBG.PresstheSELECT
button.
f. Forthestartupcalibration,thedefaultbloodglucosevalueonthe
receiveris120mg/dL.PresstheUP and DOWN buttons to enter
theexactbloodglucosevaluefromyourbloodglucosemeter.
Press the SELECT button.
g. PresstheSELECTbuttonagaintoacceptthecalibration.
h. Repeatstepsc-gtoenterasecondbloodglucosevalue.
Calibration Update:
Asingleblooddroppromptwillappearonthereceiver
screen to let you know a calibration update is needed.
Toconrmthisprompt,pressSELECT.
Afteryourstartupcalibration,calibrationupdatesmust
beenteredonceevery12hoursataminimum.
NOTE: Calibrating less than the recommended amount may
result in inaccurate sensor glucose readings. You can enter more
calibrations each day if you want. See the Dexcom G4 PLATINUM
System User’s Guide for more details on calibrating.
Step 7
Ending Your Sensor Session
Thesensorautomaticallyshutsoffafter7days.The
receiverwillalertyouat6hours,2hoursand30
minutesbeforethesensorsessionends.TheReplace
SensorNowscreenwillshowwhenitistimetoremove
your sensor.
Removing Your Sensor Pod and Transmitter:
a. PeelthesensorpodoffyourbodylikeaBand-Aid.Donotremove
the transmitter from the sensor pod until the entire sensor has
been removed from your body.
b. Placethesensorpod/transmitteronahard
surface.Therearetwowaysyoucanremove
the transmitter:
•Useyourngerstospreadthebacktabsof
thesensorpod.Thetransmitterwillpopout.
OR
• Usethesafetylock(fromthesensorapplicator).
Insertthejaggededgesofthesafetylockso
they“hug”thewideendofthetransmitterinthe
sensor pod. Press the safety lock down until
you cannot press anymore, and then pull up.
Thetransmitterwillpopout.
c. Keepthetransmitter.Disposeofthesensor
followingyourlocalguidelinesfordisposalof
blood-contactingcomponents.
Safety
Lock
SensorPodwithSafety
Lock snapped in
Sensor Troubleshooting
RefertoyourUser’sGuideorcontactDexcomTechnicalSupport
at 1.877.339.2664 or 1.858.200.0200 for any unresolved
questions/troubleshootingissues.TheDexcomG4PLATINUMSystem
online tutorial is also available at www.dexcom.com.
Blood Drop
in Status Area
15 Minute
Calibration Error
1 Hour Calibration
Error
Unknown Sensor
Glucose Readings
in Status Area
Sensor Failed
Calibration needed.
• EnteracalibrationasdescribedinStep6onfrontpage
ofthisQuickStartGuide.
Sensor is not calibrating correctly.
• PresstheSELECT button. will show in status bar
• Wait15minutes,thenenter1calibration
• Iferrorcontinues,enter1morecalibration,andwait15minutes
• Ifnosensorglucosereadingsshow,contactDexcom
TechnicalSupport
Sensor is not calibrating correctly.
• PresstheSELECT button. will show in status bar
• Waitabout1hour,thenenter1calibration
• Wait15minutes.Ifnosensorglucosereadingsshow,
contactDexcomTechnicalSupport
Wait. usually clears up by itself within minutes or
hours. If this continues after 3 hours, contact Dexcom
Technical Support.
• Donotcalibrate
• Makesurethesensorpodisstickingwelltoyourbody
andnothingisrubbingagainstit
• Checkthatthetransmitterissnappedinonbothsides
Sensor shuts off before end of 7-day session.
• Pressanybuttontoclearthealert/screen
• ContactDexcomTechnicalSupport
• Removefailedsensorandinsertanewsensor
TrendArrow
CurrentTime
Mostrecent5-minuteglucosereading
Glucose
Target
Range LowGlucose
AlertSetting
Plot of most
recentglucose
reading
Antenna
Battery StatusArea
HighGlucose
AlertSetting
Glucose
Values
TrendGraphHours
Sensor Troubleshooting (continued)
Calibration “Do’s”
• Usethesamebloodglucosemeterforallcalibrationsduringa
sensor session.
• Makesureyourbloodglucoseteststripsarecodedcorrectly
andnotexpired.
• Washanddryyourhandsbeforetestingyourbloodglucose.
• Useonlyngerstickbloodglucosevaluesforcalibration.
Calibration “Don’ts”
• Don’tcalibratewhenyousee or in the status bar.
• Don’tcalibrateifyourbloodglucosevalueishigherthan400mg/dL
orlowerthan40mg/dL.
• Don’tcalibratewhenacetaminophen(suchasTylenol)isactivein
your body.
Low Glucose Alarm
TheDexcomG4PLATINUMSystemhasanautomaticLowGlucose
alarmsetat55mg/dL.Youcannotchangeorturnoffthisalarmorits
re-alertsettings.Ifyougetthisalarm:
• PressSELECT to clear.
• Youwillgetthisalarmagainin30minutes
ifyoursensorglucosereading
isstillatorbelow55mg/dL.
Advanced Features of the Dexcom G4
PLATINUM CGM System
TheDexcomG4PLATINUMSystemhasadvancedfeaturesandalertsto
takeyourglucosesensingtothenextlevel.ExceptfortheTrendArrows
andEventMarkers,theseadvancedalertsareturned‘off’whenyourst
receiveyourDexcomG4PLATINUMSystembutcanbeturnedonand
customized.
Advanced Feature #1: Trend Arrows
Atrendarrowmayshownexttothesensor
glucosereadingonyourreceivertrendscreens.
Trendarrowsshowyouthedirectionandspeed
yourglucoseischanging.SeetheDexcomG4
PLATINUMUser’sGuideformoreinformation.
Advanced Feature #2: Event Markers
Eventmarkersletyourecordinformationthatmayhelpyouandyour
healthcareteambetterunderstandyourglucosepatternsandtrends.Events
includecarbohydrates(grams),insulin(units),exercise(intensityand
duration),andhealth(illness,stress,high/lowsymptoms,menstrualcycle,
alcohol).Eventmarkersdonotshowonthereceiverbutcanbedownloaded
totheDexcomStudiosoftware.SeetheDexcomG4PLATINUMUser’sGuide
for more information.
Advanced Feature #3: Advanced Alerts
ToturnonanyoftheAdvancedalerts,followthesteps
below:
a.Fromanytrendgraph,presstheSELECT button to
gettotheMainMenu.
b.Press the DOWNbuttontohighlightAlerts.Press
the SELECT button.
c. Press the DOWNbuttontohighlightAdvanced.Press
the SELECT button.
d.Press the UP and DOWNbuttonstohighlight
the advanced feature you want to set. Press the
SELECT button.
a. High/Low Snooze Alerts
TheHigh/LowSnoozealertscanbesettore-alertyou
whenyoursensorglucosereadingstaysoutsidehighorlowalertlevel.
Snoozealertscanbesettore-alertevery15minutesupto5hours.Seethe
DexcomG4PLATINUMUser’sGuideformoreinformation.
b. Rise/Fall Glucose Rate Alerts
TheRateAlertscanbesettoalertyouwhenyoursensorglucosereadings
arerising(RiseAlert)orfalling(FallAlert)at2mg/dLormoreperminuteor3
mg/dLormoreperminute.SeetheDexcomG4PLATINUMUser’sGuidefor
more information.
c. Out of Range Alert
TheOutofRangealertcanbesettoalertyouwhenthetransmitterand
receiverarenotcommunicatingforanamountoftimebetween20-200
minutes.TheOutofRangeSymbol( )willbeintheupperrightcorner
ofthetrendgraph,andtheOutofRangealertscreenwillshow.Seethe
DexcomG4PLATINUMUser’sGuideformoreinformation.
Frequently Asked Questions
Should I make treatment decisions based on the results from my Dexcom G4
PLATINUM CGM system?
No.Treatmentorinsulindosingdecisionsshouldbebasedonthebloodglucosevaluefrom
yourbloodglucosemeter.Thedirection,rateofglucosechange,andtrendgraphonyour
DexcomG4PLATINUMSystemprovideadditionalinformationtohelpwiththesedecisions.
Is it okay if my Dexcom G4 PLATINUM CGM sensor glucose readings and
ngerstick blood glucose values don’t match exactly?
Yes.Yoursensorglucosereadingsaremeanttobeusedfortrendingonly.Yourbloodglucose
meterandsensormeasureyourglucosefromtwodifferenttypesofbodyuids:bloodand
interstitialuid.Therefore,thevaluesfromyourbloodglucosemeterandsensormaynot
match exactly.
Dexcom,DexcomG4,DexcomG4PLATINUM,DexcomStudioandTheGlucoseSensorCompanyareeitherregistered
trademarksortrademarksofDexcom,Inc.intheUnitedStatesand/orothercountries.Allotherproductorcompanynamesthat
maybementionedinthispublicationaretradenames,trademarksorregisteredtrademarksoftheirrespectiveowners.
Dexcom,Inc.I6340SequenceDriveISanDiego,CA92121
TechnicalSupport:1.877.339.2664/1.858.200.0200Iwww.dexcom.com
©2012Dexcom,Inc.Allrightsreserved.
Frequently Asked Questions continued
Why can’t I take any acetaminophen containing medication while I am using
the Dexcom G4 PLATINUM System?
AcetaminophenisacontraindicationoftheDexcomG4PLATINUMSystemandshould
notbetakenwhileyoursensorisinserted.TheDexcomG4PLATINUMSystemmayread
inaccuratelyhighwhenyoutakeacetaminophen-containingdrugs.Thelevelandduration
ofinaccuracymaybedifferentforeachperson.Tounderstandhowlongacetaminophen-
containingmedicinesmayaffectyourbody,consultyourhealthcare
provider.
How do I change my high/low glucose alert levels?
Followthebelowsteps:
a. Fromanytrendgraph,presstheSELECT button
togettotheMainMenu.
b. Press the DOWNbuttontohighlightAlerts.Press
the SELECT button.
c. Press the SELECTbuttontoselect“HighAlert.”
OrpresstheDOWN button, and then the SELECT
buttontoselect“LowAlert.”
d. UsetheUP and DOWNbuttonstochangeAlert
Level.
e. Press the SELECTbuttontoconrmchanges.
How long is the warranty on the Dexcom G4 PLATINUM
Transmitter?
Thewarrantyforthetransmitteris6months.
How long is the warranty for the Dexcom G4 PLATINUM
Receiver?
Thewarrantyforthereceiveris12months.
WARNING: Reviewallcontraindications,warnings,precautionsanddetailed
proceduresintheuser’sguidepriortousingyourDexcomG4PLATINUM
ContinuousGlucoseMonitoringSystem.
Start Sensor
“thinking” screen
Startup calibration prompt
Calibration prompt
Replace Sensor Now screen
Low Glucose Alarm
Rate of Change Arrow appears
in upper right of trend graph
Main Menu
Alerts highlighted
Alerts Menu
Advanced highlighted
Advanced Menu, High
Snooze highlighted
High Alert Setting Screen,
15 minutes selected
Advanced Menu,
Rise Rate highlighted
Rise Rate, On/Off
highlighted
Rise Rate screen,
On highlighted
Advanced Menu, Out of Range highlighted Out of Range Alert screen
Main Menu,
Alerts highlighted
Alerts screen, High
Alert highlighted
High Alert screen,
Level highlighted
Countdown symbol lls in during sensor startup
LBL-010799Rev10MT21204