Dialogic D/4PCI Use and care manual

Ericsson and OneBox are registered trademarks of Ericsson Business Networks AB.
Dialogic is a registered trademark and D/4PCI is a trademark of Dialogic Corporation, an Intel company.
All other products, services, brand names, or companies mentioned in this document may be registered trademarks or trademarks of their respective companies.
R2A ãSeptember 2000 Ericsson Business Networks AB
Dialogic D/4PCI Linecard
Installation and Replacement
Inside this Document:
Before You Begin...........................................................................................................................................2
Technical Specifications of the D/4PCI Linecard...........................................................................................3
Preparing the D/4PCI Linecard for Installation ..............................................................................................4
Installing the D4/PCI Linecard in the Platform ...............................................................................................6
Connecting the D/4PCI to the Telephone System .........................................................................................9
Installing Dialogic System Software.............................................................................................................10
Using the Dialogic Configuration Manager – DCM......................................................................................12
Configuring Lines in OneBox Configuration ................................................................................................18
This document explains how to install or replace Dialogic D/4PCI linecards in a OneBox
telephony server platform. We recommend that you read this entire document before
disassembling the hardware.
IMPORTANT
§D/4PCI linecards
cannot
be used with
any
other makes or models of telephony linecards. If other makes
or models of telephony linecards are installed in the platform, they must be removed prior to installing
D/4PCI linecards.
§Failure to comply with the regulations in your area may result in significant penalties. Verify that the
configuration of your platform complies with local regulations before using the platform.

Dialogic D/4PCI Linecard Installation and Replacement
R2A ãSeptember 2000 Ericsson Business Networks AB
2
Before You Begin
Review this section before performing any of the procedures in this document. This
section provides important information about electrostatic discharge and the tools and
equipment required to complete the installation.
Electrostatic Discharge (ESD) Warning
Static electricity will damage internal components. When working with internal
components, keep them on a static-safeguarded work area and wear a grounding strap at
all times.
Gathering Tools and Equipment
Before you begin disassembling the OneBox telephony server platform, verify that you
have the following required tools and equipment:
•OneBox Telephony Server CD-ROM
•New feature key diskette (if the addition of linecards exceeds the number of ports for
which you are currently licensed)
•One or more Dialogic D/4PCI linecards
•#2 Phillips screwdriver
•RJ-11 linecord adapters (if needed to connect the platfrom to the phone system).
•D/4PCI Installation Quick Reference Card (Dialogic part number 05-1341-002)
•Regulatory Notices for Europe, Australia, and New Zealand
(Dialogic part number 05-1395-001)

Dialogic D/4PCI Linecard Installation and Replacement
R2A ãSeptember2000 Ericsson Business Networks AB 3
Technical Specifications of the D/4PCI Linecard
Table 1 lists the technical specifications for the Dialogic D/4PCI linecard. Your local
telephone company may require some of these specifications. For example, in the United
States, some telephone companies require an FCC registration number if the linecard is
connected directly to central office (CO) lines. Contact your local telephone company for
its requirements.
Table 1: D/4PCI Technical Specifications
Feature Specification
NUMBER OF PORTS
1–4; THE ONEBOX TELEPHONY SERVER PORT ASSIGNMENT
IS DETERMINED BY THE CARD’S LINECARD IDENTIFICATION
NUMBER
DIALING DTMF
ANALOG NETWORK
INTERFACE ON-BOARD LOOP-START INTERFACE CIRCUITS
VOICE CODING PCM, ADPCM, µ-LAW PCM
FCC REGISTRATION NUMBER EBZUSA-65588-VM-E *
* For a list that provides information for registering Dialogic linecards in many countries, contact
Dialogic or retrieve a copy of their Global Product Approvals list from their website
(http://www.dialogic.com/products/finalap.htm).

Dialogic D/4PCI Linecard Installation and Replacement
R2A ãSeptember 2000 Ericsson Business Networks AB
4
Preparing the D/4PCI Linecard for Installation
Before installing the Dialogic D/4PCI linecard in the OneBox Telephony Server platform,
you need to set its default line state (hook-switch state) and determine the ports it will
handle so you can assign its linecard identification number.
Setting the Default Line State (Hook-Switch State)
The D/4PCI linecard has a configurable default line state (hook-switch state). This setting
determines how the D/4PCI will respond to incoming telephone calls when the OneBox
platform is turned on but either OneBox or the Dialogic System Software (device driver)
is not running.
•If switch SW4 is in the OFF position, the default line state setting is onhook; callers
will get a ring-no-answer (RNA) response.
•If switch SW4 is in the ON position, the default line state setting is offhook; callers
will get a busy signal.
Note If the computer is turned off, callers will get an RNA response.
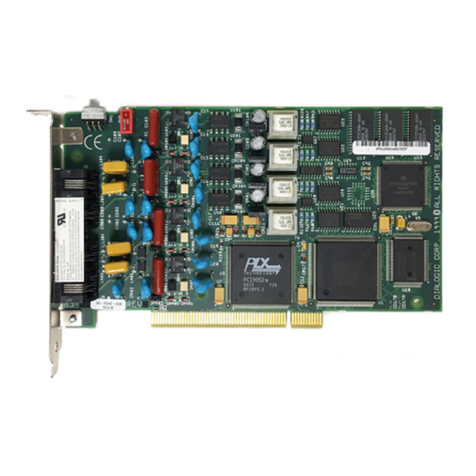
We recommend that you set the default line state to offhook.SwitchSW4,shownin
Figure 1, controls the default line state.
To set the default line state:
•Slide the switch SW4 to the ON position, as shown in Figure 2.
Figure 1. Switches SW1 and SW4 on the D4/PCI
Figure 2. Detail of switch SW4
SW1 SW4

Dialogic D/4PCI Linecard Installation and Replacement
R2A ãSeptember2000 Ericsson Business Networks AB 5
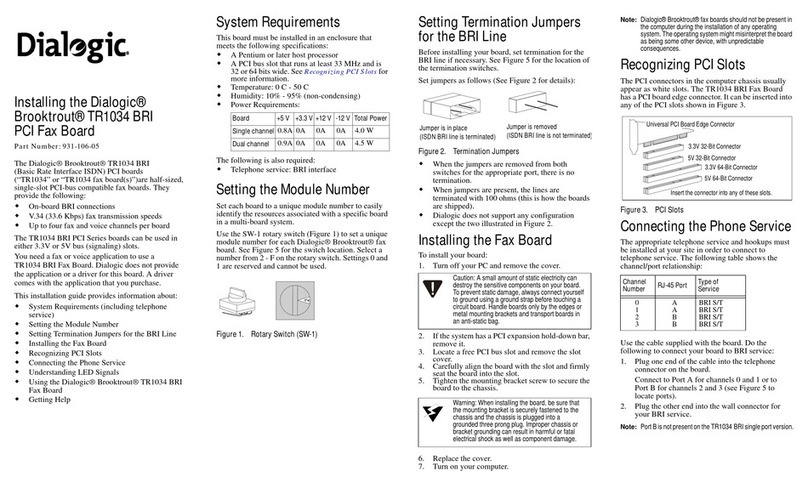
Assigning a Linecard Identification Number
Each Dialogic linecard installed in the OneBox Telephony Server platform must be
configured with a unique linecard identification number (referred to by Dialogic as the
Board ID, Board Locator ID, or Board Locator Technology ID). This number, from 1
through F hex (1–15 decimal), is used by the Dialogic System Software to determine
which linecard is sending a signal. Unique linecard identification numbers must be
assigned in ascending order to each linecard starting at 1.
OneBox assigns port numbers in ascending order based on the linecard identification
number. For example, if a D/4PCI linecard installed in the platform is assigned the
linecard identification number 1, the four ports provided by the linecard will be
designated ports 1–4. If another D/4PCI linecard installed in the platform is assigned the
linecard identification number 2, the four ports provided by the linecard will be
designated ports 5–8. If your platform will have more than one linecard, make note of the
linecard identification number of each linecard to clarify the process of connecting the
platform to the telephone system.
IMPORTANT
Each linecard installed in the platform must use a unique linecard identification number. If
two linecards installed in the platform use the same linecard identification number, the
Dialogic System Software (the device drivers) will be unable to locate either linecard.
Do
not
use linecard identification number 0 for any Dialogic PCI linecard. OneBox
Telephony Server does not support the automatic linecard identification number
assignment scheme for PCI linecards (called Geographic Sequencing by Dialogic).
To assign a linecard identification number:
•Select the linecard identification number for the linecard by dialing rotary switch
SW1 (refer to Figure 1 for the location of switch SW1).
If you are… Then…
Replacing an existing card Select the identification number used by the
linecard you are replacing.
Adding another card Select a new identification number for the
linecard.
Dialogic D/4PCI Linecard Installation and Replacement
R2A ãSeptember 2000 Ericsson Business Networks AB
6
Installing the D4/PCI Linecard in the Platform
Since Dialogic D/4PCI linecards are designed to be installed in the PCI expansion bus,
the interrupt requests and memory addresses used by the cards are assigned by the BIOS
of the platform, not by configuring jumpers or switches. All PCI linecards installed in the
platform should share IRQ 5. The method of assigning this interrupt will vary depending
on the particular BIOS and platform used. For example, a BIOS may allow you to assign
IRQ 5 to the PCI expansion slots you intend to use for the linecards. Another BIOS may
automatically assign IRQ 5 to the PCI expansion slot based on its location in the
platform. Refer to the platform documentation to determine how to configure the
platform to assign IRQ 5 to expansion slots used by PCI linecards.
After you have prepared the Dialogic PCI linecards for installation and have determined
how to assign IRQ 5 to the expansion slots they use, you can install the linecard in the
computer platform.
IMPORTANT
Dialogic D/4PCI linecards cannot be used with any other makes or models of
telephony linecards. If other makes or models of telephony linecards are installed
in the platform, they must be removed prior to installing D/4PCI linecards.
To install D/4PCI linecards:
1. If possible, configure the Dialogic System Service to start manually.
If Dialogic System Software is… Then…
Installed on the platform Continue to step 2.
Not installed on the platform Skip to step 5.
2. From the Start menu, point to Programs, point to Dialogic System Software, and
select Dialogic Configuration Manager – DCM.

Dialogic D/4PCI Linecard Installation and Replacement
R2A ãSeptember2000 Ericsson Business Networks AB 7
3. From the Service menu, point to Startup Mode, and select Manual.
4. From the File menu, select Exit.
5. Turn off the computer, unplug its power cord, and remove its cover.
6. Verify that the linecard identification number and the default line state are configured
correctly (refer to “Preparing the D/4PCI Linecard for Installation” for instructions).
7. Select a PCI expansion slot.
If the linecard… Then…
Replaces an existing linecard Remove the existing linecard from the PCI
expansion bus slot and use this expansion
slot for the replacement linecard.
Adds ports to the OneBox Telephony
Server platform
Select an empty PCI expansion bus slot that
will be assigned IRQ 5, and remove the
slot’s retaining screw and access cover plate.

Dialogic D/4PCI Linecard Installation and Replacement
R2A ãSeptember 2000 Ericsson Business Networks AB
8
8. Insert the linecard into the PCI bus slot. Gently press the linecard down to seat the
edge connector into the slot, applying pressure only to the top edge of the board.
Rocking the card or applying excessive pressure on the card or the bus connector
may cause damage.
9. Attach the retaining screw.
10. If you are installing another linecard, repeat steps 6–9.
11. After installing the linecard(s), replace the computer’s cover and plug in the
power cord.
12. Proceed to the following section “Connecting the D/4PCI to the Telephone System.”

Dialogic D/4PCI Linecard Installation and Replacement
R2A ãSeptember2000 Ericsson Business Networks AB 9
Connecting the D/4PCI to the Telephone System
With the D/4PCI linecard(s) installed in the platform, you can now cable the platform to the
telephone system. As described in “Assigning a Linecard Identification Number,” OneBox
assigns port numbers in ascending order based on the linecard identification number.
Therefore, the D/4PCI linecard to which you assigned the linecard identification number 1
will be assigned port numbers 1–4, and the linecard to which you assigned the linecard
identification number 2 will be assigned port numbers 5–8 (as shown in Figure 3). Keep this
port number assignment scheme in mind when connecting each D/4PCI linecard to the
telephone system.
Figure 3. D/4PCI linecard port assignments
To cable Dialogic D/4PCI linecards to the telephone system:
•Plug the linecords (jacks) from the telephone system (switch) to the RJ-11 connectors
on the D/4PCI (refer to the port assignment diagram shown in Figure 3).
Note Country-specific linecord adapters may be required to connect the telephony
server to the local public telephone network. If these adapters are required and not
included with the linecards, please contact your technical service representative.
Linecard
ID# 1
Linecard
ID# 2
Port 1 Port 5
Port 2 Port 6
Port 3 Port 7
Port 4 Port 8

Dialogic D/4PCI Linecard Installation and Replacement
R2A ãSeptember 2000 Ericsson Business Networks AB
10
Installing Dialogic System Software
OneBox supports the version of the Dialogic System Software called Dialogic Network
Architecture (DNA) version 3.3. Because Dialogic uses this device driver for several of
its products, many of the default settings in the setup program differ from the settings
required by the D/4PCI. Please follow these installation instructions carefully.
To install the Dialogic System Software:
1. Log on to Windows NT with an account that has Administrator privileges on the
OneBox Telephony Server platform.
2. Insert the OneBox Telephony Server CD-ROM into the CD-ROM drive.
3. From the Start menu, select Run.
4. Click Browse, open the Dialogic folder on the CD-ROM, then double-click the
file Setup.exe.
5. With the path to Setup.exe in the Run dialog box, click OK to start the setup program.
6. In the Setup Options dialog box, click Custom,thenclickNext.
7. In the Custom Components Selection dialog box, select only the Dialogic Core
Drivers, Firmware, and Configuration Files option, then click Next.

Dialogic D/4PCI Linecard Installation and Replacement
R2A ãSeptember2000 Ericsson Business Networks AB 11
8. In the Setup Options Summary dialog box, verify that the options you want appear on
the property sheet.
9. If you want to change any of the options, return to the appropriate dialog box by
clicking Back. Otherwise, click Next.
10. In the Setup Finish Options dialog box, clear the View Release Notes check box and
select the Run Dialogic Board Configuration (DCM) check box, then click Finish.
11. If prompted, “Would you like to install GammaLink Fax?” click No.
12. If prompted, “Would you like to install SpeechWorks?” click No.
13. When the installation is complete, select No, I will restart my computer later, then
click OK.
The Setup program closes and the Dialogic Configuration Manager dialog box
appears. Refer to “Using the Dialogic Configuration Manager – DCM” for instruction
on how to configure DNA System Software.

Dialogic D/4PCI Linecard Installation and Replacement
R2A ãSeptember 2000 Ericsson Business Networks AB
12
Using the Dialogic Configuration Manager – DCM
The Dialogic Configuration Manager (DCM) is a utility that allows you to configure a
number of parameters used by the DNA System Software to control the D/4PCI linecard.
Each time you start the Dialogic Configuration Manager it automatically detects any
linecards installed in the platform. The DCM then matches the linecards it detects with
the corresponding configuration data.
Note The DCM has a comprehensive online help system. Consult the Dialogic
Installation and Configuration Knowledge Base book in the help system for
advice about troubleshooting the DNA Version 3.3 System Software.
Starting and Stopping Dialogic System Service
The Dialogic System Service downloads firmware to the D/4PCI and initializes its device
drivers. If you are installing the Dialogic System Software DNA version 3.3 for the first
time, the Dialogic services have not been started.
Note Only users with Windows NT Administrator privileges on the platform can start
or stop Dialogic System Service. If a system administrator will not be available at
all times, set the Startup Mode for the Dialogic System Service to Automatic
(reference “To set the Startup Mode to Automatic:” for details). This
configuration allows the Dialogic System Service to start automatically when the
computer is restarted.

Dialogic D/4PCI Linecard Installation and Replacement
R2A ãSeptember2000 Ericsson Business Networks AB 13
To start the Dialogic System Service:
1. From the Start menu, point to Programs, point to Dialogic System Software, and
select Dialogic Configuration Manager - DCM.
If the service for the D/4PCI linecard is not running, the Dialogic System Service
Status line at the bottom of the DCM dialog box will read Stopped, as shown below.
2. From the Service menu, select Start Service.
3. When the Dialogic System Service dialog box displays “Success: Dialogic services
started,” click OK.
The Dialogic System Service Status line should now read Running.

Dialogic D/4PCI Linecard Installation and Replacement
R2A ãSeptember 2000 Ericsson Business Networks AB
14
To stop the Dialogic System Service:
1. From the Start menu, point to Programs, point to Dialogic System Software, and
select Dialogic Configuration Manager - DCM.
If the service for the D/4PCI linecard is running, the Dialogic System Service Status
line at the bottom of the DCM dialog box will read Running, as shown below.
2. From the Service menu, select Stop Service.
3. When the Dialogic System Service dialog box displays “Success: Dialogic services
stopped,” click OK.
The Dialogic System Service Status line should now read Stopped.

Dialogic D/4PCI Linecard Installation and Replacement
R2A ãSeptember2000 Ericsson Business Networks AB 15
To set the Startup Mode to Automatic:
1. From the Start menu, point to Programs, point to Dialogic System Software, and
select Dialogic Configuration Manager – DCM.
2. From the Service menu, point to Startup Mode, and select Automatic.
3. From the file menu, select Exit.

Dialogic D/4PCI Linecard Installation and Replacement
R2A ãSeptember 2000 Ericsson Business Networks AB
16
Configuring a D/4PCI Linecard with the DCM
The configuration of the DNA System Software can only be changed when the Dialogic
System Service is stopped. Conversely, the Dialogic Configuration Manager will not
apply the changes you make to the settings of the DNA System Software until you restart
the Dialogic System Service. Refer to the earlier section “Starting and Stopping Dialogic
System Service” for details.
To configure a D/4PCI linecard:
1. Log on to Windows NT with an account that has Administrator privileges on the
OneBox Telephony Server platform.
2. From the Start menu, point to Programs, point to Dialogic System Software, and
select Dialogic Configuration Manager – DCM.
3. Stop the Dialogic System Service, if it is running.
4. Highlight the Configured Devices line; then from the Action menu, select
Configure Device.

Dialogic D/4PCI Linecard Installation and Replacement
R2A ãSeptember2000 Ericsson Business Networks AB 17
5. Click the Country tab; then from the Parameter list, select Country.
6. From the Value list, select your country.
Note The Country tab allows you to configure the D/4PCI for use in specific countries.
Based on the value selected for the Country parameter, the DCM will suggest
default values for the other parameters that optimize the configuration of the
linecard for use in the selected country. We recommend using the default settings
given by the DCM for your country.
7. When you have finished configuring the linecard, click OK to apply the changes you
have made and exit the Dialogic Configuration Manager.
8. From the Service menu, select Start Service.
9. From the Service menu, point to Startup Mode, and select Automatic.

Dialogic D/4PCI Linecard Installation and Replacement
R2A ãSeptember 2000 Ericsson Business Networks AB
18
Configuring Lines in OneBox Configuration
There is one configuration parameter for linecards in OneBox Telephony Server that you
must consider. On the Integration tab in the OneBox Configuration utility, select Loop
Start in the Type box for all lines provided by the D/4PCI linecard(s) on your platform.
Other manuals for D/4PCI
1
Table of contents
Other Dialogic PCI Card manuals

Dialogic
Dialogic D/41JCT-LS Use and care manual

Dialogic
Dialogic Diva User manual

Dialogic
Dialogic Brooktrout TR1034 BRI User manual

Dialogic
Dialogic D/41EPCI User manual

Dialogic
Dialogic Brooktrout TR1034 User manual

Dialogic
Dialogic Brooktrout TruFax User manual

Dialogic
Dialogic DM/N Series Instructions for use

Dialogic
Dialogic Brooktrout TR1034 BRI User manual

Dialogic
Dialogic D/4PCI Use and care manual

Dialogic
Dialogic D/41ESC Use and care manual