Diamant Steam pressure cleaner with Iron User manual

User InstrUctIons
DIamant
DIamant
www.novaprint.it - cod.10161026300

1
Dear Client,
congratulations on your purchase of your DIAMANT. This versatile steam clea-
ning system was designed for Profi application requirements in compliance with
the strictest standards of safety and efficiency.
You will soon see how easy, simple and safe it is to use DIAMANT.
To become acquainted with the possibilities of this Profi device for household
maintenance, we recommend that you read these instructions all the way through
carefully and then follow these instructions step by step.
User instructions DIAMANT
Steam pressure cleaner with Iron
Read carefully these instructions before using the machine.
14
NOTE
13 2
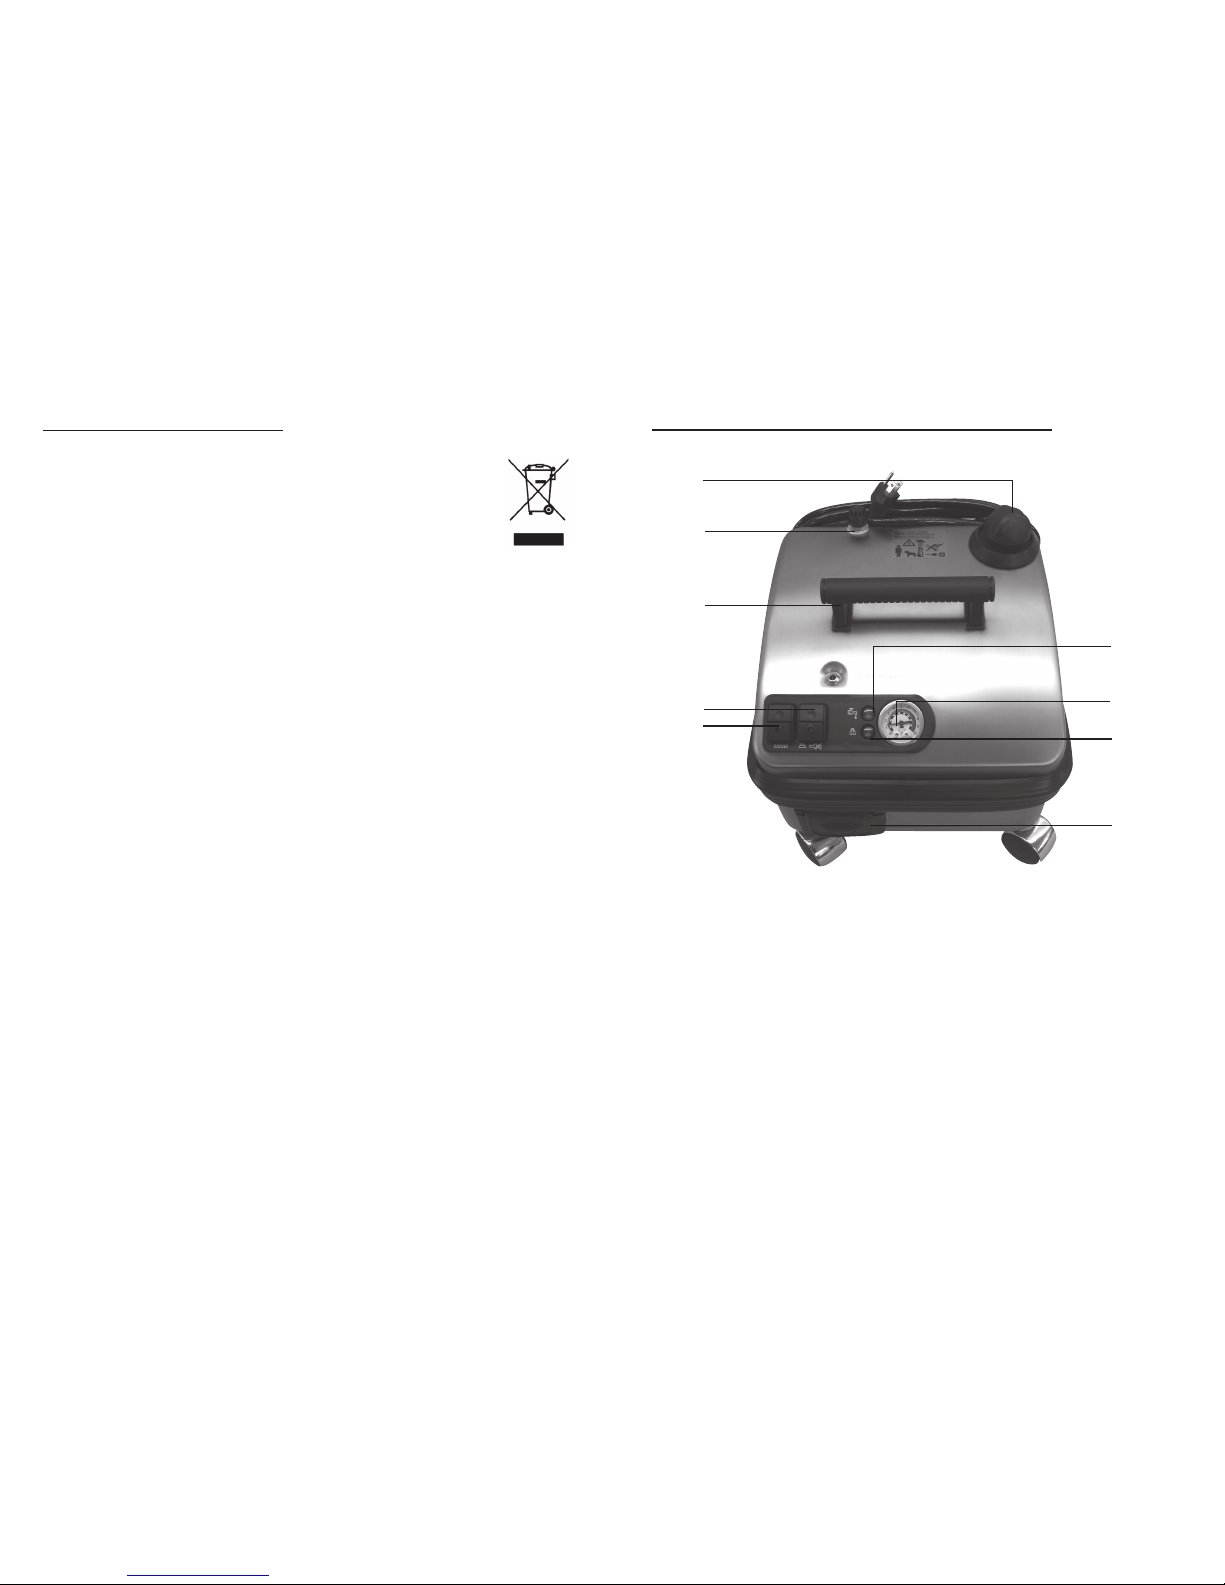
GETTING TO KNOW THE DIAMANT
1
8
2
3
4
5
7
7
6
9
1 Safety pressure cup 6 “Steam ready” warning light
2 Carry handle 7 Pressure gauge
3 Iron/steam switch 8 Steam adjustment knob
4 Main switch 9 Monobloc socket
5 “No water” warning light
USER INFORMATION
In accordance with the provisions of Guidelines 2002/95/EU, 2002/96/EU and
2003/108/EU on the Restriction of the Use of Certain Hazardous Substances
in Electrical and Electronic Devices and Waste Electrical and Electronic
Equipment, the symbol of the “crossed-out rubbish bin” on the product means
that the device must be disposed of separately from other rubbish at the end of
its useful life.
This means that when the device reaches the end of its useful life, the user will be required
to take the device to an appropriate specialist centre for the separate disposal of electronic
and electro-technical equipment, or return it to the dealer when purchasing a new device of
the same kind, in a ratio of one to one.
The separate collection and disposal of this device for recycling protects the environment
and prevents hazards to human health while facilitating the reuse of its constituent mate-
rials.
Improper disposal of this product by the user will result in application of the relevant
penalties provided for under national legislation.

3
DESCRIPTION OF ACCESSORIES
12
1 HOLE
3 HOLE
10
10a
11
12
16
16a
16b
19
17
13
13a
21
15
18
14
10 Rectangular brush
10a Brush cover
11 Extension tubes
12 Triangular brush
13 Dress fit 1 holes
13a Dress fit 3 holes
14 Dress fit with
rubber protection
15 Window wiper
16 Small round brush
(nylon)
16a Small round brush
(brass)
16b Small round brush
(stainless steel)
17 Round brush (nylon)
18 Grip unit
19 Small triangular brush
for dress-fit (nylon)
21 Dosing bottle
MAINTENANCE
Since the DIAMANT is operated with mains water, regular decalcification is required to
assure the useful life of the device as ensure proper functioning. The frequency of decalci-
fication will depend on water hardness and duration of utilisation.
For average water hardness (10°-15°) and normal use in a private household, we recom-
mend that the device be decalcified at least every three months.
Please proceed as follows:
• Fillthetankhalffull(approximately1litreofwater)andaddacommerciallyavailable
decalcifier in the appropriate quantity.
• Screwthefillercaptight
• Turnonthemainswitchandsteamsupplylineswitch
• Waituntilthediodelightsup
• Turnthemainswitchoffagainandfullyreleasethesteampressuretothespraygun
using the steam button
• Allowthedevicetocoolforafewminutes
• Emptythedeviceandrinsethetanktwicewithclearwater
• Whenusingcleansingvinegar,allowthedevicetostandforafewhoursorovernight
before emptying it, and then rinse it thoroughly several times
Important: The drain screw to empty the tank is located on the bottom of the device.
Do not open before releasing all steam.
After emptying the tank, retighten the screw.
TECHNICAL DATA
Input 120V-60Hz
Boiler output 1500 W
Boiler capacity 2 l
Steam temperature 150°C
Maximumpressure 500kPa(5bar)
Profi electric iron 850 W
Boiler aluminum

4
SAFETY INSTRUCTIONS
Please test inconspicuous parts of all surfaces and objects to ensure colour-fastness
and heat resistance. We will not be liable for damage caused by failure to test the
surfaces to be cleaned.
1) Never open the filler cap while the boiler is under pressure. Release the pressure using
the steam button on the pistol grip only.
2) Do not add detergents or other additives. Use only mains water – no distilled water.
2) Take care to ensure that the electrical data on the type plate corresponds to the local net-
work voltage.
4) Never dip the device in the water.
5) Pull the mains plug when the device is not in use or is to be left unattended, or when fil-
ling the tank or cleaning the device.
6) You must only use the
DIAMANT
for the applications described in these instructions.
7) Use only original replacement and accessory parts.
8) Do not pull the mains plug out of the socket by the cable.
9) Do not allow the mains cable to come into contact with hot surfaces.
10) The steam generated by the device can reach very high temperatures (150°C) upon lea-
vingthedevice.Avoidallcontactwiththesteam.Donotpointthesteamsprayatper-
sons or animals.
11) This device is not a toy. Special care is required when used by children or in the vicinity
of children.
12) Never use steam to clean electrical devices, such as radios, televisions or other hou-
sehold appliances generally.
13) When using the electric iron, take care to ensure that the iron is safely stowed at all
times(forexample,thesupportbaseonthetable).
14) Only put the
DIAMANT
away after it has completely cooled off. The tank need not be
emptied unless the device is to remain unused for a long time.
15) Do not use the device if it has been damaged or if the mains cable or any of the acces-
sory parts is damaged. Inspections and repairs of all kinds must always be performed
by our client service department. Unauthorised repair work may be dangerous and will
void the warranty.
11
Electric steam iron
(optional)
25. Steam button for continuous steam
26. Steam button for puffer
27. Cork handle
28. Connection hose
29. Stainless steel iron base
30. Temperature regulator
25 26 27 28
30
29
FILLING THE BOILER
If the steam of the DIAMANT finishes while using the machine, the “water level” warning
light lights up. The boiler must then be refilled with water.
Proceed as follows:
1c. Leave steam switch (3) on
2c. Turn off the main switch 4.
3c. Operate steam trigger (G1) on handle (18) or the steam button on the iron till the steam
runs out.
4c. Disconnect supply plug from the mains (9).
5c. Unscrew safety plug (1) turning it in an anticlockwise direction.
6c. Wait for a few minutes to let the boiler cool down.
7c.FillthemachineasdescribedintheGETTINGSTARTEDchapter.Iffillingthetank
when hot, add small quantities of water in order to prevent water from evaporating straight
away. To fill the tank use dosing bottle (21).
8c. Close the machine and plug it in again, switch the general switch on and wait for “pres-
sure” light (6) to light up.
9c. The DIAMANT is ready for use again!
FINISHING USING THE MACHINE
• Switchboilerswitch(4)off
• Venttheremainingsteamusingsteambutton(G1)oriron(25).
• Unplugsupplycablefromthemains(9).
• Letthemachinecooldownbeforeputtingitaway.
• Tips
Wool: only steam, without pulling the fabric
Silk: dampen and then only steam
Velvet: iron inside out with a little steam or steam only without turning inside out

510
GROUNDING INSTRUCTIONS
This appliance must be grounded. If it should malfunction or
breakdown, grounding provides a path of least resistance for
electric current to reduce the risk of electric shock. This
appliance is equipped with a cord having an equipment-groun-
ding conductor and grounding plug. The plug must be inserted
into an appropriate outlet that is properly installed and
grounded in accordance with all local codes and ordinances.
WARNING–Improperconnectionoftheequipment-groundingconductorcanresult
in a risk of electric shock. Check with a qualified electrician or service person if you
are in doubt as to whether the outlet is properly grounded. Do not modify the plug pro-
vided with the appliance – if it will not fit the outlet, have a proper outlet installed by a
qualified electrician.
This appliance is for use on a nominal 120-volt circuit and has a grounding attachment
plug that looks like the plug illustrated the Figure. Make sure that the appliance is con-
nected to an outlet having the same configuration as the plug. No adaptor should be
used with this appliance.
WINDOW WIPER (15)
STEAM IRON
To get dirt and grease off windows has never been easier. Fit the machine with the appro-
priate window accessoryDirect steam onto the windows and get rid of the dirt with the rub-
ber.
Attention: In winter pre-heat the windows!Start cleaning only after spraying some
steam from a distance of about 5-10cm.
The DIAMANT acts as a “steam power plant” for the iron.
Couple the electric iron to the device when it is ready to ope-
rate, heat it up and iron as usual. Press steam button to relea-
sesteam.Adjusttothedesiredtemperaturedependingonthe
material to be iron, using the temperature regulator.
• Normal ironing
With up to 4.5 bar steam pressure, your wash will be smoother and more perfect than ever
before – even through several layers.
• Wool, Velvet
Pass the electric iron over the material to be ironed, using little steam, from a distance of
about 2 cm and press the steam button at the same time. The power of steam smoothes and
relaxesthefabricandstraightensthefibres.
• Clothing, curtains
Suits, costumes and clothing can get be ironed, freshened and put back in shape even while
hanging up. Hold the electric iron vertical and pass it over the material, from top to bottom,
at a short distance away. Press the steam button at the same time until the wrinkles disappe-
ar. Curtains should be taken directly out of the washing machine, hung up and steamed.

96
GETTING STARTED
Steam cleaner
•Pushfillercap(1)downwards,thentwistleftand
screw open.
•Filltankwithasmuchwateraspossible(maximum
filling quantity 2 litres). Use only mains water .
Do not use distilled water.
•Pressfillercapdownwards,thentwistrightand
screw shut.
•Connectmainscabletothesocket.
•Turnonmainswitch(4).Diodelightsup:deviceis
heatingup.Assoonasthegreencontrollamp
light on the pressure indicator (6) lights up, the
device is ready for operation.
•Connecthosewithspraygun(18).Besurethatthe
coupler plug is correctly engaged!
•Whendeviceisreadyforoperation,turnonthe
steam supply line switch (3).
•Screwthesteamregulator(8)openandadjust
according to the application.
Depending on the quality, rugs and carpets should be cleaned carefully with very little
steam and then brushed with a clean, dry cloth over the brush attachment.
Cloth carpets, mattresses and bed frames can be cleaned and disinfected in the same way
(house mites, germs, bacteria).
Cleaning of sealed parquet and marble floors
Firmly attach a triple-folded dry wipe cloth to the cleaning brushes and wipe evenly.
Cleaning of walls, ceilings and high glass panes
Extendthetubesaccordingtotheheightoftheroomandinsertthelargecleaningbrush
with covering.
Important: Change the cloth when it gets dirty.
Be careful with water-soluble colours!
TRIANGULAR BRUSH (optional 12)
The triangular brush is used wherever working with the large brushes is laborious and
impossible due to lack of room.
Special applications:
• Furniture covers and car seats (not leather)
Cover the triangular brush with a clean, dry cloth and fasten it tight. Treat stubborn stains
carefully with the spray gun. Spray steam from a distance of about 10 cm away, and dab
with a clean, dry cloth or carefully rub dry.
• Textiles
Clothing, blankets, curtains, mattresses and upholstery can not only be cleaned, but freshened
upaswell.Coverthetriangularbrushwithaclothasdescribedaboveandbrushdownthetexti-
leslightly,orsteamevenlyfromashortdistanceaway.Thesteampenetratesandrelaxesthe
fibres, restoring the shape of the fabric.
Important: With textiles of any kind, always follow the manufacturer instructions
and/or test for colour fastness on an inconspicuous part of the fabric.

78
USING THE ACCESSORIES
Attention: We recommend you start with not too strong a jet and increase the intensi-
ty as needed.
• High pressure outlet
High pressure outlet (13, 13a) with or without round brush – to apply as needed.
Usethesteamtrigger(G1)anddirectthefirstjetontoaclothtogetridofcondensationand
anyimpuritiesintheextensiontube.
The spray gun is particularly suitable to get rid of dirt and grease from:
• Worksurfacejoints,cracksorseriesofunits
• Ovenextractorsandglass
• Varnishedwoodorformicakitchenunits
• Ovens
• Stainlesssteelorenamelsinks
• Washbasins,baths,bidets,toilets,showers,taps
- to eliminate limescale and water spots
• Doors,windows,stairs
• Varnishedsurfaces,cartyrerims,andothers
For the first stage of cleaning we recommend you use triangular brush (12, optional).
Accordingtothesurfacetobetreated,useadrycloth.Finallytreatthemostdifficultand
inaccessible places or those particularly dirty with the spray gun.
Getting rid of spots
Direct the steam onto the spot at the right distance (5-10 cm) to loosen and remove the dirt.
Atthesametimerubandeliminatethedirtwithacleancloth.Afterthis,treatthesurface
with the brush to get a smooth finish.
LARGE CLEANING BRUSH (10 - 10A)
Cleaning hard floors
Sticktheextensiontubeontothespraypistolandattachthelargecleaningbrushtothe
extensiontube.Passoverthefloorwithevenmovements.
Pauseabitlongeroverjointsandunevenplaces,todissolvedeeply-ingraineddirt.Repeat
several times if necessary.
Finally, clamp a dry wipe cloth around the brush and wipe the whole surface clean.
The floor will shine like new.
For linoleum, proceed carefully, using very little steam; or, better yet, use a dry wipe cloth
to retain the floor’s natural brilliance.
Cleaning carpets with the brush cover
Using the DIAMANT,textilewall-to-wallcarpets,rugsandevenPersiancarpetscanbe
cleaned and disinfected, eliminating even animal hair and house mites, without chemicals
and additives, restoring the original colour and providing renewed brilliance.
The elimination of deeply ingrained dirt and detergent residues left over from previous cle-
aning attempts may require several treatments for the best results.
For after-treatment, simply repeat the process, using a dry wipe cloth clamped over the
brush attachment.
For first-time cleaning following the process, use a vacuum cleaner only.
Slide the brush cover (10a) over the brush (10) and allow it to latch into place. This allows
the attachment to glide easily and smoothly over the floor, without damaging the carpeting,
aspiratingawayanydirtasaresultofthesteamvortexeffectandresultingunder-pressure
generated around the brushes by the brush cover.
Table of contents


