Oreck STEAM-IT STEAM100LRH User manual

Important!
Read all instructions carefully, and keep for future reference.
STEAM-IT®
All Purpose Steam Wand
STEAM100LRH & STEAM100S
User’s
Guide

Thank You for purchasing an Oreck Steam-It®All Purpose Steam Wand!
This state of the art steam wand will help you have a cleaner home.
At Oreck, we understand that our customers are unique and expect superior
service. To meet your needs, we offer different customer service options to work
with your lifestyle and preferences.
Welcome to our Call. Click. customer service program.
To speak with an Oreck representative call:
USA: 1-800-989-3535
Canada: 1-888-676-7325
On the web, point and click at: www.oreck.com and click locate
a store on the top right
Enjoy
Contents
Call
Click
2
Safety . . . . . . . . . . . . . . . . . . . . . . . . . . . . . . . . . . . . . . . . . . . . 3
Parts . . . . . . . . . . . . . . . . . . . . . . . . . . . . . . . . . . . . . . . . . . . . . 5
Product Components & Accessories . . . . . . . . . . . . . . . 5
peration . . . . . . . . . . . . . . . . . . . . . . . . . . . . . . . . . . . . . . . . . 6
Operating Instructions . . . . . . . . . . . . . . . . . . . . . . . . . . . 6
Using the Steam-It® . . . . . . . . . . . . . . . . . . . . . . . . . . . . . 6
Cleaning Surface/Steam Setting Reference . . . . . . . . . . 7
Hard Floor Cleaning . . . . . . . . . . . . . . . . . . . . . . . . . . . . 7
Attaching an Accessory . . . . . . . . . . . . . . . . . . . . . . . . . . 8
Maintenance . . . . . . . . . . . . . . . . . . . . . . . . . . . . . . . . . . . . . . 9
After Each Use . . . . . . . . . . . . . . . . . . . . . . . . . . . . . . . . . 9
Cleaning the Steam Generator . . . . . . . . . . . . . . . . . . . . 9
Unblocking the Steam Outlet . . . . . . . . . . . . . . . . . . . . . 9
Cleaning the Cloths . . . . . . . . . . . . . . . . . . . . . . . . . . . . . 9
Troubleshooting . . . . . . . . . . . . . . . . . . . . . . . . . . . . . . . . . . . . 10
Warranty . . . . . . . . . . . . . . . . . . . . . . . . . . . . . . . . . . . . . . . . . . 11
E N G L I S H

3
IMP RTANT SAFETY INSTRUCTI NS!
General Warnings
When using an electrical appliance, basic precautions should always be followed,
including the following:
READ ALL I STRUCTIO S BEFORE USI G THIS STEAM CLEA ER
WARNING! To reduce the risk of fire, electric shock, or injury:
• Do not leave the steam cleaner unattended when plugged in. Unplug it from
the socket when not in use.
• To prevent electric shock do not use outdoors.
• Not to be used as a toy. Close supervision is necessary when used near children.
• Use only as directed in this manual.
• Do not use with damaged cord or plug. If appliance is not working as it
should, has been dropped, damaged, left outdoors, or dropped into water, return
it to a service center or call customer service at:
USA: 1-800-989-3535 Canada: 1-888-676-7325
• Do not pull or carry by the cord, use the cord as a handle, allow the cord to
come into contact with hot or sharp surfaces or close a door on the cord.
• Do not unplug by pulling on the cord.
• Do not handle the plug or cleaner with wet hands.
• Do not put any objects into openings or operate with openings blocked.
• Do not use without the tank cap in place.
• Turn off all controls before unplugging.
• Do not use an extension cord.
• Store indoors, put away after use to prevent tripping accidents.
• Using improper voltage may result in damage to the steam cleaner and
possible injury to the user. The correct voltage is listed on the rating label.
• This steam cleaner is intended for household use only.
• A hazard may occur if the steam cleaner runs over the power cord.
• Never immerse the steam cleaner in water or other liquids.
• The steam cleaner is not suitable for outdoor use.
• Do not operate the steam cleaner without water in the tank.
• Empty the water tank when the steam cleaner is not in use.
• Do not fill the water tank with anything other than water or Oreck Fresh Air®
Steam Mop Essence. Never put additives (such as perfume, stain remover or
products containing alcohol) in the water as they may damage the steam
cleaner or make it dangerous to use.
• Always remove the power cord from the outlet and handle the steam cleaner
with care when filling with water.
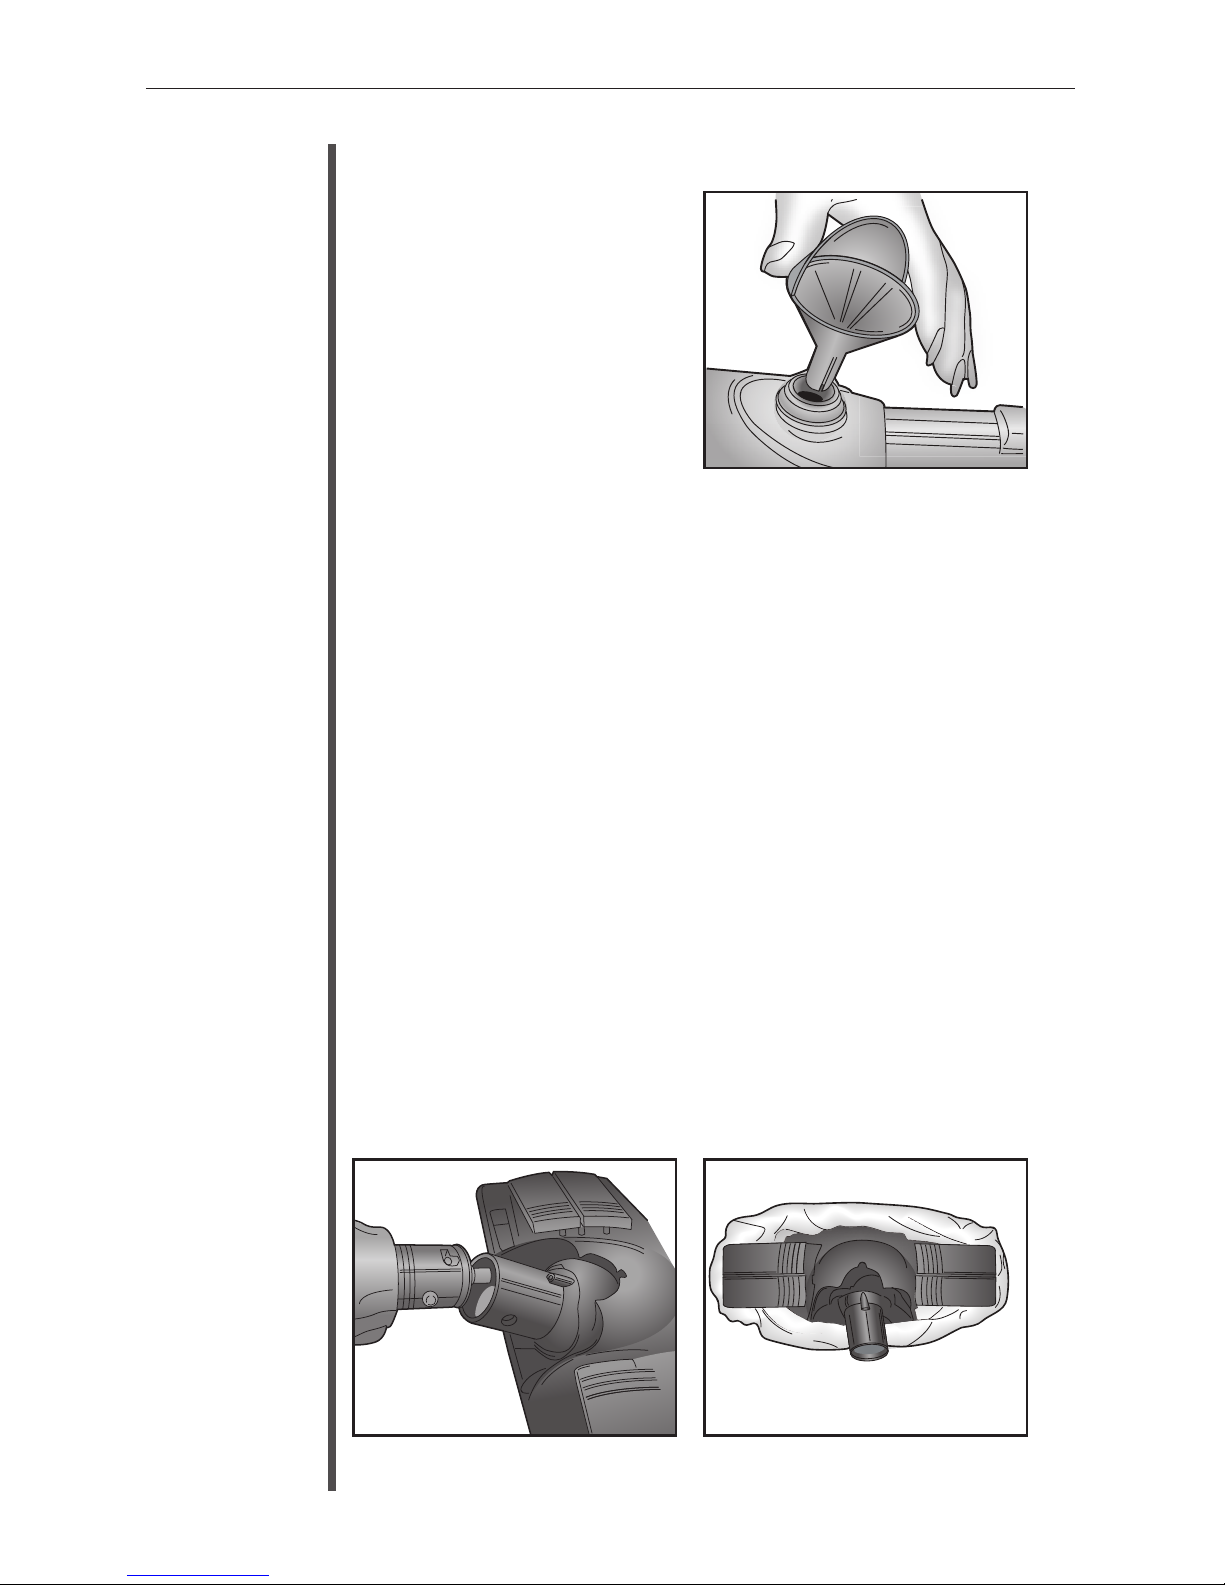
• Do not overfill the tank. Do not exceed the maximum prescribed filling level.
Please use the funnel included.
Safety
EN G L I S H

• Ensure that the water tank’s closure cap has been screwed down fully before use.
• Do not touch any hot areas on the steam cleaner. It is normal for the steam
cleaner to heat up during operation.
• Do not use the steam cleaner to treat any item of clothing while being worn on
the body.
• The force and heat of the steam may have an adverse effect on some materials.
Always test the steamer on a small concealed area to determine if it is
suitable for treatment with the steam cleaner.
• Never aim the steam cleaner at people, animals or plants (risk of scalding!)
Do not aim the steam cleaner at electrical systems or wires.
• Accessories become hot during use - allow them to cool down before handling.
• Do not use the steam cleaner directly overhead.
• Not for use on fine silks, velour, very thin plastics, unsealed hardwood,
laminates, engineered hard floor surfaces, ceilings, drywall and exterior paint
of automobiles, electronics or items using electricity.
• WARNING: Product contains chemicals known to the State of California to
cause cancer and birth defect or other repoductive harm.
NOTE: Be sure to test in a hidden area prior to use.
IMPORTA T! This steam cleaner is equipped with a steam release valve
mechanism, located at the rear of the steam generator. In the event of a
steam flow blockage, the safety valve is designed to release the steam.
Regular cleaning of the steam chamber and nozzle is therefore recommend-
ed to avoid such an occurrence. If the steam is released from the safety
valve, stop cleaning and unplug the steam cleaner from the electrical outlet.
Allow the steam cleaner to cool down thoroughly for at least one hour. After
this time, clean the steam chamber and nozzle.
If steam is still being released from the safety valve after cleaning, contact a
service center.
SAVE THESE INSTRUCTI NS
Household Use nly
4
IMP RTANT SAFETY INSTRUCTI NS!
General Warnings
Safety
EN G L I S H

5
Product Components & Accessories
Parts
E N G L I S H
1 Steam Regulator
2 Control Switches
3 Water Tank Cap
4 Water Tank
5 Lock Button
6 Powerhead
7 Towel Grips
8 Brush Slides
9 Cord Wrap
10 Lower Handle
11 Power Cord
12 Cord Dump
13 Squeegee
14 Utility Tool
15 Deflector Nozzle
16 Floor Cloth
17 Utility Cloth
18 Spot Brush
19 Nozzle Brush
20 Nozzle Pin
21 Funnel
22 n/ ff Switch
23 Steam Switch
24 Power N Light
(red)
25 Steam Ready Light
(green)
1
3
4
2
5
6
7
8
9
10
11
12
13
14
15
16
17
18
19
21
20
22 23
24 25
Accessories
Parts

perating Instructions
1. Place the steam cleaner in a
horizontal position and remove
the water tank cap. Use the funnel
provided to slowly fill the water
tank with clean water. Replace the
cap securely.
2. Insert the power plug into an
electrical outlet. Make sure the
steam cleaner is switched off.
3. Press the ON/OFF switch located
on the handle to switch the steam cleaner on. The red heater “ON”
light should now be illuminated.
4. Press the steam switch to the “ON” position. After approximately
45 seconds the green “steam ready” light should come on.
5. Turn the steam regulator control to maximum and point the steam
nozzle towards a cloth or sink for approximately 10 - 15 seconds, to
stabilize the flow and produce a continuous steam.
OTE: Ensure the steam switch is turned off and the powerhead has
cooled before connecting the powerhead or any of the other cleaning
accessories.
Using the Steam-It®
1. Align the hole in the side of the powerhead with the lock button
on the main body of the steam cleaner. Ensure that the lock
button clicks firmly into place.
2. After assembling powerhead, connect the floor cloth to the powerhead
by using the towel grips.
3. Turn the steam switch on.
Operation
E N G L I S H
6

Glass & Mirrors
Grout on Hard
Surfaces
Tiled Surfaces,
Cabinets &
Countertops in
Kitchens &
Bathrooms
Sealed Hardwood
Minimum (Low)
Medium to High
Low to Medium
Low
Operation
E N G L I S H
7
Cleaning
Surfaces Steam
Regulator Setting
Cleaning Surface/Steam Setting Reference
Hard Floor Cleaning
Reduce the steam flow to a lower setting by turning the steam control
regulator. Use both forward and backward strokes across the floor area.
OTE: When the cloth becomes very wet, let cool, ring out the
moisture, use the reverse side or replace with a clean, dry cloth.
To Sanatize Hard Floor Surfaces:
• Allow unit to heat for one minute.
• Set steam regulator to “HIGH”.
• Use short scrubbing motions on hard floor area for at least 5 seconds.
Attaching an Accessory
Accessories can be used on the main body of the steam cleaner by
removing the powerhead and then attaching the desired accessory.
1. Press the lock button to remove the powerhead when cool.
2. Attach the desired accessory by aligning the hole in the side of the
accessory with the lock button on the main body of the steam cleaner.
Ensure the lock button clicks firmly into place.

E N G L I S H
8
Operation
Squeegee
For cleaning glass and mirror panels. Use the squeegee at a
very low steam flow. Achieve this by adjusting the steam regu-
lator. A cloth can be used to wipe the blade and remove excess
water during usage when cool. For small window panels,
remove the squeegee tool and spray the steam directly onto the
surface. Use the squeegee separately to wipe away the mois-
ture.
Spot Brush
For cleaning the grout between tiles or stubborn marks and
stains on hard surfaces. Use at medium or high steam flow.
Utility Tool
For cleaning tiled surfaces, cabinets and
countertops in kitchens and bathrooms.
Use on a low to medium steam flow.
Cover the utility tool with the elasticised
cloth.
Deflector ozzle
For cleaning sanitary ware such as toilet bowls, taps or
drain covers. Use this nozzle at maximum steam flow. Point it
directly at stains on carpets or upholstery while holding a
clean cloth near the stained area to capture any loosened dirt.

Mainte-
nance
E N G L I S H
9
After Each Use
OTE: When you have finished steam cleaning, ensure that both the
power switch and steam switch are turned off and that the plug is
removed from the electrical outlet.
Empty any remaining water from the tank by unscrewing the cap and
turning the steam cleaner upside down over a sink or outdoors. If
needed store the steam cleaner by using the hanging strap at the top
of the handle.
Cleaning the Steam Generator
IMPORTA T! Only follow these instructions when the steam clean-
er is completely cooled down. Also ensure that the plug is removed
from the electrical outlet.
1. Pull down the nozzle lock and twist the
steam nozzle first, before pulling the nozzle
out of the steam chamber completely.
2. Insert the nozzle brush into the chamber
and rotate the brush while pulling in and out
of the chamber.
3. Insert the steam nozzle back into the chamber
and turn it clockwise to lock back into position.
OTE: Oreck recommends cleaning the chamber at least after every
12 - 15 uses to ensure optimum performance.
Unblocking the Steam utlet
If steam flow appears reduced, the steam nozzle may be blocked. Unplug
the unit from the electrical outlet and allow it to cool.
1. Insert the nozzle pin into the center of the steam nozzle to clear any
blockage that may have formed.
Cleaning the Cloths
Both the floor and utility cloths can be machine washed (140˚F max). For
heavy soiling, soak the cloths in warm water and detergent or a mild stain
remover. Allow the cloths to dry completely before storing.

Problem Cause Solution
Trouble-
shooting
E N G L I S H
If the following troubleshooting tips do not resolve the problem please contact
Oreck Customer Service. U.S.: 1-800-989-3535 Canada: 1-888-676-7325
IMPORTA T! Always unplug and allow the steam cleaner to cool down before
conducting any troubleshooting. See safety warnings.
Steam Cleaner has
no power.
Very low or no
steam is emitted
when the steam
cleaner is on.
The water tank
appears out of
shape.
Unit still does not
operate properly.
Steam cleaner is not
properly plugged into
an electrical outlet or
is not switched on.
The socket is faulty.
The tank is empty.
The Steam Nozzle is
blocked.
Despite the green
light, the steam
switch is not activat-
ed properly.
The weighted tube in
the tank is not
immersed in water.
The steam regulator
is set to minimum.
A vacuum is being
created inside the
wate tank, causing it
to deform.
This could be because
the water cap’s air-
inlet valve is stuck.
Check all the above
points.
Insert the plug into
an electrical outlet
and switch the steam
cleaner on.
Check the socket by
unplugging the steam
cleaner and plugging
in a different appli-
ance.
Fill the water tank.
See “Unblocking the
Steam Outlet”
Press down the steam
switch fully.
Shake the steam
cleaner gently.
Turn the steam con-
troller until sufficient
steam is emitted.
Press the center of
the cap to release the
vacuum.
Contact Oreck for
service.
10

Warranty
E N G L I S H
ORECK MANUFACTURING COMPANY: (Oreck gives you the following
limited warranty for this product only if it was originally purchased for use, not
resale, from Oreck or an Oreck Authorized Retail Dealer.)
Oreck will repair or replace, free of charge, to the original purchaser, any part
which is found to be defective in material or workmanship within one (1) year
of the date of purchase. This limited warranty applies to normal domestic use.
This limited warranty does not cover the replacement of expendable or consumable
parts subject to normal wear.
This limited warranty does not apply to any part subjected to accident, abuse,
commercial use, alteration, misuse, damage caused by fire or act of God, the
use of voltages other than indicated on the serial number plate of this product or
service of this product by other than Oreck or an Oreck Factory Authorized
Service Center.
Oreck does not authorize any person or representative to assume or grant any
other warranty obligation with the sale of this product.
Oreck’s limited warranty is valid only if you retain proof of purchase from Oreck
or an Oreck Authorized Retail Dealer for this product. If you purchase this product
from any other source, your purchase is “AS IS,” which means Oreck grants you
no warranty, and that you, not Oreck, assume the entire risk of the quality and
performance of this product, including the entire cost of any necessary servicing
or repairs of any defects.
ORECK’S LIABILITY FOR DAMAGES TO YOU FOR ANY COSTS WHAT-
SOEVER ARISING OUT OF THIS STATEMENT OF LIMITED WARRANTY
SHALL BE LIMITED TO THE AMOUNT PAID FOR THIS PRODUCT AT
THE TIME OF ORIGINAL PURCHASE, AND ORECK SHALL NOT BE
LIABLE FOR ANY DIRECT, INDIRECT, CONSEQUENTIAL OR INCIDEN-
TAL DAMAGES ARISING OUT OF THE USE OR INABILITY TO USE
THIS PRODUCT.
Some states do not allow the exclusion or limitation of incidental or consequential
damages, so the above limitation or exclusion may not apply to you.
ALL EXPRESS AND IMPLIED WARRANTIES FOR THIS PRODUCT,
INCLUDING IMPLIED WARRANTIES OF MERCHANTABILITY AND
FITNESS FOR A PARTICULAR PURPOSE, ARE LIMITED IN DURATION
TO THE WARRANTY PERIOD, AND NO WARRANTIES, WHETHER
EXPRESS OR IMPLIED, WILL APPLY AFTER THIS PERIOD.
Some states do not allow limitations on the duration of implied warranties, so the
above limitation may not apply to you.
This warranty gives you specific legal rights, and you may also have other rights
which vary from state to state.
If there is an issue with your vacuum that you believe is covered by this warranty,
Contact Oreck Customer Service at 1-800-989-3535.
11

¡Importante!
Lea todas las instrucciones cuidadosamente, y conserve esta
Guía para consultas en el futuro.
STEAM-IT®
Boquilla de vapor multiuso
STEAM100LRH & STEAM100S
Guía del
usuario

Gracias por comprar una Boquilla de vapor multiuso Steam-It®de Oreck.
Esta boquilla de vapor de tecnología avanzada le ayudará a mantener un hogar
más limpio.
En Oreck comprendemos que nuestros clientes son únicos y esperan un servicio
superior. A fin de satisfacer sus necesidades ofrecemos diferentes opciones de
servicio al cliente, para trabajar con su estilo de vida y sus preferencias.
Le damos la bienvenida a nuestro programa de servicio al cliente 'Llame. Haga clic.'
Para hablar con un representante Oreck llame a los números que siguen.
En los Estados Unidos: 1-800-989-3535
En Canadá: 1-888-676-7325
En la Web, apunte y haga clic en: www.oreck.com y luego haga
clic en ‘localice una tienda’, en el ángulo superior derecho.
Disfrute
Índice
Llame
Haga
clic
13
Seguridad . . . . . . . . . . . . . . . . . . . . . . . . . . . . . . . . . . . . . . . . . 14
Piezas . . . . . . . . . . . . . . . . . . . . . . . . . . . . . . . . . . . . . . . . . . . . 16
Componentes y accesorios del producto . . . . . . . . . . . . 16
peración . . . . . . . . . . . . . . . . . . . . . . . . . . . . . . . . . . . . . . . . . 17
Instrucciones de operación . . . . . . . . . . . . . . . . . . . . . . . 17
Uso de la Steam-It® . . . . . . . . . . . . . . . . . . . . . . . . . . . . . 17
Relación entre las superficies a limpiar y el ajuste de vapor . . 18
Limpieza de pisos duros . . . . . . . . . . . . . . . . . . . . . . . . . 18
Colocación de accesorios . . . . . . . . . . . . . . . . . . . . . . . . . 18
Mantenimiento . . . . . . . . . . . . . . . . . . . . . . . . . . . . . . . . . . . . . 20
Después de cada uso . . . . . . . . . . . . . . . . . . . . . . . . . . . . 20
Limpieza del generador de vapor . . . . . . . . . . . . . . . . . . 20
Desbloqueo de la salida de vapor . . . . . . . . . . . . . . . . . . 20
Limpieza de los paños . . . . . . . . . . . . . . . . . . . . . . . . . . . 20
Localización de fallas . . . . . . . . . . . . . . . . . . . . . . . . . . . . . . . 21
Garantía . . . . . . . . . . . . . . . . . . . . . . . . . . . . . . . . . . . . . . . . . . 22
E S P A Ñ O L

14
INSTRUCCI NES IMP RTANTES DE SEGURIDAD
Advertencias Generales
Cuando se use un artefacto eléctrico deben observarse siempre las precauciones
básicas, incluidas las siguientes:
LEA TODAS LAS I STRUCCIO ES A TES DE UTILIZAR ESTA
LIMPIADORA DE VAPOR
¡ADVERTENCIA! Para reducir el riesgo de incendio, choque elé ctrico o
lesiones:
• No deje la limpiadora de vapor desatendida mientras está enchufada.
Desenchúfela del tomacorriente cuando no la use.
• Para evitar choques eléctricos, no use la unidad en exteriores.
• No se debe usar como un juguete. Es necesario mantener una especial super
visión cuando se utilice cerca de niños.
• Use la unidad únicamente como se indica en este manual.
• No la use con un cordón o enchufe dañado. Si el artefacto no está funcionando
como debería, o si se ha caído, dañado, dejado a la intemperie o sumergido
en el agua, devuélvalo a un centro de servicio o llame a Servicio al cliente:
En los Estados Unidos: 1-800-989-3535 En Canadá: 1-888-676-7325
• No tire del cordón para transportar la unidad, ni use el cordón como manija, ni
deje que el cordón entre en contacto con superficies calientes o aguzadas, ni
cierre una puerta sobre el cordón.
• No la desenchufe tirando del cordón.
• No maneje el enchufe o la limpiadora con las manos húmedas.
• No coloque ningún objeto en las aberturas ni haga funcionar la unidad con las
aberturas bloqueadas.
• No utilice la unidad sin tener colocada la tapa del tanque.
• Lleve todos los controles a la posición 'Apagado' ('Off') antes de desenchufar.
• No utilice un cordón de extensión.
• Almacene la unidad en interiores, y guárdela después de usarla para evitar
tropiezos accidentales.
• El uso de una tensión incorrecta puede dar como resultado un daño en la
limpiadora de vapor, y posibles lesiones al usuario. La tensión correcta se
indica en la etiqueta de especificaciones.
• Esta limpiadora de vapor está diseñada únicamente para uso doméstico.
• Puede existir un riesgo si la limpiadora de vapor pasa sobre el cordón de
alimentación eléctrica.
• No sumerja nunca la limpiadora de vapor en agua ni en otros líquidos.
• La limpiadora de vapor no es apta para uso en exteriores.
• No haga funcionar la limpiadora de vapor sin agua en el tanque.
• Vacíe el tanque de agua cuando la limpiadora de vapor no esté en uso.
• No llene el tanque de agua con nada diferente a agua o la Esencia para
Trapeadores a Vapor Fresh Air®(Fresh Air®Steam Mop Essence) de
Seguridad
ES P A Ñ O L

Oreck. Nunca agregue aditivos al agua (tales como perfume, quitamanchas o
productos que contienen alcohol) ya que estos podrían dañar el limpiador a
vapor o volverlo peligroso de usar.
• Quite siempre el cordón del tomacorriente y maneje la limpiadora de vapor
con cuidado cuando la llene con agua.
• No llene el tanque en exceso. No supere el nivel de llenado máximo indicado.
Utilice el embudo incluido.
• Antes del uso, asegúrese de que la tapa de cierre del tanque de agua se haya
enroscado por completo.
• No toque ninguna zona caliente de la limpiadora de vapor. Es normal que la
limpiadora de vapor se caliente durante la operación.
• No use la limpiadora de vapor para tratar ninguna vestimenta mientras esté
colocada en el cuerpo.
• La fuerza y el calor del vapor pueden tener un efecto desfavorable en algunos
materiales. Pruebe siempre la vaporización de una zona pequeña y poco visible
para determinar si es apta para el tratamiento con la limpiadora de vapor.
• No apunte nunca la limpiadora de vapor a las personas, animales o plantas
(¡existe riesgo de escaldadura!). No apunte la limpiadora de vapor a cables o
sistemas eléctricos.
• Los accesorios se calientan mucho durante el uso; espere a que se enfríen antes
de manejarlos.
• No use la limpiadora de vapor directamente sobre su cabeza.
• No debe usarse en sedas delgadas, terciopelo, plásticos muy delgados, madera
dura sin sellar, laminados, superficies de pisos duros de diseño especial, cielos
rasos, paneles ‘drywall’ y pintura exterior de automóviles, sistemas electrónicos
o elementos que utilicen electricidad.
• ¡ADVERTENCIA!: El producto contiene sustancias químicas conocidas por el
Estado de California como causantes de cáncer y defectos de nacimiento, u
otros daños en el sistema reproductor.
NOTA: asegúrese de hacer una prueba en un área oculta antes del uso.
IMPORTA TE Esta limpiadora de vapor está equipada con un mecanismo
de válvula de salida de vapor, ubicado en la parte trasera del generador de
vapor. En caso de un bloqueo del flujo de vapor, la válvula de seguridad está
diseñ ada para dar salida al vapor. Por lo tanto, se recomienda la limpieza
perió dica de la boquilla y la cámara de vapor para evitar ese evento. Si se
produce la salida de vapor por la válvula de seguridad, interrumpa la
limpieza y desenchufe la limpiadora de vapor del tomacorriente. Deje que la
limpiadora de vapor se enfrí e bien, durante una hora como mí nimo.
Despué s de transcurrido este tiempo, limpie la boquilla y la cámara de
vapor.
Si sigue saliendo vapor por la válvula de seguridad despué s de la limpieza,
pó ngase en contacto con un centro de servicio.
C NSERVE ESTAS INSTRUCCI NES
Uso doméstico únicamente
15
Advertencias Generales
Seguridad
ES P A Ñ O L
INSTRUCCI NES IMP RTANTES DE SEGURIDAD

16
Componentes y accesorios del producto
Piezas
E S P A Ñ O L
1 Regulador de vapor
2 Interruptores
de control
3 Tapa del tanque
de agua
4 Tanque de agua
5 Botón de bloqueo
6 Cabezal motorizado
7 Agarraderas de toalla
8 Guías de cepillo
9 Dispositivo para
enrollar el cordón
10 Manija inferior
11 Cordón de
alimentación eléctrica
12 Pasador para cordón
13 Escobilla de caucho
14 Herramienta de
uso general
15 Boquilla deflectora
16 Paño para pisos
17 Paño de uso general
18 Cepillo para manchas
19 Cepillo de boquilla
20 Pasador de boquilla
21 Embudo
22 Interruptor
Encendido/Apagado
( n/ ff)
23 Interruptor de vapor
24 Luz de encendido
(roja)
25 Luz de vapor listo
(verde)
1
3
4
2
5
6
7
8
9
10
11
12
13
14
15
16
17
18
19
21
20
22 23
24 25
Accesorios
Piezas

Instrucciones de operación
1. Coloque la limpiadora de vapor en
una posición horizontal y quite la
tapa del tanque de agua. Utilice el
embudo provisto para llenar lenta
mente el tanque de agua con agua
limpia. Vuelva a colocar la tapa.
Ajústela firmemente.
2. Inserte el enchufe en un
tomacorriente. Asegúrese de que
la limpiadora de vapor esté apagada.
3. Oprima el interruptor Encendido/Apagado (On/Off) ubicado en la
manija, para encender la limpiadora de vapor. Debe encenderse la luz
roja de encendido del calentador.
4. Oprima el interruptor de vapor para ir a la posición ‘Encendido’
(‘On’). Después de aproximadamente 45 segundos debe encenderse la
luz verde ‘Vapor listo’.
5. Lleve el control del regulador de vapor al máximo y apunte la boquilla
de vapor hacia un paño o un fregadero durante unos 10 a 15 segundos,
para estabilizar el caudal y producir un vapor continuo.
OTA: asegúrese de que el interruptor de vapor esté en posición
‘Apagado’ (‘Off') y el cabezal motorizado se haya enfriado antes de conec-
tar el cabezal o cualquiera de los otros accesorios de limpieza.
Uso de la Steam-It®
1. Alinee el agujero del costado del cabezal motorizado con el botón de
bloqueo del cuerpo principal de la limpiadora de vapor. Asegúrese de
que el botón de bloqueo encaje firmemente en su posición con un ‘clic’.
2. Después de montar el cabezal motorizado, conecte el paño para pisos al
cabezal motorizado mediante las agarraderas de toalla.
3. Pase el interruptor de vapor a la posición ‘Encendido’ (‘On’).
Operación
E S P A Ñ O L
17

Relació n entre las superficies a limpiar y el ajuste de vapor
Limpieza de pisos duros
Reduzca el caudal de vapor a un ajuste menor girando el regulador de
control de vapor. Aplique pasadas hacia adelante y hacia atrás por el
área del piso.
OTA: cuando el paño esté muy mojado déjelo enfriar, escúrralo para
quitarle la humedad y utilice el lado opuesto, o reemplácelo por un paño
seco y limpio.
Para esterilice de pisos duros:
• Deje que la unidad se caliente durante un minuto.
• Ajuste el regulador de vapor en 'ALTO' (‘HIGH’).
• Realice movimientos de restregado cortos sobre un área de piso
duro durante 5 segundos como mínimo.
Colocación de accesorios
Pueden utilizarse accesorios en el cuerpo principal de la limpiadora de vapor,
quitando el cabezal motorizado y colocando luego el accesorio deseado.
1. Oprima el botón de bloqueo para quitar el cabezal motorizado,
cuando se encuentre frío.
2. Para colocar el accesorio deseado, alinee el agujero del costado del
accesorio con el botón de bloqueo del cuerpo principal de la
limpiadora de vapor. Asegúrese de que el botón de bloqueo encaje
firmemente en su posición con un ‘clic’.
Vidrio y espejos
Lechada en
superficies duras
Superficies embal-
dosadas o azule-
jadas, armarios y
cubiertas en cocinas
y bañ os
Madera dura sellada
Mï nimo (Bajo)
Medio o Alto
Bajo o Medio
Baja
Operación
E S P A Ñ O L
18
Superfice
a limpiar Ajuste del
regulador de vapor

Escobilla de caucho
Para la limpieza de paneles de vidrio y espejos. Utilice la escobilla de cau-
cho con un caudal de vapor muy bajo. Para lograrlo, ajuste el regulador de
vapor. Puede utilizarse un paño para frotar la lámina de la escobilla y elimi-
nar el exceso de agua durante el uso, cuando esté fría. Para paneles de ven-
tana pequeños, quite la escobilla y rocíe el vapor directamente sobre la
superficie. Utilice la escobilla separadamente para quitar la humedad.
Cepillo para manchas
Para limpiar la lechada entre baldosas o azulejos, y las marcas y manchas
rebeldes de las superficies duras. Utilícelo con un caudal de vapor medio
o alto.
Herramienta de uso general
Para la limpieza de superficies
embaldosadas o azulejadas, armarios
y cubiertas en cocinas y baños.
Utilícelo con un caudal de vapor bajo
o medio. Cubra la herramienta de uso
general con el paño elastizado.
Boquilla deflectora
Para la limpieza de artefactos sanitarios como tazas de inodoro, grifos o
tapas de drenaje. Utilice esta boquilla con el caudal de vapor máximo.
Apunte directamente a las manchas en alfombras o tapicería, a la vez que
sostiene un paño limpio cerca del área manchada para capturar toda posi-
ble suciedad suelta.
E S P A Ñ O L
19
Operación

Manteni
miento
E S P A Ñ O L
20
Después de cada uso
OTA: Cuando haya terminado la limpieza de vapor, asegúrese de que
tanto el interruptor de encendido como el interruptor de vapor estén en
posición 'Apagado' ('Off') y el enchufe esté quitado del tomacorriente.
Vacíe el agua que hubiera quedado en el tanque. Para ello desen-
rosque la tapa e invierta la limpiadora de vapor sobre un fregadero o
en exteriores. Si fuera necesario, al guardar la limpiadora de vapor
utilice la correa colgante que está en la parte superior de la manija.
Limpieza del generador de vapor
IMPORTA TE! Siga estas instrucciones únicamente cuando la
limpiadora de vapor se haya enfriado por completo. Asegúrese
tambié n de que el enchufe se haya extraí do del tomacorriente.
1. Tire de la traba de la boquilla hacia abajo y gire
la boquilla de vapor primero; luego tire de la
boquilla hacia afuera hasta extraerla por comple
to de la cámara de vapor.
2. Inserte el cepillo de boquilla en la cámara y haga
girar el cepillo mientras lo mueve hacia adentro y
afuera de la cámara.
3. Inserte la boquilla de vapor de nuevo en la cámara
y hágala girar en sentido horario para volver a
trabarla en su posición.
OTA: Oreck recomienda limpiar la cámara cada 12 a 15 usos como
mínimo, a fin de asegurar un desempeño óptimo.
Desbloqueo de la salida de vapor
Si el caudal de vapor parece haberse reducido, es posible que la boquilla
de vapor esté bloqueada. Desenchufe la unidad del tomacorriente y deje
que se enfríe.
1. Inserte el pasador de boquilla en el centro de la boquilla de vapor
para despejar el bloqueo que se hubiera formado.
Limpieza de los paños
Tanto los paños para pisos como los paños de uso general pueden lavarse
a máquina (140 ºF máx.). Si hay mucha suciedad acumulada, remoje los
paños en agua tibia y detergente, o un eliminador de manchas suave. Deje
que los paños se sequen por completo antes de guardarlos.
This manual suits for next models
1
Table of contents
Languages:
Other Oreck Steam Cleaner manuals