Diamond TS8 User manual

The catering program
Production code: FTS117
Mod: TS22
11/2005

3
INTRODUCCIÓN
Premisa...................................................................4
Peligros u contrindicaciones....................................4
Advertencias especiales de seguridad....................6
Sistemas de seguridad............................................6
Características técnicas..........................................7
INSTALACIÓN
Embalaje y transporte..............................................8
Conexión del aparato..............................................8
MODALIDADES DE USO
Descripción del aparato...........................................9
Montaje del grupo picador.....................................11
Desmontaje del grupo picador...............................11
Encendido y apagado............................................12
Funcionamiento práctico.......................................12
Opcional trituradora de tomate..............................13
Opcional cortadora de mozzarella.........................13
MANTENIMIENTO
Limpieza................................................................14
ASISTENCIA Y GARANTÍA
Asistencia..............................................................15
Normas de garantía...............................................15
Esquemas eléctricos.............................................17
INSTRUCTION
Preliminary remarks................................................4
Safety tips................................................................4
Particular warnings.................................................6
Safety systems........................................................6
Technical features...................................................7
INSTALLATION
Packing and transport.............................................8
Connecting the appliance.......................................8
USE
Appliance description..............................................9
Mounting of the mincing group..............................11
Dismantling of the mincing group..........................11
Switching on and off..............................................12
Pratical operation.................................................12
Optional tomato liquidizer......................................13
Optional shredder..................................................13
MAINTENANCE
Cleaning................................................................14
ASSISTANCE
Assistance.............................................................15
Terms of guarantee...............................................15
Wiring Diagrams...................................................17
INDICE INDEX
1.0
1.1
1.2
1.3
1.4
1.5
2.0
2.1
2.2
3.0
3.1
3.2
3.3
3.4
3.5
3.6
3.7
4.0
4.1
5.0
5.1
5.2
1.0
1.1
1.2
1.3
1.4
1.5
2.0
2.1
2.2
3.0
3.1
3.2
3.3
3.4
3.5
3.6
3.7
4.0
4.1
5.0
5.1
5.2

4
1.0 INTRODUCCIÓN 1.0 INTRODUCTION
1.1 Premisa
Les agradecemos y les felicitamos por su elección. Desde hace
cuarenta años la empresa opera en el sector de aparatos para
uso profesional, diseñando y produciendo los mejores sistemas
para Picar, Rallar, Licuar y Moler. Para el uso, les rogamos
atenerse escrupulosamente a las instrucciones contenidas en
este manual. El producto que ha adquirido posee el Marcado
CE y, por lo tanto, respeta los requisitos esenciales de seguridad
y de protección de la salud.
1.2 Peligros y contraindicaciones
Leer atentamente las advertencias presentes en este manual
ya que proveen importantes indicaciones referentes a la
seguridad de instalación, de uso y de mantenimiento.
1) Conservar el presente manual en un lugar seguro para futuras
consultas.
2) Estos aparatos se deben destinar únicamente al uso para
el cual fueron específicamente diseñados. Cualquier otro
uso se considerará impropio y por lo tanto peligroso. La
Empresa Fabricante no podrá ser considerada responsable
por eventuales daños provocados por usos impropios.
3) Reglas fundamentales para el uso de aparatos eléctricos:
- desocupar la superficie de trabajo y no dejar objetos que
pudieran provocar peligro;
- nunca desplazar el aparato cuando esté conectado a la red
eléctrica;
1.1 Preliminary remarks
Thank you for your discerning choice. For 40 years the company
has been working to make equipment for professional use,
designing and producing high quality systems for mincing,
grating, liquidizing and grinding.
Please follow closely the operating instructions in this booklet.
The product you have purchased features EC Marking and
therefore complies with essential safety and healthprotection
requirements.
1.2 Safety tips
Read carefully the instructions in this booklet as they provide
important indications regarding safety for installation, use and
maintenance.
1) Keep this booklet in a safe place for future reference.
2) These appliances must be used only for those purposes for
which they were specifically designed. Any other use is
improper and therefore dangerous. The company cannot be
considered responsible for any damage resulting from
improper, wrong or unreasonable use.
3) Basic rules for using electrical appliances:
- clear the work surface; do not leave items which can be a
source of danger;
- never move the appliance when it is connected to the mains;
- do not touch the appliance with wet or damp hands;
WARNING
IMPORTANT
ATENCIÓN
ADVERTENCIA

5
- no tocar el aparato con las manos mojadas o
húmedas;
- no tirar del cable de alimentación o del aparato
para quitar la clavija de la toma de corriente;
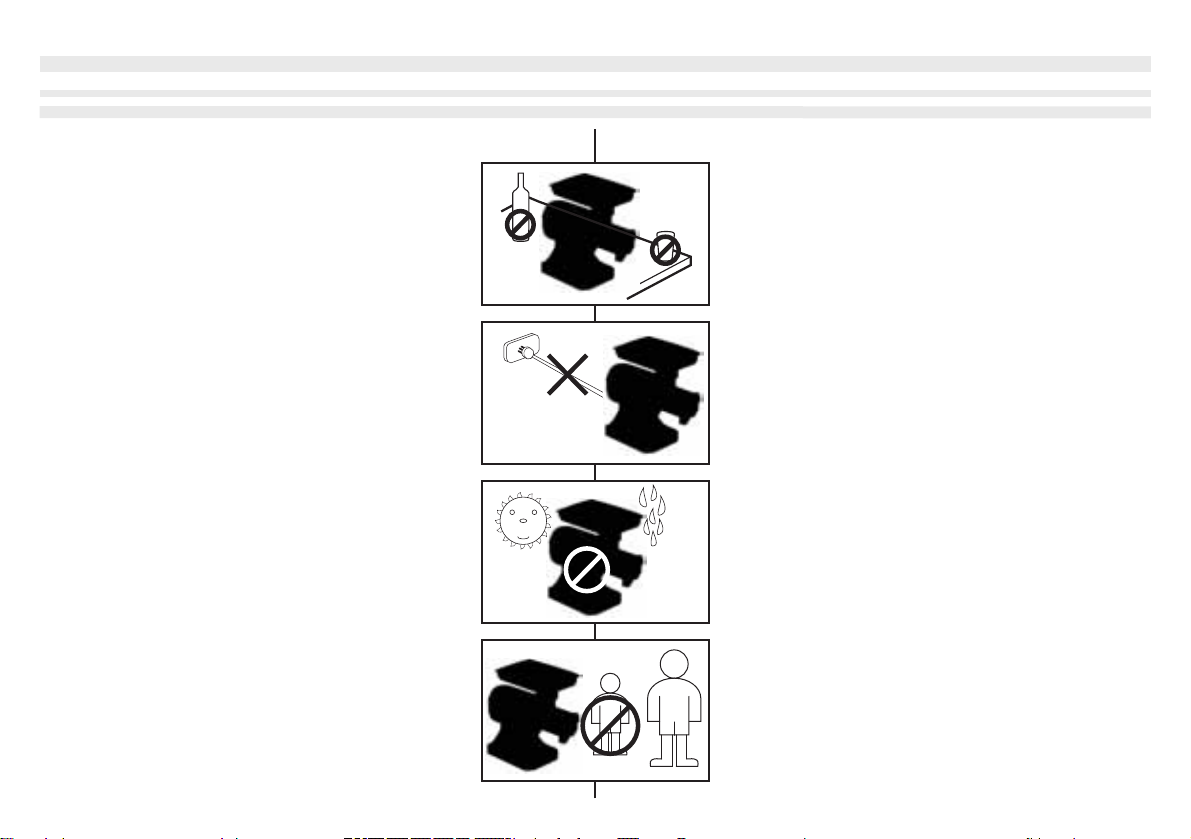
- no dejar el aparato expuesto a agentes
atmosféricos (lluvia, sol, etc.);
- no sumergir el aparato en agua u otros líquidos;
- no usar el aparato al aire libre.
- no permitir que niños, discapacitados o personas
que no hayan leído este manual usen el aparato;
- no tocar las partes en movimiento. Tener cuidado
con las manos, cabello e indumentaria;
- no apoyar objetos pesados sobre el cable;
- no dejar el cable eléctrico en contacto con
superficies calientes o cortantes;
- nunca usar el aparato si estuviera dañado o sus
cables de alimentación no estuvieran en perfectas
condiciones;
- no utilizar sustancias inflamables, corrosivas o
nocivas para limpiar el aparato;
4) Antes de realizar cualquier operación de limpieza
o de mantenimiento, desconectar el aparato de
la red de alimentación, desenchufando la clavija.
5) En caso de avería y/o mal funcionamiento del
aparato, apagarlo y no intervenir en el mismo.
Para su eventual reparación contactar al
fabricante o al distribuidor de la zona y solicitar
el uso de repuestos originales. El incumplimiento
de lo indicado anteriormente puede comprometer
la seguridad del aparato.
6)
Siempre se debe apagar el aparato y desconectarlo
de la red eléctrica antes de limpiarlo.
7) Si el aparato resulta obsoleto o ha sido averiado
de manera irreversible, se lo debe dejar fuera
- do not pull the mains lead, or the appliance itself, to
remove the plug from the socket;
- do not leave the appliance itself, to remove the plug
from the socket;
- do not leave the appliance exposed to atmospheric
agents (rain, sun, etc.);
- do not immerse in water or other liquids;
- do not use the appliance outside;
- do not allow children, unqualified persons who have
not read this manual to use the appliance;
- do not touch the moving parts when in operation. Be
careful with hands, hair and clothing;
- do not weight down the electric cable;
- do not bring the flex into contact with hot or abrasive
surfaces;
- never use the appliance if it is damaged or if the mains
lead is not in perfect condition;
- do not use inflammable, corrosive or other harmful
substances for cleaning;
4) Before any cleaning or maintenance operations,
unplug the appliance from the mains.
5) In case of a fault or of imperfect performance, turn
off the appliance. Do not attempt to rep For any
necessary repairs contact the production company.
Only authorised spare parts may be used. Failure
to observe this requirement may compromise the
safety of the appliance.
6) Turn off the appliance and always unplug it before
connecting the attachments and before cleaning.
7) If the appliance is no longer to be used because it
is obsolete and irreparably damaged, avoid all danger
by making it inoperative.

6
de servicio inutilizándolo para que no pueda
ocasionar daños. Sellar el aparato dentro de
un embalaje resistente y eliminarlo procediendo
según las normas vigentes referidas a la gestión
de los residuos, dirigiéndose a los organismos
locales dedicados a tal fin.
8) Para evitar peligros se recomienda desenrollar
todo el cable de alimentación para que no se
produzcan torsiones.
9) No dejar el aparato enchufado innecesariamente. Desconectar
el aparato de la red eléctrica si no va a ser utilizado.
1.3 Medidas especiales de seguridad
- No introducir objetos de metal o de otro material en las rejillas
de ventilación o en las bocas para rallar y picar carne.
- No colocar objetos debajo de la base del aparato.
- No introducir materiales, objetos o sustancias no apropiadas
en el aparato.
- El aparato está provisto con la cantidad de aceite necesaria
para su correcto funcionamiento y no está sujeto a desgaste
o consumo por el funcionamiento de la máquina.
1.4 Sistemas de seguridad
Está prohibido extraer o alterar los sistemas de seguridad
instalados en la máquina que se detallan a continuación.
Ficha de baja tensión: se encuentra en el interior del aparato;
permite un control seguro (a una tensión de 24V) de los
pulsadores de encendido y apagado y del micro de seguridad.
La ficha de seguridad evita que el aparato se vuelva a encender
accidentalmente después de eventuales interrupciones de la
tensión de la red.
Seal the appliance inside sturdy packaging and
dispose according to the regulations in force through
authorized channels.
8) To avoid dangerous overheating it is advisable to
unwind the total length of the mains lead avoiding
twisting and straining.
9) Do not leave the appliance plugged into the mains
when not in use.
1.3 Particular warnings
- Do not introduce objects, both metal and non-metal, inside
the motor ventilation casing or grating and mincing mouths.
- Do not introduce objects beneath the base of the appliance.
- Do not put unsuitable materials, objects or Substances in the
appliance.
- The appliance is already supplied with the appropiate quantity
of oil to ensure correct operating. It is not subject to diminuition
when the appliance is working.
1.4 Safety systems
It is strictly forbidden to remove or tamper with the safety
systems fitted to the machine and specified hereunder.
Low voltage panel: this is positioned inside the appliance. It
allows safe operation of the on/off switches and of the security
micro switch. The safety panel ensures that the appliance does
not accidentally switch itself on again following an interruption
in the mains supply.
WARNINGATENCIÓN

7
1.5 Características técnicas
Las máquinas están fabricadas con aleación de aluminio moldeada bajo presión,
y las partes del grupo de trabajo (cuerpo, hélice, tuerca, cuchilla y placa, rodillo
y recipiente recolector) están realizados completamente con acero inox 18/8
(están disponibles versiones económicas con partes de hierro fundido y
aluminio).
Mod. TS8 - TI8:
Potencia (kW): 0.38
Tensión: 230 V. - 50/60 Hz (monofásica)
400 V. - 50/60 Hz (trifásica)
Peso (kg): TS8: 9 - TI8: 10
Medidas (cm): 31 x 25 x 35
Producción por hora (kg/h): 30
Mod. TS12 - TI12:
Potencia (kW): 0.75
Tensión: 230 V. - 50/60 Hz (monofásica)
400 V. - 50/60 Hz (trifásica)
Peso (kg): 19
Medidas (cm): TS12: 44 x 24.5 x 41 - TI12: 49 x 31 x 46
Producción por hora (kg/h): 150/200
Mod. TS22 - TI22:
Potencia (kW): 1.10
Tensión: 230 V. - 50/60 Hz (monofásica)
400 V. - 50/60 Hz (trifásica)
Peso (Kg): 22
Medidas (cm): TS22: 49 x 31 x 46 - TI22: 49 x 31 x 46
Producción por hora (kg/h): 300
Para mod. 8: Después de 10 minutos de trabajo, dejar enfriar la máquina para
evitar el recalentamiento del motor.
Para mod. 12/22: Después de 20/25 minutos de trabajo, dejar enfriar la máquina
para evitar el recalentamiento del motor.
Nivel de ruido de la máquina
La medición del ruido realizada en el lugar de trabajo del operador reveló un
nivel continuo de presión acústica equivalente ponderado A inferior a 70 dBA.
1.5 Technical features
The machines are made of a hig quality aluminium alloy while the elements which
make up the working parts (main body, propelling shaft and collecting basins)
are made exclusively from 18/8 stainless steel, (More economical versions are
available with these elements in cast iron and aluminium safe for foodstuffs).
Mod. TS8 - TI8:
Power (kW): 0.38
Vac: 230 V. - 50/60 Hz (mono-phase)
400 V. - 50/60 Hz (tri-phase)
Mass (kg): TS8:9 - TI8:10
Measurements (cm): 31 x 25 x 35
Hourly output (kg/h): 30
Mod. TS12 - TI12:
Power (kW): 0.75
Vac: 230 V. - 50/60 Hz (mono-phase)
400 V. - 50/60 Hz (tri-phase)
Mass (kg): 19
Measurements (cm): TS12: 44 x 24.5 x 41 - TI12: 49 x 31 x 46
Hourly output (kg/h): 150/200
Mod. TS22 - TI22:
Power (kW): 1.10
Vac: 230 V. - 50/60 Hz (mono-phase)
400 V. - 50/60 Hz (tri-phase)
Mass (Kg): 22
Measurements (cm): TS22: 49 x 31 x 46 - TI22: 49 x 31 x 46
Hourly output (kg/h): 300
For mod. 8: After 10 min. of job please turn off the machine for do not over it
the machine.
For mod. 12/22: After 20/25 min. of job please turn off the machine for do not
over it the machine.
Machine noise level
Sound level measurements carried out at the operator station have shown a
continuos acoustic pressure level equal to an estimated level of less than 70
db (A).
WARNING
ATENCIÓN

8
2.0 INSTALACIÓN 2.0 INSTALLATION
2.1 Embalaje y transporte
Retirar con precaución el aparato del embalaje original, levantarlo con
cuidado y con la ayuda de medios apropiados.
Cuando el aparato haya sido retirado del embalaje, asegurarse
de que esté completo. En especial, controlar que no haya
eventuales daños que podrían ser causados por el transporte.
Ante la duda, no utilizar el aparato y acudir a personal especializado
Los elementos del embalaje (caja, bolsas, etc.) no se deben dejar
al alcance de los niños ya que representan una potencial fuente
de peligro.
2.2 Conexión del aparato
Antes de conectar el aparato verificar que los datos
de la placa de identificación sean compatibles con la
red de distribución eléctrica. La placa se encuentra
al frente, sobre el interruptor. Si la toma de corriente
de la red y la clavija del aparato no son compatibles,
personal calificado deberá reemplazar la toma de
corriente por uno adecuado. Éste deberá asegurarse
especialmente de que la sección de los cables de la
toma de corriente corresponda con la potencia absorbida por el aparato.
Está prohibido el uso de adaptadores, tomas múltiples y/o prolongadores.
Si fuera indispensable utilizarlos, se deben usar solamente
prolongadores conformes con las normas de seguridad vigentes,
controlando que no se supere el límite de capacidad de transmisión
de corriente y potencia que figura en los mismos.
Operación reservada a personal especializado
Para aparatos trifásicos: cuando se enciende, verificar siempre el
sentido de marcha observando la flecha que se encuentra sobre el
aparato: si no corresponde, desconectar la clavija, desarmarla y
cambiar dos fases de la misma.
2.1 Package and transport
Care is needed in removing the appliance from its packing. Lift carefully,
if necessary with the help of suitable equipment.
After removing the appliance from its packing check, in particular,
to see whether any damage has been caused in transit. If in
doubt, do not use the appliance and contact a specialist. The
packing items (boxes, bags, etc.) should not be left within the
reach of children. They are potentially dangerous.
2.2 Connecting the appliance
Before connecting the appliance, ensure that the
information on the rating plate corresponds with the
local voltage. The plate is stamped frontally, above the
switch. If the mains socket is different from the appliance
plug, get an electrician to change the socket with one
of suitable type. Important: the electrician should ensure
that the size of the cable is suited to the power load
absorbed by the appliance. It is prohibited use adaptors
and/or extension flexes. If these should prove indispensable, an
extension flexes which comply with current safety laws should be used.
Special attention should be paid to not exceeding the power load limit
of the same.
It is advisable to get an electrician to do this.
Tri-phase appliances: once turned on, check the direction of movement
with reference to the arrow on the appliance. If these do not correspond,
unplug the appliance, open the plug and exchange 2 phases.
Kg
Hz
V
Nr.
Mod.
A
Hp
kW
IMPORTANT
ATENCIÓN

9
TS8 - TI8
The appliance is a
domestic mincer able to
mince lean meat (without
bone or fat) to obtain
mincemeat, hamburger,
meat balls and sausages.
The machine features:
1. Hopper
2. Motorbase
3. On/Off Switch
4. Tightering handle
5. Ring nut
3.0 MODALIDADES DE USO 3.0 USE
3.1 Appliances description3.1 Descripción de los modelos
TS12 - TS22
The appliance is a
professional mincer able to
mince lean meat (without
bone or fat) to obtain
mincemeat, hamburger,
meat balls
and sausages.
The machine features:
1. Hopper
2. Motorbase
3. On/Off Switch
4. Tightering handle
5. Ring nut
TI12 - TI22
The appliance is a
professional careened
mincer able to mince lean
meat (without bone or fat)
to obtain mincemeat,
hamburger, meat balls and
sausages.
The machine features:
1. Hopper
2. Motorbase
3. On/Off Switch
4. Tightering handle
5. Ring nut
TS8 - TI8
El aparato esta una
picadora diseñada para
picar carne magra (sin
hueso, ni grasa) para
obtener ragús,
hamburguesas,
albóndigas y embutidos.
Componentes de la
máquina
1. Tolva
2. Cuerpo del motor
3. Interruptur On/Off
4.
Empuñadura para
bloquear la boca
5. Tuerca para fijar la
placa perforada
4
12
3
5
1
2
3
4
5
1
2
3
45

10
Gruppo
picador B Gruppo picador Bdesmontado
3.2 Montaje del grupo picador
Para montar cualquier parte de
la máquina, ésta debe estar
apagada y desconectada de la
red eléctrica.
El montaje del grupo picador en la
máquina se desarrolla en dos fases:
La primera fase se realiza sobre
un banco de trabajo siguiendo
estos pasos:
1) Colocar en la boca (1) y en el
siguiente orden: sinfín (2),
cuchilla autoafilante (3) placa
perforada(4);
2) Enroscar y ajustar la tuerca
para sujetar las partes(5).
La segunda fase se realiza en
la máquina:
1) Encajar hasta llegar al tope el
grupo picador completo Ben
la máquina A
2) Ajustar la manilla Chasta que
el grupo picador B quede
fijado firmemente en la
máquina A.
3) En estas condiciones la
máquina está lista para ser
usada.
3.3 Desmontaje del
grupo picador
Para desmontar cualquier
parte de la máquina, ésta debe
estar apagada y desconectada
de la red eléctrica.
El desmontaje del grupo picador
en la máquina se desarrolla en
dos fases:
La primera fase se realiza en la
máquina siguiendo este orden:
1) Aflojar la manilla C hasta que
el grupo picador B se pueda
retirar de la máquina A;
2) Retirar el grupo picador B de
la máquina A.
La segunda fase se realiza sobre
el banco de trabajo siguiendo
estos pasos:
1) Desenroscar completamente
la tuerca (5);
2) Retirar el sinfín (2), la cuchilla
autoafilante (3) y la placa
perforada (4) de la boca (1);
3) Luego, proceder a la limpieza.
12345
12345
Máquina completa A Manilla C
Grupo
picador B
ATENCIÓN ATENCIÓN

11
Mincing
Group B Stripped Down Mincing Group B
3.2 Mounting of the
mincing group
The mounting operations of
each part of the machine must
be done when the machine is
switched off and unplugged
from the socket.
The mounting of the mincing group
on the machine happens in two
phases:
The first phase is carrying out on a
workbench following the order
carried below:
1) Fit into the union (1) in this order:
the worm (2), the self-sharpening
knife (3), the perforated plate (4);
2) Screw down and fasten the
handwheel (5).
The second phase is carrying out
on the machine:
1) Fit till the joint of the full mincing
group Bis blocked on the
machine A;
2) Fasten the handle (or knob) Ctill
the mincing group Bis blocked
on the machine A;
3) In these conditions the machine
is ready to work.
3.3 Dismantling of the
mincing group
The dismantling operations of
each part of the machine must
be done when the machine is
switched off and unplugged
from the socket.
The dismantling of the mincing group
on the machines happens in two
phases:
The first phase is carrying out on the
machine following the order carried
below:
1) Slack the handle (or knob) till the
mincing group is able to exit from
the machine A;
2) Pulling out the mincing group B
from the machine A.
The second phase is carrying out
on a workbench following the order
carried below:
1) Unscrew completely the
handwheel (5);
2) Take out the worm (2), the self-
sharpening knife (3) and the
perforated plate (4) from the auger
(1);
3) Proceed with the cleaning.
12345
12345
Complete Machine A Handle C
Mincing
Group B
WARNING WARNING

12
3.4 Encendido y apagado
Para encender el aparato presionar el pulsador verde señalado
con el símbolo “I”; para apagarlo presionar el pulsador rojo
señalado con el símbolo “0”.
Para modelos equipados con inversor de marcha, presionar
con impulsos durante algunos segundos el pulsador verde
señalado con el símbolo “II”.
EVITAR SOBRECARGAS PELIGROSAS AL MANTENER
PRESIONADO DURANTE MUCHO TIEMPO EL BOTÓN
INVERSOR DE MARCHA. DESCONECTAR DE LA RED
ELÉCTRICA Y ELIMINAR EL PROBLEMA DESMONTANDO
EL GRUPO PICADOR.
3.5 Funcionamiento práctico
Antes de utilizar el aparato por primera vez, lavar bien
todos los accesorios con agua tibia.
- Elegir la placa perforada adecuada para el trabajo que se desea realizar.
- Antes de comenzar a trabajar, controlar que los accesorios hayan sido
montados correctamente, en especial la cuchilla.
- Colocar el recipiente recolector y montar la tolva.
- Conectar el aparato a la red eléctrica.
- Accionar la picadora siguiendo las instrucciones para el encendido.
Para presionar la carne en la máquina se debe utilizar
exclusivamente el mazo provisto para empujar.
- Empujar la carne en la boca de entrada de la tolva.
- Al concluir el trabajo, desconectar el aparato de la red eléctrica
y limpiarlo.
3.4 Switching on and off
To swich on the appliance, press green button , marked with
an "0"; to switch off the plliance, press the red button, marked
with an "I".
For models with reverse movement, must be carry on the "II"
position.
TO AVOID DANGEROUS OVERLOADING BY PROLONGED
PERIODS IN POSITION "II", UNPLUG AND REMOVE THE
OBSTRUCTION MANUALLY.
3.5 Pratical operation
When first using, carefully wash the attachments in warm water.
- Choose the perforated disk suited to the task.
- Check that the attachments, especially the blade, have been properly connected
before beginning the task.
- Position the collecting tray and the hopper.
- Connect the appliance to the mains supply.
- Turn on the mincer following the instructions.
Use only the presser supplied to push the meat in to the
appliance
- Push the meat down into the hopper opening.
- Once the task is completed, unplug the appliance from the mains
and clean.
WARNING
IMPORTANT
WARNING
ATENCIÓN
ATENCIÓN
ADVERTENCIA

13
1
3
1 2 3 4 5 6
3.6 Opcional trituradora de tomate
La trituradora de tomates es un accesorio opcional disponible
con las picadoras serie 12 y 22. Está diseñada para triturar
tomates, licuar frutas (sin carozos) y verdura (cocida).
PARA PRESIONAR LOS TOMATES EN EL APARATO SE
DEBE UTILIZAR EXCLUSIVAMENTE EL MAZO PROVISTO
PARA EMPUJAR.
- Montar la boca 2y ajustarla
con el elemento para
sujetar accesorios 1.
- Introducir el sinfín 3dentro
de la boca 2.
- Introducir el filtro 4.
- Sujetar el filtro ajustando
la tuerca 5.
- Introducir y posicionar la
boquilla escurridora 6.
- Colocar los recipientes para
la recolección del puré y
para los desechos.
- Para el funcionamiento seguir las instrucciones
de la picadora.
3.7 Opcional cortadora de mozzarella
La cortadora de mozzarella es un accesorio opcional
disponible con las picadoras serie 12 y 22. Está
diseñada para cortar quesos, mozzarella, setas y
zanahorias utilizando los respectivos accesorios:
-cono n.1 para mozzarella
- cono n.2 para verduras en general
- cono n.3 para rallar
- cono n.4 para rebanar
2
4
3.6 Optional tomato liquidizer
The tomato liquidizer is an optional attachment to the series 12
et 22 mincer. It can extract the juice from tomatoes, and liquidize
fruit (with the stone removed) and (cooked) vegetables.
USE ONLY THE PRESSER SUPPLIED TO PUSH THE
TOMATOES INTO THE APPLIANCE.
- Fit the union 2 and fasten
using the accessory lock-
knob 1provided.
- Fit the auger 3 inside the
union.
- Fit the filter 4.
- Block the filter by means
of locknut 5.
- Fit and position the drip
trough 6.
- Fit the mince and waste
containers.
- For operation, see the mincer instructions.
3.7 Optional shredder
The shredder is an optional attachment to the
series 12/22 mincer. It can slice and shred
cheese, mozzarella, mushrooms, carots, etc.
using the appropriate attachment:
- cone n.1 for mozzarella
- cone n.2 for general vegetables
- cone n.3 for shredding or grating
- cone n.4 for slicing

4.1 Limpieza
Antes de proceder a la limpieza el aparato siempre debe
estar apagado y desconectado de la red eléctrica.
No sumergir el aparato en el agua. Evitar el uso de sustancias
corrosivas o abrasivas que puedan arruinar el metal.
No meter el aparato ni los accesorios en el lavavajillas.
Al concluir cada trabajo:
- Limpiar las superficies externas con un paño húmedo o con
una esponja.
- Desmontar todos los accesorios siguiendo las secuencias del
montaje a la inversa.
- Para limpiar los accesorios, utilizar agua y detergente neutro,
o productos que se utilicen para lavar utensilios de cocina.
- Secar siempre el aparato antes de volver a utilizarlo y antes
de guardarlo.
4.1 Cleaning
Turn off the appliance and always unplug from the mains
before cleaning. Do not immerse the appliance in water or
use substances or materials which can scratch or otherwise
impair the autside surface. Do not wasch the attachments
or the appliance in a dish-washer.
When each cycle of work is completed:
- Clean the external surface with a damp cloth;
- Remove the attachments;
- To clean the attachments, use neutral soap and water, or
products made for washing kitchen pans;
- Always dry the appliance before reusing or replacing it in its
box.
14
4.0 MANTENIMIENTO 4.0 MAINTENANCE
1
2 3
5 6
4
- Colocar el accesorio portaconos 2 y ajustarlo
con la empuñadura para fijar accesorios 1.
- Colocar la tolva 5que se suministra con la
cortadora de mozzarella.
- Levantar la tapa 6del portaconos, colocar el
cono 3que se desee utilizar y ajustarlo con la
tuerca 4.
- Ubicar el recipiente recolector.
- Para el funcionamiento seguir las instrucciones
de la picadora.
Para presionar los productos en el aparato se debe utilizar
exclusivamente el mazo provisto para empujar
- Fit the cone-holder accessory 2and fasten by
means of the accessory lock-knob provided 1.
- Fit the hopper 5equiped with mozzarella cutter
- Lift the cone-holder grate 6and fit the required
cone 3, subsequently fastening by means of the
nut 4.
- Fit the tray.
- For operation, see the mincer instructions.
Use only the presser supplied to push
the food in to the appliance
IMPORTANT
IMPORTANT
ADVERTENCIA
ADVERTENCIA

5.0 ASISTENCIA Y GARANTÍA 5.0 ASSISTANCE AND GUARANTEE
15
5.1 Asistencia
En caso de que el aparato no se encienda, antes de hacerlo
reparar se debe verificar:
- que esté conectado correctamente a la red eléctrica
- que el interruptor se encuentre en la posición “I” ENCENDIDO
- que haya tensión en la toma de corriente y en la instalación;
esto se puede corroborar conectando el aparato a una toma
de corriente que funcione indudablemente.
- que no haya cuerpos sólidos que impidan la rotación del motor,
en ese caso se debe limpiar el aparato.
Solicitar asistencia directamente al fabricante indicando:
modelo, número de serie y problema.
5.2 Normas de garantía
El aparato tiene una garantía de 24 meses a partir de la fecha
de venta. La garantía solo cubre reparaciones de los aparatos
comprados en los puntos de venta autorizados, si se demuestra
que presentan defectos en los materiales o en el ensamblaje
y en las condiciones que se establecen a continuación:
1- Se entiende por garantía la sustitución gratuita de todas las
partes que presenten defectos de fabricación. La garantía
caduca si no está acompañada por el recibo fiscal o por una
factura que certifique la adquisición. La garantía también
caduca en los siguientes casos:
a) intervenciones en el aparato o daños provocados por
descuidos;
b) si se utiliza el aparato sin respetar las advertencias presentes
en el manual de instrucciones;
5.1 Assistance
If the appliance fails to start, before taking it to be repaired,
check:
- the plug is fitted correctly in the socket;
- the switch is in position "1" ON;
- power is reaching the machine. Check this by connecting to
the appliance to a socket which you are sure is operating
correctly;
- clean the appliance whenever solids prevent correct motor
rotation.
For servicing, call company indicating:
model, serial number and problem.
5.2 Terms of guarantee
The appliance is guaranteed for 24 months from the date of
purchase. The guaramtee covers repairs to appliances purchased
from authorised sales outlets whwnever it can be shown that
the appliance is defective in material or workmanship and on
the conditions which here follow:
1- The guarantee provides for the free replacement of all those
parts which are of defective manifacture. The guarantee is
not valid unless accompanied by an official receipt or invoice
as proof of purchase. Morover the guarantee is not valid in
the following cases:
a) tampering with or damage to the machine due to incorrect
use;
b) use of the appliance which does not accord with the information
and advice in the instruction booklet;

16
c) daños provocados por operar el aparato en un ambiente que
no sea apropiado o por fenómenos que no dependan del
funcionamiento normal del aparato (irregularidades en los
valores de tensión y frecuencia de la instalación de red);
d) modificaciones o reparaciones llevadas a cabo por personal
o centros no autorizados por el fabricante.
2- La garantía tiene validez sólo si se complete el certificado
de garantía en el momento de la adquisición del aparato con
fecha, sello y firma del revendedor autorizado.
3- La solicitud de la intervención por garantía se podrá realizar
sólo en puntos de venta u oficinas autorizados. El aparato
defectuoso deberá estar acompañado por un certificado de
garantía que cumpla con los requisitos descritos en el punto 2.
4- Los gastos y riesgos de transporte no corren a cargo del
comprador.
5- No se sustituirá el aparato ni una prolongación de la garantía
después de una intervención por desperfectos.
6- El fabricante no responde por daños directos o indirectos,
de cualquier naturaleza, sufridos por personas o cosas y
provocados por la incorrecta utilización del aparato o por la
falta de uso del mismo durante el tiempo que requiera su
reparación.
PARA TENER DERECHO A LA PRESENTE GARANTÍA SE
DEBE ENVIAR EL CUPÓN ADJUNTO COMPLETO EN TODAS
SUS PARTES DENTRO DE LOS 10 DÍAS POSTERIORES A
LA ADQUISICIÓN DEL APARATO.
ESTÁ PROHIBIDA la reproducción total o parcial de textos o dibujos sin previa
autorización de la dirección. Todas las características, los datos de construcción
y las ilustraciones se basan en válidas especificaciones del momento de la
redacción del presente manual de instrucciones. Si el aparato presenta algún
problema que no está contemplado en este manual, contactarse inmediatamente
con el fabricante.
c) damage caused by a working environment unsuitable to the
appliance and by phenomena not dependent on its normal
functioning (incorrect voltage and frequency rating of mains);
d) repairs made by individuals or centres not authorised by the
manufacturing company.
2- The guarantee is considered valid only if the accompanying
certificate is fully completed at the time of purchase and
dated, stamped and counter-signed by the authorised dealer.
3- Request for repair under guarantee must be made exlusively
to authorised sales outlets or workshops. The faulty appliance
must have attached to it the certificate of guarantee with
details as outlined in point 2 above.
4- The costs and risks involved in transit are not at the purchaser's
expence.
5- Specific exclusion is made both to the replacement of the
appliance and the extension of the guarantee following
intervention to repair faults.
6- the production company is not responsible for damage of
any kind, either direct or indirect, to persons or property due
to misuse of the appliance. Neither is it responsible for the
appliance being out of service during the time necessary for
repairs.
TO OBTAIN THE RIGHT TO THE PRESENT GUARANTEE
THE ATTACHED GUARANTEE CARD, FULLY
COMPLETED, MUST BE POSTED WITHIN 10 DAYS
OF PURCHASE OF THE APPLIANCE.
It is FORBIDDEN to reproduce, even in part, the text and illustrations without
the prior authorisation of the management.
The features, construction data and illustrations are all based on information
correct at the tine of drafting the present instruction booklet. Should the appliance
present a problem not considered in this manual, contact the production company
immediately.

17
TS8 - TI8
PLACA MONOFÁSICA
RL1
Q1
C1 J2
CN1 = BOTONERA
CN1
Q2
T1
L1
LN1 N
CONDENSADOR
m
F12,5 V400
1-4 = LINEA
2-3 = MOTOR
C
C
Av
Av
PUENTE
M~

18
TS12 - TS22
PLACA MONOFÁSICA
PT MC STARTSTOP L
3
124
START
STOP
PUENTE
1-4 = LINEA
2-3 = MOTOR
PUENTE
FUSE
FUSIBLE 500mA
M~Av
Av
C
C
CONDENSADOR
m
F16 V400 (mod.12)
m
F20 V400 (mod.22)

19
P1
T1
1 2 4
35 7
6
C1 Q1
RL1
C3
RL2
NL L1 N1
START
STOP
L-N = LINEA
L1-N1 = MOTOR
C
CAv
Av
CONDENSADOR
mF16 V400 (mod.12)
mF20 V400 (mod.22)
PUENTE
C2
8
TERMICA
TS12 - TS22
PLACA MONOFÁSICA
M~

20
TS12 - TS22
PLACA TRIFÁSICA
L1-L2-L3 = LINEA
U-V-W = MOTOR
PUENTE CAMBIO
TENSION
1-2 = 230
1-3 = 400
PUENTE
STOP
START
VU START
WLSTOP MC
L2L1 L3 1 2 3
FUSE
FUSIBLE 500mA
M
3~

21
FUSIBLE 315mA
U-V-W = MOTOR
PUENTE
STOP
START
L1-L2-L3 = LINEA
PUENTE CAMBIO
TENSION
FUSE
3
54
400V
W
TL1
2 1 F1
U V
L1 L2 230V
T1
L3
76
TERMICA
TS12 - TS22
PLACA TRIFÁSICA
M
3~
Other manuals for TS8
1
This manual suits for next models
6
Table of contents
Other Diamond Meat Grinder manuals