diapath Giotto User manual

1
Giotto
Automatic stainer
User Manual

2
Manufacturer:
Diapath S.p.A.
Via Savoldini,71
2 057 Martinengo (BG) Italy
Tel. (+39)0363.986. 11
Fax (+39)0363.9 8.000
www.diapath.com
info@diapath.com

3
Manual information
This document is protected by copyright laws; copyrights of this document belong to Diapath S.p.A.
It is strictly forbidden, full or in part, to modify this manual in absence of an explicit authorization.
Diapath S.p.A. is not obliged to regularly update this manual, or to regularly send reviewed or updated versions of this
manual to its customers.
Information contained in this manual is subject to changes without prior notice.
Diapath S.p.A. guarantees the accuracy of the information present in this manual as the result of thorough research; if
information is incorrect or unclear, please contact Diapath S.p.A. or the distributor. Diapath S.p.A. is not responsible for
any kind of material damages or other damages related to non-compliance with indications or specific information
present in this manual.
Diapath S.p.A. continuously adopts a development policy and reserves the right to make changes and improvements to
any product described in this manual without prior notice.
The Serial number and date of manufacture are reported on the registration plate attached on the instrument rear part.
Inspired to:
Giotto (Vespignano, 1266/7 – Florence, 8
th
January 1337) Italian painter, architect and sculptor.
Since his childhood he showed a particular flair for art and drawing, for these reasons he started working at
Master Cimabue’s workshop in Florence.
Between 1288 and 1292 he painted a lot of frescos in the Cathedral of Assisi.
The Giottesco style began in Rimini and Ravenna.
Giotto’s works were fundamental for the development of Italian and European art: the two-dimensional
style, typical of the Byzantine period, was abandoned and the figure of mankind began to assume volume
inside space.
A lot of documents, dated 133 , shows his return in Florence as an architect, where he planned and
supervised all the architectural works of the city, such as the bell tower of the cathedral of Santa Maria del
Fiore.
Manual revision: Rev. 07
Edition date: 30
th
May, 2018
3

Contents
Preface ............................................................................................................................................................... 6
Safety information .............................................................................................................................................. 8
Compliance with safety rules ............................................................................................................................... 9
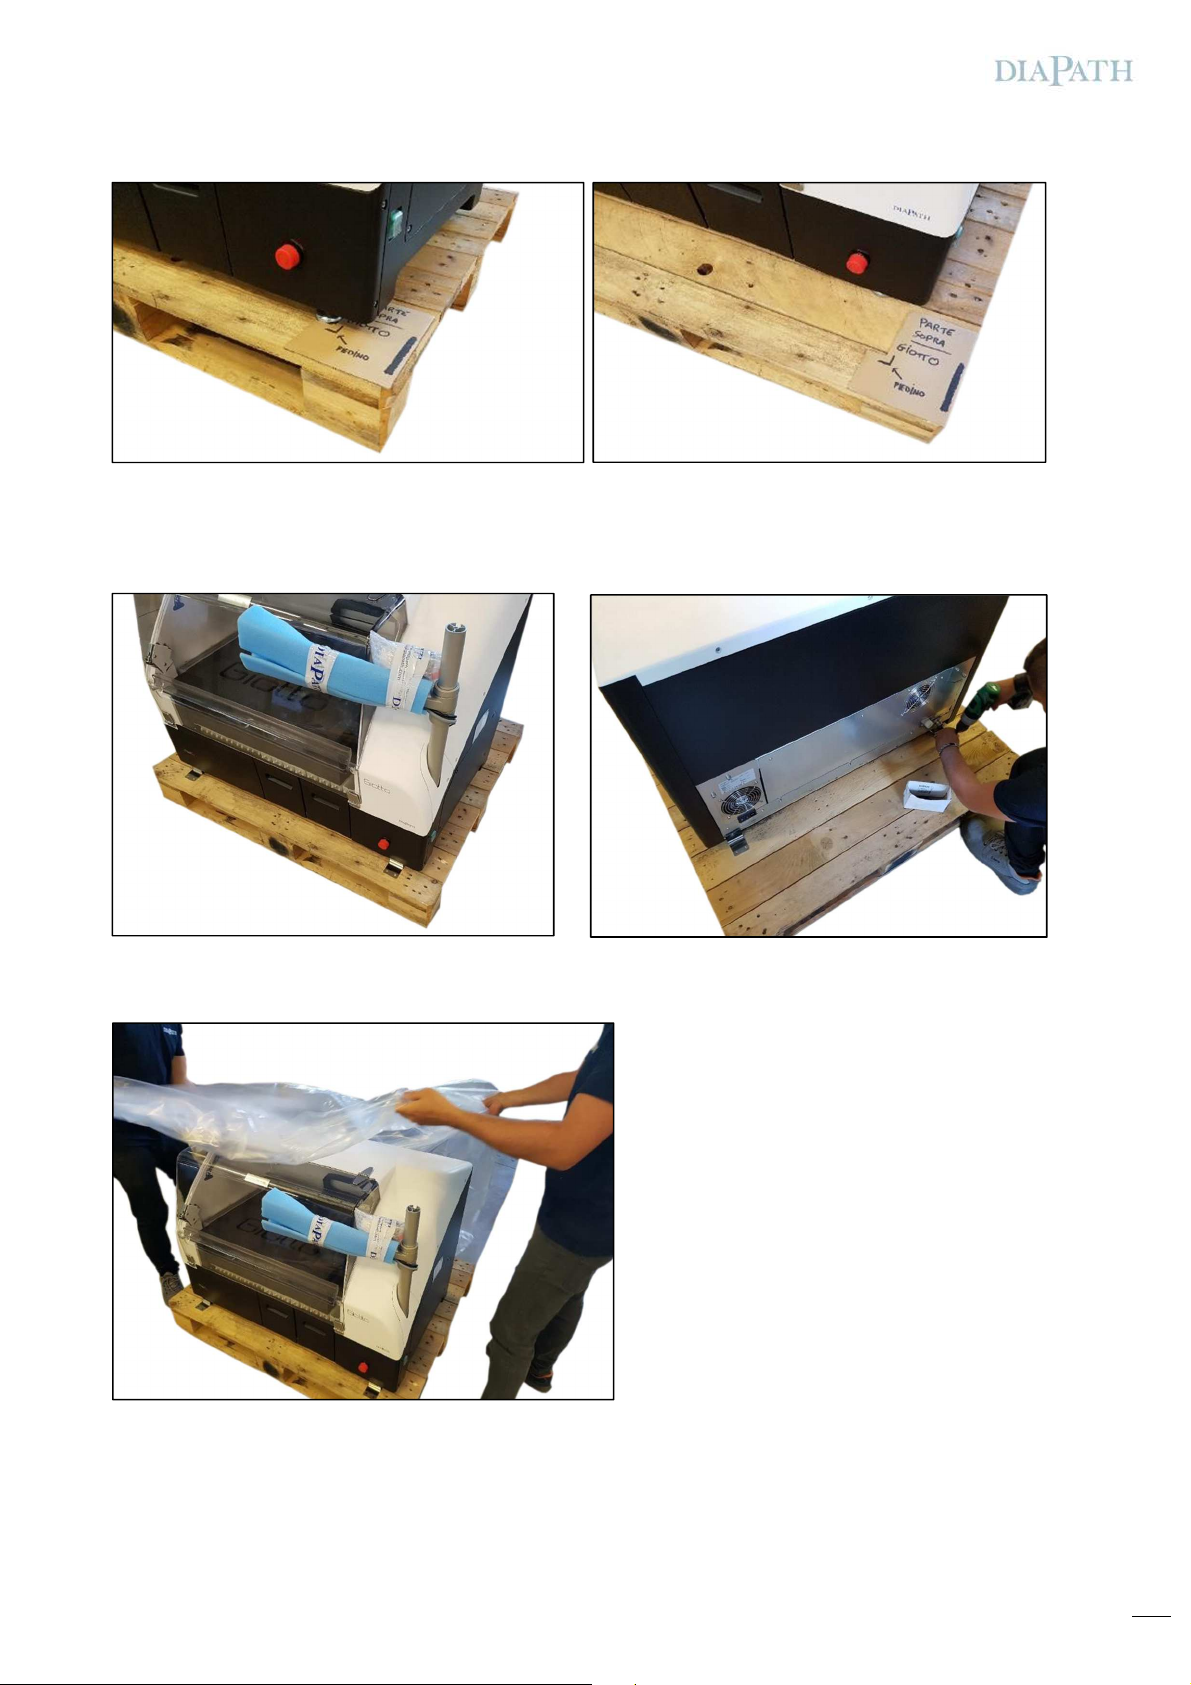
1 Packing instructions ................................................................................................................................ 10
2 Giotto stainer components...................................................................................................................... 18
2.1 Instrument overview ............................................................................................................................ 18
2.2 Instrument rear part............................................................................................................................. 19
2.3 Instrument features ............................................................................................................................. 19
2. Packing list .......................................................................................................................................... 20
2.5 Accessories .......................................................................................................................................... 20
2.6 Technical data ..................................................................................................................................... 21
2.7 Reagent reservoir ................................................................................................................................. 22
2.7.1 Loading and replacement of reagents ................................................................................................ 22
2.8 Water reservoir .................................................................................................................................... 22
2.8.1 Loading and replacement of water reservoirs ...................................................................................... 23
Instrument setting .................................................................................................................................. 24
3.1 Placement and installation .................................................................................................................... 2
3.1.1 Requirements dor the installation ...................................................................................................... 2
3.1.2 Unpacking ....................................................................................................................................... 2
3.1.3 Re-packing ...................................................................................................................................... 25
3.1. Checks before the use ...................................................................................................................... 25
3.1.5 Requirements for connections ........................................................................................................... 25
3.2 Water connection ................................................................................................................................. 26
3.3 Air drainpipe assembly .......................................................................................................................... 28
3. Instrument level................................................................................................................................... 28
3.5 Electrical connection ............................................................................................................................. 29
3.5.1 P
ROCEDURES BEFORE THE USE
.................................................................................................................. 30
3.6 Instrument starting .............................................................................................................................. 30
3.7 Check list before the start up ................................................................................................................ 30
3.8 Alarm system ....................................................................................................................................... 31
3.9 Transport ............................................................................................................................................ 31
3.10 Quick installation guide ......................................................................................................................... 31
4 Software functionalities .......................................................................................................................... 2
.1 User interface ...................................................................................................................................... 32
.1.1 Main screen ..................................................................................................................................... 32
.1.2 User authentication .......................................................................................................................... 32
.1.3 Key symbols .................................................................................................................................... 33
.1. Values introduction .......................................................................................................................... 33
5 Giotto setup ............................................................................................................................................. 4
5.1 General Setup ...................................................................................................................................... 3
5.1.1 Language, Time and date ................................................................................................................. 3
5.1.2 Oven ............................................................................................................................................... 35
5.1.3 Rinsing of water reservoirs ................................................................................................................ 35
5.1. Timings ........................................................................................................................................... 36
5.1.5 Racks .............................................................................................................................................. 36
5.1.6 Protocols ......................................................................................................................................... 37
5.1.7 Renewal of filter or staining kit .......................................................................................................... 38
5.1.8 Instrument switching off ................................................................................................................... 38
5.2 Roles and permissions management ...................................................................................................... 39
5.3 Reagent management .......................................................................................................................... 0
5.3.1 Add/modify reagent.......................................................................................................................... 0
5.3.2 Park setting ..................................................................................................................................... 0
5.3.3 Reservoirs setting ........................................................................................................................... 1
5. Create and modify staining protocols ..................................................................................................... 3
5. .1 Link the rack to the protocol ............................................................................................................ 5
5.5 S
3
Functionality .................................................................................................................................... 6
5.6 Scan of reagent level ............................................................................................................................ 8
5.6.1 Reagent refill and replacement .......................................................................................................... 9
5.7 Open drawer ....................................................................................................................................... 50
5.7.1 Drawer IN ....................................................................................................................................... 50
5.7.2 Rack loading .................................................................................................................................... 51
5.7.3 Loading of an unknown handle .......................................................................................................... 51
5.7. Drawer OUT .................................................................................................................................... 51
5.7.5 Door opening ................................................................................................................................... 51

5
5.8 Staining in progress.............................................................................................................................. 52
5.8.1 Staining interruption ......................................................................................................................... 53
5.9 Archive................................................................................................................................................ 5
5.9.1 Staining history ................................................................................................................................ 5
5.9.2 Reagent replacement history ............................................................................................................. 55
5.9.3 Alarm history ................................................................................................................................... 55
5.10 Emergency and error ............................................................................................................................ 55
5.11 Alarm list ............................................................................................................................................. 56
5.12 Smart LED System ............................................................................................................................... 57
5.12.1 A
COUSTIC ALARMS
............................................................................................................................ 57
5.13 Water Pressure System alarm................................................................................................................ 57
5.1 Data Import and Export ........................................................................................................................ 57
5.15 Report and prints ................................................................................................................................. 57
6 Cleaning and maintenance ...................................................................................................................... 58
6.1 LCD display cleaning ............................................................................................................................ 58
6.2 External surfaces ................................................................................................................................. 58
6.3 Internal surfaces .................................................................................................................................. 58
6. Instrument cleaning frequency .............................................................................................................. 58
6.5 Charcoal filter replacement ................................................................................................................... 59
6.6 Scheduled maintenance ........................................................................................................................ 59
6.6.1 Cleaning of reagent reservoirs ........................................................................................................... 59
6.6.2 Cleaning of water reservoir ............................................................................................................... 59
6.6.3 Fuse replacement ............................................................................................................................. 60
6.6. Preventive maintenance .................................................................................................................... 60
7 Troubleshooting ...................................................................................................................................... 61
8 WEEE DirectivE ........................................................................................................................................ 62
8.1 Uninstallation and disposal .................................................................................................................... 62
9 Diapath instrument warranty ................................................................................................................. 62

6
Preface
Destination of use
Giotto is an automatic stainer specifically for the staining of slides.
Giotto is ideal for the automated production of histological, cytological and histochemistry staining procedures.
It is to be used in Anatomic Pathology labs and wherever the staining of histological sections or cytological specimens on slides are
conducted.
The instrument should be used, accordingly to all instructions present in this manual, only by well-trained, authorized staff.
Any improper use of the instrument must be considered as a “not-allowed” operation.
It is possible to configure the instrument, assign reagents to the reservoirs and create or modify staining procedures that foresee the
placement of racks into the reservoirs for a specific length of time.
In order to prevent dangerous situations and for the correct use of the instrument, this manual should be kept and read.
The operators must be adequately trained in its use and must respect all safety rules and its use limits.
Instrument maintenance, due to trouble or malfunction, should only be performed by trained, authorized Diapath S.p.A. staff.
The instrument complies with CISPR 11 Class A rules: in case of domestic use, it may cause radio interferences. In this case, a
measurement and mitigation of such interference is necessary.
Before installing the instrument, perform an analysis of electromagnetic interferences.
Do not use the device near sources of strong electromagnetic radiations, such as radiofrequency wave generators. In this case the
radiations may interfere with normal functioning of the instrument.
The instrument has been designed according to the legislative decree 332/00 of 08th September 2000 “Accomplishment of 98/79/CE
directive of 27th October 1998 concerning in vitro diagnostic medical devices” respecting the following rules:
•2007/ 7/CEE Directive 93/ 2/EEC concerning the updating of Directives 98/79/EEC on medical devices and medical devices in
vitro, which came into force on 21/03/2010 by Legislative Decree 25/2010.
•Legislative Decree 27
th
January 2010, n. 17 implementing Directive 2006/ 2/EC on machinery and amending Directive
95/16/EC relating to lifts.
•ISO 9001(*): quality management system requirements.
•ISO 13 85(*): quality management system requirements for medical devices. Requirements for regulatory purposes and
specific requirements of the application of ISO 9001(*)
•UNI CEI EN ISO 1 971(*): application of risks management to medical devices
•EN 61326-1(*): Electrical equipment for measurement, control and laboratory use - EMC requirements Part 1: General
requirements.
•EN 61326-2-6(*): Electrical equipment for measurement, control and laboratory use - EMC requirements. Part 2-6: Particular
requirements - In vitro diagnostic medical devices (IVD).
•EN 61000-3-2(*): Electromagnetic compatibility (EMC) Part 3-2: Limits - Limits for harmonic current emissions. (Equipment
with input current <= 16A per phase).
•EN 61000-3-3(*)+ A1(*)+ A2(*): Electromagnetic compatibility (EMC) Part 3-3: Limits - Limitation of voltage fluctuations and
of flicker in low voltage supply systems for equipment with rated current <= 16A and not subject to conditional connection.
•EN 61010-1(*): Safety requirements for electrical equipment for measurement, control and laboratory use. Part 1: General
requirements.
•EN 61010-2-101(*): Safety requirements for electrical equipment for measurements, control and laboratory use. Part 2-101:
Particular requirements for medical equipment for in-vitro diagnostics.
•The LED light according to standard EN62 71 and classified in 1 Risk Group Category.
(*)
In the applicable edition

7
Quality control
Diapath S.p.A. adopts quality management system ISO 9001(*) and ISO 13 85(*) to project, make and improve the technical-scientific
solution for the customer in medical and diagnostic in vitro systems, assuring high quality services with the help of highly qualified,
motivated staff to contribute to the improvement of Diapath S.p.A. products.
Diapath S.p.A. constantly strives for customer satisfaction, trying to perceive their expectations and treating the customer without any
discrimination. Diapath S.p.A. assures the application of normative requirements.
Quality assurance of data furnished by Diapath S.p.A. is obtained through these activities:
•Regular use of reference materials
•Performing tests on all production
•Correlation of different results
The internal quality control foresees to monitor the most difficult passages of an analytic process so as to verify their stability, to assure
that quality parameters estimated during the validation or check of the method are valid also for real instruments and that they won’t
deteriorate over time.
Diapath S.p.A. tests its own products in accordance with some internal procedures, to reduce possibility of anomalies during the
operation.
To identify and to find out its own instruments, Diapath S.p.A. uses internal procedures which allows us to find production recording,
assembling recording, tests recording, serial number or batch code and configuration recording.
Instrument information
All information present in this manual only is with regards to the device shown on the cover.
On the instrument rear part, there is the registration plate with the serial number (Image - 1).
Storage and handling
For correct conservation and functioning of the instrument, all the instructions provided in this manual concerning the maintenance and
the installation must be respected.
Also shown below are the environmental requirements that must be respected:
The instrument can work within 80% relative humidity conditions for temperatures up to 31°C with a linear decrease up to 50% at the
temperature of 0°C. Voltage variation can’t exceed +/-10% the nominal value.
The instrument is planned only for internal use and up to 2000 m o.s. altitude
Storage a
nd transportation temperature range:
F
rom +5°C to + 0°C
Storage humidity:
80%
Working temperature range:
F
rom +5°C to + 0°C
Image 1
–
Registration plate

8
Safety information
Mentioned agreement and graphic symbols
Danger - The danger instructions signal situations that might cause death or serious lesions
Caution - The caution instructions signal situations that might cause physical lesions to people or damages to things
Biohazard - The biohazard instructions signal situations that might cause the contamination of people or parts
involved in the process
Heated surfaces - Heated surface instructions signal surfaces that get hot during use. Risk of burns, avoid direct
contact
Instruction of danger
Never disassemble, modify or repair the instrument or one of its parts without written authorization by Diapath S.p.A.
Do not use any kind of different power supply from the mentioned ones
For a correct use of reagents, please refer to their safety data sheets
Instruction of caution
Do not place objects that are not involved in the use of the instrument
The use of specific individual protection devices is recommended (for instance: gloves)
Replace reagents once exhausted or contaminated
For the disposal of exhausted reagents, please comply with current rules of the company/State where the
instrument is used
Instruction of biohazard
Pay attention to the possible biological hazard of the parts involved in the process
Special individual safety measures should be used by operators, in accordance with the safety standards in the
laboratories and product safety data sheets in relation to current rules

9
Safety training
All the operators must be trained to use Giotto automatic stainer safely.
After such training the operators must have understood that:
•The instrument must be connected to a voltage source in accordance with electrical data label
•An instrument use different from Diapath S.p.A. instructions might compromise its functioning and the safety of the
operator
User groups
Giotto automatic stainer must be used only by qualified and well-trained operators.
All users can proceed with the use of the automatic stainer only after reading this user manual and when all technical details are
familiar to them.
Compliance with safety rules
All regulations related to safety, local codes and instructions present in the manual or on the equipment must be carefully observed to
ensure personal safety and to prevent damages to both the automatic stainer and to equipment connected to it. If the equipment is
used incorrectly, the protection provided might be compromised
Definition of adopted symbols
Read carefully the manual before the
instrument starting
In vitro diagnostic use
Manufacturer
Built
in
Danger
Disposal
European Community apporval
mark
Electrical shocks risk
See the user manual
Important information for the user
Diapath innovation

10
1Packing instructions
Cover PC as following:
Cover the PC using the supplied plastic bag and place protection as shown below (Picture 1).
Use the original box and insert the PC inside (Picture 2-3)
Place the instrument on a pallet (Picture ).
Take care that the instrument stays within the pallet and position all trays. Place racks within trays.
Picture 1
Picture 2
Picture 3
Picture

11
Place the lid over the surface (Picture 5).
Insert black polystyrene box and all accessories (pipes, connections, documentation and all racks in excess) Picture 6.
Then, place polystyrene black lid (Picture 7).
Cover monitor bracket using blue foam rubber (Picture 8)
Picture 5
Picture 8
Picture 7
Picture 6

12
Use adhesive tape to cover it. Remove LED light placed over the bracket and cover it with bubble-wrap (Picture 9 -10)
Using adhesive tape, fix LED light as shown in the picture (Picture 11).
Move the bracket as shown below (Picture 12).
Picture 9
Picture 10
Picture 11
Picture 12

13
During packaging it is good practice to place correctly the instrument using suitable devices (Picture 13 – 1 ).
Procedure not necessary for re-packaging due to screw holes previously done. See following pictures:
Place stop metal around instrument foot (Picture 15). Fix it using screws (Picture 16). Repeat the procedure for all feet.
Cover the instrument using the plastic protection (Picture 17).
Picture 13
Picture 1
Picture 15
Picture 16
Picture 17

1
Place the plastic protection taking care to cover the instrument avoiding air bubbles (Picture 18 – 19 -20 -21 – 22).
Final result:
Picture
18
Picture 19
Picture 20
Picture 21
Picture 22

15
Place external packaging components (Picture 23 – 2 – 25).
Take care that all four corners fit as shown below
At this point
Picture 23
Picture 2
Picture 25

16
Start placing soft angles on instrument external and frontal part as shown below (Picture 26 – 27).
Place PC box in the rear part and place soft angle as shown (Picture 28 – 29).
Add packaging second wooden protection (Picture 30 -31).
Picture 26
Picture 27
Picture 29
Picture 28
Picture 31
Picture 30

17
Third and fourth wooden protection too, taking care to align the angles as shown below (Picture 32 – 33).
Place the lid and fix it (Picture 3 – 35).
Final result:
Picture 32
Picture 33
Picture 35
Picture 3
Picture 36
Picture 37

18
2Giotto stainer components
2.1 Instrument overview
Picture 38 - Giotto automatic stainer
1. 12” colour Touch screen 2. LED status
. Robotic arm for rack movement 4. Double-opening door for the use under the hood
5. Reagent reservoir 6. Water reservoirs
7. Oven workstation 8. Drain drawer (OUT)
9. Fill drawer (IN) 10. Emergency head
11. Switch ON/OFF 12. Safety lock
1 . Electric compartment 14. Running water adjusted
15. Activated charcoal filter Handle (Optional accessory)

19
2.2 Instrument rear part
Instrument rear part – Picture 39
1. Input power supply
2. Input running water
3. Liquids drain point
. Discharge of fumes and vapours regarding staining reservoirs
Picture 39 - Instrument rear part
2. Instrument features
•Automatic stainer for H&E, Papanicolau and special simultaneous staining
•High productivity (max 12 slide holders simultaneously)
•STAIN ID technology, technology that allows automatic identification of handles and specific procedures related to them
•S
- Simultaneous Staining Scheduler, new software that generates the best possible configuration between the 0
workstations present inside the instrument, in accordance with laboratory procedures
•Automatic scanning of reagents level, automatic detection system that allows an adequate level of reagents and staining to
be maintained.
•High efficiency noiseless robotic arm that allows fast, accurate movements; before the movement to the next reagent, it
emulates manual dripping movement by placing the rack into inner reservoir sides. This procedure protects the level of the
reagents and guarantees a more accurate cleaning of staining reservoirs, it also limits cross-contamination
•Smart LED System, acoustic and visual warning about the status of the system
•Water Pressure System is a sensor that informs the operator of the possible absence of water flow into the water system
•The notice allows the user to intervene in time, in order to avoid the lack of differentiation of hematoxylin into running water
•Unlimited number of memorable staining procedures
• loading stations (drawer IN)
• unloading stations (drawer OUT)
•Continuous loading, management and opening of reagent drawer and IN/OUT drawers through software in order to avoid user
exposure to harmful vapours
•From 2 to washing stations (customizable)
•From 26 to 28 reagent stations (customizable)
•Alarm for exhausted reagent replacement trough reagent management system
•Only one cap for the reservoirs surface that allows reagent reservoirs to be covered and uncovered with a single gesture.
•Colour touchscreen monitor
•Easy-to-use, Italian and English user interface
•Graphic representation regarding the state of the procedures
•Activated charcoal filter and fumes conveyor for external connection
•Emergency head
WARNING
In order to avoid damages to the instrument or to the specimens, Diapath S.p.A. recommends to use only original spare

20
2.4 Packing list
Giotto Automatic stainer configuration consists of:
1. Installed parts and accessories:
Code
Descri
ption
Quantit
y
SDSGT9000
Giotto A
utomatic stainer
01 p
c
SDSGT0003
Giotto reagent reservoirs
3 p
cs
SDSGT
90
35
Giotto water reservoirs
0 p
cs
SDXCE0109
PC screen 12”
01 p
c
SDXFG0001
Activated charcoal filter
01 p
c
2. Power cable kit:
Cod
e
Descri
ption
Quantit
y
SDXCE0079
Power cable with straight Schuko plug 3m
01 p
c
SDXCE0070
Power cable with straigh
t
UL plug 2m
01 p
c
SDXCE009
Power cable China plug, angle plug 10° m
01 p
c
. Accessories box:
Optional
Code
Description
Quantity
SDSGT0063
Cap for left side
01 p
c
SDSGT0003
Giotto reagent reservoirs
02 p
cs
SDSGT0
103
Reservoir cover
01
pz
53CV30
Rack for 30 slides
10 p
cs
GP1811
Handle for rack 30 slides, white*
10 pcs
0006
Draining pipe 19X22 mm
01 p
c
SDSGT00 2
Suction conductor
01 pc
SDXRA0038
Union elbow r½
-
½” f/f OT NI
01 pc
SDXRA0028
Rubber holder connector ½” Ø20mm
01 pc
SDYFS0003
ABA DIN W1 clamps, 50
-
65 MM.9
02 pcs
SDXCI00 0
ff filling pipe connection and 3/ bend L 200
01 pc
SDXFU0005
Fuses 5x20 F6,3 AL 250V
02 pcs
SDXFG0001
Activated charcoal filter
01 pc
SDXET0020
Numbered label sheet for handles
01 pc
4. Informative documentation:
C
od
e
Description
Quantit
y
MKT0130
User Manual
Giotto, EN
-
IT
01 p
c
N/A
CE declaration
01 pc
N/A
Electrical test
01 pc
2.5 Accessories
Available accessories
SDSGT0003 Reagents reservoir 01 pc
SDSGT9035 Water reservoir 01 pc
53CV30 Racks for 30 slides 01 pc
GP18111 Handle for rack 30 slides, pink* 01 pc
GP18112 Handle for rack 30 slides, yellow* 01 pc
GP18113 Handle for rack 30 slides, grey* 01 pc
GP18115 Handle for rack 30 slides, green* 01 pc
GP18116 Handle for rack 30 slides, orange* 01 pc
GP1811 Handle for rack 30 slides, white* 01 pc
GP18200 Rack 30 slides compatible with Leica coverslipper 01 pc
SDSGT9085 Adapter kit 20 slides for Sakura rack 01 pc
SDSGT9086 Adapter kit 30 slides for Thermo rack 01 pc
SDSGT9087 Adapter kit 30 slides for Medite rack 01 pc
SDXET0020
Numbered label sheet for handles 01 pc
SDXFG0001
Activated charcoal filter 01 pc
Consumables
SDXFG0001 Activated charcoal filter 01 pc
SDXCE0078 RFID card 01 pc
*with STAIN ID technology
This manual suits for next models
1
Other diapath Laboratory Equipment manuals
Popular Laboratory Equipment manuals by other brands

Axygen
Axygen AXYPET AP-10 manual

Zymo Research
Zymo Research ZymoPURE Plasmid Miniprep instruction manual

Velp Scientifica
Velp Scientifica OHS 200 DIGITAL instruction manual

Waters
Waters SYNAPT G2 Operator's, overview and maintenance guide

Qsonica
Qsonica Sonicator Q700 Operation manual

Baker
Baker SterilGARD e3 SG404 Operator's manual