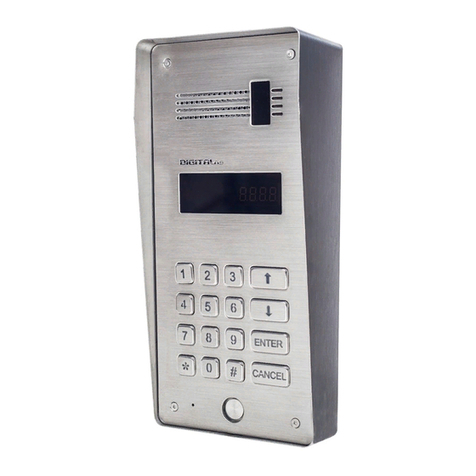
DIGITALas DD-5100 Owner's manual

Digital Door phone
DD-5100

Table of Contents
Chapter . About DD-5 00 door phone.........................................................................................................3
. . General features of the DD5 00 Digital Door phone........................................................................3
.2. Dimensions.........................................................................................................................................4
Chapter 2. Components of the System...........................................................................................................6
Chapter 3. Connection of DD-5 00 door phone............................................................................................7
3. . A standard wiring diagram.................................................................................................................7
3.2. Video camera wiring diagram............................................................................................................8
3.3. Door phone connection to the network..............................................................................................8
Chapter 4. Programming menu description................................................................................................. 5
4. . Activation of programming mode:................................................................................................... 5
Leaving programming mode:......................................................................................................... 5
4.2. Programming menu overview.......................................................................................................... 5
4.3. DD-5 00 programming manual.......................................................................................................2
4.3. . Actions with identificators........................................................................................................2
Add a new identificators................................................................................................................2
Add Service identificators.............................................................................................................2
Auto Add function.........................................................................................................................22
Delete identificator........................................................................................................................22
Delete identificator, related to sequence number......................................................................22
Delete identificator, related to user ID......................................................................................22
Delete all identificators from the memory................................................................................22
Delete system identificator, related to sequence number..........................................................22
4.3.2. Actions with codes....................................................................................................................22
Set/change users door unlock code................................................................................................23
Change Service PIN (SPIN) code..................................................................................................23
4.3.3. System settings.........................................................................................................................23
Setting of unlock delay time..........................................................................................................23
Selection of a lock type..................................................................................................................23
Access control settings...................................................................................................................24
Door unlock timer in error case.....................................................................................................24
4.3.4. Volume control..........................................................................................................................24
Indoor volume control...................................................................................................................25
Outdoor volume control.................................................................................................................25
System signals sound control.........................................................................................................25
4.3.5. User (subscriber) administrating..............................................................................................25
Disable...........................................................................................................................................25
Disable a user according to ID..................................................................................................25
Disable a group of users ID.......................................................................................................26
Enable............................................................................................................................................26
Enable a user according to ID...................................................................................................26
Enable a group of users ID........................................................................................................26
4.3.6. Setting of addressing................................................................................................................26
Regular addressing.........................................................................................................................26
Shifted addressing..........................................................................................................................26
Hotel addressing............................................................................................................................27
4.3.7. Network settings.......................................................................................................................27
a) main menu (default configuration – network disabled). ...........................................................28
b) network settings menu for L type configured doorphone. ........................................................28
c) network settings menu for H type configured doorphone.........................................................28
4.3.8. Reset to factory settings............................................................................................................29
Chapter 5. Doorphone net types and configuration.....................................................................................30

DD-5 00
5. . Introduction to Net configurations...................................................................................................30
5.2. Ways to connect DD5 00 to Network (Net types)...........................................................................30
5.2. . NET ........................................................................................................................................30
5.2.2. NET2 .......................................................................................................................................30
5.2.3. NET3........................................................................................................................................3
5.3. Network configuration.....................................................................................................................3
5.3. . Net configuration examples......................................................................................................3
5.4. Error codes.......................................................................................................................................3
Chapter 6. Error, its identification and troubleshooting...............................................................................32
User Manual.................................................................................................................................................33
. How to use a door phone:....................................................................................................................33
2. Entering from outside..........................................................................................................................33
3. Internal door unlock............................................................................................................................33
4. Changing of user’s PIN code:.............................................................................................................33
5. Programming of new identificators.....................................................................................................34
2

Chapter 1. About DD-5100 door phone
DD-5100 is a cutting edge nowadays door phone of a high protection level and a modern design, intended
for blocks of flats and could be used in an unfriendly environmental conditions.
Door phone is created, considering the cutting edge technical solutions. Outdoor station panel, system
controller, commutator and other parts are integrated in one unit of a door phone, so less material is used for
mounting the system and more time is saved.
mm stainless steel outdoor station panel of a new design contains a bright and resistant to external
influence and kicks of vandals, LED display. A outdoor station panel of small dimensions (width – 1 0 mm, height –
06 mm) could be easy mounted even in narrow areas (options: inserted panel or mounted above the plaster).
Keyboard light switches on automatically only in dark period, so more electricity is saved. A new generation
keyboard of a door phone is resistant to kicking. Similar keyboards are used in cash points with buttons, able to
withstand more than a million pressings.
There is a possibility to reduce system sound signals to the minimum (a high level of sound usually annoys
residents of the first floor), when keeping the same conversation sound.
Comfortable handsets suit for a modern interior. Due to mounted plug-switch a call sound could be switched
off at nights. Entrance doors could be opened using an individual 4-digits door unlock code, presented to each flat.
Residents could independently program or change door unlock codes and extra Tags; an operation lasts only -3
minutes.
1.1. General features of the DD5100 Digital Door phone
•Possibility to connect up to 55 users
•Duplex audio connection
•Two-Wire connection line
•TM Tags reader *
•RFID Tags reader *
•Internal memory of 1376 Tags
•Individual door unlock code
•Possibility to turn-off door unlock codes
•Possibility to add six Service Tags **
•The doors could be opened: by entering the door unlock code, using TM or RFID Tags, by pressing door
unlock button, or during conversation with a guest by pressing unlock button on the handset
•Operating temperature -40 Co to +85 Co
•Small dimensions – 1 0x 60x30 mm
•All system is supplied by a sole power supply 1 V
•Low energy consumption. Duty mode with keyboard light – 1 VDC, 85 mA + electric flow of electric lock
•Error indication
•Digital volume control of loudspeaker, microphone and the system sound separately
•Possibility to disable separate users or disable door unlock function
•Three types of addressing: regular, shifted and hotel
•A bright 4-digits LED display
•Keyboard with buttons, able to withstand more than a million pressings
•Possibility to install a video camera
•Options: inserted panel or mounted above the plaster
•Audible and visual indication
•Automatic lightening of a keyboard during a dark period
•Possibility to connect several systems to a network
•Protection of Service PIN (SPIN) code
•Protection from an electroshock
•Unlimited amount of Tags, related to one User's ID
•Comfortable and easy system programming
•Possibility to program/change door lock codes by the User interface
•Possibility to program TM/RFID Tags by the User interface
* DD-5100T – door phone with TM Tag reader, DD-5100R – door phone with TM and RFID Tag readers
** Service Tags are used in order to simplify system servicing (Page 15. Activation of Programming mode)o
3

DD-5 00
1.2. Dimensions
Fig. 1: Dimensions of DD-5100 door phone
Fig. 2: Dimensions of door phone rain shield DR-1
4
1 3
4 5 6
7 8 9 ENTER
0#CANCEL
1 0 110
110
30
33
30
31
30
33
61
1 0
51
110
63
1
30
33
30
33

Fig. 3: Dimensions of Name frame NF-1
5
1 0 110
110
30
3
30
31
30
3
61
1 0
51
110

DD-5 00
Chapter 2. Components of the System
Call module of a door phone DD-5100
Call module is the main unit of a door phone system with a loudspeaker, microphone and a 4-digits LED
display, also anti vandalism keyboard, and electronic Tag readers. Possibility to install a video camera.
DD-5100T – call module with TM Tag reader
DD-5100R – call module with TM and distant RFID Tags reader
Door phone rain shield DR-1
Door phone rain shield is needed in order to arrange a door phone DD-5100 in the easiest way, avoiding
insert into a plaster. Rain shield protects an appliance of direct rain and other environmental factors.
ame frame F-1
Name frame NF-1 allows to write surnames of residents, titles of companies, to introduce advertisement
texts etc. NF-1 is made of stainless steel panel, double organic glass mount with lightening and paper for printing
your information. Surname frame matches design and dimensions of DD-5100, so could be mounted together.
Power supply
1 VDC 1.5 a stabilized power supply for the whole door phone system
Electronic lock
DD-5100 call module could manage two types of electric locks (electric opener and electromagnetic lock),
managed by a permanent 1 V flow. A nominal flow for electric lock must not exceed 0.8A. Lock type and locking
delay time are set by the program.
Door unlock button
Door unlock button used for unlocking the door, when leaving the object. In this case any standard button
with normally opened contacts is used.
Audio handsets
DD-5100 door phone could be connected with DG-H1 and DG-H type receivers, installed to all subscribers
in order to talk to a guest, calling from the outside call module. After the conversation one has a possibility to unlock
the door, pressing a button on a conversation appliance. DG-H1 contains another extra button, used for unlocking
of the second entrance door or corridor door. Sound of receiver’s signal could be switched off by the switch,
mounted on a conversation appliance.
Video/audio adaptor ADV 100
ADV 100 allows to connect analogous video/audio devices.
etwork connection adaptor DD-S2.1
In order to connect two or more call modules to a network, DD-S .1 adaptor could be used. Three call
modules could be connected using one adaptor. In order to connect more modules with one adaptor, cascade DD-
S .1
6

Chapter 3. Connection of DD-5100 door phone
3.1. A standard wiring diagram
For basic usage of DD5100 doorphone, only connections made to right connector (see Fig. 4) are
mandatory. A minimal standard DD-5100 door phone completion involves:
•Door phone module DD-5100
•Stabilized power supply (1 V, 1.5 A)
•Electronic lock
•Door unlock button
•Door phone handsets.
Left connector is dedicated for camera or external RFID reader.
Requirements for wire diameters are given in table 1.
Main contacts (mandatory connections, needed for basic doorphone operation):
GND, LGND – ground contact.
P1 V – power supply positive contact,
UNL – contact of inner door opening switch,
LINE – positive line contact (line connects all handsets to doorphone),
LC- – negative contact of electric lock or electromagnet,
LC+ – positive contact of electric lock or electromagnet. By default doorphone drives electromagnet. To
drive electric lock, appropriate settings should be done in doorphone settings menu, please refer to menu section
3. on page 18.
Additional contacts (used to implement specific features):
D0, D1 – contacts for „Wiegand“ protocol based RFID reader data lines. RFID reader works only with
special software equipped DD5100 (if during boot R0T0, R1T1 or R1T appears on screen, Your DD5100
7
Fig. 4: DD5100 digital doorphone wiring diagram
L-IN
LINE
LGND
LC-
LC+
GND
P1 V
Regulated DC
Power Supply
(1 VDC, 1.5A)
Door unlock
switch
Communication line
Handsets
Name list frame
lighting (1 V, 300mA)
UNL
GND
ILMN
BUS
D1
D0
CPW
GND
CAM

DD-5 00
supports RFID reader),
GND – ground contact for camera,
CAM – contact to connect video signal cable (wire of camera's video signal needs to be soldered to
soldering area near CAM contact),
CPW – positive power supply contact for camera module – during conversation through this contact
doorphone supplies power to camera.
Table : Electric installation wire upon the length
Wire*/length Up to 0 meters Up to 100 meters Up to 00 meters
Handset connection line wire D=0,5mm / S=0, mm x D=0,5mm / S=0,4mm
System power supply wire S=1mm – –
Electric lock wire S=0,5mm – –
Door unlock button wire S=0,5mm – –
*Use a copper wire for installation
3.2. Video camera wiring diagram
There is a possibility to mount a video camera to a door phone module. See fig. 5 for video camera wiring
diagram. Pay attention, a contact “CAM” is not connected to a door phone circuit, as it is intended for commutation.
GND – ground contact, CPW – video camera power supply contact, 1 V voltage appears when calling and during
conversation session.
In order to ensure quality of image, use a coaxial wire for transfer of video signal.
3.3. Door phone connection to the network
A network connection is needed in case a room (residential house or office) has several entrances. In this
case a door phone module DD-5100 is mounted for each entrance. Several configurations are possible.
If only two doorphones in a network are needed, simplest solution is connect two DD-5100 as shown in fig. 8.
In this configuration one DD-5100 doorphone needs to be configured as L type, and NET1 configuration selected,
other DD-5100 should be configured as H type with NET1 configuration selected. Please refer to Chapter 5
“Doorphone net types and onfiguration“ for more info.
8
Fig. 5: Video amera wiring diagram
L-IN
LINE
LGND
LC-
LC+
GND
P1 V
UNL
GND
ILMN
BUS
D1
D0
CPW
GND
CAM
Wires soldered to
soldering areas
Video signal
Coaxial cable

Fig. 6: Wiring diagram for two DD-5100 all modules, NET1 onfiguration
L-IN
LINE
LGND
LC-
LC+
GND
P1 V
UNL
GND
ILMN
BUS
D1
D0
CPW
GND
CAM
L-IN
LINE
LGND
LC-
LC+
GND
P1 V
UNL
GND
ILMN
BUS
D1
D0
CPW
GND
CAM
DD-5100 configured as H type DD-5100 configured
as L type
Electric lock/electromagnet
Regulated power
supply (1 VDC 1,5A)
Door unlock
switch
GND
+1 V
Door unlock switch
Regulated power
supply (1 VDC 1,5A)
GND
+1 V
Electric lock/electromagnet
Communication line
Handsets / Monitors
Video splitter
VD-1x5
VIN
VO5VO1 VO VO3 VO4
1 V
GND
Power supply
(1 VDC 0,3A)
Monitor
power supply
LG
C
L
CG
V+
GND
Wires soldered to
soldering areas

DD-5 00
In this configuration user sees video only from that doorphone, which is connected with his/her monitor. For
example first DD-5100, configured as H type and NET1 configuration selected, is mounted at the gates of closed
yard, second DD-5100, configured as L type and NET1 configuration selected, is mounted at the entry to stairway.
Guest, using H type DD-5100 at the gates, can call to any Flat thru L type DD-5100, but only audio conversation is
possible. See 5. .1 “ NET1“ for how to use DD-5100 in NET1 configuration. Although video conversation is possible
from DD-5100 at the entry to stairway (L type configured DD-5100). If video conversation from both DD-5100 is
needed, it is recommended to connected doorphones in a NET through DDSV1 module as shown in fig. 9. In this
case network configuration should be disabled in DD-5100 settings. Although video line from two doorphones in
NET1 configuration (fig. 6) could be connected to audio / video line in parallel, but for long video cables video
performance could suffer.
If more than two doorphones needs to be connected to a network, one DD-5100, configured as H type and
either NET or NET3 configuration selected, and as many as 9999 DD-5100's, configured as L type doorphones
with NET or NET3 configuration selected, could be used as shown in fig. 7. In fig. 7 shown wiring diagram has
drawback - user in a flat can't see guest at H type doorphone. To overcome this drawback it is recommended to
connect several DD-5100's in network through DDSV1 commutators as shown in fig. 10. In this setup, any network
configuration for all DD-5100's should be turned off in settings menu. In wiring diagram in fig. 10 is depicted
network implementation for object, which includes gates of the closed yard and three entrances at the stairways.
In case more than two H type DD-5100's needs to be connected to network, H type DD-5100's should be
connected through network module DD-S .1, as shown in fig. 8. If several DD-5100's should share the same audio
line, network commutator DD-S .1 or DDSV1 (for audio / video line) could be used, as shown in fig. 9. This is
useful when one building has several entries. Commutator itself could be connected to H type DD-5100 as one of L
types.
Example 1: there is a yard with three houses, each of them has two entrances. The yard has gates. Video
conversation should be possible from DD-5100 at the gates and DD-5100 at any of the entrances, to any flat of
corresponding house.
Solution: replace all L type DD-5100's in fig. 8 (with all devices connected to audio / video line, electric lock
etc.), with complete schematic of fig. 9. Then one of the two L type DD-5100's should be connected to H type DD-
5100 in parallel (Line of H type DD-5100 should be connected to L-IN of one of the two L type DD-5100's). Now
each house has two DD-5100's which share one audio / video line. One L type DD-5100 for each house (total
three) are connected to H type DD-5100 at the gates. Configure one DD-5100, at the gates, as H type NET or
NET3 and three DD-5100's, at the entrances, as L type NET or NET3, see chapter Chapter 5. “Doorphone net
types and onfiguration“ for more info. Network configuration for remaining three DD-5100's should be disabled.
0

Fig. 7: Wiring diagram for more than two DD-5100 all modules, NET2 or NET3 onfiguration
L-IN
LINE
LGND
LC-
LC+
GND
P1 V
UNL
GND
ILMN
BUS
D1
D0
CPW
GND
CAM
L-IN
LINE
LGND
LC-
LC+
GND
P1 V
UNL
GND
ILMN
BUS
DD-5100 configured as
H type doorphone
Regulated power
supply (1 VDC 1,5A)
Door unlock switch
GND
+1 V
DD-5100 configured as
-nd L type doorphone
Door unlock switch
Regulated
Power supply
(1 VDC 1,5A)
GND
+1 V
Electric lock/electromagnet
Communication line
Video splitter
VD-1x5
VIN
VO5VO1 VO VO3 VO4
1 V
GND
Handsets / Monitors
Monitor
power supply
LG
C
L
CG
V+
GND
Electric lock/electromagnet
To other monitors
L-IN
LINE
LGND
LC-
LC+
GND
P1 V
UNL
GND
ILMN
BUS
D1
D0
CPW
GND
CAM
DD-5100 configured as
1-st L type doorphone
Door unlock switch
Regulated
Power supply
(1 VDC 1,5A)
GND
+1 V
Communication line
Video splitter
VD-1x5
VIN
VO5VO1 VO VO3 VO4
1 V
GND
Handsets / Monitors
Monitor
power supply
LG
C
L
CG
V+
GND
Electric lock/electromagnet
To other monitors
LGND
LINE(H)/L-IN(L)
BUS
To other L type doorphones
Power supply
(1 VDC 0,3A)
Power supply
(1 VDC 0,3A)

Fig. 8: Wiring diagram for more than two H type DD-5100 all modules, any NET onfiguration enabled
L-IN
LINE
LGND
LC-
LC+
GND
P1 V
UNL
GND
ILMN
BUS
D1
D0
CPW
GND
CAM
DD-5100 configured as
1-st L type doorphone
Door unlock switch
Regulated Power
supply (1 VDC 1,5A)
GND
+1 V
Communication line
Video splitter
VD-1x5
VIN
VO5VO1 VO VO3 VO4
1 V
GND
Handsets / Monitors
Monitor
power supply LG
C
L
CG
V+
GND
Electric lock/electromagnet
To other monitors
Power supply
(1 VDC 0,3A)
LED1
BUS
L1
GND
GND
1 V
L
GND
L3
GND
OUT
GND
DD-S .1
L-IN
LINE
LGND
LC-
LC+
GND
P1 V
UNL
GND
ILMN
BUS
DD-5100 configured as
1-st H type doorphone
Door unlock switch
Regulated power
supply (1 VDC 1,5A)
GND
+1 V
Electric lock/electromagnet
BUS (common)
Line of -nd H type DD-5100
Line of 3-rd H type DD-5100
Regulated power
supply (1 VDC 0,5A)
GND
+1 V
BUS (common)
Line (to L-IN and GND)
To other L type
doorphones

Fig. 9: Wiring diagram for up to three DD-5100 all modules with video inter onne tion, NET onfiguration disabled
Audio / Video Line
Handsets / Monitors
LED1
BUS
L1
GND
GND
1 V
L
GND
L3
GND
LOUT
GND
LG
C
L-
L+
Door Unlock Button
DDSV1
C1
C
C3
COUT
L
CG
Video splitter
VD-1x5
VIN
VO5
Power Supply
(1 VDC 1,5A)
Power Supply
(1 VDC 1,5A) Power Supply
(1 VDC 0,5A)
VO1 VO VO3 VO4
1 V
GND
Power Supply
(1 VDC 0,3A)
Monitor
Power Supply
V+
GND
L-IN
LINE
LGND
LC-
LC+
GND
P1 V
UNL
GND
ILMN
BUS
D1
D0
CPW
GND
CAM
1-st DD-5100 with network
Configuration disabled
L-IN
LINE
LGND
LC-
LC+
GND
P1 V
UNL
GND
ILMN
BUS
D1
D0
CPW
GND
CAM
-nd DD-5100 with network
Configuration disabled
Door Unlock Button
Electric Lock / Electromagnet

Fig. 10: Wiring diagram for one master and three slave DD-5100 all modules with video swit hing, NET onfiguration disabled
Audio / Video Line
DD-5100 – 1
DD-5100 –
DD-5100 – 3
Pover Supply
(1 VDC 0,5A)
Pover Supply
(1 VDC 0,5A)
LED1
BUS
L1
GND
GND
1 V
L
GND
L3
GND
LOUT
GND
DDSV1 – 1
C1
C
C3
COUT
LED1
BUS
L1
GND
GND
1 V
L
GND
L3
GND
LOUT
GND
DDSV1 –
C1
C
C3
COUT
LED1
L1
GND
L
GND
L3
GND
LOUT
GND
C1
C
C3
COUT
BUS
GND
1 V
Pover Supply
(1 VDC 0,5A)
Audio / Video Line 1
DDSV1 – 3
Vaizdo daliklis
VD-1x5
VIN
VO5VO1 VO VO3 VO4
1 V
GND
DD-5100 – 4
Audio / Video Line 3
Pover Supply
(1 VDC 0,3A)

Chapter 4. Programming menu description
4.1. Acti ation of programming mode:
A new door phone outdoor station module does not contain Servi e PIN – SPIN ode programmed in
advance, so during the first programming procedure the System will ask to enter the mentioned code.
During the first programming procedure enter *100 #. A note “SET PIN” and four horizontal dashes will
appear. Enter your secret SPIN code of 4 digits.
NOTE: don't lose SPIN code, otherwise it will be forbidden to make any programming actions; the
code could be renewed only at manufacturers’ or representati es’ ser ice.
For programming mode activation enter *100 # and enter SPIN code.
If you enter a wrong SPIN code, try one more time. If you enter wrong SPIN code 3 times a programming
mode will be blocked for 5 minutes.
Programming mode could be activated using Service Tag.
For programming mode activation enter *100 # and attach Service Tag to the reader. After activation of
programming mode, browse the MENU by using buttons.
Button used for approving, button - for canceling operation or return back for one step.
Lea ing programming mode:
The System will return to the duty mode automatically after 0 seconds from the latest action. Also you can
leave programming mode by pressing “Cancel”.
4.2. Programming menu o er iew
Below is given quick programming menu overview. Fig. 11 shows menu structure.
5
ENTER CANCEL
ENTER CANCEL

DD-5 00
6
Fig. 11: Stru ture of programming menu
Programming >> 1. Tag >> 1. U.Add
. S.Add
3. C.Add
4. Auto Add >> 1. on
. off
5. Del >> 1. One
. Group
3. S.One
4.C.One
5. All
. Code >> 1. U.Pin
. S.Pin
3. C.Pin
4. rESEt-ALL
3. Settings >> 1. Lc.Delay
. Lc.Type >> 1. Nc
. No
3. Acc.Type >> 1. Code >> 1. Dis
. En
. T.Tag >> 1. Dis
. En
3. R.Tag >> 1. Dis
. En
4. Err.Unl. >> 1. Set
. off
5.CS.no
6.UnL.beep 1.on
.oFF
Chip.set 1.on
.oFF
4. Vol >> 1. User
. Guest
3. Syst.
5. User >> 1. Disable >> 1. One
. Group
UcLc
. Enable >> 1. One
. Group
UcLc
6. Addressing >> 1. Regular
. Shifted
3. Hotel >> 1. Add Int
. Start

1. Tag >> Action with Tags
1. U.Add Add User Tag [TM/RFID], (1-1376) U.Tags.
1. ID=0 – U.Tags not related to users ID
. ID=(1- 55) – U.Tags related to users ID
[visual] and {audio} notifications:
[n.- ] - Next U.Tag number in the memory
[done] {pyyp} – U.Tag is saved
{pyp pyp} – U.Tag is already in the memory
[full] {pyp pyp} – Memory is full (1376 U.Tags is saved to the memory)
. S.Add Add System Tag [TM/RFID], (1-6) S.Tags.
[visual] and {audio} notifications:
[S.- ] - Next S.Tag number in the memory
[done] {pyyp} – S.Tag is saved
{pyp pyp} – S.Tag is already in the memory
[full] {pyp pyp} – Memory is full (6 S.Tags is saved to the memory)
3. C.Add Add Common Tag [TM/RFID], (1-16) C.Tags.
[visual] and {audio} notifications:
[C.- ] - Next C.Tag number in the memory
[done] {pyyp} – C.Tag is saved
{pyp pyp} – C.Tag is already in the memory
[full] {pyp pyp} – Memory is full (16 C.Tags is saved to the memory)
3. AutoAdd Auto Add User Tags.
On – Function is ON
Off – Function is OFF
When this function is ON, all new User Tags will unlock the door, and will be saved to the
memory.
4. Del >> Delete Tag
1. One Delete one User Tag:
1. Enter U.Tag number (1-1376) and press Enter.
. Or add U.Tag to the reader
[visual] and {audio} notifications:
[done] {pyyp} – U.Tag is deleted
[Err] {pyp pyp} – Incorrect U.Tag number (n=0 or n>1376)
. Group Delete all User Tags related to one User ID(1- 55):
[visual] and {audio} notifications:
[done] {pyyp} – U.Tags are deleted
[Err] {pyp pyp} – Incorrect Users ID (ID=0 or ID> 55)
[n.xxx] – shows how many U.Tags were deleted
3. S.One Delete System Tag by its number (1-6).
[visual] and {audio} notifications:
[done] {pyyp} – S.Tags are deleted
[Err] {pyp pyp} – Incorrect S.Tag number (S=0 or S>6)
4. C.One Delete Common Tag by its number (1-6).
[visual] and {audio} notifications:
[done] {pyyp} – C.Tags are deleted
[Err] {pyp pyp} – Incorrect C.Tag number (C=0 or C>16)
4. All Delete All Tags (U.Tag + S.Tag +C.Tag= 138 Tags):
[visual] and {audio} notifications:
[done] {pyyp} – U.Tags+S.Tags+C.Tags are deleted
[n.xxx] – shows how many Tags were deleted
7

DD-5 00
2. Code >> Action with PI Codes
1. U.Pin Add or Delete User PIN code related to Users ID (1- 55):
To delete U.PIN code, enter User ID and enter U.PIN=0000
[visual] and {audio} notifications:
[done] {pyyp} – U.PIN is saved
[Err] {pyp pyp} – Incorrect User ID (ID=0 or ID> 55)
. S.Pin Change System PIN code:
[visual] and {audio} notifications:
[done] {pyyp} – S.PIN is saved
3. C.Pin Change Common PIN code:
[visual] and {audio} notifications:
[done] {pyyp} – C.PIN is saved
4.rESEt-ALL Delete All PIN codes except S.Pin
[visual] and {audio} notifications:
[done] {pyyp} – all Pin deleted
3. Settings >> Main System Settings
1. Lc.Delay Lock delay time (1-99 sec.):
[visual] and {audio} notifications:
[done] {pyyp} – Setting is saved
[Err] {pyp pyp} – Wrong time value (=0 or >99)
. Lc.Type >> Lock Type:
1. nc – Normal closed circuit (electromagnet)
. no – Normal open circuit (electric bolt)
[visual] and {audio} notifications:
[done] {pyyp} – Setting is saved
3. Acc.Type >> Type of Access Control
1. Code >> Access to unlock door by using User PIN code:
1. dis – Access is disabled
. en – Access is enabled
[visual] and {audio} notifications:
[done] {pyyp} – Setting is saved
. t.tag >> Access to unlock door by using TM Tag:
1. dis – Access is disabled
. en – Access is enabled
[visual] and {audio} notifications:
[done] {pyyp} – Setting is saved
3. r.tag >> Access to unlock door by using RFID Tag:
1. dis – Access is disabled
. en – Access is enabled
[visual] and {audio} notifications:
[done] {pyyp} – Setting is saved
4. Err.Unl >> Door unlock timer in case error
1. Set Set door unlock timer (in case error) interval (1 – 60 min):
[visual] and {audio} notifications:
[done] {pyyp} – Setting is saved
8
Table of contents
Other DIGITALas Intercom System manuals
Popular Intercom System manuals by other brands

urmet domus
urmet domus 956/94 Installation and instruction manual

Trigon Electronics
Trigon Electronics T.A.C. 500 Installation and operation instructions

Eyevision
Eyevision EV-DMR18S user manual

Alcad
Alcad 972 Series Installation datasheet

Aiphone
Aiphone GT SYSTEM installation manual

Koch
Koch TC40/STA user manual

Racing Electronics
Racing Electronics RT605 Installation operation & maintenance

Leitronic AG
Leitronic AG LMK70-ATEX manual

TCS
TCS IVW3012-0110 Product information

iCentral
iCentral 10.2 Premium Installation & operation manual

Extel
Extel WEPA 245 SER.R2 Installation and user guide

urmet domus
urmet domus IPercom VOG7 1761 Quick user guide