Digitax M1 mdt Assembly instructions

Technical Manual
Installation and Programming
ver.1
16/12/2014


The information contained here are property of DIGITAX Automotive Electronics Italy, and extremely confidential. Any disclosure, copying, distribution to third
party is strictly prohibited.
3
Introduction ............................................................................................................ 4
About this Manual .................................................................................................. 4
Appearance............................................................................................................. 5
How to Seal the Taximeter ...................................................................................... 6
Regular Way of Sealing the Taximeter ..................................................................... 6
Measures ................................................................................................................ 7
M1 MDT Navigator Taximeter Display ..................................................................... 8
Display Composition and Inscriptions...................................................................... 8
M1 MDT Navigator MID Taximeter Display Area...................................................... 9
Functional area for Developer’s Applications........................................................... 9
Electrical Connection Table...................................................................................... 10
Specifications .......................................................................................................... 11
Mechanical Movement Sensor ................................................................................ 12
How to assemble the sensor box............................................................................. 12
Test Connector ........................................................................................................ 13
“E-Seal”- Electronic Sealing:.................................................................................... 14
1st Section: Last 100 Reading Changes Done ........................................................... 14
“E-Seal”- Electronic Sealing:.................................................................................... 15
2nd Section ............................................................................................................. 15
For Hire - Hired - Stopped........................................................................................ 16
The Operative Mode ............................................................................................... 16
Pre-Selection of the Tariff........................................................................................ 17
The K-Constant........................................................................................................ 18
(Car Transmission Ratio).......................................................................................... 18
Time Synchro........................................................................................................... 19
Time and Date setting ............................................................................................. 20
How to set the taximeter’s time and date ............................................................... 20
Diagnostic Tariff Test (Check Sum) ........................................................................... 21
Statistical Memory .................................................................................................. 22
How to Read the Locations Memory Content .......................................................... 22
Statistical Memory .................................................................................................. 23
How to Print Locations Memory Content................................................................. 23
Statistical Memory .................................................................................................. 24
How to Erase the Locations Memory Content.......................................................... 24
“Trip by Trip”........................................................................................................... 25
Events Memory Buffer............................................................................................. 25
“Trip by Trip”........................................................................................................... 26
Print Out Format ..................................................................................................... 26
Ticket Print Out: Settings......................................................................................... 27
The Tariff................................................................................................................. 28
General Description................................................................................................. 28
The Tariff................................................................................................................. 29
How to Program the Tariff ....................................................................................... 29
Tariff Show .............................................................................................................. 30
Tariff Show .............................................................................................................. 31
The “ProgDate” ....................................................................................................... 32
Programming Keys................................................................................................... 33
Programming Parameters ........................................................................................ 34
Connectors and Cables ............................................................................................ 53
Windows RS232/USB............................................................................................... 54
User and Demo Software ........................................................................................ 55
Software Developing - Getting Started .................................................................... 72
Communications - Getting Started........................................................................... 73
Connection Service.................................................................................................. 75
Digitax AITP-Taximeter Service ................................................................................ 78
Notes: ..................................................................................................................... 79

The information contained here are property of DIGITAX Automotive Electronics Italy, and extremely confidential. Any disclosure, copying, distribution to third
party is strictly prohibited.
4
The is designed to be, at the same me, easy to use and extremely powerful.
This manual is conceived to be user friendly, more graphical and easy to understand.
In the first secon are described the electrical connecons, the ways to fix and lead the taximeter,
how to assemble the sensor box.
The second secon explain the meter’s operave modes, the funcons and the programming
phase (Autotest, Stascal Memory, “Trip by Trip” buffer and the Tariffprogramming).
The third secons contains the descripon of all the tariffprogramming parameters.
Introducon
About this Manual

The information contained here are property of DIGITAX Automotive Electronics Italy, and extremely confidential. Any disclosure, copying, distribution to third
party is strictly prohibited.
5
Main Connectors Panel
Appearance
Main Connectors Panel
1Microphone
2Command Taximeter Keys
3Cover Wires
4Label
5SIM Card
6Wires Connecon
7MDT ON / OFF
8Label
9Label
10 TariffSeal
11 Micro SD
12 Manufacturer Seal
13 Speaker
13
12
7 8 9 10 11
5
3
4
6
2
1

The information contained here are property of DIGITAX Automotive Electronics Italy, and extremely confidential. Any disclosure, copying, distribution to third
party is strictly prohibited.
6
How to Seal the Taximeter
Regular Way of Sealing the Taximeter
2
13
4
5
6
4
Taximeter’s Seals
1TariffProgramming Seal Cover
2Taximeter Manufacturer Seal
3MICRO SD Seal
4Car Fixing Seal
5SIM Seal
6Wires Seal

The information contained here are property of DIGITAX Automotive Electronics Italy, and extremely confidential. Any disclosure, copying, distribution to third
party is strictly prohibited.
7
Top
Front
Dimensions (in millimeters)
Width
289
Height
88,3
Depth
28
Weight (in grams)
M1 mdt
500
Measures
289 mm
88,3 mm 28 mm
The information contained here are property of DIGITAX Automotive Electronics Italy, and extremely confidential. Any disclosure, copying, distribution to third
party is strictly prohibited.
8
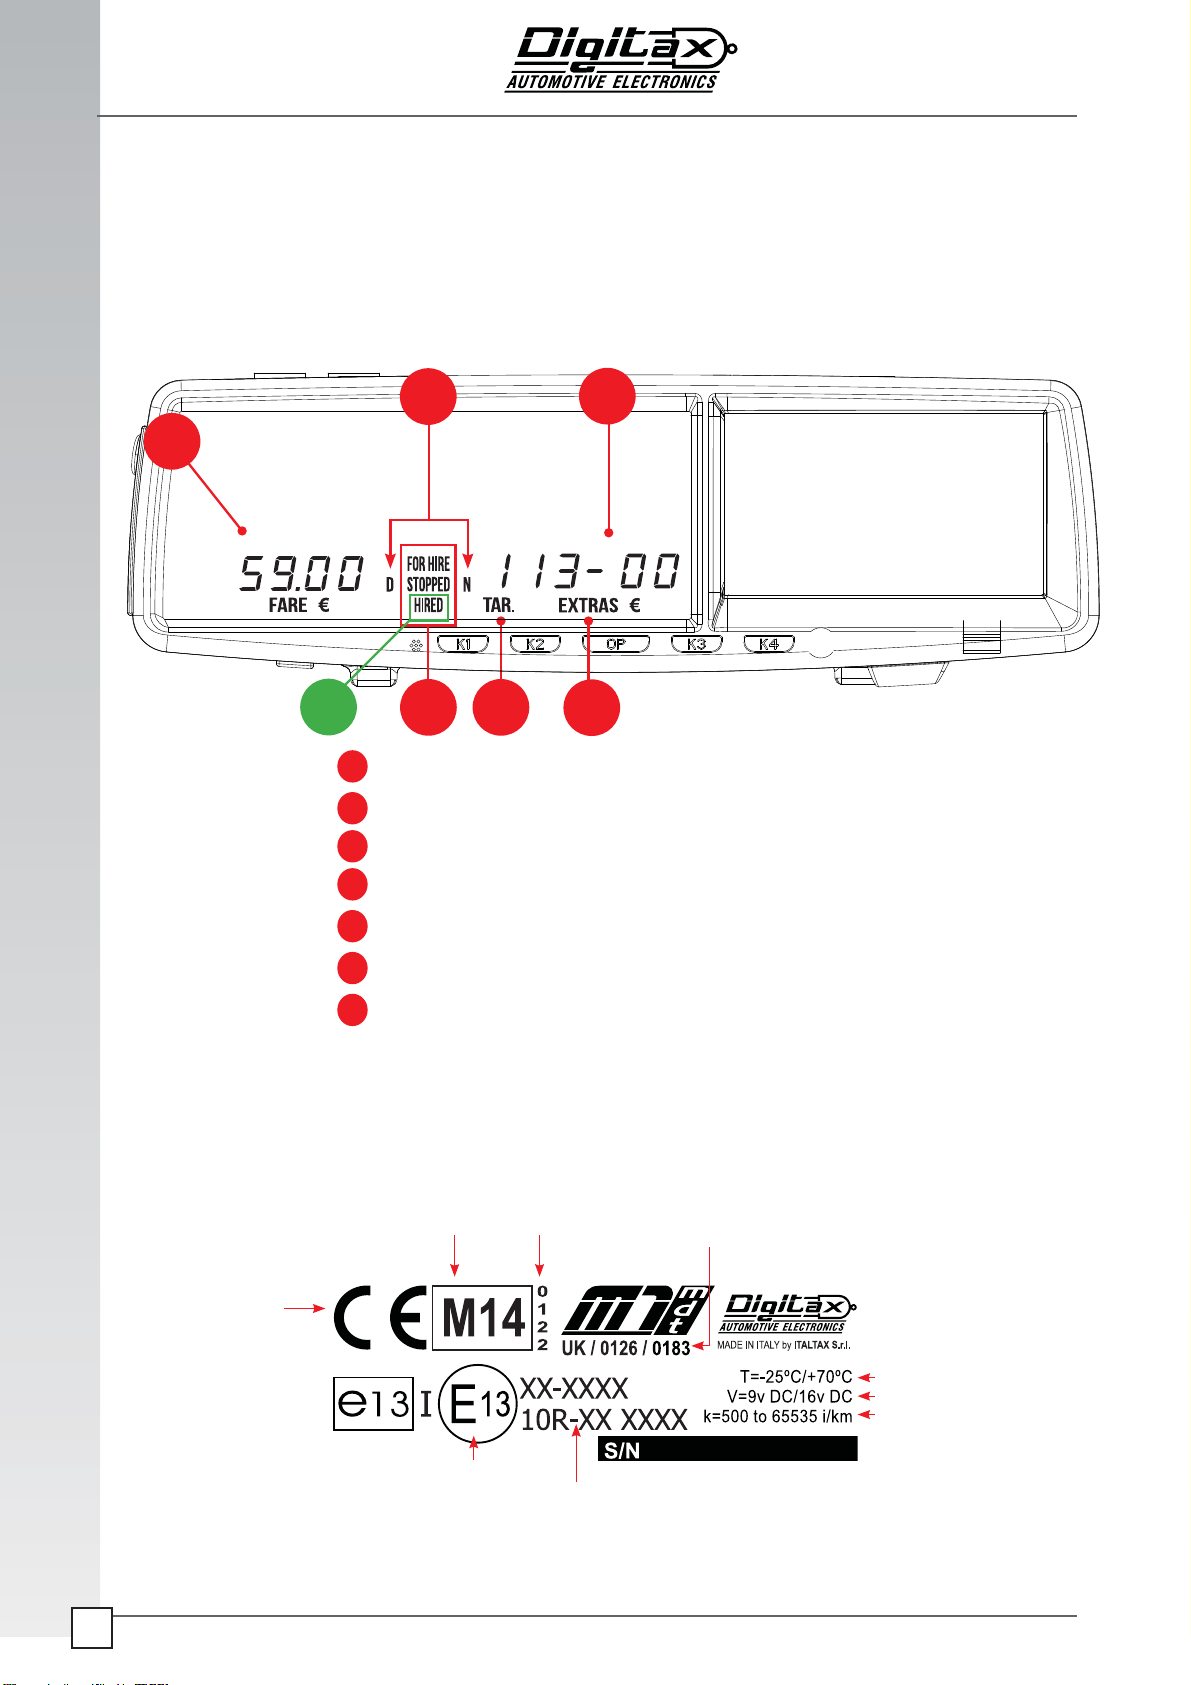
M1 mdt Taximeter Display
Display Composion and Inscripons
6
Metrological Inscripons Plate
Fare Display
Day / Night Indicaon
Status (For Hire, Hired, Stopped)
Movement detecon status (when it-s blinking)
Secondary Display
TariffIndex
Descripon (extras / me)
Currency depending on the Country indicaon
1
2
3
4
5
6
7
E-Mark Number
Approval E-Mark Number
EC. Type examinaon
cerficate number
Nofied Body Number
CE Mark
Verificaon Year
Temperature range
Voltage range
K-Constant range
1
2
3
4
5
*
*
7

The information contained here are property of DIGITAX Automotive Electronics Italy, and extremely confidential. Any disclosure, copying, distribution to third
party is strictly prohibited.
9
M1 mdt MID Taximeter Display Area
Funconal area for Developer’s Applicaons
MID Taximeter Area:
This area is used only by the taximeter
Developer’s Functional Area:
This area is a functional area for developer’s applications
Note:
The MID Taximeter Area cannot be overwrien by user’s applicaons
The information contained here are property of DIGITAX Automotive Electronics Italy, and extremely confidential. Any disclosure, copying, distribution to third
party is strictly prohibited.
10
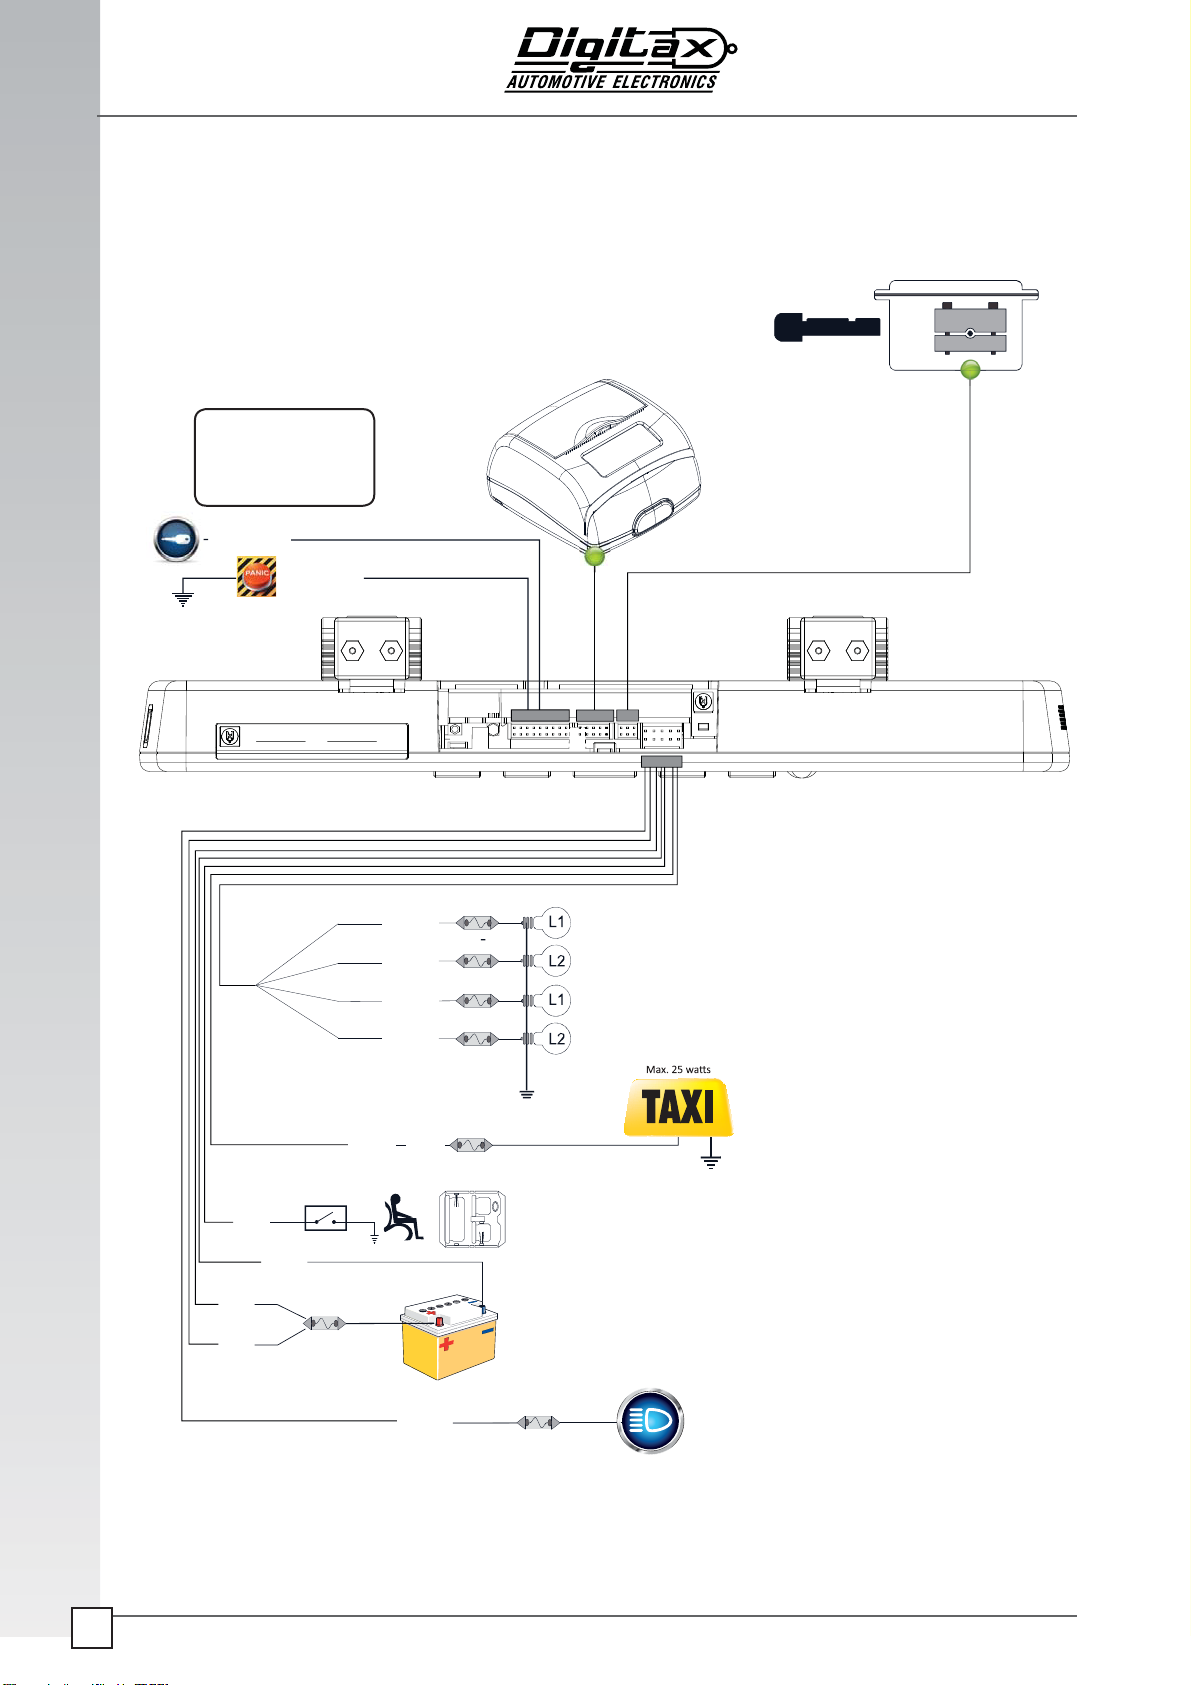
Electrical Connecon Table
MECHANICAL TRANSDUCER
or
CAR ODOMETER INPUT
PRINTER
GREY
VIOLET
GREEN
YELLOW
Passenger Sensor
PINK
RED
RED
BLACK
fuse 2 A
fuse 2 A
fuse 2 A
fuse 2 A
fuse 2 A
fuse 2 A
CAR LIGHT SWITCH
+12 V
BROWN
WHITE
fuse 2 A
* For Detailed pin-out connecon go to the “Connector and Cable” Chapter (page 15)
GREEN
YELLOW
Detailed pin-out on
“Windows RS232 / USB”
Chapter - page 54

The information contained here are property of DIGITAX Automotive Electronics Italy, and extremely confidential. Any disclosure, copying, distribution to third
party is strictly prohibited.
11
Specificaons
Power Supply (Vcc): Operang Range: 8 to 32 V
Range of device constant: k = 500 km⁻¹ to 65535 km⁻¹
Resoluon of device constant: 1 km⁻¹
Range of me tariff: 0.10¹ CU/h to 6553.50 CU/h
Resoluon of me tariff: 0.10 CU/h
Range of distance tariff: 0.10 CU/km to 6553.50 CU/km
Resoluon of distance tariff: 0.10 CU/km
Odometer Transducer Input:
input range: 0 to 32 V
level for LOW voltage: 0 - 0.3 V
level for HIGH input: 5 - Vcc
maximum frequency: 1 KHz
high voltage trigger: high - low transion
Passenger Sensor:
Input range: 0 to 32 V
maximum level for LOW input: 1.4 V
Engine Input:
Input range: 0 to 32 V
maximum level for LOW input: 1.4 V
Taxi Light Output:
Maximum Current: 3 A
Output Voltage: Vcc
Lights Outputs:
Maximum Current: 1 A
Output Voltage: Vcc
Printer Power Out:
Maximum Current: direct from Vcc input
Output Voltage: Vcc
RS-232 serial ports: Taximeter COM1, COM2
Windows COM5,
COM6 (Oponal Windows Com7)

The information contained here are property of DIGITAX Automotive Electronics Italy, and extremely confidential. Any disclosure, copying, distribution to third
party is strictly prohibited.
12
Mechanical Movement Sensor
How to assemble the sensor box
SENSOR
Screws B Screws B
Screws A
Clamps
Clamps
Screws (A)
Sha
36 m/m
Sheathing
Speedometer
Cable
Sensor Prove
1. Take out the internal wire from the
sheathing.
2. Shorten the sheang 36 m/m
3. Insert both ends of the sheathing in the
clamps and ght the 4 screws B
4. Loosen the 4 screws (A) and insert
the internal wire. Do not ght the 4
screws A*.
* Aenon: when you insert the internal
wire, the dummy shamust come out
and be dispose
A) Re-assemble the trasmission cable in the car, connecng it to
both the gear box and the odometer.
B) Drive about 100 mts to allow the internal wire to find its origi-
nal posion.
C) Tight the 4 screws A.
D) Insert the sensor’s prove.
E) Fix the sensor’s cap to end the sensor’s assembling operaon
and to have the sensor fully operave
Electrical Connecons
Red cable = Power Supply (5 Vcc to 24)
White cable = Output Signal (open collector)
Shield = Ground

The information contained here are property of DIGITAX Automotive Electronics Italy, and extremely confidential. Any disclosure, copying, distribution to third
party is strictly prohibited.
13
Test Connector
The Test Connector for M1 MDT taximeter is a mini USB connector that must be inserted in its
dedicated slot as shown in this draw. Please use this slot only to connect the test connector cable.
Any other device with the same plug must not be connected as it can damage the device.
NOTE: In order to use with property the test connector funconality blue wire must be connected to a power baery
suply with almost 12v. Once the test connector is powered and plugged in the M1 MDT slot, the main display will
show “teston”.
If the text “teston” doesn’t appear in the M1 MDT main display even with the test connector plugged in, please
review the blue wire connecon.
tEStOn
Test Connector
VIOLET
YELLOW
RED
GREEN
BROWN
PINK
GREY GROUND
FARE INCREMENT PULSE OUTPUT
DISTANCE PULSE INPUT
TIME PULSES OUTPUT
TIME PULSES INPUT
TIME BLOCK INPUT
DISTANCE PULSES OUTPUT

The information contained here are property of DIGITAX Automotive Electronics Italy, and extremely confidential. Any disclosure, copying, distribution to third
party is strictly prohibited.
14
“E-Seal”- Electronic Sealing:
1st Secon: Last 100 Reading Changes Done
The “E-Seal” is a non-erasable memory splied in two secons where, in the first secon, are recorded the last 100
alteraons made on the programming funcons. These are shown on the displays or printed, with detailed informa-
on of: index nr, event, date, year and hour. The second secon is made of permanent, non-reseable, progressive
individual events counter, incremented by each event alteraons without details. The first secon is by default a FIFO
buffer, with the last 100 events recorded, but can be configured by tariffto disable the FIFO and block the taximeter
when it reaches its maximum capacity. The second secons (counters) is never FIFO, and when reaches its maximum
capacity of 1000 events on any counter, the taximeter shows “ESEAL FULL” and it is blocked unl the mechanical seal
is broken and the taximeter is again inialized.
The “E-Seal” Reading, is included in the “SelfFunon Menu”. This is the procedure to enter it:
1) Keep pressed K2 at least for two seconds to enter in the menu selecon
2) Select E-Seal menu by pressing K2 key
3) Comfirm by K4 the E-Seal reading.
Now the first Record is showed on the display (see figure 1). To increase the record index press K4; to decrease the
record index press K3. The following pictures are only an example of E-Seal records because every single device could
have a different records sequence.
MAIN DISPLAY PRINTED REPORT DESCRIPTION EVENTS
K-Cons K-CONS Constant “K” calibraon Autotest
A.DEFL A.DEFL Aer checksum error with black key inserted Autodefault
TARIFF TARIFF TariffProgramming Tariff
CLOCK CLOCK Clock seng Clock
SYN.CL SYN.CL Clock +/- 2’ syncro Syncro Clock
TICKET TICKET cket heading programming Header Ticket
M.E.S. M.E.S. Mulextra-charge system programming Mes
CL.MEM CL.MEM Stascal Memory block reset (block 2) Clear memo
DEFAUL DEFAUL By manual operaon General Default
LB.RES LB.RES Long Buffer Memory Reset Long Buffer Reset
BIOS BIOS Firmware changed Bios Change
LIGHTS LIGHTS Taxi Roof Lights Test Light Test Result
4) By pressing K4 the E-Seal menu has two opons depend-
ing on the event type. In that case showing Bios event type
by pressing K4 we will see the Bios Checksum Programmed.
By pressing again K4 we will go to the next event type.
5) In that event type by pressing K4 we will go to the next
event type (DEFAUL).
6) By pressing K3 we will go to the previous event type
(LB. RES)
(figure 1)
7) Press OP to exit and return to main screen
Note:
At any index posion by pressing K1 the E-Seal counters report will be printed
At any index posion by pressing OP the taximeter will come back to For Hire posion
1) Modified Record Number
2) Event type
3) Event Modificaon Date
4) Event Modificaon Time
5) Event Value
BIOS 0
operator.IDevent type
E-SEAL
BIOS 23241
event type
10.50
LB.RES 0
operator.IDevent type
DEFAUL 0
operator.IDevent type
LB.RES 0
operator.IDevent type

The information contained here are property of DIGITAX Automotive Electronics Italy, and extremely confidential. Any disclosure, copying, distribution to third
party is strictly prohibited.
15
“E-Seal”- Electronic Sealing:
2nd Secon
By pressing K2 key in the E-Seal Mode is possible to read the second secon. Press K4 to go to the next event, press
K3 to go to the previous event. Press OP to exit. It can be displayed in the following format:
Exit to the main menù
K-CONS 0
A.DEFL 0
TARIFF 0
SYN.CL 0
TICKET 0
M.E.S. 0
CL.MEM 0
DEFAUL 0
LB.RES 0
AVAIL 0
LIGHTS 0
PAIRIN 0
CLOCK 0
AVAIL 0
BIOS 0
Note:
At any event posion by pressing K1 the E-Seal counters report will be printed
Press K2 at anyme to come back to the E-Seal first secon * Pairing event is shown but is never generated
*

The information contained here are property of DIGITAX Automotive Electronics Italy, and extremely confidential. Any disclosure, copying, distribution to third
party is strictly prohibited.
16
For Hire - Hired - Stopped
The Operave Mode
The taximeter works with 3 working modes:
In any of these modes it is possible to have different funcons acvated by pressing one of the 5 taximeter’s buons:
In FOR HIRE posion the follow sequence
can be obtained by pressing the OP buon:
Crono Start Crono Stop
Keeping pressed self funcon Menu
Shows the date in the main display (Day - Month)
Shows the year in the main display
Insert the Extra n° 3 (if enabled).
Insert the Extra n° 4 (if enabled)
Adds the Extras to the fare
Splits the final fare
• The ledisplay shows the normal fare
• The right one shows the total extras
Change the tariff(if enabled).
The current tariffis shown in the ledigit of the secondary
display (5)
Insert the Extra n° 1 (if enabled)
Insert the Extra n° 2 (if enabled)
Reset the added Extras
FOR HIRE - STOPPED - HIRED and the relave buons funcons
It’s the posion selected by the Taxi Driver when the vehi-
cle is parked or it moves without any passenger on board.
• The main display (3) is turned off
• The right one (5) shows the clock.
Once the taxi starts the trip, the Taxi Driver selects the
Hired posion by pressing OP buon.
The taximeter starts the fare calculaon by distance (Hired
sign is fixed) or me (Hired sign is blinking).
• The main display shows the tarifffare (8)
• The le(2) one shows: the tariffindex,
The right ones the added extras (5).
The current tariffcan be changed by pressing the key K1 if
manual tariffchange is available
At the end of the trip, the Taxi Driver has to select the
Stopped posion to calculate the final fare.
He does it by pressing the OP buon. The waing me is
thus blocked.
• The main (3) display shows the final fare
• The right one shows the total extras (5)
FOR HIRE
HIRED
STOPPED
FOR HIRE
HIRED
STOPPED
FOR HIRE

The information contained here are property of DIGITAX Automotive Electronics Italy, and extremely confidential. Any disclosure, copying, distribution to third
party is strictly prohibited.
17
Pre-Selecon of the Tariff
In order to avoid possible fraudulent use of the taximeter, it is possible to acvate an alternave way of starng a
trip, that allows to select the desired tariffwhen the taximeter is sll in For Hire posion, and so to start the trip
directly with the pre-selected tariff.
Tariffpre-selecon is acvated by changing the following setup quesons:
Q32=yes
Q2=0
Q3=number of tariffs
When Pre-Selecon is enabled:
pressing K1 key from “For Hire” posion is shown the
TariffSelecon menu, and the driver has to select the
tariffnumber.
To start with scrolling through the tariffs with K3 (up)
and K2 (down).
The selected tariffis confirmed by pressing K1 key again,
and so the taximeter starts the trips directly with the
Pre-selected tariff.
If the tariffis not selected in 5 seconds, the taximeter
goes back to “For Hire” posion
TARIFF 3
TARIFF 4
TARIFF 2
TARIFF 2

The information contained here are property of DIGITAX Automotive Electronics Italy, and extremely confidential. Any disclosure, copying, distribution to third
party is strictly prohibited.
18
The K-Constant
(Car Transmission Rao)
The “K Constant” is the number of pulses per Kilometer emied by a transducer and received by a taximeter.
K Constant = Pulses/Kilometer
The pulses can be emied by the car’s electronic transducer or, if the car is not provide of it, by the Digitax mechanical
one or by a third part interface. This constant can be known or be tested on road.
How to find out the K-Constant value (Autotest)
Follow this procedure to find out the car tansmission rao (K-constant).
For a right procedure it must be done in a road with a carefully marked distance of 1 Kilometer(default).
Align carefully the car’s front wheels with the test distance‘s start line.
Take out the taximeter programming cover
Select For Hire posion.
Insert the Service Programming Key (1) in its slot.
Press K2 and K3 buons at the same me.
The ATTEST text appears on main display (3)
The main display (3) shows the programmed K-Constant value.
The extras display (5) shows the meters to be covered for the Autotest
Press K2 buon to increase the pulses/km number.
Press K1 buon to decrease the pulses/km number.
By pressing K1+K2 at the same me the programmed K-Constant
becomes 1000
Press K4 to save the programmed value
Press OP buon to end the procedure and go back to For Hire
posion
Take out the Service Programming Key (1) from the taximeter.
Take out the taximeter programming cover
Select For Hire posion.
Insert the
Service Programming Key (1)
in its slot.
Press K2 and K3 buons at the same me.
The ledisplay shows “Aest” for a few seconds.
Press K3 buon to reset all meter’s counters.
The secondary display (5) will show the value 0.
Start driving at 30 km / hours maximum.
Drive to the Autotest Finishing Point (1 Km).
Once the Autotest Finishing Point is reached, press K4 buon to finish the
Autotest. Now the taximeter will calculate and record the new K- Constant.
The main display (5) will show the new K-Constant value. The secondary
display (5) will show the number of pulses generated during the Autotest.
Press the OP buon in order to finish the Autotest procedure and come
back to For Hire posion.
Take out the
Service Programming Key (1)
from the taximeter.
How to program a known K-constant value (autotest)
ATTEST
1000 1000
100 1000
900 1000
ATTEST
1000 1000
995 0
680 680
1 Kilometer at Max 30 Km/Hour
Autotest Finishing Point Autotest Starng Point
pulse/dist.
pulse/dist.

The information contained here are property of DIGITAX Automotive Electronics Italy, and extremely confidential. Any disclosure, copying, distribution to third
party is strictly prohibited.
19
Time Synchro
FOR HIRE
11-58
11-59
12-00
The M1 MDT me clock can be synchronized to exactly the 12:00 am, once every seven days, between the 11:58
and 12:02
The Time Synchro works only if the manual me seng is disabled (Q269 = Yes). It is enabled only aer 7 days from
the last me synchro or clock set.
When the taximiter clock is between 11:58 and 12:02, the clock can be synchronized at exactly 12:00 am by pressing
the K2 + K4 keys at the same me.
The procedure ends automacally.
FOR HIRE
12-01
12-02
Select For Hire posion
(Do not instert any programming key)
Press K1 and K3 at the same me
12-00
SYNCRO
SYNCRO

The information contained here are property of DIGITAX Automotive Electronics Italy, and extremely confidential. Any disclosure, copying, distribution to third
party is strictly prohibited.
20
Time and Date seng
How to set the taximeter’s me and date
In the normal posion “For Hire”.
Insert the Service Programming Key (1)
Press K1 and K3 at the same me.
The main display (3) will show “TIME”
for a few seconds.
The main display (3) shows in the ledigits the day number and in
right digits the month in ddmm format.
The secondary display (5) shows in the lethe hour number and in
right digits the minutes numbers in its format
To set the Day number press K1 buon.
(only increasing way)
To set the Month number press K2 buon.
(only increasing way)
To set the Hour press K3 buon.
(only increasing way)
To set the Minutes press K4 buon.
(only increasing way)
Press OP buon to enter in the Year programming.
To decrease the Year number press K1 buon.
To increase the Year number press K2 buon.
Press K3 buon to set the taximeter manufacturing year.
Press OP buon to end the programming procedure and go back
to For Hire posion and take out the Service Programming Key (1)
Hour
15 05 16-40
2009
2011
FOR HIRE
FOR HIRE
TIME
Day Month
Hour Minutes
14 04 16-40
2010
Year
2010
15 05 16-40
Minutes
Day
15 04 16-40
Month
15 05 16-40
Table of contents
Other Digitax Automobile Accessories manuals


