Dimplex GDDEYS40 User manual

– 1 –
40L DEHUMIDIFIER
AND AIR PURIFIER
INSTRUCTION MANUAL
GDDEYS40
Dehumidifies a large home and purifies air

– 2 –

CONTENTS
Safety and usage notices 5
Components 9
Control panel 10
Display screen 11
Setting Timer 12
Dehumification instructions 13
Automatic dehumification 13
Continuous dehumification 13
Clothes drying 13
Emptying the tank and drainage 14
Air purification and filters 16
Ventilation 16
Air purification function 16
Inserting a filter 17
Filter information 18
Maintenance 19
Self-cleaning mode 20
Troubleshooting 21
Technical specifications 22

– 4 –
Before operating this appliance, please read this instruction manual
carefully. Please also keep for future reference.

– 5 –
SAFETY AND USAGE NOTICES
The power supply for this appliance is 220-
240V~ If the voltage is 10% higher or lower
than the normal voltage, the appliance will
not operate. It is suggested that a voltage
stabilizer be equipped.
The working range of this appliance
is between 5-32oC, outside of these
temperatures the appliance will not operate
normally. However the optimum working
temperature is between 16-32oC. The unit
will dehumidifiy between 30%-85% relative
humidity.
Technical Specifications
Please position the appliance on a flat and
stable surface to reduce vibration and noise.
Please do not position your appliance near
flames or heating appliances.
Please do not use the appliance if plug or
electrical cord is damaged.
Multi-socket plug adapters are not
recommended for use with this appliance.
Usage
Please do not immerse the appliance in
water.

– 6 –
SAFETY AND USAGE NOTICES
The appliance is designed for domestic use
only, not for commercial purposes.
Please do not use aerosols or other
flammable substances near the appliance.
Please do not place anything on top of the
appliance.
Please do not tilt the appliance when in use.
Please do not use sharp objects on the
appliance to prevent scratching.
Usage
Please do not knot, or fold the power cord,
also ensure the power cord is free from
tangle and nothing is place on top of it while
in operation.
Please do not hang anything over the air
outlet, by doing this you will reduce the
dehumidification capacity and increase
the noise.
Please do not put the automatic drainage
pipe directly in the cold outdoors.

– 7 –
When operating the appliance, please keep
a clearance of 50cm above and over 30cm
surrounding. Please refer to the following
figure.
Please keep windows closed when
appliance is in use.
Please do not direct your appliance towards
plants or pets for long periods of time.
Please do not operate in direct sunlight, this
will influence the dehumidification capacity.
SAFETY AND USAGE NOTICES
Usage

– 8 –
SAFETY AND USAGE NOTICES
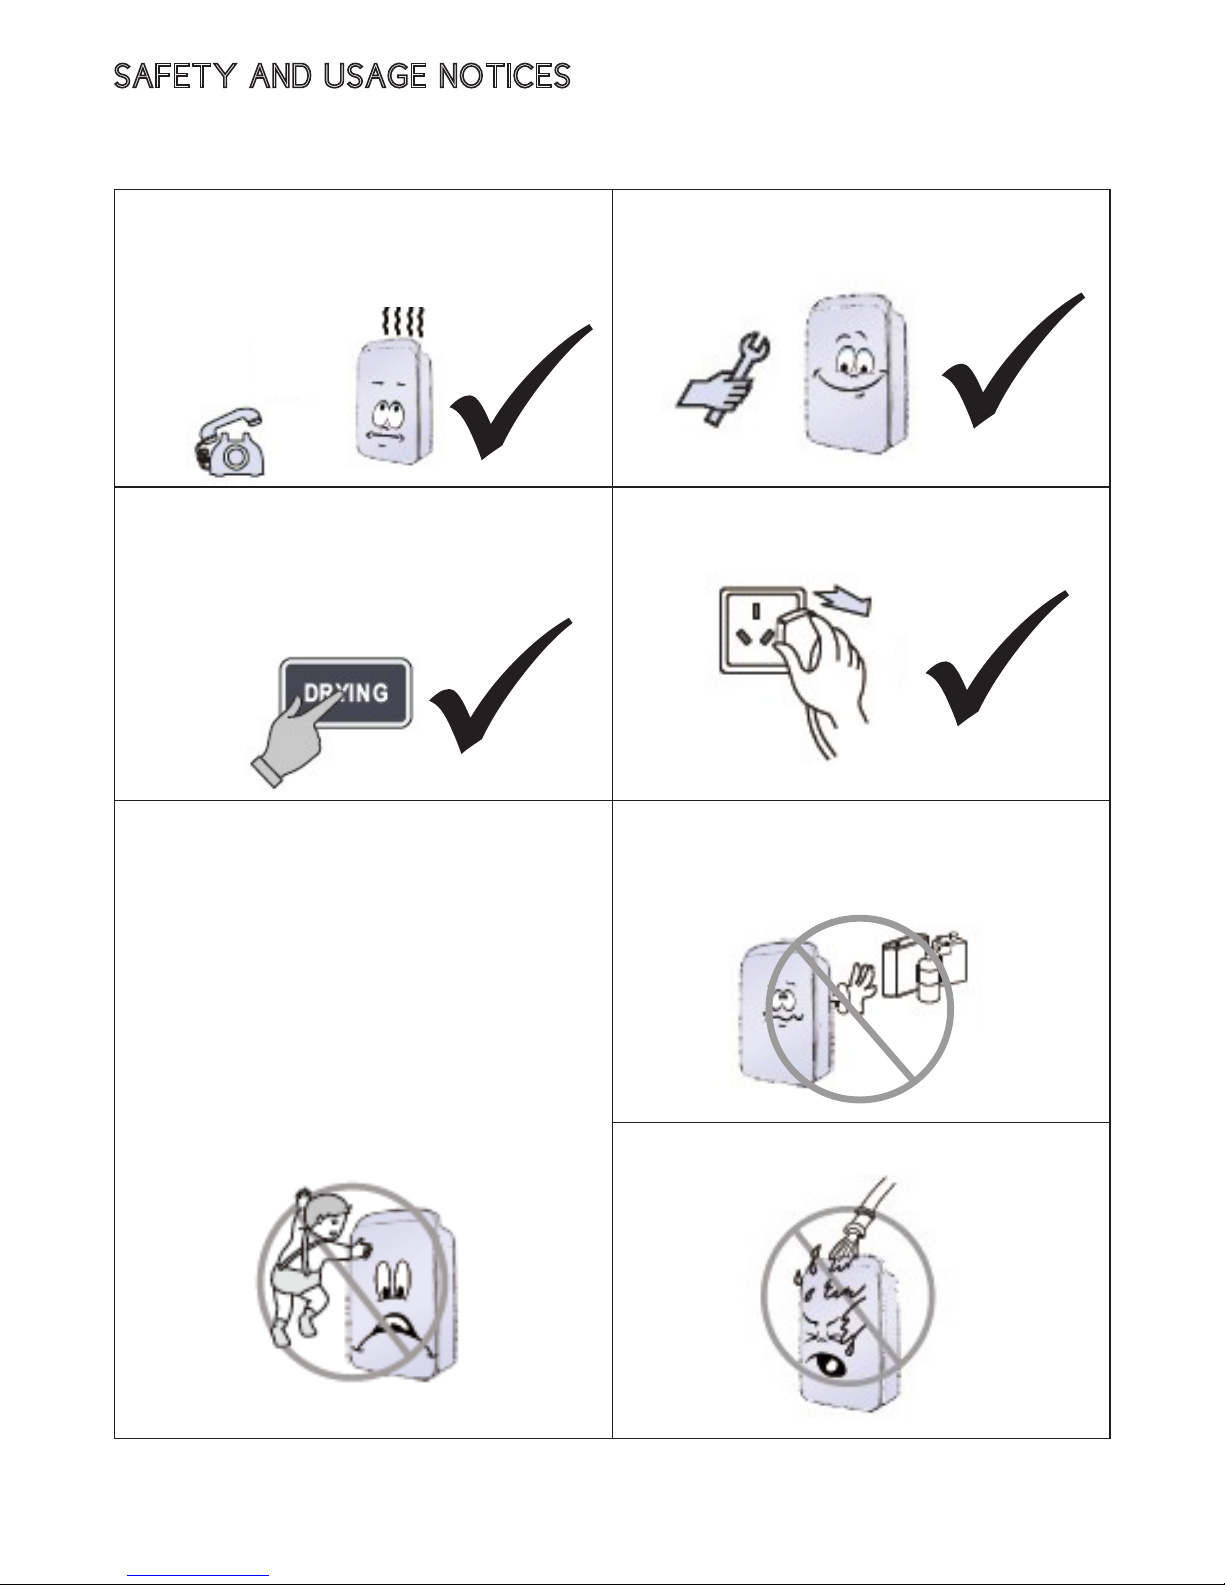
If the unit is faulty (e.g., burning smells, smoke
detected), please turn off the appliance and
unplug it, then contact a qualified service
agent for maintenance.
If the appliance is not to be used, or is to be
stored for a period of time, please activate
the self-cleaning function, which will dry the
internal components of the appliance and
prevent mildew growth.
If the power cord is damaged, it must be
replaced by a qualified electrician, service
agent or similarly qualified persons in order
to avoid malfunction.
This appliance is not intended for use by
persons (including children) with reduced
physical, sensory or mental capabilities,
unless they have are supervised or given
instruction concerning use of the appliance
by a person responsible for their safety.
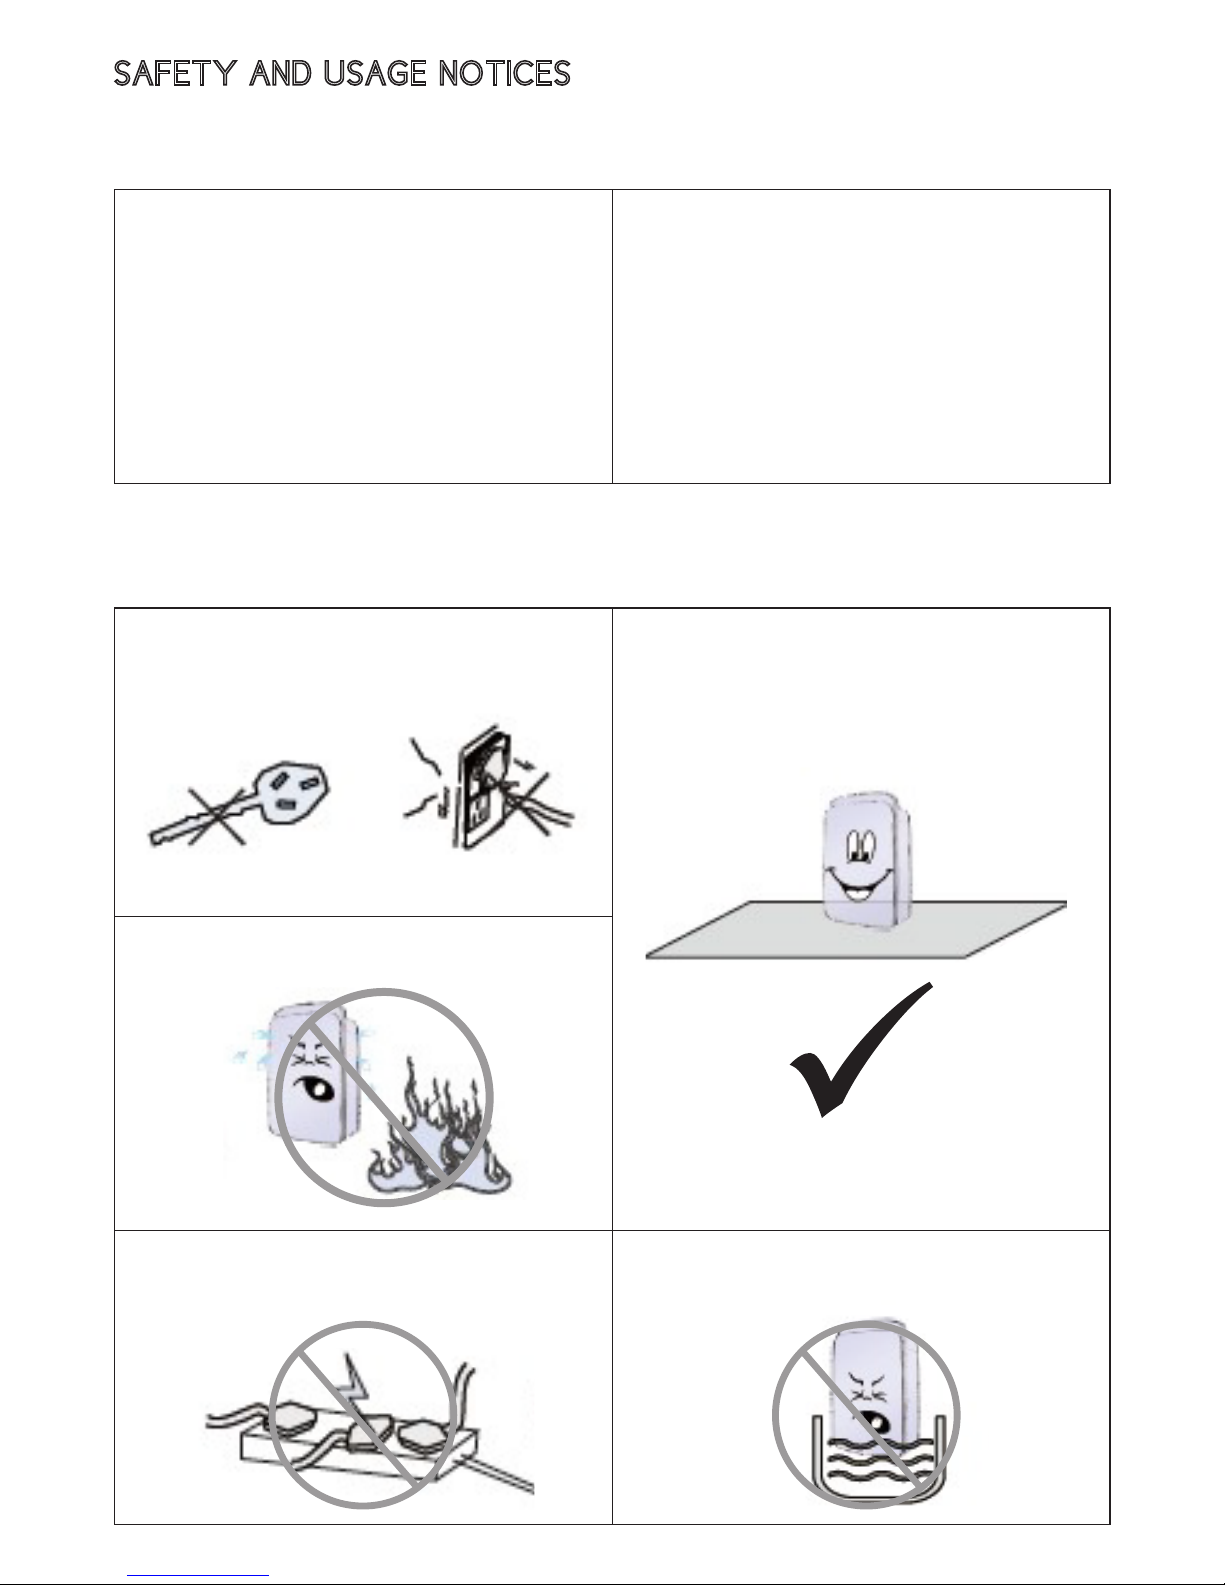
Children should be supervised at all times. Please do not hose down the appliance.
Maintenance and Storage
Repairs are to be done by a qualified
electrician or service agent.
Please unplug the appliance when not in use
for long periods of time.
Please do not use chemical solvents (e.g.,
benzene, gasoline, alcohol,etc.) to clean the
appliance. Instead, use warm soapy water.

– 9 –
COMPONENTS
Front side
Rear side
Front panel
Tank lid
Full tank
float device
Water level
window
Tank
Control panel
Air purification
filters (HEPA
or activated
carbon filter)
Inlet grid
Lifting handle
Swing lourve
Continuous
drainage outlet
Mesh filter
(for large partcles)

– 10 –
CONTROL PANEL
CHANGE
FAN SPEED TIMER HUMIDITY
LEVEL
SELF-CLEAN
MODE
CHANGE
MODE
POWER
QUIET/NIGHT
MODE
SWING LOUVRE
ON/OFF
POWER: turn on or turn off the appliance.
CHANGE MODE: cycles between different modes: automatic dehumidification,
continuous dehumidification, clothes drying, air purification or ventilation. You can also
press this button for 3 seconds to activate child lock mode.
QUIET/NIGHT MODE: minimises fan noise and dehumidification rate.
SELF CLEAN MODE: dries the internal components of the appliance. Press for 3
seconds to activate seconds.
SWING LOUVRE ON/OFF: activate oscillation of the wind vent louvres for wider air
movement.
TIMER: set the number of hours until the appliance turns on or off.
HUMIDITY LEVEL: Set desired humidity level for “automatic dehumidification” mode;
Press this button and the “TIMER” button together to toggle between oCand oF
temperature displays.
CHANGE FAN SPEED: changes speed of fan and air that is emitted from the appliance.

– 11 –
DISPLAY SCREEN
Mode
Child lock
Full tank
Self cleaning mode
Filter usage
day counter
Quiet/Night
mode
Swing louvre
Fan speed
Filter indicator
Temperature and
timer display
Timer
Self cleaning mode: lights up when self cleaning function is activated.
Mode: shows which functions are selected. The modes shown, from left to right are: automatic
dehumidification , continuous dehumidification , clothes drying , air purification
,ventilation .
Child lock: you can activate the child lock by pressing the “CHANGE MODE” button for 3 seconds.
Full tank: indicator will turn on when the water tank is full, then will beep to remind you to
empty the tank.
Humidity: displays the current humidity level in your room.
Low temperature: displays when the temperature is lower than15oC. This indicator will flash
when the room temperature is lower than 2oC.
Swing louvre: displays when swing louvre is in operation.
Fan speed: shows high vs low fan speed.
Quiet/Night Mode: minimises fan noise and/or dehumidification rate for quieter functioning.
Filter usage day counter: indicates the number of days the filter has been used for.
Filter in use indicator: shows when a filter is inserted.
Temperature and timer display: shows current room temperature. When setting the timer
this display shows the number of hours for timer function.
Timer: Timer function is activated.
Low
temperature
Humidity

– 12 –
OPERATION INSTRUCTIONS
Turning on the appliance
Plug in the appliance
Press the “POWER” button to turn appliance on
Setting timer to turn the appliance on
When the appliance is on standby, press the “TIMER” button –
the Timer display will light up and start flashing.
Press the “TIMER” button the right number of times to set
the number of hours until the appliance turns on. The Timer
display will flash with the number of hours you have set and
stop flashing after 5 seconds when the timer function is set.
If you want to change the preset time after you have set it,
press the “TIMER” button to cancel the preset time and you
can start over.
Setting timer to turn the appliance off
When the appliance is operating, press the “TIMER” button to
activate the “timer off” function. The timer display will start to
flash. Press the “TIMER” button the right number of times to set
the number of hours until the appliance automatically turns off.
The Timer display will flash with the number of hours you
have set and stop flashing after 5 seconds when the timer
function is set.
If you want to change the preset time after you have set it,
press the “TIMER” button to cancel the preset time and you
can start over.

– 13 –
DEHUMIDIFICATION INSTRUCTIONS
Automatic dehumidification
Under this mode, the dehumidifer will dehumidify the room
according to the humidity setting you have chosen (press
“HUMIDITY LEVEL” to adjust). The ideal humidity for a room
is between 50%-60%. The dehumidifier will only operate if
the room humidity is higher than what you have set.
Continuous dehumidification
Under this mode, the dehumidifier will continuously dehumidify
the room, regardless of the room’s humidity. This function is
particularly useful if you are trying to dry up a wet area.
When humidity is low, the dehumidifier fan will operate on
a low speed, dehumidifying slower. When humidity is
high, the dehumidifier fan will operate on a high speed,
dehumidifying faster.
Clothes-drying
This function will assist in drying your clothing.
Position the dehumidifier with the back of the unit
facing your wet clothes.
Use the “MODE” button to select clothes-drying mode.
The compressor and fan operate on high settings to blow
high-speed air over your clothes, aerating and drying them.
You can also activate the swing louvre to widen the angle
of drying.
At the same time, the moisture that is aerated off your
clothes is removed from the air through the dehumidifier.

– 14 –
Dehumidification Tips
While operating automatic or continuous dehumidification or clothes drying mode, you can also
insert one of the HEPA or activated carbon filters to simultaneously purify the air. The appliance
will tell you if there is a filter in use by illuminating the air purification indicator . See “Air
purification and filters” section for more information on air purification.
DEHUMIDIFICATION INSTRUCTIONS
EMPTYING THE TANK AND DRAINAGE
To do so, gently remove the tank via the hand-hold at
the bottom of the tank.
Then take off the tank lid and drain the water.
Put the tank lid back on, reposition the tank and restart
your appliance.
Please note:
Please make sure that the tank lid is installed firmly on
tank and that the full tank float device is free to move.
Emptying the tank
The tank-full light on the display panel will illuminate when the tank is full. The unit will also beep
ten times to remind the user to empty the tank

– 15 –
1) Locate the drainage outlet, shown below on the
side of your appliance and insert a screwdriver
into the circular groove and break off the drain
hole cover.
2) Remove the tank and in the back of the
drainage cavity of the appliance towards the
right, there should be a lever, push that lever to
the side to expose the drainage outlet nozzle.
3) While pushing that lever open, connect a drain-
pipe firmly to the drainage outlet nozzle through
the whole in the side of the appliance that you
have made.
Please note:
The continuous drainage pipe is gravity fed. Make
sure that the height of the drainage pipe is lower
or equal to the height of water outlet.
Continuous drainage
If your house suffers from constant high humidity and you do not want to empty the tank
frequently, you can connect a drain-pipe (internal pipe diameter is 9mm) into the side of the
appliance to continuously drain the dehumidified water.
EMPTYING THE TANK AND DRAINAGE

– 16 –
AIR PURIFICATION AND FILTERS
Ventilation
This mode moves air around the room. Before
activating ventilation mode, remove any HEPA or
activated carbon filters to ensure the lifespan of
the filters. If you do not remove the filter, the filter
indicator will flash to remind you to remove it. Press
the “MODE” button to select ventilation mode.
Air purification function
Press the “MODE” button to select the Air purification
mode (as indicated by the two trees icon).
Ensure a filter (HEPA filter or activated carbon filter) is
installed (see next page on how to insert a filter). If it
is installed, the air purification icon will flash.
You can alternate between high and low fan speeds
by pressing the “CHANGE FAN SPEED” button.
If no filter is detected, the appliance will not operate.
The filter light will flash to remind you to insert a
filter.

– 17 –
Inserting a filter
1) Open the front panel
2) Remove the plastic mesh filter and insert an air
purification filter (activated carbon or HEPA). Then
replace the plastic mesh filter back into the appliance.
3) Replace the front panel
Note: See the “care and maintenance of activated carbon and HEPA filters”
section for information on when to replace filters.

– 18 –
Activated carbon filter
HEPA 13 filter
Activated carbon filter information
Activated carbon has a wide range of applications
such as in medical and environmental applications
where it is used to remove poisons and pollutants
and filter drinking water.
In your home, the activated carbon filter can remove
certain chemicals, volatile organic compounds,
odours and impurities from the atmosphere in your
home. Examples of these are pet or cigarette smells,
paint and petrol fumes, burnt food smells/smoke,
ammonia, CFCs, microbes and fungi.
HEPA 13 filter information
Your HEPA 13 filter removes 99.95% of the smallest
particles (MPPS) from the air. This includes allergens
such as dust, mould spores, pollen, dust mites as
well as bacteria and viruses.
HEPA filters have been shown to reduce the spread
of diseases and allergic reaction. The HEPA filter
prevents the dehumidifier from re-circulating and
spreading airborne bacteria and viruses that are
often common in winter. The result is a healthier
home and family.
Please note: You can only use one of the HEPA or
activated carbon filters at a time.
Plastic mesh filter
The plastic mesh filter is designed to trap large particles (such as dust and hair). This can be
cleaned and reused. Please see the Maintenance section for instruction on cleaning the dust off
this filter.

– 19 –
Replacing activated carbon and HEPA filters
Activated carbon and HEPA filters cannot be washed. Instead they need to be replaced every
9 – 18 months (depending on the air quality in your home). An average home will need filters
changed once per year. Replacement filters can be found at the retailer where you purchased
this appliance.
The appliance will keep track of the number of
days you have used a filter on the filter usage day
counter to indicate when you should change it.
To replace a filter, turn off the appliance and
remove the front panel and plastic mesh filter.
Remove the activated carbon or HEPA filter by
the fabric tab.
Before inserting a new filter, press the very small
button in the filter cavity to reset the filter usage
day counter. You may need a pen or a needle to
poke the button.
Now insert your new filter taking note of the
“FRONT” side of the filter. Replace plastic mesh
filter and front panel.
MAINTENANCE
Cleaning plastic mesh filter
First remove the front panel. It should be held on
magnetically. Then remove the plastic mesh filter
by pulling on the tabs on the side.
Remove dust by vacumming.
If the mesh filter is particularly dirty, wash it with
warm, clean, soapy water. Do not use chemical
solvents. Air-dry the filter out of direct sunlight.
After cleaning, re-insert plastic mesh filter so it sits
flat and isn’t buckled.

– 20 –
MAINTENANCE
Self cleaning mode
This dries out the internal components of
the appliance to ensure mildew does not
grow on the inside of it. Use this function
before any long period in which the
appliance will not be in use.
Activate this mode by holding down
the “SELF CLEAN MODE” button for 3
seconds. This drying procedure will take
approximately 1 hour. In this time, the
appliance fan settings will increase and
decrease and the swing louvre will open
and close at different stages.
To stop self cleaning, press the “SELF
CLEAN MODE” button for over 3 seconds.
The appliance will go back to the operating
mode it was in before self cleaning began.
Alternatively, press the “POWER” button to
stop the self clean mode and go back to
standby mode.
Storage
Before storing away, remember to clean
the unit both externally and internally (using
the self-clean mode). When storing away,
cover the unit so that it does not get dusty
in storage.
Cleaning of the appliance’s exterior
Wipe down the appliance with warm, clean, soapy
water and ensure you dry it thoroughly afterwards.
Table of contents
Other Dimplex Air Cleaner manuals

Dimplex
Dimplex DCEVP20W User manual

Dimplex
Dimplex DXAPV3 User manual

Dimplex
Dimplex DXAPV3N User manual

Dimplex
Dimplex DCEVP10 User manual

Dimplex
Dimplex GDC-EC7RS User manual

Dimplex
Dimplex GDC-ET4RS User manual

Dimplex
Dimplex BRAVA DXBRVAP5 User manual

Dimplex
Dimplex Brava DXBRVAP4 User manual

Dimplex
Dimplex DCEVP20W User manual

Dimplex
Dimplex DCEVP6WT User manual
Popular Air Cleaner manuals by other brands

Panasonic
Panasonic EH3015 - AIR PURIFIER-PHCC operating instructions

Coway
Coway airmega AP-1515G manual

Electrolux
Electrolux PURE A9 Series Instruction book

Coast-Air
Coast-Air CEP081C Installation and operation instruction manual

Honeywell
Honeywell UC100A1005 installation instructions

Olansi
Olansi K08 user manual