manuals.online logo
Brands
  1. Home
  2. •
  3. Brands
  4. •
  5. Dimplex
  6. •
  7. Heater
  8. •
  9. Dimplex DEOC15 User manual

Dimplex DEOC15 User manual

IMPORTANTSAFETYADVICE
DO NOT coverthe radiatoror placematerial or
garmentson itor betweenthefins.
DO NOT obstructthe aircirculationaroundthe
radiator, for example with curtains or furniture,
as this could cause overheating and a fire risk.
See ‘Positioning the Radiator’.
Thisradiatorcarriesawaring‘DONOTCOVER’
toalertthe usertotherisk offirethatexistsifthe
radiatorisaccidentaly covered.
DO NOT use the heater in the immediate
surroundingsofabath, ashoweroraswimming
pool.
DO NOT placethe heaterdirectly belowafixed
socketoutlet.
WARNING: In order to avoid a hazard due to
inadvertentresetting ofthethermal cut-out,this
appliance must not be supplied through an
external switching device, such as a timer, or
connectedto acircuit thatis regularlyswitched
onandoff bytheutility.
This appliance can be used by children aged
from 8 years and above and persons with
reducedphysical,sensoryormentalcapabilities
orlackofexpierienceorknowledgeiftheyhave
beengivensupervisionorinstructionconcerning
the use of the appliance in a safe way and
understandthehazards involved.Cleaningand
usermaintenanceshallnot bemadebychildren
withoutsupervision.
Childrenoflessthan3yearsshouldbekeptaway
unless contiuously supervised. Children aged
from 3 years and less than 8 years shall only
switch on/off the appliance provided that it has
been placed or installed in its intended normal
operating position and they have been given
supervisionor instructionconcerningthe useof
theappliance inasafe wayand understandthe
hazards involved. Children aged from 3 years
andless than8 yearsshall notplug in,regulate
and clean the appliance or perform user
Oil filled Column Radiators
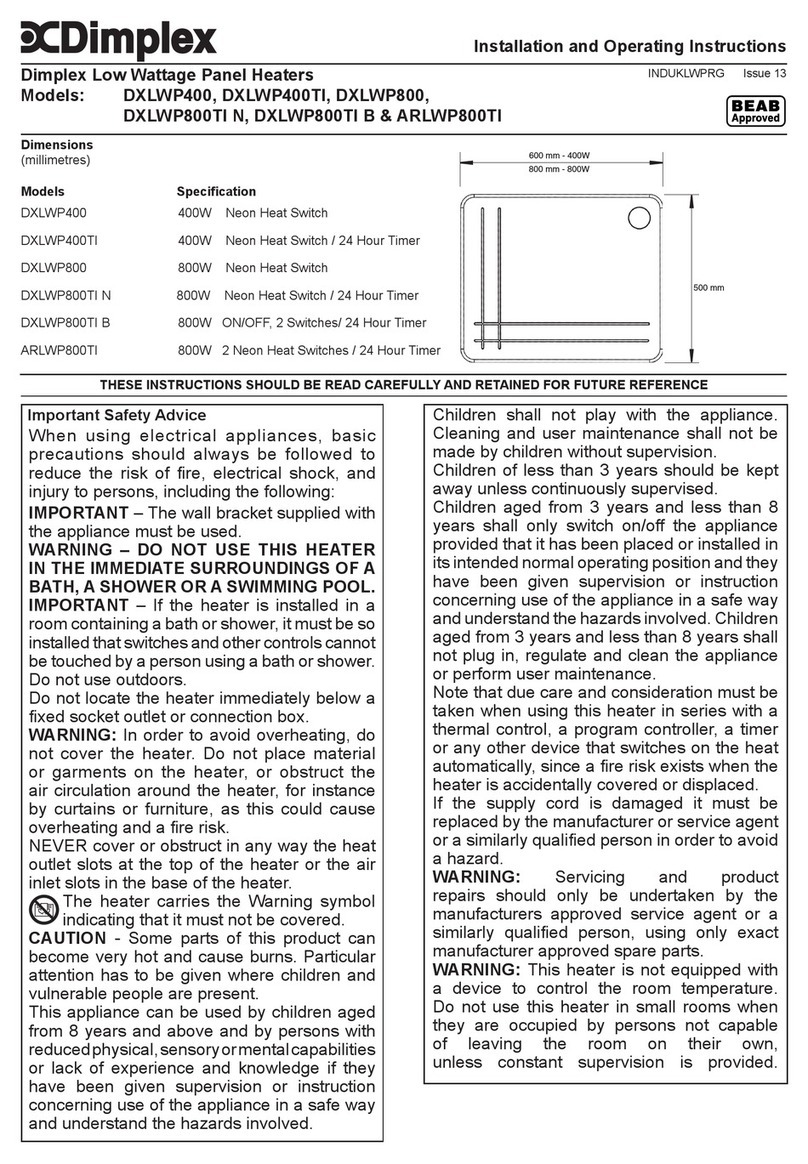
Models : DEOC15 & DEOC20
Model(s) Specification
DEOC15 7 Fin, 1.5kW, Thermostat, 3 Heat Settings, Mains Neon
DEOC20 9 Fin, 2.0kW, Thermostat, 3 Heat Settings, Mains Neon
THESE INSTRUCTIONS SHOULD BE READ CAREFULLY AND RETAINED FOR FUTURE REFERENCE.
Installation and Operating Instructions
08/51938/0 Issue 0
maintenance.
CAUTION: Some parts of this product can
become very hot and cause burns. Particular
attention has to be given where children and
vunerablepeople arepresent.
Avoid use of an extension cord because the
extensioncord mayoverheat andcause riskof
fire.
This heater is filled with a precise quantity of a
special oil. Repairs requiring opening of the oil
container are only to be made by the
manufacturer or his service agent who should
be contacted if there is an oil leak
Whenscrappingtheheater,followtheregulations
concerningthe disposalof oil.
Thisradiatorcomplieswith stringent safetystandardsbut
to ensure efficient operation SURFACES OF THE
RADIATORWILLBECOME HOTANDCONTACTWITH
THESE AREAS SHOULD BE AVOIDED, particularly
betweenthe fins.
Thecontrolpanel area isdesignedtobe cooler andallow
safe operation of the controls at all times.
Ifyoung children,the aged or infirm arelikely tobe leftin
the vicinity of the heater, we advise that adequate
precautionsshouldbetaken. Werecommendthataguard
befitted to ensurecontact withtheheater isavoided and
objects cannot be inserted into the product.
This radiator must be used on anAC ~ supply only and
the voltage marked on the heater must correspond with
thesupply voltage.
DO NOT USE the radiator if it has been dropped or
damaged or the mains lead has been damaged, until it
hasbeen examined bya qualifiedengineer.
DO ENSURE thatthe mainsleadcannot be trippedover.
DO NOT operate the radiator with the mains lead
overhangingthefins.
DO NOT USETHISRADIATORWHENITIS LYING ON
ITS SIDES. If the radiator is tipped over, unplug it and
allow it to cool before standing it back up.
If the mains lead is damaged, it must be replaced by the
manufacturer or its service agent or a similarly qualified
personin order toavoid ahazard.
The appliance is not intended for use by young children
orinfirmedpersons without supervision.
Young children should be supervised to ensure they do
not play with the appliance.
Electrical
WARNING– THISAPPLIANCE MUSTBE EARTHED
This heater must be used on an AC ~ supply only and
thevoltagemarkedontheheater must correspondtothe
supply voltage. If fitting a 13 amp plug, a 13 amp fuse
approvedbyASTAto BS 1362mustbeused.If any other
type of plug is used, a 15 amp fuse must be fitted in the
plug,the adaptor, or at thedistribution board.
IMPORTANT - The wiresinthe mainsleadare coloured
inaccordance withthe followingcode:
GREENandYELLOW - EARTH
BLUE - NEUTRAL
BROWN - LIVE
ConnecttheGREEN AND YELLOW wiretotheterminal
marked ‘E’ or by the earth symbol , or coloured
GREENorGREENAND YELLOW.
Connect the BROWN wire to the terminal marked ‘L’ or
colouredRED.
Connect the BLUE wire to the terminal marked ‘N’ or
colouredBLACK.
Thisappliance mustonly beused onA.C.mains supply
of230-240 Volts~.
Fitting the castors
Removethecarton containingthecastorassembliesfrom
the packing.
Fit the castors to the stub axles by applying hand
pressure until each castor clicks into position - see ‘a’
Fig 1.Note thatthe castorsare designedto bea tightfit
on the axles but will rotate in use.
The castors must be fitted between the outer fins (as
shown on ‘b’ and ‘c’ in Fig. 1).
IMPORTANT – ENSURE THAT THE CASTORS ARE
FITTED TO THE BASE OF THE RADIATOR SO THAT,
WHEN IN USE, THE CONTROLS ARE AT THE TOP
ANDTHE CABLESTORAGEATTHE BOTTOMOFTHE
CONTROL PANEL – see Fig. 2.
Turn the radiator upside down on a carpet or other soft
surfacetoavoiddamage
Fig.1
(a)
(b) (c)
Lifttheradiator clear of the floor,then turn it back upright
andstand iton its castorsas shownin Fig. 2 ‘D’.It is now
readyfor use.
Positioning the radiator
Always ensure that the radiator is stood on a firm, level
base near to, but not directly beneath, a suitable fixed
socket outlet.
Unwind the mains lead fully from the cable store at the
base of the control panel before plugging in the radiator.
DO NOT pull the radiator along by the mains lead.
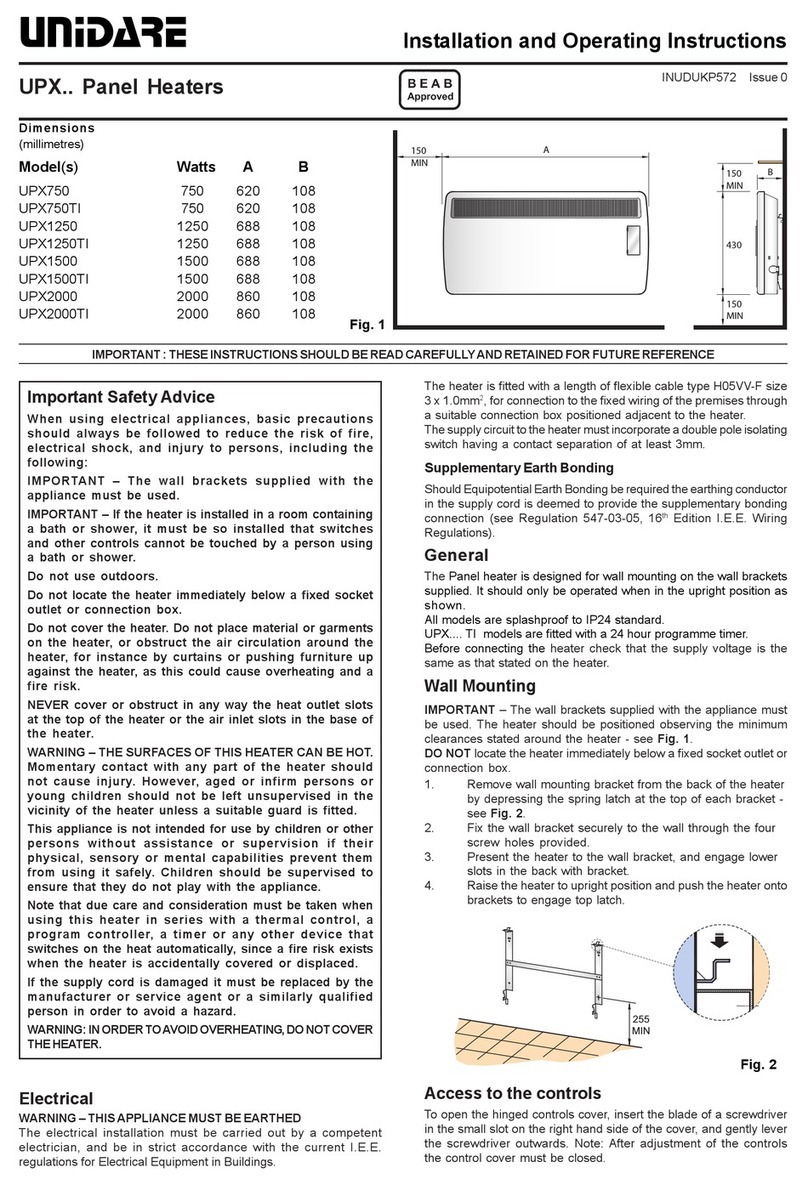
Ensure that curtains and furniture are not closer than 1
metre (3’) from the chosen position, as this would create
apotential fire hazard.
Ensurethatthereisatleast300mm(1’) above the radiator
ofunobstructed space.
Before switching on
Ensure that all packing items are removed (read any
warning labels carefully) and that all warnings and
instructionshavebeen readcarefullyand followed.
Operation
Whenyouarecertainthat you havecompletedtheabove,
plug in and switch on at the wall socket. The neon will
glow all the time that the radiator is connected to the
mains supply.
Please Note – We recommend that you open a window
to ventilate the room when using the heater for the first
time.
Fig.2
Model Heat switch settings
DEOC15(1500W) o – Off II
II
I- 600W,II
II
III
II
I- 900W,II
II
III
II
III
II
I-
1500W
DEOC20(2000W) o – Off II
II
I- 800W,II
II
III
II
I- 1200W,II
II
III
II
III
II
I-
2000W
Heat control (see Fig. 3)
The heat switch provides a choice of heat outputs :
Onbothmodels, the radiatorisOFFwhen the heatswitch
is set to position ‘O’
Warning:Theradiatorisheavy–ensurethatitissupported
to prevent it from toppling. Ask a second person to help
withthisif necessary.Locatethe wire clampsandremove
the plastic straps and winged nuts (see Fig. 2 ‘C’).
Insertthe non-threaded endof thewireclamp ‘A’intoone
ofthe twoholes inthe castorplate ‘B’as shownin Fig. 2,
at the same time tilting the opposite end of the plate
slightly. Lower the castor plate and insert the threaded
end of the clamp through the fins and over the boss and
into the other hole in the castor plate. Place the winged
nut ‘C’on the thread and tighten it securely.
WARNING – THIS RADIATOR MUST ONLY BEOPERATED IN
THE UPRIGHT POSITION WITH THE CASTORS FITTED, AS
DETAILED INLEAFLET
Storage
Ifthe radiator isnotrequired forlongperiods, for example
during the summer, it should be stored in dry place and
preferablycoveredtopreventtheaccumulationofdustand
dirt.
The mains lead can be wound around the cable store at
the bottom of the control panel, ensuring that the plug
does not trail on the floor.
Cleaning
WARNING – ALWAYS DISCONNECT FROM THE
POWER SUPPLY AND ALLOW THE RADIATOR TO
COOLBEFORE CLEANING.
Donotusedetergents,abrasivecleaningpowderorpolish
ofanykindonthebodyoftheradiator,asthesecandamage
thefinish.
Wipe the radiator with a dry cloth to remove dust and a
damp cloth (not wet) to clean off stains.
Be careful not to allow moisture into the controls area.
Thermostat control (see Fig. 3)
The heat output is controlled by
the thermostat, according to the
roomtemperature.
Turn the knob to max. setting.
When the room is warm enough,
reducethe settingslowly untilthe
radiator just clicks off.
Theradiatorwill now cycleonand
offtomaintainyourselected room
temperature.
NOTE : If the radiator does not
come on when the thermostat is
on a low setting, this is normally
becausethe room iswarmer than
the thermostat setting and is not
afault.
Ifthethermostatisset to min.and
a heat setting is selected, the
thermostatwillturntheradiatoron
and off to maintain a low
temperature to help protect
against frosty conditions.
Fig.3
Heat selector
switch
max
min
Thermostat
knob
RecyclingFor electrical products sold within the
European Community.At the end of the
electricalproducts usefullife itshould notbe
disposed of with household waste. Please
recyclewherefacilitiesexist. Checkwithyour
LocalAuthority orretailerforrecycling advice
in your country.
After Sales Service
Your product is guaranteed for 1 year from the date of
purchase. After sales information or assistance with this
productcan befound onour website:
www.dimplex.co.uk/support.
Your rights under this guarantee are additional to your
statutory rights, which in turn are not affected by this
guarantee.
Please do not return a faulty product to us as this may
result in loss or damage and delay in providing you with a
satisfactoryservice.
If after following these steps your product still does not
operate you should return it to your point of purchase.
Pleaseretain yourreceipt asproof ofpurchase.
[c] Glen Dimplex UK Limited
All rights reserved. Material contained in this publication may not be reproduced in whole or in part, without prior permission in writing of Glen Dimplex UK Limited.
The product complies with the European Safety Standards EN60335-2-30 and the European Standard Electromagnetic Compatibility (EMC) EN55014,
EN60555-2 and EN60555-3. These cover the essential requirements of EEC Directives 2006/95/EC and 2004/108/EC

This manual suits for next models

1

Other Dimplex Heater manuals

Dimplex CPTS User manual

Dimplex

Dimplex CPTS User manual

Dimplex RPX075N User manual

Dimplex

Dimplex RPX075N User manual

Dimplex PLX050NN User manual

Dimplex

Dimplex PLX050NN User manual

Dimplex FrostWatcher FW600 User manual

Dimplex

Dimplex FrostWatcher FW600 User manual

Dimplex R23DH Series User manual

Dimplex

Dimplex R23DH Series User manual

Dimplex Girona GFP 200 B User manual

Dimplex

Dimplex Girona GFP 200 B User manual

Dimplex CKHA20D31 User manual

Dimplex

Dimplex CKHA20D31 User manual

Dimplex 403TSFTIE7 User manual

Dimplex

Dimplex 403TSFTIE7 User manual

Dimplex CUH05B31T User manual

Dimplex

Dimplex CUH05B31T User manual

Dimplex DXLWP400TS User manual

Dimplex

Dimplex DXLWP400TS User manual

Dimplex QM050 User manual

Dimplex

Dimplex QM050 User manual

Dimplex Firefly FIF20 User manual

Dimplex

Dimplex Firefly FIF20 User manual

Dimplex DXUCTW2B User manual

Dimplex

Dimplex DXUCTW2B User manual

Dimplex FX 20E IPX4 User manual

Dimplex

Dimplex FX 20E IPX4 User manual

Dimplex XMX706N User manual

Dimplex

Dimplex XMX706N User manual

Dimplex SRX 070C User manual

Dimplex

Dimplex SRX 070C User manual

Dimplex RFI Series User manual

Dimplex

Dimplex RFI Series User manual

Dimplex 3082S User manual

Dimplex

Dimplex 3082S User manual

Dimplex XLS12N User manual

Dimplex

Dimplex XLS12N User manual

Dimplex SRX 080 User manual

Dimplex

Dimplex SRX 080 User manual

Dimplex XMC712N User manual

Dimplex

Dimplex XMC712N User manual

Dimplex BLF3451 User manual

Dimplex

Dimplex BLF3451 User manual

Dimplex CXLS12N User manual

Dimplex

Dimplex CXLS12N User manual

Dimplex 403TS User manual

Dimplex

Dimplex 403TS User manual

Popular Heater manuals by other brands

Sapir SP-1974-E instruction manual

Sapir

Sapir SP-1974-E instruction manual

LIFEPLUS IFH11A-100 instruction manual

LIFEPLUS

LIFEPLUS IFH11A-100 instruction manual

MCS B 35 CEG User and Maintenance Book

MCS

MCS B 35 CEG User and Maintenance Book

Heat Outdoors Shadow Safety instructions and operation manual

Heat Outdoors

Heat Outdoors Shadow Safety instructions and operation manual

Trustech OH907R owner's manual

Trustech

Trustech OH907R owner's manual

NTN-SNR Safe Therm 70 instruction manual

NTN-SNR

NTN-SNR Safe Therm 70 instruction manual

LavorPro HK070F-A Operation manual

LavorPro

LavorPro HK070F-A Operation manual

SunStar SPS 40-N5 Installation and operation instructions

SunStar

SunStar SPS 40-N5 Installation and operation instructions

Shizuoka Seiki VAL6 EPX owner's manual

Shizuoka Seiki

Shizuoka Seiki VAL6 EPX owner's manual

MrHeater MH60QFAV Owner's Manual and Operating Instructions

MrHeater

MrHeater MH60QFAV Owner's Manual and Operating Instructions

Life Smart LS1002THD13 owner's manual

Life Smart

Life Smart LS1002THD13 owner's manual

Dura Heat DH2304S owner's manual

Dura Heat

Dura Heat DH2304S owner's manual

TriStar KA-5111 user manual

TriStar

TriStar KA-5111 user manual

Silvercrest 100108 operating instructions

Silvercrest

Silvercrest 100108 operating instructions

Duracraft TOW011448 instruction manual

Duracraft

Duracraft TOW011448 instruction manual

Thomas&Betts RENZOR FT 30 manual

Thomas&Betts

Thomas&Betts RENZOR FT 30 manual

Silvercrest SHLF 2000 A1 operating instructions

Silvercrest

Silvercrest SHLF 2000 A1 operating instructions

Soler & Palau COR-1000 NW 9 Installation and operation manual

Soler & Palau

Soler & Palau COR-1000 NW 9 Installation and operation manual

manuals.online logo
manuals.online logoBrands
  • About & Mission
  • Contact us
  • Privacy Policy
  • Terms and Conditions

Copyright 2025 Manuals.Online. All Rights Reserved.