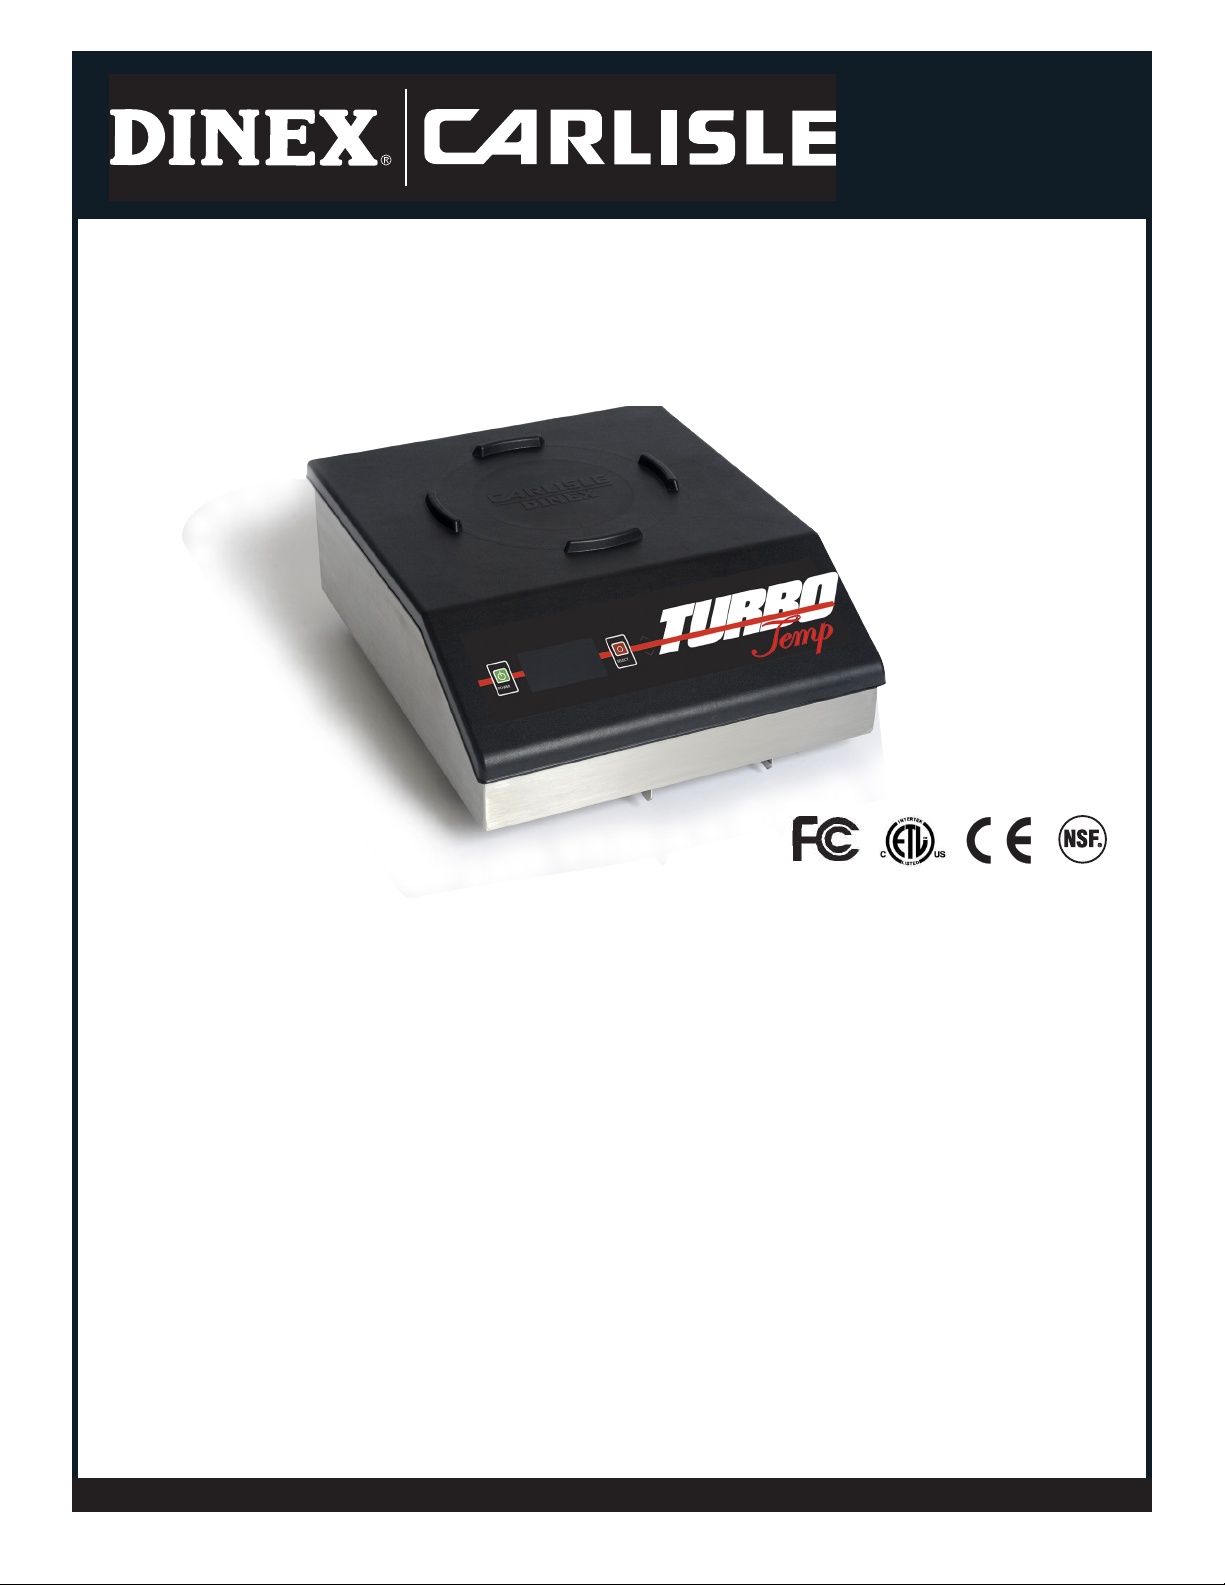
Dinex CARLISLE Turbo-Temp DX1011208 Installation and operation manual

DINEX | CARLISLE • 4711 EAST HEFNER ROAD, OKLAHOMA CITY, OK 73131 • WWW.DINEX.COM
© 2010 DINEX | CARLISLE • 4711 EAST HEFNER ROAD, OKLAHOMA CITY, OK 73131 • WWW.DINEX.COM
Introduction.................................................................................................................................................................................... 2
Installation ..................................................................................................................................................................................... 2
Operating Instructions ................................................................................................................................................................... 3
Troubleshooting............................................................................................................................................................................. 4
Maintenance .................................................................................................................................................................................. 5
Dinex®Warranty............................................................................................................................................................................ 6
Turbo•Temp™: Induction Base Heating system
For Service Information call 1.888.673.4639
Please provide following information:
• Model number
• Serial number (from bottom of unit)
Manual No. Turbo•Temp_0810
Turbo•Temp™
Operating & Maintenance Manual
Model: DX1011208 (208V, 3-Phase)
DO NOT DISCARD

Turbo•Temp | 2
INTRODUCTION
Congratulations! You have purchased the new Dinex® Turbo•Temp™
Induction Charger. Your Dinex Turbo•Temp induction heated base
system, when used within a controlled hot food trayline process and
covered with Dinex insulated domes, will keep hot plated food satisfying
for up to one hour from plating.
Please read this manual for helpful guidelines on how to use your new
equipment. Should you have any questions concerning the equipment,
please call Dinex Service at
1.888.673.4639.
!
IMPORTANT: For your safety, read and follow all cautions,
information, and warnings.
FREIGHT DAMAGE CLAIMS
Your Turbo•Temp Induction Charger was carefully inspected and packed
before leaving our factory. The transportation company assumes full
responsibility for the safe delivery of this equipment. Dinex cannot
assume responsibility for damage or loss incurred during transit. Visible
damage or loss should be noted on the freight bill and signed by the
person making the delivery.
A freight claim should be led immediately with the transportation
company. If damage is unnoticed or concealed until the equipment is
unpacked, notify the transportation company immediately and tell them
you want to le a concealed damage claim. This must be done within
fteen (15) days after delivery was made. Be sure to retain all packing
materials and cartons.
!
ATTENTION: Use of this symbol identies a potentially hazardous
situation which, if not avoided, may result in damage to the machine
or injury to the operator.
!
CAUTION: If the product is used without observing the information
given under this symbol, minor personal injury, or damage to
equipment may result.
!
ATTENTION: Installation of this equipment should be performed
only by persons qualied or licensed to install electrical equipment.
• Adjustments and service work should be performed only by
qualied service technicians.
• This equipment is intended for commercial use only. Not for
household use.
• Use of other than genuine Dinex replacement parts or service
work performed by those other than authorized Dinex service
agents will void the warranty.
• Do not use corrosive cleaners on the equipment. Use
only mild detergents.
APPLICATION & USE
The equipment is for commercial use in the foodservice industry. It
provides maximum induction heating compatible with Dinex bases. Use
with Dinex Smart bases only.
SAFETY
The instructions contained in this manual provide important guidelines
for the equipment user regarding correct and safe installation. Particular
attention should be paid to the precautions given in various parts of
this manual. Do not attempt to repair this equipment. Repairs must be
performed by authorized personnel only.
• Never use the equipment as a work surface or cutting board.
• Do not attempt to heat anything other than a Dinex base.
!
IMPORTANT: Do not place a Smart base in a microwave oven.
!
INFORMATION: This appliance is for commercial use only and must
be used exclusively for the purposes prescribed.
!
IMPORTANT: The following instructions reduce the risk of re,
electrical shock, or injury.
INSTALLATION
SET UP
1. Carefully remove any packing material from the induction charger
and check loose packing material for small parts or accessories.
Inspect the charger for concealed damage before placing packing
material aside. Keep the packaging until you are condent with the
equipment performance.
2. The Turbo•Temp induction charger is equipped with a locking plug.
This plug is part of a system that will protect you from injury in the
event of an electrical malfunction inside the unit. Be sure the plug is
fully plugged into a matching socket that is properly grounded.
!
ATTENTION: DO NOT cut or break off the larger angled prong on
this plug, or change the plug or power in any
way. Doing so will create a safety hazard and also void
the warranty.
3. MAKE SURE THAT INCOMING VOLTAGES MATCHES THE
CHARGER REQUIREMENTS. A product identication label on the
bottom of the unit species the operating voltage, current, frequency,
phase, and maximum wattage of the charger. Plugging or wiring
the charger into less voltage than the charger is rated may
signicantly decrease the performance of the unit or damage
internal electrical components.
4. Do not place foreign objects on the charger, or between the Dinex
base and the charger surface. Foreign objects may heat within the
induction eld and cause damage to the charger surface and/or
base.
5. Do not use any Turbo•Temp charger that has a damaged cord or
plug. Consult the warranty and follow the instructions for service.
6. Do not let the power cord touch hot surfaces.
7. The center of the charger may get hot to the touch after hours of
continuous use. Use caution when loading and unloading bases.
8. The charger requires ample air ow to cool the internal electronic
components. Air is pulled in from the front and sides of the bottom
of the unit and is exhausted towards the rear of the unit. Assure that
nothing obstructs the airow around all four sides of the unit. Allow at
least two inches from a wall or partition.
9. A dedicated electrical circuit is recommended for each Turbo•Temp
charger.
!
IMPORTANT: Every installation site has different electrical wiring
requirements. Because many different local codes exist, it is the
owner and installer’s responsibility to comply with all federal, state,
and local codes. Dinex is not responsible for any consequential
damages, either expressed or implied, as a result of failure to
comply with installation requirements.

Turbo•Temp | 3
!
CAUTION: Please do not attempt to open the charger or perform
service of any kind. This product can only be serviced by a Dinex
Authorized Service Agent or designated Dinex personnel. Contact
Dinex at 1.888.673.4639 for service information.
!
CAUTION: Any installation not matching the requirements
discussed in this manual will automatically void the product’s
warranty.
INSTALLATION
1. The Turbo•Temp Charger can be installed on top of a at, level
counter top or shelving, being careful to maintain at least two inches
of clearance on all sides of the charger for cooling. Do not place
over paper or loose material that may inhibit air ow into the bottom
air intakes. Consider the Dinex Induction Stand (Accessory product)
ICSTANDM (Mobile with casters) ICSTAND (Not mobile).
2. The charger must be plugged into a grounded 208V 3-Phase
receptacle. Check rating plate on the charger
to verify correct voltage.
!
IMPORTANT: Each charger should be connected to its own
dedicated circuit. They should not be connected to circuits sharing
compressors or other heavy current draw devices (i.e. plate heaters,
steam tables, etc.)
3. Do not move the Turbo•Temp Charger when it is electrically
connected.
4. Two grease lters are mounted to the bottom of the unit. Assure
each is seated and free of excessive debris or grease.
OPERATION INSTRUCTIONS
Turbo•Temp Induction System
1. Make sure that your Turbo•Temp Charger is plugged into an
energized circuit as described in the previous section. This should
be a dedicated circuit, not shared with any devices utilizing motors,
compressors, or components requiring a heavy current draw.
User Interface:
LCD
INFO CENTER
POWER key will turn the unit on and off.
SELECT key will be used to reset error conditions, clear informational
messages, and select or set options.
UP/DOWN arrow keys (these are not embossed – just right of the
SELECT key) are used to move among Manager Options in the
OPTIONS menu.
LCD Info Center provides feedback on the status of bases charging
and equipment operation.
2. The Turbo•Temp Charger is turned on by pressing the POWER
button on the left front of the switch panel. The LCD Info Center will
display “Waiting for base…” indicating the Turbo•Temp Charger is
turned on and ready for use.
3. Place a Dinex Smart base on the charger within the positioning rails,
making sure the base is seated at on the top. The charger will beep
once as it recognizes the base.
4. The LCD Info Center will display “Heating Base” when it begins a
charge. A status bar at the bottom of the screen will continue to ll
in to show the charge process. If the base is removed prior to the
status bar being completely lled the base will not be fully charged
and may result in a lower delivery temperature.
!
INFORMATION: You will hear three loud “BEEPS” if you remove the
base before it is fully charged.
!
INFORMATION: To prevent overheating a base, the charger will
not reheat a base until slightly over one hour has elapsed – even
if the base was removed before the initial charge completed.
“Reheat Later” will appear in the LCD if insufcient time has elapsed
between charges.
5. If the phrase “Waiting for base…” still appears after placing a base
on the charger, remove the base and reposition – assuring the base
is seated at to the top, and within the positioning rails.
6. After the status bar is completely lled the charger will display “Base
Ready” and will beep indicating that base is at full temperature.
Charge time for a base will be approximately 10 seconds. Low
incoming voltage may increase charging time.
!
INFORMATION: Fluctuations in voltage may affect heating time.
7. If the charger sees no activity for an extended period of time, it will
beep 2 times and go into “Sleep” mode to conserve power. This will
be indicated by the display reading “Power Save. Press any key to
return to previous mode”. Press any key to exit “Sleep” mode.
8. Power off the Turbo•Temp Charger by depressing the POWER
button.
MANAGER OPTIONS
Your Turbo•Temp charger can be set to display in English, Spanish, or
French languages. You may also choose to disable information alerts
(see below). These options may be changed through the OPTIONS
menu.
DINEX
1. The unit must be powered down with DINEX in the display. Press
and hold the SELECT key for 7 seconds.
2. Release the SELECT key, and within two seconds, press the
POWER key once. The OPTIONS menu should now be displayed.
SET OPTIONS
Set Language
Ignore Warnings
Reset Defaults
Exit
3. Use the UP/DOWN arrow keys to move the caret symbol (>) to the
desired option, and press SELECT.
4. The “Set Language” and “Ignore Warnings” options will bring up sub-
menus where you may select the desired mode. “Set Languages”
allows you to choose between displaying English, Spanish, or
POWER SELECT
PMS 354 C (Power Button)
PMS 506 C (Select Button)
PMS Process Black C at 90% (Arrows)
PMS 485 C (Line & Temp)
POWER SELECT
PMS 354 C (Power Button)
PMS 506 C (Select Button)
PMS Process Black C at 90% (Arrows)
PMS 485 C (Line & Temp)
POWER SELECT
PMS 354 C (Power Button)
PMS 506 C (Select Button)
PMS Process Black C at 90% (Arrows)
PMS 485 C (Line & Temp)

Turbo•Temp | 4
French. “Ignore Warnings” allows you to suppress the display of
certain informational warning messages (for example, you may
suppress the display of “Low Voltage” warnings during times of
heavy electrical demand where voltage on power lines may sag).
5. Choose “Exit” to back out of the displayed menu.
6. At any time, you may also press the POWER key to cycle the unit
back into normal operation.
INFORMATIONAL WARNINGS
Two informational warning messages may appear in the course
of operation. Make note of and correct the condition as soon as is
practical. Press the SELECT key to continue normal operation.
1. Warning!! Low voltage condition exists. Performance may suffer.
Press SELECT to continue.
This indicates that the unit senses the line voltage has dropped
where charge times may be adversely affected. The unit will pause
operation until SELECT is pressed. No harm will result if you
continue to operate the unit. If these warnings become excessive
(for example, during periods of high electrical demand), they may be
suppressed from the OPTIONS menu.
2. Warning!! Reduced airow detected. Check grease lter. Press
SELECT to continue.
Your Turbo•Temp Charger incorporates a sensor and software to detect
when airow diminishes. This message will appear from time to time to
remind you to check the lters – then with increasing regularity as the
grease lters get clogged. This message may also appear if there are
obstructions to good airow around the bottom of the unit, or if paper
is pulled into the lter. Assure no napkins or plates are blocking the
sides and that the unit is two inches from any obstruction around all four
sides.
TROUBLESHOOTING
!
INFORMATION: Safety-relevant parts should be replaced with
original factory parts only. Any defective part must be removed
and replaced by a qualied service technician authorized by
Dinex. Should you require service please call the Dinex Hotline at
1.888.673.4639. In order for the warranty to remain valid, work must
be authorized by Dinex prior to being performed.
The Dinex Turbo•Temp Charger is a very intelligent device. Built in
diagnostics can help you to determine the cause of most problems. The
following section explains how to determine if you are experiencing a
problem and what can be done to correct the problem. This information
can be very helpful if you are calling our Customer Service department
to report any operational difculties.
1. Errors are displayed in easy to understand text on the LCD Screen.
2. If an error occurs, remove the base from the charger and turn the
charger OFF and turn the charger back ON.
3. If an error persists, remove the base from the charger, turn the
power off and unplug the charger, wait 5 seconds and then plug the
charger back in and turn the charger on by pressing the “POWER”
button.
4. When the display reads “Waiting For Base”, put the base back
on the charger to continue charging. Make sure that the base is
properly positioned on the charger.
5. If the base still doesn’t heat, set it aside and take it out of service.
If other bases exhibit similar conditions note the error code and call
Dinex Service.
ERROR CONDITIONS
Error Codes will be indicated by a message on the LCD Info Center. If
there is more than one error condition, the display will alternate between
the error messages. It will continuously repeat this cycle until the errors
are reset. Error messages may be reset by pressing SELECT.
If the error persists, turn the charger off, unplug the power cord, wait 5
seconds, and plug it in again. If the error still persists, turn the charger
off and call the Dinex Service Department at 1.888.673.4639.
Message: Error! RFID Communications problem. Possible bad
base. 1/2
Condition: RFID read/write problem.
Check: Possible bad RFID tag on the base, or RFID antenna/
reader problems. If isolated to one or more bases, set them
aside and call service about those bases. If error issued
with many bases, call service about the charger.
Message: Error! Incompatible base. 3
Condition: Base draws too much current.
Check: Object being heated is not a Dinex 8x1-series base or
internal charger problem.
Message: Error! Unit overheat! Check fan operation. Allow to
cool. 4
Condition: Internal unit temperature too hot.
Check: Fan stalled, restricted air ow, or ambient operating
temperature too hot. Possible internal electronics fault.
Verify grease lters are not blocked and unrestricted airow
about the bottom of the unit. Listen for fan operation. If error
persists, call Dinex service.
Message: Error! Incoming voltage too high. 6
Condition: Line voltage measures greater than 110% (228V) of unit
rated voltage.
Check: Line voltage spikes, possible voltage sensing electronics
fault. Have maintenance verify line voltage. Recalibrate
to your line conditions (for trained maintenance personnel
only):
1. Measure voltage across phase 1 to ground (typically
about 120V) with voltmeter.
2. Set unit to OFF position – DINEX in the display.
3. Press and hold the DOWN arrow for 7 seconds.
4. Release, and within 2 seconds, press POWER once.
The CALIBRATION screen should display.
5. Using arrow keys, move caret (>) to Set V Offset. Press
SELECT.
6. Using UP/DOWN arrow keys, dial in the measured
phase voltage. Press SELECT.
7. Please do not use the reset logs selections, this will
clear valuable stored information should your unit
require additional service.
8. Select EXIT or cycle the POWER button.
Message: Incoming voltage too low. 10
Condition: Line voltage is less than 90% (187V) of unit rated voltage.
This could cause the unit to draw excessive current. To
protect the charger, this error is displayed.
Check: Verify the line voltage at your outlet is between 187V and
228V. The unit draws up to 6500W which can make your
outlet voltage sag during charges. It is best to attempt this
measurement while a base is charging – or allow about
5V drop during operation. If required, recalibrate to your
line conditions as outlined under the high voltage error
description.
Message: Critical Error! Unit requires service. Call Dinex (888)
673-4639. 7
Condition: Inverter drawing power when commanded off.

Turbo•Temp | 5
Check: Possible internal electronics fault. Unplug, wait 5 seconds,
and replug unit. If error persists, call Dinex service.
Message: Error! Check incoming voltage! If problem persists, Call
Dinex Service (888) 673-4639. 8
Condition: Line voltage measured to be out of range.
Check: Major line voltage sags (severe brown out) or internal
electronics fault. Have maintenance verify line voltage.
Unplug, wait 5 seconds, and replug unit. If error persists,
call Dinex service.
Message: Critical Error! Time corrupted. Call Dinex Service (888)
673-4639. 9
Condition: Internal system clock time incorrect.
Check: System clock backup battery dead, system clock electronics
fault, or electronic noise spike. Cycle POWER button.
Unplug, wait 5 seconds, and replug unit. If error persists,
call Dinex service.
Message: Critical Error! RFID failure. Call Dinex Service (888) 673-
4639. 15
Condition: RFID reader-to-host communications failure
Check: RFID reader fault, internal power supply electronics fault,
CPU electronics fault, bad internal interconnect. Call Dinex
service.
Message: Critical Error! Electronics platform fault. Call Dinex
Service (888) 673-4639. 16
Condition: CPU memory corrupt.
Check: Internal CPU fault or electrical noise spike. Cycle power. If
error persists, call Dinex service.
Message: Reheat later. (Clears when base is removed).
Condition: 1) Insufcient base cooling time or 2) Base time stamp has
corrupted information – but the unit automatically repaired
it.
Check: Set base aside for reuse after one and one-quarter hour.
MAINTENANCE
Turbo•Temp CHARGER CLEANING INSTRUCTIONS
1. Unplug the charger before cleaning. Do not submerge the charger in
water. Do not splash or pour water onto the charger’s control panel
or into intake/outlet vents. Possible shock hazard may result and the
charger may be damaged.
2. The heating surface is a high strength composite material. Please
use appropriate care in handling and cleaning.
3. Do not use steel wool, abrasive cleaners, or chlorinated cleaners on
the charger.
4. Wipe the entire charger off with a damp cloth and mild detergent.
Dry the charger before connecting it to its electrical source.
GREASE AND AIR FILTERS
1. Weekly, inspect the two bottom-mounted grease lters for build-up
of debris.
2. Slide lters out of their holders and run under faucet or in
dishwasher to clear of debris and grease. FILTERS MUST BE
DRY BEFORE SLIDING BACK INTO THEIR HOLDERS. DO NOT
OPERATE YOUR Turbo•Temp WITHOUT PROPERLY FITTED, DRY
FILTERS.
3. Replacement lters may be obtained by calling Dinex service.
!
WARNING: Never spray, wash or use excessive water on the
charger. Before cleaning it is absolutely necessary to unplug power
plug.
• Do not use the charger if the top is broken or cracked.
• Never use the charger as a work surface or cutting board.
• Never attempt to heat anything other than a Dinex
8x1-Series Smart base.

Turbo•Temp | 6
DINEX WARRANTY
These Warranties cover the following Dinex | Carlisle (“Dinex”)
equipment products (the “Warranted Products”):
• Rethermalization Equipment Products
• Induction Heating System Products (excluding Induction Bases
covered under separate warranty)*
• Milk Cooler Products
• Ice Cream Freezer Products
• Air Curtain Refrigerator Products
• Blast Chiller Products
• Hot/Cold Food Counter Products
• Plate, Rack and Tray Dispenser Products
• Plate Heater Products
• Base Heater Products
• Drying and Storage Rack Products
• Starter Station Products
• Conveyer Products
• Tray and Other Cart Products
Warranted Products also includes any other Equipment System
Products identied on Dinex’s website (www.dinex.com) from time to
time.
Standard Warranty. Except as indicated otherwise below, Dinex
warrants that the Warranted Products will be free from defects in
title, material and workmanship under normal use and service and
will perform substantially in accordance with Dinex’s written technical
specications for the Warranted Products (as such specications
exist on the date the Warranted Products are shipped) (the “Product
Specications” ) . This warranty covers both parts and labor and
is available only to end-users (the “Customers”) that purchase the
Warranted Products from Dinex or its authorized distributors. For the
purpose of these warranties, a defect is determined by Dinex after its
good faith investigation.
Dinex Software. In addition to the other warranties set forth herein, with
respect to Dinex’s licensed software, Dinex warrants that it has the right
to license or sublicense the software to Customer for the purposes and
subject to the terms and conditions set forth in Dinex’s standard terms
and conditions.
Supplies and Accessories. Dinex’s warranty for its supplies and
accessories that are shipped with Warranted Products is covered by a
separate warranty statement, which is available at www.dinex.com.
Services. Dinex warrants that any service it provides to Customer will
be performed by trained individuals in a workmanlike manner.
DURATION
Dinex provides a one year warranty for the Warranted Products. The
warranty period begins on the date the Warranted Products are shipped
to Customer. The warranty period for any Warranted Product or part
furnished to correct a warranty failure will be the unexpired term of the
warranty applicable to the repaired or replaced Warranted Product.
*Turbo•Temp and Smart•Therm Induction Chargers are Warranted for
two years.
REMEDIES
If Customer promptly noties Dinex of Customer’s warranty claim and
makes the Warranted Product available for service, Dinex will, at its
option, either repair or replace (with new or exchange replacement
parts) the non-conforming Warranted Product or parts of the Warranted
Product. With respect to Dinex’s licensed software, Dinex will, at its
option, either correct the non-conformity or replace the applicable
licensed software. Warranty service will be performed without charge
from 8:00 a.m. to 5:00 p.m. EST, Monday - Friday, excluding Dinex
holidays, and outside those hours at Dinex’s then prevailing service
rates and subject to the availability of personnel. With respect to Dinex’s
warranty for the services it provides to Customer, Customer’s exclusive
remedy shall be the re-performance of the services by Dinex. The
foregoing remedies are Customer’s exclusive remedies and Dinex’s
sole liability for warranty claims under this warranty statement. This
exclusive remedy shall not have failed of its essential purpose (as
that term is used in the Uniform Commercial Code) as long as Dinex
remains willing to repair or replace defective Warranted Products within
a commercially reasonable time after being notied of Customer’s
warranty claim.
LIMITATIONS
THESE WARRANTIES ARE EXCLUSIVE AND IN LIEU OF ALL
OTHER WARRANTIES, WHETHER WRITTEN, ORAL, EXPRESSED,
IMPLIED OR STATUTORY. EXCEPT AS PROVIDED HEREIN, NO
EXPRESS OR IMPLIED WARRANTIES, INCLUDING BUT NOT
LIMITED TO IMPLIED WARRANTIES OF MERCHANTABILITY,
FITNESS FOR A PARTICULAR PURPOSE, QUIET ENJOYMENT,
SYSTEM INTEGRATION AND DATA ACCURACY, WILL APPLY.
THERE ARE NO WARRANTIES THAT EXTEND BEYOND THOSE
DESCRIBED IN THIS DOCUMENT AND NO PRIOR STATEMENTS BY
ANY OF DINEX’S REPRESENTATIVES SHALL MODIFY OR EXPAND
THESE WARRANTIES. DINEX AND DINEX’S AFFILIATES AND
REPRESENTATIVES SHALL HAVE NO LIABILITY TO CUSTOMER
FOR (1) ANY SPECIAL, PUNITIV E, INCIDENTAL, INDIRECT
OR CONSEQUENTIAL DAMAGES ARISING OUT OF OR IN
CONNECTION WITH THE WARRANTED PRODUCTS, REGARDLESS
OF WHETHER SUCH LIABILITY SHALL BE CLAIMED IN CONTRACT,
TORT, EQUITY OR OTHERWISE, (2) ANY ASSISTANCE NOT
REQUIRED UNDER DINEX’S QUOTATION OR (3) ANYTHING
OCCURRING AFTER THE WARRANTY PERIOD ENDS.
DINEX’S STANDARD WARRANTIES ONLY APPLY TO END-USER-
PURCHASERS LOCATED IN THE UNITED STATES AND CANADA.
ANY SALE TO END-USER-PURCHASERS OUTSIDE THE UNITED
STATES AND CANADA WILL BE SUBJECT TO COMMERCIAL
TERMS SPECIFICALLY AGREED BY DINEX AND THE END-USER
PURCHASER. DINEX MAKES NO WARRANTY, EXPRESS OR
IMPLIED, TO END-USER-PURCHASERS OUTSIDE THE UNITED
STATES OR CANADA UNLESS OTHERWISE EXPRESSLY AGREED
IN WRITING.
These warranties do not apply to, and Dinex shall not have any
obligation to Customer hereunder with respect to, any warranty claim
resulting from or arising out of: (i) normal wear and tear; (ii) damage
caused by shipping or accident; (iii) damage caused by improper
installation, repair or alteration not performed by Dinex; (iv) the use
of the Warranted Product in combination with any software, tools,
hardware, equipment, supplies, accessories or any other materials or
services, not furnished by Dinex or recommended in writing by Dinex;
(v) the use of the Warranted Product in a manner or environment,
or for any purpose, for which Dinex did not design or license it, or
inconsistent with Dinex’s recommendations or instructions on use
including, but not limited to, power supply requirements identied in
Product Specications; (vi) any alteration, modication or enhancement
of the Warranted Product by Customer or any third party not authorized
or approved in writing by Dinex; (vii) Warranted Product manufactured
to meet customer specications or designs; or (viii) any accessories or
supplies or other equipment or products that may be delivered with the
Warranted Product .
In addition, these warranties do not cover: (i) Any defect or deciency
(including failure to conform to Product Specications) that results,
in whole or in part, from any improper storage or handling, failure
to maintain the Warranted Products in the manner described in any
applicable instructions or specications, inadequate backup or virus
protection or any cause external to the Warranted Products or beyond
Dinex’s reasonable control, including, but not limited to, power failure
and failure to keep Customer’s site clean and free of dust, sand and
other particles or debris; (ii) the payment or reimbursement of any
facility costs arising from repair or replacement of the Warranted
Products; (iii) any adjustment, such as alignment, calibration, or other
normal preventative maintenance required of Customer; and (iv)
expendable supply items.

Turbo•Temp | 7
NOTES:

© 2010 DINEX | CARLISLE • 4711 EAST HEFNER ROAD, OKLAHOMA CITY, OK 73131 • WWW.DINEX.COM
Manual No. Turbo•Temp_0810
Table of contents
Other Dinex Batteries Charger manuals