Dinsafer DGDA4 User manual

The User Manual of
Wireless Garage Door Sensor
FCC Statement
This equipment has been tested and found to comply with the limits for a Class B digital device, pursuant to Part 15 of the FCC
Rules. These limits are designed to provide reasonable protection against harmful interference in a residential installation.
This equipment generates uses and can radiate radio frequency energy and, if not installed and used in accordance with the
instructions, may cause harmful interference to radio communications. However, there is no guarantee that interference will
not occur in a particular installation. If this equipment does cause harmful interference to radio or television reception, which
can be determined by turning the equipment off and on, the user is encouraged to try to correct the interference by one or
more of the following measures:
-- Reorient or relocate the receiving antenna.
-- Increase the separation between the equipment and receiver.
-- Connect the equipment into an outlet on a circuit different from that to which the receiver is connected.
-- Consult the dealer or an experienced radio/TV technician for help.
This device complies with part 15 of the FCC Rules. Operation is subject to the following two conditions:
(1) This device may not cause harmful interference, and (2) this device must accept any interference received, including inter-
ference that may cause undesired operation.
Changes or modifications not expressly approved by the party responsible for compliance could void the user’s authority to
operate the equipment.
Operating Instructions
Installation & Notice
Entry Delay & Home Arm Settings
Features
Parameters
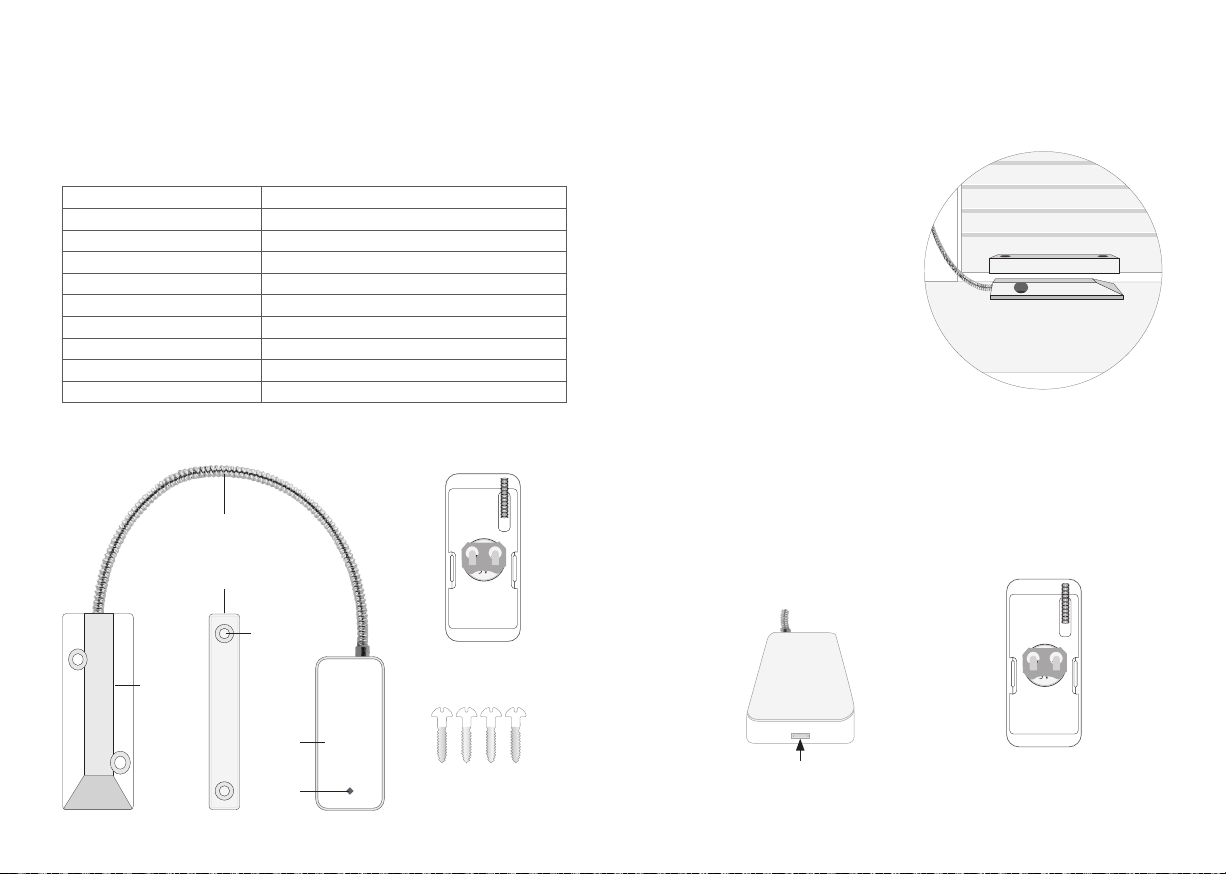
Appearance
The wireless garage door sensor is an accessory of smart alarm system.
It’s fashion design, energy saving, low battery alert supported and with long transmission distance. The indicator will light
up every 1 second in the event of low battery and push notication will be sent to your APP. When the shuttle door is opened
under armed status, the sensor will trigger alarm.
• Working Voltage DC 3V
• Battery 1 × CR2032 button battery (3V)
• Working Current ≤40mA
• Standby Current ≤2μA
• Transmission Distance Up to 300m without obstacle
• Transmission Frequency 433.92MHz
• Working Temperature -10℃~50℃
• Humidity ≤90%rh (non-condensing)
• Weight 148.1g(battery not included) 159.5g(battery included)
• Dimension 80.0mm*38.2mm*13.3mm ( L*W*H )
PCB Layout
Metal Canula
Magentic Part
Reed Part
Transmitter
LED Indicator
Metal Screw × 4
Transmitter
Screw Mounting Hole
Battery Replacement Instructions
1. Working principle
The transmitter sends trigger signal to paired main panel when the magnet mounted near is moved apart.
2. Pairing with main panel by App
①Scan the QR code on the sensor.
②The pairing result would be confirmed in APP.
• Pull out the battery insulative strip.
• Pairing main panel by App before installing.
• Install the magnetic part on garage door and reed part on
ground with screws provided. Attach the transmitter with
double-side sticky tape on wall.
• Make sure the distance between reed part and magnetic
part is less than 1cm.
The Entry Delay feature can be turned ON individually to make the system waiting few seconds before
triggering alarm which is caused by the sensor.
This product features ‘Entry Delay,’ ‘Home Arm’ modes and can be selected in App.
Entry Delay feature : Under Arm/Home Arm mode, in the event the sensor is triggered, the
system will wait for preset time then set o the alarm.
Home Arm feature : Under Home Arm mode, when the sensor with this feature is enabled and triggered ,
the alarm will be set o.
①Insert the flat blade of a small screwdriv-
er into the pry-off slot of transmitter, twist
the blade to remove the cover.
②Replace with 1 × CR2032 button battery.


