Diono Radian RXT User manual

®
Please read carefully
Store manual behind cover
Instruction Manual
Canadian English Version
convertible +booster
Diono_CA_EN_RadianRXT_Manual_REBRAND 030416.indd 1 3/8/16 5:21 PM

2
Table of Contents
Page
4Warnings
5Seating Position Information
6Child Restraint Safety Information
8Seat Belt Information
9Carrying Restraint
10 Unfolding and Folding Car Seat
13 Installing and Removing Detachable Base
14 Rear-facing Lower Connector System (UAS) Installation
(2.3 to 20.5 kg/5 to 45 lbs)
16 Rear-facing Lap-Shoulder Belt Installation
(2.3 to 20.5 kg/5 to 45 lbs)
18 Rear-facing Lap Belt Installation
(2.3 to 20.5 kg/5 to 45 lbs)
20 Forward-facing Lower Connector System (UAS)
Installation (10 to 29.5 kg/22 to 65 lbs)
22 Forward-facing Lap-Shoulder Belt Installation
(10 to 29.5 kg/22 to 65 lbs)
24 Forward-facing Lap Belt Installation
(10 to 29.5 kg/22 to 65 lbs)
25 Checking Restraint Stability
26 Booster (23 to 54 kg/50 to 120 lbs)
28 Aircraft Installation
28 Safe Stop®Instructions
29 Forward-facing Recline Adjustment
30 Top Tether
31 Tether Connecting Strap
32 Infant Support Cushions
32 Side Impact Head Support
33 Using Harness Clip
33 Restraint Harness Buckle
34 Properly Securing Child
35 Proper Harness Height and Child Height
36 Adjusting Harness Height
37 Harness Buckle Removal and Installation
39 Locking Vehicle Belt with Locking Clip
40 Restraint Cover
41 Expandable Sides
41 Cup Holder
42 Using SuperLATCH™ UAS Connector
43 Replacing Harness Straps
44 Cleaning and Maintenance
47 Warranty Information
Diono_CA_EN_RadianRXT_Manual_REBRAND 030416.indd 2 3/8/16 5:21 PM

3
Radian Features
10
14
4
18
7
9
1Cam lock access flap
2UAS strap
3UAS strap guide
4Release lever
5 Locking clip
6 Top tether
7 Lap belt guide
8 Harness adjuster
9 Shoulder belt guide
10 Rear-facing base
11 Backpack strap anchor
12 Safe Stop®
13 Shoulder carry strap
anchor
14 Locking bolts
15 Rear-facing tether
connector strap
16 Infant Support Cushion
15
16
2
11
5
13
3
1111
44
12 6
Diono_CA_EN_RadianRXT_Manual_REBRAND 030416.indd 3 3/8/16 5:21 PM
4
WARNING
DEATH OR SERIOUS INJURY CAN OCCUR
• Follow all instructions labeled on this child restraint and in the
written instruction manual on the lanyard located on back of
restraint. For infants under 4.5 kg (10 lbs), consult pediatri-
cian for recommended seat back angle before installation.
• Failure to follow all instructions and product labels can result
in death or serious injury in a crash. Carefully read and
understand this instruction manual prior to using restraint. If
you have any questions, visit ca.diono.com or contact Diono
at 1-866-954-9786.
• Use only with children weighing between 2.3 kg to 54 kg (5
lbs to 120 lbs) and who have a height of 144 cm (57”) or less.
• Use only in rear-facing position with any infant weighing less
than 10 kg (22 lbs) and between 46–76 cm (18–30” ).
• For children rear-facing with harness: 2.3–20.5 kg and 46–112
cm (5–45 lbs and 18–44”)
Forward-facing with harness: 10–29.5 kg and 76–144 cm
(22–65 lbs and 30–57”)
Booster mode: 23–54 kg (50–120 lbs) and 101–144 cm (40–57”)
• Only secure this child restraint with the vehicle’s lower
universal anchorage system (UAS) if available or with vehicle
seat belt.
• Always use the top tether strap when installing this restraint
forward-facing.
• Always use the Safe Stop® device according to manufacturer’s
instructions.
• Always use a locking clip if it is required for proper restraint
installation. Consult vehicle owner’s manual.
• WARNING: Before installing restraint in a vehicle equipped
with front passenger airbags, carefully read the vehicle
owner’s manual for proper restraint installation instructions.
• Some vehicles have passenger seating in which the passen-
ger faces the side or the rear of the vehicle. Do not install this
restraint in such passenger seating. Only use this restraint in
a vehicle seat which faces an adult passenger toward the
front of the vehicle.
• Always adjust restraint harness for a comfortable and snug fit
around child. A snug harness strap should not allow any slack.
It lies in a relatively straight line without sagging. It does not
press on the child’s flesh or push the child’s body into an
unnatural position.
Diono_CA_EN_RadianRXT_Manual_REBRAND 030416.indd 4 3/8/16 5:21 PM

5
WARNING
DEATH OR SERIOUS INJURY CAN OCCUR
• This restraint is not for use in homes, boats, on a motorcycle or
in any other non-specified applications or environments.
• Always keep this child restraint secured in the vehicle even
when it is unoccupied, using the lower universal anchorage
system (UAS) or vehicle seat belt, and also the tether strap.
• Do not carry restraint by harness adjusting strap. This can
damage the mechanism and the webbing. Only carry restraint
by red carry strap, harness shoulder straps or by the plastic shell.
• In the event of an accident, the vehicle body itself provides the
most significant passenger protection. While a properly
installed restraint will improve chances for survival in most
accidents, some crashes are unsurvivable regardless of what
restraint is used.
• Based on accident statistics, Diono recommends the vehicle’s
rear seat as the safest location for all children under age 13.
• Register this restraint with the manufacturer using the
attached registration card.
Seating Position Information
WARNING: This child-restraint system must be used only
in a forward-facing seating position equipped with a vehicle seat
belt or a lower universal anchorage system (UAS). Some vehicles
have no seating positions which are compatible with this child
seat. If in doubt, contact the vehicle manufacturer for assistance.
Forward-facing vehicle seats MUST be used with this child
seat. Side-facing or rear-facing seats CANNOT be used.
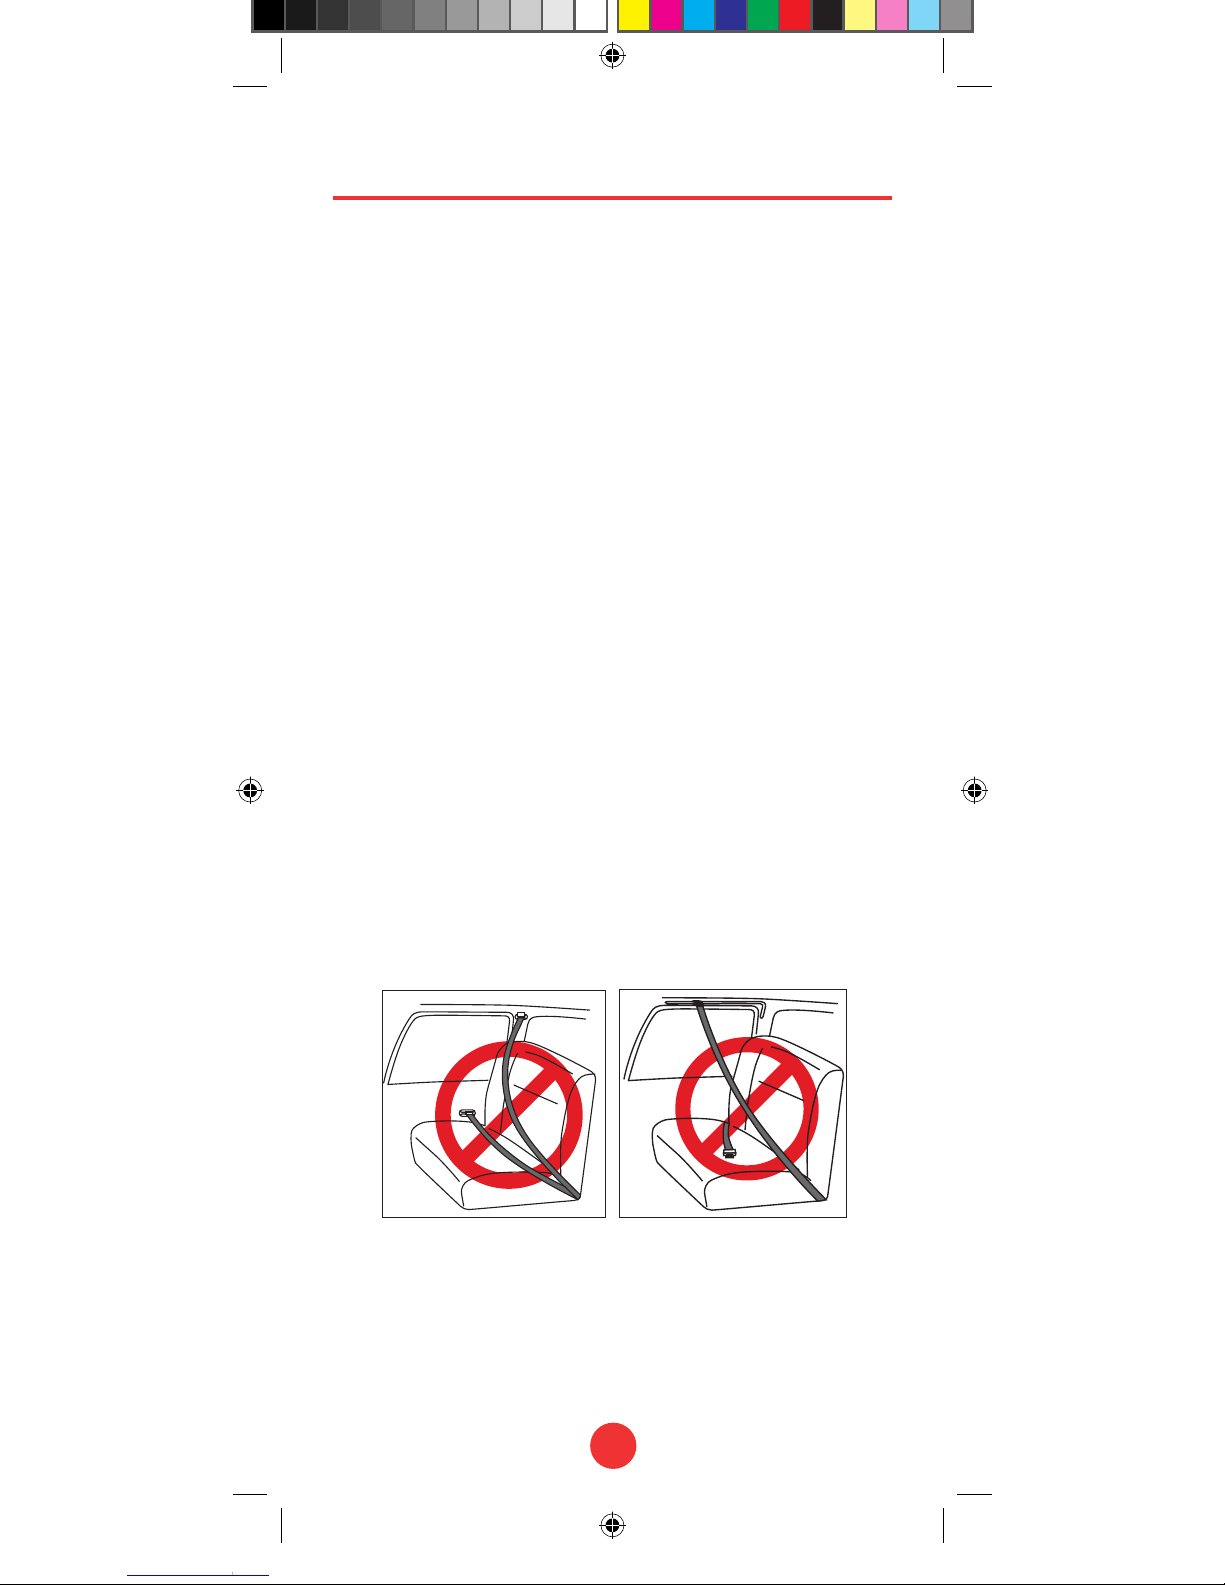
WARNING: Only use this child restraint in
forward-facing vehicle seats. DO NOT use this
child restraint in side-facing or rear-facing seats
in vans or station wagons.
Seats which face
sides of vehicle. Seats which face rear of vehicle.
MISE EN GARDE: Utiliser cet ensemble de retenue
dans les sièges de véhicule qui font face vers l’avant.
NE PAS utiliser cet ensemble de retenue sur des sièges qui
font face vers l’arrière dans les fourgonnettes ou
les voitures familiales.
Sièges qui font face
aux côtés du véhicule
Sièges qui font face à l’arrière du véhicule
Diono_CA_EN_RadianRXT_Manual_REBRAND 030416.indd 5 3/8/16 5:21 PM

6
Child Restraint Safety Information
• This child restraint system conforms to all applicable
requirements of Canadian Motor Vehicle Safety Standards
213, 213.1 and 213.2 and is certified for use in motor
vehicles.
• This car seat is for use only in the following classes of
vehicles: passenger cars, trucks, and multi-purpose vehicles
such as SUVs (sport utility vehicles) and CUVs (crossover
utility vehicles).
• This restraint is certified for use in Aircraft.
• Register this restraint with the manufacturer.
Child restraints can be recalled for various reasons. To be
reached directly in the event of a recall, you must register your
restraint with the manufacturer. Fill out the included product
registration card and mail it. You can register online at
ca.diono.com. You can also register by sending your name,
address, the restraint’s model and serial number to:
Diono Canada, ULC
50 Northland Road, Suite 400
Waterloo, Ontario N2V 1N3 Canada
Or you can call Diono: 1-866-954-9786.
WARNING: DO NOT place a child
restraint in the front seat of a
vehicle with a passenger air bag
unless the air bag is turned off.
DEATH or SERIOUS INJURY can
occur. The back seat is the safest.
IMPORTANT:
• Before each use, always confirm restraint is securely installed
and harness is properly adjusted around the child. Remem-
ber: The addition or removal of clothing (such as a sweater or
coat) will change the fit of the harness.
• Always confirm before each use that restraint is securely
locked in its unfolded position.
• Make sure vehicle seats which fold forward are securely
locked in their open position. An unsecured vehicle seat back
can impair the ability of the restraint to protect the child
occupants.
• Cover restraint when vehicle is parked in direct sunlight. Parts
of the restraint can become hot and cause injury to a child.
Diono_CA_EN_RadianRXT_Manual_REBRAND 030416.indd 6 3/8/16 5:21 PM

7
• Do not leave any child in a vehicle alone or unattended by
an adult.
• Secure all personal objects inside the vehicle. In an ac-
cident loose objects can become flying hazards with the
potential for causing serious injury.
• Except per the instructions in this manual or as instructed
by a representative of the manufacturer, do not disas-
semble, attempt to disassemble or tamper with any part of
this restraint or change the way the restraint harness or the
vehicle restraint system is used.
• Do not use restraint if there is any appearance of rust on
any of the metal surfaces.
• Do not oil or lubricate any part of the restraint.
• Release levers and locking bolts should operate smoothly
and freely. When release levers are lifted, the release levers
and locking bolts should spring back immediately and
completely. Do not use restraint if release levers and/or
locking bolts wither bind or do not move freely.
• When not in use, store restraint properly and avoid placing
heavy objects on top of it.
To prevent injury to child:
•Do not use restraint in harness mode if it is older than
eight years from the date of original purchase. Do not
use this restraint in booster mode if it is older than 10
years from the date of original purchase. Manufacture
date is on side of restraint.
•Do not use restraint after it has been involved in any
crash, whether the child was present in the restraint
or if the restraint was unoccupied. Damage to the
restraint may have occurred which could impair its
ability to adequately protect a child. Please call our
Customer Care Team at 1-866-954-9786 so we can help
you determine if your restraint needs to be replaced.
• This restraint is not a toy. Do not allow children to play
with it.
• Using any non-Diono product with this restraint, or any
product not specifically approved by Diono for use with this
restraint, is not allowed. Use of such products voids manu-
facturer’s warranty and may seriously impact this product’s
ability to perform properly in an accident.
Diono_CA_EN_RadianRXT_Manual_REBRAND 030416.indd 7 3/8/16 5:21 PM
8
Seat Belt Information
The information below applies only to installations using
vehicle seat belts.
IMPORTANT:
• This restraint can be installed securely in most vehicles
using the seat belt. However, some seat belts have an
anchoring position for the lap belt that may not allow a
secure restraint installation.
• Some vehicles do not have any seating positions that
are compatible with a child restraint. Read owner’s
manual to determine child-specific seating. Contact
the vehicle manufacturer if you have any doubts or
questions.
Some vehicle seat belts that are NOT compatible with this
restraint are:
• Seat belts with top or bottom anchorage points
attached to the front door.
• Motor driven automatic seat belts.
• Non-locking, ELR (Emergency Locking Retractor)
two-point vehicle seat belts.
If your seat belt is of a type listed above, choose another
seat within the vehicle or use UAS connectors and anchor-
age points. Information on the types of seat belts in your
vehicle are in the vehicle owner’s manual.
Diono_CA_EN_RadianRXT_Manual_REBRAND 030416.indd 8 3/8/16 5:21 PM

9
1 2 3
4
Carrying Restraint
WARNING:
• Do not carry restraint by harness adjuster strap (see
diagram, page 3). This can damage the mechanism and
the webbing.
• Only the shoulder strap made by Diono is approved for
use with this restraint.
There are four ways to carry restraint:
1. Red carry strap (Fig. 1)
2. Plastic side (Fig. 2)
3. Shoulder strap: Connect shoulder strap* to webbing
anchors on side of restraint (Fig. 3)
4. Backpack (requires 2 shoulder
straps*) : Connect shoulder
straps to lower webbing anchors
on both sides and upper
webbing anchors on back of
restraint. (Fig. 4)
* Padded shoulder strap(s) avail-
able as a separate accessory, not
included.
Diono_CA_EN_RadianRXT_Manual_REBRAND 030416.indd 9 3/8/16 5:21 PM
10
WARNING:
• Do NOT use restraint if release levers or locking bolts
bind or do not move freely. When release levers are
lifted, release levers and locking bolts should spring back
immediately.
• Do NOT oil or lubricate any part of restraint.
• ALWAYS confirm restraint is locked securely in its unfold-
ed position before each use.
• To avoid risk of injury, keep others at a safe distance
during folding and unfolding.
• Familiarize yourself with restraint unfolding and folding
operations prior to use.
• Foreign objects and debris can interfere with proper
operation of locking mechanism. Before installation,
confirm both locking bolt and release lever areas are free
of any debris (see page 44 for cleaning of mechanisms).
1
2
Unfolding and Folding Restraint
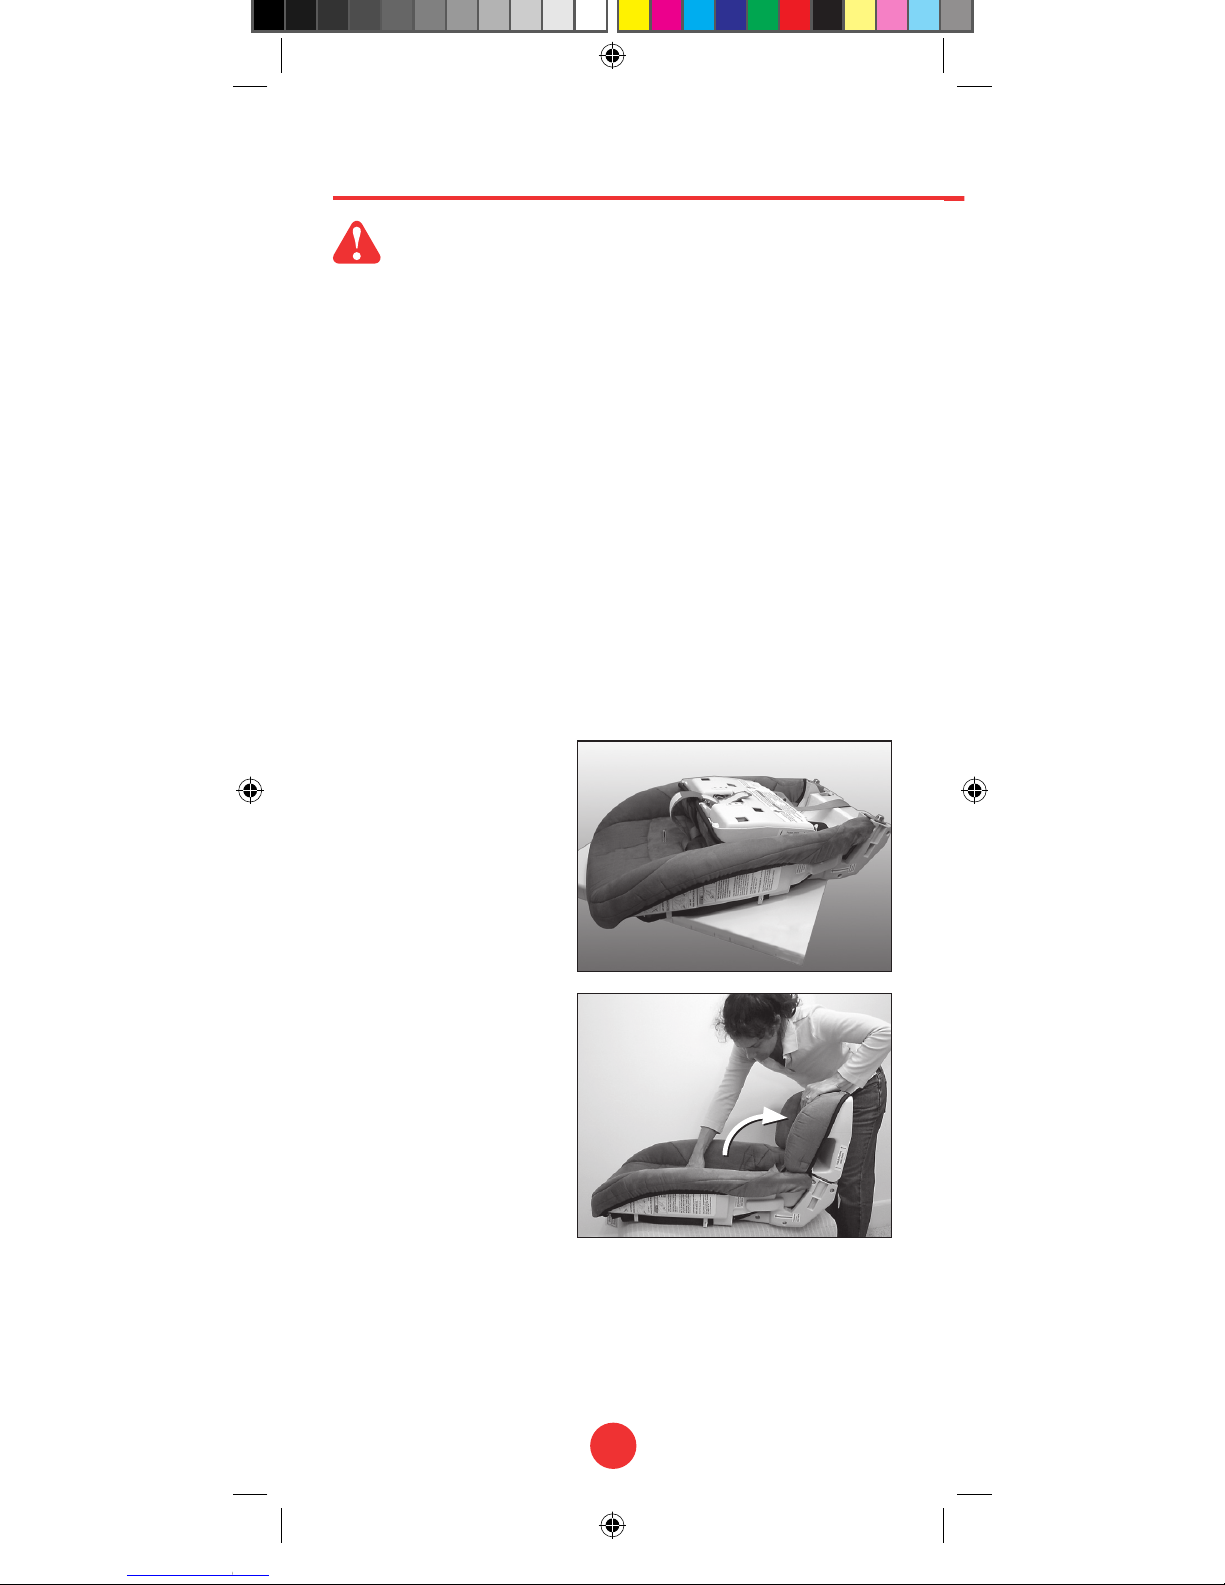
Unfolding Restraint
1. Place restraint on its
back on a flat surface
and unfasten red
carry strap from
restraint bottom.
(Fig. 1)
2. Firmly rotate
restraint bottom
until a ‘click’ confirms
restraint is locked in
open position.
(Fig. 2)
IMPORTANT:
Confirm release levers are completely recessed inside their
housings. (See page 3 diagram.) Confirm restraint is locked
in the open position. If not, repeat step 2.
Diono_CA_EN_RadianRXT_Manual_REBRAND 030416.indd 10 3/8/16 5:21 PM

11
3. Pull harness adjusting strap
until harness begins to
tighten. (Fig. 3) If strap
does not slide freely, fold
restraint, remove harness
adjusting strap from fold
joint and repeat step 3.
4. Fasten both fabric side
panels to center panel.
(Fig. 4)
5. Slide red carry strap into
the slot in center of cover
when not in use.
(Fig. 5)
Folding Restraint
1. Remove red carry strap
from behind cover and
unbuckle harness. Unfasten
both fabric side panels and
tuck them into the sides.
(Fig. 1)
2. Loosen harness: lift harness
adjuster while pulling the
harness straps all the way
forward. (Fig. 2)
3. Raise head support to its
top position (see page 32).
4. Adjust both expandable
sides to their inward
position (Fig 2A)
(continued next page)
3
4
5
1
2
A A
Diono_CA_EN_RadianRXT_Manual_REBRAND 030416.indd 11 3/8/16 5:21 PM

12
Folding Restraint
(continued)
5. Place restraint on its back,
push either release lever
downward to release
locking bolts. (Fig. 3)
6. Pull harness straps firmly
toward top center restraint.
Keep buckle extended
toward top of restraint
while folding seat bottom
into back. (Fig. 4)
• Unfasten and tuck fabric side panels into the sides.
• Pull harness buckle toward top of restraint.
• Adjust expandable sides to their inward position (see
page 41).
• Make sure cover fabric or harness webbing is not caught
in the steel supports when folding.
IMPORTANT:
If restraint does not easily fold completely, do NOT force it
closed. See below: ‘Folding Tips’
7. Fasten red carry strap to
secure restraint in its folded
position. (Fig. 5)
WARNING:
Restraint can accidentally
unfold and cause injury if not
properly secured by carry
strap.
Folding Tips: to fold
restraint completely:
• Loosen harness sufficiently.
5
6
7
Diono_CA_EN_RadianRXT_Manual_REBRAND 030416.indd 12 3/8/16 5:21 PM
13
Detachable Base
1
2
3
WARNING:
• Detachable base must be used when restraint is
rear-facing.
• Do NOT use detachable base
when restraint is forward-facing.
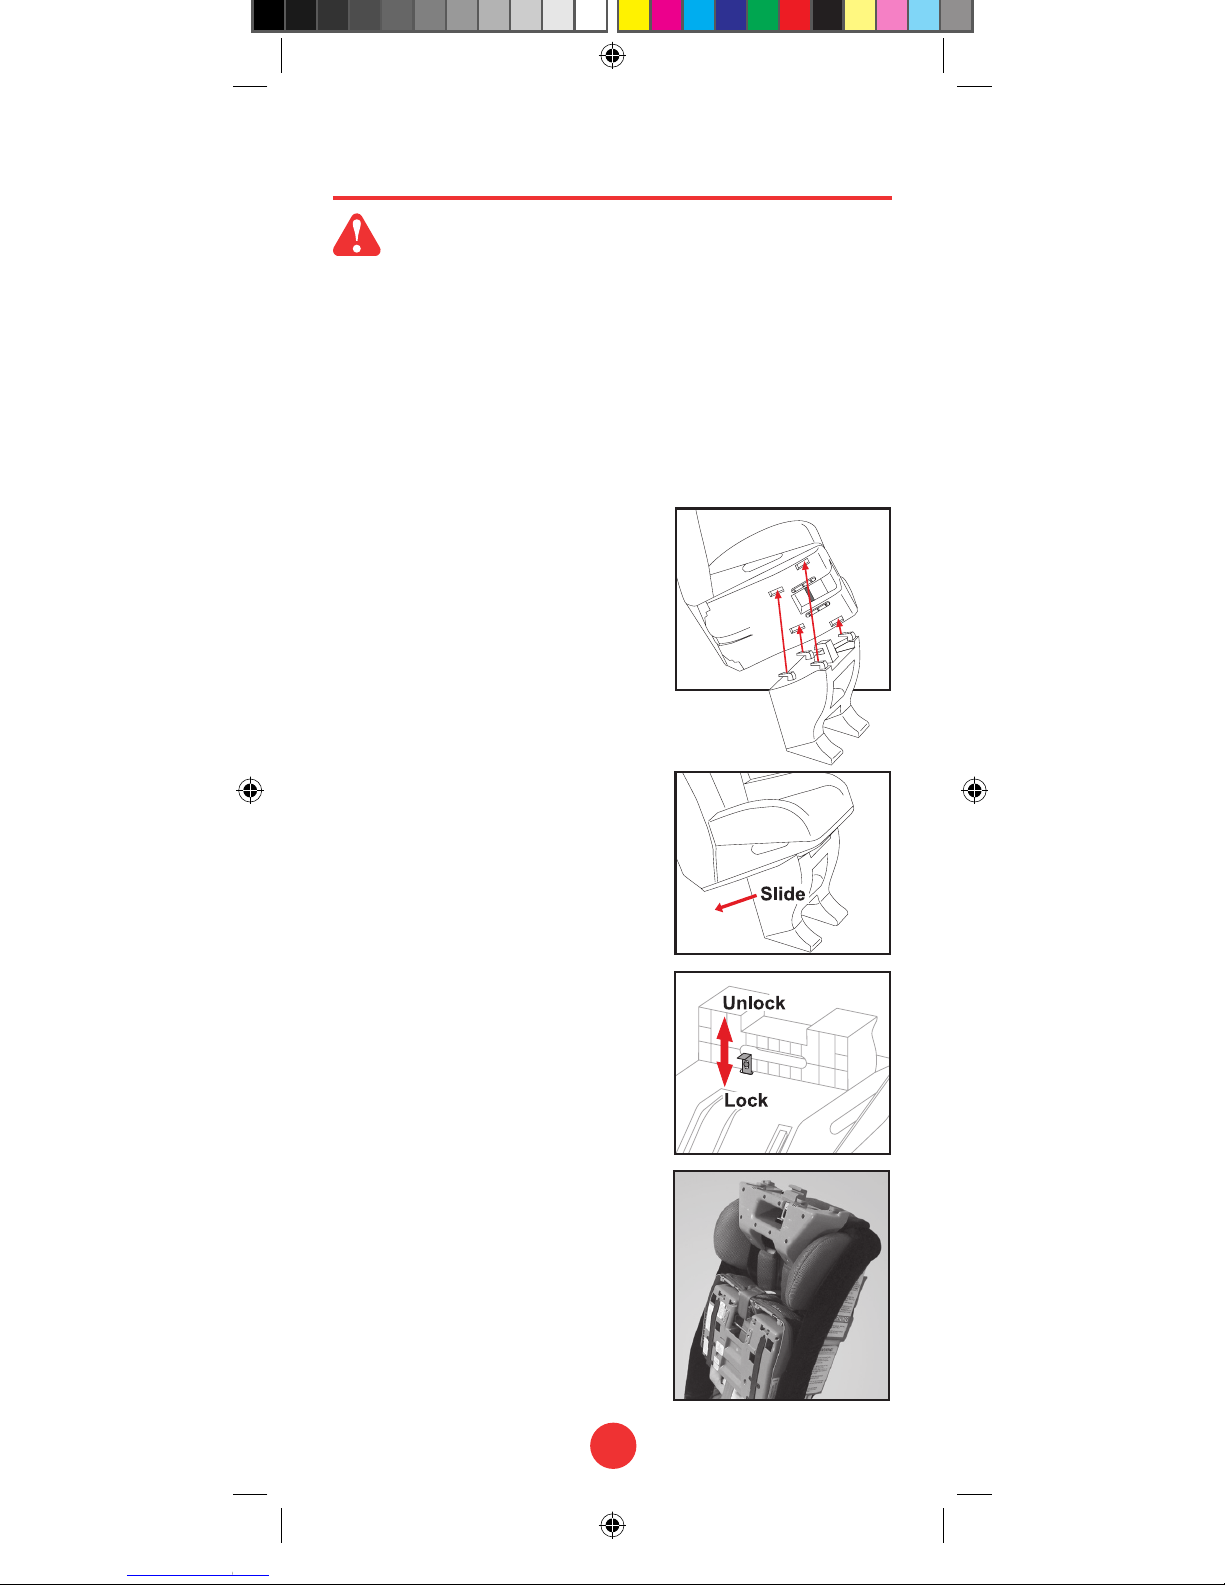
Installing base (Rear-facing only)
1. Confirm restraint is locked in its unfolded position
(see page 10).
2. Confirm adjustable bottom is
locked in its raised position
(see page 29).
3. Align posts with holes and
insert base into restraint
bottom. (Fig. 1)
4. Slide base back until it
reaches alignment mark on
restraint bottom and secures
into place. (Fig. 2)
5. Push down metal tab to lock
base. (Fig. 3)
Removing Base
1. Lift metal tab to unlock base.
(Fig. 3)
2. Slide base forward (the
opposite direction as shown
in Fig. 2).
3. Pull base away from restraint
bottom.
Tip: To carry detachable base,
fit it inside folded restraint.
(Fig. 4)
4
Diono_CA_EN_RadianRXT_Manual_REBRAND 030416.indd 13 3/8/16 5:21 PM
14
1
Rear-Facing UAS Installation
for children 2.3–20.5 kg (5lbs–45lbs)
WARNING:
• You must use restraint rear-facing if child is less than 1
year and weighs less than 10 kg (22 lbs). Diono recom-
mends keeping children rear-facing until they are at
least 2 years old.
• Detachable base must be used with rear-facing restraint.
• Do NOT use Safe Stop® with rear-facing child.
• See page 42 for UAS connector instructions.
1. Confirm detachable base is securely attached to
restraint bottom (see page 13).
2. Confirm vehicle seating location has its own UAS
anchors (see vehicle owner’s manual). If it does not, you
must use vehicle seat belt for installation (see pages 16
and 18).
3. Locate UAS belt secured in storage compartment on
restraint back. Press red release button to remove each
UAS connector and webbing. Slide the narrow UAS
tethering strap out of plastic strap guides on side of the
seat.
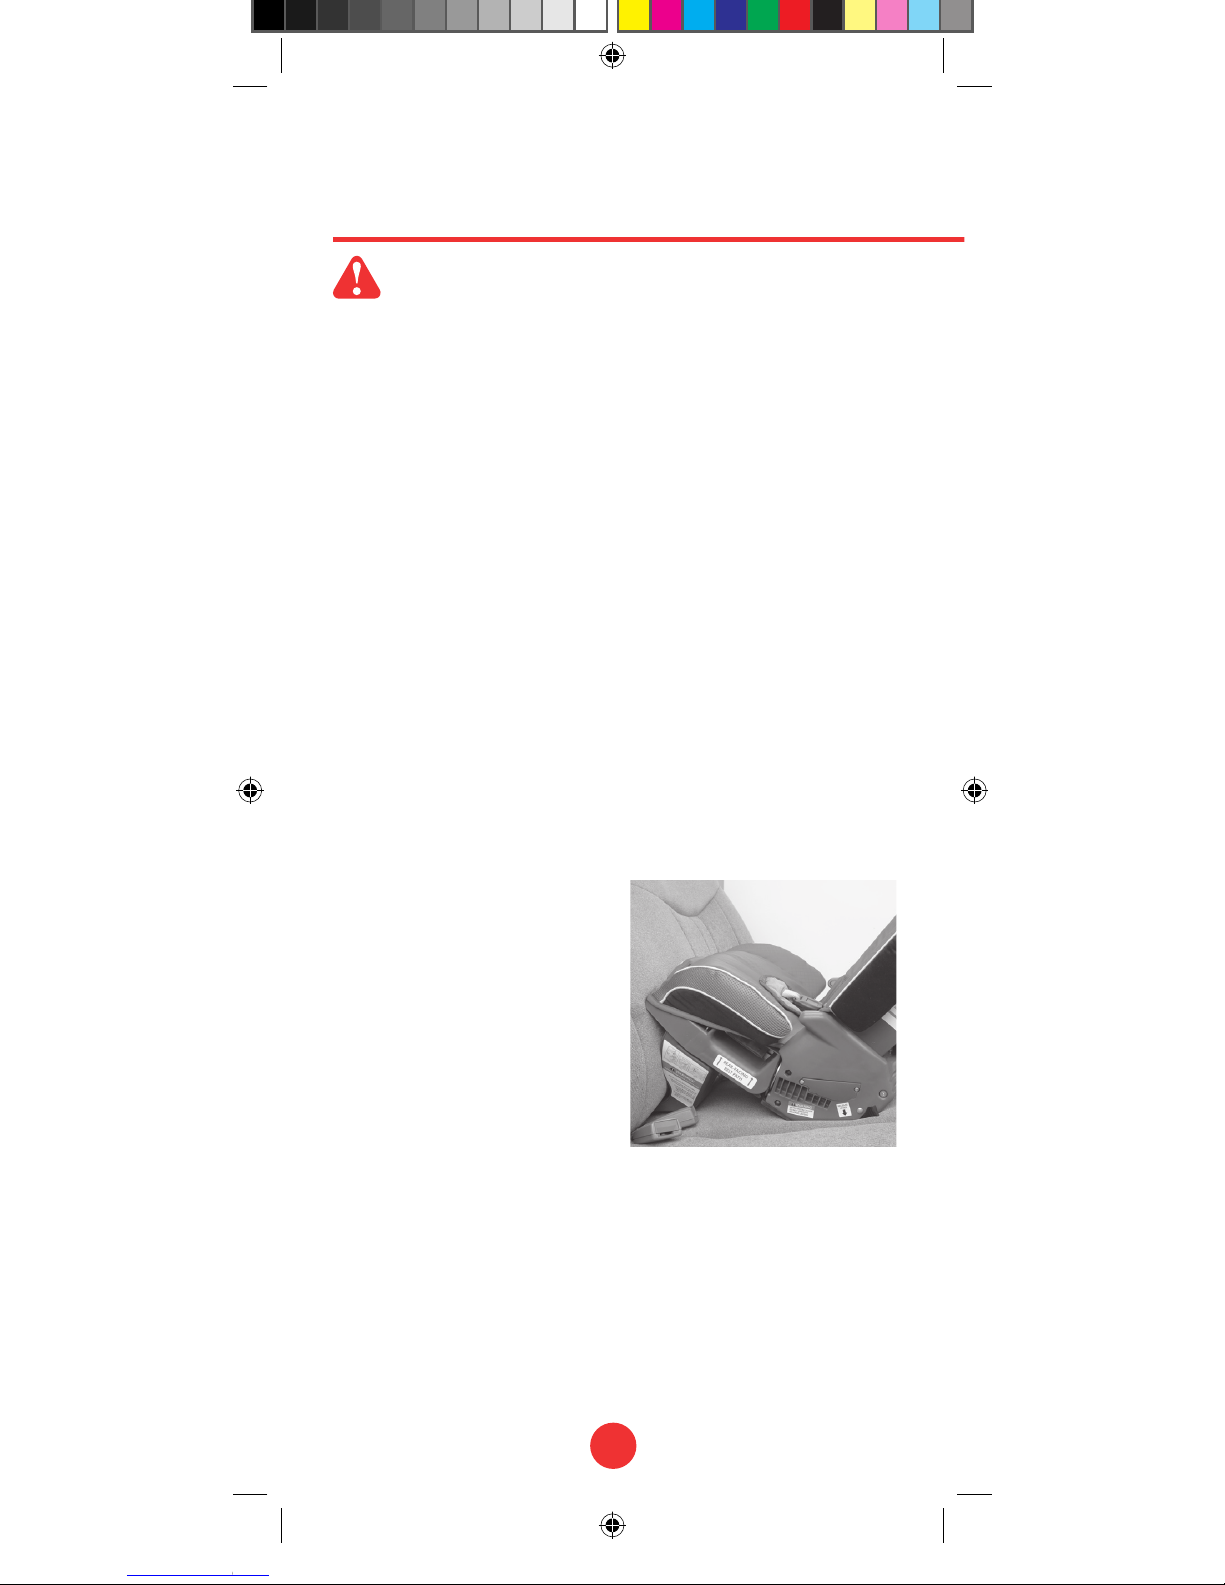
4. Place restraint in proper
rear-facing position:
Restraint bottom and base
are both flat on the vehicle
seat with front of restraint
against the back of that
vehicle seat. (Fig. 1)
Note: It may be necessary to
move vehicle front seats
slightly forward to properly
fit a rear-facing restraint.
Diono_CA_EN_RadianRXT_Manual_REBRAND 030416.indd 14 3/8/16 5:21 PM
15
2
3
4
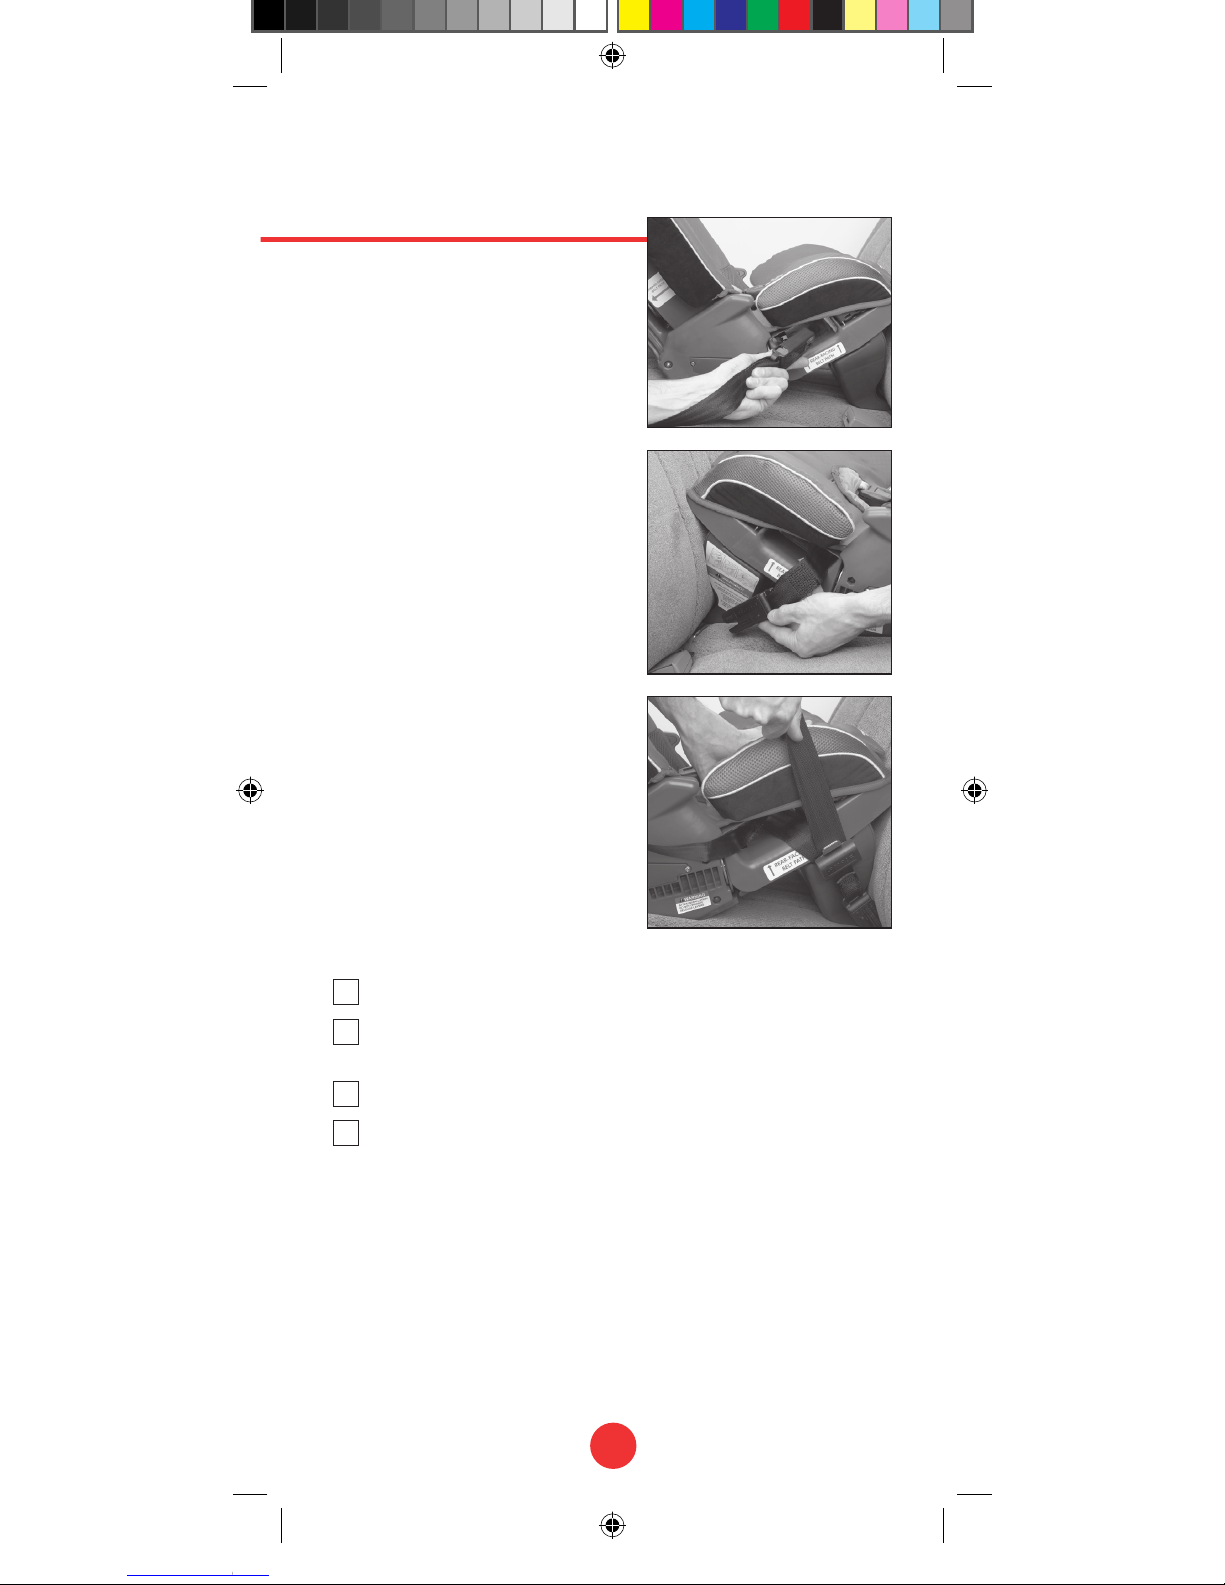
5. Route UAS belt through
rear-facing belt path.
Confirm UAS belt lays flat
and is not twisted. Attach
each connector to the UAS
anchor closest to each side
of the restraint. (Figs. 2 & 3)
UAS connector will ‘click’ to
confirm attachment to
anchor.
6. Push restraint down firmly
into vehicle seat while
tightening UAS belt.
(Fig. 4)
Vehicle cushions should
compress where there is
contact with car seat.
CHECK LIST:
Confirm restraint is properly positioned.
Confirm UAS belt is tight and that connections to
approved UAS anchors are secure.
Confirm restraint installation is stable (see page 25).
Stability of installation can be improved by using top
tether (see page 30 for tether instructions).
Removal:
• Press red release button on each UAS connector to
release it.
• Disconnect top tether if in use.
• Properly store UAS belt and top tether.
Diono_CA_EN_RadianRXT_Manual_REBRAND 030416.indd 15 3/8/16 5:21 PM

16
Rear-Facing Lap-Shoulder Belt Installation
for children 2.3–20.5 kg (5lbs–45lbs)
1
2
3
WARNING:
• You must use restraint rear-facing if child is less than 1
year and weighs less than 10 kg (22 lbs). Diono recom-
mends keeping children rear-facing until they are at
least 2 years old.
• Detachable base must be used with rear-facing restraint.
• Do NOT use Safe Stop® with rear-facing child.
1. Confirm detachable base is
securely attached to
restraint bottom
(see page 13).
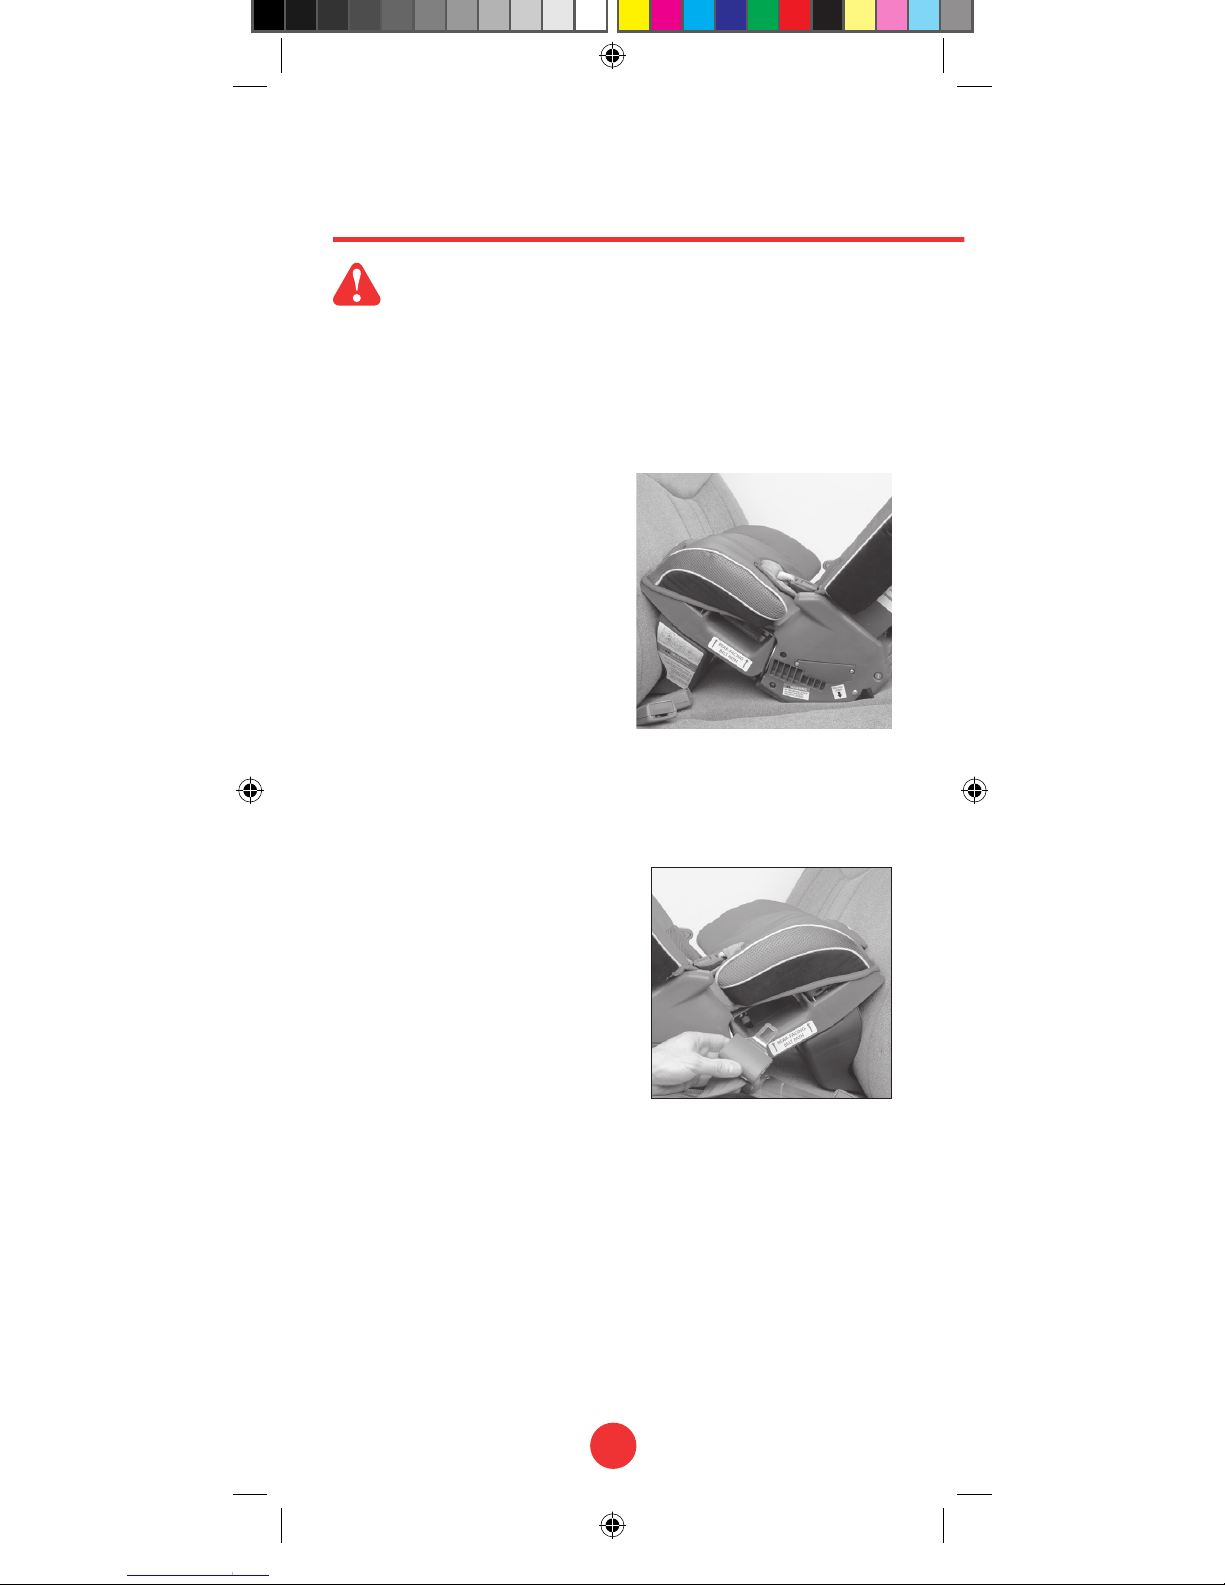
2. Place restraint in proper
rear-facing position:
Restraint bottom and base
are both flat on the vehicle
seat with front of restraint
against the back of that
vehicle seat. (Fig. 1)
Note: It may be necessary to
move vehicle front seats
slightly forward to properly fit
a rear-facing restraint.
3. Route seat belt through
rear-facing belt path and
buckle it. (Figs. 2 & 3)
Confirm seat belt lays flat
and is not twisted.
Diono_CA_EN_RadianRXT_Manual_REBRAND 030416.indd 16 3/8/16 5:21 PM

17
4
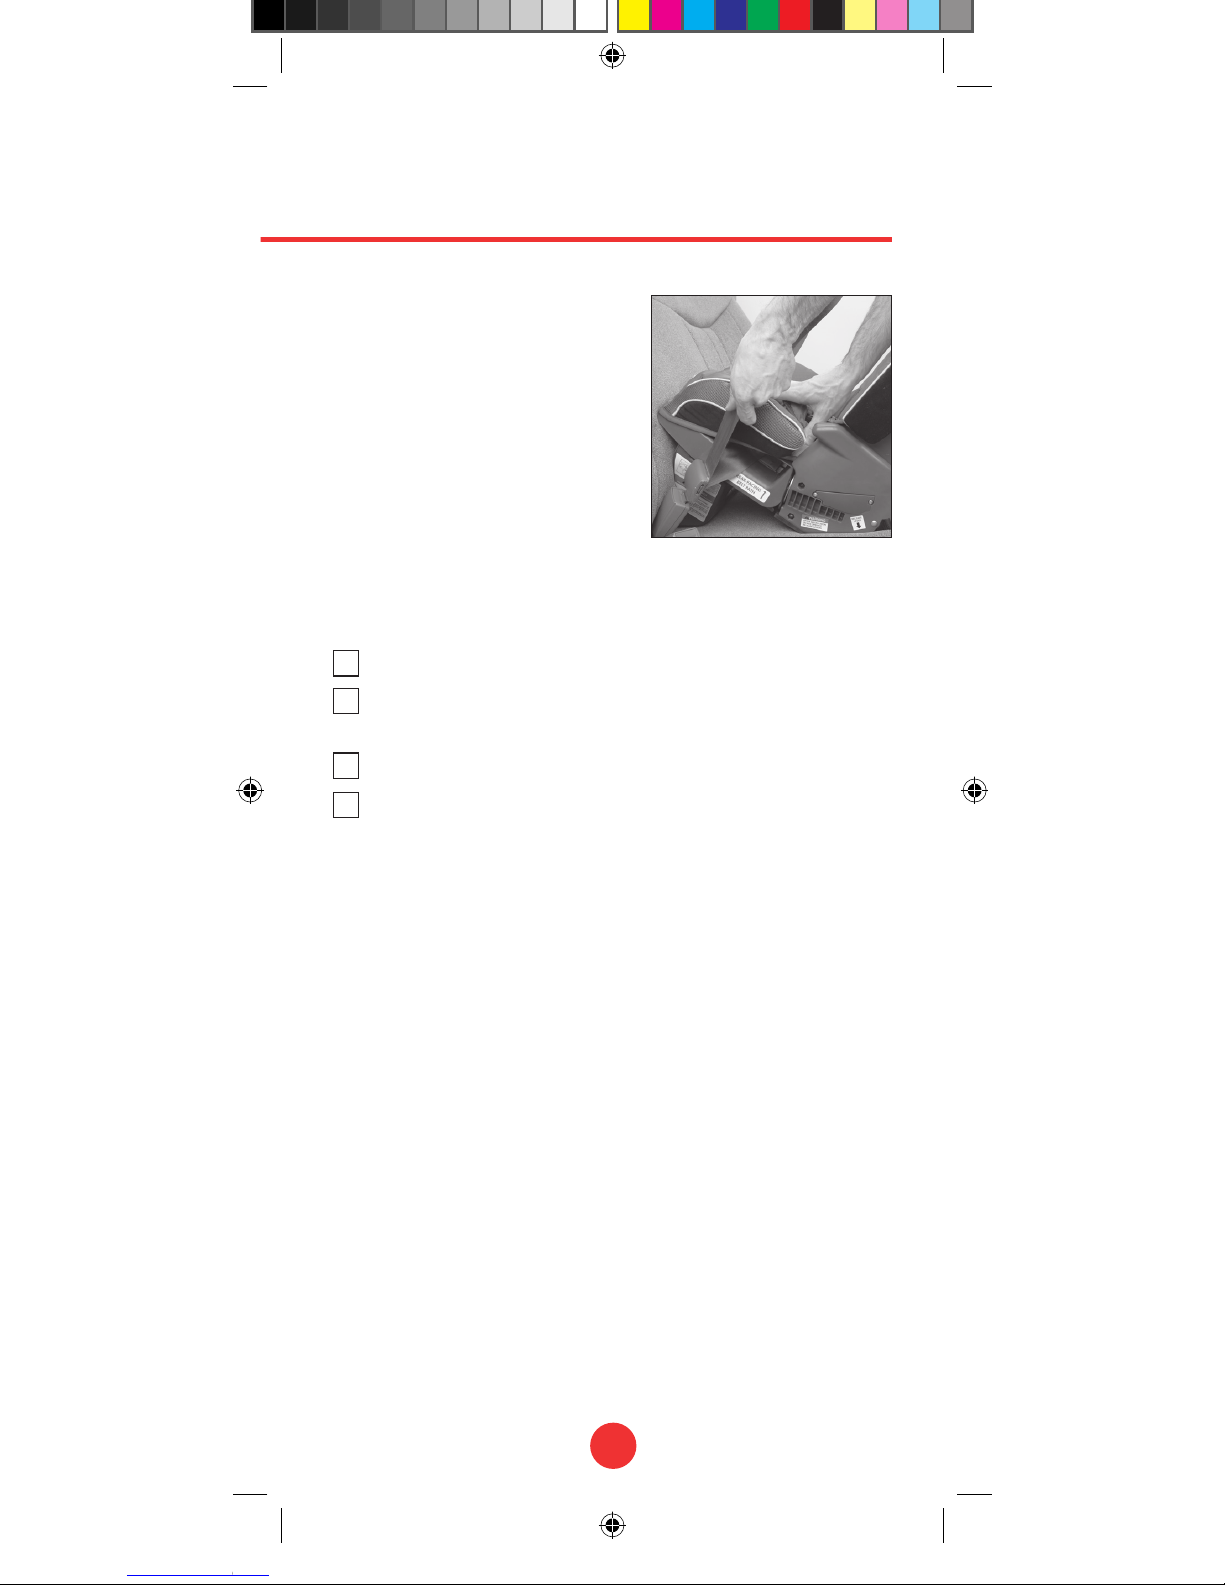
4. Push restraint down firmly
into vehicle seat while
pulling shoulder portion of
seat belt to remove slack
and tighten lap portion of
seat belt. (Fig. 4)
Vehicle cushions should
compress where there is
contact with the car seat.
WARNING:
• Make sure vehicle seat belt is properly locked.
• Failure to properly lock seat belt will result in an unsafe
installation that will greatly increase the potential for
injury or death to the child in an accident.
• Carefully read vehicle owner’s manual to determine seat
belt locking requirements or contact vehicle manufac-
turer.
See page 39 for instructions on using a locking clip.
CHECK LIST:
Confirm restraint is properly positioned.
Confirm seat belt is tight and securely locked.
Confirm seat belt buckle is properly fastened.
Confirm restraint installation is stable (see page 25).
Stability of installation can be improved by using top
tether (see page 30 for tether instructions).
Removal:
Release seat belt buckle and disconnect top tether if in
use. Properly store top tether.
Diono_CA_EN_RadianRXT_Manual_REBRAND 030416.indd 17 3/8/16 5:21 PM
18
Rear-Facing Lap-Belt Installation
for children 2.3–20.5 kg (5lbs–45lbs)
1
2
WARNING:
• You must use restraint rear-facing if child is less than 1
year and weighs less than 10 kg (22 lbs). Diono recom-
mends keeping children rear-facing until they are at
least 2 years old.
• Detachable base must be used with rear-facing restraint.
• Do NOT use Safe Stop® with
rear-facing child.
1. Confirm detachable base is
securely attached to restraint
bottom. (see page 13)
2. Place restraint in proper
rear-facing position:
Restraint bottom and base
are both flat on the vehicle
seat with front of restraint against the back of that
vehicle seat. (Fig. 1)
Note: It may be necessary to move vehicle front seats
slightly forward to properly fit a rear-facing restraint.
3. Route seat belt through
rear-facing belt path. (Fig. 2)
Confirm seat belt lays flat
and is not twisted.
Diono_CA_EN_RadianRXT_Manual_REBRAND 030416.indd 18 3/8/16 5:21 PM
19
3
4. Push restraint down firmly
into vehicle seat while
adjusting seat belt length.
Tighten and lock seat belt
according to vehicle
owner’s manual. (Fig. 3)
Vehicle cushions should
compress where there is
contact with the car seat.
CHECK LIST:
Confirm restraint is properly positioned.
Confirm seat belt is tight and buckle is properly
fastened.
Confirm restraint installation is stable (see page 25).
Stability of installation can be improved by using top
tether (see page 30 for tether instructions).
Removal:
Release seat belt buckle and disconnect top tether if in
use. Properly store top tether.
Diono_CA_EN_RadianRXT_Manual_REBRAND 030416.indd 19 3/8/16 5:21 PM
20
WARNING:
• Remove detachable base when restraint is forward-facing.
• Do NOT place infant in forward-facing restraint until
1 year and 10 kg (22 lbs). Diono recommends keeping
children rear-facing until they are at least 2 years old.
• ALWAYS use Safe Stop® with forward-facing child below
18 kg (40 lbs). (See page 28)
• See page 42 for UAS connector instructions.
• Always use top tether as shown in blue. See page 30 for
instructions.
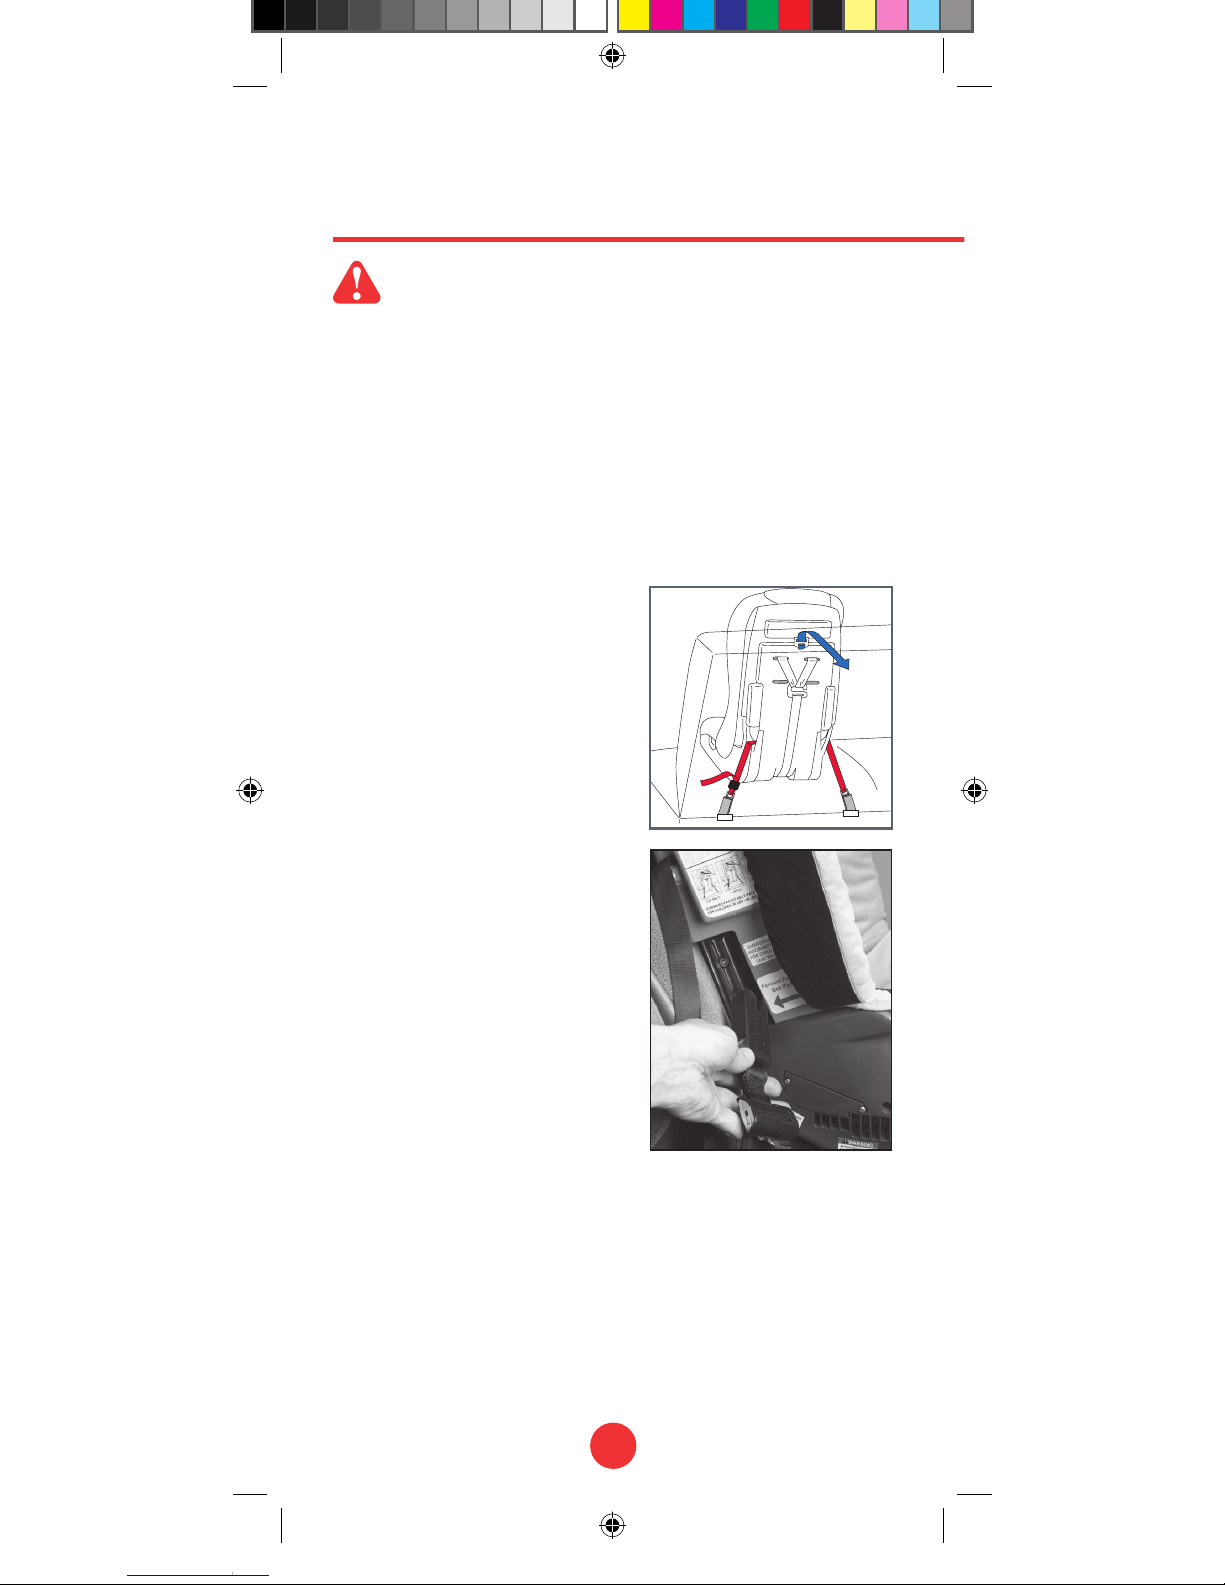
Forward-Facing UAS Installation
for children 10 kg–29.5 kg (22lbs–65lbs)
1
2
Fig. 1 shows a typical forward-
facing installation with UAS.
If forward-facing recline is
desired, adjust it prior to
installation (see page 29 ).
1. Confirm vehicle seating
location has its own UAS
anchors. If it does not, you
must use vehicle seat belt
installation (see pages 22
and 24).
2. Locate UAS belting secured
in storage compartment on
restraint back. Press red
release button to remove
each UAS connector and
webbing. Slide the narrow
UAS tethering strap out of
plastic strap guides on side
of the seat.
3. Place restraint in forward-facing position.
4. Route UAS belt through forward-facing belt path and
behind restraint cover. (Fig. 2)
Diono_CA_EN_RadianRXT_Manual_REBRAND 030416.indd 20 3/8/16 5:21 PM
Table of contents
Other Diono Car Seat manuals

Diono
Diono Radian R120 Manual

Diono
Diono camaria User manual

Diono
Diono monterey XT LATCH User manual

Diono
Diono Radian 3 R User manual

Diono
Diono Cambria User manual

Diono
Diono Solana User manual

Diono
Diono Radian 3R SafePlus Series User manual

Diono
Diono Cambria 2XT User manual

Diono
Diono Monterey User manual

Diono
Diono Radian 3QX User manual

Diono
Diono Radian 3 RXT User manual

Diono
Diono Radian 3 RX User manual

Diono
Diono Monterey2 User manual

Diono
Diono everett NXT fix User manual

Diono
Diono RadianR100 User manual

Diono
Diono Cambria 2 User manual

Diono
Diono Radian 5 User manual

Diono
Diono Radian 3QXT User manual

Diono
Diono Monterey 4 DXT User manual

Diono
Diono mXT User manual


