dji Ronin S2 User manual

v1.0
Quick Start Guide

©2020 DJI OSMO All Rights Reserved.
1
Quick Start Guide 2
快速入门指南 13
快速入門指南 24
Panduan Mulai Cepat 28
クイックスタートガイド 32
퀵스타트 가이드 36
Panduan Mula Pantas 40
44
Ръководство за бързо стартиране 48
Příručka pro rychlé spuštění 52
Hurtigstartvejledning 56
Kurzanleitung 60
Guía de inicio rápido 64
Οδηγός γρήγορης εκκίνησης 68
Pika-aloitusopas 72
Guide de démarrage rapide 76
Vodič za brzi početak rada 80
Rövid üzembe helyezési útmutató 84
Guida di avvio rapido 88
Snelstartgids 92
Hurtigstartveiledning 96
Skrócony przewodnik 100
Guia de início rápido 104
Guia de início rápido 108
Ghid de inițiere rapidă 112
Краткое руководство 116
Snabbstartsguide 120
Hızlı Başlangıç Kılavuzu 124
128
JP
CS
ID
BG
KR
DA
MS
TH
EN
ES
FI
HR
FR
HU
DE
EL
NL
NO
PT
PL
PT-BR
RU
TR
AR
RO
SV
IT
Contents
CHS
CHT

EN
2
©2020 DJI OSMO All Rights Reserved.
DJI RS 2 Quick Start Guide
DJI RS 2 Overview
1. Tilt Lock
2. Tilt Motor
3. Pan Lock
4. Pan Motor
5. Touchscreen
6. Ronin Series Accessories (RSA)/
NATO Ports
7. Power Button
8. Camera Control Button
9. M Button
10. BG30 Grip (Built-in battery with
¼"-20 screw hole)
11. Extended Grip/Tripod
12. Joystick
13. Lower Quick-Release Plate
14. Upper Quick-Release Plate
15. Roll Motor
16. Roll Lock
17. Grip Lever/Safety Button
18. Battery Level Indicators
19. Battery Level Button
20. Power Port (USB-C)
21. Trigger
22. Front Dial
23. Image Transmission/Focus Motor
Port (USB-C)
24. Focus Motor Port (USB-C)
25. RSS Camera Control Port (USB-C)
19
1
3
8
25
24
23
15
16
17
18
7
9
6
11
12
2
5
10
4
13
14
21
22
20

EN
©2020 DJI OSMO All Rights Reserved.
3
DJI RS 2 Quick Start Guide
Getting Started
A. Downloading the DJI RONINTM App and Watching the Tutorials
B. Charging the Battery and Checking the Battery Level
Before using for the first time, charge the battery grip through the power port using a
charging cable (included) and a USB adapter (not included). It is recommended to use a
USB adapter with QC 2.0 and PD protocol (max. 24 W).
During charging and usage, the battery level indicators indicate the battery level. When
not in use, press the battery level button to check the battery level.
C. Attaching the Extended Grip/Tripod
Ronin App
USB Power
Adapter
Power Outlet
100 - 240 V
1
2
3
Tutorials
Power Port High Low

EN
4
©2020 DJI OSMO All Rights Reserved.
DJI RS 2 Quick Start Guide
Roll Lock
D. Mounting the Grip
Insert the grip into the gimbal as shown 1. Make sure the grip lever is in the unlocked
position 2, and then toggle to the locked position after attaching 3.
To remove the grip, toggle the lever to the unlocked position, hold down the safety
button, and pull the grip away from the gimbal.
The gimbal is folded by default. To unfold the gimbal, toggle the tilt lock, roll lock, and pan
lock levers to the unlocked position and adjust the gimbal position as shown, and then
toggle the three locks to the locked position.
Pan Lock
Tilt Lock
1
23

EN
©2020 DJI OSMO All Rights Reserved.
5
DJI RS 2 Quick Start Guide
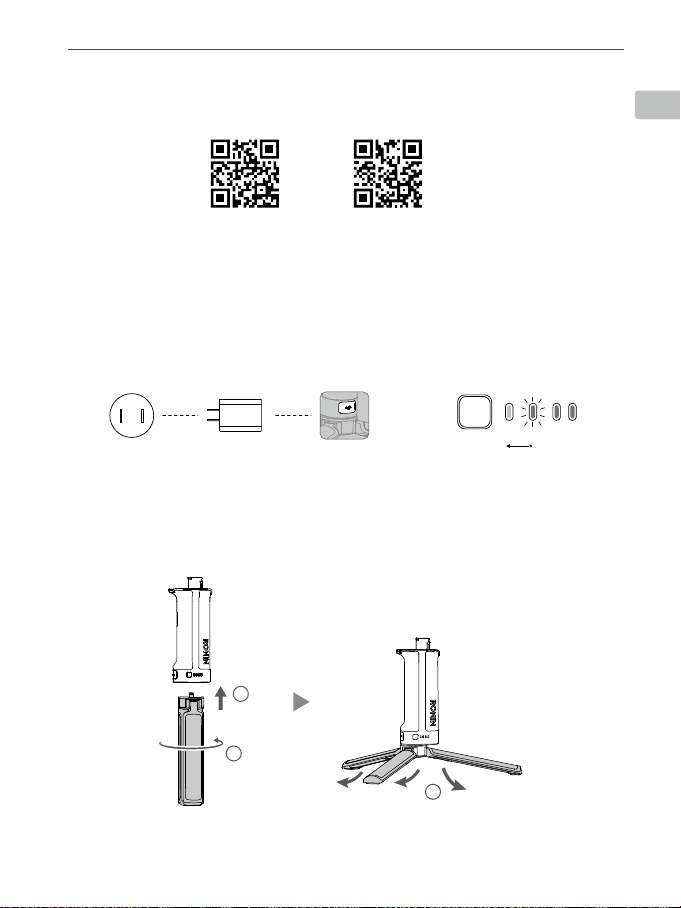
E.PoweringOn/OandEntering/ExitingSleepMode
Press and hold the power button to turn DJI RS 2 on or off. Press twice to enter or exit
sleep mode.
F. ActivatingDJIRS2
DJI RS 2 needs to be activated through the Ronin app before using
for the first time.
1. Press and hold the power button to power on the gimbal.
2. Enable Bluetooth on your mobile device and launch the Ronin
app. Note that a DJI account is required to launch the Ronin app.
Once detected in the list of Bluetooth devices, select DJI RS 2
and input the default Bluetooth password: 12345678. Make
sure you are connected to the internet and follow the on-screen
instructions to activate DJI RS 2.
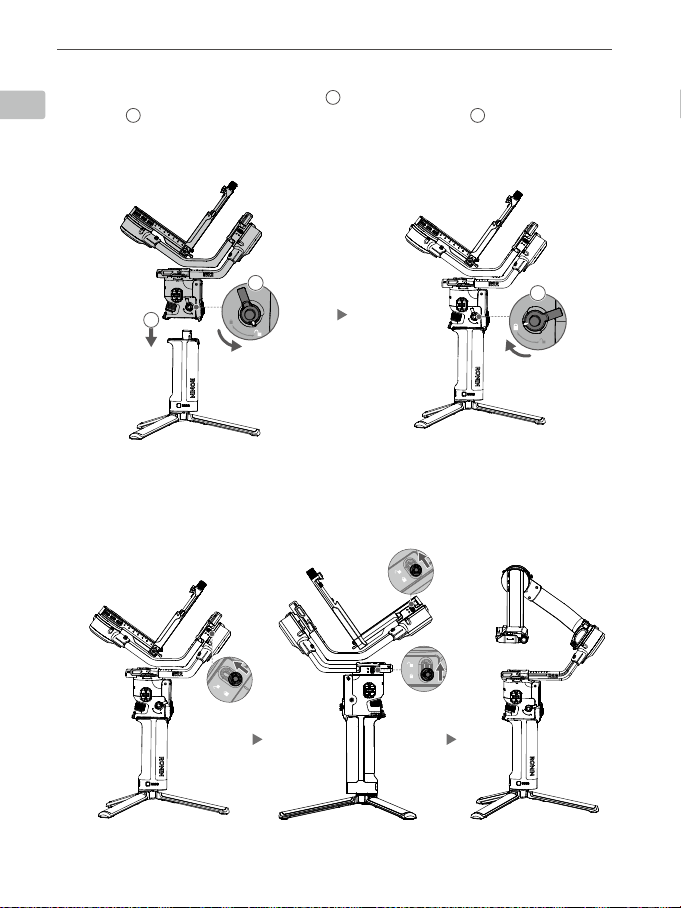
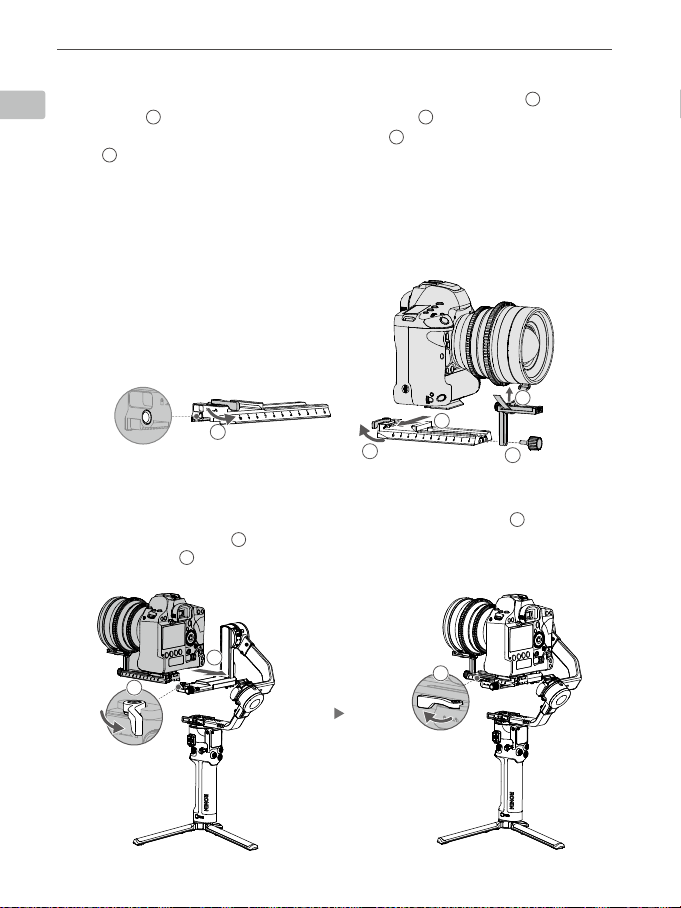
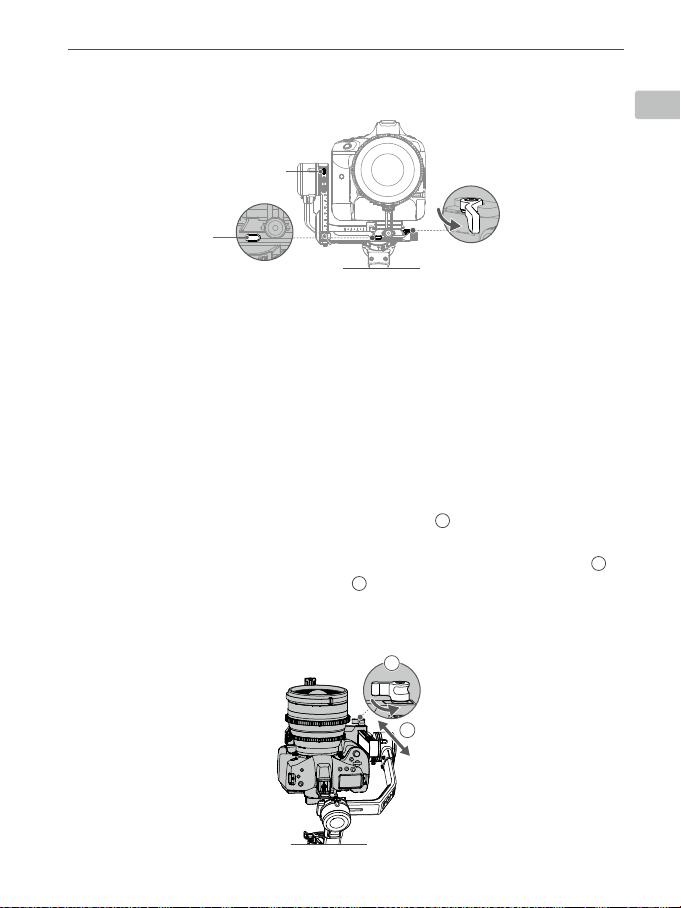
Mounting the Camera
Make sure to prepare the camera before mounting it to DJI RS 2. Remove the lens cap and
check that the battery and memory card are inserted in the camera. Make sure DJI RS 2 is
powered off or in sleep mode before mounting the camera.
1. Attach the Upper Quick-Release Plate
The camera lens and the arrow on the bottom of the upper quick-release plate must face
the same direction. Attach the upper quick-release plate to the camera by tightening the
screw.
DJI RS 2
Creat
User Profile Status
Device Activation
Activation is required prior to using the
device. To do so, information regarding
your device and DJI account will be
uploaded to DJI. Please agree and
proceed to activation.
Agree and activate
A camera riser is required when using a focus motor or a small camera with a large lens, such as a
Sony A6400 with the Sony FE 24-70 f2.8 GM lens.

EN
6
©2020 DJI OSMO All Rights Reserved.
DJI RS 2 Quick Start Guide
2. Attach the Lower Quick-Release Plate and Lens-Fastening Strap
Toggle the lever on the lower quick-release plate to the unlocked position 1, then insert
the camera 2and toggle the lever to the locked position 3after it is engaged. Attach the
lens-fastening strap to the lower quick-release plate 4, and bind the strap to the camera
lens 5. Note that the rubber of the lens-fastening strap must be directly under the lens.
It is recommended to use the lens-fastening strap when using a long or heavy lens, and
always use the lens-fastening strap before enabling SuperSmooth mode.
To remove the camera from the lower quick-release plate, toggle the lever to the unlocked
position and remove the camera while pressing the safety lock beside the lever.
3. Attach the Camera to the Gimbal
Toggle the lever on the camera mounting plate to the unlocked position 1and insert the
lower quick-release plate 2. Toggle the lever to the locked position once the camera is
roughly balanced 3.
2
1
3
Safety Lock 4
3
1
5
2

EN
©2020 DJI OSMO All Rights Reserved.
7
DJI RS 2 Quick Start Guide
To remove the lower quick-release plate, toggle the lever on the camera mounting plate
to the unlocked position and remove the lower quick-release plate while pressing the
safety lock on the mounting plate.
Balancing
Balancing is required before shooting. Before balancing, make sure to power on the camera
if using an optical zoom lens and to select the focal length if using a varifocal lens. Make sure
DJI RS 2 is powered off or in sleep mode before balancing.
1. Balancing the Vertical Tilt
a. Unlock the tilt axis and loosen the mounting plate knob 1.
b. Rotate the tilt axis so that the camera lens is pointing upward. Check to make sure
the camera is not top or bottom-heavy. If top-heavy, move the camera backward 2. If
bottom-heavy, move the camera forward 2.
c. Tighten the mounting plate knob while holding the camera upward. The vertical tilt is
balanced when the camera is steady while pointing upward.
1
2
4. Connect the Camera Control Cable
Choose the proper camera control cable according to the camera type. Plug one end
of the cable into the RSS camera control port of the gimbal (shown above) and plug the
other end into the camera.
Safety Lock
RSS Camera Control Port

EN
8
©2020 DJI OSMO All Rights Reserved.
DJI RS 2 Quick Start Guide
3. Balancing the Roll Axis
a. Unlock the roll axis. Toggle the lever on the roll arm to the unlocked position 1.
b. Check the direction in which the roll motor swings. If the camera rotates to the left,
move the camera to the right 2. If the camera rotates to the right, move the camera
to the left 2.
c. Toggle the lever on the roll arm to the locked position. The roll axis is balanced when
the camera is steady.
d. Lock the roll axis.
2. Balancing Depth for the Tilt Axis
a. Rotate the tilt axis so that the camera lens is pointing forward. Toggle the lever to the
unlocked position 1.
b. Check to make sure the camera is not front or back-heavy. If front-heavy, move the
camera backward by turning the knob 2. If back-heavy, move the camera forward.
c. Toggle the lever to the locked position. The tilt axis is balanced when the camera is
steady while tilted up or down by 45°.
d. Lock the tilt axis.
1
2
3
1
2

EN
©2020 DJI OSMO All Rights Reserved.
9
DJI RS 2 Quick Start Guide
4. Balancing the Pan Axis
a. Unlock the pan axis. Toggle the lever on the pan arm to the unlocked position 1.
b. While holding the grip, tilt DJI RS 2 forward, and rotate the pan arm until parallel with you.
c. Check the movement of the pan axis. If the camera lens rotates to the left, push the
pan axis to the right 2. If the camera lens rotates to the right, push the pan axis to the
left 2.
d. Toggle the lever on the pan arm to the locked position. The pan axis is balanced when
the camera is steady when rotating the pan while tilting the grip.
1
2
Briefcase Mode
You can use DJI RS 2 in Briefcase mode with the briefcase handle and extended grip/
tripod mounted. The briefcase handle can be mounted to either RSA/NATO port. Attach the
briefcase handle as shown. Make sure the knob is tightened.
2
1
3
4
When attaching the briefcase handle to the other side, the Extended Grip/Tripod angle must be
adjusted by loosening the screw on the briefcase handle.

EN
10
©2020 DJI OSMO All Rights Reserved.
DJI RS 2 Quick Start Guide
Operation
After balancing, make sure the three axes are unlocked before powering on DJI RS 2.
Touchscreen
100
PTF Fast
Timelapse Track
Panorama Time Tunnel
Home
Slide right on the
screen to select
shooting modes.
Slide left on the screen
to set system settings.
Silent Mode
Push Mode
Disable Selfie
Slide up on the screen
to enter the joystick
and front dial settings
page.
Slide down on the
screen to view the
image transmission
(with the Image
Transmission System
mounted).
30
High
Joystick Speed Joystick Smoothness
Dial Functions Dial Speed
100
Auto-Tune: after balancing, DJI RS 2 must be auto-tuned before it can be used. Tap
the icon to enter auto-tune page. If the lens-fastening strap is installed, you can enable
SuperSmooth prior to auto-tune for the best performance.
Balance Status: tap to check the balance status.
Follow Mode: tap to select follow mode. The tilt motor controls the tilt axis to follow,
pan motor controls the pan axis to follow, and roll motor controls the roll axis to follow.
PF: pan follow, where only the pan axis follows the grip’s movements.
PTF: pan and tilt follow, where both the pan and tilt axes follow the grip’s
movements.
FPV: pan, tilt and roll follow, where all three axes follow the grip’s movements.
3D Roll 360: enable to shoot footage while rotating the camera 360°.
Portrait: enable to shoot in portrait mode.
Custom: enable or disable any axis follow as required.
Follow Speed: tap to select follow speed.
NavigatingtheScreen

EN
©2020 DJI OSMO All Rights Reserved.
11
DJI RS 2 Quick Start Guide
Ronin App
Use the Ronin app to access more functions such as Force Mobile, virtual joystick, and
gimbal and camera settings.
Button Functions
* The functions of the camera control button and front dial vary according to the camera and require the
camera control cable to be connected. Refer to the DJI RS 2 Camera Compatibility List on www.dji.
com/rs-2 for more information.
Power Button
Press and hold to power on or off.
Tap to lock or unlock the
touchscreen.
Press twice to enter or exit sleep
mode.
Battery Level Button
Press once to check battery level.
Trigger
Tap once to start ActiveTrack
(requires the Image Transmission
System to be enabled).
Press and hold to enter Lock
mode.
Tap twice to re-center the gimbal.
Tap three times to turn the gimbal
180° so that the camera faces you
(selfie mode).
Front Dial*
Turn to control focus (default
setting).
Camera Control Button*
Press halfway for autofocus.
Press once to start or stop
recording.
Press and hold to take a photo.
Joystick
Push up or down to control the
movement of the tilt axis (default
setting). Push left or right to
control the movement of the pan
axis (default setting).
M Button
Tap to select a user profile.
Press and hold to enter Sport mode.
Press and hold and press the trigger twice to remain in Sport mode. Repeat to exit
Sport mode.
Quickly tap twice to enter portrait mode.
Press three times to enter or exit 3D Roll 360. When in 3D Roll 360, move the joystick
left or right twice to automatically rotate the camera. Tap the trigger twice to stop
continuous auto rotation.
Press and hold the M button together with the trigger to begin auto tune.

EN
12
©2020 DJI OSMO All Rights Reserved.
DJI RS 2 Quick Start Guide
For more information, read the User Manual:
www.dji.com/rs-2/downloads
※This content is subject to change without prior notice.
Specifications
Weight Gimbal: Approx. 960 g (2.12 lbs) (excluding the Quick-
Release Plates and Camera Mounting Plate)
Camera Mounting Plate: Approx. 150 g (0.33 lbs)
BG30 Grip: Approx. 265 g (0.58 lbs)
Extended Grip/Tripod: Approx. 226 g (0.50 lbs)
Upper and Lower Quick-Release Plates: Approx. 105 g
(0.23 lbs)
Dimensions Gimbal (folded): 260×265×70 mm (excl. grip)
Gimbal (unfolded): 410×260×195 mm (incl. grip, excl.
Extended Grip/Tripod)
Input Power Model: BG30-1950mAh-15.4V
Type: LiPo 4S
Capacity: 1950 mAh
Energy: 30.03 Wh
Voltage: 12 - 17.6 V
USB Input 5V/2A, 9V/2A, 12V/2A, 15V/1.6A
Bluetooth Operating Frequency 2.40 - 2.4835 GHz
Bluetooth Transmitter Power <8 dBm
Operating Temperature -20° to 45° C (-4° to 113° F)
Max Standby Time 12 hours
Charging Time 1.5 hours (when using a 24 W charger )

CHS
©2020 大疆灵眸 版权所有
13
DJI RS 2 快速入门指南
For more information, read the User Manual:
www.dji.com/rs-2/downloads
认识 DJI RS 2
1. 俯仰轴锁
2. 俯仰轴电机
3. 平移轴锁
4. 平移轴电机
5. 触摸屏
6. RSA 配件扩展接口 /NATO 接口
7. 电源按键
8. 相机控制按键
9. M 按键
10. BG30 手柄(内置电池,底部含
1/4"-20 安装孔)
11. 手柄延长脚架
12. 摇杆
13. 下层快装板
14. 上层快装板
15. 横滚轴电机
16. 横滚轴锁
17. 手柄锁定拨杆 /拆卸按键
18. 电量指示灯
19. 电量查看按键
20. 充电接口(USB-C)
21. 扳机
22. 前置拨轮
23. 图传 /跟焦电机接口(USB-C)
24. 跟焦电机接口(USB-C)
25. RSS 相机快门控制接口(USB-C)
19
1
3
8
25
24
23
15
16
17
18
7
9
6
11
12
2
5
10
4
13
14
21
22
20

CHS
14
©2020 大疆灵眸 版权所有
DJI RS 2 快速入门指南
准备
A. 下载 DJI RONINTM App 和观看教学视频
B. 充电、查看电量
首次使用,请通过手柄 USB-C 接口充电以激活电池。
推荐使用满足 QC2.0 或PD 协议的 USB 充电器(最大支持 24 W)。充电以及使用过程
中电量指示灯指示电量。不使用时,短按电量查看按键,可查看当前电量。
C. 安装手柄延长脚架
Ronin App
低高
USB-C 接口
USB 充电器交流电源
100~240 V
1
2
3
教学视频

CHS
©2020 大疆灵眸 版权所有
15
DJI RS 2 快速入门指南
横滚轴锁
D. 连接手柄与云台
如图所示将云台主体插入手柄 1,首先使锁定拨杆处于解锁位置 2,插入手柄后将手
柄锁定拨杆拨至锁定位置 3。取下手柄时,先将锁定拨杆拨至解锁位置,并同时按住拆
卸按键才能取下手柄。
出厂时云台主体部分处于收纳状态,请分别将三轴轴锁拨动至解锁位置,调整三轴的位
置(如图所示),再分别将三轴轴锁拨动至锁定位置,方便下一步操作。
平移轴锁
俯仰轴锁
1
23

CHS
16
©2020 大疆灵眸 版权所有
DJI RS 2 快速入门指南
E. 开机 / 关机 / 休眠
长按电源按键开启 /关闭云台,双击使云台电机休眠、唤醒。
F. 激活
首次使用 DJI RS 2 需连接 Ronin App 激活。激活步骤如下:
1. 长按电源按键开启云台。
2. 开启手机蓝牙功能。
3. 在手机上运行 Ronin App,注册或登录 DJI 帐号。在点击连接
后选择 DJI RS 2,输入默认密码 12345678,按提示激活。激
活过程中需连接网络。
安装相机
安装相机之前,确保云台已完成 “准备 ”章节的安装步骤,并使云台关机或休眠。请摘下
镜头盖,安装电池(确保电量充足)以及存储卡,确保相机已做好拍摄准备。
1. 安装上层快装板
使上层快装板底部箭头方向与镜头方向一致,安装上层快装板至相机底部,拧紧上层快
装板底部螺丝。
DJI RS 2
智能拍摄
用户参数 系统状态
设备激活
请激活之后开始使用设备,完成
激活操作需要您向 DJI 提供您的
DJI 设备信息、DJI 账号信息,
请确认同意后开始激活。
同意,开始激活
以下情况请选择安装上层快装板(增高版):
安装跟焦电机使用时。
小相机搭配大镜头使用时,例如:索尼 A6400 + FE 24-70 F2.8 GM。

CHS
©2020 大疆灵眸 版权所有
17
DJI RS 2 快速入门指南
2. 安装下层快装板和镜头固定支架
解锁下层快装板上的锁扣 1,将相机嵌入快装板 2后锁紧锁扣 3。将镜头固定支架安
装至快装板 4,使镜头固定支架上部软胶顶住镜头,并将魔术贴缠绕住镜头并固定 5,
以支撑相机镜头。建议在搭载使用较长、较重的镜头进行拍摄使用镜头支架,以及使用
“超级增稳模式 ”时必须使用镜头支架以获取更好的增稳效果。
将相机从下层快装板拆下时,需将下层快装板锁扣解锁,并按住圆形安全锁。
3. 安装相机至云台
解锁相机安装底座锁扣 1,将下层快装板连同相机嵌入安装底座 2,并前后调节相机
至大致平衡后锁紧锁扣 3。
2
1
3
安全锁 4
3
1
5
2

CHS
18
©2020 大疆灵眸 版权所有
DJI RS 2 快速入门指南
将下层快装板从云台上拆卸时,需将安装底座锁扣解锁,并按住底座圆角矩形安全锁。
调节平衡
拍摄前需要对云台相机进行平衡调节。若相机搭配电动伸缩镜头,请将相机开启后调平。
若使用变焦段镜头,请先选定焦段后再开始调平。确保调平时云台关机或休眠。
1. 俯仰轴垂直平衡
a. 打开俯仰轴轴锁,拧松安装底座旋钮 1。
b. 翻转相机使镜头垂直朝上,判断相机重心朝向。如果相机镜头朝前倾斜,则表明重心
朝前,需向后移动安装底座 2。如果相机向后倾斜,则表明重心靠后,需向前移动
安装底座 2。
c. 拧紧安装底座旋钮,拧紧时需要向上托住相机,使云台不承受相机重量,才能将旋钮
拧紧到位。如果相机镜头垂直朝上时能保持不动,代表俯仰轴垂直方向已调节平衡。
安全锁
RSS 相机快门控制接口
4. 连接相机快门控制线
根据相机型号,选择对应的相机快门控制线,线材两端分别连接相机快门控制接口与云
台的 RSS 相机快门控制接口。
1
2

CHS
©2020 大疆灵眸 版权所有
19
DJI RS 2 快速入门指南
3. 横滚轴平衡
a. 打开横滚轴锁,解锁横滚轴轴臂锁扣 1。
b. 判断相机重心朝向。若相机向左侧倾斜,说明相机重心靠左,需将横滚轴力臂往右
移动 2。若相机向右侧倾斜,说明相机重心靠右,则将横滚轴力臂往左移动 2。
c. 锁紧横滚轴轴臂锁扣。若相机能保持水平不动,表示横滚轴已调节平衡。
d. 将横滚轴锁拨至锁定位置,锁定横滚轴。
2. 俯仰轴前后平衡
a. 使相机镜头水平朝前,解锁安装底座上的锁扣 1。
b. 判断相机重心朝向。如果相机镜头向下倾斜,说明重心靠前,需拧动微调旋钮 2使
相机往后移动;当相机镜头向上倾斜,则拧动微调旋钮使相机往前移动。
c. 锁紧安装底座上的锁扣。若相机在向上或向下倾斜 45° 能够保持静止,表明俯仰轴已
调节平衡。
d. 将俯仰轴锁拨至锁定位置,锁定俯仰轴。
1
2
3
1
2
Other manuals for Ronin S2
1
This manual suits for next models
1
Table of contents
Other dji Camera Accessories manuals

dji
dji Osmo Mobile 4 User manual

dji
dji Zenmuse H2-2D User manual

dji
dji Matrice 210 V2 User manual

dji
dji Zenmuse X5R User manual

dji
dji OSMO MOBILE 3 User manual

dji
dji OSMO+ User manual

dji
dji RONIN 4D User manual

dji
dji RONIN 2 User manual

dji
dji OT-111 User manual

dji
dji High-Bright Remote Monitor User manual