dji RS 3 MINI User manual

v1.0 2023.01
User Manual

Searching for Keywords
Search for keywords such as “battery” and “install” to find a topic. If you are
using Adobe Acrobat Reader to read this document, press Ctrl+F on Windows or
Command+F on Mac to begin a search.
Navigating to a Topic
View a complete list of topics in the table of contents. Click on a topic to navigate to
that section.
Printing this Document
This document supports high resolution printing.

1 ©2023 DJI All Rights Reserved.
Using this Manual
Legend
Important Hints and Tips
Read Before First Use
Read the following documents before using DJITM RS 3 Mini.
DJI RS 3 Mini Safety Guidelines
DJI RS 3 Mini Quick Start Guide
DJI RS 3 Mini User Manual
It is recommended to watch all the tutorial videos on the official website (https://www.dji.com/
rs-3-mini) or in the DJI Ronin app and read the Safety Guidelines before using for the first time.
Make sure to review the Quick Start Guide before using for the first time and refer to this user
manual for more information.
Download the Ronin App and Watch the Tutorial Videos
Scan the QR code to download the RONINTM app and watch the tutorial videos.
iOS 11.0 or above Android 7.0 or above
https://s.dji.com/guide22
Ronin App

2 ©2023 DJI All Rights Reserved.
Contents
Using this Manual 1
Legend 1
Read Before First Use 1
Download the Ronin App and Watch the Tutorial Videos 1
Introduction 3
DJI RS 3 Mini Diagram 4
Using for the First Time 5
Charging DJI RS 3 Mini 5
Attaching the Extended Grip/Tripod 5
Unlocking and Locking the Gimbal 6
Mounting the Camera 7
Balancing 11
Activating DJI RS 3 Mini 16
Connecting a Camera 17
Auto Tune 17
Operations 18
Button and Port Functions 18
Touchscreen 19
Ronin App Settings 24
Firmware Update 35
Grip and Built-In Battery 36
Safety Guidelines 36
Operation Modes 39
Maintenance 40
Specifications 40

3 ©2023 DJI All Rights Reserved.
Introduction
DJI RS 3 Mini is a professional single-handed 3-axis gimbal specifically designed for mirrorless
cameras. It is compatible with a wide range of mainstream cameras and lenses and supports a
tested payload of up to 2 kg (4.4 lbs). DJI RS 3 Mini boasts enhanced gimbal performance thanks
to the 3rd-Gen RS Stabilization Algorithm.
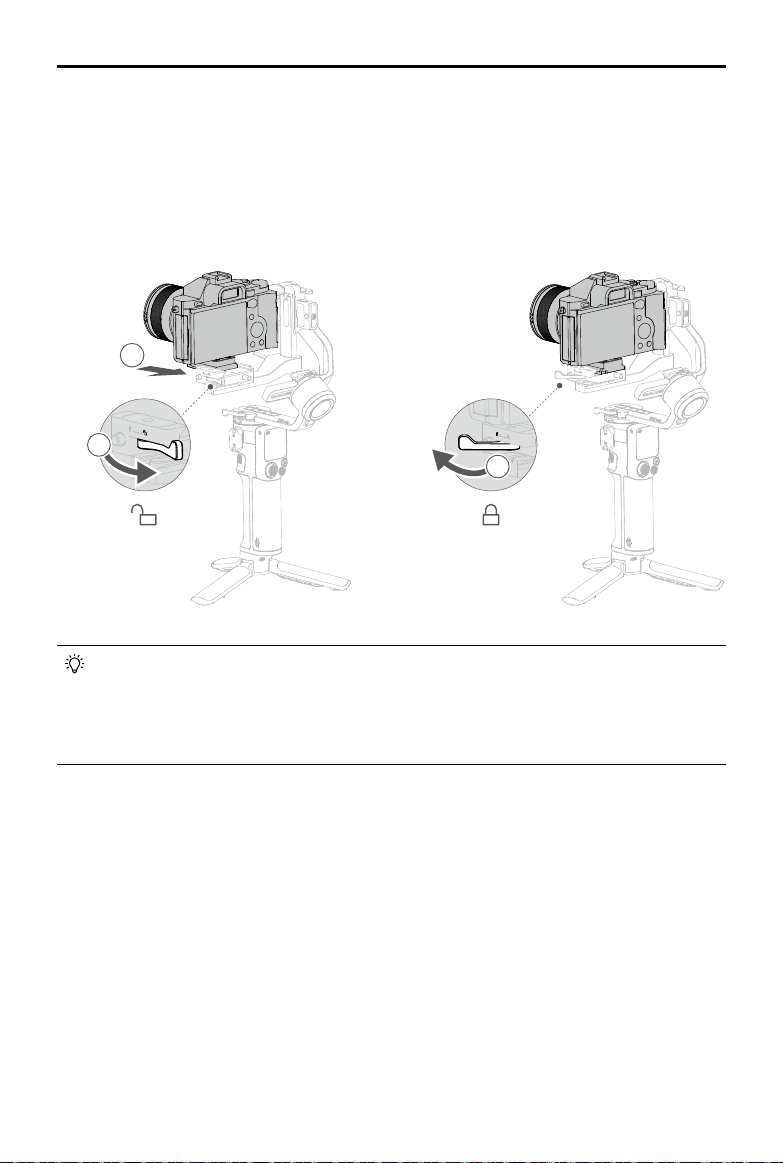
DJI RS 3 Mini weighs 850 g, which makes it lightweight for users to carry on the go. [1] The gimbal
can be switched between horizontal and vertical shooting without additional accessories. With
a 1.4-inch full-color touchscreen, users can calibrate the gimbal and set parameters. Users can
control the gimbal movement, shutter, recording, and camera focus using the onboard buttons.
DJI RS 3 Mini can be paired with mainstream mirrorless cameras via Bluetooth for wireless
camera control. With the NATO port, accessories such as the DJI RS Briefcase Handle can be
used. The grip has a built-in battery with a capacity of 2450 mAh, providing a maximum runtime
of up to 10 hours. [2]
After connecting to the Ronin app, easily control gimbal movement and parameter settings with
intelligent functions such as Panorama, Timelapse, and Track.
[1] The weight in Horizontal Shooting Mode is 850 g (1.8 lbs), and in Portrait Mode is 795 g (1.75 lbs)
with the quick-release plate attached (excluding both the extended Grip/Tripod and arm protector
and screw kit). The actual weight may vary depending on the manufacturing process.
[2] Measured with the equipment in a level and stationary state. The maximum runtime is for
reference only.

DJI RS 3 Mini User Manual
4 ©2023 DJI All Rights Reserved.
20. RSS Camera Control Port (USB-C)
21. NATO Port
22. Front Dial
23. Trigger
24. Safety Lock
25. Vertical Arm
26. Roll Arm
27. Safety Lock
28. Roll Motor
29. Roll Lock
DJI RS 3 Mini Diagram
1. Upper Quick-Release Plate
2. Lower Quick-Release Plate
3. Horizontal Arm
4. Roll Arm
5. Roll Motor
6. 1.4-inch Full-Color Touchscreen
7. Joystick
8. Camera Control Button
9. Grip (Built-in battery with 1/4"-20
screw hole)
10. Extended Grip/Tripod
11. Tilt Lock
12. Tilt Motor
13. Tilt Arm
14. Pan Motor
15. Pan Lock
16. Pan Arm
17. Power Port (USB-C)
18. Power Button
19. M Button
1
2
3
4
5
6
9
10
20
11
12
13
14
24
15
16
17
18
19
21
22
23
25
26
27
28
29
7
8

5 ©2023 DJI All Rights Reserved.
Attaching the Extended Grip/Tripod
Attach the extended grip/tripod to the gimbal, tighten and unfold the tripod and place the
gimbal on a level surface.
3
2
1
3
2
1
Using for the First Time
Charging DJI RS 3 Mini
Charge DJI RS 3 Mini through the power port (USB-C) using the charging cable (included) and a
USB adapter (not included). It is recommended to use a 5V-2A USB adapter. The battery can be
fully charged in approximately 2.5 hours. [1] Press the power button to check the battery level on
the screen when powered off.
[1] Tested in a 25° C (77° F) environment while using a 10W charger.
5V-2A

DJI RS 3 Mini User Manual
6 ©2023 DJI All Rights Reserved.
1
2
6
5
3
4
Unlocking and Locking the Gimbal
Each axis of the gimbal is equipped with a lock, which can lock the axes for convenient storage
and installation. The gimbal is packaged in the locked position. Toggle the tilt and roll lock to the
unlocked position. Adjust the gimbal position as shown and toggle the tilt and roll locks in the
locked position before mounting the camera.
1
2
6
5
3
4
1
2
6
5
3
4
1
2
6
5
3
4
•The tilt and roll axis of DJI RS 3 Mini have different locked positions, which can be
locked and stored according to the actual situation.

DJI RS 3 Mini User Manual
7 ©2023 DJI All Rights Reserved.
Mounting the Camera
Supported Cameras and Lenses
DJI RS 3 Mini has been rigorously tested to support a payload of 2 kg (4.4 lbs). Make sure the
combined weight of the camera, lens, and other accessories are within 2 kg (4.4 lbs). Refer
to the official DJI website (https://www.dji.com/support/compatibility) for the most updated
Ronin Series Compatibility List.
Mounting a Camera
Make sure to prepare the camera before mounting it to DJI RS 3 Mini. Remove the lens cap and
check that the battery and memory card are inserted in the camera.
1. Attach the Upper Quick-Release Plate
Attach the upper quick-release plate to the camera by tightening the screw. Note: use the
curved placement guide to secure the camera on the upper quick-release plate firmly.
•If the curved placement guide of the upper quick-release plate cannot be used to
firmly secure the camera, change the direction of the upper quick-release plate and
then install it.
2. Attach the Camera to the Gimbal
DJI RS 3 Mini supports horizontal shooting and vertical shooting. Follow the steps to install
the camera in horizontal and vertical shooting modes.

DJI RS 3 Mini User Manual
8 ©2023 DJI All Rights Reserved.
Horizontal Shooting
1. Loosen the lever ①on the lower quick-release plate.
2. Insert the upper quick-release plate with the camera attached into the lower quick-release
plate ②, as shown below.
3. Adjust the lower quick-release plate to an appropriate position according to the width of the
camera, and then tighten the lever ③.
2
3
1
2
3
1
•The position of the lower quick-release plate on the horizontal arm can be adjusted
according to the width of the camera. Loosen the red lever on the lower quick-release
plate and then move the lower quick-release plate.
•To remove the upper quick-release plate, loosen the gray lever on the lower quick-
release plate and press and hold the safety lock beside the lever.

DJI RS 3 Mini User Manual
9 ©2023 DJI All Rights Reserved.
1
2
2
3
4
1
2
2
4
1
Vertical Shooting
1. Detach the Lower Quick-Release Plate
Loosen the red lever ①on the lower quick-release plate, and then move the lower quick-
release plate while pressing the safety lock ②beside the lever.
2. Detach the Horizontal Arm
Loosen the lever ③on the horizontal arm, slide the horizontal arm down and unlock the safety
lock ④on the bottom of the vertical arm to separate the horizontal arm from the vertical arm.
3. Mount the Lower Quick-Release Plate to the Vertical Arm
Make sure that the red lever ①of the lower quick-release plate is unlocked and points upward
when mounting. Make sure that the red arrows on the side of the lower quick-release plate and
the vertical arm are in the same direction. Align the lower quick-release plate with the groove of
the vertical arm, install the lower quick-release plate, and then tighten the red lever ②.
1
2
2
3
4
1
2
2
4
1
1
2
2
3
4
1
2
2
4
1

DJI RS 3 Mini User Manual
10 ©2023 DJI All Rights Reserved.
•DO NOT install the lower quick-release plate in the wrong direction. Otherwise, the
camera will not be properly secured to the vertical arm.
4. Attach a Camera to the Gimbal
Make sure the lever ②on the lower quick-release plate is the unlocked position. Insert the
camera and upper quick-release plate ①into the lower quick-release plate, as shown in the
diagram below. Tighten the lever ②to the locked position after it is engaged.
1
2
2
3
4
1
2
2
4
1
1
2
2
3
4
1
2
2
4
1

DJI RS 3 Mini User Manual
11 ©2023 DJI All Rights Reserved.
Balancing
To obtain the best performance from DJI RS 3 Mini, proper balancing is essential. Proper
balance is critical for shots with DJI RS 3 Mini where fast motion or acceleration is required and
also offers longer battery runtimes. There are three axes that need to be properly balanced
before powering on DJI RS 3 Mini and setting up the software.
Before Balancing
1. The camera needs to be fully configured, with all accessories and cables connected, before
installing and balancing the camera on the gimbal. If the camera has a lens cap, make sure
to remove it before balancing. Before balancing, make sure to power on the camera if using
an optical zoom lens and to select the focal length if using a varifocal lens.
2. Make sure DJI RS 3 Mini is powered off or in sleep mode before balancing.
Balancing Steps
DJI RS 3 Mini supports horizontal shooting and vertical shooting. Follow the steps below to
balance the gimbal in different shooting modes. Make sure to use the diagrams below as a
reference when balancing.
https://www.dji.com/guide22Tutorial Videos:

DJI RS 3 Mini User Manual
12 ©2023 DJI All Rights Reserved.
2. Balancing Depth for the Tilt Axis
a) Rotate the tilt arm, so that the camera lens points forward. Loosen the lever on the
vertical arm ①.
b) Check to make sure the camera is not front or back-heavy. If the camera is front-
heavy, move the camera backward ②. If the camera is back-heavy, move the camera
forward ②.
c) Tighten the lever on the vertical arm to the locked position. The tilt axis is balanced
when the camera lens is steady while pointing forward.
d) Toggle the tilt lock to the locked position ③.
1
2
3
1
2
3
Balancing in Horizontal Shooting
1. Balancing the Vertical Tilt
a) Unlock the tilt axis ①and loosen the lever on the horizontal arm ②.
b) Rotate the tilt arm, so that the camera lens points upward. Check to make sure the
camera is not top or bottom-heavy. If the camera is top-heavy, move the camera
backward ③. If the camera is bottom-heavy, move the camera forward ③.
c) Lift the camera upwards slightly so that the gimbal does not bear the weight of the
camera, and then tighten the lever on the horizontal arm. The vertical tilt is balanced
when the camera lens is steady while pointing upward.

DJI RS 3 Mini User Manual
13 ©2023 DJI All Rights Reserved.
4. Balancing the Pan Axis
a) Unlock the pan axis ①and loosen the lever on the pan axis ②.
b) While holding the grip, tilt the gimbal forward and rotate the pan arm until it is parallel
with a level surface. Check the movement of the pan axis. If the camera lens rotates to
the left, move the camera to the right ③. If the camera lens rotates to the right, move
the camera to the left ③.
c) Tighten the lever on the pan axis. The pan axis is balanced when the pan arm maintains
parallel with a level surface while the grip is tilted.
1
3
2
3. Balancing the Roll Axis
a) Unlock the roll axis ①and loosen the lever on the roll axis ②.
b) Check the direction in which the roll motor swings. If the camera rotates to the left, move
the camera to the right ③. If the camera rotates to the right, move the camera to the left ③.
c) Tighten the lever on the roll axis. The roll axis is balanced when the horizontal arm
maintains parallel with a level surface.
d) Toggle the roll lock to the locked position.
1
2
3

DJI RS 3 Mini User Manual
14 ©2023 DJI All Rights Reserved.
Balancing in Vertical Shooting
1. Balancing the Vertical Tilt
a) Unlock the tilt axis ①and loosen the red lever on the lower quick-release plate ②.
b) Rotate the tilt arm, so that the camera lens is in the upward. Check to make sure the
camera is not top or bottom-heavy. If the camera is top-heavy, move the camera
backward ③. If the camera is bottom-heavy, move the camera forward ③.
c) Tighten the red lever on the lower quick-release plate. The vertical tilt is balanced when
the camera lens is steady while pointing upward .
2. Balancing Depth for the Tilt Axis
a) Rotate the tilt axis, so that the camera lens points forward. Loosen the lever on the
vertical arm ①.
b) Check to make sure the camera is not front or back-heavy. If front-heavy, move the
camera backward ②. If back-heavy, move the camera forward ②.
c) Tighten the lever on the vertical arm. The tilt axis is balanced when the camera lens is
steady while pointing forward.
d) Toggle the tilt lock to the locked position ③.
3
2
1
2
1
3

DJI RS 3 Mini User Manual
15 ©2023 DJI All Rights Reserved.
3. Balancing the Roll Axis
a) Unlock the roll axis ①and loosen the lever on the roll axis ②.
b) Check the direction in which the roll motor swings. If the camera rotates to the left,
move the camera to the right ③. If the camera rotates to the right, move the camera to
the left ③.
c) Tighten the lever on the roll axis. The roll axis is balanced when the vertical arm
maintains perpendicular with a level surface.
d) Toggle the roll lock to the locked position.
4. Balancing the Pan Axis
a) Unlock the pan axis ①and loosen the lever on the pan axis ②.
b) While holding the grip, tilt the gimbal forward and rotate the pan arm until it is parallel
with a level surface. Check the movement of the pan axis. If the camera lens rotates to
the left, move the camera to the right ③. If the camera lens rotates to the right, move
the camera to the left ③.
c) Tighten the lever on the pan axis. The pan axis is balanced when the pan arm maintains
parallel with a level surface while the grip is tilted.
3
1
2
1
2
3

DJI RS 3 Mini User Manual
16 ©2023 DJI All Rights Reserved.
Activating DJI RS 3 Mini
Activation is required for DJI RS 3 Mini through the Ronin app. Follow the steps below to activate
DJI RS 3 Mini:
1. Press and hold the power button to power on DJI RS 3 Mini, and select the language on the
touchscreen.
2. Scan the QR code on the screen to download the Ronin app.
3. Enable Bluetooth on the mobile phone. Launch the Ronin app and log in with a DJI account.
Select DJI RS 3 Mini, type in the default password 12345678, and activate the gimbal
according to the instructions. An internet connection is required for activation.
•DJI RS 3 Mini supports up to five uses without activation. After that, activation is
required for further use.
•Make sure the tilt, roll, and pan locks are in the unlocked position before using the
gimbal.
2s

DJI RS 3 Mini User Manual
17 ©2023 DJI All Rights Reserved.
Connecting a Camera
DJI RS 3 Mini supports wireless camera connection using Bluetooth, camera control is available
without a cable connection. Swipe down from the top of the touchscreen on the Home screen
to enter the Control Center. Tap the Bluetooth icon and select the device, the gimbal and
camera will start to pair. The Bluetooth icon turns blue indicating connection is successful.
For Sony-series cameras, remote Bluetooth control needs to be enabled before connecting to
the gimbal.
For Canon-series cameras, remote control mode for photo or record mode needs to be enabled
before connecting to the gimbal.
Refer to the Ronin Series Compatibility list for more camera settings when using a Bluetooth
connection.
Choose the proper camera control cable for cameras that do not support Bluetooth according
to the camera type. Connect the camera and the RSS camera control port of the gimbal with the
cable.
•Refer to the Ronin Series Compatibility list (https://www.dji.com/support/compatibility)
for supported camera models.
•Some camera control cables need to be purchased separately.
Auto Tune
Use the auto tune to adjust the stiffness of the motor before using the gimbal. Auto tune
provides the proper stiffness for the motor according to the payload to obtain the optimum
gimbal performance. The gimbal is ready to be used after the auto tune calibration is complete.
Press and hold the power button to power on DJI RS 3 Mini, or press once or twice to exit sleep
mode. Tap the auto tune icon on the touchscreen to enable the auto tune calibration.
•Place the gimbal on a steady flat surface. DO NOT move the gimbal during auto tune.
It is normal for the gimbal to shake or make sounds during the auto tune calibration.

18 ©2023 DJI All Rights Reserved.
Operations
Button and Port Functions
Power Button
•Press and hold: power on/off
•Press once/twice: enter or exit sleep mode
•Press to check the battery level when powered off
Camera Control Button
After connecting the camera with Bluetooth or a camera control cable, the
camera control button can realize the following functions:
•Press halfway: autofocus
•Press once: start or stop recording
•Press and hold: take a photo
Refer to https://www.dji.com/support/compatibility. Check the Ronin Series
Compatibility list for detailed information on supported camera features.
M Button
•Press once: select a user profile
•Press and hold: enter Sport Mode, and press the trigger twice to remain in
Sport Mode. Repeat to exit Sport mode
•Press and hold the M button together with the trigger: begin auto tune
In Sport Mode, the follow speed of the gimbal increases greatly. It is suitable
for shooting in scenarios where subjects move suddenly and at fast speeds.
Joystick
The default settings of the joystick control directions are as follows:
•Push up or pull down: control the movement of the tilt axis
•Push left or right: control the movement of the pan axis
The joystick control direction can be set in the Ronin app.
Front Dial
Turn to control the focus/zoom by default. The settings can be changed via
the touchscreen. Refer to the Touchscreen section for more details.
Trigger
•Press and hold: enter Lock mode, tap the touchscreen to stay in lock mode,
and then the trigger can be released
•Tap twice: recenter the gimbal
•Tap three times: the gimbal rotates 180°, so the camera can face the user
(selfie mode)
Table of contents
Other dji Camera Accessories manuals

dji
dji RSC 2 User manual

dji
dji RONIN-SC FOCUS MOTOR User manual

dji
dji RONIN-M User manual

dji
dji Three-Channel Follow Focus User manual

dji
dji Zenmuse H2-2D User manual

dji
dji Zenmuse X5R User manual

dji
dji Ronin-S User manual

dji
dji RONIN 2 User manual

dji
dji TB50 Instruction Manual

dji
dji Osmo Pocket User manual