DMC AFE8B User manual

AFE8B
BATTERY POWERED CRIMP TOOL DATASHEET
________________________________________________________________________________________________
AFE8B-DS ©2012 Daniels Manufacturing Corp., All Rights Reserved Page 1 of 7 REV. D 6/20/2014
Daniels Manufacturing Corporation
526 Thorpe Road, Orlando, FL 32824 USA
Phone: 407-855-6161 Fax: 407-855-6884 Email: DMC@dmctools.com
Description
The AFE8B Battery Powered Crimp Tool is a hand held, self
contained crimp tool intended to crimp machined contacts
onto copper and aluminum cable.
Safety
Safety is essential in the use and maintenance of DMC tools
and equipment. This manual and any markings on the tool
provide information for avoiding hazards and unsafe
practices related to the use of this tool. Observe all of the
safety information provided.
Purpose of this Manual
This manual is intended to familiarize all personnel with the
safe operation and maintenance procedures for the following
DMC tool:
AFE8B Battery Powered Crimp Tool
Keep this manual available to all personnel. Replacement
manuals are available upon request at no charge.
All specifications are nominal and may change as
design improvements occur. DMC shall not be liable
for damages resulting from misapplication or misuse
of its products.
KEEP THIS MANUAL
Important Safety Information

AFE8B
BATTERY POWERED CRIMP TOOL DATASHEET
________________________________________________________________________________________________
AFE8B-DS ©2012 Daniels Manufacturing Corp., All Rights Reserved Page 2 of 7 REV. D 6/20/2014
Daniels Manufacturing Corporation
526 Thorpe Road, Orlando, FL 32824 USA
Phone: 407-855-6161 Fax: 407-855-6884 Email: DMC@dmctools.com
Important Safety Information
DO NOT REMOVE TOOL HEAD
DO NOT OPERATE TOOL
WITHOUT HEAD INSTALLED

AFE8B
BATTERY POWERED CRIMP TOOL DATASHEET
________________________________________________________________________________________________
AFE8B-DS ©2012 Daniels Manufacturing Corp., All Rights Reserved Page 3 of 7 REV. D 6/20/2014
Daniels Manufacturing Corporation
526 Thorpe Road, Orlando, FL 32824 USA
Phone: 407-855-6161 Fax: 407-855-6884 Email: DMC@dmctools.com
Important Safety Information
Identification
Specifications
Crimp Tool
Length=14-3/4” (375mm)
Width=2.9” (74mm)
Depth=3-1/8” (79mm)
Mass/Weight (with battery)=4.16lb (1.87kg)
Sound Level=75db (A) at 1 meter
Vibration=<2.5m/s2
Hydraulic Oil=Shell Tellus® T-15
Crimp Capacities
Max Crimp Force=.75 tons (6.7kN)
Avg. Crimp Time=2 seconds
Avg. Crimps per Charge=Approx. 150
Battery
Charging Voltage=18VDC
Charging Time=22 minutes
US Pat. No. 7,254,982

AFE8B
BATTERY POWERED CRIMP TOOL DATASHEET
________________________________________________________________________________________________
AFE8B-DS ©2012 Daniels Manufacturing Corp., All Rights Reserved Page 4 of 7 REV. D 6/20/2014
Daniels Manufacturing Corporation
526 Thorpe Road, Orlando, FL 32824 USA
Phone: 407-855-6161 Fax: 407-855-6884 Email: DMC@dmctools.com
Operation
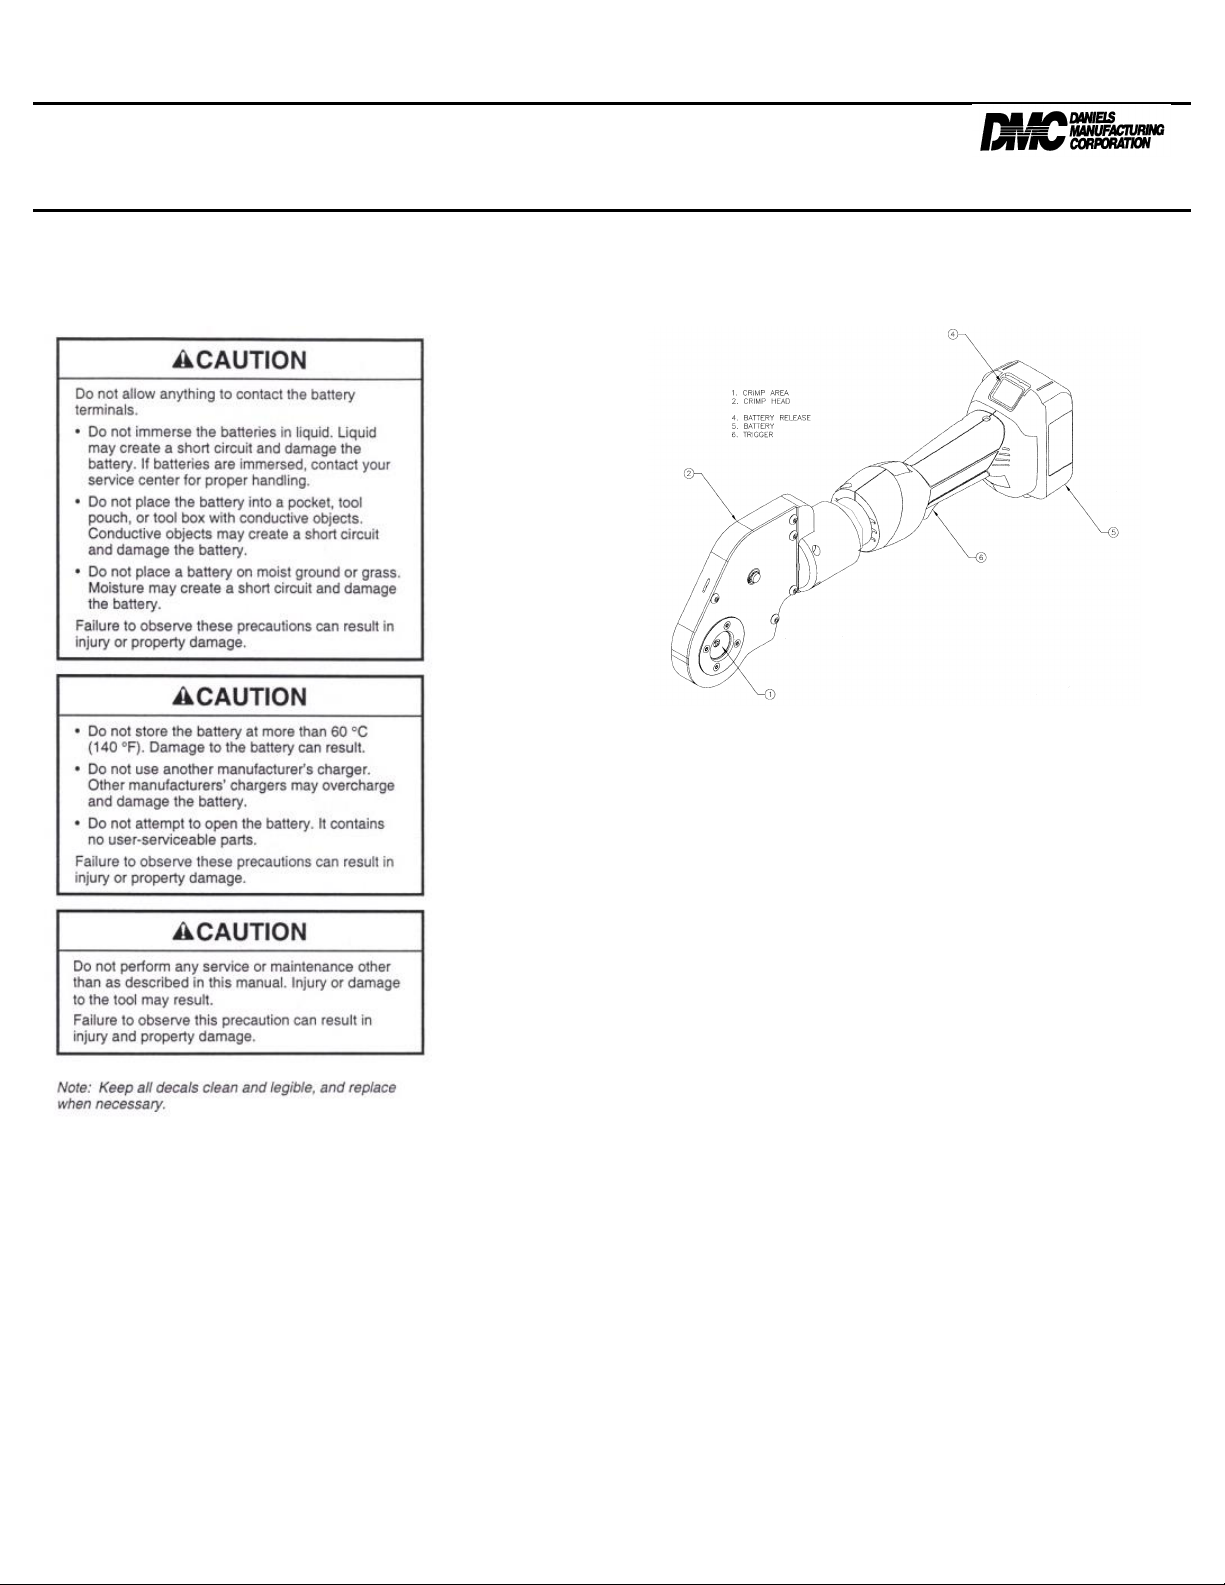
LED Work Light (White)
This LED automatically turns on when the trigger is pulled.
It remains on for 10 seconds after the trigger is released.
LED Indicator (Red)
This tool is equipped with a special circuit board
incorporating several important features to inform the user
about the current status of the unit. The Red LED on the
side of the tool signals in the following cases:
What Happens…
Signal
What it Means…
Flashing for 2
seconds
••
Battery is inserted in tool
Constant light for 20
seconds at end of
cycle
____
Battery charge is below 17V at
beginning of cycle
Tool will not start,
and constant light
for 20 seconds when
trigger is released
____
Battery charge is below 16V at
beginning of cycle
Tool will stop, and
constant light for 20
seconds after trigger
is released
____
Battery voltage drops below 13V
during cycle
Tool will stop, and
flashing light for 20
seconds when
trigger is released
••••
Motor current exceeds 20A during
cycle
Circuit has become too hot
Pressure Sensor
This tool is equipped with a pressure sensor that alerts the
user of an incomplete crimp.
If the tool is manually retracted before completion of
a crimp, the red LED and audible beep will be active
for 2 seconds.
If the tool is unable to reach the required crimp
force, the red LED, work light, and an audible beep
will pulse until after the trigger is released.
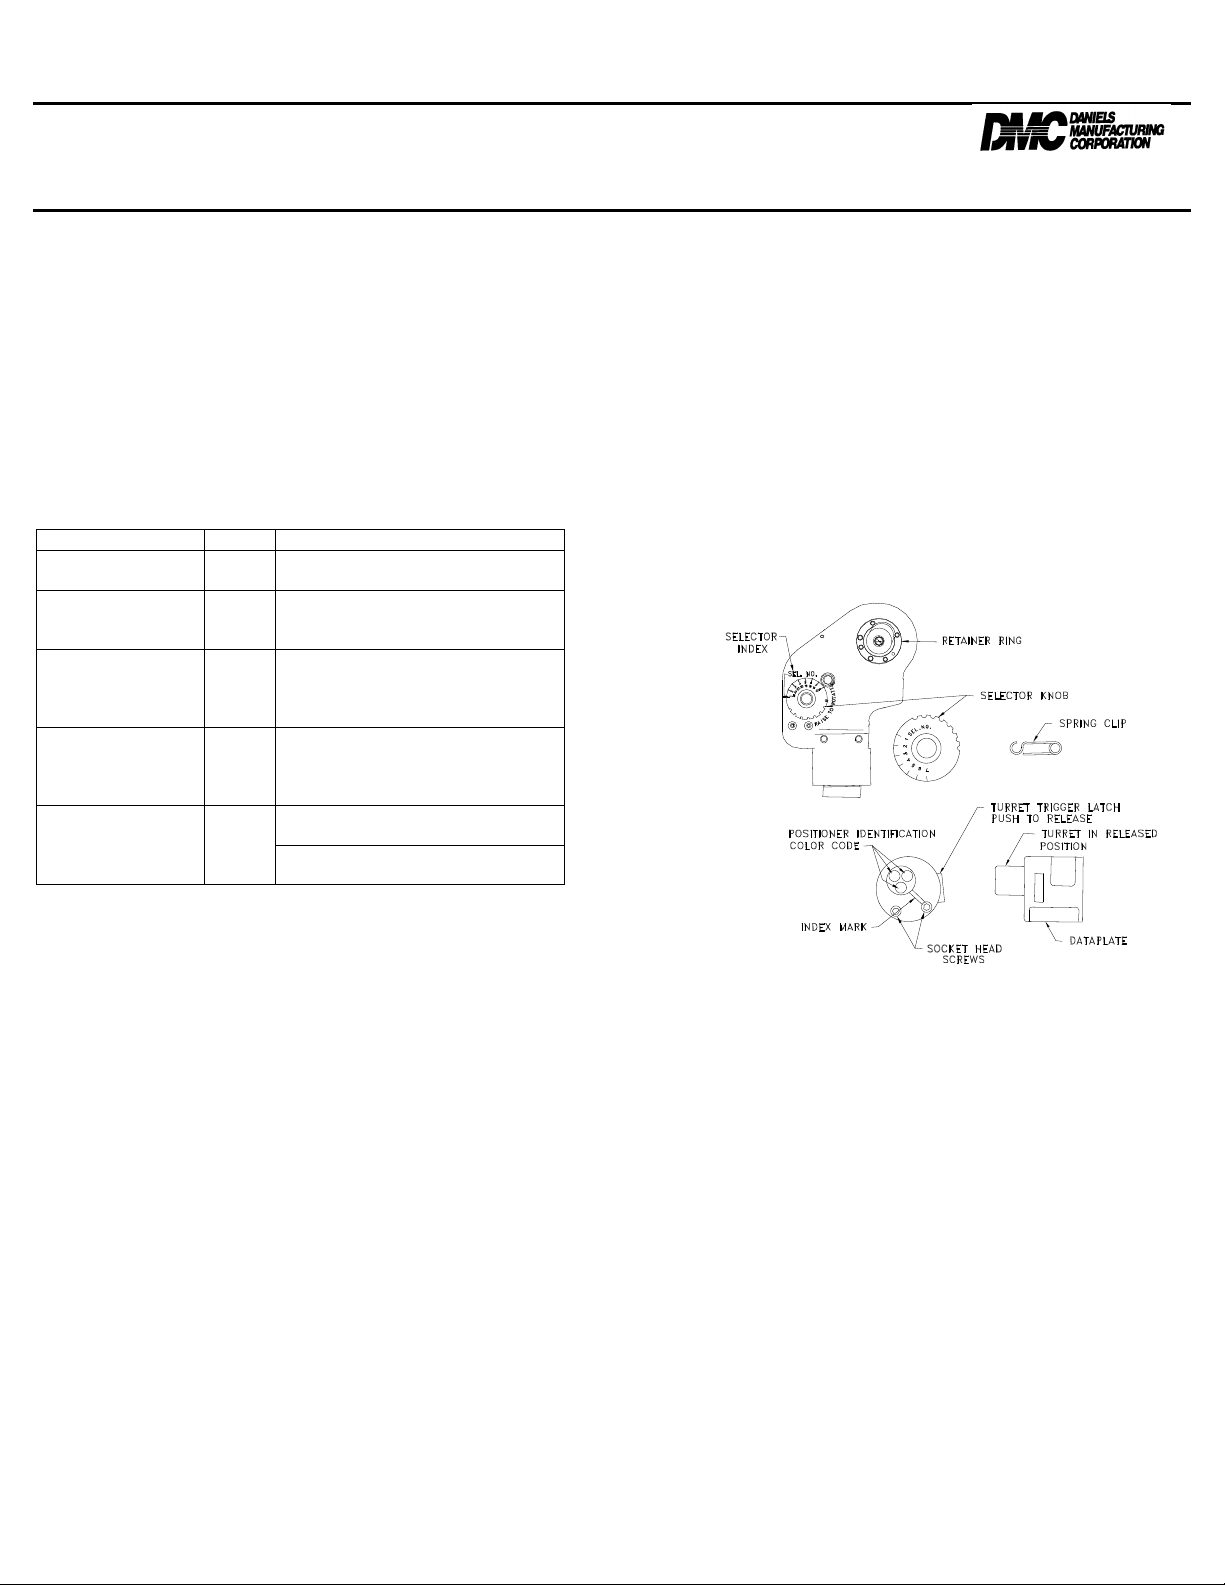
Installation of Positioners
1. Press turret trigger latch which releases turret to
indexing position.
2. Place the selected turret head assembly onto the
retainer ring with the alignment pin and socket head
screws lined up with their respective holes.
3. After the turret head is seated against the retainer
ring fully, tighten the socket head screws with a
9/64” hex key.
4. Refer to dataplate on turret head. From the color
code column, select the positioner color that
corresponds with the appropriate part number and
size of contact to be crimped.
5. With the turret in the indexing position, rotate until
color coded positioner is in line with the index mark.
Press turret until it snaps in latched position.
6. Refer to dataplate on turret head. From proper wire
size column, determine the selector number that
corresponds with the contact being used.
7. Remove spring clip from the selector knob.
Depress the retract button to fully retract the
tool piston. Raise the selector knob, and
rotate until selector number is in line with
index mark. Replace the spring clip.
Preparing Cable
Follow the lug/connector manufacturer’s instructions for
appropriate cable strip length, and contact/wire assembly.
Crimping Cable
1. Insert the properly assembled contact and wire into
the crimp area.
2. Press the trigger to make the crimp.
3. Hold the trigger down until crimping tool achieves
pressure relief, which is accompanied by an audible
“pop”.
4. The crimp tool push rod retracts automatically.

AFE8B
BATTERY POWERED CRIMP TOOL DATASHEET
________________________________________________________________________________________________
AFE8B-DS ©2012 Daniels Manufacturing Corp., All Rights Reserved Page 5 of 7 REV. D 6/20/2014
Daniels Manufacturing Corporation
526 Thorpe Road, Orlando, FL 32824 USA
Phone: 407-855-6161 Fax: 407-855-6884 Email: DMC@dmctools.com
Maintenance
Each Operating Day
Before Use:
1. Inspect indenters for wear or damage such as
cracks, gouges, or chips.
2. Inspect the tool for damage or leaks. If damage is
detected, return the tool to the DMC repair center
for inspection.
After Use:
1. Wipe all tool surfaces clean with a damp cloth and
mild detergent.
2. Charge the battery.
3. Fully retract the tool push rod.
4. Place the tool in the carrying case.
5. Store in a cool dry place.
Monthly
1. Thoroughly clean all surfaces.
Trouble Shooting
Before You Begin
1. Make sure that the battery is charged. Recheck the
battery after several minutes to make sure the
battery is holding its charge.
2. Use a nonflammable contact cleaner or pencil eraser
to clean the electrical contacts on the battery and
crimp tool.
3. Reinstall the battery and check the tool again.
Problem Probable Cause Probable Remedy
Tool is inoperative Dirt, contaminants, etc, Clean tool.
in ram area of tool.
Crimping tool battery Reform contacts.
contacts damaged.
Tool components worn or Return tool to DMC.
damaged.
Dies stop during Oil level is low. Return tool to DMC.
operation.
Air in hydraulic system. Press trigger and hold
emergency release
button simultaneously.
Hold for approximately
10 seconds.
Tool loses oil. Damaged internal seal. Return tool to DMC.
Gaging the crimp tool
The crimp should be gaged periodically to ensure that
proper crimping is being performed. Intervals between
checks should be determined by the customer based on tool
use and environment the tool is used in. Gaging is checked
by crimping soft solder and measuring the indents created
with a point to point gage.
Gaging Instructions
1. Insert a short length of soft solder into the crimp
area of the tool. 1/16” diameter for settings 1 thru
4, & 1/8” diameter for settings 5 thru 8.
2. Activate tool to crimp the soft solder.
3. After crimping, measure the depth of two of the
opposing indents with a point to point gage as
shown.
4. Measurements should be as follows:
Battery Charger Operating Instructions
Operating Environment
The charger is designed for use in dry areas. All ventilation
slots must be kept free. If possible, keep away from heat
sources and out of direct sunlight as ambient temperatures
in excess of 95°F (35°C) may increase charging times
significantly.
AC Connection
Before connecting the charger, check that the AC supply
voltage is the same as what is indicated on the charger.

AFE8B
BATTERY POWERED CRIMP TOOL DATASHEET
________________________________________________________________________________________________
AFE8B-DS ©2012 Daniels Manufacturing Corp., All Rights Reserved Page 6 of 7 REV. D 6/20/2014
Daniels Manufacturing Corporation
526 Thorpe Road, Orlando, FL 32824 USA
Phone: 407-855-6161 Fax: 407-855-6884 Email: DMC@dmctools.com
Specifications
Frequency=50Hz to 60Hz
Output Voltage=7.2 to 18VDC
Weight=2.2lb(1.0kg)
Safety Instructions
The charger is designed only for Li-ion and Ni-MH batteries
with voltages ranging from 9.6VDC to 18VDC and capacities
from 1.7Ah to 3.0Ah.
1. Before you use the charger, check the power cord,
extension cable and connectors for any signs of
damage or aging.
2. Do not open up batteries or the charger. Do not
puncture or expose to heat as there is RISK OF
EXPLOSION.
3. Only store in dry areas. Protect from moisture and
dampness.
4. Do not use if the charger is defective and never
insert defective batteries.
5. Observe the symbols on the charger’s rating plate.
6. Do not throw old batteries into the fire or dispose of
as domestic waste.
7. Keep metal objects that could cause shorts away
from the charger.
8. Do not dismantle the charger or batteries.
Operation
Green LED
If the charger is connected to the AC line the green LED will
flash repeatedly until a battery is installed for charging.
Charging a Battery
When a battery is inserted on to the charger the red LED will
illuminate and stay on while charging occurs.
The green LED will turn off while the battery is less than
80% charged.
Both green and red LED’s will illuminate when the battery is
greater than 80% charged, but not yet fully charged.
When charging is complete, the red LED will turn off, and
the green LED will stay on.
If you leave the battery on the charger after it is charged,
the charger will switch to its trickle charge mode for 24
hours.
The following are the possible conditions shown by
the right hand yellow LED.
Flashing indicates trouble with the cooling fan system.
Ensure that all cooling vents, and the battery connections
are free of dust or debris. If flashing continues, return the
unit to DMC for repair.
Continuous illumination indicates that a conditioning charge
is occurring. This happens when the battery being charged
is at either a very low or very high temperature. This can
also occur if you attempt to charge a fully charged battery.
These conditions will increase charging times.
Other conditions indicated by charger LED’s
Flashing Red with Green off-Charger is overheated.
Unplug the charger, and allow it to cool down.
Flashing Red, with Flashing Green-This indicates a
defective battery.
Spare Battery Parts
120 VAC Battery Charger HDE-LI-120C
230 VAC Battery Charger HDE-LI-230C
18V Replacement Battery HDE-LI-B
120 VAC Power Adapter HDE-120AC-A
230 VAC Power Adapter HDE-230AC-A

AFE8B
BATTERY POWERED CRIMP TOOL DATASHEET
________________________________________________________________________________________________
AFE8B-DS ©2012 Daniels Manufacturing Corp., All Rights Reserved Page 7 of 7 REV. D 6/20/2014
Daniels Manufacturing Corporation
526 Thorpe Road, Orlando, FL 32824 USA
Phone: 407-855-6161 Fax: 407-855-6884 Email: DMC@dmctools.com
DMC offers complete refurbishing and recalibration services.
DMC specially engineers and manufactures complete tool
kits to satisfy individual customer requirements, such as total
aircraft support general shop maintenance or production, on
board ship and vehicle service, etc.
Limitation of Liability
DANIELS MANUFACTURING CORPORATION IS NOT LIABLE
FOR CONSEQUENTIAL OR SPECIAL DAMAGES OF ANY
NATURE OR KIND RESULTING FROM THE USE, OR MISUSE,
OF ANY OF ITS PRODUCTS. OWNERS AND USERS OF DMC
PRODUCTS ASSUME FULL RESPONSIBILTY FOR
INSTRUCTING THEIR EMPLOYEES IN THE PROPER AND
SAFE USE OF SUCH PRODUCTS.
Limited Warranty
DMC (Daniels Manufacturing Corporation) warrants each
new product sold by it to be free from defects in material
and workmanship under normal use and service. DMC’s
obligation under this warranty is limited to the free
correction or, at DMC’s option, the refund of the purchase
price of any such product which proves defective in normal
service within ninety (90) days after delivery to the first
user, provided that the product is returned to DMC with all
transportation charges prepaid and which shall appear to
DMC’s satisfaction, after DMC’s inspection, to have been
defective in material and workmanship, it being understood
that DMC products are not consumer products. This
warranty shall not cover any damage to any product which,
in the opinion of DMC, was caused by normal wear, misuse,
improper operation, tampering, neglect or accident. This
warranty is in lieu of all other warranties express or implied.
No warranty, express or implied, is made or authorized to be
made or assumed with respect to products of Daniels
Manufacturing Corporation other than those herein set forth.
Table of contents
Other DMC Crimping Tools manuals
Popular Crimping Tools manuals by other brands

KUDOS
KUDOS HD-BGD3 SAFETY OPERATING & MAINTENANCE INSTRUCTIONS

Eastwood
Eastwood CRIMP-RIGHT WEATHER-TIGHT 31676 instructions

molex
molex 63823-7570 Specification sheet

molex
molex 63823-8000 manual

Textron
Textron Klauke K 14 instruction manual

Westward
Westward 13H894 Operating instructions and parts manual