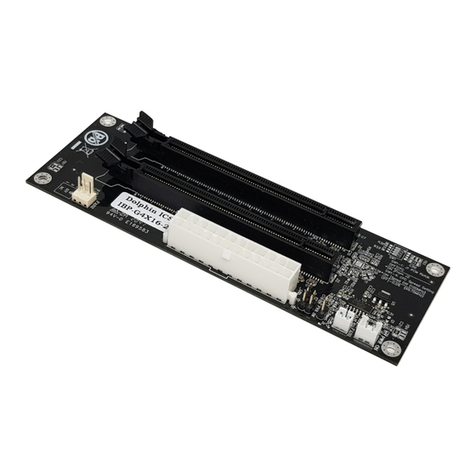
Dolphin IBP-G4x16-3 User manual

IBP-G4x16-3 User’s Guide Page 1
IBP-G4x16-3
IBP-G4x16-3 Backplane Users Guide
Version 1.0
Date: 8th June 2022

IBP-G4x16-3 User’s Guide Page 2

IBP-G4x16-3 User’s Guide Page 3
Table of Contents
DISCLAIMER................................................................................................................................................................ 4
TERMS AND ACRONYMS............................................................................................................................................. 4
SPECIFICATIONS.......................................................................................................................................................... 5
PIN HEADERS AND CONNECTORS.............................................................................................................................................. 5
DIP-SWITCHES ....................................................................................................................................................................6
SUPPORTED DOLPHIN TARGET CARDS.......................................................................................................................................6
BLOCK DIAGRAM.................................................................................................................................................................. 6
ATX /MICROATX CABINET MOUNTING....................................................................................................................................7
OPERATING ENVIRONMENT....................................................................................................................................................7
INSTALLATION ............................................................................................................................................................ 7
STEP 1-UNPACK BOARD ....................................................................................................................................................... 7
STEP 2–INSTALL THE IBP-G4X16-3 IN A CABINET .................................................................................................................... 7
STEP 3–CONNECT THE POWER SUPPLY ...................................................................................................................................7
STEP 4–INSTALL THE DOLPHIN PCIE UPLINK CARD.....................................................................................................................7
STEP 5–CONNECT A POWER TOGGLE SWITCH OR JUMPER ........................................................................................................... 8
STEP 6–CONNECT THE CABINET FANS.................................................................................................................................... 8
SUPPORT .................................................................................................................................................................... 8
COMPLIANCE AND REGULATORY TESTING.................................................................................................................. 9
EMC COMPLIANCE ..............................................................................................................................................................9
ROHS COMPLIANCE .............................................................................................................................................................9
WEEE NOTICE ....................................................................................................................................................................9
LIMITED WARRANTY..................................................................................................................................................10
WARRANTY PERIOD............................................................................................................................................................10
COVERAGE........................................................................................................................................................................ 10
SERVICE PROCEDURE ..........................................................................................................................................................10

IBP-G4x16-3 User’s Guide Page 4
DISCLAIMER
DOLPHIN INTERCONNECT SOLUTIONS RESERVES THE RIGHT TO MAKE CHANGES WITHOUT FURTHER NOTICE TO ANY OF ITS
PRODUCTS TO IMPROVE RELIABILITY, FUNCTION, OR DESIGN.
TO THE FULLEST EXTENT PERMITTED BY LAW, DOLPHIN WILL NOT BE LIABLE FOR ANY INDIRECT, INCIDENTAL, SPECIAL OR
CONSEQUENTIAL DAMAGES (INCLUDING LOST PROFITS, LOST DATA, OR LOSS OF USE) ARISING OUT OF ANY USE OF DOLPHIN’S
PRODUCTS, SOFTWARE OR SERVICE PROVIDED. DOLPHIN’S MAXIMUM LIABILITY WILL NOT EXCEED THE TOTAL AMOUNT PAID FOR
THE PRODUCT BY THE PURCHASER.
LIFE SUPPORT POLICY
DOLPHIN INTERCONNECT SOLUTIONS’ PRODUCTS ARE NOT AUTHORIZED FOR USE AS CRITICAL COMPONENTS IN LIFE SUPPORT
DEVICES.
ENVIRONMENTAL POLICY
Dolphin is minimizing the amount of printed documentation and software CDs in its shipments; please download additional
documentation and software from www.dolphinics.com.
Terms and acronyms
Important terms and acronyms used in this manual
Dolphin Uplink card Dolphin Transparent adapter cards configured for Dual Passive Expansion / two x8 Target
functionality. This functionality is currently supported by Dolphins MXH932, MXH94x and MXH95x.
Add-On card Any standard PCIe plug in card.

IBP-G4x16-3 User’s Guide Page 5
Specifications
The IBP-G4X16-3 is a passive backplane supporting PCIe Gen1, Gen2, Gen3 and Gen4 speeds and x1, x2, x4, and x8 link-widths. Both
Add-on slots are identical and can be used for any type of customer PCIe card. (The silk print specifies Add-On and Target cable
adapter slot.
•Two PCIe x8 slots for Add-On Cards (J1+J3)
•One PCIe x16 Target Cable Adapter slot for a compliant Dolphin PCIe uplink card (J2)
•Support any combination of PCIe x1/ x2 /x4 width and x8 / PCIe 1.0 / 2.0 / 3.0 / 4.0 speed
•55.52(W) mm x 164.53(L) mm
•Compliant to ATX / MicroATX cabinets.
Pin headers and connectors
The card has the following connectors and pin headers:
J1/J3: PCIe x16 PCI-E 4.0 SMT Type Slots (x8 mode)
- For Customer PCIe Add-On Cards
J1: PCIe Lane 0~7
J3: PCIe Lane 8~15
J2: PCIe x16 PCI-E 4.0 SMT Type Slot
- For Dolphin MXH932, MXH94x or MXH95x Transparent adapter only
ATXPR: Power Connector
- ATX 24-Pin Power Connector
FAN: FAN Power Connector (12V Output)
- JST compatible wafer 2pin (pitch=2.0mm) connector
FANA1: FAN Power Connector (12V Output)
- JST compatible wafer 3pin (pitch=2.54mm) connector
RESET J1: RESET Button
PWR ON: Must be shorted to power on card unless the ‘PWR SW’option is used.
If this option is used, the card will always power on when the ATX power is restored.
PWR SW: Power Switch Pin Header
- 2pin Header (pitch=2.54mm)
Connect to the power switch on the cabinet front panel to enable the card to power on when the power button is
pressed.
POWER LED: 3.3V Power LED Pin Header
- 3pin Header (pitch=2.54mm)

IBP-G4x16-3 User’s Guide Page 6
DIP-Switches
The IBP-G4x16 DIP switches are not in use when used with Dolphin MXH9xx series cards. Please leave all DIP-Switches to the
shipping default –ALL OFF
Supported Dolphin Target cards
All Transparent MXH932, MXH94x and MXH95x adapter cards are supported. Please note, the Dolphin cards must be using BMC
firmware version 2.7 or newer and configured for Dual Passive Expansion / two x8 Target functionality. Please consult the adapter
card firmware release note and Users Guide for details.
Block diagram

IBP-G4x16-3 User’s Guide Page 7
ATX / microATX Cabinet mounting
The IBP-G4X16-3 is compliant to both microATX and ATC cabinets. Please refer to the figure below for dimensions and mounting
holes.
Operating Environment
To maximize lifetime for the products and maintain the warranty, please honor the specified operating temperature for the Dolphin
PCIe uplink card and the installed PCIe device and make sure the proper air flow is present. Special care should be considered when
IBP-G4X16-3 is used in office type cabinets in combination with other high energy consuming PCIe devices, e.g., not active cooled
GPUs. Please consult the PCIe uplink card users guide and the installed PCIe devices users guide for details.
Installation
Step 1 - Unpack board
The IBP-G4X16-3 is shipped in an anti-static bag to prevent static electricity damage. The card should only be removed from the
bag after ensuring that anti-static precautions are taken. Static electricity from your clothes or work environment can
damage your PCI Express adapter card or your PC. Always wear a grounded anti-static wrist strap while opening the
expansion chassis and when the IBP-G4X16-3 is removed from the anti-static bag.
Unpack the IBP-G4X16-3 from the anti-static bag using proper anti-static procedures.
Step 2 –Install the IBP-G4X16-3 in a cabinet
The backplane can be installed in a ATX or MicroATX compliant Chassis with proper airflow to meet the requirements of
both the Dolphin uplink card and the installed Add-On cards.
Step 3 –Connect the Power Supply
The backplane must be powered from an ATX 24-Pin Power Supply. The power supply must provide enough power for
both the Dolphin uplink card and the PCIe adapter card installed.
Step 4 –Install the Dolphin PCIe uplink card
Configure and Install the Dolphin PCIe uplink card in one of the slots. Please refer to the Users Guide for the selected PCIe
card. The guides can be found at https://www.dolphinics.com/MX. To operate the IBP-G4X16-3 backplane, the selected
Dolphin target card must be running BMC firmware 2.7 or newer.

IBP-G4x16-3 User’s Guide Page 8
Step 5 –Connect a power toggle switch or jumper
Connect the cabinet power toggle switch to the pin header marked ‘PWR SW’or add a jumper to the ‘PWR ON’ pin
header. This connects to the ATX power-supply Power-good pins and signals the PSU unit to start and provide power.
With a toggle switch, the ATX PSU can be left switched on, and power to the device can be controlled with this switch,
while with a jumper, the expansion system can be turned on or off with the ATX PSU power switch.
Step 6 –Connect the cabinet FANs
To ensure proper cooling for the Dolphin uplink card and the Plug-On cards, you must always install and connect the
appropriate number of fans. The fans can be connected the FAN and FANA1 pin headers. Using the IBP-G4x16-3 without
fans is not possible and will void the warranty of your Dolphin uplink card and possibly destroy your Add-On cards.
Support
More information about the product, support and software downloads at https://www.dolphinics.com Please email pci-

IBP-G4x16-3 User’s Guide Page 9
Compliance and Regulatory Testing
EMC Compliance
The IBP-G4X16-3 is not tested for EMC compliance. It is the customer responsibility to install the backplane in a proper cabinet and
install the PCIe adapter cards of choice before conducting their own EMC test.
This does not ensure that it will comply with the relevant standards in any random cabinet. It is the responsibility of the integrator
to ensure that their products are compliant with all regulations where their product will be used.
RoHS Compliance
The Dolphin IBP-G4X16-3 is RoHS compliant. A Compliance certificate issued by the manufacturer is available
upon request.
WEEE Notice
The IBP-G4X16-3 is labelled in accordance with European Directive 2002/96/EC concerning waste
electrical and electronic equipment (WEEE). The Directive determines the framework for the return
and recycling of used appliances as applicable throughout the European Union. This label is applied to
products to indicate that the product is not to be thrown away but returned to your local approved WEEE waste
collector.

IBP-G4x16-3 User’s Guide Page 10
Limited Warranty
Dolphin Interconnect Solutions warrants this product to be free from manufacturing defects under the following terms:
Warranty Period
Dolphin warrants the product for one (1) year from the date of purchase. Extended warranties are available.
Coverage
To the extent permitted by applicable law, this warranty does not apply to:
•Damages caused by operator error or non-compliance with instructions available for the product.
•Use or attempt to use or program firmware not approved by Dolphin.
•Damage which results from accident, abuse, misuse, neglected improper handling or improper installation, moisture,
corrosive environments, high voltage surges, shipping or abnormal working conditions.
•Damages which results from violating the specified operating or storage temperatures and airflow.
•Damages caused by acts of nature, e.g. floods, storms, fire, or earthquakes.
•Damage caused by any power source out of range or not provided with the product.
•Normal wear and tear.
•Attempts to repair, modify, open, or upgrade the product by personnel or agents not authorized by Dolphin.
•Products that have had the product serial number tampered with or removed.
•Damage to the product caused by products not supplied by Dolphin.
Service Procedure
If the product proves defective during the Warranty Period, you should contact the seller that supplied you with the product, or if
you purchased it directly from Dolphin, email [email protected]om to obtain a valid RMA number and instructions.
Products returned to Dolphin without a proper RMA number will not be serviced under this warranty.
Table of contents
Other Dolphin Computer Hardware manuals

Dolphin
Dolphin IXH620 XMC User manual

Dolphin
Dolphin IBP-G3x16-2 User manual

Dolphin
Dolphin PXH812 User manual

Dolphin
Dolphin IXH610 User manual

Dolphin
Dolphin PXH810 User manual

Dolphin
Dolphin MXP909 User manual

Dolphin
Dolphin IBP-G4x16-2 User manual

Dolphin
Dolphin PXH812 User manual

Dolphin
Dolphin MXH930 User manual