4
4. Transpose
Press "TRANSPOSE +" or “TRANSPOSE-" to set the change value. Every time you press the "TRANSPOSE+" or "TRANSPOSE-"
button, the tone will "rise" or "fall" half a tone, the change value range from "+6" to "-6". At the same time, the digital display
area of the LCD will display the value of the rise or fall after you adjust it, and it will return to the original state 3 seconds
later. Press "TRANSPOSE+" and "TRANSPOSE-" at the same time to return to the default (00).
5. Dual keyboard (keyboard split)
Press the "SPLIT" key, and the function of the dual keyboard of the LCD will be lit up. The keys will be divided into C2~B3 and
C4~C7 segments. The scales of the keys in C2~B3 will correspond to the scales of C3~B4, and the scales in C4~C7 will
correspond to the scales of C3~C6. At this time, you can use digital to select the main tone to replace the original tone of
C4~C7 keys. The keyboard is divided into two different timbre playing simultaneously. Press "SPLIT" key again to cancel this
feature, and the dual keyboard function of LCD screen will be closed.
6. Keyboard percussion
Press the " PERCUSSION" key, at this time 61 keyboards into a full keyboard drum, the full keyboard for each keyboard
corresponding to a percussion instrument; Press the "PERCUSSION" key again to cancel the full keyboard drum, and the full
keyboard will return to playing mode.
7. Panel percussion
On the function panel, there are 7 percussion keys on the piano. Pressing these keys will sound the corresponding
percussion music. This panel percussion for real-time performance percussion, can be inserted during the performance of
the music to add effect, or can be used alone.
8. Animal calls
On the percussion button of the function panel, there are 7 animal call keys on the piano. Press the key of "PERCUSSION",
and then the percussion on the panel will be transformed into corresponding animal calls. If you press these keys, there will
be corresponding pattern animal calls.
(III). Demo music and teaching functions
1. Demo Song
Press the "DEMO-NEXT" key, that is, play the current demo song, at this time the LCD displays the song number and name,
press again to stop playing, press again to play the next song. And so on; If you select a song, the machine locks that song
and plays it in a loop.
Note: Press the "DEMO-NEXT" key to play one song at a time, then press this key to stop and press it again to play the next
song. Press it in turn, then you can select each song in the memory of the piano. Press the key of "DEMO" to play the current
song, and the LCD displays the number and name of the song. At this time, the song starts to play from the current song,
and then plays the next one after playing.
Note: You can also press the "START/STOP" button to cancel the function.
2. In the demo song playing mode, automatically enter the song selection mode
You can select the song you want by pressing the key "0, 0, 0-0, 4, 9" and +/- on the numeric keypad. Exit the demo mode
and return to the mode of tone and rhythm selection. When the song is playing, pressing the tone selection key will
temporarily switch to the tone selection mode. At this time, you can change the tone selection of the song. After a few
seconds of selection, it will return to the digital selection mode of demo song.
3. Music selection of teaching mode
Press one of the three teaching keys →press a key of the keyboard white key for music selection; Press "0, 0, 0-0, 4, 9" to
select the song you want(50 teaching demonstration songs). See the appendix for the sequence of key selection and the
name of the demo songs (the first white key C2 from the left is the first song;the white key, D2, is the second... and so on).
Note: In teaching mode, press the key of tone selection will temporarily switch to the tone selectionmode, and return to the
mode of demo music selection 3s after selection.
4. Teaching Function 1 (Randomly-play mode)
Press the key of "TEACH 1" and enter the playing mode. The teaching function point of the LCD screen will be lit up. After the
song is played, the user will press the key at will as the main melody. If the main melody does not reach the next bar, the
backing voice will repeat the bar until the end of the song stops. Press “TEACH 1" or "START/STOP" button again to exit and
the LCD learning function is closed.
5. Teaching Function 2 (Following mode)
Press the key of "TEACH 2" and enter the following mode. The teaching function point of the LCD screen will be lit up. After
the song is played, the main melody will not be played. The user must press the key according to the corresponding
keyboard to continue to play the next note. The background sound will play the section repeatedly until the end of the song.
Press “TEACH2" again or press the "Start/Stop" button to exit the function and the LCD teaching function is closed.
6. Teaching Function 3 (Ensemble mode)
Press the “TEACH 3" key and enter the ensemble mode. The teaching function points of the LCD screen will be lit up. The
main melody does not play the flash and without prompting, the user will play the main melody keyboard by his own ability.
If you do not press the keyboard to play the main melody in about 7 seconds, it will play automatically. As long as you play
the main melody of the keyboard, it will be blocked until the end of the song. Press “TEACH 3" again or press the "Start/Stop"
button to exit the function and the LCD learning function is closed.
(IV). Use of recording and programming functions
1. Recording and playback
Press the "REC" key, and the LCD recording function will be lit up, playing the keyboard melody at this time you can record
the song notes. The song after playing and then press the "PLAY" key will just play the song from beginning to end, after the
playing, press the key one more time you can play the song just recorded again. To disable the recording and playback
functions, press the “Record” key or the “Start/Stop” key again.
Note: The recording can record a maximum of "85" notes. After the recording is full, the following notes will not be recorded.
Turn off the power and turn it on again, all the recorded data will be cleared.
2. Use of rhythm programming and programming playback
Press the "PROG" button, then the rhythm programming function of the LCD will be lit up. Press the 7 corresponding
percussion instruments on the panel, or press the "PERCUSSION" button to convert the keyboard into full keyboard
percussion. You can record the self-programmed percussion one by one (up to 32 drum beats can be programmed) by
pressing the keyboard corresponding percussion , and then press the "PLAYBACK" key after the programming is finished. At
this point, the piano will playback the percussion rhythm you just programmed. During rhythm playback, you can adjust the
playback speed by pressing "TEMPO+ "or "TEMPO-" key. To cancel the programming function, press the "PROGRAM" button or
the "Start/Stop" button again.
Note: If you use the keyboard drum percussion, press "Percussion" key again to cancel the full keyboard drum percussion,
and the full keyboard will switch to playing mode. Turn off the power and turn it on again, all the programmed data will be
cleared.
(V). Play with rhythm and auto accompaniment (styles)
1. Start of rhythm
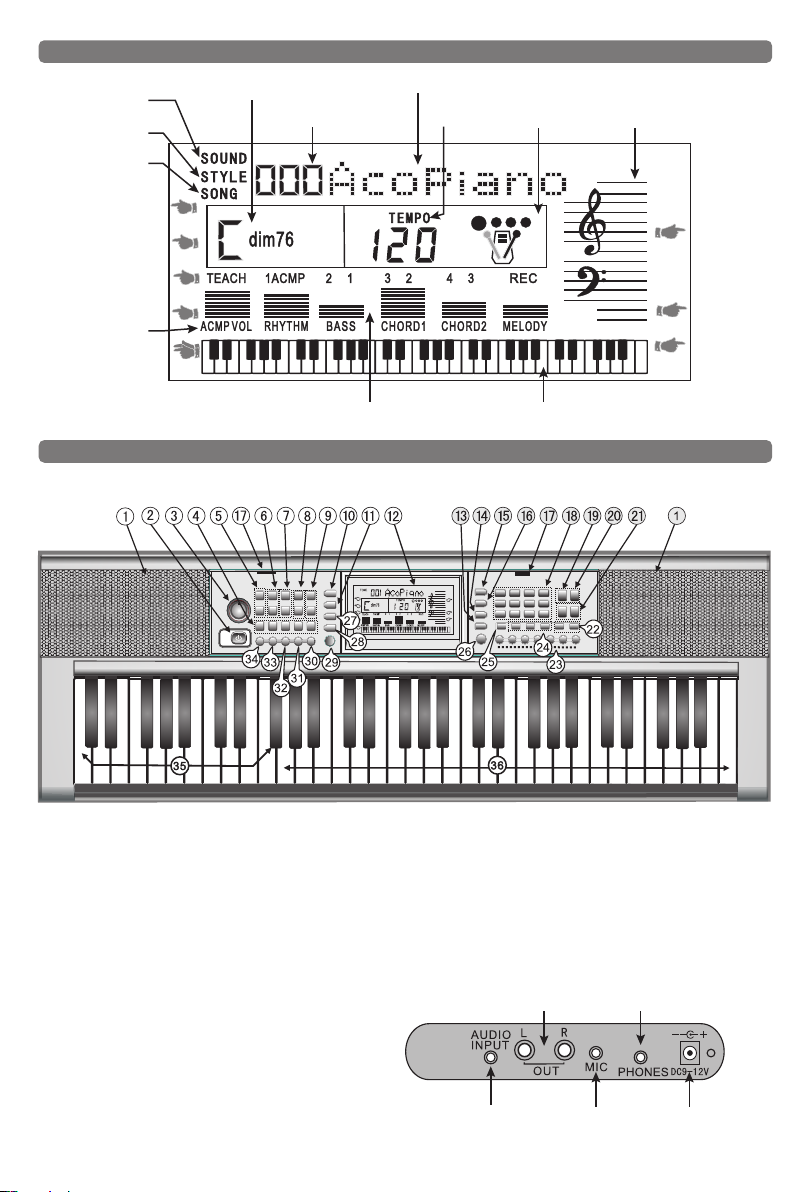
Press the "START/STOP" button once to immediately start the rhythm accompaniment. At this time, the small dots in the
beat display area of the LCD will keep flashing, and the beat indicator will swing from side to side with different beats. To
turn off the rhythm, press the "Start/Stop" button again.
2. Intro and ending
Press the "INTRO" key during the rhythm playing, then the rhythm will stop playing after playing a short piece of the
endgame ; If you press the "ENDING" key when the rhythm is not started, the current rhythm will be played after a short
prelude. You can also press the "SYNC" key to play a single or multi-finger chord, intro/ending, and then press the chord
keyboard area (1 to 19 keys from the left) at the same time to start the prelude, or you can choose to play separately.
3. The choice of rhythm (Rhythm name refer to Appendix II: Rhythm unified table)
By default, tone selection is used when the system is powered on. Press the "RHYTHM" key to switch from tone selection to
rhythm selection. You can select the rhythm you want on the number key, and the number and name of the rhythm will be
displayed on the LCD. For example, select the rhythm numbered 18, press the number key "0, 1, 8" , at this time the LCD
digital displays "018" rhythm and its name. In rhythm selection mode, press the "+" key, or "-" key, the rhythm number
increases or decreases in sequence until you select the wanted rhythm.
4. Synchronization
Press the "SYNC" key, and then the small dot in the rhythm display area of the LCD starts to blink. Then press the chord
keyboard area (1 ~ 19 keys from the left), and the rhythm and playing will be sounded simultaneously. You can also press the
"SYNC" key to press the one-finger chord or multi-finger chord, and then press the chord keyboard area to synchronously
start the performance, or you can choose separately.
5. Use of single finger chord
Under rhythm playing or synchronous mode, press the " SINGLE" chord key, the single finger function of the LCD will be lit,
and then play the chord keyboard area according to the single finger chord fingering method. At this time, the single finger
chord notes will be played together with the rhythm.
6. Use of multi-fingerd chord
Under the rhythm playing or synchronous mode, press the "FINGER" chord key, the multi-finger function of the LCD is lit, and
then play the accompaniment keyboard area according to the multi-finger chord fingering. At this time, the multi-finger
chord tone is playing together with the rhythm.
7. Bass chord
Press the "BASS CHORD" key to change the chord from Bass to Piano..............And so on.
8. Chord closure
To cancel "single or multi-fingered" chord, press the "CHORD OFF" key once. To close the "single or multi-fingered chord note"
and "rhythm" together, press the "Start/Stop" key once to stop the chord and rhythm playing at the same time, and the
single or multi - finger function of the LCD will be off.
9. Use of fill-in function
If you press the key "FILL IN" during the use of rhythm, the piano will automatically insert a strong intermezzo, and then
continue the rhythmic accompaniment.
10. Change the tempo
The rhythm speed is set to 120 beats/min at startup. Press the rhythm speed key "TEMPO+" or “TEMPO-" to speed up or slow
down the rhythm speed, and the rhythm speed can be adjusted from 30 beats/min to 240 beats/min. Press the speed keys
“TEMPO+" and “TEMPO-" at the same time to return to 120 beats/min.
11. Rhythm volume
Press the rhythm volume control button "RHYTHM VOL-" during the playing rhythm to reduce the rhythm volume. The
minimum value can be set to "1".Press the rhythm volume control button "RHYTHM VOL+" to increase the rhythm volume, the
maximum can be set to "10".
12. Chord volume
Press the chord volume control button "CHORD-" to reduce the chord volume during the rhythm and chord. The minimum
value can be set to "1".Press the chord volume control button "CHORD+" to increase the chord volume, the maximum can be
set to "10".
(VI). Registration memory
According to the needs of the performer, select the timbre or rhythm, chord and speed you need before playing. Press the
key of "MEMORY " and then press one of the keys of "Memory 1" or "memory 4". At this time, the current timbre or rhythm will
be recorded, and the corresponding system can be updated and called at any time. After the state has been memorized,
simply press one of the "memory 1" or "Memory 4" keys, then read out the required timbre or rhythm and play.
Note: The memorized data will be cleared to zero each time the machine is turned off.