SECURITY CONSIDERATION
Selection of Demo Music
1. Long press the "TONE/DEMO/RHYTHM" button and simultaneously press any black and white key in the demo area (#A2-f) to enter the Music Mode.
2. In the mode of Music Mode, press the "NEXT" button or long press "FUNCTION" button and simultaneously press the "#A2 number-" key to switch
the rhythm.
3. Or long press the "FUNCTION" button and simultaneously press the corresponding "B-d1 number key" to select music (Please refer to the Table of
Music)
4. After the selection, press the "START/STOP" button to start music playback, press the "START/STOP" button again to stop playing.
Demo Teaching Function
1. In the demo music mode (please refer to the Demo Selection to enter the demo mode), long press any black and white key (demo area #A2-f) first
and then press “START/STOP”.
2. Then enter the mode of demo teaching. Press any key on the keyboard to start playing the main melody. The melody will stop if no keys are pressed.
3. Press the "START/STOP" button again to exit the mode.
Auto Chord
1. Long press the "FUNCTION" button and simultaneously press the "A2 Chord On" button on the keyboard to activate the auto chord.
2. Long press the "FUNCTION" button and simultaneously press the "B2 Chord Off" button on the keyboard to inactive the auto chord.
Sync ON and Sync OFF
1. Long press the "FUNCTION" button and simultaneously press the "#C1Sync" button on the keyboard to turn on the sync function.
2. Press the "#C1Sync" button again to turn off the sync function.
Intro/Ending
1. Long press the "FUNCTION" button and simultaneously press the "#D1Intro/Ending" button on the keyboard, and then press the "START/STOP"
button to start the intro playing,
2. During the rhythm playing, long press the "FUNCTION" button and simultaneously press the "#D1Intro/Ending" button on the keyboard to start the
ending playing.
Accompaniment Volume
Long press the "FUNCTION" button and simultaneously press the "C1 Accompaniment Volume Up" button or "D1 Accompaniment Volume Down" on the
keyboard adjust the accompaniment volume.
Octave
Long press the "FUNCTION" button and press "E1 Octave Up" or "F1 Octave Down" on the keyboard to adjust the octave.
Transposition
Long press the "FUNCTION" button and press "G1 Transposition Up" or "A1 Transposition Down" on the keyboard to adjust ±12 semitones.
Brightness
Long press the "FUNCTION" button and press "f1 Brightness Up" or "g1 Brightness Down" on the keyboard to adjust the sound brightness.
Recall/Save
1. Long press the "FUNCTION" button and press any one of "C-F Settings 1-4” keys on the keyboard, and then long press the "Memory Setting" to save
your selected parameters such as tone, rhythm, speed and volume.
2. Long press the "FUNCTION" button and press the "C-F Settings 1-4" key in the settings you just saved, and then short press the "Memory Setting" to
recall the saved parameters.
3. This piano is capable of four save settings, 4 memories and 16 memory settings in total. Long press the "FUNCTION" button first and then press the
"G Memory Up" key or “A Memory Down” key to select the memory.
Recording/Playback
1. Long press the "METRONOME" button and press "B-d1 Recording Track" on the keyboard after the beep to select the track to be recorded. There
are "0-15" tracks in total, of which 1-15 is the melody track and 0 is the accompaniment track.
2. After selecting the recording track, it will enter the recording mode. Play the piano and start recording, the metronome indicator flashes to start
recording.
3. Long press the "START/STOP" button to stop recording, and the metronome stops flashing to exit the recording mode.
4. Long press the "START/STOP" button again to play the recorded sound.
5. Recording Deletion: Long press the "metronome" button to enter the recording mode after the beep, and then long press the "PLAY/STOP" button to
delete all track recordings.
Dual Tones:
1. Choose one tone as the first of dual tones.
2. Long press the "FUNCTION" button and press the "C2 Dual Tone" key on the keyboard.
3. The dual tone is activate now and the second tone is the No. 49 tone by default.
4. In this mode, enter the Tone Mode to change the second tone (please refer to the Tone Selection.)
5. Press and hold the "FUNCTION" button again, and press the "d 2 Dual Tone Off" key on the keyboard to exit the dual tone mode.
Dual Keyboard/Dual Piano:
1. Choose a tone as the left area.
2. Long press the "FUNCTION" button and press the "e2 Dual Keyboard" key on the keyboard to activate the Dual Keyboard mode.
3. In the activated state, the keyboard is divided into two identical areas on the left and right. The split point is located at the Middle C. In the Dual
Keyboard mode, the pitch of Middle C is always the same as the pitch of the rightmost C.
4. In this mode, enter the Tone Mode to change the tone of right area (please refer to the Tone Selection.)
5. Long press the "FUNCTION" button and press the "f2 Dual Piano" key on the keyboard. Then, both the left and right keyboards will play the tone of
piano.
6. Long press the "FUNCTION" button and press the "g2 Dual Keyboard/Dual Piano Off" key on the keyboard to exit Dual Keyboard/Dual Piano mode.
Reverberation
1. Long press the "FUNCTION" button and press the "c3 Reverb On" key on the keyboard to activate the reverb mode. Then, the digital piano will play
with the reverb effect.
2. Press the "C3 Reverb" button to switch the type of reverberation. All together 8 reverberation effects are preset.
3. Long press the "FUNCTION" button and press the "d3 Reverb Off" button to turn off the reverb effect.
Chorus
1. Long press the "FUNCTION" button and press the "e3 Chorus" key on the keyboard to activate the chorus mode, then the digital piano will play with
the chorus effect.
2. Press the "e3 Chorus" button to switch the type of chorus. All together 8 chorus effects are preset.
3. Long press the "FUNCTION" button and press the "f3 Chorus Off" button to turn off the chorus effect.
Metronome
1. Long press the metronome button in the function box and the indicator will light up to play the metronome.
2. Long press the "FUNCTION" button and press the "g3-b3 Beat 1-6" key on the keyboard to select the number of beats.
Speed
1. Long press the "FUNCTION" button and press “#d4 Speed Up" on the keyboard to increase the BPM value.
2. Long press the "FUNCTION" button and press “#f4 Speed Down" on the keyboard to reduce the BPM value.
3. BPM Range: 30-280
Strength
1. Long press the "FUNCTION" button and press the "d4-g4 Strength" button on the keyboard to select the strength curve of the keyboard.
2. All together 5 strength curves: "OFF, SOFT, STANDARD, HARD" and default strength after power on.
Keyboard Percussion
1. Long press the "FUNCTION" button and press the "a4 Percussion On" button on the keyboard to enter the Keyboard Percussion mode, and the
keyboard will play the percussion effect.
2. Long press the "FUNCTION" button and press the "b4 Percussion Off" button on the keyboard to exit the Keyboard Percussion mode.
WARNINGS/CAUTIONS
●Power Adapter
- This product is available for the standard indoor wall socket.
- Please use only the power cord specified by this product.
- Please turn off the power supply and pull out the power cord when the product is not in use for an extended
period of time.
●Smoke, odor, overheating
- The following operations shall be carried out immediately to avoid the danger of fire and electric shock
when the product is smoking, emitting odors, or overheating.
1. Turn off the power supply.
2. Pull the plug from the power outlet.
3. Contact the local agency.
●Power Supply and Power Line
- Improper use of power supply and power lines may cause the danger of fire and electric shock.
The following precautions must be observed:
1. Specified power lines for this product must be used.
2. An AC power adaptor with output voltage within the household rated voltage must be used.
3. Do not place the power cord near the heat and wet sources.
4. Do not overload wall outlets and extension cords.
5. Do not place heavy objects on the power lines.
6. Do not twist and bend the power lines.
7. Do not use wet hands to touch the power cord and plug.
8. Unplug the power cord from the power outlet when not using the instrument or during a thunderstorm.
9. Make sure that the power is off when connecting or cutting off the power cord.
10.Children should not be allowed to contact the plug and power line when there is no adult supervision.
●Water and Foreign Matter
- Please turn off the power supply and unplug the power cord so as to avoid the danger of fire and electric
shock when water and other foreign matter into this product.
●Dismantlement
- Please do not disassemble or modify this product so as to avoid the danger of fire and electric shock.
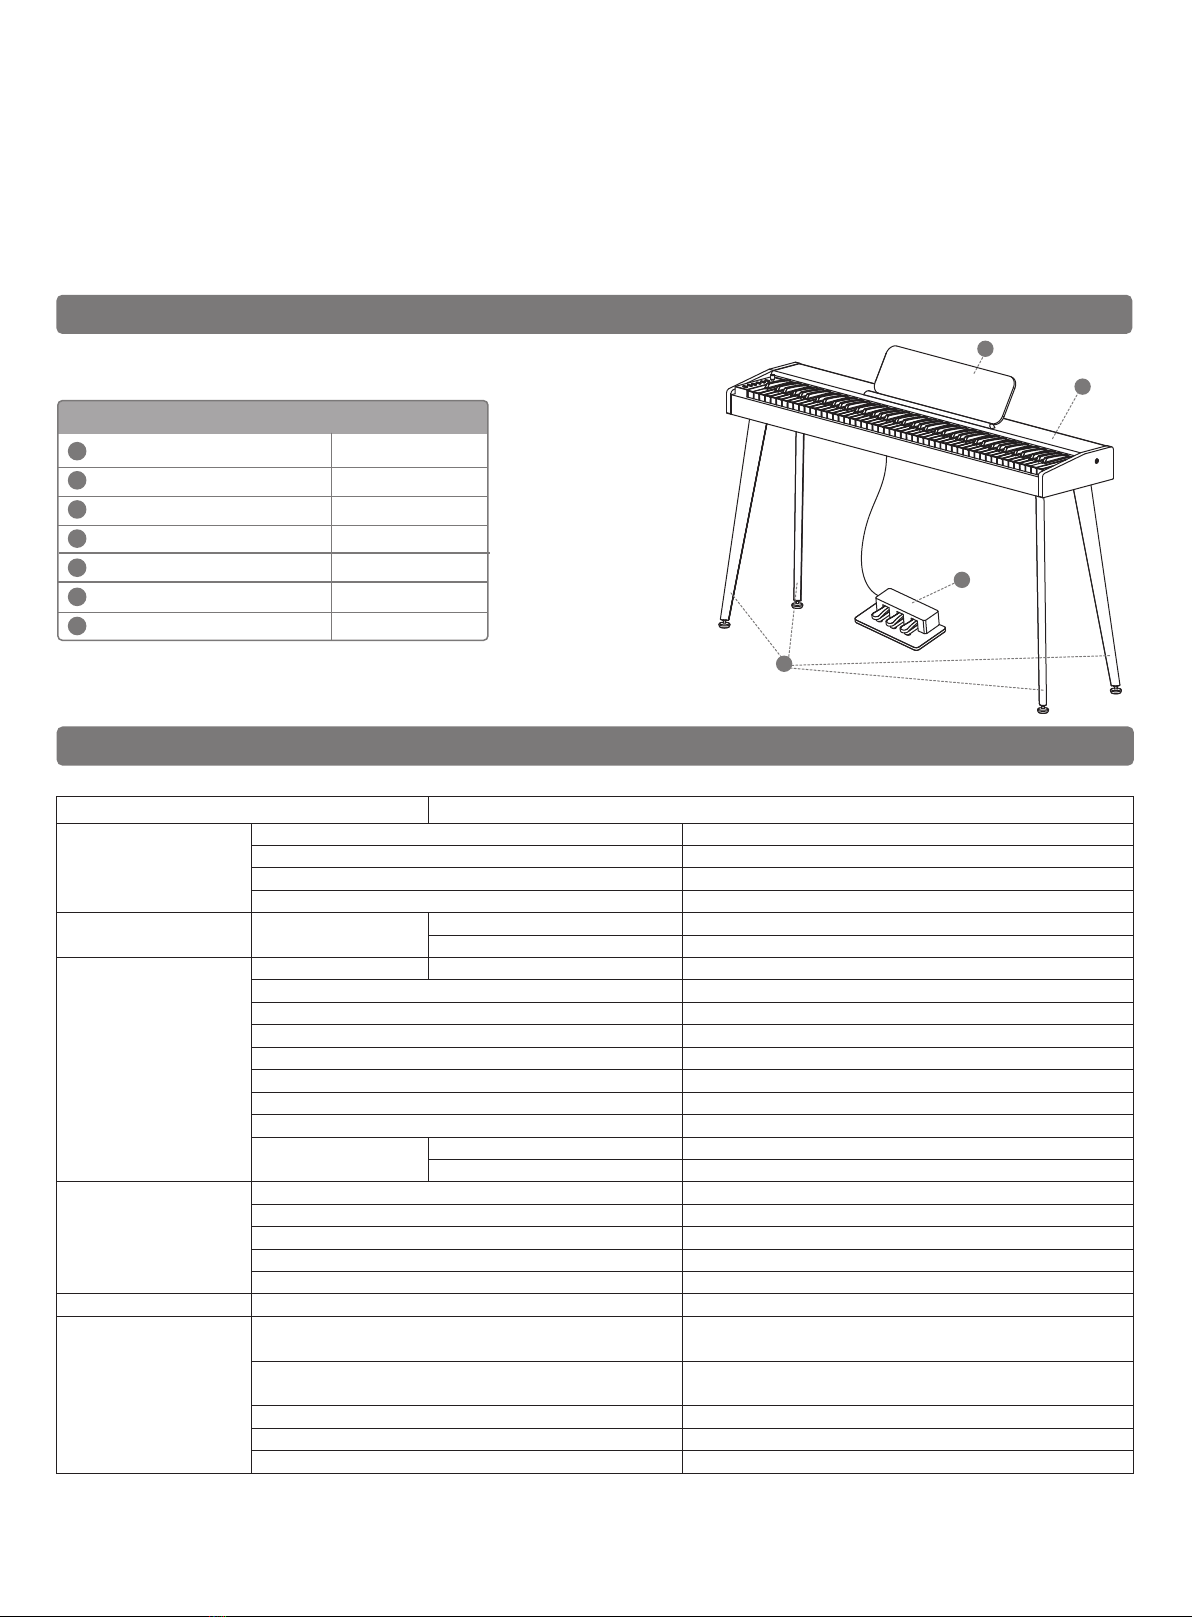
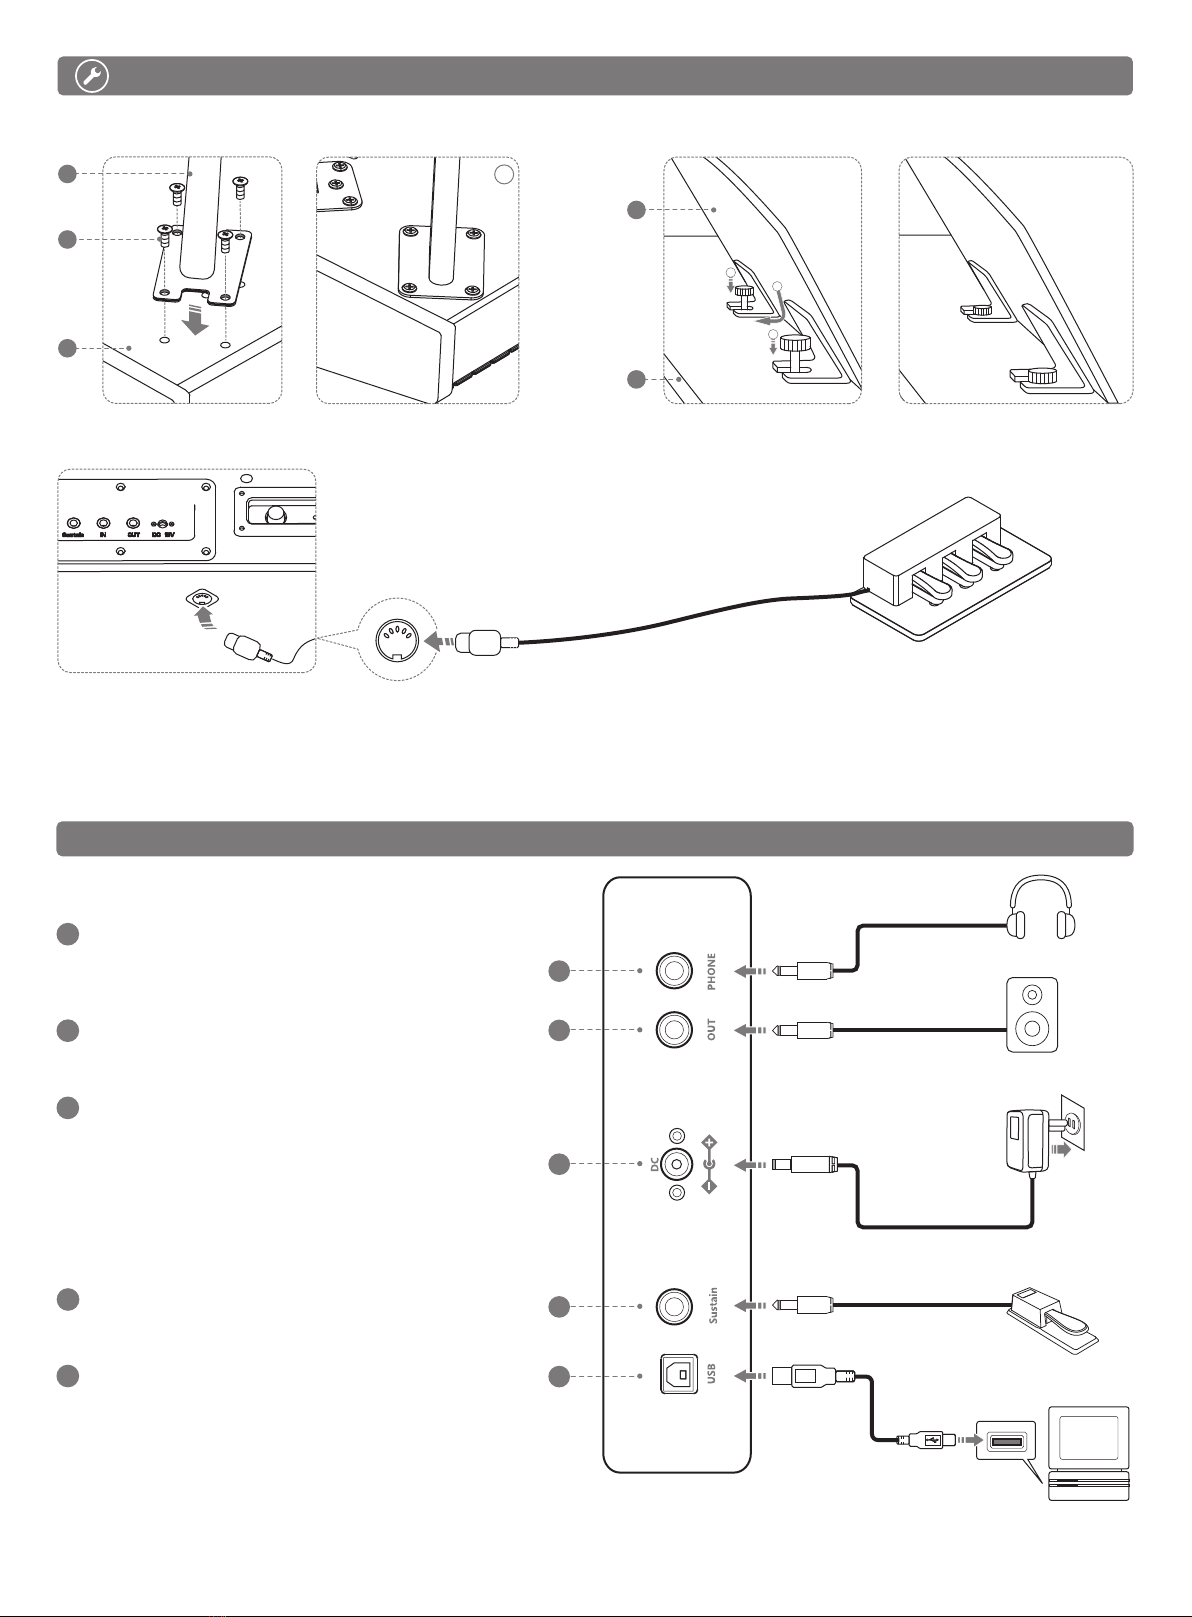
Power Supply Socket
●Handling and transportation
- Never apply excessive force to the controls, connectors, or other parts of the instrument.
- Grab the plug firmly while unplugging the cables, never pull the cables with force.
- Disconnect all cables before moving the instrument.
- Shocks caused by dropping, bumping the instrument, or placing heavy objects on top of it, can result in
scratches and even more severe damages.
●Placement
- Please do not place this product on an uneven surface or any other unstable place so as to avoid any
falling damage.
●Interface
- The interface of this product can only be connected to the specified equipment and devices.
The connection of non-designated equipment or devices has the risk of fire and electric shock.
●Plastic Bag
- Keep the plastic bag away from children to avoid suffocation
●Volume
- Do not use the instrument at high volume for long periods of time. A high volume may damage your
hearing.
●Clean
- Please remove the power cord from the wall outlet before cleaning this product so as to avoid the danger of
fire and electric shock.