DP Audio Video DP434 User manual

TOUCH SCREEN USB/SD 4.3 TFTLCD DVDPLAYERTOUCH SCREEN USB/SD 4.3 TFTLCD DVDPLAYER MADE IN CHINA
DP434
User Manual
Designed in theUSA
-+
ADJ EJT
BAND
MENU
DP VideoDP Video
SD
DP434
DVD

Positioning the Display
Eject discs
1
Receiption connection
Speaker connection
Warning and Precautions.........................................2
Wire Connection......................................................4
Loading and Replacingthe battery
Basic operation
Install the unit
Remove the unit
Install.....................................................................5
Controls and Elementsof the Unit............................6
Remote Control.......................................................7
Setup Operation.....................................................10
Basic Operation......................................................9
Basic
Audio
V ideo
Band
Band tuner
AS/PS
Radio Operation.....................................................11
Accessories.........................................................20
Specifications.....................................................26
Troubleshooting...................................................21
Familiar characters and their meanings
General problems
TFT Monitor
Radio Tuner
MP3 playback
DVD player
TV tuner...............................................................19
Play Operation......................................................12
Bluetooth............................................................ 16
Contents
Caption choose/Choose angle/Volume Control/Jpeg/
Picture rotation/Zoom Out
MP3 playback/Media fileformat switch/Pbc/
Audio track switch
Repeat/USB mode/SD mode
DVDplayback/VCDplayback
Numeric keyboard/Title/Back/Mpeg4

2
Warnings and Precautions
Warnings
Only connect theunit to a12V power supplywith negative grounding.Do not use24V power
such as thatused in manytrucks.
distract
To prevent electronicsparks or fires never expose theunit, amplifier, or speakersto moisture orwater.
you experience anyof the following
Not all Bluetoothdevices are compatible,and not allBluetooth devices haveall Bluetooth
fatures, so yourBluetooth-enabled cell phonemay not workwith this unit.
Never install theunit where itcan the driver fromdriving safely.
Do not watchvideos (except rearviewcamera) while driving;it is illegaland increases therisk of
traffic accidents.
,
Do not changethe fuse inthe power cordwithout professional guidance.Using an improperfuse
may cause damageto the unitor start afire.
Power off the unit at once and send it back to the after-sales service center orthe dealer/
distributor you purchasedfrom if :
(a)no audio output,(b)no image output,(c)water or otherobstacle enters theunit, (d)smoking;
(e)peculiar smell.
Keep the volume at asafe and comfortablelevel.

3
't work aftera few hours,please contact with
after-sales servicecenter.
Never disassemble or the unit withoutprofessional guidance. For details, please consult a professional car shop/
dealer.
If the frontpanel or displayis dirty, use a clean silicone cloth and neutral detergent .
Using a roughcloth and non-neutraldetergent such asalcohol for cleaningmay result inscratching or discolorationto the unit.
If please refer totrouble shooting sectionof this manual.
If you haveparked the carin hot orcold weather fora long time,please wait untilthe temperature inthe car becomesnormal
before operating theunit.
Using in-car heaterin low temperatureenvironment may inside the unit.DO NOT usethe unit inthis
situation, eject thedisc and wipeoff the beadon the disc.If the unitstill doesn
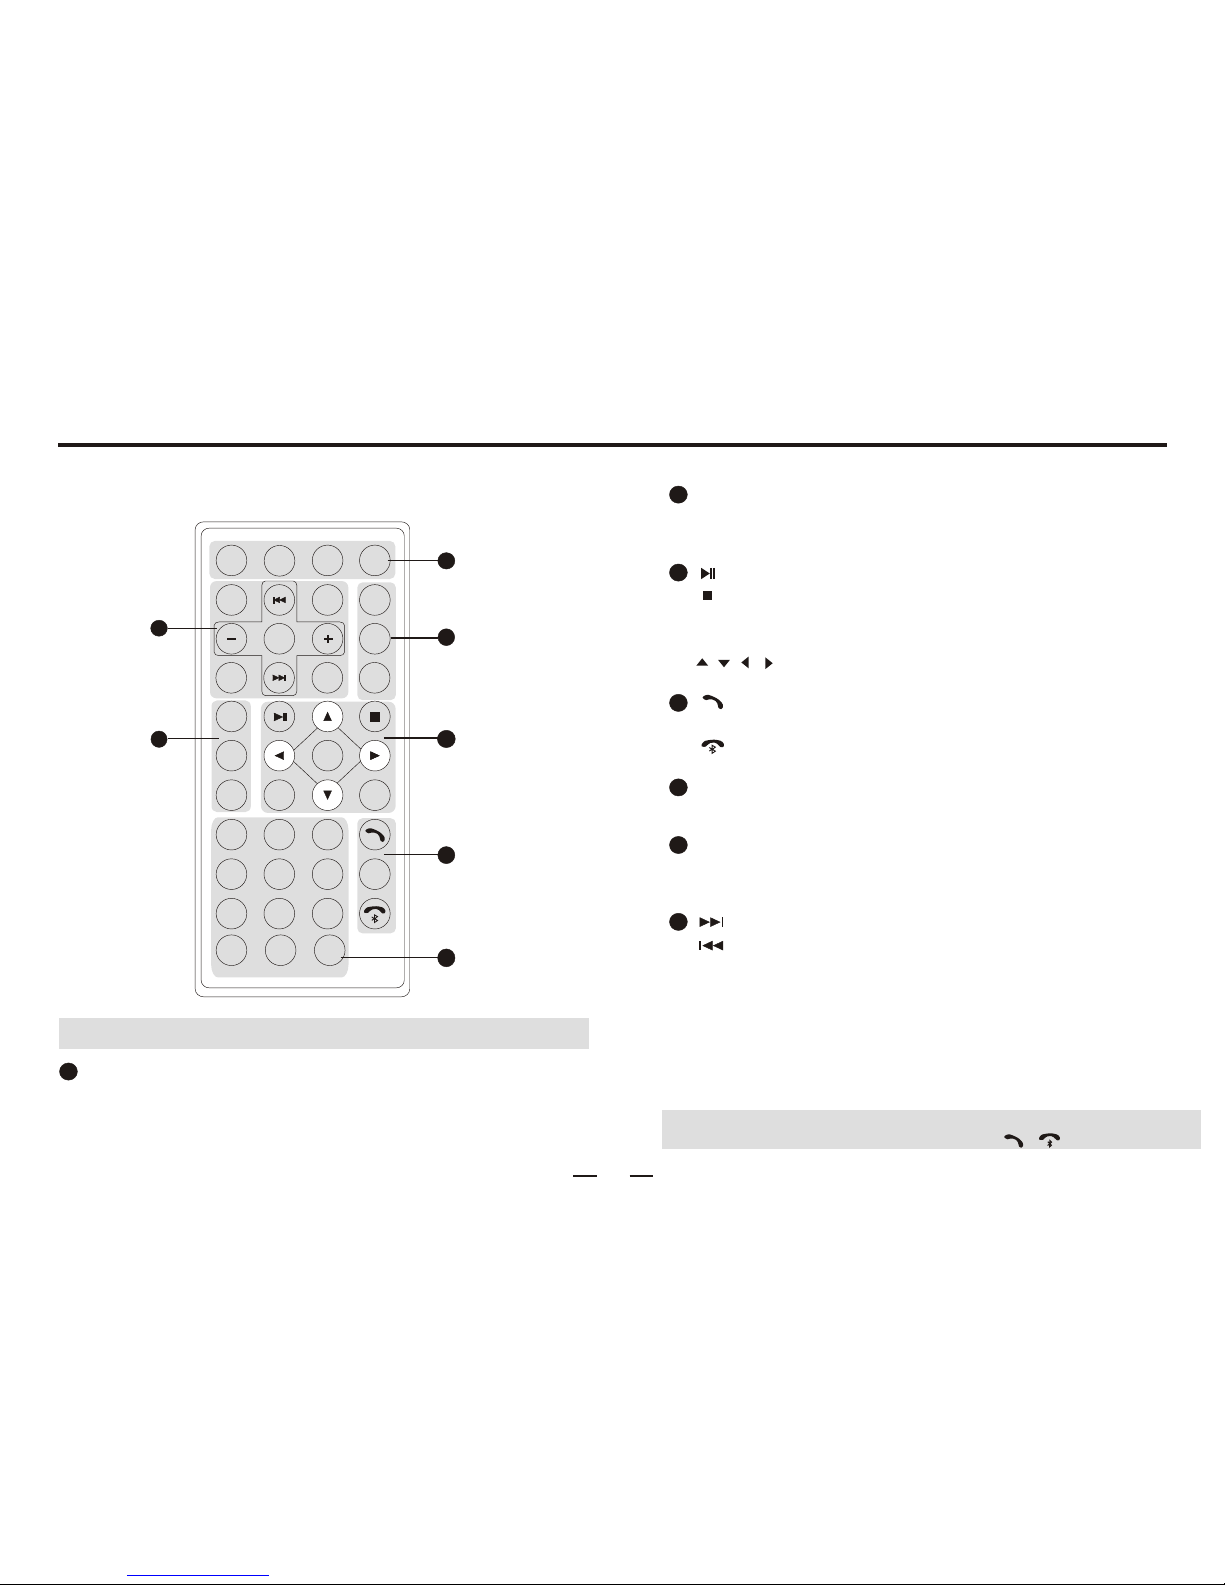
During operation ofthe unit, if" " isdisplayed, that operationis unavailable
service
and wipe anymoisture off thedisc
the unit malfunctions,
form condensation
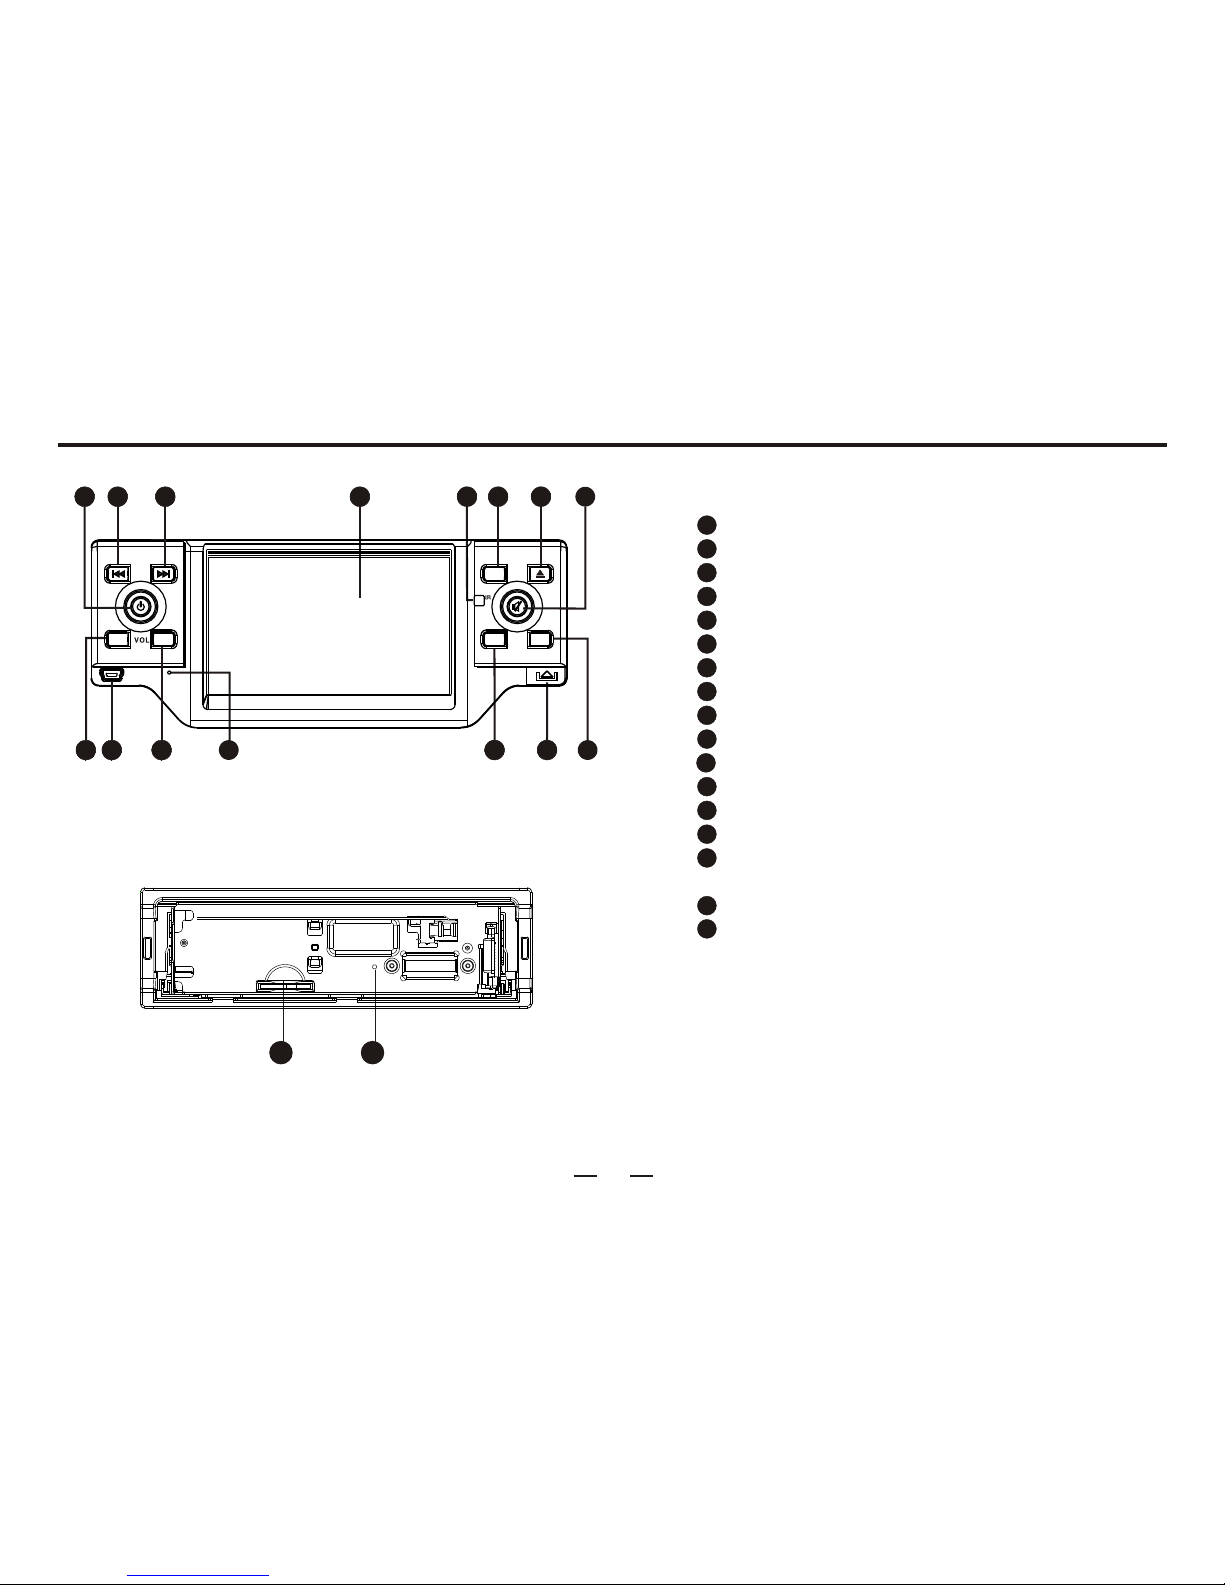
To prevent damageto the unit,avoid hard impacts to the display when it is in the open position.
To prevent damageto the display, avoid touching it with sharp objects.
The display hasits own motor. To prevent damageto that motor, do notpush, pull, orswivel the displayby hand.
Operate the unitaccording to themanual to preventdamaging the unit.The warranty willbe void ifproblems are
caused by improperuse.
Precautions
Warnings and Precautions

4
Wire Connection
1
[BLUE][BLUE]
[RED][RED]
[YELLOW][YELLOW]
[ORANGE][ORANGE]
+12V
[]BLACK[]BLACK
FRONT.L
White
White/Black
FRONT.R
Gray
Gray/Black
Green
Green/Black
Purple
Purple/Black
DIMMER
Ground wire
Battery wire
ACC wire
Connect control for antenna
Ignition key
swtich
Car fuse box
(main fuse)
Battery
REAR.
L
REAR.
R
WHITE
RED
YELLOW
Remote control for amplifier
Radio ANTENNA
[PINK][PINK]
Connect to Switched Side of Parking Brake Circuit(-)
PARKING-
REVERSE [GREEN/WHITE][GREEN/WHITE]
RED
WHITE
AUX RIGHT IN
VIDEO OUT
[BLUE/WHITE][BLUE/WHITE]
External Power
Amplifier
AUX LEFT IN
VIDEO IN
BACKUP CAMERA
VIDEO INPUT
Fuse (10A)
YELLOW
YELLOW
Connect DLink or
any other External
AV System
FRONT LEFT RCA OUT
SUBWOOFER
FRONT RIGHT RCA OUT
BROWN

55
Install
Before installing thereceiver,find the mostsuitable place forit in yourcar.Make the necessaryspeaker and electricalconnections.
Once your receiveris connected properly, follow the installation instructions.
INSTALL THE UNIT
Insert the keysinto the smallgaps in theright
and left sidesof the unitat the sametime. Once
the keys catchthe unit, gentlypull out theunit,
and then disconnectthe wiring.
REMOVE THE UNIT
Installation bracket
The installation hole with bracket
Figure 1
Figure 3
Figure 2
1.Use the twokeys to removethe bracket
from the unit,as in Figure(1).
2.Put the bracketinto the installationspace.
3.Bend the tabsto secure thebracket, as inFigure (2).
4.Put the unitinto the installationspace via thebracket,
until the unitis fixed well,as in Figure(3).

6
Controls and Elements of the Unit
1
2
3
4
5
7
6
8
9
10
11
12
13
14
15
16
17
Panel ejection button
Menu button
Mute button
Disc eject button
Position adjustment button
Remote control sensor
The display
Next or forwardbutton
Backward or previousbutton
Power button for the display
Reduce volume button
USB port
Increase volume button
The microphone
Band button forswitching between collections
of radio presets
SD card slot
The reset button
87
21
15
34
5
6910
11 12 13 14
--++
ADJ
BAND
MENU
17
16
RESET

7
Remote Control
[BAND] Button: Bandswitch
[APS] Button: Scan
[ST/RPT] Button: Stereoswitch/Repeat
[ ]Button: Play/Pause
[ ]Button: Stop
[Title] Button: Title Menu
[ENTER] Button: Play/Confirm
[ ][ ][ ][ ]Button: Up/down/left/rightbutton
[0~9]Button:0~9
[RO/SN] Button: Radioscan
[AF] Button: Searchstations automatically
[TA] Button: Traffic broadcast
[PTY] Button: Programstyle
[ ]Button: Forward/Next chapter
[ ]Button: Backward/Previouschapter
[+/-]Button: Increase/reduce volume
[SEL] Button: Systemsetting
[CLK] Button: Clockdisplay
[EQ] Button: Soundeffect
[R.L/LANGUAGE] Button: Left/right sound trackswitch
dialogue language.
[PWR] Button: Power
[REC/Sub-T]Button: Transfer recording/Language switch
[MUTE] Button: Mute
[SRC] Button: Playsource switch
Note: Picture of Remotefor reference
Note: If this unit doesn't have RDS function, AF/TA/PTY buttons are invalid.
If thisunit doesn't havebluetooth function, [ ]/[ ] buttonsare invalid.
1
2
3
4
5
6
7
[ ] Button:Ring on
[OSD/ Id3] Button:Screen Display/ Id3information
[ ] Button:Ring off
5
1
3
4
2
MuteMute
Sub-TSub-T
BandBand
APSAPSAPSAPSAPSAPS
EQEQEQEQ S TS T
R/LR/L
SRCSRC
PWRPWR
112233
445566
778899
00
EnterEnter
SELSEL
CLKCLK
TitleTitleTitleTitle
AFAF
TATA
PTYPTY
RPTRPT
PBCPBC
OSDOSD
I D3I D3
##
ABCABC DEFDEF
GHIGHI JKLJKL MNOMNO
PQRSPQRS TUVTUV WXYZWXYZ
RO/SNRO/SN
10+10+
**
LanguageLanguage
7
6
RECREC

Pull out
Loading and replacingthe battery
Remote Control
8
Notes for usingthe remote control:
DO NOT storethe remote controlunder direct sunlight
or in hightemperature environment, orit may notfunction
properly.
The battery canwork for 6months under normalcondition.
If the remotecontrol doesn't work,change the battery.
DO NOT recharge,disassemble, heat orexpose the battery
to fire.
Insert the batteryin proper directionaccording to the
The remote controluses infrared signals,not radio signals,
so you mustaim the remoteat the unitwhen using it.
If the batterywill not beenused for amonth or longer,
then remove thebattery from theremote control orinsert
a battery insulator.
Only use thelithium, button cellbattery CR-2025.
Store the batteryout of thereach of childrento avoid
accidents. Should achild swallow abutton cell battery,
seek medical attentionimmediately!
(+)
and ( -) poles.

9
Basic Operation
Positioning the Display
Press [ADJ] buttonone or moretimes to positionthe screen intoany
of its threepossible positions. When in the thirdposition,
pressing ADJ willcycle the display back through its
positions.
Youcan always returnthe display to its original positionby pressing
and holding theADJ button.
CAUTION
Do not put anythingon the screen, or impose undue force.
Do not forcefully movethe screen .
The display's range ofmotion may be limitedby the car orthe
way the unit was installed.
Adjust Angle
The front panelmust be downto
either insert oreject a disc.
When the panelis down, youcan
insert discs bygently sliding them
into the loadingslot, and eject
them by pressing the EJECT button.
Disc slot
If you ejecta disc, butdo not removeit from theslot
within 10 seconds,then the unitwill pull thedisc back
into the unit.The EJECT buttononly functions when
the front panelis down.

10
Setup Operation
How to Configure Options
1. Press [SETUP]on the remotecontrol, or touchthe
[SETUP] icon onthe unit.
2. Touch Basic, Audio, or Video to enter their respective
menus.
3. Once ina menu, touchthe up ordown arrows toselect
a setting.
4. With the setting highlighted, pressthe [+] or[ ] buttons
to change asetting.
Setting Descriptions
Basic Setup Menu
Loud: Increases thevolume of softersounds to makethem
easier to hear. Does notaffect sounds thatare already loud.
Beep: Determines whetherthe unit makesa beep sound
when a buttonis pressed.
Topic: Changes thescreen theme
Video Setup Menu
STAN USER
BRIG SOFT
Audio Setup Menu
Audio setup: Bass Treble Balance Fader setup
between 7.
+
The EQ settingchange the overallsound of theplayback
to make differenttypes of musicsound better. ROCK is
for rock music,POP is forpop music, CLASis for orchestral
music, and NORMresets the frequencies.
Brightness sets thebrightness of thedisplay on ascale of
1 to 30.The higher thenumber,the brighter thedisplay.
Color changes thecolor saturation ona scale of1 to 30.
The higher thenumber,the higher thesaturation.
Mode: choose standard,user define, brightor soft.

11
BAND
FM1 FM2
AM1AM2
FM3
Radio Operation
Changing Frequencies
Manually Tune
Press[ ] toadjust to ahigher frequency.
(such as 87.50,87.60...)
Press[ ] toadjust to alower frequency.
(Such as 105.50,105.00...)
Automatically Tune
Hold the [ ] button toautomatically tune intothe next
available radio stationup the band.
Hold the [ ] button toautomatically tune intothe next
available radio stationdown the band.
Note: If the unitdoesn't have RDSfunction, it won't
show "AF, TA and PTY" onthe touch-screen. Press C01, C02,C03, C04, C05,or C06 onthe display to
select that channelpreset.
AF TA PTY
A band is simply a group of six radio station presets. The unit has
three FM bands, and two AM bands.
Touch the wave band on the display to cycle through the bands in
the following sequence:
Preset Channels

12
After inserting a DVD/VCD/CD , the touchscreen will display
the following:
Play Operation
T 001/003 TITLE
C 002/025
BACK
REP
00:33:11/01:45:44
DVD-V
OFF
1/2
BACK
REP
00:33:11/01:45:44
DVD-V
OFF
T 001/003 TITLE
C 002/025
BACK
REP
00:33:11/01:45:44
DVD-V
DVD features, suchas the main movie and behind-the-scenes
featurettes, are considered"titles". In turn, each title comprisesone
or more "chapters".You can navigate titles and
chapters by touchingthe title status or chapter status on the screen,
as illustrated below:
T 001/003 TITLE
C 002/025
BACK
REP
00:33:11/01:45:44
DVD-V
TITLETITLE
BACKBACK
MPEG4MPEG4
Title Column Chapter Column
When you toucheither status, a numeric keypad appearson the screen.
Touch the numberbuttons to show that title orchapter.
Touch OK toexit from the numeric keyboard.
When playing a DVD, touch [BACK] on the display to go back to the Media
Player menu.
Navigating DVDs
In play mode, press [TITLE] on the display or remote control to get back
to the title menu.
Playing MPEG4 discs is the same as playing DVDs.

OFF
OFF
OFF
1/3
1/3
Caption choose
If the disccontains several subtitleor "caption" languagesyou
can switch thecaption.
Angle choose
Volume Control
13
Play operation
Picture rotation
ZOOM OUT
Touch [ ]on the displayto rotate the picture
JPEG
Insert JPEG disc, the screen will show thefollowing menu:
Note: Please referto DVD disc play for theoperation of otherfunctions
Touch [ ]on the displayto zoom in orout of apicture.
Youcan choose themedium to play by touching itsicon on the
touchscreen. You can also configure disc play.
If a DVD features multiple camera angles, you can view the different
angles by touching[ ] or pressing [ANGLE] button on the
remote control.
Touch [ ] to switch between STEREO, and LEFT RIGHT.
When you touchthe title column/chapter column, the sub-menu
will show upon the screen.
F 011/014 4915X2644
T 008/008
001.JPG
BACK
REP
001 001.JPG
001
PHOTO
002 002.JPG
003 003.JPG
004 004.JPG
005 005.JPG
BACK
MEDIA
F 011/014 4915X2644
T 008/008
001.JPG
BACK
REP
Title Column Chapter Column

001
MUSIC
001 001 .MP3
002 002 .MP3
003 003 .MP3
004 004 .MP3
005 005 .MP3
BACK
MUSIC
NONE
FILE NAME: 004 004.MP3
ALBUM: NONE
00:00:30/00:04:12
REPEAT BACK
PLAYING
001 TRACK01
001 CD
MUSIC
002 TRACK02
003 TRACK03
004 TRACK04
005 TRACK05
BACK
MUSIC
CDDA
TRACK01
00:00:30/00:04:12
REPEAT BACK
PLAYING
MEDIA
PBC
14
Insert MP3 disc, the screen will showmenu as follows:
Insert CD disc, the screen will showmenu as follows:
Play/pause: Touch [ ] to play or pause.
Play operation
When playing CD/MP3disc, touch [ ] on thescreen or press
[ ] onthe panel to choose the previouschapter; touch [ ] on
the screen orpress [ ] on the panelto choose thenext chapter.
MEDIA file formatswitch
If the discincludes more thanone type ofmedia files, such
as both jpegimages and MP3files, press [MEDIA]to view
or play theother file type.
When playing VCDdisc, touch the words on thetop right cornerto
switch among STEREO, LEFT, and RIGHT.
Audio track switch:
PBC is a menu system used on some video discs that
allows you toselect what toplay instead ofplaying the disc
from beginning toend.
When playing VCDdisc, click [PBC]
on the screento switch themode among ON/OFF/CANCEL
In the abovemenu, you can select the songand touch iton the
screen to playit directly.
Touch [ ][ ] to browsethe available songs.

USB/SD operation
15
RESET
SD
REPEAT
T 001/003 STEREO
PBC
BACK
REP
00:33:11/01:45:44
VCD
Play operation
USB mode
SD mode
When you plugin a USBdrive, the system will enter intoUSB mode
automatically.
For detailed operation information, please refer to MP3play/DVD
play/JPEG play/VCD play.
When you insertan SD card,the system will enter into SDmode
automatically.
For detailed operation information, please refer to MP3play/DVD
play/JPEG play/VCD play.
USB
--++
ADJ
BAND
MENU
When playing aCD/MP3 disc, click [REPEAT] on the screen to
determine what willbe repeated: a single TRACK, nothing (OFF),
the FOLDER, orALL the media files.
When you inserta VCD disc, the following appearson the display:

BT Choose
16
Bluetooth
Follow these steps to setup phone pairing:
1. Turn on Bluetooth,then touch On/Officon to turn
on this function.( 2)
2. Turn on the Bluetooth function on your cell phone.
3. When themobile phone setfinds the signal,input
pairing number. Initial Pairing Code No. 0000
4. After pairing,the screen willshow "Pairing Succeed" and
"Quit Pairing".
Figure
BLUETOOTH-ON
PASSWORD-0000
PAIRING
Pairing
Working mode of Bluetooth
Choose the Bluetoothmode
Touch Bluetooth iconon the mainmenu to enter into Bluetooth mode
Calling History
Figure 1
Figure 2
Bluetooth has thefollowing functions:
Paring: pair the bluetooth module with the cellphone
Connecting:after the unitis connected withthe cell phone,
you can operatethe cell phonevia the unitin bluetooth mode
such as dialcalls, receive callsor view thecall history.
Hands free feature:touchrelevant icon onthe screen to
answer the phone,dial the phoneand re-dial
Touch [ ]on the screento view alist of missed,dialed,
and answered calls.
Different cell phoneshave different Bluetooth features, and
because there aremultiple versions of Bluetooth standards, notall
Bluetooth devices arecompatible. As such, your cell phonemay
not work withthis unit.

17
Bluetooth
Making a phonecall
After connecting the bluetooth of the cell phone with the unit,
you can make a phone call through the remote control, touch
screen, or recorded phone numbers i .n the history list
When making a phone call, the[ ]will be .
Input the numberson the screen,press the [ ] icon tocorrect
;
Press [ ]icon to answera phone cal.
Press[ ] iconto cancel orhang up.
lit
typos
Answer the phone call
Hang up
Youcan press the[ ]button tohang up.
C
The answering featuresare as follows:
After the Bluetoothpairing is completed,the cell phone
function can beoperated through theunit
When you receivea call, theunit will automaticallydisplay
the caller's phonenumber.
Touch the [transfer] icon to switch to phone answering mode
(answer calls fromthe phone).
Touch it againto switch backto the unitanswering mode
(answer calls fromthe unit).

A2DP is asubsidiary function toBluetooth. After thephone
paired with theunit successfully, click A2DPicon on themain
menu to enterinto A2DP interface,then you canoperate your
cell phone viathe unit, suchas pause asong, play asong,
previous, next. Asin figure:
18
Note: Before pairingwith the unit,A2DP is invalid.In addition,
because different mobilephone use differentBluetooth module
and software, soA2DP feature maynot work wellor at all.
A2DP operation
Bluetooth

19
Press [ESC], toexit TV andreturn to mainmenu.
These icons onlyappear on touchablescreen,and may
not be afunction of yourunit.
TV tuner
TV operation
Selecting stored Channels:
Exiting the TV function:
To access astored channel directly, type thechannel using
the remote control.
For example: press [0] and[8], to play8 channel.
Press[ ][ ]on the remote control or touch [CH-][CH+]
to choose the previous or next channel.
A TV antenna must be installed to use the TV function.
Touch the TV icon on the main menu to watch TV.
Press [AMS] tohave the unitautomatically scan the
TV spectrum, discoverchannels, and storethem.
Automatically discover and store channels
Table of contents
Other DP Audio Video Car Video System manuals

DP Audio Video
DP Audio Video DP351X User manual

DP Audio Video
DP Audio Video DP318AP User manual

DP Audio Video
DP Audio Video DP301BL User manual

DP Audio Video
DP Audio Video D352XB User manual

DP Audio Video
DP Audio Video DP311X User manual

DP Audio Video
DP Audio Video DZP905 User manual

DP Audio Video
DP Audio Video DZP903 Quick start guide

DP Audio Video
DP Audio Video dbd807nav User manual