manuals.online logo
Brands
  1. Home
  2. •
  3. Brands
  4. •
  5. dreambaby
  6. •
  7. Lock
  8. •
  9. dreambaby Mag Lock User manual

dreambaby Mag Lock User manual

Other dreambaby Lock manuals

dreambaby MAG LOCK L855 Operator's manual

dreambaby

dreambaby MAG LOCK L855 Operator's manual

dreambaby ADHESIVE MAG LOCK F855 User manual

dreambaby

dreambaby ADHESIVE MAG LOCK F855 User manual

Popular Lock manuals by other brands

Magic 105 manual

Magic

Magic 105 manual

Gantner GAT NET.Lock 7020 System Installation, configuration & operation

Gantner

Gantner GAT NET.Lock 7020 System Installation, configuration & operation

Dorma Studio Classic Installation instruction

Dorma

Dorma Studio Classic Installation instruction

Securam ECSL-601 quick start guide

Securam

Securam ECSL-601 quick start guide

Sudhaus 3003 operating manual

Sudhaus

Sudhaus 3003 operating manual

Safety 1st 48517 user guide

Safety 1st

Safety 1st 48517 user guide

Pado FDS-10 user manual

Pado

Pado FDS-10 user manual

Esco systeQ Series installation instructions

Esco

Esco systeQ Series installation instructions

COMPX National D8951 instruction sheet

COMPX

COMPX National D8951 instruction sheet

secureo Key Box instruction manual

secureo

secureo Key Box instruction manual

Stock Loks C8713 instruction sheet

Stock Loks

Stock Loks C8713 instruction sheet

COMPX 1T-058 Information

COMPX

COMPX 1T-058 Information

Auslock T11 user manual

Auslock

Auslock T11 user manual

Stealth SAFES ShadowVault Instructions & Troubleshooting

Stealth SAFES

Stealth SAFES ShadowVault Instructions & Troubleshooting

Knox KeySecure 5 Admin & user guide

Knox

Knox KeySecure 5 Admin & user guide

Kwikset 48334/01 Quick installation guide

Kwikset

Kwikset 48334/01 Quick installation guide

Metra Electronics Door Access Terminal Combo Technical manual

Metra Electronics

Metra Electronics Door Access Terminal Combo Technical manual

Kilitronik miniK10m operating manual

Kilitronik

Kilitronik miniK10m operating manual

manuals.online logo
manuals.online logoBrands
  • About & Mission
  • Contact us
  • Privacy Policy
  • Terms and Conditions

Copyright 2025 Manuals.Online. All Rights Reserved.

F150 Rev. A
MAG LOCK®
Magnetic Locking System
Components (Mag Lock® Key not included in F153 or F154)
A. Installation Templates D. Mag Lock® Key F. Disengaging Clip
B. Mag Lock® E. Plunger Pin G. 12mm (1/2 in) Screws
C. Catch
Door Thickness
Door Thickness
12 to 15mm (1/2 in to 5/8 in)
15 to 28mm (5/8 in to 1-1/8 in)
CAUTION: This product contains very powerful magnets.
Do not place near CREDIT CARDS, CD’s, VIDEOS, TAPES etc.
When installing MAG LOCK® or when it is in use,
ensure that it does not make contact or come close to
electrical sources, wire mesh racks, or metal canned goods.
Plunger
Pin
Disengaging
Clip
Lock
Configuration
not drawn
to scale
12 to 15mm (1/2 in to 5/8 in)
15 to 28mm (5/8 in to 1-1/8 in)
A B C D E F G
Lock Configuration
(refer to diagram to right)
Omit Plunger Pin
Use Plunger Pin
Please keep instructions for future reference.
Dreambaby
®
products by
Tee-Zed Products Pty Ltd, PO Box 2022, Bondi Junction NSW 1355
Australia Tel: (02) 9386 4000
Tee-Zed Products (N.Z.) Ltd, PO Box 64013, Botany Town Centre Auckland
New Zealand Tel: (09) 274 8788
Tee-Zed Products Ltd, PO Box 29227, Dunfermline, KY12 2DN
United Kingdom Tel: +44 (0)844 800 9445
info@tee-zed.co.uk
Made in Dongguan, China.
©2014 Tee-Zed Products Pty Ltd
info@tee-zed.com.au
www.maglock.com.au
www.dreambaby.co.uk
www.dreambaby.com.au
facebook.com/Dreambabysafety
Look for the Dreambaby
®
range of Child Safety and Care Products.
Tee-Zed acknowledges that its customers may be entitled to statutory consumer guarantees and does not seek to exclude or limit them. These
guarantees include that Tee-Zed’s products are of acceptable quality. This Tee-Zed product is for the specific purpose detailed in the
instructions and packaging and Tee-Zed considers use outside of that purpose to be abnormal use. To the maximum extent permitted by law,
Tee-Zed does not accept any liability for damage:
• arising from abnormal use of the products;
• caused by installation or removal of the products other than in accordance with the supplied installation and removal instructions; or
• arising under the law of tort or contract.
For cabinet doors thicker than 28mm (1-1/8 in), please
email us at info@tee-zed.com.au
B
Tools required for installation
• #1 Phillips Head screwdriver • Hand/Cordless drill (non-electric)
• Sharp pencil or nail • 7mm (9/32 in) drill bit
• Optional 1.5mm (1/16 in) drill bit
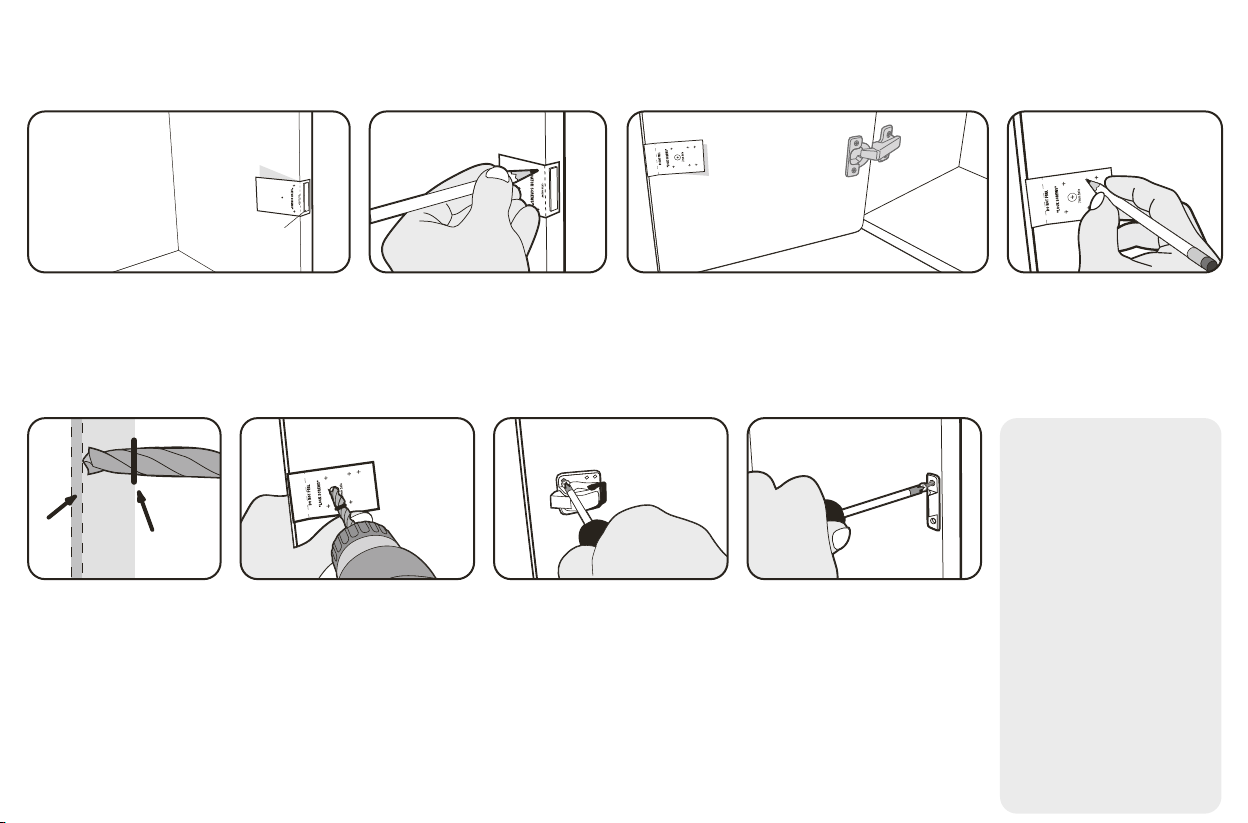
A – Inside cabinet
Figure A & B
• Decide on the best position for your Mag Lock
®
. (Installation will depend on your cabinet and drawer
construction, as possible mounting positions will vary from style to style).
• Peel the narrow adhesive backing strip from the Installation Template “Lock Screws” side.
• Position the Template (as shown in A) on the cabinet wall or drawer cabinet wall and use sharp
pencil or nail to mark “Catch” hole locations (2 arrows).
• Now peel backing from foam tape.
Installation steps Read all steps before starting.
The templates have been designed to help you install your Mag Lock
®
in most standard cabinets
and drawers (both top and bottom drawers). It is recommended that, before any holes are drilled,
you confirm the best place for your lock.
Foam tape
D
C
Figure C & D
• Close door firmly and fully onto the foam tape.
• Some cabinets have rubber pads in the corners. Remove these for this step and then reinstall.
• This will transfer the Template to the correct location on the inside of doors or drawers.
• Open the door, hold Template steady and mark 4 “Lock Screw” locations (4 arrows).
F G HDisengaging Clip
• The Disengaging Clip will allow
the Lock to be de-activated for
extended periods of time.
• Always be sure to reactivate
the Lock by pushing the
Disengaging Clip down again.
• Install the Disengaging Clip in the
hole on one side, with ‘UNLOCK’
letters up, then straddle the lock
housing and position on the
opposite side. This Clip is not
meant to be overstretched.
Test that Disengaging Clip has
been positioned correctly or
it may need to be reversed.
• If not intending to use the
disengaging facility, it is not
necessary to install
Disengaging Clip.
• However, keep Disengaging Clip
and store in a safe place, out
of reach of children.
Figure E & F
USE CAUTION. DO NOT DRILL ALL THE WAY THROUGH DOORS OR DRAWERS.
• Measure the door/drawer thickness and make a mark 3mm (1/8 in) less than
the door/drawer thickness on the 7mm (9/32 in) drill bit (E).
• DRILL WITH CAUTION:
Start drilling carefully into 7mm (9/32 in) hole on Template (F) and ensure
to stop drilling at mark drawn on drill bit.
The drilled hole will now be 3mm (1/8 in) from the front of door/drawer.
• The hole must be clean and free from all debris.
Figure G & H
• Refer to ‘Door Thickness’ table & diagram on front page,
to see if plunger pin is required.
• Match “Catch” over the 2 holes where previously marked (A). Install 12mm (1/2 in)
Screws (Drill holes with hand/cordless drill-optional using 1.5mm (1/16 in)
drill bit). Screw in loosely so adjustment can be made later if required. Match
Lock into 7mm (9/32 in) hole and align over the 4 holes (B) marked previously
and screw into place with four 12mm (1/2 in) Screws.
• A pair of auxiliary holes is provided for use if necessary.
• Close door and open using Mag Lock
®
Key.
• When catch is properly positioned, screw firmly into place.
E
3mm (1/8 in) less
than door thickness
3mm
(1/8 in)