DS Maref MEDIRENT CTC-7 User manual

Indicaons for safety use
CTC-7
User Manual
Indicaons for safe use
This is a medical device. Please read this manual
carefully and follow instructions at all times.

1. Introducon
.........................................3
2. Warnings
..............................................4
3. Cleaning, Operang and Storage
Condions
............................................. 10
4. Product Descripon
...................... 12
5. Installaon
........................................ 18
6. How to Use
...................................... 20
7. Cleaning and Draining
................. 27
7. Storage
............................................. 30
8. Troubleshoong
............................. 31
9. Informaon on EMC
.................... 34
10. Symbols informaon
.................. 37
11. Warranty
....................................... 39
Contents
This user manual species the procedures required for properly using, storing and
repairing this device. In addition, it species the instructions that must be followed to not
only prevent injury to users and other people, but also to avoid damage to the device. Read
and follow the instructions specied in this user manual prior to safely using the device.
1. Introducon
Introducon
Intended Use
The purpose of the CTC-7 system is to provide local thermal therapy of cold, heat, and
rapid contrast therapy (RCT). It is intended to be used for acute injury post-operatively or
post-trauma to reduce swelling, oedema, and pain.
This device is suitable for people 12 years and over.
Side Eects
Heat Therapy • Burns
• Skin discolouration or irritation
• Increased pain
• Increased inammation
• Increased swelling
• Increased redness
Cold Therapy • Cold burns
• Cardiovascular effects (bradycardia)
• Nerve and tissue damage
• Slowed wound healing
Contrast Therapy • Heat or cold burns
3

MEDIRENT.COM.AU © 2021
2. Warnings
Contraindicaons Precauons
Heat Therapy
and/or Contrast
Therapy
• Vascular dysregulation
• Vascular ischaemic disease
• Venous or arterial occlusive disease
• Acute inammation of the veins
• Local malignancy
• Acute inammatory skin disease or infection
• Conditions where venous or lymphatic return is not desirable
• Local or systemic active infection
• Acute unstable fractures
• Hypoesthesia, sensation impairment, numbness
• Acute trauma
• Bleeding diathesis
Cold therapy
and/or Contrast
Therapy
• Vascular dysregulation
• Vascular ischaemic disease
• Venous or arterial occlusive disease
• Acute inammation of the veins
• Decompensated hypertonia
• Cerebral infarction
• Conditions where venous or lymphatic return is not desirable
• Endocarditis
• Atheromatous embolic plaque
• Hypoesthesia, sensation impairment, numbness
• Atrial brillation
The following conditions are contraindicated for CTC-7 use.
Thermotherapy
(Heat and Cold
and / or Contrast
Therapy
• Pregnancy
• Rheumatoid arthritis
• Conditions where sensation is compromised leading to increased
or decreased sensitivity to cold/heat/injury e.g. General poor
circulation, Diabetes mellitus, multiple sclerosis, spinal cord
injuries
• Decompensated cardiac insufciency
• Hypertension, Cardiac failure
• Buerger’s disease
• Peripheral vascular disease
• Medication that may negatively affect peripheral vascular
circulation (ex: beta-adrenergic blockers, epinephrine, local
anaesthetics, etc.)
• Insensitivity to pain
• Children under 12 years old
• Recent skin graft
• Unstable angina
• Uncontrolled blood pressure
• Sickle cell anaemia
• Vasospastic disorder
• Implanted life support system
* If you have any of the following conditions you must use the device under the supervision
of a physician.
4 5

MEDIRENT.COM.AU © 2021
• Unwind the power cord prior to use.
• When you connect or disconnect the power cord to or from the
socket, make sure to hold the plug instead of the cord.
• During a storm or blackout, turn off the device and disconnect the
power plug.
• Connect the power cord so that it is rmly plugged in.
• Use the handle to lift and move the device. Do not drag by the power
cord.
• Do not use the device near any equipment that creates
electromagnetic waves such as X-ray and MRI equipment.
• Do not operate the device if it has been dropped and damaged.
• Do not operate the device if the power cord is damaged.
• When adding or draining distilled water, do not to spill water over
the device electronics.
• When the device is not in use, disconnect the power cord.
• Use a power cord in compliance with the country’s electrical
standards.
• Use the device by connecting it with a main-power supply unit with
a protective ground.
• Do not use a damaged power cord/plug or a loose socket.
• If you notice an abnormal smell whilst the device is in use,
immediately stop using the device. In this case, immediately turn off
the power switch, disconnect the power cord from the socket, and
contact Medi-Rent.
• Do not use wet hands or other wet body parts to touch this device,
the power cord, plug and socket.
• Do not damage, bend, twist, or heat up the power cord.
prohibited
caution
• Do not use the device for any purposes other than the intended use.
• Use with care if the user has an underlying condition that impairs
skin sensitivity to temperature or pain.
• If the device has not been used for a long time, clean the device and
check the function prior to applying the garment to the body.
• Do not install this system in an environment exposed to heating
devices and direct light.
• Check if the tubing is damaged.
• Prior to use, check the device and the accessories are in good
condition and undamaged.
• Set up the device on a at and stable surface.
• Do not set up the device on a desk or a table to which vibration or
impact is frequently applied.
• Set up the device in a place where the power plug can be connected
and disconnected without any obstruction.
• Do not use coolant in the device.
• When setting up the device, make sure that the vent is not blocked.
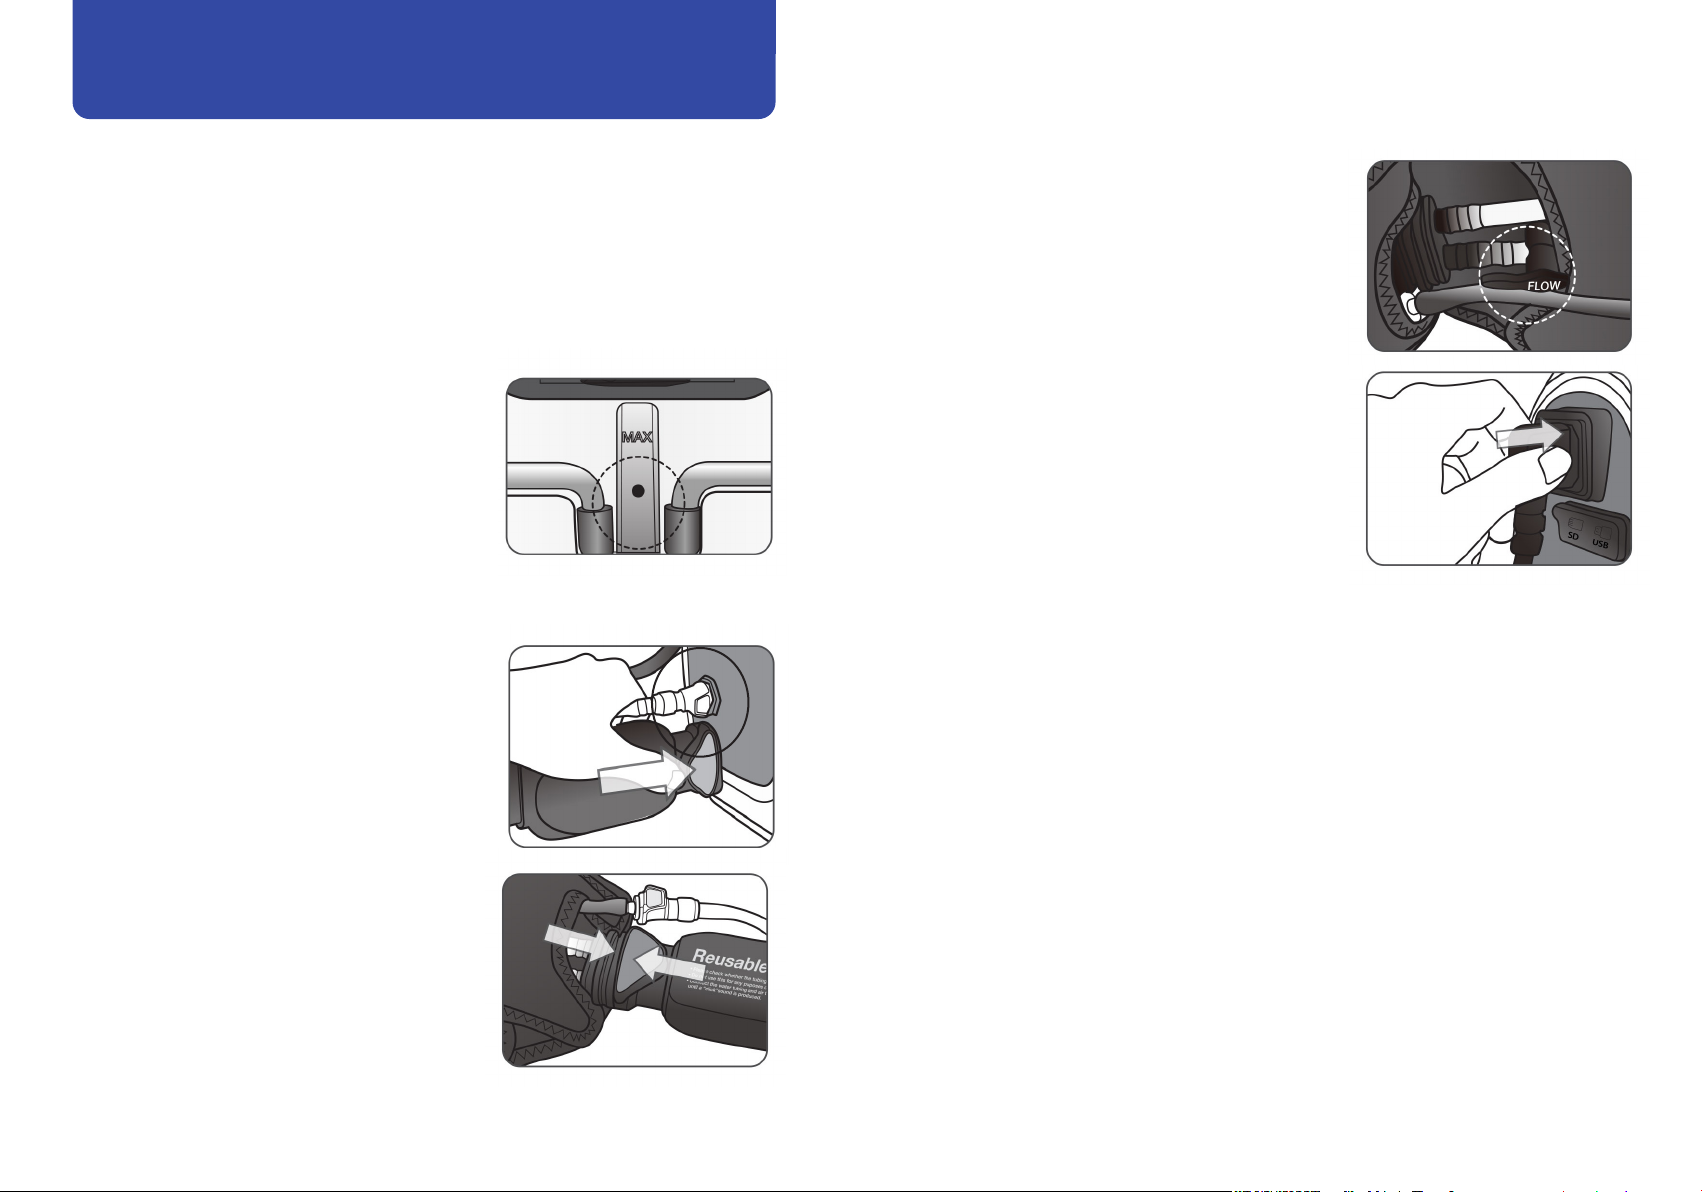
• The SD card and USB cable can only be used as a rmware update.
• Prior to use, make sure that the water tank cover is screwed on
tightly.
• Do not paint the device or attach stickers and other foreign
substances to it.
• Do not cover the power cord with a carpet or other objects.
• Wear thin fabric between your skin and the CTC-7 garment.
prohibited
caution
Electrical Safety Cauons prior to use
Make sure that you follow all the specied cautions and warnings prior to using this device.
• Do not remodel, disassemble, or repair this device as this will void
warranty.
• Do not set up the device on a foldable, portable, or lightweight table.
• Make sure that no liquid or foreign substance enters any part of the
device other than the inlet of the water container.
• Allow the device 1-2 hours to reach room temperature operating
conditions between 10 and 25ºC prior to use. If condensation has
occurred, dry with a soft cloth before turning the device on.
• The wrap is intended to be connected with the CTC-7 only. Do not
connect the wrap with devices manufactured by other companies.
• The accessories and parts to be used inthe CTC-7 must be of those
provided or approved by DAESUNG MAREF.
6 7

MEDIRENT.COM.AU © 2021
Cauons during use
• When determining the temperature, mode and time settings of this
device, follow the instructions given by your clincian.
• Use the device indoors where the temperature is 10−25ºC.
• CTC-7 wraps are not sterilised. Avoid direct contact of the wrap to
the skin. Wear a thin layer of fabric between the skin surface and
the wrap.
• Keep the treatment area dry and check frequently.
• Do not drop the device.
• Do not use the device while it is inside the carry bag.
• Do not apply heat to the abdomen if you are pregnant, or to the
genitals.
• When this device is used in the Cold, Heat, or RCT mode, do not use
the device with other heat sources.
• Do not insert your nger into the water container or the vent.
• Make sure that the front, side, or rear vent of the device is not
blocked while the device is in operation.
• Do not to touch the side vent of the device while it is in use or
immediately after the device has been used.
• Do not forcefully bend the tubing when connecting to the device.
• Turn off the device prior to moving it
• Remove all jewellery on the affected limb prior to wearing the wrap.
caution
Cauons aer use
• Disconnect the power cord from the socket prior to removing it
from the device, particularly before cleaning.
• Check whether or not the device is damaged and whether or not it
functions properly at least once per year.
• Make sure that no liquid is inserted into the socket, AC inlet or vent
located on the side of this device.
• Do not directly apply liquid detergent to the device or use benzene,
thinner, or alcohol to clean this device. Clinell wipes are the
preferred method to clean the device and can be purchased from
Medi-Rent or other outlets.
• After operating the device, always wait until the device reaches
room temperature prior to storage.
• If the device case is damaged, immediately submit a request for
repair to Medi-Rent.
• Store this device and the accessories in a dry place free from water
and moisture.
• Dust and foreign materials may result in failure, re, or electric
shock.
• When the device and the accessories are to be stored for a long
time, make sure to completely remove the distilled water inside the
system.
• The adequate temperature range for storing this device is 1−50ºC.
caution
prohibited
• To prevent voiding warranty, do not disassemble or remodel the
device at your own discretion for repair.
• This device can only be disassembled and repaired by Medi-Rent.
8 9

MEDIRENT.COM.AU © 2021
Cleaning; Operang and Storage Condions WEEE Marking
• When any foreign substance (e.g. dirt, dust, blood) contaminates the device, turn off,
apply a damp cloth or Clinell wipe to gently remove the foreign substance.
• Do not wipe the device with benzene, thinner, alcohol, etc or spray water directly on the
device.
• Use pH neutral detergent or Clinell wipes (available from Medi-Rent) to clean.
• Dilute in water if it is alkali undiluted state.
• Take necessary care when using cleaning detergents. Use appropriate skin and eye
protection.
Device cleaning
• When necessary apply pH neutral/mild detergent or water to a soft cloth; use the cloth
to clean the wrap, and completely dry the wrap prior to use.
• Close the tubing hole at the bottom with a rubber stopper before cleaning.
• Do not use a dryer to dry the wrap.
Wrap cleaning
Operang condions
Storage condions
This marking shown on the product or its literature, indicates that
it should not be disposed with other household wastes at the end
of its working life. To prevent possible harm to the environment or
human health from uncontrolled waste disposal, please separate
this from other types of waste and recycle it responsibly to promote
the sustainable reuse of material resources.
Household users should contact Local Council about how and
where they can dispose of this item for environmentally safe
recycling.
Business users should contact their supplier and check the items
and conditions of the purchase contract. This product should not be
mixed with other commercial waste for disposal.
10 11

MEDIRENT.COM.AU © 2021
Product Descripon
Basic kit
The wrap is dened as the mounting part in IEC 60601-1.
Accessories
These wraps come in both re-usable or single patient-use options.
12 13

MEDIRENT.COM.AU © 2021
Device specicaons
Name Product code
Re-usable wrap
Knee wrap CTC-KNEE-R
Shoulder wrap CTC-SHOULDER-R
Elbow wrap CTC-ELBOW-R
Ankle wrap CTC-ANKLE-R
Back wrap CTC-BACK-R
Universal wrap CTC-UNIVERSAL-M-R size medium
CTC-UNIVERSAL-L-R size large
Single
patient-use wrap
Knee wrap CTC-KNEE-D
Shoulder wrap CTC-SHOULDER-D
Elbow wrap CTC-ELBOW-D
Ankle wrap CTC-ANKLE-D
Back wrap CTC-BACK-D
Universal wrap CTC-UNIVERSAL-M-D size medium
CTC-UNIVERSAL-L-D size large
Class / type of
protection
Class I, BF-Type
Device name Circulating-uid thermal/compression therapy system control unit
Model CTC-7
Dimension 272(W) x 180(D) x 239(H) mm
Weight 3.7kg (empty water container)
3.9kg (full water container)
Power source AC 100 – 240V, 50/60Hz
Power consumption 270VA
Mode Cold Therapy, Heat Therapy, RCT
Therapy Temperature
Range
Cold Therapy : 6 - 15ºC ± 3ºC
Heat Therapy : 35 - 45ºC± 3ºC
Time Range Cold Therapy : 5 - 60 min
Heat Therapy : 5 - 30 min
Pressure Range
Cold Therapy : 0 - 4 Level / Heat Therapy : 0 - 1 Level
0 Level : 0mmHg
1 Level : 15mmHg ± 5mmHg
2 Level : 30mmHg ± 5mmHg
3 Level : 50mmHg ± 5mmHg
4 Level : 75mmHg ± 5mmHg
Coolant Distilled water
Refrigerant None
Fluid Capacity 250mL
Type of protection IP IPX0
Rx only
Setting value
should be operated
under clinician’s
instructions.
The exterior and specications of this device may be changed without notice for performance
improvements. You can purchase accessories through Medi-Rent. Only CTC-7 accessories must be used
with the device otherwise the warranty will be void.
14 15

MEDIRENT.COM.AU © 2021
No Parts Funcon
1LCD display The screen displays the operating status of CTC-7
2Back button When the back button is pressed, the previous screen will
appear.
3Dial
When the dial is rotated or pressed, the temperature, time
and pressure level of this device can be controlled. While the
device is in operation, press the dial to pause operation.
4Alarm LED
Standby status : Green
In operation : Blue and green ashing
Error : Orange ashing
5Start / Stop button
When the button is pressed, the device will operate based
on the set values. While the device is in operation, press the
button to stop operation.
6Air vent The fan-operated air vent allows internal air to circulate
during operation.
7Water socket Connection point for the water tubing of the device.
8Air socket Connection point for the air tubing of the device.
No Parts Funcon
9Memory card /
USB port Memory card and USB port for device rmware updates.
10 Power on/off
switch Turns device on/off
11 Power cord socket To connect the AC cord with the device.
12 Water level
indicator
Indicator used for checking the amount of distilled water
contained in the water container.
13 Water tank cover Cover used for preventing the distilled water from spilling.
14 Handle Convenient carry handle when moving the device.
Part numbers
16 17

MEDIRENT.COM.AU © 2021
Installaon
1. Open the package with care to avoid damage to the product. Check the device, tubing,
and garment are in good condition and undamaged prior to use.
2. Install the device on a at and stable surface.
* To avoid the air ow of the CTC-7 from being interrupted, place the device in an
area with 30cm clearance around it.
3. Open the water bottle cap located on the rear side of
the device, ll the water bottle with distilled water,
and screw the cap back on rmly.
• When adding distilled water, use a jug with a sharp
spout.
• Check the water level indicator located on the rear
side of the device.
• The maximum volume of distilled water is 250mL.
Once operang, the device needs to be topped
up with water as the inial water moves from the
device to the garment.
4. Find the water socket located on the side of the
device and connect the garment water tubing to
this until you hear a “click” sound.
• When the device is used without properly
connecting the tubing there is a risk of water
leakage.
5. After you connect the water socket, connect the air
socket by pushing the tubing until you hear a “click”
sound.
6. Check whether or not the pipe attached to the wrap
is twisted. (The pipe is only in the re-usable wrap.
Disposable wrap do not have drain pipes.)
• When the pipe is twisted 90 degrees, the distilled
water will spill.
7. Find the power cord socket located on the side of
the device, and connect the cord. Then, connect the
device to a power outlet.
• Install this device in an environment where
the power cord can be easily connected and
disconnected.
18 19

MEDIRENT.COM.AU © 2021
How to Use
1. When you turn on the power switch located on the side of the device, the mode selection
screen will appear.
2. On the mode selection screen, rotate the dial counterclockwise or clockwise to select the
mode to be used. Press the dial to select. The screen will change to the settings display for
the mode selected. Refer to the sengs instrucons for each mode on the following page.
3. Once the mode is set, press the start/stop button. (You don’t need to press this button
rmly, but you do need to cover it completely with your thumb)
• While the device is in operation, the settings cannot be changed.
• To change the settings, stop the device by pressing the Start/stop button.
• You are also able pause therapy by pressing the dial, but you are not able to make setting
changes during pause.
1. On the mode selection screen, rotate the dial to highlight Cold or Heat Therapy, and press
the dial to select the desired mode.
2. The screen will change to the settings display for the mode selected. Within the settings
menu, you can set the time, temperature and pressure level.
3. Rotate the dial counterclockwise or clockwise to highlight the setting you would like to
adjust. Select the ‘Time’, ‘Temperature’, or ‘Pressure’ setting by pressing the dial.
A setting parameter screen will appear on the display.
Rotate the dial counterclockwise or clockwise to adjust the levels. Press the dial to save
the settings, and press the back button to return to the setting screen.
• On the setting screen, press the start/stop button to start treatment.
Cold and Heat Therapy Sengs
20 21

MEDIRENT.COM.AU © 2021
4. The Time setting has two options, Manual or Preset.
a. Manual Time allows you to set the run time.
The device will automatically stop after the set time period has lapsed.
• Manual Time range
Cold Therapy : 5 - 60min / Heat Therapy : 5 - 30min
b. Preset time allows you to select from a variety of programs that will run the device for a set
period and then rest (or pause therapy) before the cycle recommences. The device will run
continuously through the run and rest cycle until the device is stopped manually.
• Preset Time options (Run / Rest) : 20/20 min, 20/40 min, 30/30 min, 30/60 min
Cold Therapy Seng Range
Time Range 5 - 60 min
Temperature Range 6 - 15°C ± 3°C
Pressure Range
0 Level 0 mmHg
1 Level 15 mmHg ± 5 mmHg
2 Level 30 mmHg ± 5 mmHg
3 Level 50 mmHg ± 5 mmHg
4 Level 75 mmHg ± 5 mmHg
Heat Therapy Seng Range
Time Range 5 - 30 min
Temperature Range 35 - 45°C± 3°C
Pressure Range 0 Level 0 mmHg
1 Level 15 mmHg ± 5 mmHg
• When Heat therapy is used at high temperatures for a long time, skin damage can
occur. Do not apply Heat therapy in consecutive sessions to the same area.
Cold and Heat Therapy Seng cont. Cold and Heat Therapy Seng cont.
22 23

MEDIRENT.COM.AU © 2021
1. On the mode selection screen, rotate the dial to highlight the ‘RCT’ image, and press the
dial to select. The RCT settings display screen will appear.
RCT (Rapid Contrast Therapy - Hot and cold) Seng
2. Rotate the dial to highlight the RCT setting you want to adjust: Cold, Heat, or Cycle. Press
the dial to select. A settings parameter screen will appear on the display. Rotate the dial to
adjust the settings to the desired level. Press the dial to save changed settings. Press the
back button to exit without saving; this will retain the previous settings for that mode.
* For the RCT mode, you can set the temperature, pressure level and treatment cycle for
Cold therapy and Heat therapy.
* In the RCT mode, the me for Cold therapy is xed to 20 minutes and the me for Heat
therapy is xed to 10 minutes.
• Cold Setting
On the Cold setting screen, rotate the dial counterclockwise or clockwise and select
‘Temperature’ or ‘Pressure Level’ by pressing the dial; a settings parameter screen will appear.
Rotate the dial counterclockwise or clockwise to adjust the levels. Press the dial to save the
settings or press the back button to exit without saving; this will retain the previous settings
for that mode.
• Heat Setting
On the Heat setting screen, rotate the dial counterclockwise or clockwise to select
‘Temperature’ or ‘Pressure Level’ by pressing the dial; a settings parameter screen will appear.
Rotate the dial counterclockwise or clockwise to adjust the levels. Press the dial to save the
settings or press the back button to exit without saving; this will retain the previous settings
for that mode.
RCT (Rapid Contrast Therapy) Seng cont.
24 25

MEDIRENT.COM.AU © 2021
RCT (Rapid Contrast Therapy) Seng cont.
• Cycle Setting
On the Cycle setting screen, rotate the dial counterclockwise or clockwise to adjust the
number of RCT cycles desired from 1 to 3. The device will stop therapy once the set number
of cycles have been completed. Press the dial to save the settings, or press the Back button to
return to the RCT standby screen without saving the settings.
RCT Seng Range
Cold Therapy mode
Time range 20 min
Cold Therapy mode
Temperature range 6 - 15°C ± 3°C
Cold Therapy mode
Pressure range
Level 0 0 mmHg
Level 1 15 mmHg ± 5mmHg
Level 2 30 mmHg ± 5mmHg
Level 3 50 mmHg ± 5mmHg
Level 4 75 mmHg ± 5mmHg
Heat Therapy mode
Time range 10 min
Heat Therapy mode
Temperature range 35 - 45°C ± 3°C
Heat Therapy mode
Pressure range
Level 0 0 mmHg
Level 1 15 mmHg ± 5mmHg
Cycle range 1 - 3 cycle
Cleaning and Draining
1. To enter the cleaning and draining mode turn the device on; press the dial once to enter
a mode setting (Cold, Heat, RCT). Press and hold the dial for 3 seconds until the display
changes to the cleaning/draining menu display illustrated below.
2. Rotate the dial counterclockwise or clockwise to highlight ‘Cleaning’ or ‘Draining’, and
press the dial to select the mode.
1. Fill CTC-7 with distilled water and connect the tubing and wrap.
2. On the cleaning settings screen, press the dial to select . The cleaning process will run
for approximately 10 minutes. If you wish to cancel press the back button and follow the
prompts.
Cleaning - this step is not required if you are renng your product
26 27

MEDIRENT.COM.AU © 2021
3. After the cleaning process is complete the device will alarm and a screen will appear as
illustrated. Press the dial to stop the alarm and clear the screen. A secondary screen will
prompt for additional clean run. Select X to return to the cleaning/draining menu.
* If this device requires more dislled water, a screen reading ‘ERROR-11’ will appear prior to
acvang the cleaning process.
* If a certain temperature is not reached during the cleaning process, a screen reading
‘ERROR-21’ will appear.
* If impuries or contaminaon are found when using the device stored for a long me
without removing the dislled water, contact Medi-Rent for cleaning method.
1. Draining mode is required when the device is
intended to be stored or transported. Please
run cleaning mode before draining the
device. Ensure the cap of the water container
(located on the rear side of the device) is
completely closed.
2. Connect the the tubing and wraps to the
device.
3. Connect the seperate connector tubing supplied with
your kit.
Cleaning cont. Draining cont.
4. Prepare a container to drain the water into and place the end of the wrap tubing in
position. Open the circuit by turning the valve 90 degrees.
5. On the Draining settings screen, rotate the dial to select , and press the dial to drain the
water from the device and the wrap.
Draining 6. After the Draining process is complete the device will alarm with a screen on display
indicating the drainage is complete. Press the dial to stop the alarm and clear the screen.
A second screen will prompt further cleaning or drainage.
Check the device water level to determine if drainage needs to be run a second time. If not,
press the dial to select X and the display will return to the cleaning drainage menu. To exit
this menu, press back or simply turn off the device.
* If the water level remains the same during the Draining process, an error message will
appear.
* If an error message occurs, check whether or not the tubing and wrap are all connected to
CTC-7, and ensure the drainage valve is open.
28 29

MEDIRENT.COM.AU © 2021
Storage
* To prevent damage to the device, store the product in the box that it was supplied in or the
CTC-7 carry case.
* For long term storage refer to previous secon on Draining to remove dislled water from
the device and accessories.
1. Ensure water container cap on the rear
side of the device is completely closed.
2. Turn off the power switch.
3. Disconnect the tubing and wrap from the device.
4. Disconnect and remove the power
cord from the mains power socket and
device socket.
5. Store the device and wrap in a safe place.
* Do not store the device (including the tubing and wrap) in a place exposed to direct light or
humidity, or in a place that creates a trip hazard.
* Make sure to store the tubing in a way that it is not creased or forcibly bent.
Troubleshoong
Maers to be checked prior to subming a request for service
When this device does not funcon properly, make sure to read the user manual and follow
the instrucons to take adequate acons against the following symptoms prior to contacng
the Medi-Rent customer centre.
1. I cannot turn on the device.
• Check whether or not the power cord is connected.
• Check whether or not the supplied power satises AC100-240V and 50/60Hz.
2. While operang this device, I had a message saying that there is no water.
• Add more water to the water container.
• If the device is tilted, re-position it on a at surface.
3. Water is leaking from the device.
• When condensation occurs inside the device, water may collect on the oor.
• Check whether or not the cap of the water tank located on the rear side of the device is
completely closed.
• Check whether or not the pipe of the wrap is closed.
• If there is a hole in the wrap, contact Medi-Rent.
4. I cannot drain water from the device.
• Disconnect the tubing and wrap and then re-connect.
• Check whether or not the pipe valve attached to the wrap is open.
5. I cannot apply pressure.
• Check whether or not the tubing is connected with the device and the wrap.
• If air is leaking from the wrap, contact Medi-Rent.
6. While using the device, a message appeared saying that the temperature of the device is high.
• Turn off the device and let it cool down for approximately 1 hour prior to turning it back
on for use.
• When the ambient temperature is high or the device is continuously used for a long time,
take a break from using the device. If you still get a message that the temperature is high
even after taking a break, contact Medi-Rent.
30 31

MEDIRENT.COM.AU © 2021
7. I feel like the wrap is neither hot nor cold.
• When the tubing or the wrap is bent, water will not ow.
• When the ambient temperature is too high or too low, the cooling and heating may not
function properly.
• When the peltier inside the wrap does not function properly, the cooling and heating will
not function properly. In this case contact Medi-Rent.
8. The device generates too much noise.
• Check whether or not there is any foreign substance attached to the fan of the vent hole.
• Check whether or not the device has been placed on an unstable or tilted surface.
Error Code Occurence
* If an error occurs during operation, the following Error codes will appear.
Error code Solution
• Turn the device off and on.
• Turn off the device and let it cool down for approximately 1 hour
before turning it back on.
• If the error occurs again after it has cooled down, contact
Medi-Rent
• Check whether or not the device is tilted. Ensure it is on a at
surface.
• The device may lack water. Add more water to the water container.
• Check whether or not the pipe of the wrap is open. Check whether
or not there is any water leakage.
• The device lacks water. Add more water to the water container.
• Contact Medi-Rent
• Check whether air is leaking from the wrap/tubing.
• Disconnect and re-connect the tubing connected to the wrap and
device.
• If the same error occurs, contact Medi-Rent
• Contact Medi-Rent
While using this device, I got a message saying that the temperature of this
device is high.
Turn off this device and let it cool down for approximately 1 hour prior to turning it back
on for use.
When the ambient temperature is high or this device is continuously used for a long
time, take a break from using this device. When you still get a message saying that the
temperature of this device is high even after taking a break, contact the service center
and the local person in charge.
I feel like the wrap is neither hot nor cold.
When the tubing or the wrap is bent, water will not flow.
When the ambient temperature is too high or too low, the cooling and heating may not
function properly.
When the peltier inside this device does not function properly, the cooling and heating
will not function properly. In this case contact the service center and the local person in
charge.
This device generates too much noise.
Check whether or not there is any foreign substance attached to the fan of the vent hole.
Check whether or not this device is placed on an unstable or tilted floor.
10-2. Error Code Occurrence
* If an error occurs during operation, the device displays the error code on the LCD screen.
Error Code Symptom Solution
Occurs when the internal
temperature of this device
increases
- Turn off and turn of this device.
- Turn off this device and let this device cool
down for approximately 1 hour prior to turning
it back on.
- When the error occurs when this device is
used after it is cooled down, contact the service
center and local person in charge.
Occurs when the
temperature of the heat
sink increases
Occurs when the water
container lacks water prior
to operating this device
- This device lacks water. Add more water to the
water container.
- Check whether or not this device is tilted.
Install this device on a flat floor.
Occurs when the water
container lacks water while
this device is in operation
- This device lacks water. Add more water to the
water container.
- Check whether or not the pipe of the wrap is
open. Check whether or not there is any water
leakage.
40
USER MANUAL
Error Code Symptom Solution
Occurs when the
temperature cannot be
adjusted due to failure of
the cooling system
- Contact the service center and local person in
charge.
Occurs when the
temperature cannot be
adjusted due to failure of
the water pump
Occurs when the air sensor
has no load while this
device is in operation
Occurs when no
pressurization is executed
due to air leakage in the
wrap area
- Check whether the wrap/tubing has any air
leakage.
- Disconnect and re-connect the tubing
connected to the wrap and main body.
When the same error occurs, contact the
service center and local person in charge.
Occurs when the
temperature sensor within
this device causes an error
- Contact the service center and local person in
charge.
Occurs when the
temperature sensor within
the heat sink causes an
error
Occurs when the water
temperature sensor causes
an error
Occurs when the pressure
sensor causes an error
Occurs when the IR-Sensor
causes an error
Occurs when the System
overload an error
41
Troubleshoong cont.
32 33

MEDIRENT.COM.AU © 2021
Informaon on EMC
Guidance and Manufacturer’s Declaraon – Electromagnec Immunity
The CTC-7 is intended for use in the electromagnetic environment specied below. The
customer should ensure that it is used in such an environment.
Voltage
dips, short
interruptions
and voltage
variations on
power supply
input lines
IEC 61000-4-11
< 5% UT
(>95% dip in UT)
for 0.5cycle
NA
Mains power quality should be that of a
typical commercial or hospital environment.
If the user of the CTC-7 requires
continued operation during power Mains
interruptions, it is recommended that the
CTC-7 be powered from an uninterruptible
power supply or a battery.
40% UT (60%
dip in UT) for
5 cycles
70% UT (30%
dip in UT) for
25 cycles
< 5% UT (>95%
dip in UT) for
5 seconds
Power
Frequency
(50/60Hz)
magnetic eld
IEC 61000-4-8
30 A/m
50 Hz or 60 Hz
30 A/m
50 Hz or 60 Hz
Power frequency magnetic elds should
be at levels characteristic of a typical
location in a typical commercial or hospital
environment.
Note 1 At 80 MHz and 800 MHz, the higher frequency range applies.
Note 2 These guidelines may not apply in all situations. Electromagnetic propagation is affected by
absorption and reection from structures, objects and people.
a. Field strengths from xed transmitters, such as base stations for radio (cellular/cordless) telephones
and land mobile radios, amateur radio, AM and FM radio broadcast and TV broadcast cannot be
predicted theoretically with accuracy. To assess the electromagnetic environment, due to xed RF
transmitters, an electromagnetic site survey should be considered. If the measured eld strength in the
location in which the CTC-7 is used exceeds the applicable RF compliance level above, the CTC-7 should
be observed to verify normal operation. If abnormal performance is observed, additional measures may
be necessary, such as reorienting or relocating the CTC-7.
b. Over the frequency range 150 kHz to 80 MHz, eld strengths should be less than 3 V/m.
Guidance and Manufacturer’s Declaraon – Electromagnec Immunity cont.
U
T
is the a.c. mains voltage prior to application of the test level.
Immunity Test IEC 60601
Test Level Compliance Level Electromagnetic environment-guidance
Conducted RF
IEC 61000-4-6
Radiated RF
IEC 61000-4-3
3 Vrms
(150 kHz to 80
MHz)
3 V/m
(80 MHz to 2.5
GHz)
3 Vrms
3 V/m
Portable and mobile RF communications
equipment should be used no closer to any
part of the CTC-7, including cables, than
the recommended separation distance
calculated from the equation applicable to
the frequency of the transmitter.
Recommended separation distance
80 MHz to 800 MHz
800 MHz to 2,50GHz
Where is the maximum output power
rating of the transmitter in watts (W)
according to the transmitter manufacturer
and is the recommended separation
distance in metres (m).
Field strengths xed RD transmitter, as
determined by an electromagnetic site
survey, should be less than the compliance
level in each frequency range
b
. Interference
may occur in the vicinity of equipment
marked with the following symbol:
Electrostatic
Discharge(ESD)
IEC 61000-4-2
± 8 kV (contact)
± 2 kV, ± 4 kV,
± 8 kV, ± 15 kV
(air)
± 8 kV (contact)
± 2 kV, ± 4 kV,
± 8 kV, ± 15 kV
(air)
Floors should be wood, concrete or ceramic
tile.
If oors are covered with synthetic material;
the relative humidity should be at least 30%.
Electrical fast
transient/burst
IEC 61000-4-4
± 2 kV, 100
kHz repetition
frequency
± 2 kV, 100
kHz repetition
frequency
Mains power quality should be that of a
typical commercial or hospital environment.
Surge
IEC 61000-4-5
± 0.5 kV, ± 1
kV differential
mode
± 0.5 kV, ± 1 kV,
± 2 kV
Common mode
± 0.5 kV, ± 1 kV
differential mode
± 0.5 kV, ± 1 kV, ±
2 kV
Common mode
Mains power quality should be that of a
typical commercial or hospital environment.
34 35

MEDIRENT.COM.AU © 2021
Guidance and Manufacturer’s Declaraon – Electromagnec Emissions
The CTC-7 is intended for use in the electromagnetic environment specied below.
The customer or the user of the CTC-7 should ensure that it is used in such an environment.
Emission test Compliance Electromagnetic environment-guidance
RF emissions
CISPR 11 Group 1 The product does not use RF energy.
RF emissions
CISPR 11 Class A
The CTC-7 is suitable for use in all
establishments other than domestic and
those directly connected to the public
low-voltage power supply network that
supplies buildings used for domestic
purposes.
Harmonic
emissions
IEC 61000-3-2
Applicable
Voltage
uctuations/
icker emissions
IEC 61000-3-3
Applicable
Symbols Informaon
Symbol Description Symbol Description
Manufactured Date Convenience
Manufacturer Load Limitation
Serial Number "ON" (power) button
Batch code "OFF" (power) button
Type BF applied part The official mark of
Europe Certificate
Refer to the User
Manual
European
Representative
Keep dry Temperature limit
Fragile, handle with
care Humidity limitation
WEEE Label with
marking bar
Atmospheric pressure
limitation
Caution Recycling
Prohibition Single patient multiple
use
Do not take to pieces Consult instructions for
use
This way up Use by prescrition
12
Symbols Information
0068
44
36 37

MEDIRENT.COM.AU © 2021
USER MANUAL
Symbol Description Symbol Description
Cold therapy Back button
Heat therapy Start/Stop button
RCT
(Rapid Contrast
Therapy)
Memory card port icon
Air compression USB port icon
Synergy No leakage
No moisture Manual Time
Convenience Preset Time
45
Warranty
Medi-Rent Pty Ltd –CTC-7 –Cryo Thermo Compression System
Limited Distributor Warranty 20210421A
Note: This warranty does not exclude or varyanyof your rights under Australian Consumer Law
What does this warranty cover?
This warranty covers the supplied equipment against defects arising through normal use of the equipment; it also
covers materials and workmanship supplied as a part of any repairs made to the equipment under this warranty.
It does not cover accidental damage, damage arising from use other than that for which the equipment is
intended, damage to any equipment that has been modified or subject to repair by an unqualified person, damage
to a device that has been in contact with water, damage caused by using unauthorized accessories or additions,
damage to equipment that has not been paid for, damage caused by incorrect or insufficient supply voltage or any
other damage found to be the result of anything other than normal use.
Warranty claim eligibility will be determined by an authorized representative of Medi-Rent Pty Ltd and decisions
are unable to be reviewed unless required under Australian Consumer Law.
If damage is found to be ineligible for repair under this warranty, fees will apply for assessment and repair.
What remedies are available under this warranty?
In the unlikely event that a defect is found in the equipment, any one, or combination of the following remedies
may be offered;
•Medi-Rent Pty Ltd may repair the equipment using either new or refurbished parts.
•Medi-Rent Pty Ltd may exchange the product for a new or refurbished item of merchantable quality.
•Medi-Rent Pty Ltd may engage a contractor of their choosing to inspect or repair the equipment on their
behalf.
•Medi-Rent Pty Ltd may refund all or part of the purchase price and take ownership of the faulty
equipment.
It is at the sole discretion of Medi-Rent Pty Ltd which of these remedies are made available. If none of these
remedies are suitable other remedies may be offered and you will be given the opportunity to accept these
remedies in lieu of the above.
How long is this warranty for?
This warranty covers equipment suppliedby Medi-Rent Pty Ltd for the following durations;
•Where the equipment has been purchased:
oTwo years from the date of issue of the invoice applicable to the fee that results in the transfer of
ownership of the equipment from Medi-Rent Pty Ltd to the customer.
•Where the equipment has been rented:
oFor the duration of any rental agreement in force between Medi-Rent Pty Ltd and the customer.
How to make a claim under this warranty?
To make a claim under this warranty, the customer should contact Medi-Rent Pty Ltd within 14 days of becoming
aware of any defect with the equipment, either;
•By calling us on 1300 726 666
•By email to info@medirent.com.au
•By post at Medi-Rent Pty Ltd
Unit 1, 61 Beauchamp Road
Matraville NSW 2036
38 39
Table of contents
Other DS Maref Medical Equipment manuals
Popular Medical Equipment manuals by other brands

B-K Medical
B-K Medical Pro Focus 2202 Color Quick reference guide

Sirona
Sirona SIROLaser Advance operating instructions

Breas Medical
Breas Medical NIPPY JUNIOR + instruction manual

Aspen Medical Products
Aspen Medical Products SIERRA LSO ADJUSTABLE manual

Storz
Storz XENON NOVA 175 Service manual

Stryker
Stryker Secure 3000 Maintenance manual