Dudek NEMO 5 User manual

NEMO 5
User manual
V10/01/2022

2
Index
NEMO
Introduction
About the wing
Paraglider design
isers design
Before first use
Pre-flight check
Launch
Flight
Winching and paramotoring
Landing
Speed modes
Quick descend methods
Extreme manoeuvres
Paraglider care
Warranty and aerocasco
Environmental care
What have you bought
Technical Data
Materials
Lining scheme
Join us
Support
Summary
3
4
5
6
9
11
12
14
16
17
18
19
21
23
26
28
29
30
31
32
34
35
36

Congratulations!
We are pleased to welcome you among the
growing number of DUDEK
PA AGLIDE S pilots. You’ve become a
proud owner of a sport paraglider,
designed according to recent trends among
paramotor canopies.
Extensive development, application of the
modern production methods and thorough
testing resulted in a friendly behaving
paraglider, offering the pilot a lot of fun
combined with great performance.
We wish you many enjoyable and safe
flying hours.
Please read this manual carefully and
note following details:
• The purpose of this manual is to offer
guidelines to the pilot using the
paraglider. By no means it is intended
to be used as a training manual for
this or any other paraglider.
• You may only fly a paraglider when
qualified to do so or when undergoing
training at an accredited school.
• Pilots are personally responsible for
their own safety and their paraglider's
airworthiness.
• The use of this paraglider is solely at
the user's own risk! Neither the
manufacturer nor dealer do accept
any liabilities involved.
• This paraglider on delivery meets all
the requirements of the EN 926-1 and
926-2 regulations or has an
airworthiness certificate issued by the
manufacturer. Any alterations to the
paraglider will render its certification
invalid.
• Other documents concerning this
paraglider can be found on attached
pendrive or on our website
www.dudek.eu.
Note: Dudek Paragliders warns that due to
the constant process of development the
actual paraglider may differ slightly from
the one described in the manual. However,
those differences cannot affect the basic
design parameters: technical data, flight
characteristics or strength. In case of any
doubts contact us please.
3
Introduction
NEMO

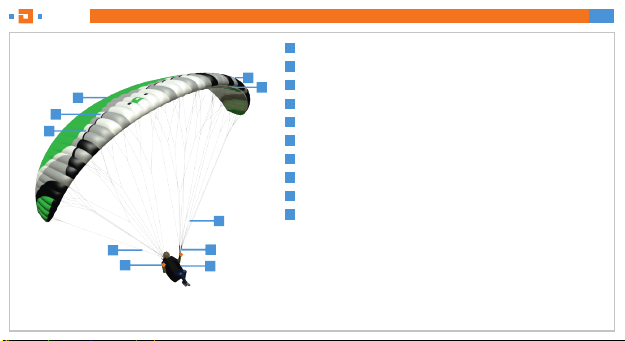
Nemo 5 is a paraglider recommended as
the first purchase after initial training,
especially if it was used there, too. For a
long time you will keep discovering its
capabilities, while it will provide you with
safety, good performance and versatility on
various levels of recreational flying. It will
forgive you many mistakes and prepare
you for further development.
What's new?
• A new internal structure, based on 3Y
supports
• increased lateral stability
• less line resistance = better
performance
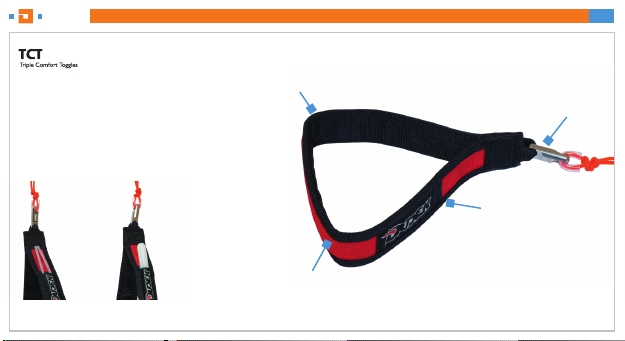
• new risers with ball-bearing pulleys
The changes in the new version of Nemo
were primarily aimed at improving the load
distribution within the canopy.
By changing the curvature of the wing, we
obtained greater lateral stability, while
maintaining good maneuverability as
compared to other wings in this class.
The main suspension lines in A and B
rows are made of Dyneema, which, due to
its high bending resistance, can be much
thinner compared to Technora. The innate
shrinkage effect of Dyneema has been
minimized by using these lines in the most
heavily loaded rows. Most importantly,
thinner lines result in less drag which
translates into better performance.
Purpose and design
Advanced software, combined with many
years of Piotr Dudek design experience,
allowed to create a wing with excellent
parameters, ideally suited to the needs of
pilots learning to fly and continuing
recreational flying. Nemo 5 is an EN A
class paraglider with a modern design,
good performance and high safety. Its
operation is simple and its control is
pleasant and effective. Moreover, it's
verstile - it's design parameters include
winch start, as well as paramotoring.
The weight ranges were selected so that
the flying schools will find it easy to
complete a full set of sizes for their
students.
4
About the wing
NEMO

The Nemo is produced in new
technology, utilizing capabilities of precise
laser cutter. All stages of the production
process take place as our Polish plant
under closes upervision of the designer
himself thus ensuring highest European
quality.
Careful selection of modern fabrics and
design solutions brings about great
strength and durability of the canopy.
All materials used come fro marked
production batches, and each production
step can be verified down to identification
of individual worker and controller.
Inlets
Leading edge
Trailing edge
Cell
ibs
Suspension lines
isers
Harness
Steering line
Brake handle
1
2
6
3
4
5
9
10
1
2
3
4
5
6
7
8
9
10
8
7
5
Paraglider design
NEMO

Steering line
Pulley
Swivel
Easy Keeper magnets and naps
Brake handle
Speed system pulleys
Speed system hooks
Carabiner
A
A’BC
1
2
34
4
56
6
7
8
1
2
3
4
5
6
7
8
6
Risers design
NEMO

For the Nemo 5 we have chosen three-way
risers equipped with:
• EL (Easy Launch iser) - system. It
is a specially marked A riser (with red
cover)
• speed-system affecting A and B risers
when engaged, featuring ball-beared
pulleys and a dedicated cord.
For quick and easy recognition in
emergency, some of the risers are
distinguished with coloured covers as
follows:
• A - red (used for launching)
• A' – red (used for big ears),
• B - yellow (used for B-stall),
• D - blue (needed to keep the glider
down in strong wind – aborted
launch).
Brake handles
Brake handles are attached to the steering
lines at an optimal point, guaranteeing safe
and effective action.This point is marked on
the line with a black dot and this setting
should not be altered.
Attaching the handles above factory
markings will cause constant braking of the
paraglider, possibly cause of an accident.
Overly loose setting of the brake lines is
not advised too, since the much lower load
on the trailing edge lines can sometimes be
dangerous too.
7
Risers design
NEMO

Addressing different needs of our clients
we have created a TCT system - Triple
Comfort Toggle, making it possible to have
your brake handles in rigid, half-rigid or soft
configuration without need to purchase
additional handles.
swivel against twisting
of the steering line
Neodymium magnet of the Easy Keeper and a nap
slit for the inserts
exchangeable insert
semi-soft insert rigid insert
The soft handle is obtained when no insert is
used.
8
Risers design
NEMO

Operation
It’s pilot responsibility to choose a canopy
matching his skills.
Dudek Paragliders cannot take
responsibility for a wrong choice, but we
are always ready to advise you – just
contact us.
Weight range
Each size of the canopy is certified for
specific weight range, meaning total take-
off weight including the pilot, harness,
equipment and the canopy itself.
Exceeding maximum take-off weight
described in technical data of the
paraglider (“Pilot’s weight incl. equipment”)
increases risk of an accident in case of
pilot’s error.The smaller canopy area as
compared to take-off weight, the greater
the risk.
Paragliders considerably change their
character due to increased load and each
experienced pilot should perfectly
understand that. The biggest danger
induced by overloading the canopy is its
hyperreactivity.
Caution: Check your real take-off weight!
Some pilots calculate their take-off weight
by just summing up catalogue numbers,
e.g.: paramotor 29 kg + canopy 6 kg + pilot
87 kg = ca. 120 kg. In fact your actual take-
off weight can be umpteen kilograms
bigger. Most often we forget the clothing,
electronics, backpacks, sometimes even
such basic things like fuel or rescue chute
weight are omitted!
What harness?
You can use any certified harness which
has its hangpoints at 40-45 centimeters
from the seatplate.The width between
carabiners should be somewhere between
37 cm and 45 cm.
Caution: Please note that any modification
of seat/hang point distance changes the
position of the brakes as related to pilot's
body. You must remember that in each
harness your steering range will be
different.
Speed system
Nemo 5 is as standard equipped with a
speed system. It consists of a cord sewn
into the A riser, leading through two pulleys
and finished with a loop and a hook. His is
where you attach the speedbar cord.
9
Before first use
NEMO

The speed system affects A (including A’)
and B risers. Pressing the speedbar
shortens first the A risers, before first use
then gradually the A’ i B. C riser retains its
original length.
Caution: Ill-adjusted speed system renders
the certification invalid!
How to adjust it?
Most of modern harnesses are equipped
with speed system pulleys and sometimes
even its own integrated speedbar. The
speed bar cord must be firmly attached to
it.
The other end of the cord must be ran
upward through the harness pulleys and
attached to the hooks.With well adjusted
speed system you should see the pulleys
on the risers touch each other at max
speedbar, meaning you are using the full
range of speed system.
Caution: Make sure that both cords on the
speed bar are equal, as even slight
difference can result in constant,
inadvertent turning of the paraglider.
Before take-off attach paraglider risers to
the harness with the main carabiners. Then
connect the hooks of the speed system
cords with hooks at the A-risers.
Caution: Before launching make sure that
the speed system is not tangled and runs
freely.
Other systems
This paraglider has no other systems which
can be adjusted, exchanged or removed.
10
Before first use
NEMO

11
Pre-flight check
NEMO
Pre-flight check
Having chosen a place to launch
accordingly to the terrain as well as wind
speed and direction clear it of any
obstacles that could damage your canopy
or tangle in the lines.
After laying out your paraglider in a
horseshoe directed against the wind
following checks must be made:
• canopy, lines and risers condition. Do
not launch if the slightest damage is
noticed,
• the paraglider should be arranged so
that the centre section A-lines will
strain earlier that the outer ones. This
ensures easy and symmetrical launch,
• the leading edge should stay taut and
even,
• all lines and risers should be
separated. Make sure they are not
tangled, and checked against catching
anything. It is equally important to
check the brake lines. They must be
firmly attached to the brake handles
and run freely through the pulleys to
the trailing edge,
• make sure the risers are not twisted,
• it is very important to check that no
lines are looped around the canopy.
The so-called ”line-over” may have
disastrous consequences during take
off.
• always put on and fasten your helmet
before clipping in to the harness,
• make sure that all quick links
(maillons) of the risers are tight,
• check main carabiners. They must be
properly mounted, closed and locked.

Classic (forward) launch
Should be used with little or no wind.
Facing the wind place the risers over your
shoulders (A riser must lay on top).
Clip it into carabiners and lock them. Grip
the brake handles and A-risers, holding
them at the stitching, just under the quick-
links. To make things easier, A-risers have
been markedwith a red cover. Spread out
your slightly bent hands, keeping them
down and back.
All other risers should be placed near your
elbow joints.
Apply some tension to check if the A risers
stay on top and the lines are not tangled.
Take a step back, bow down a little and run
forward. After the initial inflation smoothly
move the hands with the risers up and over
your head until the wing will be directly
above you. Let the A risers loose and
check the wing.
Pump out possible faults and keep an eye
on position of the paraglider. Side drift is
corrected best by moving yourself always
under center of the canopy. In order to
keep wing in the air the suspension lines
must stay taut all the time, so in light winds
you will have to run forward. With stronger
winds you can control the wing while
standing still.
When leaving the ground apply some
brakes, then release it after gaining some
distance from the ground. Keep your hands
relaxed.
Reverse launch
To be used when wind speed exceeds 3
m/s.
After clipping the risers into carabiners as
for the forward launch, turn back to face
the wing, moving one riser group over your
head. As a consequence, you will have the
risers crossed.
Unclip the brake handles from rear risers
and grip it outside of the risers without
crossing neither arms nor lines. In this way
you steer the left side with you left hand
and vice versa. Now take corresponding A
risers on both sides (still keeping brake
handles in your hands).
Make sure that the wing inflates
symmetrically and the lines are not tangled.
Building up tension with a few steps back
and simultaneously lifting the A risers (do
not pull them towards you) will make the
paraglider rise.
When it arrives over your head, stabilize it
with the brakes, check again if all lines are
12
Launch
NEMO

clear and the cells inflated.
When turning into wind, remember to turn
the right way (hint: always do it the same
direction) and to keep the lines strained at
all times. The turn itself should be quick
and smooth. While turning you have to
release the brake handles and grip them
again facing forward, so that again the left
one is in the left hand etc. Last check of the
wing & free space to launch and off you go,
running into wind with eventual light
braking when taking off.
emember: When deflating the canopy in
strong winds (e. g. aborting a launch), use
the C risers, not the brakes. Using the
brakes in strong wind can lift the pilot up
and drag him/her back.
Caution: When clipping in the crossed
risers, you can find proper connection of
the speed system particularly hard. Be
careful not to confuse the risers!
13
Launch
NEMO

Turns
Nemo 5 is an agile wing, with smooth
reactions to all pilot’s actions. Handling is
actually easy and forces grow
proportionally to position of the brakes.
Adding some weight shift will make the
paraglider turn really quick and tight.
The combined technique (weight shifting
and brake input) is by far the most efficient
method of turning. Turn radius is then
determined by the amount of inside brake
used and weight shift. Additional
application a little outside brake after
initiating the turn with maximum weight
shift increases turn efficiency and the
outboard wing’s resistance to collapse (in
turbulence, the edge of a thermal etc).
In case of necessary turning in confined
area at slow speed (e.g. slope soaring), it is
recommended to steer the decelerated
canopy by loosening the brake at the
outside of the turn while applying just a
little more brake on the inside.
Caution: when entering a turbulent area
you should brake a little to put up the
tension. It will allow you to react instantly in
case of a problem. Too hard or too quick
pulling of one brake can cause the wing to
enter a spin.
Thermalling and soaring
When flying minimum sink is reached with
slight brake pressure applied (5 to 10 cm,
depending on pilot’s weight). In turbulent
conditions the canopy should be flown with
a small amount of brake applied. This
improves overall stability by increasing the
angle of attack of the canopy. The canopy
should neither rock back nor surge
forwards, but always stay above the pilot.
In order to achieve it, the pilot should
accelerate the canopy by letting off the
brakes when entering a thermal (according
to its strength) and brake it on exiting. This
is part of basic active flying that can spare
you many potential collapses.
When soaring the slope, minimum height of
50 m above the ground is recommended
for safety reasons. It is important to comply
with air traffic rules, especially when many
pilots share airspace close to the hill.
The avoidance manoeuvres often happen
to be impossible in such conditions.
Flying with speed-system engaged
When flying into head wind, through sink,
or during long transitions between thermals
it is advisable (for the sake of best glide
angle) to increase speed, as long as
14
Flight
NEMO

conditions are not too turbulent.
In order to accelerate your flight you have
to put your feet on the speedbar and push
it forward. If you happen to feel tension
drop when pushing the speedbar, it can be
a sign of imminent frontal collapse. In this
case release the bar immediately.
Caution: Watch out for such things - fast
reaction can spare you most of the
frontstalls, always possible when using the
speedsystem.
Remember:
• Speed system operation diminishes
your paraglider's angle of attack, so
that its airspeed is increased, but
simultaneously the canopy becomes
less stable. The airflow becomes
more dynamic, too. Therefore you
should avoid using speedsystem in
turbulent conditions, close to the
ground or near other airspace users!
• Do not use speed system during
extreme manoeuvres! If the canopy
does collapse when accelerated,
release the speed bar immediately
and correct the situation as usual.
• When speed system is engaged, do
not use the brakes as it can make
your paraglider more susceptible to
frontal collapses. In such situations
you should control your direction with
C risers (blue cover).
Caution: Accordingly to increase in speed
the angle of attack diminishes, so the
canopy is more susceptible to front
collapses than in normal flight.
The faster is your flight, the more dynamic
are possible collapses and stalls.
Tandem flying
Nemo 5 is not certified for tandem flying.
15
Flight
NEMO

Winching
Our paraglider has been successfully
tested for foot launching by winch.
First phase of the winch take-off is
analogous to classic launch.
After rising the canopy you will be taken off
the ground, as the winch line gets loaded.
Avoid large heading corrections in first
stage of flight up to altitude of 50 meters.
During this stage do not sit deep in the
harness in order to be ready for emergency
landing in case of e.g. winch line break.
Make sure that your brakes are fully
released, so that angle of attack does not
increase above safe level.
During all winch it is recommended to
control the direction by weightshifting only.
Steering lines should be used only for
considerable heading corrections, but even
then do not pull them too much in order to
avoid danger of stalling your wing.
Adjust your heading regularly when
winched, so no large corrections are
necessary. Remember there are several
conditions to be met when winching:
• pilot should be properly trained for
winching,
• the winch with all gear should be in
good condition and specialized for
paraglider winching,
• the winch operator must be properly
trained in winching and servicing the
gear,
• The wing must not be winched with
forces exceeding 90 daN, and under
any circumstances must not be towed
by any vehicle not equipped properly
or controlled by unskilled operator.
Paramotoring
During tests a lot of successful fligths were
made, both using the winch and the
paramotor. In flat areas this are the only
ways to get some altitude after launch.
There are no contraindications for using
the Nemo 5 in motoparagliding.
Caution: During launch, especially winched
or with a paramotor, always remember to
bring the wing directly over your head. The
aerofoil and its angle of attack were
arranged so as to give maximum lift
coefficient with relatively high safety level.
Therefore if the canopy is not pulled
enough, it can stay behind the pilot,
rendering launch difficult and/or dangerous.
16
Winching and paramotoring
NEMO

Landing
Just make sure that last turn into the wind
is done with sufficient altitude. At about 1
meter over ground flare out by gently
braking both sides. The glider may climb
again for a while gaining some height, if too
much brake is used.
Caution: Strong wind landings hardly
require braking, if at all! Use C-risers to
deflate the canopy after landing. Using the
brakes will probably result in pilot being
lifted again and dragged backwards.
The final glide of the landing approach
should be straight and smooth. Steep or
alternating turns can result in a dangerous
pendulum effect near the ground.
17
Landing
NEMO

AA’B AA’BC
Neutral risers position
• Slowest speed,
• Minimum sink.
• Launch configuration.
Full speed
• Increased speed,
• Increased sink.
C
* lengths of the risers incl. maillons,
length tolerance +/- 5mm
* lengths of the risers incl. maillons,
length tolerance +/- 5mm
Size 20, 23 25, 28 31
555
655
555
555
A 515 535
A’ 615 635
B 515 535
C 515 535
18
Speed modes
NEMO
Size 20, 23 25, 28 31
390
490
430
555
A 390 390
A’ 490 490
B 430 430
C 515 535

Big Ears
In order to get the big ears you have to pull
down the outer lines of the A' risers
(distinguished by red sheath, 10 cm longer
than others) by some 20-50 cm. While
inducing big ears you should never let the
brakes out of your hands. After tucking the
tips in, the wing will continue to fly straight
with increased sink rate (up to 5 m/s). You
can steer the wing pretty efficiently by
weight-shifting.
After releasing lines, the paraglider will
usually open up on its own or you can
assist it with a long stroke of the brakes,
until the tips unfold. For the sake of safety
(the possibility of a parachutal stall)it is
reasonable to engage speed system after
pulling big ears in order to lessen the angle
of attack of the wing centre.
B-stall
To enter a B-stall, simultaneously pull down
both B-risers (yellow cover) by ca. 10-15
cm. The canopy will collapse across the
entire span along its B-row, the airflow over
top surface will break and projected canopy
surface will be decreased. Forward
movement will be almost completely
stopped.
Further pulling B-risers is not advised, as
testes have shown it to increase wing
instability. If the canopy forms a horseshoe,
gently pull both brakes to recover.
To exit a B-stall, the risers should be
released in a smooth and decisive manner.
On quick and symmetrical releasing B-lines
the airflow will be reinstated and the wing
will surge forward, returning to normal
flight.The surge forward is minimal due to
stability of thre reflex profile, so braking is
not necessary.
Spiral dive
Nemo 5 is an agile paraglider, so entering
spiral dive happens quickly and can be
surprising for the less experienced pilots.
A spiral is characterised by reaching the
highest sink rates possible.
Significant G-forces, however, make it
difficult to sustain a spiral dive for a long
time, as it can place high loads on both
pilot and glider, to degree of losing
consciousness by the pilot. Never do this
manoeuvre in turbulence or at too high
bank angles.
Control the dive and do not exceed 16 m/s
sink. If the dive is not stopping after
releasing the brake, assist the glider with
19
Quick descent methods
NEMO

the outer one.
Caution: Never do spirals or wingovers with
big ears pulled. That’s another example of
concentrating whole load on reduced wing
area, which - combined with high G
manoeuvres - shifts the peak loads
unnecesarily close to their maximum
values.
Wing over
You make a wingover by performing a
series of consecutive, alternating turns with
increasing bank angle. Too aggressive
banking with unsufficient control can result
with a massive collapse.
Aerobatics
Nemo 5 was not designed to do any
aerobatics.
Caution: All rapid descent techniques
should be practiced in smooth air and only
with sufficient altitude margin! Full stalls
and spins are to be avoided as they are not
recommended techniques of clearing
dangerous situations. Irrespective of
paraglider type they may lead to dangerous
consequences!
Important: By far the best technique is safe
and correct flying, so that you will never
need to descend rapidly!
20
Quick descent methods
NEMO
Table of contents
Other Dudek Aircraft manuals

Dudek
Dudek Run&Fly Series User manual

Dudek
Dudek Universal 1.1 25.5 User manual

Dudek
Dudek Colt 23 S User manual

Dudek
Dudek VOX-25S User manual

Dudek
Dudek Nucleon WRC cabrio User manual

Dudek
Dudek Shark User manual

Dudek
Dudek GLOBE 120 User manual

Dudek
Dudek Coden User manual

Dudek
Dudek NEMO2 User manual

Dudek
Dudek Nemo 4 Series User manual

Dudek
Dudek Nucleon WRC User manual

Dudek
Dudek WARP ENERGY User manual

Dudek
Dudek Snake XX User manual

Dudek
Dudek Synthesis User manual

Dudek
Dudek Orca XX User manual

Dudek
Dudek Hike&Cruise User manual

Dudek
Dudek Cabrio Synthesis User manual

Dudek
Dudek Run&Fly 2 User manual

Dudek
Dudek Nemo XX 23 User manual

Dudek
Dudek FreeWay User manual