Dudek Run&Fly 2 User manual

Run&Fly 2
User manual
V12/08/2022

Index
Introduction
About the wing
Paraglider design
Risers design
Steering handles
D-Brake System
Trim mer s (op tio nal )
Before first use
Pre-flight check
Launch
Flight
Landing
Flying with trimmer (optional)
Risers length
Lenght of risers with trimmer
(optional)
Winching and powered paragliding
Quick descent methods
Extreme manoeuvres
Paraglider care
Warranty
Environmental care
What have you bought
Tech nic al Da t a
Materials
Lining scheme
Join us
Support
Summary
3
4
6
7
9
10
11
14
16
19
21
23
24
27
28
29
30
32
34
37
39
40
41
42
43
45
46
47

Congratulations!
We are pleased to welcome you among the
growing number of DUDEK
PARAGLIDERS pilots. You’ve beco m e a
proud owner of a sport paraglider,
designed according to recent trends among
paramotor canopies.
Extensive development, application of the
modern production methods and thorough
testing resulted in a friendly behaving
paraglider, offering the pilot a lot of fun
combined with great performance.
We wish you many enjoyable and safe
flying hours.
Please read this manual carefully and
note following details:
• The purpose of this manual is to offer
guidelines to the pilot using the
paraglider. By no means it is intended
to be used as a training manual for
this or any other paraglider.
•Youmayonlyflyaparagliderwhen
qualified to do so or when undergoing
training at an accredited school.
• Pilots are personally responsible for
their own safety and their paraglider's
airworthiness.
•Theuseofthisparagliderissolelyat
the user's own risk! Neither the
manufacturer nor dealer do accept
any liabilities involved.
• This paraglider on delivery meets all
the requirements of the EN 926-1 and
926-2 regulations or has an
airworthiness certificate issued by the
manufacturer. Any alterations to the
paraglider will render its certification
invalid.
• Other documents concerning this
paraglider can be found on attached
pendrive or on our website
www.dudek.eu.
Note: Dudek Paragliders warns that due to
the constant process of development the
actual paraglider may differ slightly from
the one described in the manual. However,
those differences cannot affect the basic
design parameters: technical data, flight
characteristics or strength. In case of any
doubts contact us please.
Introduction

Providing our pilots new values in such a
radical concept as the first version of the
revolutionary Run&Fly 2 was a real
challenge for our team. Most of the design
goals were based on the opinions of the
predecessor's users. The main idea was to
enhance the positive pilot's experiences by
simplifying the operation of the paraglider
as much as possible while maint aining the
most important and valued features of
Run&Fly-small package volume and low
weight.
For whom the Run&Fly?
The Run&Fly is not a typical paragliding
canopy: it has a single skin. Therefore it’s
lighter while displaying much stronger
tendency to stay over head and recover
from any surges than a regular paraglider.
In this way, the Run&Fly 2 offers safe take-
offs, great maneuverability in flight and
smooth landings. It is exceptionally light, so
that you can carry the wing on your back
during trail running or climbing sessions
almost without noticing the load. It is so
compact, that it fits in a 4-litre bag. The
Run&Fly is perfect for trail running, hike&fly
and necessary travelling, or just as a
second wing you will always have with you
(you can easily place it in your hand
luggage while travelling by plane).
Design and purpose
The new method of calculating the canopy
stresses proposed by the originator, JB
Chandelier, helped minimizing the number
of distortions occurring where panels made
in 3to1 technology are connected. In this
way, it was possible to slightly increase the
perfection of flight, as well as the visual
qualities of the canopy.
The leading edge of the Run&Fly 2 is made
with a double- impregnated Porcher Sport
fabric, which is more resistant to increasing
the porosity over time. Main ribs are made
of more durable 32-gram hard-finish fabric.
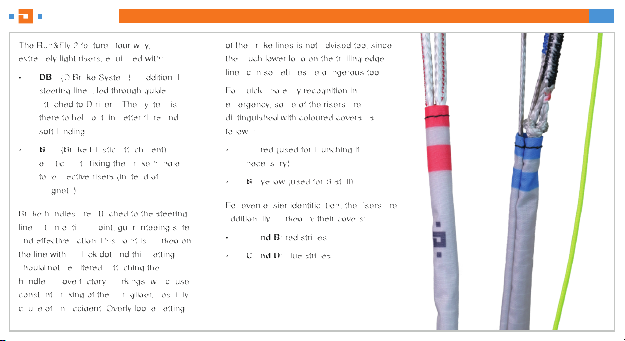
Run&Fly 2 could not miss the latest
product in the bridles catalogue of the
German company Edelrid-colourful,
uncovered lines of the A-8001 series. The
colours of the lines depend on the row and
height in the gallery where they are
attached. It makes the ground operation
easier. They are also better visible against
the rocks, from which pilots of our single-
skin often take off.
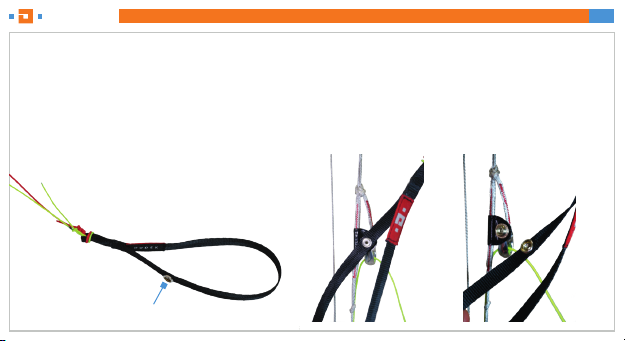
Significant improvements have been made
to the risers. The basis is Dyneema lines
without any steel or soft links. However, the
lines are hidden in multifunctional covers.
About the wing

•Theoperationoftherisersis
significantly simplified by combining
the lines into two separate groups.
The impression is similar to handling
of the risers of a two liner wing.
•Therisersaresecuredovertheir
considerable length against external
factors that can damage them, e.g. by
contact with the hard part of the
Velcro or branches.
In the new version of Run&Fly 2 it is
possible to install an optional trimmer. A
lightweight trimmer, which we have
designed especially for Run&Fly 2, extends
its speed range by +/- 2 km/h, which,
depending on the wind conditions, may be
beneficial.
Important: Run&Fly 2 belongs to the single-
surface canopy class. There is
fundamental difference between classic
double skin and modern single skin
canopies. All the launch, landing and
steering techniques look a bit different. If
you are an established paraglider pilot, you
shouldn’t have any problems with adapting
to the wealth of new possibilities brought to
you by the Run&Fly. However, this doesn’t
work both ways: if you started your
paragliding experience with the single-skin
gliders, be aware that you are not qualified
to safely fly standard double-surface
canopies.
About the wing

The Run&Fly 2 is produced in new
technology, utilizing capabilities of precise
laser cutter. All stages of the production
process take place as our Polish plant
under closes upervision of the designer
himself thus ensuring highest European
quality.
Careful selection of modern fabrics and
design solutions brings about great
strength and durability of the canopy.
All materials used come fro marked
production batches, and each production
step can be verified down to identification
of individual worker and controller.
Paraglider Design
Inlets
Leading edge
Rib
Trailing edge
Suspension lines
Risers
Harness
Steering line
Brake handle

Steering line
Guide of the D-Brake system line
FL line of the D-Brake system
Naps fasteners
Light brake handle
A-B risers cover
C-D risers cover
Hangpoint cover
Carabiner
AD BC
Riser scheme

The Run&Fly 2 features four-way,
extremely light risers, equipped with:
•DBS(D Brake System) – additional
steering lines, led through guides
attached to D risers. The system is
there to help obtain better flare and
soft landing.
•BEA(Brake Elastic Attachment) –
elastic parts fixing the brake handles
to respective risers (instead of
magnets).
Brake handles are attached to the steering
lines at an optimal point, guaranteeing safe
and effective action.This point is marked on
the line with a black dot and this setting
should not be altered. Attaching the
handles above factory markings will cause
constant braking of the paraglider, possibly
cause of an accident. Overly loose setting
of the brake lines is not advised too, since
the much lower load on the trailing edge
lines can sometimes be dangerous too.
For quick and easy recognition in
emergency, some of the risers are
distinguished with coloured covers as
follows:
•A-red(usedforlaunchingif
necessary)
•B-yellow(usedforB-stall).
For even easier identification, the risers are
additionally marked by their covers:
•AandB:redstripes.
•CandD:bluestripes.
Riser scheme

To make n ew ste e ri n g han dle s, we ch o os e
light and soft tape. The fastening system
bases on naps specially modified for this
particular project. The toggle is more
comfortable in use. Naps allow to connect
it to risers quickly.
Brake handles are attached to the steering
lines at an optimal point, guaranteeing safe
and effective action.This point is marked on
the line with a black dot and this setting
should not be altered.
Attaching the handles above factory
markings will cause constant braking of
the paraglider, possibly cause of an
accident. Overly loose setting of the brake
lines is not advised too, since the much
lower load on the trailing edge lines can
sometimes be dangerous too.
Steering handles
Snap fastening the handle to the riser

In order to optimalise parameters of the
single shell paraglider canopy on
landing approach we’ve created a
dedicated D-Brake system. It is
activated somewhere in half of the
braking range, gradually pulling down
the D-risers. Because of this, the wing
airfoil is flattened in the rear area,
generating additional lift needed for
good flare and soft landing.
D-Brake System

In the new version of Run&Fly 2 it is
possible to install an optional trimmer. A
lightweight trimmer, which we have
designed especially for Run&Fly 2, extends
its speed range by +/- 2 km/h, which,
depending on the wind conditions, may be
beneficial.
Note: Tri mm e rs c an be p urc has ed
separately. The serial wing has no
trimmers applied due to the fact that:
•customersforwhomRun&Flyis
intended may not have sufficient
experience of using trimmers in the
past,
•insomeextremesituations(iftheyoc
cur), such as a side collapse or a front
collapse, in the configuration with an
open trim, the wing may behave more
dynamically, and it may require the
pilot to react, e.g. by pulling the
brakes.
How to adjust the trimmer in Run&Fly
2?
The trimmer operation in Run&Fly 2 is
unique to the dyneema lines used. The
dyneema line has no core, therefore it is
possible to thread a cord through its center.
When the line is slack, it slides easily
through the tunnel. When under tension,
the tunnel tightens, effectively blocking the
inner cord. The trimmer is adjusted as
follows:
•Toreleasethetrimmer:pulldownthe
upper plastic trimmer bar to loosen the
thread on the trimmer cord. The trimmer
will release automatically.
•Toclosethetrimmer:pullthelowerplastic
bar (attached to the end of the trimmer
Trimmers (optional)

cord) down as required. Releasing it from
your hand will cause the thread to tighten
under its tension and to lock the trimmer.
•Settingthetrimmerintermediatevalues:
to set the trimmer to any intermediate
position (eg neutral), first release it fully
and then pull it back to the desired length.
Adjusting the trimmer is shown on the next
page.
Caution: Whenever you do adjust trim
settings, always remember to do it
symmetrically.
Trimmers (optional)

Trimmers (optional)
Releasing the trimmer: pull the top black
bar down.
Closing the trimmer: pull the lower black bar
down to the desired value.
Trimmer in neutral position: pull the trimmer
until the points on the line are visible on both
sides of the black bar.

Operation
It’s pilot responsibility to choose a canopy
matching his skills.
Dudek Paragliders cannot take
responsibility for a wrong choice, but we
are always ready to advise you – just
contact us.
Weight range
Each size of the Run&Fly 2 paraglider is
dedicated for a corresponding pilot skill
level. In this case a calculation of real take-
offweight is necessary before using the
size selection table, shown below:
For the Run&Fly, the generale rule of
selection says: the better pilot skills, the
bigger wing load is acceptable. With the
wing load, the speed and agility (response
to steering inputs) grow accordingly. The
structural strength certificate of the
Run&Fly 2 is valid up to 105 kg take-off
weight. This mass cannot be exceeded.
Caution: Check your real take-offweight!
Some pilots calculate their take-offweight
by just summing up catalogue numbers,
e.g.: harness 5 kg + canopy 6 kg + pilot 89
kg = ca. 100 kg. In reality your actual take-
offweight can be umpteen kilograms more.
Most often we forget the clothing,
electronics, backpacks, sometimes even
such basic things like fuel or rescue chute
weight are omitted!
Before first use

What harness?
You ca n u se any ce rti fied ha r ness w hich
has its hangpoints at 40-45 centimeters
from the seatplate.The width between
carabiners should be somewhere between
40 cm and 45 cm. For the Run&Fly 2 we
suggest using a light harness, for example
Sit&Fly 260 with separate leg placing, as
this increases stability and somewhat limits
the amount of kinesthetic sensations
affecting pilot’s body.
Caution: Please note that any modification
of seat/hang point distance changes the
position of the brakes as related to pilot's
body. You must remember that in each
harness your steering range will be
different.
Other systems
This paraglider has no other systems which
can be adjusted, exchanged or
removed.
Before first use

Pre-flight check
Pre-flight check
Having chosen a place to launch
accordingly to the terrain as well as wind
speed and direction clear it of any
obstacles that could damage your canopy
or tangle in the lines.
After laying out your paraglider in a
horseshoe directed against the wind
following checks must be made:
• canopy, lines and risers condition. Do
not launch if the slightest damage is
noticed,
• the paraglider should be arranged so
that the centre section A-lines will
strain earlier that the outer ones. This
ensures easy and symmetrical launch,
•theleadingedgeshouldstaytautand
even,
• all lines and risers should be
separated. Make sure they are not
tangled, and checked against catching
anything. It is equally important to
check the brake lines. They must be
firmly attached to the brake handles
and run freely through the pulleys to
the trailing edge,
•itisveryimportanttocheckthatno
lines are looped around the canopy.
The so-called ”line-over” may have
disastrous consequences during take
off,
•alwaysputonandfastenyourhelmet
before clipping in to the harness.
Attach the harness to the risers
• check main carabiners. They should
be properly attached and their latches
should be firmly closed and secured,
•makesurethattherisersareattached
to the appropriate carabiner and are
not twisted. Two-color covers of the
attachment points as well as specially
marked left and right sides will help
you to attach the risers correctly, as
shown in the photos on the next
page.

Pre-flight check
Side markings:
Pull down the flexible cover to confirm that the risers
have been attached to the appropriate carabiners:
•L-bluecolor:leftside
•R-redcolor:rightside
Direction of flight:
As in the case of Run & Fly 1, attachment point covers have two-color markings that help to
properly connect the wing to the harness, avoiding take-offwith twisted risers. Make sure
that the covers look as follows after locking the risers in the carabiners:
•Front -red:paraglider'sleadingedgeandflightdirection
•Rear -blue:paraglidertrailingedge
Direction of flight

Pre-flight check
How to properly grab the brakes?
The risers and the brake handles cannot
be twisted. For the correct grip of the
handles, take the yellow FL line as it is
fixed to the carabiner. Move your hand
along over the guide, until you grab the
handle. While moving along the line you
should not encounter any other line or riser,
otherwise it would probably be twisted.

Classic (forward) launch
Should be used with little or no wind.
Facing the wind place the risers over your
shoulders (A riser must lay on top).
Clip it into carabiners and lock them. Grip
the brake handles. Due to its outstanding
design, the Run&Fly 2 rises so fast and
easy that pulling the A risers is not
suggested. It can easily lead to a frontal
collapse! The best way is to spread your
hands a bit down and back, with slightly
bent elbows. All risers are to be placed
near the elbows.
With a soft pull check whether the A risers
are the topmost and all the lines are
cleared. For easier orientation the A risers
have a red cover.
Then in fluid movement lean forward and
run, until the canopy rises. Look up and try
to keep it directly over your head. Side drift
is corrected best by moving yourself always
under center of the canopy. In order to
keep wing in the air the suspension lines
must stay taut all the time, so in light winds
you will have to run forward. With stronger
winds you can control the wing while
standing still.
When leaving the ground apply some
brakes, then release it after gaining some
distance from the ground. Keep your hands
relaxed.
Reverse launch
May be used once the pilot feels confident
enough, after groundhandling the canopy
for a couple of hours.
After clipping the risers into carabiners as
for the forward launch, turn back to face
the wing, moving one riser group over your
head. As a consequence, you will have the
risers crossed.
Unclip the brake handles from rear risers
and grip it outside of the risers without
crossing neither arms nor lines. In this way
you steer the left side with you left hand
and vice versa. Make sure that the wing
inflates symmetrically and the lines are not
tangled.
By taking a few steps back you will strain
the risers and consequently get the canopy
up. Dedicated pulling the A risers is not
necessary. When rising, the canopy should
stop over your head on itself without your
intervention. To make sure you have full
control, you can keep the brakes slightly
strained.
When turning into wind, remember to turn
the right way (hint: always do it the same
direction) and to keep the lines strained at
Launch

all times. The turn itself should be quick
and smooth. While turning you have to
release the brake handles and grip them
again facing forward, so that again the left
one is in the left hand etc. Last check of the
wing & free space to launch and offyou go,
running into wind with eventual light
braking when taking off.
Caution: To get t he ca nopy d own in s tron g
wind, pull the brakes down abruptly &
forcefully to disrupt creating lift. You may
also use the D risers by pulling them at
least 25 cm down.
Launch
Table of contents
Other Dudek Aircraft manuals

Dudek
Dudek Hike&Cruise User manual

Dudek
Dudek FreeWay User manual

Dudek
Dudek Run&Fly Series User manual

Dudek
Dudek Universal 1.1 25.5 User manual

Dudek
Dudek Coden User manual

Dudek
Dudek Nemo XX 23 User manual

Dudek
Dudek GLOBE 120 User manual

Dudek
Dudek Snake XX User manual

Dudek
Dudek Nucleon WRC User manual

Dudek
Dudek Universal User manual

Dudek
Dudek NEMO 5 User manual

Dudek
Dudek NEMO2 User manual

Dudek
Dudek Synthesis User manual

Dudek
Dudek WARP ENERGY User manual

Dudek
Dudek Nucleon WRC cabrio User manual

Dudek
Dudek VOX-25S User manual

Dudek
Dudek Cabrio Synthesis User manual

Dudek
Dudek Shark User manual

Dudek
Dudek Colt 23 S User manual

Dudek
Dudek Orca XX User manual