NOTE:
This equipment has been tested and found to comply with the limits for a Class B Digital Device, pursuant
to Part 15 of the FCC Rules.
These limits are designed to provide reasonable protection against harmful interference in a residential
installation. This equipment generates, uses, and can radiate radio frequency energy and, if not installed
and used in accordance with the instructions, may cause harmful interference to radio communications.
However, there is no guarantee that interference will not occur in a particular installation. If this equipment
does cause harmful interference to radio or television reception, which can be determined by turning
following measures:
- Reorient or relocate the receiving antenna.
- Increase the distance between the equipment and receiver.
- Consult the dealer or an experienced radio/TV technician for help.
This equipment complies with Part 15 of the FCC Rules. Operation is subject to the following two conditions:
1) This device may not cause harmful interference.
2) This device must accept any interference received, including interference that may cause undesired
operation.
compliance could void the user’s authority to operate the equipment.
Industry Canada Statement
This Class B digital apparatus complies with Canadian CAN ICES-005 (B) / NMB-005 (B).
NOTA:
Este equipamiento ha sido probado y cumple con los límites establecidos para los Dispositivos Digitales
Clases B, conforme a la Parte 15 de las Normas de la FCC.
Estos límites están diseñados para proveer una protección razonable de interferencias dañinas en una
instalación hogareña. Este equipo genera, usa y puede irradiar energía de radiofrecuencia y, si no se instala
y utiliza de acuerdo a estas instrucciones, puede causar interferencias en las comunicaciones por radio.
No hay garantías de que la interferencia ocurra en una instalación en particular. Si este equipo causa
alienta al usuario a tratar de corregirla con una o más de las siguientes medidas:
- Reubicar la antena receptora.
- Aumentar la distancia entre el equipo y el receptor.
- Conectar el equipo a un salida o a un circuito diferente del que estaba conectado.
- Consultar con el vendedor o con un técnico especializado.
Este equipamiento cumple con la Parte 15 de las Normas de la FCC. El funcionamiento está sujeto a estas
dos condiciones:
1) El dispositivo no debe causar interferencia.
2) El dispositivo debe aceptar cualquier interferencia recibida, incluida la que pueda causar un
esta unidad por la parte responsable de su cumplimiento pueden anular la autoridad del usuario para el
funcionamiento de este equipo.
Declaración de la industria de Canadá
Este aparato digital clase B cumple con l
㮦⿍ᵉ曃 :
㜓䔉⒨娔₀䵺㸓婍ḍ嬰㗵䬍⏯㠠㓁併⛲偖悍态姱⦻Ⓢ㛪Ƌ)&&ƌḲ䬓㢄奶⮁Ə㈧娔⮁Ḳ%䴁Ƌ&ODVV%ƌ㕟ἴ
壄何Ḳ昷∝㢄ờ˛
䛟旃昷∝䙫姩⮁✏㖣㎷ᾂ恐䕝䙫ῄ孞ƏỌ昙㭉ἶ⭬⭰壄㘩怇ㇷ剖⹙㓥˛㜓娔₀㛪䔉䔆˚ὦ䔏ḍ憲㔥⯫栢曢僤Ə
⥩㜑ᾄ䅎媑㗵㈲ⅱ怙堳⭰壄凮ὦ䔏Ə⯮⯴䄈䷁曢态姱䔉䔆剖⹙㓥˛
䄝俳ƏỌ䉠⮁䙫䧲⭰壄ḍῄ嬰䴼⯴㛪㛰⹙㓥䔉䔆˛勌㜓壄何䢡⯍⯴䄈䷁曢态姱⎱曢好Ὲ噆㎌㔝䔉䔆⚛憴
䙫⹙㓥Ə㭋剖⹙㓥⏖䵺䔘ẋ㛦敲旃㜓䔉⒨娔₀Ὥ∋⮁ƞ䔏㈝⏖忶怵Ọ䨕ㇽ⤁䨕㖠㲼婍吾姊晋⹙㓥Ɲ
媦㕛㎌㔝⤐䷁䙫㖠⏸ㇽἴ何˛
㊰敞娔₀凮㎌㔝♏䙫敺巄˛
⯮䔉⒨娔₀㎌∗凮㎌㔝♏⏳曢巖䙫㎹⺎˛
媲㴤䵺択┭ㇽ㛰䵺樾䙫䄈䷁曢曢好㉧堺ạⓈỌ⯲㰩⌻⊐˛
㜓䔉⒨䬍⏯併⛲偖悍态姱⦻Ⓢ㛪Ƌ)&&ƌḲ䬓㢄奶⮁˛㒴ὃ㘩曧恜⭯Ọ⅐柬㢄ờ昷∝Ɲ
㜓壄何凛怇ㇷ㛰⮚䙫⹙㓥˛
㜓壄何⾬柯僤㉦⎾㈧㎌㔝ḲỢἼ⹙㓥Ə⋬㋓⏖僤怇ㇷ杅柷㜆䙫㒴ὃ⹙㓥˛
孍Ɲ㜑䵺㉦嫥岇岓䙫㖠Ḳ婴⏖⍚忼凑㔠壄ㇽ孱㛛㜓䔉⒨Əὦ䔏俬⯮░⤘ὦ䔏㜓䔉⒨Ḳ㫱∐˛
Battery Installation
REMOTE CONTROL - DL2025 button cell battery pre-installed.
This product contains a button cell battery. If swallowed, it could cause
severe injury or death in just 2 hours. Seek medical attention immediately.
(On First Use Remove Battery Compartment Protective Plastic)
PUCKS - 3 AAA batteries each (included)
- Remove the battery cover by rotating to“Unlocked”position.
- Place 3 AAA batteries into the battery compartment
aligning polarity (+) (-) as indicated.
- Return battery cover by turning to the“Locked”position.
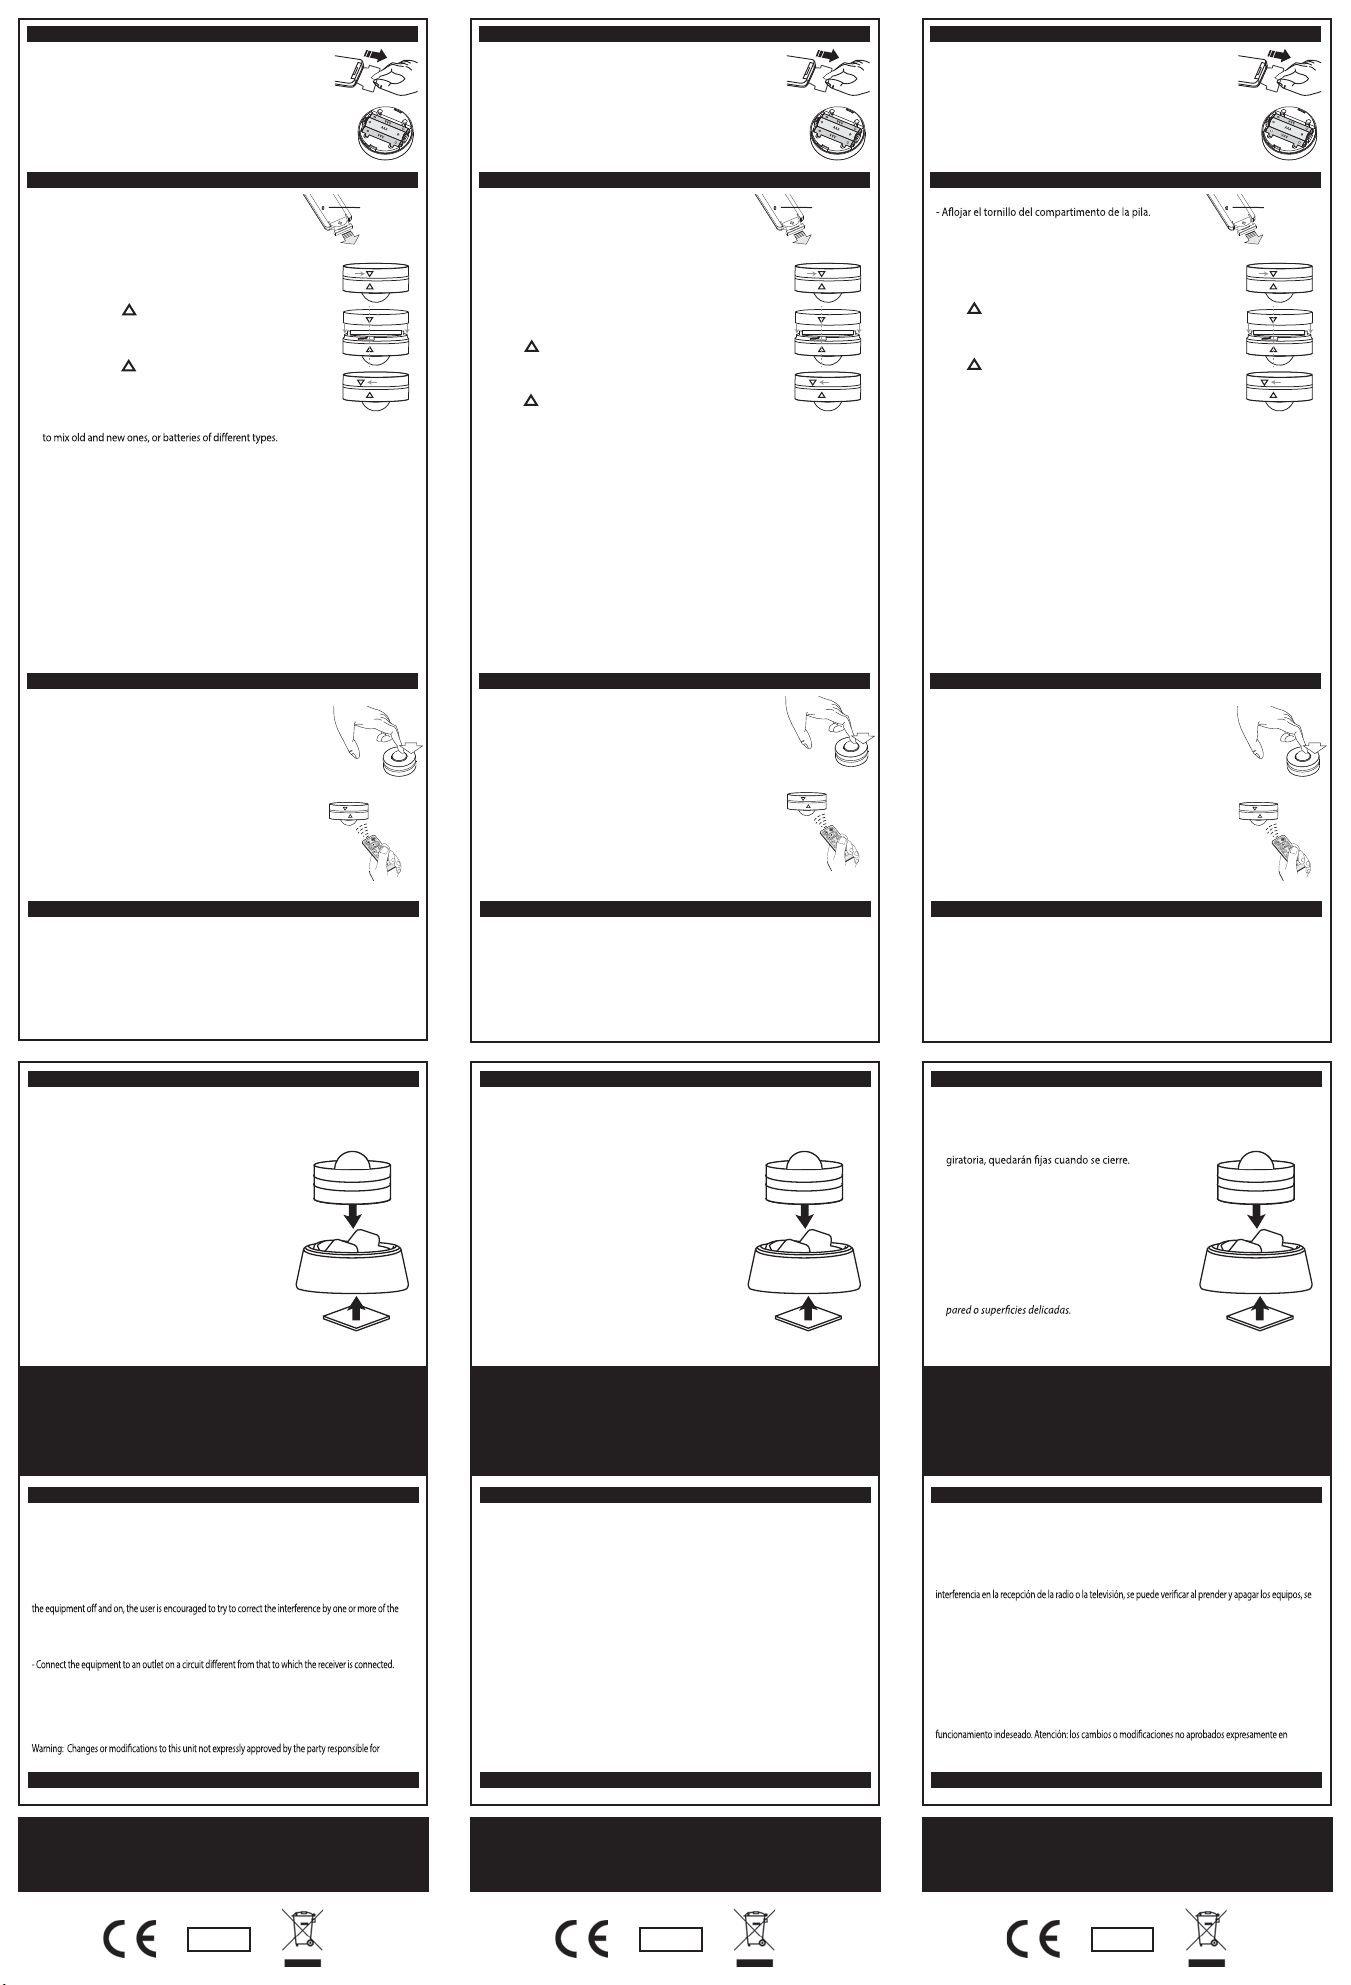
Battery Replacement
REMOTE CONTROL - DL2025 button cell battery required.
- Loosen battery compartment retaining screw.
- Slide battery drawer out.
- Remove battery.
- Place new battery in position aligning polarity (+) (-) as indicated.
- Slide battery drawer in.
- Tighten battery compartment retaining screw.
PUCKS - 3 AAA batteries each
- Open by rotating ’s until aligned.
- Remove ALL batteries
- Place 3 new AAA into battery compartment aligning polarity
(+) (-) as indicated.
- Close by rotating ‘s until out of alignment.
CAUTIONS: BATTERY INSTRUCTIONS
- Always purchase the correct size and grade of battery most suitable
for the intended use.
- Always replace the whole set of batteries at one time, taking care not
- Clean the battery contacts and also those of the device prior to battery installation.
- Ensure the batteries are installed correctly with regard to polarity (+ and -).
- Remove batteries from equipment which is not to be used for an extended period of time.
- Remove used batteries promptly.
For recycling and disposal of batteries to protect the environment, please check the
internet or your local phone directory for local recycling centers and / or follow local
government regulations.
CAUTION: Swallowing may lead to serious injury in as little as 2 hours or death, due
to chemical burns and potential perforation of the oesophagus. If you suspect
your child has swallowed or inserted a button battery, immediately seek urgent
medical assistance. Examine devices and make sure the battery compartment is
correctly secured, e.g. that the screw or other mechanical fastener is tightened.
Do not use if compartment is not secure. Dispose of used button batteries
immediately and safely. Flat batteries can still be dangerous. Tell others about the
risk associated with button batteries and how to keep their children safe.
Operating Instructions
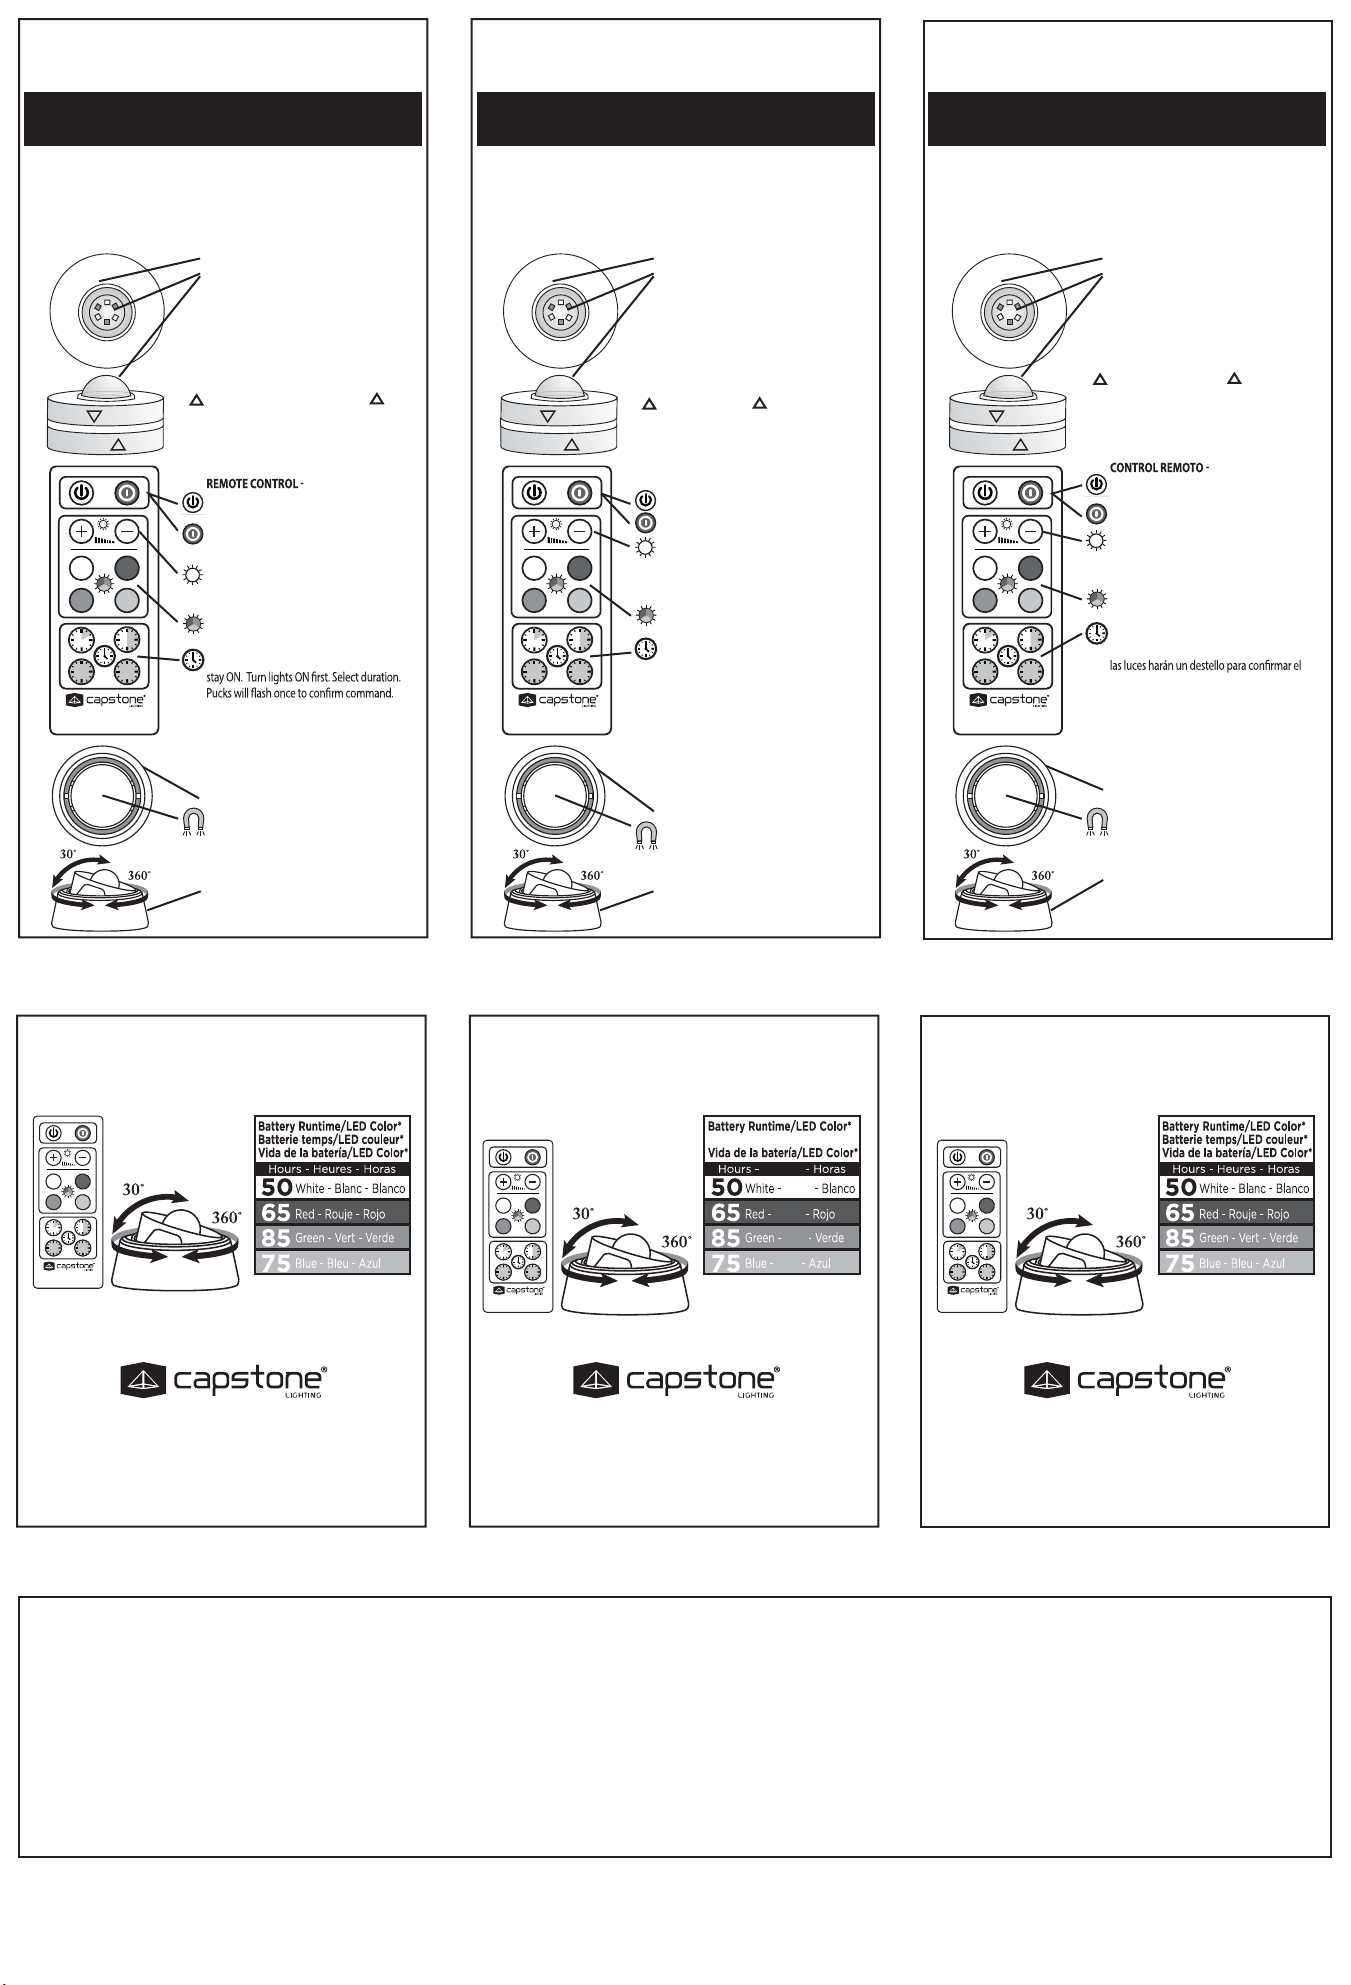
PUCKS - Manual Operation - Once batteries are installed turn ON each puck
by lightly pressing the Activation Dome. Repeat pressing
the Activation Dome to manually turn the unit OFF. Light
brightness will default to previous settings.
PUCKS - Remote Control Operation
The remote control unit will operate Pucks within a 6 m / 19.6 ft
range. Once batteries are installed turn all puck lights ON by
pointing the remote control towards the sensor. Use the DIMMER,
COLOR SELECTOR and TIMER functions by pointing the remote
control towards the sensor and selecting the desired function.
ADDING PUCKS TO A SET
Up to 36 pucks may be controlled by one remote control. No
programming is needed. Any similar pucks will be controlled when
placed within the range of the remote control’s signal.
Mounting Instructions - Puck Lights ONLY
* DO NOT PLACE ADHESIVE ON PUCKS IF MOUNTING ON DIRECTIONAL BASE. This is
permanent tape that will cause the pucks to be attached to the directional base.
PUCKS - Adhesive Mounting Tape Included* Remove the protective paper on one
side of the Mounting Pad and apply to the battery cover (use caution as the
adhesive is very strong). Position the puck in the desired location. Remove the
second protective paper and apply pressure to set the adhesive. Once applied the
puck is permanently mounted.
Instalación de las pilas
CONTROL REMOTO - la pila botón DL2025 está preinstalada.
Este producto contiene una pila botón. En caso de ingesta, puede provocar
graves lesiones o incluso lamuerte en tan sólo 2horas. Busque atención
médica de inmediato (En el primer uso retire el plástico protector del
compartimento de la pila).
LUCES - 3 pilas AAA cada una (incluídas)
- Para retirar la tapa de la pila, gírela hasta la posición“Unlocked”.
- Coloque las 3 pilas AAA en el compartimento de la pila y
alinee la polaridad (+) (-) como se indica.
- Coloque la tapa de la pila y ciérrela en la posición“Locked”.
方㬞⩇垛
弗㉥┦
曎 ⩇垛'/ 惓ㄡ方㬞
㜓䔉⒨ⅎ壄栭懼㉊曢㱇˛勌媋棆Ə⏖僤✏ῲ⯶㘩ⅎ⍚㛪怇ㇷ⚛憴
䙫⮚ㇽ㭢Ẉ˛媲䪲⍚⯲㰩憒䘩⌻⊐˛楽㬈ὦ䔏㘩媲䧢晋曢㱇⌊䙫
ῄ孞⠸冇
垛枼䂆⋂ỉ垛枼䂆ḽ䏦朄▙唝濑$$$濒方㬞濑䏠⍿⊤攂濒
弰凚˥敲╆˦Ƌ8QORFNHGƌἴ何㊭曢㱇咲˛
ᾄ曢㱇⌊Ḕ㈧䤡䙫㭊㥜Ƌƌ˚岇㥜Ƌƌἴ何⭰壄栭⛂噆
Ƌ$$$ƌ曢㱇˛
弰⊼凚˥旃数˦Ƌ/RFNHGƌἴ何⯮曢㱇咲憴㖗㭟ἴ˛
Mounting Instructions - Puck Lights with Directional Base
* DO NOT PLACE ADHESIVE ON PUCKS IF MOUNTING ON DIRECTIONAL BASE.
DIRECTIONAL BASE - Batteries must be installed in Pucks previous to use with
Directional Base. The directional base uses a magnet to connect with batteries that
are installed in the pucks. Place Puck in the middle
of the swivel base, pucks should attach when close.
Adhesive Mounting Tape Included* Remove the
protective paper on one side of the Mounting Tape and
apply to the bottom of the directional base (use caution
as the adhesive is very strong). Position the base in the
desired location. Remove the second protective paper
and apply pressure to set the adhesive. Once applied
the directional base is permanently mounted.
* This is permanent tape that may cause damage if
removed. Not recommended for use on wallpaper or
delicate surfaces.
For indoor, dry use only
Instrucciones de instalación - Luces embutidas con la base móvil
* NO PONGA ADHESIVO SOBRE LAS LUCES SI LO VA A INSTALAR SOBRE LA BASE MÓVIL.
BASE MÓVIL - Las pilas deben estar instaladas en las luces previamente a su uso
con la base móvil. Ésta utiliza un imán para conectarse con las pilas instaladas en
las luces. Ubique a las luces en el medio de la base
La cinta doble faz está incluida* Retire el papel protector
de un lado de la cinta y aplíquelo al fondo de la base
móvil (hágalo con cuidado, el adhesivo es muy fuerte).
Ubique la base en la posición deseada. Retire el
segundo papel protector y aplíquelo haciendo presión
para asentar el pegamento. Una vez aplicada la base
estará permanentemente instalada.
* Esta es una cinta adhesiva permanente que puede causar
daño si se retira. No se recomienda su uso sobre papel de
Sólo para interiores, para uso en seco
⩇垛奨㓌ħ垛枼䂆僅⩘⋏⚸ⵥ
*
⭰壄㖣⮁⏸⟡⺎㘩媲⋦✏壄棥䆯ὦ䔏⭰壄傳冇˛
⩘⋏⚸ⵥ✏凮⮁⏸⟡⺎⭰壄ὦ䔏Ḳ∴Ə⾬柯ℯ⯮曢㱇⭰壄㖣壄棥䆯ⅎ˛⮁⏸⟡⺎
ὦ䔏䢨搜凮⭰壄✏壄棥䆯ⅎ䙫曢㱇䛟怊˛⯮壄棥䆯㔥✏㖲弰⟡⺎䙫Ḕ⤕ἴ何Ə✏旃数
㘩壄棥䆯ㆰ㛪凮⟡⺎䛟㎌˛䔉⒨ⅎ␒⭰壄傳冇⯮⭰壄
傳冇Ợ杉䙫ῄ孞䴀䧢晋ḍ岣㖣⮁⏸⟡⺎惏
Ƌ⛇傳冇溶『⽯⼞Ə溶岣㘩媲䉠∌䕀ヶƌ˛
㉥∗恐⏯⭰壄⟡⺎䙫ἴ何˛⯮⏍杉䙫ῄ孞䴀㑼
ḍ䔏⊂⢺ἶỌὦ溶冇⛡⮁˛㗍⛡⮁⽳⍚⏖㰟Ḭ
⭰壄㖣恟⮁䙫ἴ何˛
*
ὦ䔏䙫傳冇⅞㰟Ḭ⛡⮁䙫䉠『Ə⏖僤㛪㖣䧢晋㘩怇ㇷ㏴⣅˛
ḍ⻡字ὦ䔏㖣⢨䴀ㇽ䴗䷢䙫䈭杉˛
攎㑺⩢‥Ʊᴼ䂣䍮❁ḽ䏦
ON/OFF Encendido/
Apagado
敲╆旃数
Directed
at sensor
6 m / 19.6 ft
Apuntar al
sensor dentro
de los 6m
㖣⅓Ⱑƒ勘䙫
䮫⛴ⅎ㋮⏸ㄆㆰ♏
Retaining
screw Tornillo de
ajuste
⮁ἴ垡䵙
WARNING
1. This product is not a toy and contains small parts. Close supervision is necessary
when this unit is used near children.
2. To reduce the risk of electrical shock, do not put the unit in water or other liquid.
For cleaning, use a soft dry cloth. Do not place or store appliance where it can fall
or be pulled into a tub or sink.
ADVERTENCIA
1. Este producto no es un juguete y contiene piezas pequeñas. Se recomienda
especial atención cuando sea utilizado cerca de niños.
2. Para reducir el riesgo de descarga eléctrica, no ponga la unidad en agua u otro
líquido. Para limpiarlo, utilice trapos secos y suaves. No ubique o almacene los
apliques donde se puedan caer o ser tirados a la bañadera o al inodoro.
娤⌈ᵉ曃
1. 㜓䔉⒨ḍ杅䎐⅞ⅎ␒⯶❲曝ờ˛㜓䔉⒨㖣杇徸⭐䫌䙫⠛㈧ὦ䔏㘩曧暏㘩㳏ヶ˛
2. 䂡昴ἵ姟曢䙫梏暑Ə⇮⋦⯮㜓䔉⒨何㖣㰛壈ㇽ⅝ẽ䙫㶙檻Ḕ˛㷬㼻㘩ὦ䔏㞻廆ṥ䇌䙫ⷪ㖀
㷬䏭˛媲⋦⯮㜓䔉⒨㔥何ㇽ岖⬿✏㛪㍰吤ㇽ㘖墒㊰怙䮈⬷ㇽ㰛㧤壈䙫✗㖠˛
Locked Cerrado
⛡⮁
Unlocked Abierto
㊭敲
CW EU CW EUCW EU
Battery
compartment
Compartimento
de la pila
曢㱇⌊
Protecting the Environment - Recycle It
Reponsibly recycling these products saves natural resources and protects
human health through reuse of reclaimed resources. Please call your local waste
management company for vendors in your immediate area.
Proteja al ambiente - Recicle
El reciclado responsable de estos productos ayuda a salvar los recursos naturales y
protege la salud a través de la reutilización de los recursos. Por favor contacte a su
compañía de gestión de residuos para contactarse con los vendedores en su área.
ẛ娵◮䋁䍮❁妉Ḛ⠻▜㏴
䛈岓✗⛅㔝怀Ẃ䔉⒨⏖䶔孞凑䄝岮㹷ḍ⏖忶怵⛅㔝岮㹷䙫憴㖗∐䔏ῄ孞ạ桅⁌⺞˛
媲Ị㛦わ愗徸⌧⟆䙫ᾂㆰ┭偖䵈䕝✗䙫⻉㢫䉐䮈䏭⅓⏟˛
⩇垛奨㓌ħ攎垛枼䂆
⭰壄㖣⮁⏸⟡⺎㘩媲⋦✏壄棥䆯ὦ䔏⭰壄傳冇˛
ὦ䔏䙫傳冇⅞㰟Ḭ⛡⮁䙫
䉠『Ə㛪ὦ壄棥䆯溶昫㖣⮁⏸⟡⺎˛
垛枼䂆䔉⒨ⅎ␒溶岣⭰壄傳冇⯮⭰壄傳冇Ợ杉䙫ῄ孞䴀䧢晋ḍ岣㖣曢㱇咲
Ƌ⛇傳冇溶『⽯⼞Ə溶岣㘩媲䉠∌䕀ヶƌ˛㉥∗恐⏯⭰壄䆯棥䙫ἴ何˛⯮⏍杉䙫
ῄ孞䴀㑼ḍ䔏⊂⢺ἶỌὦ䆯棥⛡⮁˛㗍䆯棥⛡⮁⽳⍚⏖㰟Ḭ⭰壄㖣恟⮁䙫ἴ何˛
⅞ㆽ⟥ⲣ㠫估㓌
㜓%䴁㕟ἴ壄何䬍⏯⊇㋦⤎CAN ICES-005 (B) / NMB-005 (B)
Instrucciones de instalación - SÓLO luces embutidas
* NO UTILIZAR ADHESIVO SOBRE LAS LUCES SI SE INSTALAN SOBRE LA BASE MÓVIL.
Esta cinta es permanente y la luz quedará pegada a la base móvil.
LUCES - Cinta doble faz incluida* Retire el papel protector de un lado de la
almohadilla de montaje y aplíquelo sobre la tapa de las pilas (úselo con precaución,
el adhesivo es muy fuerte). Ubique la luz en la posición deseada. Retire el segundo
papel protector y aplíquelo haciendo presión para asentar el pegamento. Una vez
aplicada la luz, está permanentemente instalada.
方㬞㖲㊙
弗㉥┦柷ℯ⭰壄'/ 懼㉊曢㱇
櫭敲曢㱇⌊䙫⮁ἴ垡䵙˛
⯮曢㱇䚹㊤⇡˛
⎽⇡曢㱇˛
㋰㋮䤡䙫曢㱇㭊㥜Ƌƌ˚岇㥜Ƌƌἴ何壄⅌㖗䙫曢㱇˛
ⅴ⯮曢㱇䚹㎏⛅⎆ἴ˛
⯮曢㱇⌊䙫⮁ἴ垡䵙憴㖗捽䶱˛
垛枼䂆⏫ῲ壄棥䆯ὦ䔏栭⛂噆Ƌ$$$ƌ曢㱇Ƌ䔉⒨⏍昫ƌ
弰⊼ὦ⯴漱⽳㈺敲曢㱇⌊˛
⎽⇡㈧㛰䙫曢㱇˛
ᾄ曢㱇⌊Ḕ㈧䤡䙫㭊㥜Ƌƌ˚岇㥜Ƌƌἴ何⭰壄栭⛂噆
Ƌ$$$ƌ曢㱇˛
弰⊼ὦ挖敲⯴漱ἴ何Ọ⛡⮁曢㱇⌊˛
㮦⿍濣方㬞ḽ䏦奨㓌
⋀⾬峣岞㛧恐䔏Ḳ㭊䢡Ⱑ⯟⎱䬰䴁䙫曢㱇˛
曢㱇⋀⾬㕛䴫⏳㘩㛛㏂Ə曧㳏ヶ⋦㷞䔏㖗˚凱曢㱇ㇽ㘖⏳䨕桅䙫曢㱇˛
⭰壄曢㱇∴曧㷬㼻曢㱇㎌滅⎱⅝ẽ䙫䛟旃壄何˛
敞㘩敺ὦ䔏㘩曧⯮曢㱇䔘壄何Ḕ⎽⇡˛
俾䔏⭳䙫曢㱇曧怆⎽⇡˛
䂡僤⛅㔝ḍ嘼䏭曢㱇Ọ⁁⥤䒗⡪ῄ孞Ə媲䶙㟌婉ㇽỌ䕝✗䙫曢婘䰦⯲㉥䕝✗䙫岮㹷
⛅㔝Ḕ⾪ḍƒㇽ㘖恜䅎䕝✗䙫䮈䏭㲼奶Ḳ奶⮁怙堳⛅㔝嘼䏭˛
㮦⿍濣⋜枝㗁▞⇔⨶㼺ή⊈㸙◦䕂枝弑䤽⨒今◦䚫㕩䕂⫍㔀‥廞ノ╲悋䕂ή⩱ピ㨹ᵟ
Ʋ冣⽦サ䑏⨧䦣⋜枝ピ㊐‣惓ㄡ方㬞濕妉䦉∱⫉㬀䲈⻣䕂恩䔀−ⅧƲ㥠㚣士ὗ᳤䝸奋
方㬞⇡䝸⪤◮䲈⪤䄠▸濕ṉ⡀噸䰰ピ‴ᶔ㤝㝮ㄡᶴ㽸扔䲈䕂䅾〉Ʋ方㬞⇡冣㗨▸⩘㔀
妉↽ḽ䏦Ʋ方⅙Ⲱ仕䖟䕂惓ㄡ方㬞妉䦉∱᳤⊭昞◮廰圊▜㏴唓䋄Ʋ㭐㗇方䕂方㬞ᶋ㗇
∯敨⻥Ʋ⌈䚣‴ᶔᵸ㗇撚㑺惓ㄡ方㬞䕂∯敨⻥ᶣ⊈⡀ḓẛ娵⨧䦣⩇…䕂䖶撚宅壈Ʋ
㎋Ḛ奨㓌
垛枼䂆ㄉ↓㎋Ḛ曢㱇㗍⭳ㇷ⭰壄Ə廼姟⛺柩╆⊼敲旃⍚⏖
敲╆壄棥䆯˛憴奭⢺⛺柩╆⊼敲旃⍚⏖㈲⊼旃数䆯棥˛
䆯ℰẕ⺍⯮㛪⛅∗⎆⦲娔⮁‣˛
垛枼䂆
弗㉥㎋Ḛ
恀㎎♏⏖✏⅓Ⱑƒ勘Ⱑ䙫䮫⛴ⅎ媦㎎壄棥䆯˛㗍曢㱇
⭳ㇷ⭰壄⽳⍚⏖ὦ䔏恀㎎♏⯴㹽ㄆㆰ♏敲╆䆯棥˛恀㎎♏⯴㹽
ㄆㆰ♏ḍ恟㒮曧奨䙫⊆僤⍚⏖ὦ䔏ẕ⺍媦㕛˚䆯剙恟㒮懼˚
⮁㘩壄何䬰⊆僤˛
㲹⅞垛枼䂆䰂ノ䂆枼䰂
ῲ恀㎎♏㛧⤁⏖㎎∝ῲ壄棥䆯˛曧⏍⣽䙫䧲奶≪娔姯˛
䛟ἣ䙫壄棥䆯㔥何✏姱噆㎌㔝䙫䮫⛴ⅎ䙭⏖䔘恀㎎♏怙堳㒴㎎˛
Cambio de pilas
CONTROL REMOTO - requiere una pila botón DL2025.
- Retire la tapa.
- Saque la pila.
- Ponga la nueva pila alineando la polaridad (+) (-), como se indica.
- Ponga la tapa.
- Ajuste el tornillo del compartimento de la pila.
LUCES - 3 pilas AAA cada una
- Gire hasta abrir.
- Retire TODAS las pilas.
- Coloque 3 nuevas pilas AAA en el compartimento alineando la
polaridad (+) (-) como se indica.
- Gire hasta cerrar.
PRECAUCIONES: INSTRUCCIONES PARA LAS PILAS
- Utilizar siempre el tamaño y grado de pila adecuado para su uso.
- Reemplazar siempre todas las pilas al mismo tiempo, cuidando de no
mezclar las nuevas con las viejas, o las pilas de distinto tipo.
- Limpiar los contactos de la pila y los del dispositivo antes de su instalación.
- Asegurarse de que las pilas estén correctamente instaladas en relación
a su polaridad (+ y -).
- Retirar las pilas del equipo cuando no lo utilice por un período largo de tiempo.
- Retirar las pilas usadas enseguida.
Para el reciclado y deshecho adecuado de las pilas, por favor busque en Internet
o en su guía local de teléfono los centros de reciclado y/o siga las regulaciones
gubernamentales locales.
PRECAUCIONES: La deglución puede causar lesiones graves en tan sólo 2 horas o
la muerte, debido a quemaduras químicas y a la posible perforación del esófago.
Si sospecha que su hijo ha ingerido o insertado una batería de botón, solicite
inmediatamente asistencia médica urgente. Examine los dispositivos y asegúrese de
que el compartimento de la batería esté correctamente asegurado, por ejemplo, que
el tornillo u otro sujetador mecánico esté apretado. No lo use si el compartimiento no
está asegurado. Deseche las baterías de botón usadas de forma inmediata y segura.
Las baterías planas aún pueden ser peligrosas. Dígale a otros sobre el riesgo asociado
con las baterías de botón y cómo mantener a sus hijos seguros.
Instrucciones de operación
LUCES - Operación Manual - Una vez que las pilas estén instaladas encienda cada luz
presionando el Domo de Activación suavemente. Si presiona
nuevamente, la luz se apagará. Se prenderá con el último nivel
de brillo establecido.
LUCES - Uso del control remoto
El control remoto funciona a una distancia de 6m de las luces.
Una vez que las pilas están instaladas, encienda todas las luces
apuntando al sensor. Utilice el ATENUADOR, SELECTOR DE COLOR
y el TEMPORIZADOR apuntando hacia el sensor y seleccionando la
función deseada.
AGREGAR LUCES
Un solo control remoto puede manejar hasta 36 luces. No se
necesita programación. Las luces similares se controlarán siempre y
cuando están dentro del rango de señal del control.
䢡婴曢㱇ᾄ㭊䢡䙫㭊岇㥜Ƌ⎱Ɛƌἴ何⭳ㇷ⭰壄˛
canadiense.a CAN ICES-005 (B) / NMB-005 (B)
Ḳ奶䮫˛