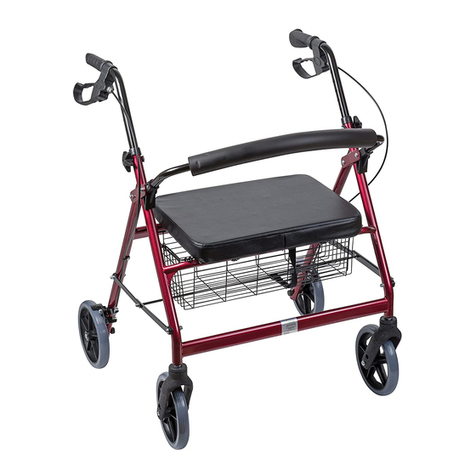
Duro-Med 1013 User manual

Los productos que han sido sujetos a la negligencia, el abuso,
el almacenaje impropio o el manejo, la operación impropia,
modificaciones no autorizadas o daños y perjuicios más allá de
el control razonable no son cubiertos según esta garantía.
Las partes o los materiales que son sujetos al uso normal que
es resultado del empleo de este producto, y que debe ser
reemplazado o reparados debido al uso normal, son la
responsabilidad del dueño y no son cubiertos según esta
garantía.
Esta garantía es exclusiva y es en lugar de todas otras
garantías expresas, implicadas en la garantía, incluyendo,pero
no limitadas con la garantía implícita del valor comercial y fisico
para un propósito particular, y no se extenderán más allá de la
duración de la garantía expresa proporcionada aquí. DMI no
serán obligado de daños y perjuicios consiguientes o
secundarios en absoluto.
Esta garantía le da los derechos legales específicos que
pueden variar de estado a estado.Algunos estados no permiten
a las exclusiones o las limitaciones de daños y perjuicios
secundarios o consiguientes, o cuanto tiempo una garantía
implícita dura, es posible que las exclusiones y limitaciones no
se apliquen a usted.
Esta unidad no es querida para ser usado como una silla
de ruedas. Para la seguridad máxima,asegúrese que todos los
detalles de seguridad le sean explicados por un terapeuta
calificado, el médico, o una persona certificada de ventas.
A intervalos regulares, haga su distribuidor local comprobar y
apretar todos los sujetadores y partes de la bisagra. Compruebe
todas las partes plásticas para uso a menudo.
Esta unidad no ha sido diseñada para asistir a usuarios que
esten de pie a la posición sentada. Cuando este parando,
no se inclíne en exceso sobre la unidad.Los frenos no son
diseñados para soportar la presión excesiva.
El empleo excesivo hace que los cables de freno puede
producir estiramiento o desgaste y ajuste ó reemplazo del cable de
freno puede ser requerido. DMI rollators no son sugeridos para la
gente con limitaciones de movimiento con severidad limitado para
quien pueden recomendar a un caminante rígido.
Por favor consulte con su médico antes de la utilización de
este producto sobre todo si Ud. toma alguna medicación. Omitir
estas observaciones de advertencia puede causar una herida.
Fabricado por Duro-Med Industries
1788 W. Cherry Street • Jesup,Georgia 31545
Hecho en China
Siempre revise sus frenos antes de usar su rollator. Cuide su
freno de mano en excelentes condiciones todo el tiempo. Siempre
revise por partes flojas, tensión en el cable y limpieza. Lo mejor
es mantener su rollator en buen estado todo el tiempo.
LIMITACIONES
Y EXCLUSIONES
ADVERTENCIA! LEAANTES DE USAR
CUIDADO! REVISE FRENOSANTES DE USARLO

WITH LOOP LOCK BRAKES
STEEL
Getting Around
Has Never
Been Easier...
HEAVY DUTY
HEAVY DUTY
Rollator
Rollator

ASSEMBLY INSTRUCTIONS:
1. With the rollator in the upright position,
open legs all the way by pushing the
front legs out. Rotate the folding lock
mechanism around to lock securely onto
cross bar to prevent the rollator from
folding while in use.
2. Remove the two rubber plugs from each
side of the steel frame. Place both
handlebars with their pre-assembled
locking loop brakes, into the handlebar
openings and adjust to the desired
height.To do this, twist the height
adjustment handle on the outside of
each frame opening until tight.
(CAUTION: DO NOT EXTENDTHE
HANDLEBARS BEYOND THE SECURITY MARK.)
3. Test and adjust the tension on the
braking system mechanism to ensure
proper and secure braking before use.
4. Align tray with seat rest by placing
the four prongs on the tray into the holes
in the seat.
5. Hook wire basket onto hooks located
under the rest seat.
WARNING! It is very important that you read all instructions
before assembly and use of this rollator.
This rollator should always be assembled and fitted for the
user by a qualified DuroMed authorized dealer. Before using the
rollator, be sure your weight is within the weight capacity of the
unit.This rollator will require little or no assembly and can be
performed without tools.
PARTS OF ASSEMBLY:
2 Handlebars with Loop Lock Brakes; 1 Basket; 1 Tray.
INSTRUCTIONS
FOR ASSEMBLY
2
1
4
3
SPECIFICATIONS
Overall Width 23”; Wheels, 8”x 2”;
Seat, 15” x 8.5”; Seat Height, 24”;
Basket, 16” x 12” x 7” deep; Tray 15.5” x 10” x 1” deep;
Handle Height, 31” - 38.5”; Width Between Handles, 17”;
Weight, 28 lbs.; Weight Capacity, 250 lbs.
5
ITEM# 1013

ANTES DE USAR, FAVOR LEA TODAS PRECAUCIONES
Y ETIQUETAS DE ADVERTENCIA
www.duromed.com
USO DEL
NUEVO ROLLATOR
APRETAR PARA PARAR
SOLTAR PARA ANDAR
EMPUJAR HACIA ABAJO
PARA ASEGURAR
SUELTE EL SEGURO
Y TIRE HACIA ATRAS
HASTA LA POSICION
PLEGABLE
FACIL PARA CAMINAR
EL PASEO
Esta unidad debe ser usado como una ayuda de
movilidad que crea un equilibrio natural.
Con manos bien agarradas sobre los pasamanos,
el usuario puede caminar despacio detrás del
rollator. Con cuidado,empuje adelante con el peso
distribuído uniformemente entre pasamanos.
EL FRENADO
Freno Normal
puede ser activado tirando la manija
de freno hacia arriba, similar al funcionamiento de
los frenos de una bicicleta.Esta función puede ser
aplicada, andando con el rollator para reducir
la velocidad del ímpetu, pararse un momento,
o la maniobra encima de, abajo o alrededor de las
fronteras que pueden estar en su camino.
Freno de Parada
puede ser activado empujando
la manija abajo en la posición de cerradura. Esta
función debería ser activada cuando el usuario se
detiene por un periodo largo. Por razones de
seguridad, el freno de parada siempre deberá estar
activado antes de sentarse en el asiento.Además
si esta comprando, sería buena idea de activar el
freno de parada mientras usted se detiene en la
sección de la tienda para evitar que el rollator se
mueva hacia adelante. Para desactivar el freno de
parada, empuje gentilmente el pasamano hacia
arriba. El sistema de freno es conveniente y fácil
de operar. Personas que posiblemente tengan
problemas con las manos deberían encontrar el freno
de parada ancho, confortable y no se dobla.La
presión mínima tendrá que ser aplicada para
activar el sistema de freno de lazo que se cierra.
EL PLEGADO
La canasta debería ser removida antes del plegado
de cualquier rollator. Desde la posición del usuario,
libere el mecanismo de seguridad al que esta en la
barra de adelante en el lado derecho del rollator.
Agarre la barra debajo del asiento y empuje para
arriba y hacia las ruedas de atras hasta la posición
plegable. El rollator se doblará fácilmente para ser
guardado o transportado.
EL MANTENIMIENTO
Siempre se asegura que sus frenos funcionan
correctamente antes del empleo. Cuide que el
freno se maneja este libre de suciedad, el polvo y
la mugre. El desarrollo de partículas podría hacer
que sus frenos no funcionen correctamente.
Si los frenos no frenan, compruebe los cables para
la soltura. Los cables pueden ser apretados en el
tornillo de ajustador localizado donde el cable es
conectado a la manija de freno. Si el cable es roto,
esto tendrá que ser reemplazado. De vez en
cuando compruebe y apriete todas las tuercas,
cerrojos, tornillos, y otro soporte físico localizado
en el rollator.

INTRUCCIONES DE ENSAMBLE:
1. Sostenga el rollator en la parte superior
derecha, abriendo y empujándolo hacia el
frente. Gire el mecanismo de cerradura
giratorio y asegurelo a la barra cruzada del
rollator para prevenir que se cierre cuando
se este usando.
2. Remueva los dos tapones de cauchos
de cada uno de los tubos laterales
del rollator. Coloque los dos pasamanos
con el freno pre-ensamblado, dentro
de la barra de mano con el agujero y ajustelo
a la altura deseada. Para hacer esto gire la
manija de ajuste hasta que este bien
apretado. (PRECAUCION: NUNCA EXTIENDA
LA BARRA DE MANO SOBRE LA MEDIDA
MARCADA EN LA PARTE INFERIOR).
3. Verifique y ajuste la tensión del sistema
mecánico de frenos para asegurar que
el freno esta funcionando apropiadamente
antes de usarlo.
4. Alinear la bandeja con el asiento de descanso
y ubique los cuatro pines debajo de la bandeja
en los agujeros del asiento de descanso.
5. Ponga la canasta en los ganchos debajo del
asiento de descanso.
ADVERTENCIA:Es muy importante que Ud.lea todas las
instrucciones antes del asamble y\o el empleo de este rollator.
Este rollator siempre debería ser montado y encajado para el
usuario por un distribuidor calificado y autorizado de DuroMed.
Antes de la utilización del rollator, aseguro que su peso esta
dentro de la capacidad de peso de la unidad. Este rollator
requerirá un pequeño ensamble o ninguna y puede ser
realizado sin herramientas.
PARTES DE EMSAMBLE:
2 Pasamanos con Frenos; 1 Canasta; 1 Bandeja.
INSTRUCCIONES
PARA EMSAMBLE
ESPECIFICACIONES
ANCHO APRÓXIMADO 23”; RUEDAS, 8” x 2”;
ASIENTO, 15” x 8.5”; ALTURA DEL ASIENTO, 24”;
CANASTA, 16” x 12” x 7” LARGO; BANDEJA, 15.5” x 10” x 1 LARGO”
ALTURA DEL PASAMANO, 31”- 38.5”; ANCHO ENTRE PASAMANO, 17”;
PESO, 28 lbs.; CAPACIDAD DE PESO, 250 lbs.
PRODUCTO # 1013
2
1
4
3
5

WALKING
This unit is to be used as a mobility aid
creating a natural balance.With hands grasped
securely onto handles, the user walks slowly
behind the rollator. Gently, push forward with
weight distributed evenly between handlebars.
BRAKING
Normal Brake can be activated by pulling the
brake handle up, similar to operating the
brakes of a bicycle.This function may be
applied, while walking with the rollator to slow
down momentum, stop for a moment,or
maneuver up, down or around boundaries
which may be in your path.
Parking Brake can be activated by pushing the
handle down into the lock position.This
function should be activated when the user
stops for a period of time. For safety reasons,
the parking brake should always be engaged
before sitting down onto the seat.Also if
shopping, it will be a good idea to activate the
parking brake while stopped in an isle, to avoid
rollator from advancing forward.To release the
parking brake, gently pull up.
The braking system is convenient and easy
to operate. People who may have hand
disabilities should find the brake handles wide,
comfortable and non binding. Minimum
pressure will need to be applied to activate the
locking loop brake system.
FOLDING
Basket or tray should be removed before
folding any rollator. From the user side, release
the lock mechanism from around the cross bar
located on the right side of the rollator. Grasp
bar under seat and pull up onto back wheels
until folded.The rollator folds easily for storage
or transport.
MAINTENANCE
Always make sure your brakes are operating
correctly before use. Keep the brake handles
free from dirt, dust and grime. Build-up of
particles could cause your brakes not to
engage properly. If the brakes are not braking,
check the cables for looseness.The cables can
be tightened at the adjuster screw located
where the cable is connected to the brake
handle. If the cable is broken, it will need to be
replaced. Periodically check and tighten all nuts,
bolts, screws, and other hardware located on
rollator.
BEFORE USE, PLEASE READ ALL CAUTION
AND WARNING LABELS ON THE ROLLATOR
www.duromed.com
USE OF
NEW ROLLATOR
SQUEEZE TO STOP
RELEASE TO ROLL
PUSH DOWN TO LOCK
RELEASE LOCK AND
PULL BACK INTO
FOLDING POSITION
WALKING MADE EASY

Products which have been subject to negligence, abuse,
improper storage or handling, improper operation,unauthorized
modifications or damages beyond reasonable control are not
covered by this warranty.
Parts or materials which are subject to normal wear resulting
from the use of this product, and which must be replaced or
repaired due to such normal wear, are the owner’s
responsibility and are not covered by this warranty.
This warranty is exclusive and is in lieu of all other express
warranties, implied warranty, including but not limited to the
implied warranty of merchantability and fitness for a particular
purpose, and shall not extend beyond the duration of the
express warranty provided herein. DMI will not be liable for
consequential or incidental damages whatsoever.
This warranty gives you specific legal rights which may vary
from state to state. Some states do not allow the exclusions or
limitations of incidental or consequential damages, or how long
an implied warranty lasts, so the exclusions and limitations
may not apply to you.
This unit is not intended to be used as a wheelchair. For
maximum safety, make sure all safety features are explained to
you by a qualified therapist, physician,or a certified sales person.
At regular intervals, have your local dealer check and tighten all
fasteners and hinged parts. Check all plastic parts for wear often.
Units are not designed to assist users from a sitting to a standing
position.When stopping,do not lean excessively on the unit.The
brakes are not designed to withstand excessive pressure.
Excessive use causes the brake cables to stretch or fray and
adjustment or replacement of the brake cable may be required.
DMI rollators are not suggested for people with severely limited
ambulation for whom a rigid walker may be recommended.
Please consult with your physician before using this product
especially if you are taking any medication. Failure to observe
this warning may result in injury.
Always check your brakes before using your rollator. Keep
your brake handles in excellent condition at all times.Always
check for loose parts, tightness of the cables and cleanliness.
It is best to keep your rollator fully assembled at all times.
LIMITATIONS
AND EXCLUSIONS
WARNING! READ BEFORE USING
CAUTION! CHECK BRAKES BEFORE USING
Manufactured for Duro-Med Industries
1788 W. Cherry Street • Jesup,Georgia 31545
Made in China

CON FRENOS DE CERRADURA DE LAZO
DE METAL
Moverse
Alrededor
Nunca ha
sido tan fácil...
EXTRA FUERTE
EXTRA FUERTE
Rollator
Rollator
Table of contents
Languages:
Other Duro-Med Mobility Aid manuals
Popular Mobility Aid manuals by other brands

Invacare
Invacare DOLOMITE Jazz Series user manual

Focal Meditech
Focal Meditech 872FOCPBLC00ABD187 user manual

lifestyle mobility aids
lifestyle mobility aids H5001 instructions

Guardian
Guardian Garnet User instruction manual & warranty

Thuasne
Thuasne Townsend Genucontrol manual

McKesson
McKesson 146-RTL10263KDR instructions