Dust Free MicroPure 9" with MX4 User manual

Read manual carefully for proper procedures and operation.
OWNER’S MANUAL
MicroPure
®
5” with MX4™ #14015 #14003
MicroPure
®
9” with MX4™ #14013 #14004
MicroPure® 9” with MX4™ Lite #14016 #14001
MicroPure® 14” with MX4™ #14017 #14005
MicroPure® 14” with MX4™ Lite #14014 #14002
24V 120V/230V

CONTENTS
2
on your purchase of the MicroPure® Total Home Active Air Purifier by Dust Free®.
This unit is designed to be installed into an existing HVAC system and provide
virtually maintenance free air purification.
Please read and follow all service procedures outlined in this manual.
Please record the name and phone of your Dust Free® dealer.
Name _________________________________________________________
Phone _________________________________________________________
Please record the serial number of your MicroPure® system.
Serial #________________________________________________________
CONGRATULATIONS . . .
Product Contents . . . . . . . . . . . . . . . . . . . . . . . . . . . . . . . . . . . . . . . . . . . . . . . . . 3
Installation Hardware . . . . . . . . . . . . . . . . . . . . . . . . . . . . . . . . . . . . . . . . . . . . . . 3
Replacement Parts . . . . . . . . . . . . . . . . . . . . . . . . . . . . . . . . . . . . . . . . . . . . . . . . 3
Specifications . . . . . . . . . . . . . . . . . . . . . . . . . . . . . . . . . . . . . . . . . . . . . . . . . . . . 4
About MicroPure® . . . . . . . . . . . . . . . . . . . . . . . . . . . . . . . . . . . . . . . . . . . . . . . . 4
Recommended Installation Tools . . . . . . . . . . . . . . . . . . . . . . . . . . . . . . . . . . . . . 5
Installation Requirements . . . . . . . . . . . . . . . . . . . . . . . . . . . . . . . . . . . . . . . . . . . 5
Metal Ductwork Installation . . . . . . . . . . . . . . . . . . . . . . . . . . . . . . . . . . . . . . . . . . 6
Fiberglass Ductwork Installation . . . . . . . . . . . . . . . . . . . . . . . . . . . . . . . . . . . . . . 8
Maintenance/UV Lamp Indicator . . . . . . . . . . . . . . . . . . . . . . . . . . . . . . . . . . . . . 10
Disposal of MX4™ core . . . . . . . . . . . . . . . . . . . . . . . . . . . . . . . . . . . . . . . . . . . . . 10
Changing MX4™ core . . . . . . . . . . . . . . . . . . . . . . . . . . . . . . . . . . . . . . . . . . . . . . 11
Warranty . . . . . . . . . . . . . . . . . . . . . . . . . . . . . . . . . . . . . . . . . . . . . . . . . . . . . . . . 12

3
REPLACEMENT PARTS
INSTALLATION HARDWARE
(8) Self-tapping screws (4) Threaded bolts
(4) Toggle bolt wall anchors
(4) Hex nuts
PRODUCT CONTENTS
UV lamp
indicator
Replaceable MX4™ Core
Power Module
(includes UV Lamp)
Light Pipe
Safety Switch
Power Supply (120V/230V models only.)
Mounting
Plate
MX4™ Core (Includes UV Lamp)
UV Lamp
Mounting Plate
Power Module (Includes power supply, safety switch, and light pipe.)
Power Cord (For 24V and 230V operation)
120V Power Supply

SNOITACIFICEPS
To reduce the risk of electric shock, this equipment may have a grounding type
plug that has a third (grounding) pin. This plug will only fit into a grounding
type power outlet. If the plug does not fit into the outlet, contact qualified
personnel to install the proper outlet. Do not alter the plug in any way .
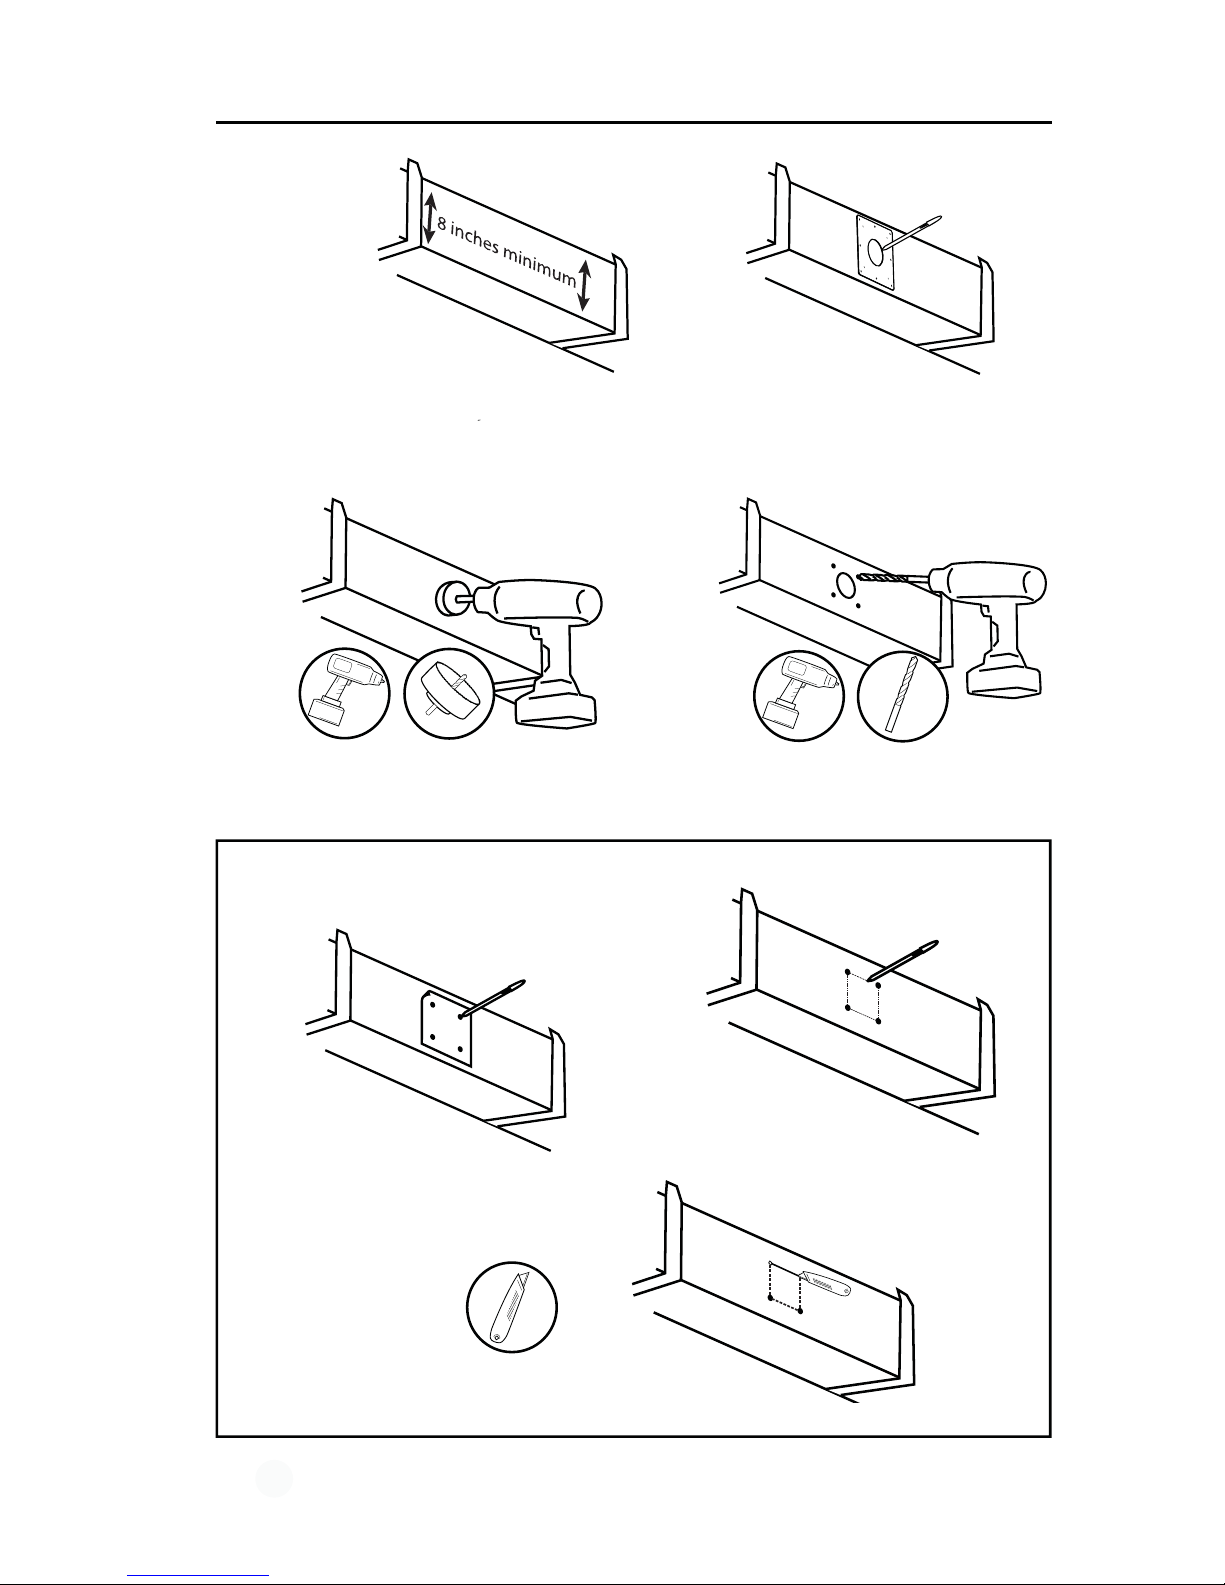
Location for Protective Earth Line.
ABOUT MicroPure®
4
WARNING! UV Light in operation. Disconnect unit from power
supply before servicing. Failure to follow warnings may result in
severe eye damage.
The MicroPure® Total Home Active Air
Purifier is a new generation HVAC air
system designed to reduce odors,
smoke, germs, and a broad spectrum
of indoor air contaminants.
The MicroPure® system is easily
mounted into HVAC system air ducts
where many air quality problems can
start. Using a unique technology, The
MicroPure® system uses UV light
energy to illuminate a quad-metallic
core to produce ionic oxidizers that
seek out and attack indoor pollutants.
These ionic “air scrubbers” clean the
air AND surfaces where ever the air
goes.
Specifications subject to change without notice.
Dimensions:
5" Model: 6"H x 6"W x 7"L
9" Model: 6"H x 6"W x 11"L
14" Model: 6"H x 6"W x 16.75"L
Mounting Plate: 8"H x 8"W
Electrical:
24V 50/60Hz or 120V/230V
50/60Hz (auto-sensing),
depending on model.
Output:
5" and 9" Models: 13.3 Watts.
14" Model: 19.2 Watts.
Weight:
Approx. 2.6lbs - 3lbs.
IMPORTANT:
The device must be installed in
compliance with all national
and local electrical and
mechanical codes. Failure to
do so will void ETL safety
listing and Dust Free®
warranty.

1. Unit should be installed after the air handler in the
HVAC system.
dluohsaeranoitallatsniehtdnuorakrowtcudehT.2
be clean and dry to insure proper adhesion of the
gasket materials and any tape used.
deenlliwgninepo)mc98.8(”5.3etamixorpp
anA.3
to be cut into the existing duct work to install the
unit properly.
RECOMMENDED INSTALLATION TOOLS
INSTALLATION REQUIREMENTS
3 1/2” Hole Saw
for metal
(recommended)
Drill/Power Driver Phillips Screwdriver 3/8” Drill Bit
(if installing into fiberglass
ducting with toggle bolts)
You may also need:
Utility Knife Tin Snips
(for metal ductwork)
5
Electrical Requirements (120V only)
Hardwiring Requirements (24V and 230V Operation)
•
Air
Handler
Min. 8” x 8”
11/32” Open-End Wrench 1/4” Nut Driver Bit
For 120V operation use the 120V power supply and cord. Be sure to
locate the unit within 9.8ft of a standard 120V grounded outlet. Long term
use of an extension cord is not recommended due to safety
considerations.
For 24V models: Connect black and white wires to a dedicated 40Va transformer.
(Not Provided.)
For 230V models: Connect black and white wires to proper power. Connect green
wire to ground.
Electrical wiring of the unit to the HVAC system should be done by a
licensed HVAC installer or electrical contractor.
Max. 9.8ft
for 120V
Models.

6
METAL DUCTWORK INSTALLATION
1
1.
3
3. Mark location for 3.5” opening using either the
mounting plate or included template.
a
a. Using template, mark 4 holes on duct.
b
b. Drill 4 holes where marked.
c
c. Cut between holes using tin snips.
ALTERNATIVE CUTTING METHOD
4
4. Cut hole in duct using 3.5” hole saw.
2
2. Cut away insulation to expose metal duct
(if needed).
Locate suitable area of duct for installation.
Be sure to locate near proper power.

7
5
5. Remove backing from mounting plate
adhesive gasket.
6
6. Center openings and press mounting plate onto
duct. The adhesive gasket will hold the mounting
plate in place.
8
8. Insert unit into opening. Be sure the air will pass
though the MX4™ core as indicated on the label.
9
9. Secure the unit to the mounting plate with
(4) hex nuts.
10
10. Plug unit into working power receptacle or
hardwire to proper power.
Hard wiring unit into HVAC system
should be done by a licensed
HVAC installer or electrical
contractor.
7
7. Secure the mounting plate using (8) self-
tapping screws.
METAL DUCTWORK INSTALLATION
(CONTINUED)

34
8
a
a. Using template, mark 4 holes on duct.
b
b. Draw a line between each corner mark.
c
c. Cut between holes using a utility knife.
Continue with #4 (above)
ALTERNATIVE CUTTING METHOD
FIBERGLASS DUCTWORK INSTALLATION
12
2. Mark location for 3.5” opening using either
the mounting plate or included template. Also
mark the locations of 4 screw holes in corners
(see template).
3. Cut hole in duct using 3.5” hole saw. 4. Drill 4 holes (at corner screw locations)
using a 3/8” drill bit.
1. Locate suitable area of duct for installation.
Be sure to locate near proper power.

9
11
11. Plug unit into working power receptacle or
hardwire to proper power.
5
5. Insert (4) 2” Threaded bolts into screw holes
at corners of mounting plate. Attach (4) toggle
bolt anchors to ends of threaded bolts.
6
6. Remove backing from mounting plate
adhesive gasket.
7
7. Insert (4) toggle bolts into 3/8” holes in duct.
Be sure toggle anchors open after inserting.
8
8. Center large opening in mounting plate over
3.5” opening in duct and press plate to duct.
The adhesive gasket will hold the mounting
plate into place.
Tighten toggle bolts - DO NOT OVERTIGHTEN.
9
9. Insert unit into opening. Be sure the air will
pass though the MX4™ core.
10
10. Secure the unit to the mounting plate with
(4) hex nuts.
FIBERGLASS DUCTWORK INSTALLATION
(CONTINUED)
Stud
Hard wiring unit into HVAC system
should be done by a licensed
HVAC installer or electrical
contractor.

UV lamp operation indicator
DISPOSAL OF THE MX4™ CORE AND UV LAMP
10
MAINTENANCE/UV LAMP INDICATOR
Dispose of spent MX4
™
core and UV lamp at your
local recycling center. You may also send your spent
MX4
™
core and UV lamp, in the same container you
received your replacement, to :
Dust Free
®
MicroPure® Reclamation
1112 Industrial Drive
Royse City, TX 75189
For optimal performance, replace the MX4
™
core
every 4 years and the UV lamp every 2 years, even if
the UV lamp appears to be operating normally.
The UV lamp operation indicator on the face of the
unit will glow when the UV lamp is in use. If the
indicator does not glow and the unit has power, the
MX4
™
core should be replaced.
TM
www.dustfree.com/micropure

11
7
7. Secure with 2 screws.
8
1
3
3. Remove the unit from the mounting plate.
4
4. Remove the 2 screws holding the MX4™ core.
1. Unplug unit. If the unit is hard wired, be
sure the power to the unit is off.
10
10. Reconnect
power supply.
9
9. Secure unit with 4 nuts.
2
2. Remove the 4 mounting nuts.
8. Insert the unit into the mounting plate.
6
6. Plug the new MX4™ core into the base unit.
5
5. Separate the used core from the
base unit and dispose of properly.
CHANGING THE MX4™ CORE
WARNING! UV Light in operation. Disconnect unit from power
supply before servicing. Failure to follow warnings may result in
severe eye damage.

LIMITED WARRANTY
Dust Free®, LP (Dust Free) warrants to the original purchaser that the MicroPure® Total Home Active
Air Purifier (other than the MX4™ core and the UV Lamp) shall be free from defect in material and
workmanship under normal use and service, for a period of five (5) years from the date of original
purchase. Dust Free warrants to the original purchaser that the MX4™core shall be free from defect in
material and workmanship under normal use and service, for a period of four (4) years from the date of
original purchase. Dust Free warrants to the original purchaser that the UV lamp shall be free from
defect in material and workmanship under normal use and service, for a period of two (2) year from the
date of original purchase. Dust Free’s obligation under this warranty shall be limited to the repair or
replacement of those goods which prove defective, provided that such products are installed,
maintained, and operated for the purpose and in the manner intended and for which Dust Free
instructs or recommends. Neither Dust Free nor its dealers shall be liable for any special or
consequential damages directly or indirectly arising from the design, construction, installation,
servicing, or operation of the goods. SOME STATES DO NOT ALLOW THE EXCLUSION OR
LIMITATION OF INCIDENTAL OR CONSEQUENTIAL DAMAGES, SO THE ABOVE EXCLUSION MAY
NOT APPLY TO YOU. THIS IS DUST FREE‘S SOLE WARRANTY AND THERE ARE NO WARRANTIES
THAT EXTEND BEYOND THE DESCRIPTION ON THE FACE HEREOF. NEITHER DUST FREES NOR
ITS DEALERS MAKE ANY OTHER WARRANTY OF ANY KIND, EXPRESS OR IMPLIED. ALL IMPLIED
WARRANTIES OF MERCHANTABILITY AND FITNESS FOR A PARTICULAR PURPOSE WHICH
EXCEED DUST FREES’ AFFORESTATED OBLIGATIONS ARE HEREBY DISCLAIMED AND EXCLUDED
FROM THIS WARRANTY. SOME STATES DO NOT ALLOW LIMITATIONS ON HOW LONG AN IMPLIED
WARRANTY LASTS, SO THE ABOVE LIMITATION MAY NOT APPLY TO YOU. THIS WARRANTY GIVES
YOU SPECIFIC LEGAL RIGHTS, AND YOU MAY ALSO HAVE OTHER RIGHTS WHICH VARY FROM
STATE TO STATE. DUST FREE‘S AND ITS DEALER’S LIABILITY UNDER THIS WARRANTY SHALL IN
NO EVENT EXCEED THE COST OF THE GOODS SOLD UNDER THE CONTRACT OF SALE.
Dust Free neither assumes, nor authorizes any person to assume for it, any obligation in connection
with the goods. This warranty shall not apply to any goods: (a) which have been subjected to misuse,
tampering, negligence, or accidents; (b) the serial numbers of which have been altered, defaced, or
removed; or (c) which have been used in a manner contrary to Dust Free‘s instructions or recommen-
dations. This warranty may not be assigned or transferred. If any portion of this limited warranty is
held illegal or unenforceable by reason of any law, such partial illegality or unenforceability shall not
affect the enforceability of the remainder of this limited warranty.
For Warranty Claims:
By Telephone: Call Dust Free® at1-972-635-2323, and ask to speak with a Customer Service
Representative regarding a potential Warranty Claim. The Customer Service Representative will
provide further instructions.
By Website: Visit Dust Free’s website at www.dustfree.com and click on the “Contact" link to report a
potential Warranty Claim. A Customer Service Representative will reply by email and will provide further
instructions.
12
Rev. A 11/11
Dust Free®, LP, PO Box 519, Royse City, TX 75189. Please do not mail Warranty Claim requests
or your product to this address. Warranty Claim requests are only accepted by telephone and
through the website.
Table of contents
Other Dust Free Air Cleaner manuals