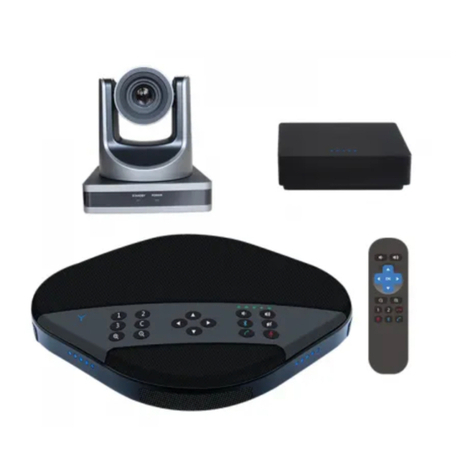
Eacome SV3100 User manual

Video Conference Collaboration System
User Manual V1.0

This manual introduces the functions, installation methods and operations
for audio video conferencing room solution in details. Please read this
manual carefully before installation and use.
Attentions
To prevent damage to this product or any product connected to it, this
product can only be used within the specified range.
1.1 Keep the product in a dry environment.
1.2 To prevent the risk of electric shock, do not open the case.
Installation and maintenance should only be carried out by qualified
technicians.
1.3 Do not use the product beyond the specified temperature,
humidity or power supply specifications.
1.4 Wipe it with a soft , dry cloth when cleaning the camera lens. Wipe
it gently with a mild detergent if needed. Do not use strong or
corrosive detergents to avoid scratching the lens and affecting the
image.
1.How to Use
Installation and use of this product must strictly comply with local
electrical safety standards.
2.Electrical Safety
Avoid damage to the product caused by heavy pressure, strong
vibration or immersion during transportation, storage and installation.
3.Handle with care
4.1 Do not rotate the camera head violently, otherwise it may cause
mechanical failure;
4.2 This product should be placed on a stable desktop or other
horizontal surface. Do not install the product obliquely, otherwise it
may display inclined image;
4.3 Housing of this product is made of organic materials. Do not
expose it to any liquid, gas or solids which may corrode the shell.
4.4 Ensure there are no obstacles within rotation range of the holder.
4.5 Do not power on before completing installation.
4.Install with Caution

1
1
Packing Contents
Speakerphone
3C
12
User Manual Hub
Remote Control 5m DIN6 Cable * 2 pcs 3m USB cable *1 pcs
Power supply
(1)Camera
(2)Accessories

2.1 Speakerphone
1. Optional expansion microphone port 1
2. Optional expansion microphone port 2
3. DIN6 cable port
4. LED Status indicator
5. Bluetooth indicator
6. Function keys
7. Volume indicator
2.2 Camera
12 3
4
2
3C
12
5
6
7
1. Status indicator
2. Power indicator
3. USB Cable port
Product Overview
13
24 5
4. DIN6 Cable port
5. DC power port

2.3 Hub
5
4
3
2
1
3
1. DIN6 Cable port
2. USB port
3. Power port
4. Turn on/off
5. Status indicator
Key operation Description
(1)About Remote control
No.
1
2
3
4
5
6
7
8
9
10
11
12
13
14
15
16
L/R direction set(press together with No.6)
IR Transmit
Close the menu
Switch for more datas in screen
Brightness adjustment
Pan direction reset (press together with No.12)
Preset number area, call presets by numbers
directly
Preset and reset positions (press together
numbers in No.7)
Zoom, SLOW T/W: slow zoom, FAST T/W: fast zoom
PTZ reset, return to the middle position
PTZ up and down, left and right
Functions
IR select switch
Focus mode (AUTO :automatic MANUAL: manual)
Open the menu
Backlight compensation switch
Power standby switch

3.2 About Speakerphone
Key Description:
Presets button
Those keys represent the camera
preset positions 1,2 and 3
respectively
Zoom in/out The camera zooms in/out
Volume button Press the volume down/up button
Bluetooth button Turn on/off bluetooth
End call Press the end call
Answer call Press the answer call
Mute microphone Turn on/off microphone mute
Echo cancellation
Press the answer call, end call and
volume up button at the same time
to enter/exit the echo cancellation
mode. When the echo cancellation
mode is entered, the status light
blue flashes three times . When the
echo cancellation mode is exited,
the blue light flashes twice
+
Camera pan / tilt Control the direction of the
camera: left, right, up, down.
4
3C
12
+

5
DIN6 cable
USB cable
Power Supply
DIN6 cable
The speakerphone can be connected to computer, the hardware
video equipment system through Hub USB. It's not only provides 48KHz
digital voice bandwidth speakers, but also an ultra-clear video
experience.
Connection steps:
1.Connect the camera and Hub with the original DIN6 data cable;
2.Connect the speakerphone and Hub with the original DIN6 data
cable;
3.Connect the power supply equipment with the original power
adapter;
4.Connect one end of the USB cable to the USB port of the
computer and video conference system, and connect the other end to
the USB socket of the Hub;
5. Turn on the power switch after the connection was confirmed
correctly, and wait for the speakerphone and camera self-check
completely, turn on the terminal third-party conference software, and
select the corresponding camera, microphone and speaker driver to
start the audio and video conference with the device.
Connection Description

6
Common reference Settings for PC and video devices with USB talking
Mode:
Once paired with a Bluetooth device, you can use an
omnidirectional microphone for audio calls. To pair your Bluetooth
device with an omnidirectional microphone, please follow these steps:
1. Please adjust the volume of horns and microphones
comprehensively to ensure the communication is clear and smooth.
2. Don't turn on the speaker and microphone automatic gain.
3. Give priority to turn off the audio processing functions of the
computer software/ video software (such as turning off automatic gain,
echo cancellation, noise , reduction etc...).
4. Please use those speeches code to get a higher sound quality as
more as possible.
1. Press the Bluetooth pairing button and the Y type Bluetooth indicator
green light flashes. At this time, the omnidirectional microphone enters
the Bluetooth pairing mode.
2. Set the mobile device in the Bluetooth device search mode and
select the corresponding Bluetooth name. After the Bluetooth is
connected , the indicator light becomes green. At this point, you can use
an omnidirectional microphone for audio calls.
Bluetooth pairing

How to save preset positions :
Adjust the camera to the position that needs to be pressed. Press and
hold the preset button for 5 seconds. The corresponding preset position
is set successfully.
(Note: 2 preset positions (1-2) can be set on the remote controller).
How to use preset position:
Shortly press the preset button to call the corresponding preset position
(Note: the number key is invalid if it's not preseted).
7
Status indicator
Blue LED light
Red LED light
USB connection
Microphone mute
status
Green light
The higher the volume is,
the more number of
lights is
Volume indicator
Bluetooth
indicator
1.Turn on the Bluetooth,
the green light flashes
2.Bluetooth connection
status, green light is always
Y type Bluetooth
indicator
Red light Speaker mute status
The LED status indicator description
on

Note:
In order to properly use and protect the expansion microphone, the extended
microphone must be plugged and unplugged under no electricity.
Mute switch, status
light
in front of the
microphone
8
Use an expansion microphone for important and large meetings.
1. Connect one end of a 3.5-meter long 4P4C dedicated wire to the socket
of the expansion microphone and the other end to the speakerphone
EXT1.
2. Connect one end of a 3.5-meter long 4P4C dedicated wire to the socket
of the expansion microphone and the other end to the speakerphone
EXT2.
3. Due to the host uses a high single point microphone. To achieve the best
effect, the speaker should be facing the microphone directly in front of
the microphone. The direction of the microphone is the same as that of
the nameplate.
4. The expansion microphone has mute switch and status indicator. The
indicator is green when it works normally, and red when mute.
Installation and use of optional expansion microphone(Optional)

9
Technical Specifications
Image Sensor
Effective
Pixels
Signal
Lens
Horizontal
View Angle
Focus System
Minimum
Illumination
Shutter
Gain
White Balance
Image Effect
S/N Ratio
Pan
Tilt
Size (L)131×(W)131×(H)175mm
Auto/Manual
PAL/NTSC
Auto/Manual/Indoor/Outdoor/One push/ATW
12x,f=3.9mm(W)~46.8mm(T)
-30°to +90°(max.speed:60°/s)
≥50db
355°(max.speed:80°/s)
72.5°(W) ~6.5°(T)
Video Conference Camera
MJPG/H.264:320*240,640*480,720*576,1280*720,19
20*1080
YUY2:320*240,640*480,720*576,1280*720
SONY 1/2.8" Progressive CMOS
3.1 Megapixels
Full color/Image flip
1/25~1/10000S
Resolution HD
0.5Lux
Auto/Manual

10
Voice
technical
parameters
Audio
parameters
Expansion Mic
(optional)
Dimensions 180mm×180mm×42mm(L×W×H)
Bluetooth devices available
Omnidirectional Speakerphone
Acoustic Echo cancellation(AEC):>65dB
Echo length cancellation:≥500ms
Bidirectional noise compression(NC):<25dB
Automatic Direction finding Technology of
Intelligent microphone(EMI)
Automatic gain control(AGC)
Microphone frequency response:100Hz-22KHz
Speaker frequency response:100Hz-22KHz
Speaker volume: 90dB at the most
Microphone sound-pickup radius: 4 meters,
360 degrees full range
Bluetooth
2 external microphones optional for connection
makes the sound-pickup radius up to 6 meters
Interface
Power supply
USB cable
Compatibility
Dimensions 113.6mm×113.6mm×32.6mm(L×W×H)
Support Windows, Android, iOS and Linux
Drive-free automatic recognition of cameras,
microphones and speakers
Compatible with Zoom, Lynch, Vidyo, Skype for
business and etc.
DIN6 data line × 2
Length: 5m
Hub
DIN6 interface × 2
Power interface × 1
Power switch × 1
USB 3.0 interface × 1
Power plug(DC12V)
Adapter input AC100V-AC240V,output DC12V/2A
Data Cable
USB cable × 1
Length: 3m
Other manuals for SV3100
1
Table of contents
Other Eacome Conference System manuals