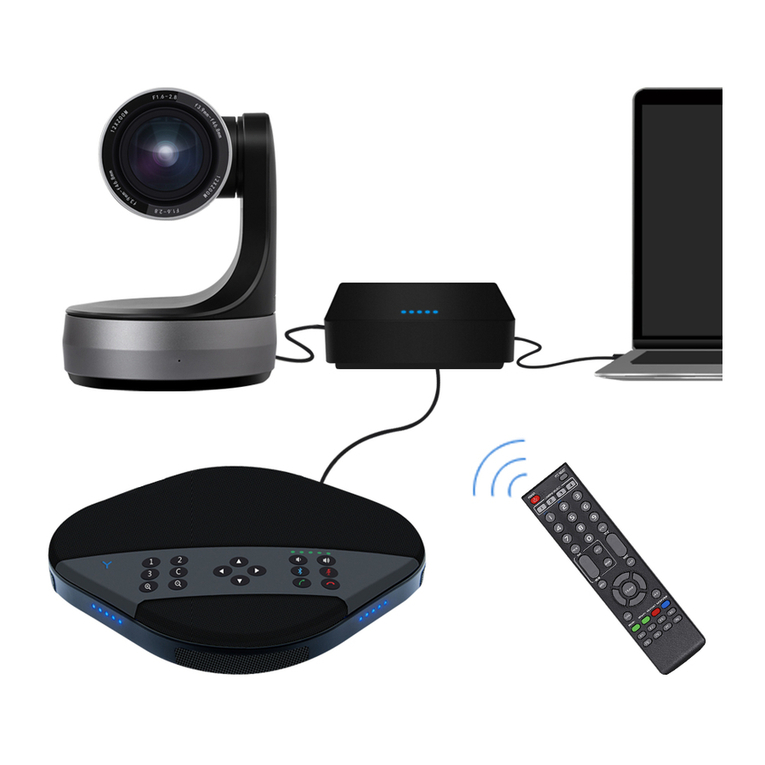
Eacome SV3100 User manual

Video Conferencing Room Soluon
User Manual V1.0

This manual introduces the funcons, installaon and operaons
for SV3100video conferencing room soluon in details. Please read
this manual carefully before installaon and use.
Aenons
To prevent damage to this product or any product connected to it, this
product can only be used within the specified range.
1.1 Do not expose the product to rain or moisture.
1.2 To prevent the risk of electric shock, do not open the case.
Installaon and maintenance should only be carried out by qualified
technicians.
1.3 Do not use the product beyond the specified temperature,
humidity or power supply specificaons.
1.4 Wipe it with a so, dry cloth when cleaning the camera lens. Wipe
it gently with a mild detergent if needed. Do not use strong or
corrosive detergents to avoid scratching the lens and affecng the
image.
1.How to Use
Installaon and use of this product must strictly comply with local
electrical safety standards.
2.Electrical Safety
Avoid damage to the product caused by heavy pressure, strong
vibraon or immersion during transportaon, storage and installaon.
3.Handle with care
4.1 Do not rotate the camera head violently, otherwise it may cause
mechanical failure;
4.2 This product should be placed on a stable desktop or other
horizontal surface. Do not install the product obliquely, otherwise it
may display inclined image;
4.3 Housing of this product is made of organic materials. Do not
expose it to any liquid, gas or solids which may corrode the shell.
4.4 Ensure there are no obstacles within rotaon range of the holder.
4.5 Do not power on before compleng installaon.
4.Install with Cauon

This product contains no parts which can be maintained by the users
themselves. Any damage caused by dismantling the product by the
users without permission is not covered by warranty.
5.Do not Disassemble the Product without Permission
Electromagnec fields at specific frequencies may affect the image.
This product is Class A. It may cause radio interference in household
applicaon. The appropriate measure is required.
6.Magnec Interference

Content
1.Packing Contents
2.Product Overview
2.1 Speakerphone
2.2 VHD-V71CV Camera
2.3 Hub
3. Keys operaon Descripon
3.1 About Remote control
3.2 About Speakerphone
4. Connecon Descripon
5. About Bluetooth pairing
6. The LED Status indicator descripon
7. About Preset
8. Installaon and use of oponal expansion
microphone(Oponal)
9. Technical Specificaons
Warranty
1
2
2
2
3
3
3
4
5
6
7
7
8
9
13

1. Speakerphone
2. VHD-V71CV Camera
3. Hub
4. Remote Control
5. 5m DIN6 Cable * 2 pcs
6. 3m USB cable *1 pcs
7. Power supply
1. Packing Contents
12
34
56
7
1
3C
12

2.Product Overview
2.1 Speakerphone
1. Oponal expansion microphone port 1
2. Oponal expansion microphone port 2
3. DIN6 cable port
4. LED Status indicator
5. Bluetooth indicator
6. Funcon keys
7. Volume indicator
2.2 VHD-V71CV Camera
12 3
4
2
3C
12
5
6
7
1. Status indicator
2. Power indicator
3. DIN6 Cable port
13
2

2.3 Hub
3. .Keys operaon Descripon
3.1 About Remote control
1: Volume down
2: Volume up
3: Pan / Tilt
4: OK
5: Zoom out
6: Zoom in
7: 1-2 Camera presets
8: Hang up
9: Mute microphone
10: Pick up
11: Turn on/off Bluetooth
5
4
3
2
1
12
3
4
56
78
910
11
3
1. DIN6 Cable port
2. USB port
3. Power port
4. Turn on/off
5. Status indicator

3.2 About Speakerphone
KeysDescripon:
Presets buon
Those keys represent the camera
preset posions 1,2 and 3
respecvely
Remote control
buon The Camera Zero posion
Zoom in/out The camera zooms in/out
Volume buon Press the Volume down/up buon
Bluetooth buon Turn on/off Bluetooth
End call Press the End call
Answer call Press the Answer call
Mute microphone Turn on/off Microphone mute
Echo cancellaon
Press the Answer call,End call and
Volume up buon at the same me
to enter/exit the echo cancellaon
mode.When the echo cancellaon
mode is entered, the status light
blue flashes three mes .When the
echo cancellaon mode is exited,
the blue light flashes twice
+
Camera pan / lt Control the direcon of the
camera:le, right,up, down,.
4
3C
12
+

5
DIN6cable
Mini USB
Power Supply
DIN6cable
4. Connecon Descripon
SV3100 can be connected to computer, the hardware video
equipment system through Hub USB. It's not only provides 48KHz digital
voice bandwidth speakers, but also an ultra-clear video experience.
Connecon steps:
1.Connect the camera and Hub with the original DIN6 data cable;
2.Connect the speakerphone and Hub with the original DIN6 data
cable;
3.Connect the power supply equipment with the original power
adapter;
4.Connect one end of the USB cable to the USB port of the
computer and video conference system, and connect the other end to
the USB socket of the Hub;
5. Turn on the power switch aer the connecon was confirmed
correct, and wait for the speakerphone and Camera self-check
completed, turn on the terminal third-party conference soware, and
select the corresponding Camera, microphone (Eacome SV3100) and
speaker driver (Eacome SV3100) to start the audio and video conference
with the device.

6
Common reference Sengs for PC and video devices with USB talking
mode:
5.AboutBluetoothpairing
Once paired with a Bluetooth device, you can use an
omnidireconal microphone for audio calls. To pair your Bluetooth
device with an omnidireconal microphone, follow these steps:
1. Please adjust the volume of horns and microphones
comprehensively to ensure the communicaon is clear and smooth.
2. Don't turn on the speaker and microphone automac gain.
3. Give priority to turning off the audio processing funcons of the
computer soware/video soware (such as turning off automac gain,
echo cancellaon, noise , reducon etc.).
4. Please use those speeches coding that has a higher sound quality
as far as possible.
1. Press the Bluetooth pairing buon and the Y type Bluetooth indicator
green light flashes. At this me, the omnidireconal microphone enters
the Bluetooth pairing mode.
2. Place the mobile device in the Bluetooth device search mode and
select “Eacome SV3100”. Aer the Bluetooth connecon, the indicator
light is steady green. At this point, you can use an omnidireconal
microphone for audio calls.

6. The LED Status indicator descripon
7. About preset
How to save presets :
Status indicator
Blue LED light
Red LED light
USB connecon
Microphone mute
status
Adjust the camera to the posion that needs to be pressed. Press and
hold the preset buon for 5 seconds. The corresponding preset posion
is set successfully.
(Note: 2 preset posions (1-2) can be set on the remote control).
How to use preset posion:
Short press the preset buon to call the corresponding preset posion
(Note: the number key is invalid if it's not preset).
Green light
The higher the volume,
the more the number of
lights
Volume indicator
Bluetooth
indicator
1.Turn on the Bluetooth,
the green light flashes
2.Bluetooth connecon,
green light is always on
Y type Bluetooth
indicator
7

8. Installaon and use of oponal expansion
microphone(Oponal)
Use an expansion microphone for important and large meengs.
1. Connect one end of a 2.5-meter long 4P4C dedicated wire to the socket
of the expansion microphone and the other end to the speakerphone
EXT1.
2. Connect one end of a 2.5-meter long 4P4C dedicated wire to the socket
of the expansion microphone and the other end to the speakerphone
EXT2.
3. Due to the host uses a high single point microphone.To achieve the best
effect, the speaker should be facing the microphone directly in front of
the microphone. The direcon of the microphone is the same as that of
the nameplate.
4. The expansion microphone has mute switch and status indicator. The
indicator is green when it works normally, and red when mute.
Note:
In order to properly use and protect the expansion microphone, it is
necessary to plug and unplug the expansion microphone connecon and
install the expansion microphone without power.
Muteswitch,status
light
infrontof the
microphone
8

9. Technical Specificaons
9
VHD-V71CV USB2.0 HD Video Conference Camera
Model NO.
Product Picture
Sensor
Effecve Pixels
Video Format
Opcal zoom lens
1/2.7'', CMOS
2.07M
1080P, 720P, 540P, 480P, 360P, 240P etc
12x, f=3.5mm ~ 42.3mm
View angle Horizontal Angle of View:72.5°~ 6.9°
Vercal Angle of View:44.8°~ 3.9°
Aperture value F1.8 – F2.8
Digital Zoom 16X
Minimum Illumina
on 0.5Lux(F1.8, AGC ON)
DNR 2D﹠3D DNR
White Balance Auto, Indoor, Outdoor, One Push, Manual, VAR
Focus Auto/Manual/One Push
Aperture/Electronic
Shuer Auto/Manual 1/30s ~ 1/1000s
BLC Support
WDR OFF/ Dynamic level adjustment

Video Adjustment Brightness, Color, Saturaon, Contrast, Sharpness,
B/W mode, Gamma curve
SNR ≥55dB
Rotaon angle Horizontal Rotaon Range:±170°
Vercal Rotaon Range:-30°~ +90°
Control speed Pan Speed Range:1.7°~ 100°/s
Tilt Speed Range:1.7°~ 69.9°/s
Dimensions 144mm x 144mm x 167.9mm
Speakerphone
Model NO.
Product Picture
Voice technical
parameters
Acousc Echo cancellaon(AEC) :>65dB
Echo length cancellaon:≥500ms
Bidireconal noise compression(NC) :<25dB
Automac Direcon finding Technology of
Intelligent microphone(EMI)
Automac gain control(AGC)
10
3C
12
Bluetooth Bluetooth devices available

Speakerphone
Model NO.
Audio parameters
Microphone frequency response 100Hz-22KHz
Speaker frequency response 100Hz-22KHz
Speaker volume: 90dB at the most
Microphone sound-pickup radius: 6 meters,
360 degrees full range
IR Recepon
Angle: 360°
Distance: 10m
IR Transparent transmission available
Expansion Mic
(oponal)
2 external microphones oponal for connecon
makes the sound-pickup radius up to 10 meters
Dimensions 180mm×180mm×42mm(L×W×H)
Hub
Model NO.
Product Picture
Interface
Mini DIN6 ×2
Power interface × 1
Power switch × 1
Mini USB interface × 1
11

Hub
Model NO.
Power supply Power plug(DC12V)
Adapter input AC110V-AC220V,output DC12V/2A
Connecon Cable Mini DIN6 data line × 2
Length: 5m(10m/15m for opons)
USB cable USB cable
Compability
Support Windows, Android, iOS and Linux
Drive-free automac recognion of cameras,
microphones and speakers
Compable with Zoom, Lynch, Vidyo, Skype for
business and etc.
Dimensions 113.6mm×113.6mm×32.6mm(L×W×H)
12

13
Warranty service is an important part in shopping.
Please refer to the company's website if the details and warranty
period that not menoned in the following contents.
The warranty
Customers who purchase this product can enjoy the repair services
in defecve of materials and workmanship.By the way, the repair
services excluded the terms listed below.
Warranty period
The warranty period is one year from the date of sale.
During the warranty period,the warranty will not be given in the
following condions:
A. The product is not stored, used in a reasonable manner or as
suggested by the user's manual that cause damaged;
B. Modify,change or use product with any modified kits,
components or accessories not sold by us.
C. The product is not installed according to relevant instrucons in
the user's manual.
D. Ask others who not authorized by us to repair the product .
E. Use those equipment, components or systems that not
manufactured by us to connect with the product.
The content of the warranty
This warranty applies to the product and all standard accessories,
but does not include the paper items such as packaging and instrucons.
The procedures for obtaining warranty services
If the customer purchases a product that requires a warranty, not
only can the customer receive the warranty service by mailing the QMC
but also they can send the customer's purchase cerficate (such as a
copy of the sales invoice) to your QMC dealer.
Warranty

Address:Floor 15th,Baoneng Technology Building,
Qingxiang Road,Longhua District,Shenzhen,China
Tel:+86-75586223352 ext 838 Mob:+86-13922832151
Email:Tylerzhou@eacome.cn Web:www.eacome.com

FCC STATEMENT :
This device complies with Part 15 of the FCC Rules. Operation is subject
to the following two conditions:
(1) This device may not cause harmful interference, and
(2) This device must accept any interference received, including
interference that may cause undesired operation.
Warning: Changes or modifications not expressly approved by the party
responsible for compliance could void the user's authority to operate the
equipment.
NOTE: This equipment has been tested and found to comply with the
limits for a Class B digital device, pursuant to Part 15 of the FCC Rules.
These limits are designed to provide reasonable protection against
harmful interference in a residential installation. This equipment
generates uses and can radiate radio frequency energy and, if not
installed and used in accordance with the instructions, may cause harmful
interference to radio communications. However, there is no guarantee
that interference will not occur in a particular installation. If this equipment
does cause harmful interference to radio or television reception, which
can be determined by turning the equipment off and on, the user is
encouraged to try to correct the interference by one or more of the
following measures:
Reorient or relocate the receiving antenna.
Increase the separation between the equipment and receiver.
Connect the equipment into an outlet on a circuit different from that to
which the receiver is connected.
Consult the dealer or an experienced radio/TV technician for help.
RF warning statement:
The device has been evaluated to meet general RF exposure
requirement. The device can be used in portable exposure condition
without restriction.
Other manuals for SV3100
1
Table of contents
Other Eacome Conference System manuals