Eaget M9 User manual

1.Introduction ofProduct
1.1Preface
The EAGETM9isahighdefinitionmultimediaplayerwithnetwork,download, DVB-Tand
TVrecordfunctions!
You canwatchmoviesinthehighestresolution(1080P)andinallcommonformatsonyour
televisionorhomecinemasystem–includingthe correspondingmulti-channelsound
(DTS,
DolbyDigital).Youcanalsowatchyourvacation picturesasaslideshowand listentoyour
favoritemusicbythisplayer.
ItsupportsTV record, nolongermissyourfavoritesportseventsandtelevisionprograms
anditalsosupportsbothMPEG2&newerMPEG4H.264DVBTbroadcast,enjoyhigh
qualitydigitaltelevisionineverycountry.
WithHDMI,YPbPr,SPDIFandCompositeaudio/videooutputports,itprovidesyou with
the
mostusefulconnectionstoTV,projector, audiosystem, etc.
Bysomesimplesettings, thisplayercanbe integratedintoyournetwork, eitherbyLANor
WLAN(optional).Thiswillallowyoutostreamall multimediafilesfromyoucomputersor
networkstorage.WithUSB hostsand cardslot, you canalsoconnectyourportablehard
drives,USB flashdrivesormemorycards.WehavealsointegratedthemostpopularBT
downloadfunction foryoutosearchand downloadmoviesonthe Internet.
UserfriendlyUI, easy tooperateand all functions&settingsareaccessiblebytheremote
control.Itwillbeaperfectmatchtoyourhometheater!
1.2MainFunctions
DVB-TTV
·SupportsDigitalVideoBroadcastingTerrestrial(DVB-T)TV reception;
·Supportsdouble-tuner, allowtowatchotherprogramswhilerecording;
·SupportsElectronicProgramGuide(EPG), Teletextandsubtitle;
·SupportsloopouttheDVB-TsignalreceivedfromAerial.
A/V Output
·HDMIV1.3forhigh-definitionvideoanddigitalaudio;
·Composite& componentvideoandstereoaudioforanalogaudio-visualconnection;
·YpbPrfor audio-visualconnection;
·S/PDIFcoaxial& opticalinterfaceforhigh-fidelitydigitalaudio;

·Adjustablevideooutputresolution(NTSC, PAL,480p,576p,720p,1080i,1080p)
A/V input
·InputtheA/Vsignalfromotherdevice, thenbrowseorrecordingit bythisplayer.
VideoRecording
·supportsonekeyrecordingandscheduledrecording, and saveasMPEG-2
(.mpg,or.ts)format;
·supportstimeshifting function.
MultimediaPlayback
·Supportsmajoraudio,videoandimagefileformats(1080pHD videodecoding)
·Movieformat: AVI/MKV/TS/MPG/MP4/MOV/VOB/ISO/IFO/DAT/WMV/RM/RMVB
·Musicformat: MP3/OGG/WMA/WAV/AAC/FLAC
·Photoformat: HD JPEG/BMP/GIF/TIF/PNG
·Photoslideshowwithbackgroundmusic
NetworkFunction
·MMS:Support forreceivebroadcasting bynetwork
·FilesharingviaSambaserver
·IMS:(Thisisathird-partyservicesthat maybeoffedbecauseofthepolicyissues)
support
·Internetchannels,searchvideo,weatherandRSS news.
·Inthebrowser,viaUPNPandnetworkitemtoaccess tocomputersonthe LAN.
FileCopy
·Supportscopying &movingfilesamongCard, USB, HDD, andNetwork
USB2.0Support
·USB DEVICEport(forcomputerconnection)
·USB HOSTportx2(forUSBstorage devices)
Note: All the informationcontainedin this manualwascorrect atthe timeofpublication.
However, asour engineersarealwaysupdating and improving theproduct, your device’s
software mayhavea slightly different appearance ormodified functionality thanpresentedin this
manual.
1.3PackingList
Beforeyoumakeusingtheproduct,pleasecheck whetherthe colorfulboxpackinghas
thefollowingparts.Ifthereisshortage, pleasecontactthedealerfromwhoyouboughtthe
productintimetoguaranteeyourrightsandinterests.

TTEM Quantity
EAGETM9Player 1Piece
PowerAdapter 1Piece
RemoteControl 1Piece
AABattery 2Pieces
AVCable 1 Piece
USBDataCable(A toMini B) 1Piece
HDMI Cable 1 Piece(optional)
UserManual 1 Piece
Note: Theactualcontents in the packagemight be differentfrom thepacking listin thismanual,if
anydifference,please check withthe vendor.
1.4Cautions
Thisplayer’sdesign and manufacturehasyoursafetyinmind.Inordertosafelyand
effectivelyusethisplayer, pleaseread thefollowingbeforeusage.
1.4.1UsageCautions
Usershouldnotmodifythisplayer.Ifcommercialharddisk isbeingused, the
environmentaltemperatureshouldbewithin+5 ~+35 .
1.4.2Power
The player’spowervoltage: DC12V.
Whenusing thisplayer,pleaseconnectthesuppliedACadapterorACadaptercableto
theplayer’spowerjack.Whenplacingtheadaptercable, makesureitcannot get
damagedorbesubjecttopressure.Toreducetheriskofelectricshock,unplugtheadapter
first beforecleaningit.
Neverconnecttheadaptertotheplayerinahumidordustyarea.Donot replacethe
adapterorcable’swireorconnector.
1.4.3RadioInterference
Ifnot properlyshielded, almostallelectronicdeviceswillgetradiointerference.Under
someconditions,yourplayermightgetinterference.
The design of thisplayerhasfollowedtheFCC/CEstandard,and hasfollowedthe
followingrules:
(1)Thisplayermaynot causeharmfulinterference;
(2)Thisplayercouldacceptsomeinterferencereceived includinginterferencethat
maycauseundesiredoperation.
1.4.4Repair
Iftheplayerhasaproblem,youshouldtakeittoanappointedrepaircenterandletthe
specialistsdotherepair,neverrepairtheplayeryourself,youmightdamagetheplayeror

endangeryourselforyourdata.
1.4.5Disposing of the Player
Whenyoudisposeoftheplayer,besuretodisposeitappropriately.Somecountries
mayregulatedisposalofelectricaldevice,pleaseconsult withyourlocalauthority.
1.4.6HardDiskCautions
The playerusesaninternalharddiskfordatastorage.
Physicalimpactmaycreatebadsectorinthe harddisk, youcanuseCHKDSKtofixthe
problem.
All datastored intheplayermaybe lostdue tophysicalimpact, electricalshock, power
lost, HDD formatetc.Pleasebackupyourdata.
It issuggestedtodo defragmentafteralongperiod ofusage.
Regularlybackupthedataintheharddisk sothatitcanberecoveredintheeventof
datacorruptionorloss.Ourcompanytakesnoresponsibilityforlossofdatastored onthe
harddisk.
1.4.7Others
1.Whenusingthisplayer,pleasedonotlettheplayercomeintocontactwithwateror
otherliquid,ifwaterisaccidentallyspilled ontheplayer,pleaseuseadryclothtoabsorb
thespillage.
2.All electronics deviceareverysensitiveand maybebrittle,nevervibrateorimpact
thisproductviolentlyduring use,norapplytoomuchforceonpressingthekeysonthis
product.
²Donot lettheplayercontactingwithwaterorotherliquid.
²Neverdisassemble,repairorrefit thisplayerbyyourself.anydamagedonewill notbe
includedintherepairrange.
²Donot press the buttonswithtoomuchforce.
²Avoidhittingtheplayerwithhardobject,avoidshaking,and keepawayfrommagnetic
fields.
²Duringinstaticand thestrong electromagneticmagneticfield,theproductwillbefailto
function,thenunplugthe powercableandthenplugthepowercableagain,theproduct
willreturntonormalperformance.
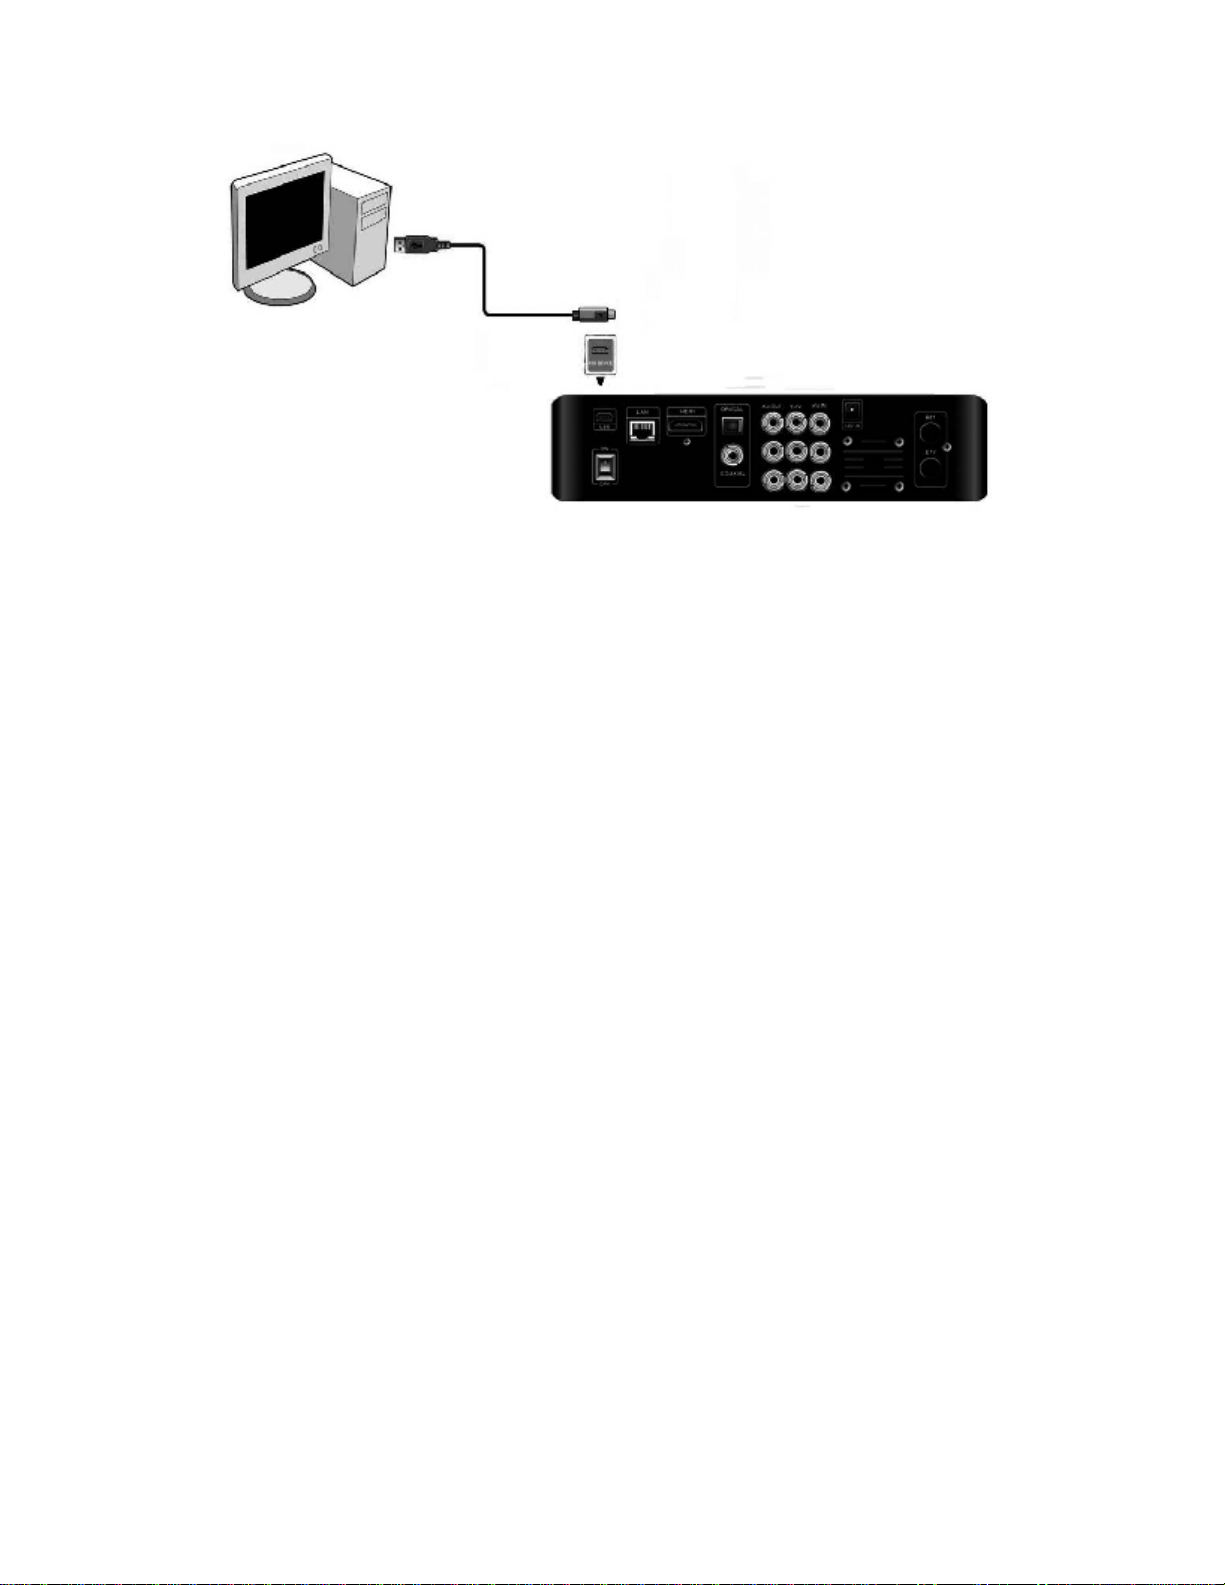
2.ConnectionInstruction
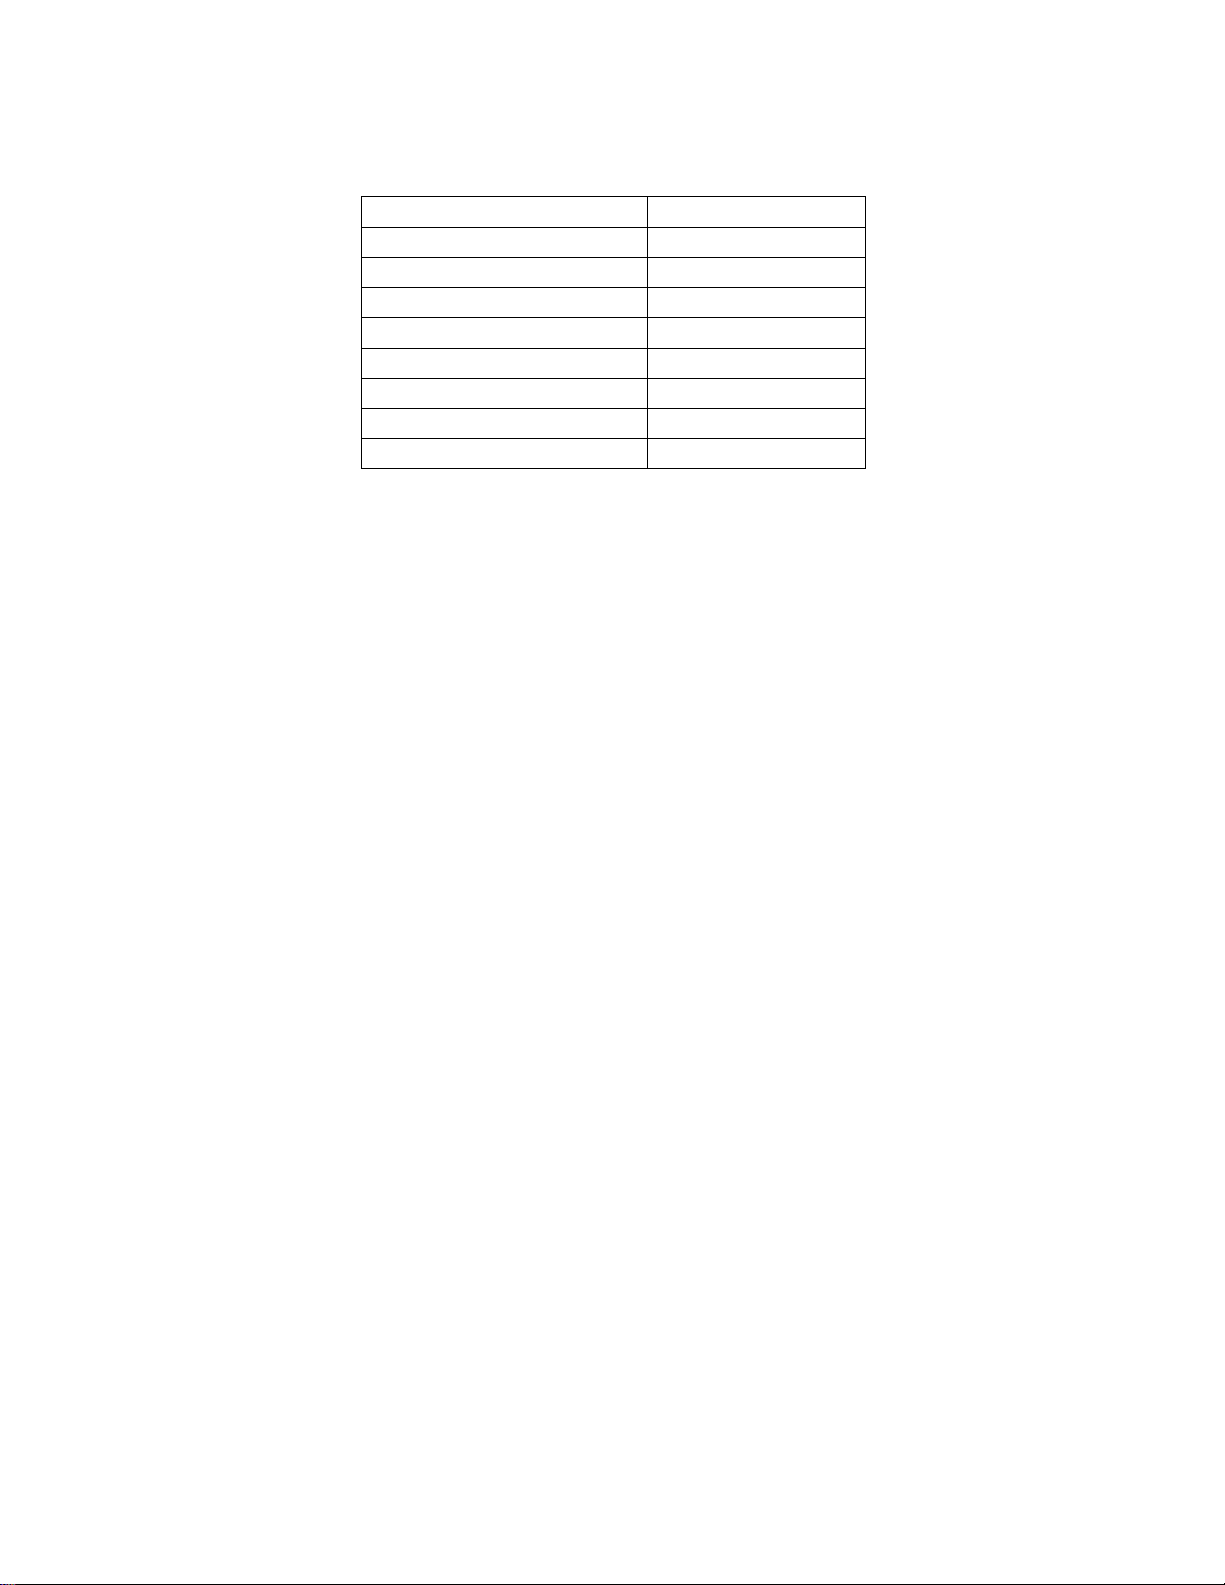
2.1ConnectingthePowerSupply
(1)FollowthepictureandconnecttheACadaptortothe player’sDC INjack;
(2)Followthepictureandplugin theACadaptortothepoweroutlet.

2.2HDMIOut
(1)Followthepictureandplugone connectoronyourHDMI cabletotheplayer’sHDMIjack;
(2)Followthe pictureand plugtheotherconnectoronyourHDMIcabletothe TV’sHDMIjack.
2.3A/VOut
(1)Followthepictureandplugin the3colorconnectortotheplayer’sA/VOUTjack;
(2)Followthepictureandplugin the3colorconnectortotheTV’sA/VINjack.
2.4A/VInput
(1) Followthepictureandpluginthe 3colorconnectortotheplayer’sA/V injack;
(2)Followthepictureand pluginthe3colorconnectortothe otherdevice’s(eg: DVB,STB
ect.)A/V out jack.

Inthiswayyou canusethisproducttorecordthecontentsoftheDVDorothervideo
playback devices.
2.5Y/Pb/PrComponent Out
(1)Followthepictureandplugin the3colorconnectortotheplayer’sY/Pb/Pr jack;
(2)Followthepictureandplugin the3colorconnectortotheTV’sY/Pb/Prjack.
Audio Connection whileusing Y/Pb/PrVideo out:
First method:usethe audiooutputfromtheA/VOUTjack;
Second method: usetheaudiooutputfromtheS/PDIF Coaxial orOptical fiberjack.
2.6ConnectingDigitalAmplifier
(1) Followthepictureand plug oneendof coaxial/ Opticalfiber cabletothecoaxial/ Optical
fiber outputport ofthisproduct.
(2) Followthepicture andplug theotherendofcoaxial/ Opticalfiber cabletothecoaxial/
Opticalfiber inputport ofcorresponding poweramplifier.
Note: Opticalfiberandcoaxial cable arenotsupplied.
(Coaxial)

(Optical Fiber)
2.7ConnectingtoaLAN
Toconnect toaLAN(Local AreaNetwork)yourequirearouterorswitch(notsupplied).
(1)Connect oneofthecrystal plugsonthecabletotheplayer’sLANsocket;
(2)Connecttheothercrystal plugonthecable toLANportonyourrouter,switch,orhub
devices.
2.8ConnectingtoaWLAN
(1)Makesuretheplayerispoweredon;
(2)Plugthe Wireless LANUSB Adapter(i.e.Wi-FiUSBDongle)totheUSBHOSTportof the
player.
Helpful tips: TheWi-FiDongleis anoptional accessorysoldseparatelyand not allwireless

Networkcardssoldon themarketcanbeusedforthis player. Please consult withthe sales when
you wish to make the best use of thisproduct.
2.9ConnectingaUSB Device
(Include:U-Disk, removableHDD,USB DVDROMect.)
(1)Makesuretheplayerispoweredon;
(2)PlugintheUSB stickorUSBHDD etc.totheUSBHOSTport of thisplayer.
2.10 ConnectingSATAHDD
(1)Followthepictureandplugonendofthe SATA cabletotheplayer’sSATAjack;
(2)FollowthepictureandpluganotherendtotheSATAHDD.
Thenyou canthroughBrower-HDDtobrowse.
2.11ConnectingtoaPC
(1)Makesuretheplayerispoweredon;
(2)PluginthesquaresconnectoroftheUSBcabletothisplayer’sUSB DEVICEport;
(3)Plugintherectangularconnectorof the USB cabletocomputer.

Helpfultips:
1.Open“MyComputer” andanewdisk symbolwill appearand Inthisway,youcanmanagethe
content onthebuilt-inHDD oftheplayeronyourlocalPC.
2. Pleaserefertothecomputerinstructionstoformattheharddisk. (It’snot recommendedthe
usertouseothersoftwaretopartitionthe harddiskofthisplayer).

3.AboutthePlayer
3.1RemoteControl 1.Remote
Indicator 2.Standby
3.Zoom 4.TVSYS
5.Confirm6.Select
7.Subtitle 8.Audio
9.Teletext 10.Timeshift
11.Pause 12.Play
13.Mute 14.Source
15.Edit 16.Repeat
17.EPG 18.TimeREC
19.Stop 20.Eject
21.REC 22.FR/FF
23.Music 24.Setup
25.Previous/Next
26.Home
27.Return 28.OK
29.Navigation
Keys 30.Vol+/-
31. NumericKeys
32.Goto
33.Info

RemoteControlDescription:
NO. Item FUNCTION
1 RemoteIndicator
Remoteindicator.
2 Standby Presstoenterstandbymodeorwakeup.
3 Zoom Zoomintheimage.
4 TVSYS Switchthe output modeintovideo signals.
5 Confirm Presstoaddthe selectstothe playlist.
6 Select Pressitincopymenutoselectthefiletobecopied andin
browsemenutoselect thefiletobeaddedintothePlayList
7 Subtitle Presstosetsubtitleoptions.
8 Audio Presstoselect anaudiotrack.
9 Teletext DTV
PresstoopenTeletextOSDifitisavailableinthe
broadcasted streamofDigitalTerrestrialTV.
10 Timeshift Presstoactivatethetimeshift function.
11 PausePressitduringplaytopausestateand thenpress itonceto
playthevideoinnextframeeverytime.Press playkeyto
returntonormalplaystate.
12 Play Pressittoplaythe currentmediafile.
13 Mute Turnon/off thesound.
14 Source SelectthevideosourceorDTVforthe recording.
15 Edit
Presstoenterintofileedit menu.you can dorenameand
deletethefilesoperations.
WhenundertheMyShortcutsinterface,presstoadjust the
networkedit menu.
16 Repeat Presstosettherepeatmode.
17 EPG DTV
Presstoenterthe ElectronicProgramGuidewhichdisplays
anon-
screenlistofprogramsforthecomingweekwhen
watching
DTV.
18 TimeREC PressittorapidlyenterintoTimeRECapplications.
19 Stop Pressittostopthemediafilebeingplayedat present.
20 Eject Controltheejection ofDVDfloppy.
21 REC
StartorpauseREC,retapwillselect the lengthofthe
video.(One keyrecordOTR,youcanselectOTR30 MIN./60
MIN./90MIN./120 MIN./180 MIN./240MIN./off)whenyou
selectedtheoff you canrecording foralongtimeand
unrestricted.
22 FR/FF
PressitinmediaplaymodeforFR/FF.PressPlaytoresume
tothenormalmode.
23 MusicPressittorapidlyenterintomusicapplications.
24 Setup PressittorapidlyenterintoSettingApplications.
25 Previous/Next
Pressitduringmediafileplayforforwardorbackwardfora
file;
Presstoselect the Previous/NextChapterwhenplaying the
filehasthechapters.
26 HomeReturntotheMainmenu.
27 Return Returntothesuperiordiretoryandexit fromplaystate.
28 OKkey Presstoconfirmcurrentoperation.

29 NavigationKeys
Pressthe navigation keys tooperatethemenuson this
interface.
Presstoadjustthesizesand verticalpositionsofplugintext
subtitles;
presstoduringpicture
playtomovetheviewing positionafter
zoominginandout.
Pressleft/rightkeytorotatethe picture.
30 Vol+/- Presstoaddordecreasethevolume.
31 NumericKeys Presstoenternumericinputwhenchangingsettings.
Selectthechapterwhenplayingthe filehasthechapters.
32 GotoPressitduringvideo playtoselectatimeperiodtobeplay
ed
back.
33 Info Presstohideordisplaytheinformationbarduringplayback.
3.2Front View
1.IRReceiverWindow2. Stand bySwitch(indicator)3.VFDScreen
Description:
No. Item Description
1 IRReceiverReceivethesignalfromremotecontrol.
2 Standby
Switch(indicator)
Pressthebottomtoenterintostandbymode;
TheLEDindicatorshowsgreenwhenturnedon,
andshowsredwhenstandby.
3 VFDScreen Displaythe playbackstatusandprogressand
otherinformation forthe operation.

3.3BackView
1.USB Device2.Switch3.LANjack4.HDMIjack
5.Coaxial/Opticalfiber6.AV OUT7.YpbPrjack8.AVIN
9.DC-IN10.FAN11.ANTIN/OUT
InterfaceDescription:
No. Interface Operationinstruction
1 USBDeviceConnecttocomputerbythisjack.
2 PowerSwitchSwitchon/off thepower.
3 LAN ConnecttowirenetworkbyLANjack.
4 HDMI Connectingtothevideo deviceand outputHDMI
audioandvideosignalsbythisjack.
5 Coaxial/
OpticalFiber
SPDIFCoaxial/Opticalfiberoutput digitalaudio.
(TheSPDIFcoaxial/opticalcablesarenotincluding
inattachment).
6 AV Out Connecttoaudioand videodevicebythisjack,and
output CVBS signals.
7 YPbPrOut Connecttoaudioand videodevicebythisjack,and
output PR/PB/Yvideosignals.
8 AV IN Connecttoaudioand videodevicebythisjack,and
input CVBSsignals.
9 DC-IN Powerinput: DC 12V.
10 CoolingFan Exhaustingthe heatfrominternal.
11 ANTIN/OUT Input oroutput digitalTV signals.

3.4SideView
1.ExtenalSATAInterface2.USBHost×2
InterfaceDescription:
No. Interface Operation instruction
1 ExternalSATAInterface Connect theexternalSATAHDD.
2 USB HOST×2 ConnectingexternalUSB deviceby
thisjack.
3.5InstallHDD
3.5.1Loosenthe screwsand open the bottomcover.
3.5.2.InstalltheHDD (Putthe 3.5”HDDonthebottomcoverandtightitbythescrews).

3.5.3Connecttheplayer’sdatacableand powercabletotheHDD.
3.5.4Installthebottomcoverasfollowingpicture:
3.5.5Lockthe screwsonthebottomofplayer.

ThenHDDinstallationiscompleted,asshownbelow:
4. PowerOn/Off
4.1PowerOn
Connectingthepowercableand Videocableandswitchon,then pressthestandbykey
ontheremotecontrollerorpress thepowerkeyon thefront panelofthe player,poweron
theTV andselectthe inputsignalbytheconnectingway,the playerwillsoonenterintothe
homemenu.
4.2PowerOff
Pressthepowerbuttononthefrontpanelorpress the standbykeyon theremote
controller,theplayerwillsoon enterstandbymode,andthe powerindicatorwill turnred.
Thenswitchoff tocutoffthepowersupplythenyou canunplugthepowercable.
5. BrowseFunction
5.1BrowsingMovie

Pressthe Left/Rightkeys onthe remotecontrollertoselect MOVIE fromthemainmenu
abovethescreen;
BrowsingMovie InstructionsofOperations
Press the Up/Downkeystoselectthe
devicetobe previewedand presstheOK
keytoaccess;
Press Up/Downkeys toselect the folder
ormovietobebrowsedandpress theOk
keytothefull screenplanstate.
The followingbuttonscanbeusedtocontrolvideo playback:
Pause Pausetoplaybackthefile.
Play Restarttoplaythefilewhichwaspaused.
FF/FR FF:(1.5x,2X,4X,8X,16X,32X)
FR:(1x,1.5x,2X,4X,8X,16X,32X)
Press repeatedlytoselectthespeed.
Previous/Next
Press it during mediafileplayforforward
orbackwardforafile;Presstoselectthe
Previous/NextChapterwhenplayingthe
filehasthe chapters.
Numberkeys Press toselectthechapterwhen playing
thefilehasthe chapters.
Goto Press it during videoplaytoselect atime
periodtobeplayedback.
Zoom Zoomintheimage.
(Zoomratio:1X,2X,3X,4X,8X)
Subtitle Selectandsetthesubtitleoptions.
Audio Press toselectanaudiotrack.
Repeat Set repeatoptions:Repeattitle,Repeat
all,repeat off.
Info Viewthe informationofthefile.
Mute Turnon/offthesound.
Volume+/-Addordecreasethevolume.
Stop Stopplaybackthe file.

Helpfultips:
1.Incaseofmessycodesdisplayedduring playingsomesubtitlefiles,press Subtitle keytocall
outthe Subtitlemenuandmodifythecorrespondingcharactersetcodesanditwill display
normally;
2. Incaseof no audiooutput duringplayingsomemovies, switchthe Audio tootherchannels
andifitstill fails,pleasetrytodecodebypoweramplification;(Pleasereferto 2.6 connectingto
aDigitalAmplifier;andreferto 9.1ChangetheAudioSettings)
3.Allsupportedmoviefileswill bedisplayedin thisapplication.
5.2BrowsingMusic
Pressthe Left/Rightkeys onthe remotecontrollertoselect MUSIC fromthemainmenu
abovethescreen.
BrowsingMusic InstructionsofOperations
Press the Left/Rightkeys onthe remote
controllertoselectMUSICinterface.
Press Up/Downkeys toselect the device
tobepreviewedandpress Okkeyto
access;
Press Up/Downkeys toselect the folder
ormusicyou wanttopreviewandpress
Okkeytoplaystate.
Thefollowingbuttonscanbeusedtocontrolmusicplayback.
Pause Pausetoplaybackthefile.
Play Restarttoplaythefilewhichwaspaused.
Repeat Settherepeatmodewhenplaying music
file.(1,ALL,Repeatoff
FR/FF FR (1.5x,2X,4X,8X,16X,32X)
FF (1x,1.5x,2X,4X,8X,16X,32X)
Pressrepeatedlytoselectthespeed.
Previous/Next Findmusicfilesbypage.
Up/downkey SelectthePrevious/Next fileonthe

previewinterface.
Mute Turnon/offthesound.
Volume+/-Addordecreasethevolume.
Stop Stopplaybackthe file.
Helpfultips: Inthisapplication, the playerwill displayall supportedmusicfiles.
5.3BrowsingPhoto
Pressthe Left/Rightkeys ontheremotecontrollertoselect photo fromthemainmenu
abovethescreen;
BrowsingPhoto InstructionsofOperations
Press the Left/Rightkeys onthe remote
controllertoselectphotointerface.
Press Up/Downkeys toselect the device
tobepreviewedandpress Okkeyto
access;
Press Up/Downkeys toselect the folder
ormusicyou wanttopreviewandpress
Okkeytofullscreenplanstate.
The followingbuttonscanbeusedtocontrolvideo playback.
PREV/NEXT Viewthe previousornextpicture.
ZoomZoomintheimage.
Zoomratio: 2X,4X,8X,16X,fit
Navigationkey
Press the Left/ Right keystorevolvingthe
previouspictures
Whenenlargedtheimage,you can move
around bynavigationkey.
InfoHideordisplaytheinformationbarduring
playback.
PausePauseplayback.
Stop Stopplayback.
Table of contents
Other Eaget Media Player manuals
Popular Media Player manuals by other brands

IAdea
IAdea XDS-2450 quick start guide

Advance acoustic
Advance acoustic WTX-StreamPro quick start

Philips
Philips GoGear SA060304 quick start guide

Telestream
Telestream Flip Player 3.2 user guide

LY International Electronics
LY International Electronics hs838 Operation instructions

Nightlife
Nightlife Media Player TESTING INSTRUCTIONS