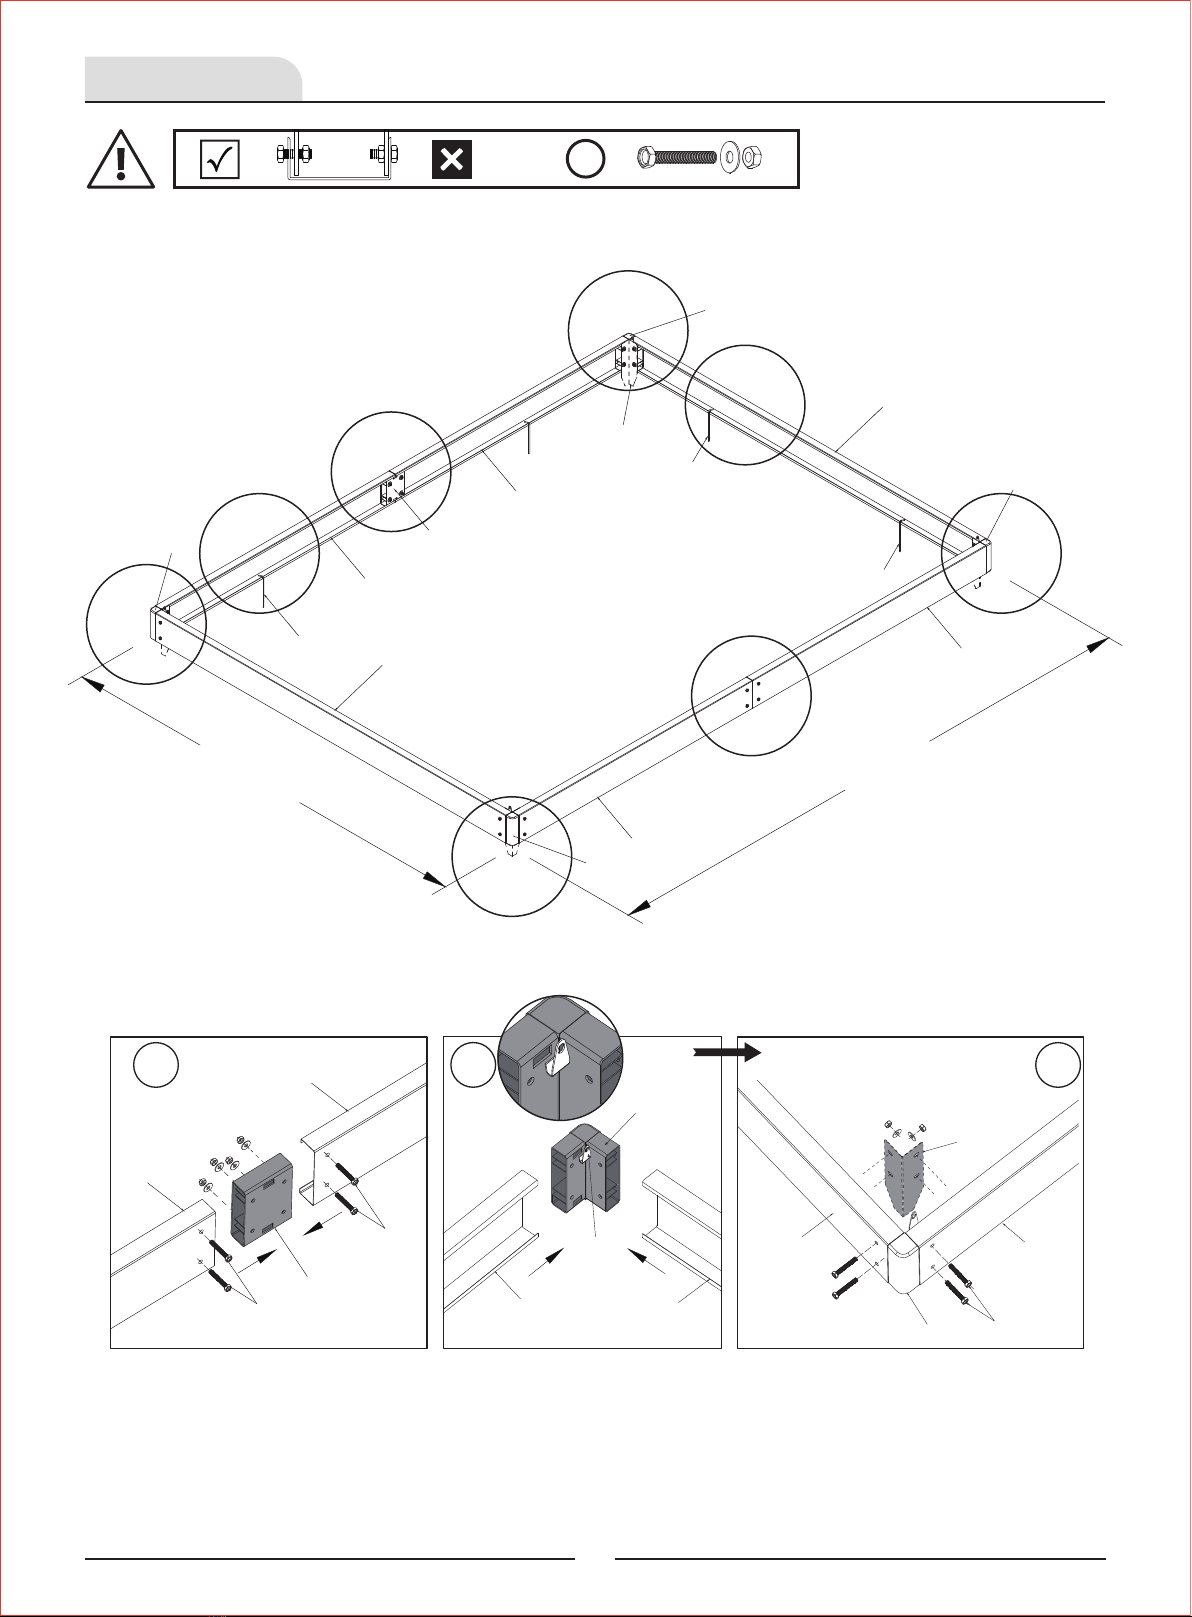
Eagle Peak GHPC48V2-GRN-AZ User manual

EAGLE PEAK PC GREENHOUSE
6 FT x 8 FT x 7 FT
Thank you for choosing Eagle Peak !
INSTRUCTION MANUAL

CONTENTS
1. lmportant Read Before Assermbly
2. Dimensions & Specifications
3. Part List
4. Base Assembly
5. Vent Assembly
6. Door Assembly
7. Front Wall Assembly
8. Door Slider Assembly
9. Side Wall Assembly
10. Back Wall Assembly
11. Roof Frame Assembly
12. Panel Supports Assembly
13. PC Panels Installation
14. Rainwater Collection System
15. Anchor the Base
16. Open and Close The Vents
17. Additional Strength
................................................................................................................................ 1
.......................................................................................................................................... 3
............................................................................................................................................................................... 4
................................................................................................................................................................... 7
................................................................................................................................................................. 10
................................................................................................................................................................ 13
..................................................................................................................................................... 16
.................................................................................................................................................... 19
......................................................................................................................................................... 22
.................................................................................................................................................... 25
................................................................................................................................................. 33
.......................................................................................................................................... 36
................................................................................................................................................. 39
.................................................................................................................................... 47
........................................................................................................................................................... 48
......................................................................................................................................... 49
..................................................................................................................................................... 50

IMPORTANT
Proper placement of your greenhouse is essential.
Do not place the product underneath or near electrical lines.
Keep children away during assembly.
This product contains small parts which can be swallowed by children.
Keep fingers away from the places where they can be pinched.
Do not attempt to assemble the greenhouse if any parts are missing.
Caution!
· The product smust be installed on flat and level horizontal surface.
· Ensure enough clearance around the product. Before assembling the product, find level ground no
less than 6'(1.8m) away from any structures or obstructions, such as fences, garages, houses,
overhanging branches, laundry lines, or electrical wires.
· This greenhouse is not to be regarded as part of a building/house structure. The greenhouse must
be anchored securely to the ground or mounting surface. It is best to build the greenhouse on a
hard, stable foundation. Appropriate screws or concrete anchors (not provided) must be used to
anchor the greenhouse to the surface. Anchor stakes are provided for use on compacted soil or
crushed stone.
· The greenhouse may require two or more people to install safely.
· Check for underground utilities before digging or driving stakes into the ground.
· During installation, follow all safety warnings provided with your tools and use safety glasses.
· If you set up more than one greenhouse, keep a minimum distance of 10'(3m) between the
greenhouses.
· Any assembly or maintenance of the product must be carried out by adults only.
· Arrange necessary manpower when assembling or moving the product.
· Some parts may contain sharp edges. Wear protective gloves if necessary.
· Keep children and pets away while setting up the greenhouse.
· Check all nuts and bolts periodically to ensure bolts/nuts are tightened.
· Repairing and replacing parts should be done by a qualified person.
· Do not light any fire inside or near the product!
· Do not hang heavy weights on the roof frame.
· Do not climb onto the roof of the greenhouse. Falling off or through the greenhouse can result in
serious injury.
Warning! To reduce the risk of serious injury, read the following safety instructions before
assembling and using the greenhouse.
Please check with your local governing authority/local municipal codes regarding
installation of structures before assembly.
1

IMPORTANT
• Please read and understand this manual before any assembly. Before beginning assembly of the
product, make sure all parts are present. Compare parts with packaging contents list.
• Place all parts from the box in a cleared area and organize them for assembly.
• Remove all packing materials and place them back into the box. Do not dispose of the packing
materials until assembly is completed.
• DO NOT tighten the screws before PC panel assembly in order to ensure all the parts fit with each
other.
• The holes in the aluminum greenhouse are oval. If necessary, all parts of the greenhouse can be
moved and adjusted before installation complete.
• It will take 6-8 hours to set up the greenhouse with 2-3 people. Please leave ample time to do the
assembly, and do not stop once assembly has begun. A partially assembled greenhouse frame may
be damaged or destroyed due to bad weather.
• Read each step carefully before beginning any assembly and make sure you understand each step.
If any part is missing, or if you have any questions, please contact the customer service:
· Needed for assembly: (The following tools are NOT included)
Tape Measure LadderGoggles
Slotted Screwdriver
Drill Pliers
2

207 cm
6.8 ft
58 cm
1.9 ft
251 cm
8.2 ft
190 cm
6.2 ft
138 cm
4.5 ft
Dimensions & Specifications
3

Part List
1A
1B
1C
1D
1E
Item
NO. Sketch Size
4X
Quantity
1215mm
47.8in
1X
1130mm
44.5in
1X1130mm
44.5in
1X
1130mm
44.5in
1X1130mm
44.5in
2A 1X
1640mm
64.5mm
2B 1X1640mm
64.5mm
3A 1X1665mm
65.5in
3B 1X
1665mm
65.5in
3C 6X1215mm
47.8in
3D 6X1115mm
43.9in
4B 1X1830mm
72.0in
4C 2X1220mm
48.0in
4D 2X
1220mm
48.0in
Sketch
5A
6A
7A
7B
7C
Item
NO.
7D
Size
1X
Quantity
1830mm
72.0in
1X
619mm
24.4in
2X
1830mm
72.0in
4X
1300mm
51.2in
2X594mm
23.4in
2X
1300mm
51.2in
7K 16X625mm
24.6in
8B 2X
1220mm
48.0in
8C 2X1220mm
48.0in
9B 2X1220mm
48.0in
10A 2X
635mm
25.0in
16A
11A 1X625mm
24.6in
12A 1X610mm
24.0in
13A
14A
15A
2X
17A
Item
NO. Sketch Size
1X
Quantity
1250mm
49.2in
1X380mm
15.0in
2X
1600mm
63.0in
2X625mm
24.6in
1X
625mm
24.6in
18B 595mm
23.4in
19B 4X520mm
20.5in
20B 2X595mm
23.4in
21A 5X603mm
23.7in
4

Part List
36
37
6X
6X
38 6X
2
3
4
5
Item
NO. Sketch Size
mm Quantity
1X
25XM6*40
2X
202XM6*10
6 16XM3*20
712X
M3*10
8 4X
8X
9 2X
10 2X
11 1X
13 2X
14 210X
15 4X
16
Item
NO.
17 74X
18
19
20
21
22
26
Sketch Size
2X
Quantity
4X
2X
1X
2X
24 9X
25 4X
2X
4X
27-1 2X
4X
28 4X
29 14X
30 4X
31 14X
32
27-2
33
35
Item
NO. Sketch Size
6X
Quantity
202X
1830mm
72.0in
1220mm
48.0in
5

D4 2X
B4 6X
F4 1X
A4
Sketch Qty
Item
NO. Size
13X
G4 1X
H4 1X I4 2X
X4 4X
E4 2X
Sketch Qty
Item
NO. Size
603x1210mm
23.75x47.63in
603x590mm
23.75x23.22in
603x655mm
23.75x25.78in
603x1120mm
23.75x44.09in
595x550mm
23.42x21.65in
620x240mm
24.40x9.45in
620x600mm
24.40x26.62in
620x230mm
24.40x9.05in
603x440mm
23.75x17.32in
Part List
6

27-1 2X
1830
28 4X 30 4X
31 10X 32 2X
3 24XM6*40
27-2 4X
1220
42X
29 4X
IMPORTANT: The ground, wooden deck, or concrete surface must be firm and level for maximum
stability and durability. If not, the PC board may not be properly secured in the provided guide rail and
may be blown out by strong wind. The greenhouse must be securely anchored by placing the
foundation frame into the ground and securing with stakes, or by fixing it to a wooden deck or concrete
surface. (See Step 1.1 - Step 1.5 for details.) Failure to properly secure or anchor the greenhouse will
void the warranty.
Step 1
Parts required for this step
Base Assembly
7

3
1.2
1.3
1.1
27-2
27-2
27-1
27-2
27-2
27-1
30
31
1.1
1.2
1.3
1.2
1.3
1.2
1.3
1.4
1.5
1.4
1.5
31
31
32
251 cm
8.2 ft
190 cm
6.2 ft
28
28
28
28
Base Assembly, cont’d
Assemble the foundation frame using (2) 27-2 Beams, (1) 32 Middle Bracket, and (4) 3 Screws,
Nuts and Washers. Repeat 1X.
Assemble the foundation frame using (2) 27-2 Beam Assembly, (2) 27-1 Beam Assembly, (4) 28
Corner Brackets, (4) 29 Base Hooks, and (16) 3 Screws, Nuts and Washers. Use (4) 30 Corner
Stakes, as shown in Step 1.2. if the greenhouse will be anchored directly to the ground.
Step 1
8
27-2
27-2
32
3
1.1 Corner Stakes are needed to
set up in soil (Status 1)
28
27-2
30
3
27-2
27-1
28
29
27-1
1.2 1.3
3

Step 1
9
1.5
Wooden Deck
or
Concrete Ground
Base Assembly, cont’d
Base
Assembly on Wood
or Concrete Pad
Build a level wood
or concrete pad
that is slightly
wider and longer
than the green
house. DO NOT
use Part 30 and 31
if set up on
wooden deck or
concrete ground.
1.3 1.4
30
31
27-1
Assembly on
Ground
Excavate the site
by removing the
top 3 in of grass or
soil and leveling
the base, allowing
a 6 in perimeter
around the
foundation.

0
Step 2
10
18B 2X595
20B 2X
595
595*550
13 2X
E4 2X 5 8X
7 4XM3*10 4 2X
19B 4X520
Parts required for this step
Vent Window Assembly
M6*10

Step 2
11
2.1
2.4
19B
E4
20B
18B
19B
13
2.3
2.1
2.2
2.3
2.2
5
Vent Window Assembly, cont’d

Step 2
12
20B 19B
5
2.1
E4
①
②
18B
19B
20B 19B
2.2
E4
19B
18B
5
2.3
E4
13
7
18B
2.4
Assemble (2) Frame piece 19B to (1) Frame piece 20B
using (3) Screw Set 5. Do not tighten screws at this
time.
Slide Window E4 into the window frame.
Secure the vent window handle 13 to the
window frame using (2) screw 7.
Repeat 2X
Vent Window Assembly, cont’d
5
5

Step 3
13
11A 1X
625
15A 2X
1600 16A 2X
17A 1X 52X
625
625
6 16XM3*20
12A 1X
610
42X
11A 1X
15A 2X 16A 2X
17A 1X 52XM6*10
6 16X
12A 1X
42X
Parts required for this step
Door Assembly

Step 3
14
3.1
3.2
3.2
3.3
15A 15A
17A
16A
16A
12A 11A
3.1
3.2
3.2
3.3
3.1
3.2
3.2
3.3
15A 15A
17A
16A
16A
12A 11A
3.1
3.2
3.2
3.3
5
Door pre-assembly for future step. PC Panels are not needed at this time.
Door Assembly, cont’d

Step 3
15
Door Assembly, cont’d
6
15A
11A
12A
5
6
15A
11A
12A
5
3.1
6
15A
16A
6
15A
16A
3.2
6
15A
17A
3.3
Assemble Part 16A to (2) Vertical Door Frames
15A using (4) Screws 6.
Repeat with second Part 16A as shown on Page
Assemble Part 12A to Part 11A using (2) Screw,
Washer and Nut 5.
Assemble Part 12A/11A to (2) Vertical Door
Frames
Assemble Part 17A to (2) Vertical Door Frames
15A using (4) Screws 6.

Step 4
16
1A 2X
1215
1C 1X
1130 2A 1X
5A 1X
6A 1X
26 2X
1640
1830
1B 1X
1130
619 7C 2X594
7D 2X
1300
5 18XM6*10
2B 1X1640
42X
Parts required for this step
Front Wall Assembly

Step 4
17
26
4.3
4.6
4.5
4.2
4.1
2B 2A 7D
7C
1A
26
1B
6A
1C
7D
7C
1A
5A
4.4
4.6
4.5
4.2
4.1
26
5
Front Wall pre-assembly for future step. PC Panels are not needed at this time.
Front Wall Assembly, cont’d

Step 4
18
Front Wall Assembly, cont’d
1B
1A
7D
7C
5
26
1B
1A
7D
7C
5
26
4.3 1C
1A
7D
7C
526
1C
1A
7D
7C
526
4.4
7C
5
2A/2B
7C
5
2A/2B
4.5
6A
2A/2B
1B/1C
5
6A
2A/2B
1B/1C
5
4.6
4.1
1A
5
5A
4.2
7D
5A
5
2A/2B
Assemble Corner Support 1A to Bottom
Frame 5A using (1) Screw, Washer, Nut 5.
Repeat at opposite end.
Assemble Part 7D to Vertical Frames 2B using
(1) Screw, Washer, Nut 5. Repeat with 2A.
Assemble Parts 7C, 7D, 1A and 1B to Corner
Bracket 26 using (4) Screw, Washer, Nut 5.
Assemble Parts 7C, 7D, 1A and 1C to Corner
Bracket 26 using (4) Screw, Washer, Nut 5.
Attach end of Part 7C to (2) Vertical Supports
2A and 2B using (2) Screw, Washer, Nut 5.
Assemble Horizontal Beam 6A to (2) Vertical
Supports 2A and 2B and Roof Beams 1B and 1C
using (4) Screw, Washer, Nut 5.
Table of contents
Other Eagle Peak Greenhouse Kit manuals