EasyPro DDK50 Use and care manual

DDK50 • DDK100E
Bubble Tubing Deicer Kit
Instructions for Operation • Safety • Warranty
Thank you for your purchase of an EasyPro bubble tubing deicer kit. EasyPro deicer kits
are designed to be an energy ecient way to keep your dock, boat lift, piers, etc. free
from ice formations. These kits are also great for shallow water aeration applications.
• Bubble tubing lays on bottom and pushes warmer water from the bottom up to the
surface preventing ice from forming.
• Self weighted bubble tubing conforms to any shape needed.
• Kits include compressor, 15' of 5/8" weighted feeder tubing, 50' or 100' bubble
tubing, ttings and clamps.
• Required cabinet or enclosure sold separately.
Safety and Electrical
Warning - Risk of electrical shock. For your protection always unplug the unit from
its power source before installing or servicing.
Warning - This compressor is solely intended to pump air. It is not for use with oil,
solvents or any petroleum products (gasoline, diesel, etc.).
• Always use a properly grounded AC outlet. Keep plug end from moisture and do not
attempt to plug in a wet plug.
• Provide a “drip loop” for the line cord. This is a loop in the cord below the level of
the receptacle or plug that prevents water from traveling along the cord into the
receptacle.
• Be sure that a Ground Fault Circuit Interrupter (GFCI) is installed in the branch circuit
supplying the equipment.
• Unit should be installed horizontally and above the height of water surface.
• Do not submerse or ood compressor. Do not place compressor where it could fall
into water.
• Do not operate if power cord is damaged.
• Use extreme caution when operation in winter. Danger due to thin ice can cause
drowning. Unseen currents can cause thin ice in areas ling distances away from
diuser operation. Provide adequate warning for others when operating this system.
• Always wear a Coast Guard approved life vest when working in or near water and
follow all safety guidelines.
Note: EasyPro Pond Products is not responsible for losses, injury or death as a result of
failure to follow these safety warnings, misuse or abuse of equipment.
DDK100EDDK50

Installation Congurations
This kit can be assembled in three possible congurations using the ttings below
depending on your pond, dock and deicing needs. The weighted ballast on the bubble
tubing keeps the airline in place, allowing you to create curves and corners as needed.
Outlet
Assembly
Tee Assembly
Coupling
Tee Assembly
Plug
Plug
Plug
Compressor
Compressor
Compressor
Bubble Tubing Deicer Kit Components
Kit Compressor
Part # Compressor Feeder Tubing Bubble Tubing Repair Kits
DDK50 SRC25 15' Weighted 50' SRC25K
DDK100E SRC50 15' Weighted 100' SRC50K
Coupling
Tee Assembly Plug
‘T’ Conguration
Linear Conguration
Closed Loop
Conguration
Bubble Tubing ShorelineFeeder Tubing

General Instructions
Compressors require protection from elements. DO NOT
place your compressor in low spots or any place water
may puddle. Flooded compressors are not covered under
warranty.
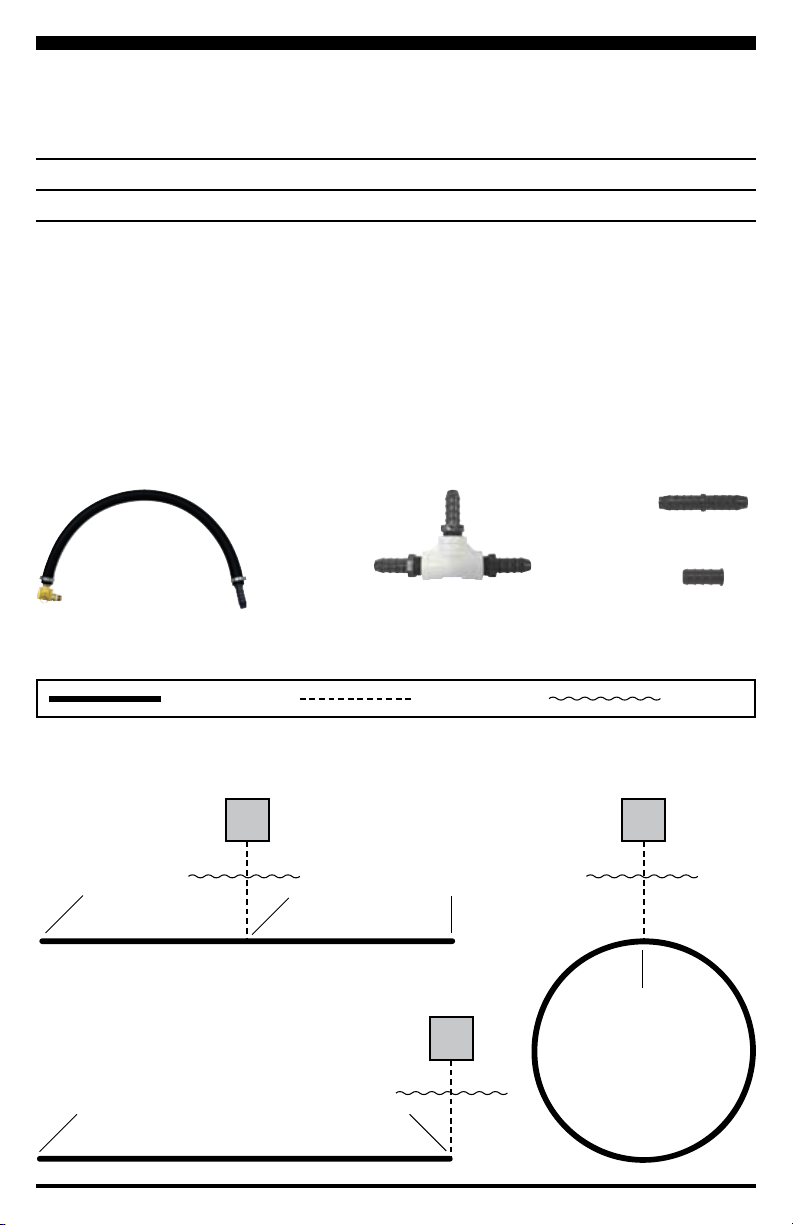
1. Select preferred installation style (see
previous page) and determine position
of compressor.
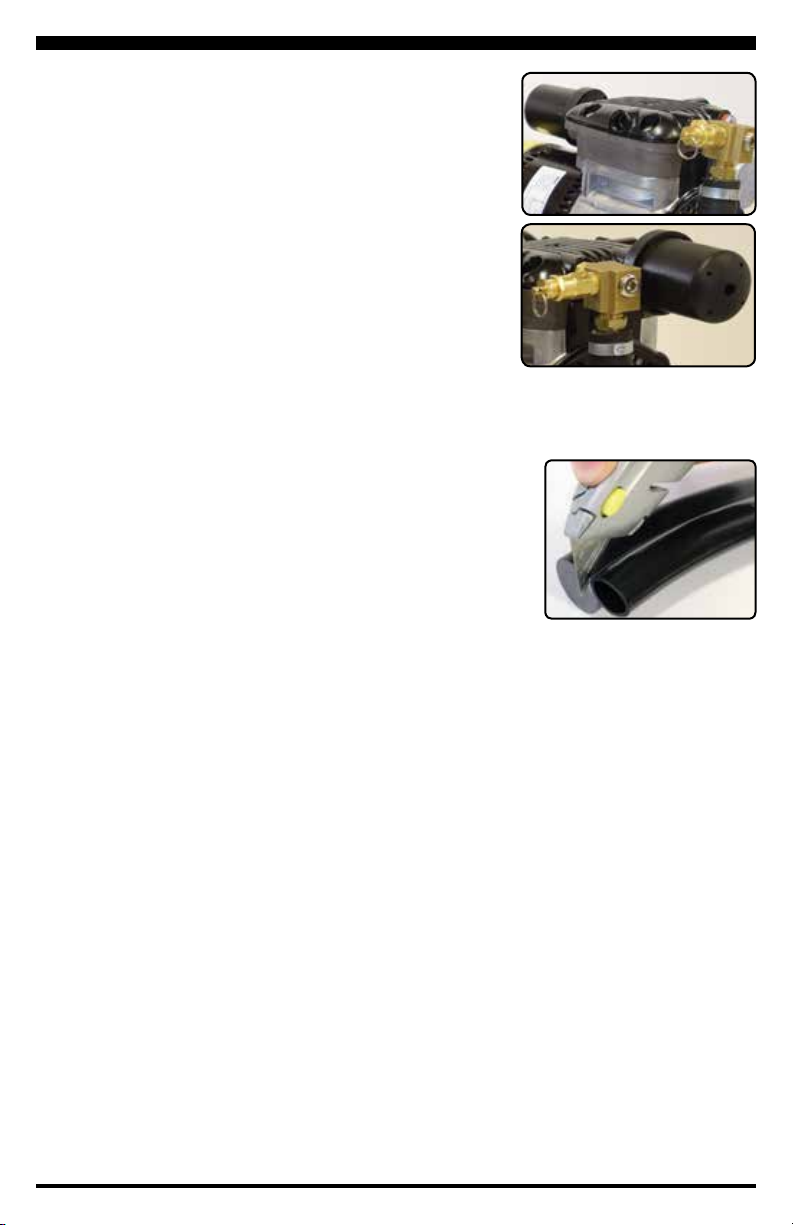
2. Install threaded outlet assembly and air lter to correct
port on the compressor, Figure 1. NOTE: Be careful to
not over tighten. Use Teon tape on threads.
3. Unroll the bubble tubing and feeder tubing.
4. Install plugs as needed in the bubble tubing and secure
with small clamps. NOTE: To clamp the bubble tubing
to all barbed ttings, carefully separate the tubing
portion from the ballast by cutting it, Figure 2. This
will allow a clamp to go only around the smaller tubing to
secure the tting. Do not attempt to clamp around ballast
and tubing.
5. Install weighted bubble tubing in the water in desired
location. Lower tubing into place and let it sink to the
bottom. In some applications it is easiest to start at the
farthest end and work toward the compressor/feeder
tubing.
6. Secure weighted feeder tubing to the outlet assembly at
the compressor with large clamp. This connection can be
submerged if necessary.
7. Connect the bubble tubing to the feeder tubing with appropriate clamps. Excess
tubing can be trimmed to length at this point.
8. When all connections are made and tubing is in place the system is ready for
operation by plugging compressor into 120v GFCI protected outlet.
Winter Operation
• You must clearly mark with warnings that there is open water or thin ice. Many states
will require this by law.
• It becomes critical to protect the compressor from the elements. A cabinet or shelter
is required. Be sure that adequate air ventilation is provided or compressor will fail
prematurely.
• If lines become frozen, rubbing alcohol can be run down the line to thaw it out.
Maintenance
1. Always unplug unit before service, cleaning or any maintenance.
2. Keep intake lter clean.
3. Over time the compressors may need to have wearable components replaced. See
chart on previous page for compressor repair kits.
Figure 1. Note the compressor
intake and outlet when installing
air lter and outlet assembly.
Figure 2. Be careful not to
damage the bubble tubing
when splitting the ends away
from the ballast.
DDK50
DDK100E

800-448-3873 • Grant, Michigan
www.easypropondproducts.com • info@easypropondproducts.com
6275 • 2/16
Limited Warranty:
• Compressors in DDK50/DDK100E kits have a two year limited warranty (see owners manual for
complete warranty information)
• Quick sink tubing and bubble tubing have ve year limited warranty
Other items included in this kit that are not listed above are considered wearable items and are
not covered under this warranty. Limited warranty only covers properly installed and maintained
units.
The limited warranty does not cover normal wear and tear, nor any deterioration suered through
overloading, improper use, negligence or accident. Similarly, any modication made by the
purchaser to the product will cause the warranty to be null and void.
All returned items will be inspected to determine cause of failure before warranty is approved.
Limited warranty does not cover any cost associated with the installation or removal of the
product subject to warranty claim.
A Return Authorization (RA) number must be obtained by calling EasyPro Pond Products at
800-448-3873. It is your responsibility to pay the return shipping charges. Be sure to include the
RA number, original receipt (in the form of an invoice or sales receipt), name, return address and
phone number inside of the package. No warranty claims will be honored without the original
receipt.
Ensure the product is properly packaged and insured for the replacement value. Damage due to
improper packaging is the responsibility of the sender.
The manufacturer or supplier shall not be held liable for any damages caused by defective
components or materials of this product; or for loss incurred because of the interruption of
service; or any consequential/incidental damages and expenses arising from the production, sale,
use or misuse of this product.
The manufacturer or supplier shall not be held liable for any loss of sh, plants or any other
livestock as a result of any failure or defect of this product.
Troubleshooting
Loss of air output but unit is running:
• Check to make sure the air lter has not been blocked or clogged by dust.
• Check to make sure lines are not kinked or plugged. If used in winter time, line may
have ice in the line. A small amount of rubbing alcohol can be run down the air line to
thaw the ice.
• Inspect the tubing to ensure it’s clean. Replace or clean as necessary. See chart on
inside page for replacement parts.
• Inspect wearable components inside compressor. Replace as necessary.
This manual suits for next models
1
Table of contents
Other EasyPro Lawn And Garden Equipment manuals