EasyPro LA1 Use and care manual

LA1 • LA2 • LA3 • LA4 • LA5W • LA10W • LA15W
Aeration Kit
Instructions for Operation • Safety • Warranty
Thank you for your purchase of an EasyPro koi and ornamental
pond aeration system. EasyPro complete aeration systems are
designed to be an energy ecient way to aerate, de-stratify and
circulate water in ponds and water gardens. The increase in oxygen
levels provided by an aeration system is benecial to any pond
but especially to ponds with sh. These kits are ideal for ponds,
aquariums or other small sh holding systems.
Each aeration system is powered by a quiet, continuous duty
compressor and includes tubing, air diuser and parts to assemble.
LA1 through LA4 Series systems include linear diaphragm
compressors that feature quiet operation, energy eciency,
aordability and solid durability.
LA5W through LA15W Series systems include linear piston
compressors that feature quiet operation, energy eciency, deeper
water capability and the best durability available.
Safety and Electrical
Warning - Risk of electrical shock. For your protection always unplug the unit from
its power source before installing or servicing.
Warning - This compressor is solely intended to pump air. It is not for use with oil,
solvents or any petroleum products (gasoline, diesel, etc.).
• Always use a properly grounded AC outlet. Keep plug end from moisture and do not
attempt to plug in a wet plug.
• Provide a “drip loop” for the line cord. This is a loop in the cord below the level of
the receptacle or plug that prevents water from traveling along the cord into the
receptacle.
• Be sure that a Ground Fault Circuit Interrupter (GFCI) is installed in the branch circuit
supplying the aquarium, fountain or pond equipment.
• Unit should be installed horizontally and above the height of water surface.
• Do not submerse compressor. Do not place compressor where it could fall into
water.
• Do not operate if power cord is damaged
Note: EasyPro Pond Products is not responsible for losses, injury or death as a result of
failure to follow these safety warnings, misuse or abuse of equipment.
LA15W
LA1

General Instructions
All of the other compressors have weather resistant housing, but we strongly suggest
that you protect them from the elements in some way.
1. Place compressor on level surface above the water level.
2. Compressor should be protected and housed from the elements. Do not place
compressor in low spots where water may puddle. Place compressor in shaded area
that is free from excessive dust or moisture, yet properly ventilated.
3. Connect the rubber elbow to the compressor with pinch clamps. See pictures below
for connecting manifold to compressor on LA1 through LA4 kits.
4. Connect the one end of airline to outlet of the compressor and secure with provided
hose clamp. If kit has a manifold system, connect the manifold to the compressor
and then ends of airline runs to manifold system, the secure with provided hose
clamps. Do not use tubing to connect compressor to manifold (will be too restrictive).
5. Connect other end of tubing to diuser(s) and secure with provided hose clamps.
The LA15W has a tee that the two diusers are screwed into and tubing connects to
the barbed male adaptor which is installed in the short side of the tee.
6. Place diuser(s) in pond in desired locations for best aeration.
7. Plug compressor into 120v AC GFCI protected outlet.
Koi and Ornamental Pond Aeration Kit Features:
Kit Maximum Compressor Maximum CFM Maximum*
Part # Pond Size Warranty** (cubic feet per minute) Recommended Depth
LA1 1000-7500 Gallons 3 Years 1.3 cfm 6 feet
LA2 2000-15000 Gallons 3 Years 2.1 cfm 6 feet
LA3 3000-22500 Gallons 3 Years 3.1 cfm 7 feet
LA4 4000-30000 Gallons 3 Years 3.7 cfm 8 feet
LA5W 3000 Gallons 3 Years 1.3 cfm 6 feet
LA10W 7500 Gallons 3 Years 1.8 cfm 6 feet
LA15W 20000 Gallons 3 Years 3.0 cfm 6 feet
Fish load, ltration capacity and other factors aect actual maximum pond size
*Various compressors will perform in deeper water, this is the recommended maximum depth for
ideal performance
**See compressor instructions for warranty details
LA2 LA3 LA4LA1

Winter Operation and Deeper Ponds
If sh are present in the pond, place the diuser between the shallowest and deepest portion of your
pond. For instance, if the deepest part of your pond is 6' and the shallowest is 1', place diuser in
the 2' - 3' range for wintertime operation. This will prevent the water at the deepest portion from
being mixed with colder water.
Maintenance
1. Always unplug unit before service, cleaning or any maintenance.
2. Over time the compressors may need to have the diaphragm or piston replaced. See chart
below for compressor repair kits.
Troubleshooting
Loss of air output but unit is running:
• Check to make sure the air lter has not been blocked or clogged by dust.
• Check to make sure lines are not kinked or plugged. If used in winter time, line may have ice in
the line. A small amount of rubbing alcohol can be run down the air line to thaw the ice.
• Inspect the diusers to ensure they are clean. Replace or clean as necessary. See chart below
for replacement diusers.
• Inspect diaphragms/pistons. Replace as necessary.
• Also see compressor manual for more troubleshooting details.
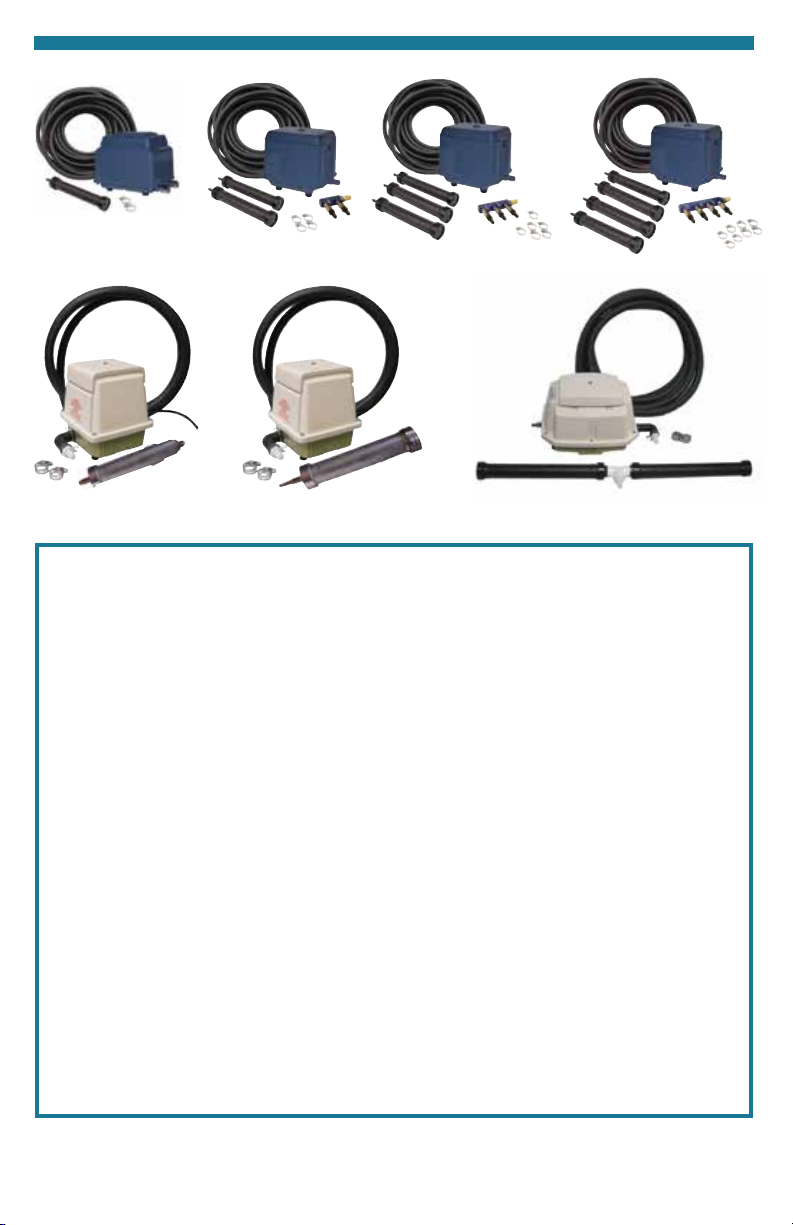
Koi and Ornamental Pond Aeration Kit Components:
Kit Compressor
Part # Compressor Tubing Diusers Repair Kits
LA1 KLC25 25' Quick Sink (1) 8" Rubber (RAD8) KLC25DK
LA2 KLC40 50' Quick Sink (2) 8" Rubber (RAD8) KLC40DK
LA3 KLC60 75' Quick Sink (3) 8" Rubber (RAD8) KLC68DK
LA4 KLC80 100' Quick Sink (4) 8" Rubber (RAD8) KLC68DK
LA5W ML28 15' Quick Sink 6" Rubber (RAD6) ML28RK
LA10W ML45 15' Quick Sink 12" Rubber (RAD12) ML45RK
LA15W ML80 15' Quick Sink 2 - 12" Rubber (RAD1250) ML80RK
Caution:
• During operation, do not touch the lower housing with bare hands as the temperature will
become about 70ºC (158ºF). (Temperature will not aect the performance of the pump.) Thermal
overload will turn o the compressor when temperature gets too high. Unit will come back on
after it cools down. Causes for excess heat should be determined and eliminated. Common
causes include lack of ventilation and excess back pressure in the system. Remedies for these
causes should be found to avoid over heating of the units.
• Proper sizing and selection of tubing, length of tubing, number of diusers and depth of
diusers are all important factors for maximizing performance. These units are designed to
produce fairly large volumes of air at low pressure. Extra back pressure created by restrictive
tubing, undersized or clogged diusers, incorrect valve systems or deeper water can cause
excess wear and tear on the rubber diaphragms. While replacing the diaphragms is easy to do,
too much back pressure may require more frequent repair.

LA1 LA2 LA3 LA4
LA5W LA10W LA15W
800-448-3873 • Grant, Michigan
www.easypropondproducts.com • info@easypropondproducts.com
5133 • 3/17
Limited Warranty:
• Compressors in all kits have three year limited warranty (see owners manual for complete warranty
information)
• Quick sink tubing and diusers have ve year limited warranty
Other items included in this kit that are not listed above are considered wearable items and are not
covered under this warranty. Limited warranty only covers properly installed and maintained units.
The limited warranty does not cover normal wear and tear, nor any deterioration suered through
overloading, improper use, negligence or accident. Similarly, any modication made by the purchaser to
the product will cause the warranty to be null and void.
All returned items will be inspected to determine cause of failure before warranty is approved.
Limited warranty does not cover any cost associated with the installation or removal of the product
subject to warranty claim.
A Return Authorization (RA) number must be obtained by calling EasyPro Pond Products at 800-448-
3873. It is your responsibility to pay the return shipping charges. Be sure to include the RA number,
original receipt (in the form of an invoice or sales receipt), name, return address and phone number inside
of the package. No warranty claims will be honored without the original receipt.
Ensure the product is properly packaged and insured for the replacement value. Damage due to improper
packaging is the responsibility of the sender.
The manufacturer or supplier shall not be held liable for any damages caused by defective components or
materials of this product; or for loss incurred because of the interruption of service; or any consequential/
incidental damages and expenses arising from the production, sale, use or misuse of this product.
The manufacturer or supplier shall not be held liable for any loss of sh, plants or any other livestock as a
result of any failure or defect of this product.
This manual suits for next models
6
Table of contents
Other EasyPro Lawn And Garden Equipment manuals