EasyPro PA10 User manual

PA10 • PA12 • PA33 • PA50 • PA60 • PA75 • PA100
and Windmill Aeration Systems
Diffused Aeration Systems
Installation • Operating
Maintenance Guidelines
Save this booklet for future reference!
Manuals also available on our website:
www.EasyProPondProducts.com

2
Thank you for your purchase!
Your aeration system will be a great benet to the aquatic ecosystem in which you
are placing it. The following are some important guidelines regarding the installation
and operation of your system.
Installation ...
• The air diffuser should not be placed in the deepest part of the pond. Try to locate the
diffuser at approximately 2/3 to 3/4 of the deepest point (a 15' deep pond would have the
diffuser at approximately 10' to 12' deep). This allows the deepest water to remain cool in
the Summer and stay warm in the Winter.
• If you purchased your aeration system without weighted tubing, you will need to supply
small weights such as chimney bricks, pipe or rerod. Strap the weights securely around
the tubing to bring it to the bottom.
• If your pond freezes during the winter, be sure the tubing is buried leading into the pond.
If not, the ice can form around the tubing, kinking it or possibly shearing it off.
Operation ...
• All of our compressors are designed for continuous operation. It is not uncommon for
these compressors to run 24 hours per day for four to ve years. The only maintenance
required is replacement of vanes or diaphragms when needed. All compressors have oil-
less motors. Never oil or lubricate the motors.
• The surface of the compressor will be hot during operation. This is normal — be careful
not to touch the compressor while it is running.
• In addition to adding oxygen to your pond, one of the main benets to an aeration system
is the circulation it creates. It takes hours for the maximum circulation to be achieved,
therefore we recommend running these systems continuously so that maximum circula-
tion is sustained. Systems that operate a few hours each day will just get the circulation
going and then it is time to shut off.
If you are installing this system at a time when your pond is already stratied (warm on
surface, cold on bottom), you should be careful when rst starting the aeration system. If
the stagnant water on the pond bottom is stirred up too fast, a temporary increase in oxy-
gen demand will occur and, in rare cases, a sh kill could result. If your pond is severely
stratied, you should only run your system one to two hours the rst day. Each day after
that, increase the run time by one to two hours during the rst week, run continuously
after that. This will slowly mix the bottom water without a sudden depletion of oxygen.
Please contact us prior to start-up if you have questions.
Maintenance ...
• It is critical that the air compressors be protected from the weather. You will need to pro-
vide a shelter for your compressor to protect it from rain, snow and other harsh elements.
Be sure your shelter has adequate ventilation. Also be sure the compressor does not sit
directly on the ground, as the vibration from the motor will cause dust and dirt particles to
be pulled into the motor and cause premature failure.
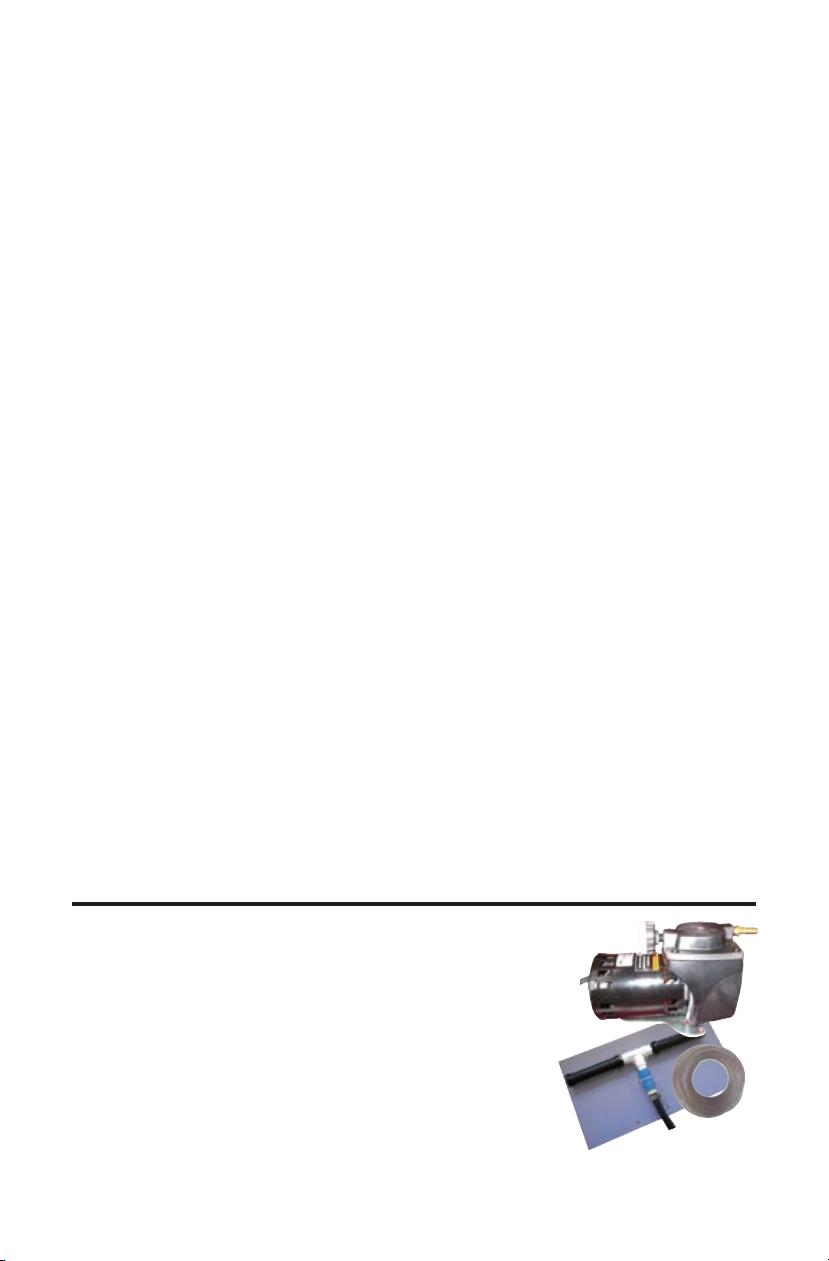
PA10 Aeration System ...
The PA10 aerator features a 1/20th horse power continuous
duty air compressor, 50' of tubing and a pond diffuser. Once
the air diffuser is assembled and the tubing is attached, you
are ready to install the diffuser into the pond. Always unroll
the tubing completely before installing the diffuser. The
diffuser can be lowered into your pond with a rope. Often
a oat, such as a duck decoy or a milk jug, will be used so
retrieval of the diffuser is possible.
Assembly:
1. Unpack all the parts. Compare parts with packing list below to ensure all parts

3
Description Quantity Packed
Air Compressor w/lter 1
PVC Manifold w/Check Valve 1
Air Diffusers 2
Tie Straps 3
Tubing Clamps 2
50' Roll Tubing 1
_____' Additional Tubing
12" x 21" Underlay 1
Packed By: Date: # of Boxes:
PA12 Aeration System ...
The PA12 aerator features a 1/8 horse power
continuous duty air compressor, 50' of tub-
ing and a pond diffuser. Once the air diffuser is
assembled and the tubing is attached, you are
ready to install the diffuser. Always unroll the
tubing completely before installing the diffuser.
The diffuser can be lowered into your pond with a rope. Often a oat, such as a duck
decoy or a milk jug, will be used so retrieval of the diffuser is possible.
Assembly:
1. Unpack all the parts. Compare parts with packing list below to ensure all parts
were received. If a shortage occurs, please notify us immediately.
2. Screw the two airstones into the PVC manifold. Do not overtighten! Hand
tighten only!
3. Slide one end of the tubing onto the barbed adapter coming out of the PVC
manifold. Clamp this connection using the clamp provided.
4. Position the PVC manifold and airstones onto the white plastic underlay. Use
the plastic straps provided to attach the manifold to the underlay.
5. Attach the other end of the tubing to the compressor and tighten.
After one or two years of operation, you will possibly notice a sudden drop in air
bubbles. This is a sure sign that the diaphram has cracked and needs replacing.
Repair kit DC22RK has all the items necessary to rebuild your compressor.
Be sure to clean the inlet air lter on your compressor regularly. Wash dirty air lters
in soapy water. Replacement lters are available.
PA10 Packing List:

PA33 Aeration System ...
The PA33 aerator features a 1/4 horse power
continuous duty air compressor, 100' of
tubing and a membrane diffuser. Once the
air diffuser is assembled and the tubing is
attached, you are ready to install the dif-
fuser into the pond. Always unroll the tubing
completely before installing the diffuser. The
diffuser can be lowered into your pond with a rope. Often a oat, such as a duck
decoy or a milk jug, will be used so retrieval of the diffuser is possible.
Assembly:
1. Unpack all the parts. Compare parts with packing list below to ensure all parts
were received. If a shortage occurs, please notify us immediately.
2. Screw the round rubber membrane diffuser into the PVC base. Fill base with
sand or small stone.
3. Slide one end of the tubing onto the barbed adapter on the PVC base and
secure with a clamp (provided).
4. Attach the 2' piece of ex pipe into the outlet side of the compressor.
5. Unroll the entire roll of pipe. It is recommended that the pond diffuser be in-
stalled at this point. This will allow you to trim any unused pipe before attaching
to the pump. Once installed and trimmed, attach the other end of the tubing to
the exible hose on the compressor.
The exible membrane diffuser is buoyant (even if weighted hose is used) unless the
base is lled with sand or gravel. Be sure to ll base at least 2/3 full. After one or two
years of operation, you will possibly notice a sudden drop in air bubbles. This is a
sign that the piston rings have cracked and need replacing. Repair kit RP74RK has
all the items necessary to rebuild your compressor.
4
bubbles. This is a sure sign that the diaphram has cracked and needs replacing.
Repair kit DC12RK has all the items necessary to rebuild your compressor.
Be sure to clean the inlet air lter on your compressor regularly. Wash dirty air lters
in soapy water. Replacement lters are available.
PA12 Packing List:
Description Quantity Packed
Air Compressor w/lter 1
PVC Manifold w/Check Valve 1
Air Diffusers 2
Tie Straps 3
Tubing Clamps 2
50' Roll Tubing 1
_____' Additional Tubing
12" x 21" Underlay 1
Packed By: Date: # of Boxes:

5
PA50 and PA60 Aeration Systems ...
These aeration systems come with a continuous
duty compressor, 200 feet of hose and two air dif-
fusers. Once the air diffuser is assembled and the
tubing is attached, you are ready to install the dif-
fuser. Always unroll the tubing completely before
installing the diffuser. The diffuser can be lowered
into your pond with a rope. Often a oat, such as a
duck decoy or a milk jug, will be used so retrieval
of the diffuser is possible.
Assembly:
1. Unpack all the parts. Compare parts with packing list below to ensure all parts
were received. If a shortage occurs, please notify us immediately.
2. Screw the round rubber membrane diffuser into the PVC base. Fill base with
sand or small stone.
3. Slide one end of the tubing onto the barbed adapter on the PVC base and
secure with a clamp (provided).
4. Attach the 2' piece of ex pipe into the outlet side of the compressor.
5. Unroll the entire roll of pipe. It is recommended that the pond diffuser be in-
stalled at this point. This will allow you to trim any unused pipe before attaching
to the pump. Once installed and trimmed, attach the other end of the tubing to
the exible hose on the compressor.
6. Connect the valved outlet assembly to the compressor.
7. Connect the tubing to the ex hose on the compressor. Once the compressor
is running, you may have to adjust the valves to equal the air ow to each dif-
fuser. This corrects the difference in air ow caused by a difference in operating
depth and/or tubing lengths.
The PA50 and PA60 aeration systems are identical except for the compressor. The
PA60 compressor has a higher pressure rating for deeper water operation. All other
items and assembly are the same for these two kits. After one or two years of opera-
tion, you will possibly notice a sudden drop in air bubbles. This is a sign the com-
pressor needs new vanes. A rebuild kit is available to restore like-new performance.
Be sure to keep the air lter clean. Wash dirty air lters in soapy water. Replacement
lters are available.
Be sure to clean the inlet air lter on your compressor regularly. Wash dirty air lters
in soapy water. Replacement lters are available.
PA33 Packing List:
Description Quantity Packed
2" Flex Hose (weighted kits only) 1
Membrane Air Diffuser w/base 1
Tubing Clamps 2
100' Roll Tubing 1
_____' Additional Tubing
Packed By: Date: # of Boxes:
This manual suits for next models
8
Table of contents
Other EasyPro Lawn And Garden Equipment manuals
Popular Lawn And Garden Equipment manuals by other brands

Sunforce
Sunforce SOLAR user manual

GARDEN OF EDEN
GARDEN OF EDEN 55627 user manual

Goizper Group
Goizper Group MATABI POLMINOR instruction manual

Rain Bird
Rain Bird 11000 Series Operation & maintenance manual

Cub Cadet
Cub Cadet BB 230 brochure

EXTOL PREMIUM
EXTOL PREMIUM 8891590 Translation of the original user manual

Vertex
Vertex 1/3 HP Maintenance instructions

GHE
GHE AeroFlo 80 manual

Land Pride
Land Pride Post Hole Diggers HD25 Operator's manual

Yazoo/Kees
Yazoo/Kees Z9 Commercial Collection System Z9A Operator's & parts manual

Premier designs
Premier designs WindGarden 26829 Assembly instructions

Snapper
Snapper 1691351 installation instructions